
Implementation
This page gives an overview of how Behaviors can be implemented.
How to implement a Behavior
There is very little difference between implementing a Widget and implementing a Behavior. Though there are some difference which will be explained below.
Base Class
The major difference is that Behaviors need to be derived from the Candera::Behavior base class instead of the Candera::WidgetBase class. Incidentally the Candera::Behavior base class is internally derived from Candera::WidgetBase further demonstrating the similarities between both.
Methods
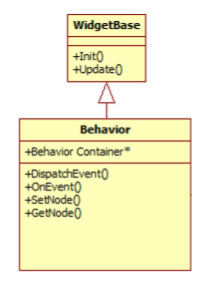
From the Candera::WidgetBase the already known Init() and Update() methods are inherited.
- Init: Called once when the Widget/Behavior is created, after all Widget/Behavior properties have been set. This is used to initialize the Widget/Behavior.
- Update: Called once per iteration (frame). Here normally the Widget/Behavior performs its actual functionality.
Newly added are the methods from Candera::Behavior which are related to event handling and the attached node:
- DispatchEvent: Starts dispatching an event with a specified strategy
- OnEvent: Called when an event is received by a Behavior
- SetNode/GetNode: Allows access to the node this behavior is attached to. Note that this uses a new data type called Candera::AbstractNodePointer which abstracts between 2D and 3D nodes. This allows creating behaviors that work und 2D and 3D without duplicating code.
META INFO
The Meta-Info is essential to provide generic access to all properties of the widget/behavior as well as special information for Scene-Composer about the available properties, their types and functionality. The available macros to define the Meta-Info are very similar to those used by widgets.
The first set of Macros defines a Behavior either for 3D, 2D or both (mixed):
    ...
    CdaBehaviorDef(<<ClassName>>, <<BaseClassName>>)
        [Information][Properties][Events]
    CdaBehaviorDefEnd()
    ...
    ...
    CdaBehavior2DDef(<<ClassName>>, <<BaseClassName>>)
        [Information][Properties][Events]
    CdaBehaviorDefEnd()
    ...
    ...
    CdaBehaviorMixedDef(<<ClassName>>, <<BaseClassName>>)
        [Information][Properties][Events]
    CdaBehaviorDefEnd()
    ...
All other macros are the same as where used by Widgets. This includes the macros to add additional information:
    ...
    CdaReadableName("Name")
    CdaCategory("Category")
    CdaDescription("Description")
    ...
As well as the macros to define properties:
...
CdaProperties()
...     [Property List]
CdaPropertiesEnd()
...
...
CdaProperty(<<Name>>, <<Type>>, <<Setter>>, <<Getter>>)
CdaDescription("Column used by this Item inside the Area")
CdaCategory("Area")
CdaPropertyEnd()
...
The new macros for events will be described in the Event Handling chapter.
For further information about the Meta Info please also see chapter Behavior Definition.
RUNTIME TYPE INFORMATION
CGI-Studio uses its own RTTI system for major parts instead of relying on the RTTI of the compiler. For this a set of macros is added to each class that uses this system. In case of Behaviors only a single macro is required to be added to the code:
...
CGI_BEHAVIOR_RTTI_DEFINITION(<<ClassName>>)
...
Event Handling
Events are one of the major new features introduced via Behaviors. This chapter shows how they can be utilized from within the Behavior code.
Meta Info
The first requirement is to add all events that should are either received or sent to the Meta-Info via the following macros:
...
CdaEvents()
   CdaEvent(CdaOutputEvent, <<EventType>>, "Description")
   CdaEvent(CdaInputEvent, <<EventType>>, "Description")
CdaEventsEnd()
...
Sending Events
An Event can be sent by multiple different approaches.
The first is achieved by calling the DispatchEvent() method of the Behavior or any of the other available alternatives. It requires providing the dispatch strategy and event itself. When using this method the dispatching will start from the current node of the Behavior.
...
    CgiStudioControl::Event event;
    EventDispatchResult dispatchResult;
    EventDispatchStrategy dispatchStrategy;

    DispatchEvent(dispatchStrategy, event, dispatchResult);
...
-
Note that the Event and EventDispatchStrategy need to be replaced with the concrete implementations.
- The second options is to directly call the DispatchEvent() method of the Event-Dispatch-Strategy. This allows to define the node from which the dispatching should start:
...
    Candera::EventDispatchResult eventDispatchResult;
    Candera::BroadcastEventDispatchStrategy dispatchStrategy;
    CgiStudioControl::ChangeValueEvent valueChangedEvent(FeatStd::Variant(listDataEvent->GetData()),
                                                         CgiStudioControl::ChangeValue::Absolute);
    dispatchStrategy.DispatchEvent(GetNode(), valueChangedEvent, eventDispatchResult);
...
Receiving Events
Receiving of events is done via the OnEvent-Method. Here normally the incoming events are type-cast to check the Event-Type and processed if applicable. Further it is possible to stop further dispatching of the event via the Dispatch-Result. In case a custom Dispatch-Result is used (again type-casting can be used) then additional information can be returned to the sender.
...
void ListItemEventBehavior::OnEvent(const FeatStd::Event& event, Candera::EventDispatchResult& dispatchResult)
{
    const ListDataEvent* listDataEvent = Candera::Dynamic_Cast<const ListDataEvent*>(&event);

    if (0 != listDataEvent) {
        if (m_index == listDataEvent->GetIndex()) {
            dispatchResult.StopDispatchingImmediately();

            // Do something with the data of the event
        }
    }
}
...
If derived from Behaviors that also do event processing also the Base-Class OnEvent method should be called.
...
Base::OnEvent(event, dispatchResult);
...
Custom Events
It is possible to define custom events by simply deriving from FeatStd::Event class. An Event can contain any number custom data.
...
class ListDataEvent : public FeatStd::Event
{
    public:
        FEATSTD_RTTI_DECLARATION();

        ListDataEvent(FeatStd::Int32 index, FeatStd::Int32 value) :
            m_index(index),
            m_value(value)
        {
        }

        FeatStd::Int32 GetIndex() const
        {
            return m_index;
        }

        FeatStd::Int32 GetData() const
        {
            return m_value;
        }

    private:
        FeatStd::Int32 m_index;
        FeatStd::Int32 m_value;
};
...
...
FEATSTD_RTTI_DEFINITION(ListDataEvent, FeatStd::Event)
...
FINDING BEHAVIORS
The second major advantage compared to widgets is that it is now possible to determine if any and which Behaviors are attached to a node. This can be done by iterating over all behaviors of a node via the code snipped shown below.
...
Candera::Behavior* behavior = Candera::Behavior::GetFirstBehavior(node);

while (0 != behavior) {
    // do something

    behavior = behavior->GetNextBehavior();
}
...
For a better understanding of how events work, please see chapter Predefined Behaviors.
How to integrate a Behavior into an Application
Behaviors are integrated into the Application similar to Widgets by adding them to the Widget-Set. How this is exactly done depends on the application.
Adding Behaviors manually
If the application doesn't generate a Widget-Set automatically (e.g. MLC-Templates) the Behavior needs first to be added to the Build-System by modifying the existing CMake-files
| Widgets.cmake (of MLC-Template App) |
...
CourierAddProjectFiles(
    OnOffWidget.cpp
    OnOffWidget.h
    WidgetSet.cpp

    CustomBehavior.cpp
    CustomBehavior.h
)
|
And then added to the Widget-Set manually via the CdaWidget-Macro:
| WidgetSet.cpp (of MLC-Template App) |
... #include "OnOffWidget.h" #include "CustomBehavior.h" ... CdaWidgetSet(MatlabConnectorApplicationWidgetSet) CdaDescription("MatlabConnectorApplication Widget Set") CdaWidgets() CdaWidget(OnOffWidget) CdaWidget(ListDataSimBehavior) ... |
Adding Behaviors to Default Behavior Project
If the Widget-Set is generated (Player application) then under normal conditions it is sufficient to add the code files to the Build-System (CMake). Here they are added to the "Default Behavior Project" (ControlBehaviors_1).
To do this, create a folder (e.g. "Custom") in "cgi_studio_controls\src\Behaviors" containing the Custom-Behavior's code and a FileList.txt file containing the related code files.
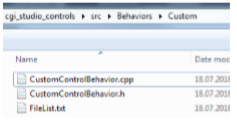
| FileList.txt |
set(FILE_LIST
    CustomBehavior.cpp
    CustomBehavior.h
)
|
Then add the folder to the CMakeLists.txt found in "cgi_studio_controls\src\Behaviors"
| CMakeLists.txt |
...
set(PRV_WIDGET_SUBDIRS
    Animation
...
    Custom
)
...
|
Adding Behavior to new Project
Another way to add the Behavior, if the Widget-Set is generated (Player application), is to create a new project containing the custom behaviors. This approach is preferred to changing the default behavior project as no code from CGI-Studio itself is modified. Also it is easy to include these custom behaviors into other projects as well.
To start create a folder with the custom behavior code, a FileList.txt file and a CMakeLists.txt file.
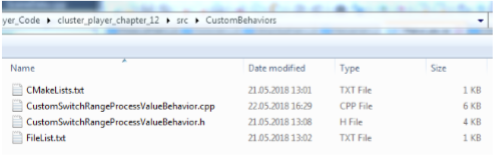
In the FileList.txt file add the required code files.
| FileList.txt |
set(FILE_LIST
    FileList.txt
    CustomSwitchRangeProcessValueBehavior.h
    CustomSwitchRangeProcessValueBehavior.cpp
)
|
In the CMakeList.txt file specify the name of the new project (here "ControlBehaviors_2") and optional all subfolders which should be searched.
| CMakeLists.txt |
# declared directories to include these directories
# must provide a "FileList.txt" which lists all files
set(PRV_WIDGET_SUBDIRS
    .
)

CgiGetCurrentDir(PRV_CUR_DIR)
CgiAddIncludeDirs(${PRV_CUR_DIR}/..)

set(PRV_APP_NAME "ControlBehaviors_2")
source_group(PRV_ALL_SRCS FILES ${PRV_WIDGET_SUBDIRS})
CgiCollectListedFiles(PRV_ALL_SRCS ${PRV_APP_NAME} "" LIST ${PRV_WIDGET_SUBDIRS})

CgiAddStaticLibrary(PRV_APP_TARGET_NAME ${PRV_APP_NAME} ${PRV_ALL_SRCS}
|
Finally in the "AdditionalBehaviorsPaths.txt" of the application add the new folder.
| AdditionalBehaviorsPaths.txt |
# Additional Behaviors # declare all directories to include (one directory per line) # these directories must provide a "FileList.txt" file which lists all files # all subdirectories containing a "FileList.txt" file will also be included # path must be relative to Default widget directory # lines starting with # will be ignored # ../../../cgi_studio_controls/src/Behaviors ../CustomBehaviors |