
Part 5: Count Received Calls
This page explains the procedure for adding an incoming call count function and displaying the count on a text node in the Main Menu scene in CGI Studio.
A "Received Calls: %d" text node is added to the Main Menu scene, and the call count is updated as a relative value each time the IncomingCall_StateMachine enters the CallActive state using the Send Value As Event behavior. Furthermore, the Value and Format String behaviors are connected to the Fusion node of the TextNode to format and dynamically display the counted incoming calls on the screen. Finally, the operation of displaying calls with the Enter key, hiding them with the ESC key, and verifying that the incoming call count is correctly updated is performed using the Player.
Incoming Call Count Configuration
Adding a TextNode
- After selecting the [ Scenes > Main Menu ] scene in the Solution Explorer, double-click it.
- The Main Menu scene will be displayed in the Scene Tree panel.
- The Main Menu scene will be displayed in the Scene Tree panel.
-
Drag and drop the Text Node from the [Node 2D] in the Toolbox panel onto the Main Menu scene in the Scene Tree.
-
The Text Node will be displayed in the Scene Editor as "Text".
-
-
Set the following properties for the added Text Node in the Properties panel.
Transformations>Position X 325 Y 0 2D Text Node>Text Received Calls: %d
OnEntry Settings
-
Double-click IncomingCall_StateMachine in the [ State Machines ] folder in the Solution Explorer.
-
The State Machine Editor will be displayed.
-
-
With the CallActive State selected, click [ Fusion ] at the bottom left of the State Machine Editor panel.
-
The Fusion panel for the CallActive State will be displayed.
-
-
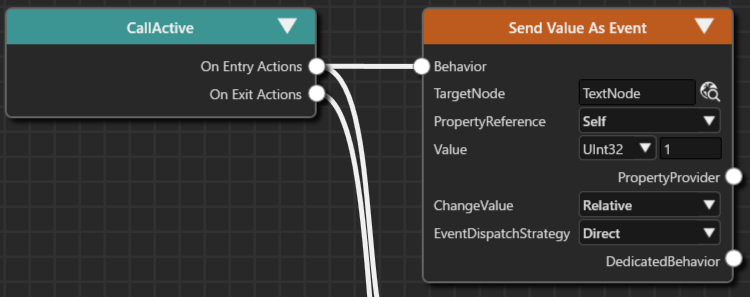
Drag the [ On Entry Actions ] connector on the right of the CallActive Fusion node and move the mouse.
- A link will appear as you move the mouse, so release the left mouse button at the any location.
- The [ Select Behavior ] dialog will be displayed.
- The selectable behaviors will be displayed by category.
-
Select “Action > Property > Send Value As Event” from the list and connect it to the top node.
- You can also narrow down the list of behaviors in the dialog by entering “Send Value As Event” in the search field at the top of the dialog.
- Send Value As Event is connected to [ CallActive > On Exit Actions ].
-
The settings in the table below are made for the connected Send Value As Event.
-
When the CallActive State is entered, a relative value (Relative) 1 is sent to the TextNode that was just added.
TargetNode Scenes>Main Menu>TextNode Value Ulnt32, 1 ChangeValue Relative
-
Adding a TextNode
-
Double-click IncomingCall_StateMachine in the [ State Machines ] folder in the Solution Explorer.
-
The State Machine Editor will be displayed.
-
- After selecting a TextNode on the scene tree, click [Fusion] displayed in the Extra Scene Tree on the left side of the scene tree.
- The Fusion panel will open, and the Fusion diagram for TextNode Fusion will open.
- The Fusion panel will open, and the Fusion diagram for TextNode Fusion will open.
-
Drag the [ Behaviors ] connector on the right of the TextNode Fusion node and move the mouse.
- A link will appear as you move the mouse, so release the left mouse button at the any location.
- The [ Select Behavior ] dialog will be displayed.
- The selectable behaviors will be displayed by category.
-
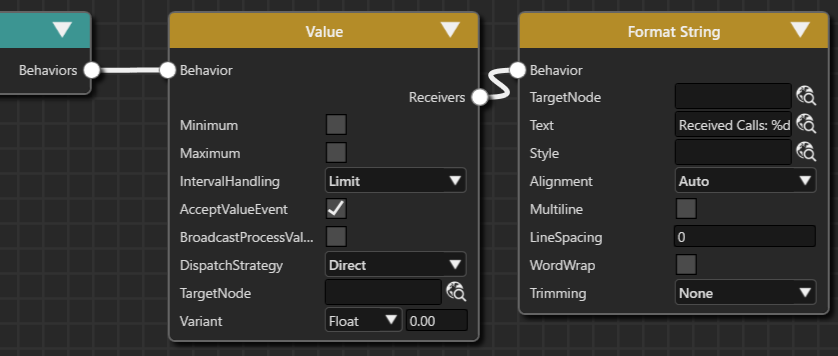
Select “Value Processing > Value” from the list and connect it to the top node.
- You can also narrow down the list of behaviors in the dialog by entering “Value” in the search field at the top of the dialog.
- Send Value As Event is connected to [ TextNode > Behaviors ].
-
Drag the [ Receivers ] connector on the right of the Value Behavior Fusion node and move the mouse.
- A link will appear as you move the mouse, so release the left mouse button at the any location.
-
Select “Value Processing > Format String” from the list and connect it to the top node.
- You can also narrow down the list of behaviors in the dialog by entering “Format String” in the search field at the top of the dialog.
- Send Value As Event is connected to [ Value > Receivers ].
- Enter “Received Calls: %d” in the [ Text ] of the Format String Behavior Fusion node.
Verifying Action
Use the Player to check the operation of the configuration you have set in the previous section.
Checking the incoming call count operation
- Click the [ Play selected scenario ] icon on the toolbar to start the Player.
- Three windows will open, and in one of them, the simulation display, in addition to “Navi Title” and “Navigation”, “Received Call: 0” will be displayed to the right of “Navi Title”.
- Three windows will open, and in one of them, the simulation display, in addition to “Navi Title” and “Navigation”, “Received Call: 0” will be displayed to the right of “Navi Title”.
- By pressing the Enter key on the keyboard, the text “Incoming Call” will appear on the screen.
- As a result, “Received Call: 0” changes to “Received Call: 1”.
- As a result, “Received Call: 0” changes to “Received Call: 1”.
- Pressing the ESC key on the keyboard hides the “Incoming Call” text displayed on the screen.
- Press the Enter key on the keyboard again to make “Incoming Call” reappear, and it will change to “Received Call: 2”.
- As a result, you can confirm that the number of incoming calls is being counted correctly.
- Close the CGI Panel and exit the Player.
- All three windows that were open will close.