
Instrument Cluster Solution
Overview
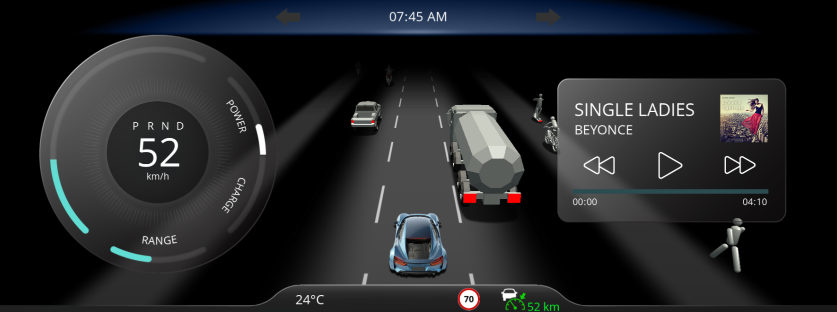
This solutions showcases an automotive instrument cluster covering several features, such as a 3D ADAS control and feature tiles.
It demonstrates a solution covering an automotive instrument cluster for an electric vehicle including advanced driving assistance systems visualization. As key feature is the ADAS control in the center of the solution and also the "floating" tiles with features such as music or phone control.
Feature Description
Scene
| No. | Category | Scene Name | Description |
| (1) | ADAS | 3D_ADAS_DemoScene | 3D scene handles several objects visible on the street (such as bikes, pedestrians, trucks, cars and so on). All the objects are handled with a single ObjectControl feature. ADAS (Advanced Driver Assistance System) features were also included. For more details on ADAS features, please refer to 3D ADAS Control Solution. |
| (2) | ADAS | AdasScene2D | 2D ADAS scene links with 3D scene. For instance, if ACC set distance toggle button is enabled, then distance between car and next object on the road must be visible which can be set based on "plus" and "minus" key inputs. In a similar way, all others like LDD, Side assist, ACC indicators and so on were connected to the 3D ADAS demo scene. |
| (3) | Background | BackgroundScene2D | Background scene |
| (4) | Main | ClusterHomeScene2D | This scene has mainly cluster (circular slider based) to handle speed, power, charge and range. On increase of speed, power increases and charge (regeneration in this case) doesn't reflect the change. As and when speed starts to decrease, power drops to zero and regeneration increases. Range indicates battery of the car which reduces gradually. Another part of this scene is the car and adas telltales' control which are connected to 3D ADAS DemoScene. |
| (5) | Tile | MusicScene2D | Slider control indicates progress bar of song and on next or previous button, song information changes. At the end of every song, it automatically shifts to the next song in the list. |
| (6) | Tile | NavigationScene2D | The navigation scene/tile is a placeholder for a navigation solution integration, as there is no "standard" for navigation integrations and strong depend on the navigation software provider solution. |
| (7) | Tile | PhoneScene2D | All contacts are listed under the scene. On click of any contact, shifts to outgoing call scene where the user has the option to decline call and go back to contacts list. |
Control
ADAS controls that is used in this solution is same as the one which is added under 3d-adas-control-solution under sample solutions. For details, please refer to 3D ADAS Control Solution.
All ADAS features added when toggle buttons in ADAS scene are enabled.
Transition
Transition rules were used with animation as transition type for respective tiles movement and it is cyclic.
For example:
State Machine
GlobalStateMachine activates common scenes that are used by all the other scenes such as background scene, cluster scene and 3D-ADAS scene. Few animations are configured that needs to be activated during startup like range display in cluster which indicates battery that decreases as per efficiency.
MainCarPositionStateMachine handles direction of central car movements. Left and Right arrow keys are used for this action.
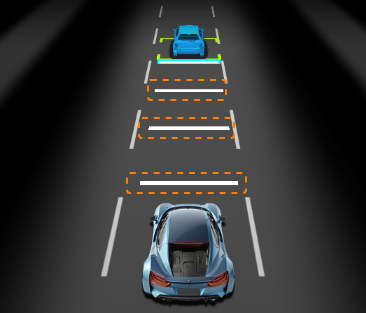
SetDistanceStateMachine gets activated when ADAS tiles toggle button is enabled and the lines between central car and another object shows up as shown in below image. Plus and Minus keys are used for this action.
SetSpeedStateMachine specifies speed range on which car must be, as per user settings. If set speed initially 80 and when user sets for 90, then speed ranges from 0-90.
TileStateMachine handles tiles movement with up and down arrow keys among Music player, Contacts, ADAS and Navigation tiles.
Play/Operation using Player
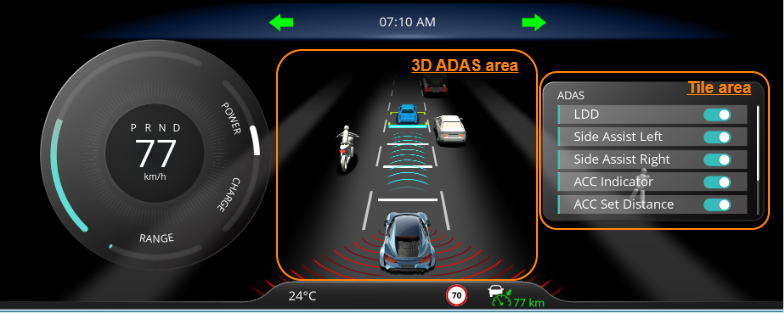
3D ADAS area
- You can control the position of the main car horizontally by pressing the Left Key and Right Key.
- The status of LDD (Lane Departure Detection) set in the Tile area is displayed.
- The status of ACC (Adaptive Cruise Control) set in the Tile area is displayed.
Tile area
- The tiles switch by pressing the Up Arrow Key or Down Arrow Key. When the Down Arrow Key is pressed, the tiles switch in the following order:
AdasScene2D→NavigationScene2D→MusicScene2D→PhoneScene2D - The Add Key ($+$) and Subtract Key ($-$) inputs can be used to set the ACC distance in the AdasScene2D.
- In the ADAS 2D scene, the Add and Subtract Keys are used to set the ACC speed.