
Dynamic List
Overview and characteristics
- The size of the list exceeds the limit to process/render all items in the view or just not known at design time in SceneComposer.
- The view sees the list items only as a fragment/subset of the original list.
- The items in the model may be inhomogeneous. In this case special behavior have to switch the presentation of the item in the view corresponding to the provided item data.
- The items in the view have homogeneous size.
- The list model is bound via Courier databinding.
- The list model has to be implemented in the Courier Model Component.
- The list view is generic. This means the list does not require to implement a specific data structure for the item data. Only a generic base class is required which can be achieved by a simple flag in data description XML file.
- (also for static list) The list view allows horizontal/vertical lists
- (also for static list) The list view allows to swipe (scrolling/ moving the list while touching and moving the finger slowly) / flick (fast move of the finger and releasing the touch screen result is an automatic scrolling of the list for a specified duration and a velocity that epends on the speed of the flick) the list by touch.
- (also for static list) The list view positioning is decoupled from the list view itself. This enables a customizable list navigation (e.g. scrollbar/sidebar)
- The list view requests a list fragment from the model
- The list model provides this list fragment (subset of the list at the requested start index and a specified buffer size). It has to be filled with data from external data sources (e.g. CAN bus or blutooth).
- The list model can provide a default list fragment to the view component before any specific view is loaded (can be done asynchronously if the model is deployed in a separate thread). This enables the view scene to immediately show the list content without the need to request the fragment first.
- The list view items can again be bound by Courier data binding to specific data items in special binding sources for data items. Those binding sources have to be marked in XML (dataContextItem="true").
Create a list in a binding source (all samples are included in cgi_studio_player)
- First of all create a new binding source or reuse an existing.
<bindingSource name="SampleBindingSource" access="asynchronous" uid="{5fb25ecc-8223-42b5-8f00-edce8fe042f3}"> </bindingSource> - This binding source does not yet provide a list. Hence, we have to add a list item to that binding source.
<bindingSource name="SampleBindingSource" access="asynchronous" uid="{5fb25ecc-8223-42b5-8f00-edce8fe042f3}"> <list name="SampleList" uid="{1241d345-07af-46ec-b0cd-90a687c56140}" /> </bindingSource> - By default this list will be able to support any fragment size that is requested. Hence, the fragment has not a fixed size capacity but a dynamically growing capacity. This implies the use of allocating memory with different block sizes.
- By providing the windowSize attribute for the list item you can easily define a list fragment with a fixed capacity. This implies that the fragment is not able to be larger than the capacity specified by windowSize (for the sample we did not use a fixed capacity).
<list name="SampleList" windowSize="30" uid="{1241d345-07af-46ec-b0cd-90a687c56140}" /> - In addition you can also define a complete list of a fixed size by providing the attribute maxCount. If both attributes are provided the attribute maxCount will be ignored and a list fragment will be used.
<list name="SampleList" maxCount="100" uid="{1241d345-07af-46ec-b0cd-90a687c56140}" />
- By providing the windowSize attribute for the list item you can easily define a list fragment with a fixed capacity. This implies that the fragment is not able to be larger than the capacity specified by windowSize (for the sample we did not use a fixed capacity).
- At this point we are already able to define the list binding itself in SceneComposer.
Create the List view binding to the list data model
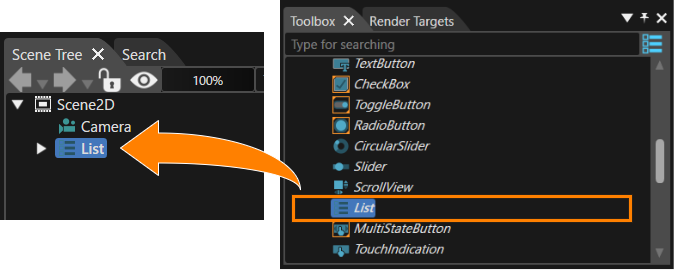
- Drag the List control from the toolbox to the Scene Tree.
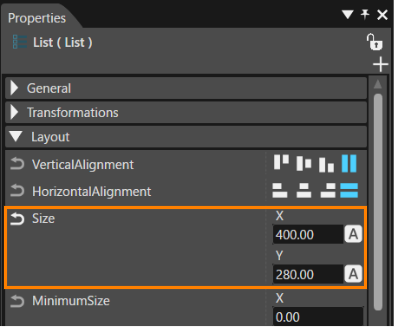
- Define the size of the List Control (e.g., 400x280). If the size is undefined, the list will be infinite in size and display as many items as you set.
- At this point, the List will not display any content because the items have not yet been set.
- At this point, the List will not display any content because the items have not yet been set.
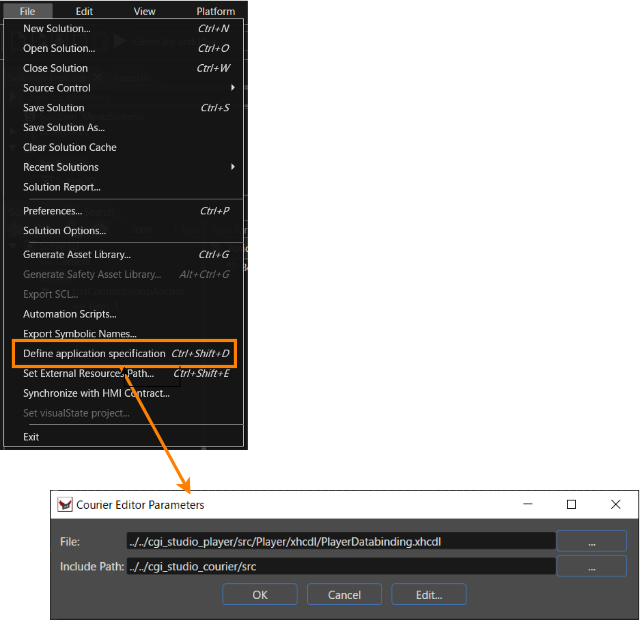
- Before defining Binding, the binding source for the application must be set. Each application must have a central XML file (like cgi_studio_player) that references all included XML files (it is also the starting point for the code generator).
-
See here for Binding source configuration instructions .
-
In CGI Studio 3.6.0, you must close and reopen the solution to reload the Data Binding.
-
- Next, set the List bindings. Press the white bind button on the right side of the List Control's properties “Control > Items” to display the [ Define Data Bindings ] dialog.
- From Data Items, select the target data and press the [ OK ] button.
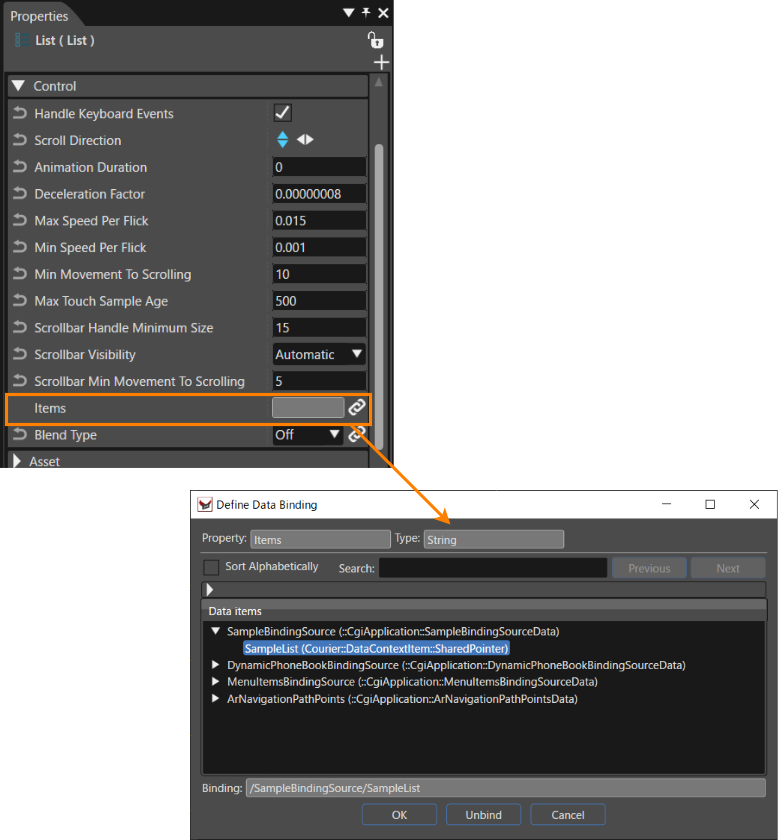
- From Data Items, select the target data and press the [ OK ] button.
- When the Data Binding operation is completed, the Bind button in the Properties panel turns blue. Also, when you mouse over the bind button, the current binding item is displayed in a tooltip.
- For more information on displaying the bind button, click here.
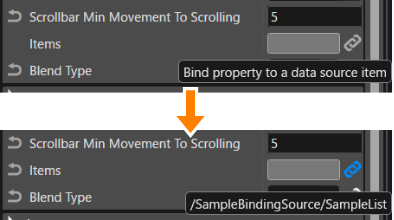
- For more information on displaying the bind button, click here.
Create the binding source for the list item
- Since we have not yet defined how the data items will look like we have to go back to the data binding description in the XML file and add a new binding source for the list item itself.
<bindingSource name="SampleListEntry" access="asynchronous" uid="{86f39d72-8d42-43eb-87e7-475cdf384734}"> </bindingSource> - To mark it as a binding source that can be used as a list item we have to enable the attribute dataContextItem. DataContext items are a more generic concept in CGI Studio that can be used to define scene node local data context containing one or more local binding sources. The list item is an example that uses this concept to enable the binding of view list item properties to list data items.
<bindingSource name="SampleListEntry" access="asynchronous" dataContextItem="true" uid="{86f39d72-8d42-43eb-87e7-475cdf384734}"> </bindingSource> - Now we have to add some data items to that binding source.
<bindingSource name="SampleListEntry" access="asynchronous" dataContextItem="true" uid="{86f39d72-8d42-43eb-87e7-475cdf384734}">
    <item name="UInt64Value" type="FeatStd::UInt64" uid="{5cb01d1b-9b9b-4982-99b2-4c82a4823d16}" />
    <item name="FloatValue" type="FeatStd::Float" uid="{7a55879f-0a01-41bf-9d96-d3048280b79f}" />
Create the List item view binding to the list item data model
After defining the List item structure, set up the Bindings in Scene Composer.
- First, Nodes for the List item are required. Drag a Stack Layout node from the Node 2D section of the Toolbox to the Scene Tree and rename it "Item_1".
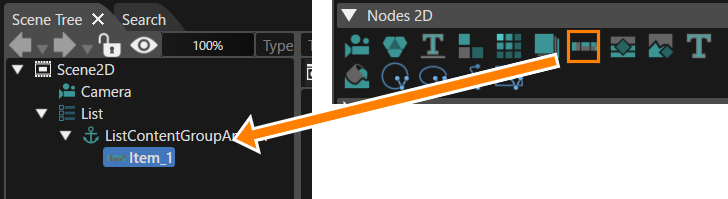
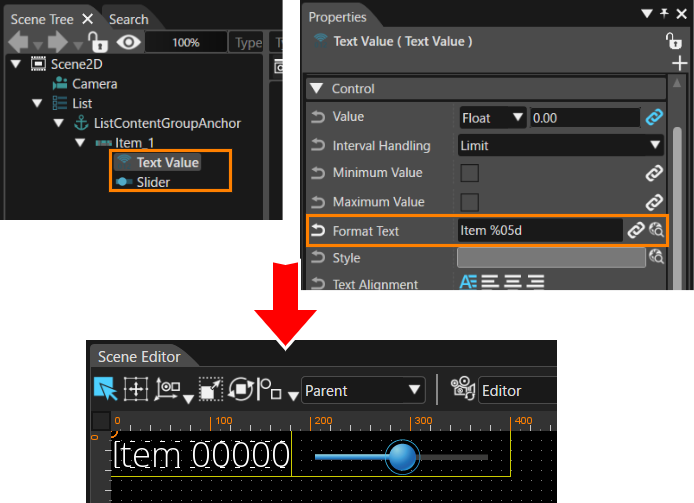
- Next, drag a Text Value Control and a Slider Control onto that stack node. In addition, change the "Format Text" property of Text Value to “Item %05d”.
- In the Scene Editor, the text "Item" should be followed by the number that binds to the UInt64 data binding item you just added.
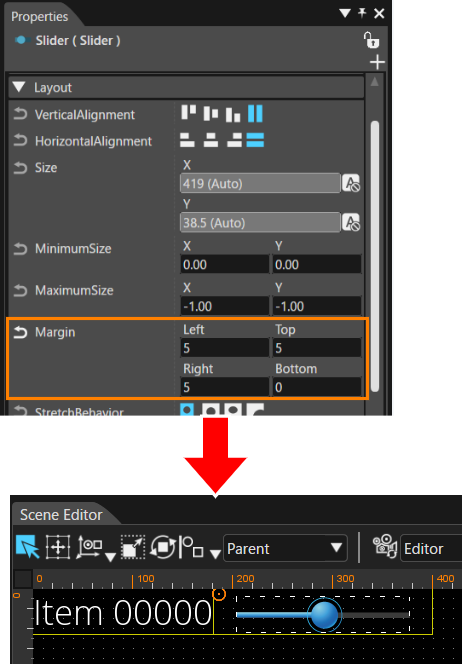
- Add a little margin to the top, bottom, left and right of the Slider Control.
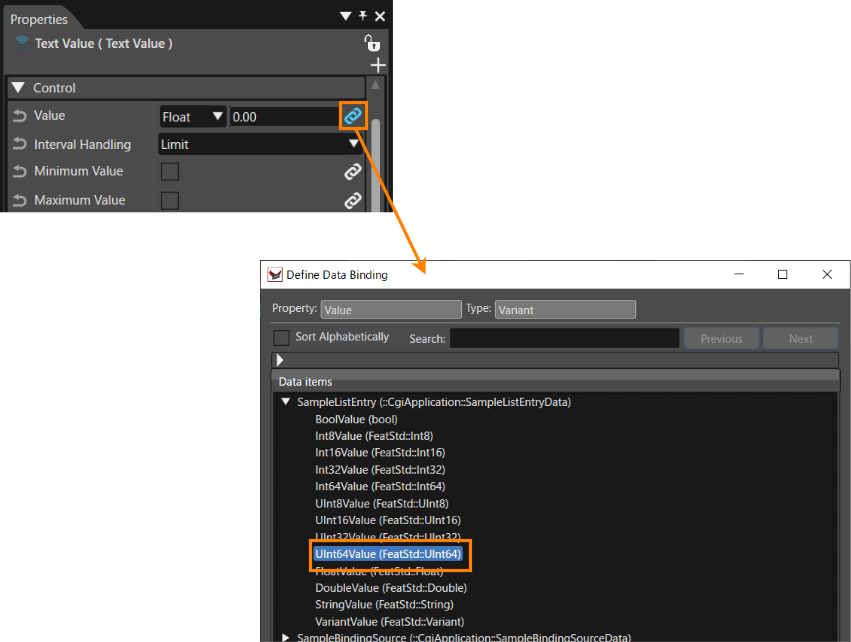
- Bind the Value property of the Text Value Control to /SampleListEntry/UInt64Value.
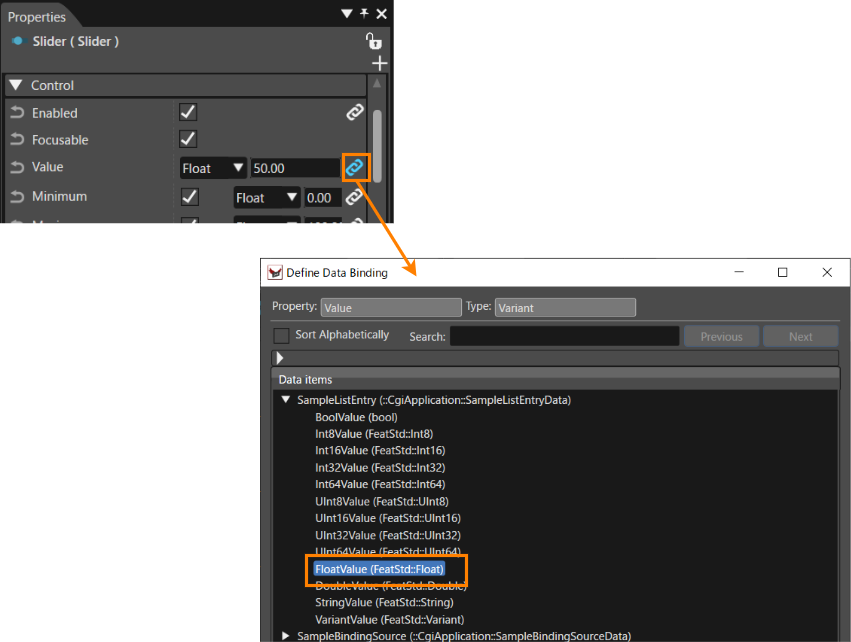
- In addition, bind the Value property of the Slider control to /SampleListEntry/FloatValue.
- This completes the binding settings for this item.
- After selecting the List control in the Scene Tree, select [ Clone ] from the context menu.
- When the [ Clone Item ] dialog box appears, select the [ Multiple Clone ] tab, enter “6” for the "Number of Copies", and perform the clone.
- A scroll bar will appear because the seventh item is outside the visible area due to the size setting set earlier.
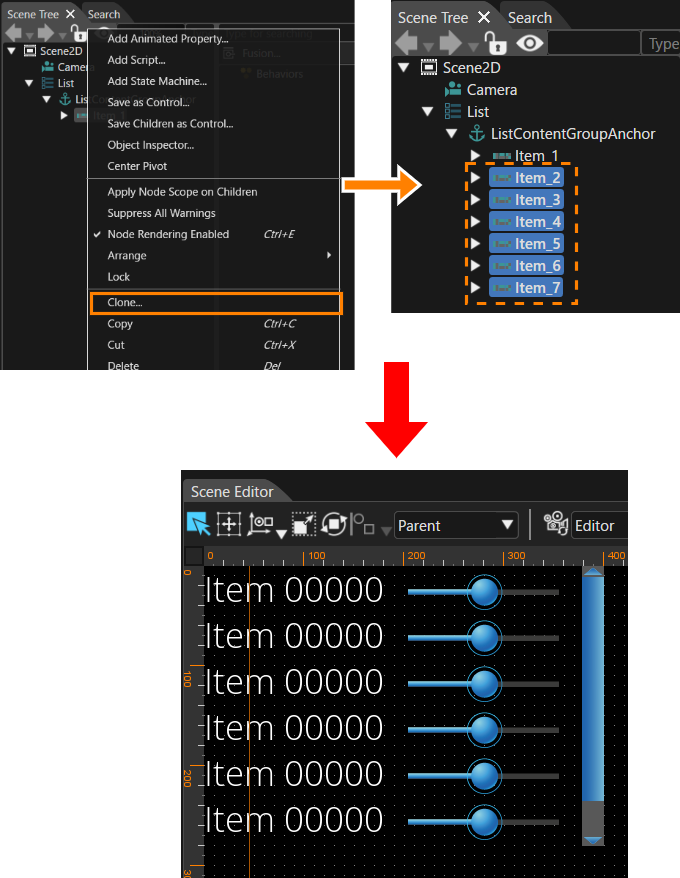
This completes the scene configuration. You can now generate the assets.
Handling the List model code
- First we have to generate the code for the binding sources. In cgi_studio_player this can be done by starting the command script: cgi_studio_player/src/generate.cmd
- You will find the list sample code of the model (DynamicListComponent.cpp and DynamicListComponent.h) located in this folder: cgi_studio_player/src/Player/SampleComponents
- So, what we do here is we provide a list fragment at the startup to enable the view as soon as possible to show the list content:
bool DynamicListComponent::OnMessage(const Courier::Message & msg)
    {
        bool rc = false;
        switch (msg.GetId()) {
        case Courier::StartupMsg::ID:
            (*mSampleBindingSource).mVariantValue = FeatStd::Variant(10.0F);
            LoadSampleListFragmentMissingItems(0, 30);
            (*mSampleBindingSource).mSampleList.UpdateListItemCount(SAMPLE_LIST_SIZE);
            mSampleBindingSource.MarkItemModified(ItemKey::SampleBindingSource::SampleListItem);
            mSampleBindingSource.SendUpdate(true);
            break;
- The call of LoadSampleListFragmentMissingItems simply initializes the list content of the default fragment.
- With the call of UpdateListItemCount we define the virtual size of the complete list.
- The call of MarkItemModified will mark the list as modified. Hence, only the list is updated by the SendUpdate call (which will post a message to the view).
- The handling of the UpdateModelMsg will do two things. The first one handles requests of new fragments from the list view. The second one handles modification of data items with the list items that are requested by the view (e.g. by the slider)
case UpdateModelMsg::ID: {
- When we handle new fragments we will receive the start index(request.NewIndex) the size (request.OldIndex) of the requested fragment. Hence, we will update the fragment with these values. We do not yet send the update message because other messages may require further modification of the model. Hence we will send the update in the OnExecute method where we can be sure that the modifications are complete.
                case Courier::ListRequestType::NewFragment:
                    switch (request.ItemKey()) {
                    case ItemKey::SampleBindingSource::SampleListItem:
                        LoadSampleListFragmentMissingItems(request.NewIndex(), request.OldIndex());
                        break;
                    }
                    break;
- When we handle the change of an data item we will get the exact information which list has been modified, which item, which data item in the item and the new value. The model still can reject this modification. In both cases the model should send an update of that data item to either reset the list that requested the change and/or update other views that are bound to the list but not yet visible (NOTE: for fragment lists only one bound list is allowed to be active because only one fragment per list is handled in the model).
        case Courier::ListRequestType::ChangeDataItem:
            switch (request.ItemKey()) {
            case ItemKey::SampleBindingSource::SampleListItem:
                switch (request.InnerItemKey()) {
                case ItemKey::SampleListEntry::FloatValueItem: {
                    const FeatStd::Float* value = request.GetItem<FeatStd::Float>();
                    SetSampleListTestListValue(request.NewIndex(), *value);
                }
                break;
                }
                break;
            }
            break;