
9-patch image
Description
The 4-slice scaling technique has been around in desktop graphics software for some years already and is well known to users of Flash and Illustrator. It's a brilliant technique for scaling images by dividing them using 5 slices into sections that have a fixed size (the corners) and sections that are flexible (the edges and the center). There are many names in use for this technique: 9-slice-sprite, 9-slice-scaling, 9-patch-bitmap.
The following image shows the 9 patches areas of an image using different colors:
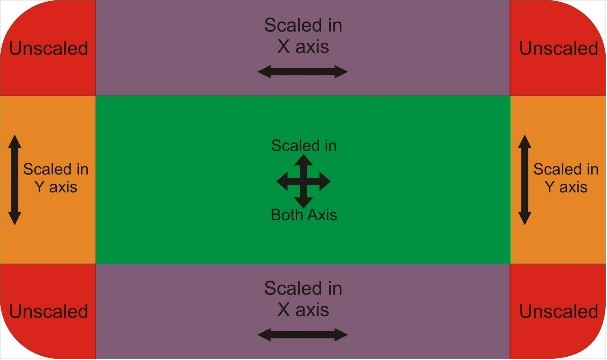
The basic rules are that the corners will not scale at all, the edges will only scale in their respective direction and the center will scale in all directions.
The green area usually is the content area and the other 8 areas are the border areas. It will be clear why the center area is named content area when we show a few example applications of 9-patch images.
Examples

The images are very often used as background in controls like buttons for example. The big advantage is the low amount of memory needed. It is only necessary to store a small minimum version of the image and it can be reused in many different sizes without losing too much of its quality.
9-patch is mainly used for controls, if you have a text field or a button you can basically stretch it infinitely, but you want certain areas to not stretch like the borders so that in the visual sense it will look much better.
In a layouter (Overlay, Grid…), the 9-patch images will still have the same rules even if the Size properties of the layouter are changed. Using layouters to control the size of a node/control 9-patch images are very often the best way to adapt nodes/controls dynamically to the required space, which is then, adapted to the 9-patch-image as expected.
For BitmapNode sample of the 9-patch click here.
Configuration and special properties
Because not all images are suitable for use as 9-patch-images SceneComposer allows the user to classify an imported bitmap as 9-patch-images using the bitmap properties. To configure the 9-patch, when a bitmap is selected from the Solution Explorer, in the Properties window, in Bitmap section, Bitmap Layout property must be set to NinePatch. If an image is a classified 9-patch-image, 4 additional properties are available. These properties define where the slices are going through the bitmap. For every slice the distance in pixel from the border has to be specified resulting in:
- Top-Border
- Left-Border
- Right-Border
- Bottom-Border

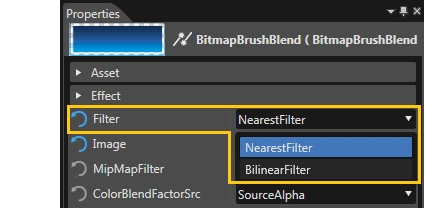
When using an image as a nine-patch image you should disable bilinear filtering (within the BitmapBrushBlend effect for example) by setting the bitmaps filter property to NearestFilter. This is necessary to have sharp borders between the 9 patches.
When using 9-patch-images on a BitmapNode or inside a control changing the size of the node or control will stretch the image as described above. The scale property of a node/control will be applied as an additional step AFTER adapting the image to the size of the node/control!
Scale properties X and Y will scale the whole image and don’t have unscaled areas. 9-patch does not work with the Scale properties, but with the Size properties X and Y. To scale an image with the 9-patch rules, in the node Properties window, in Layout section, changing the values X and Y from Size property will stretch the image according to 9-patch.
If the Size properties X or Y is smaller than the sum of the borders (9-patch Stretchable Area: Left, Top, Right and Bottom), then the borders themselves will also start scaling down.