
Automatic Resizing Layouter - CGI Studio vs. WPF
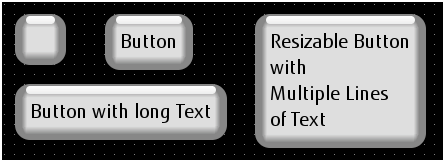
In order to adapt to changing window dimensions or the content’s size, the layouter is often required to resize automatically. The goal in this use case was to realize a sort of dialog or a button that looks as follows.

Using the layout above, a resizable button can be composed.
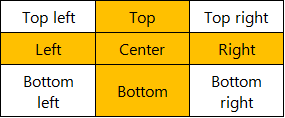
The nodes of the fields marked in orange have to be configured to stretch and the Stretch Behavior has to be set to Fill.

Here are three possibilities on how to auto size content with different layouters and a direct comparison between a configuration using CGI Studio and a configuration using WPF.
Grid as Overlay
This solution uses a Grid as Overlay.
Solution using WPF
The colored rectangles are positioned in a grid, each at the same position, alignment and margins make them all visible next to each other.
<Canvas>
    <Grid>
        <Rectangle HorizontalAlignment="Left" VerticalAlignment="Top" MinWidth="10" MinHeight="20" Fill="Red" />
        <Rectangle HorizontalAlignment="Left" VerticalAlignment="Stretch" Margin="0,20,0,20" MinWidth="10" MinHeight="20" Fill="Green" />
        <Rectangle HorizontalAlignment="Left" VerticalAlignment="Bottom" MinWidth="10" MinHeight="20" Fill="Red" />
        <Rectangle HorizontalAlignment="Right" VerticalAlignment="Top" MinWidth="10" MinHeight="20" Fill="Red" />
        <Rectangle HorizontalAlignment="Right" VerticalAlignment="Stretch" Margin="0,20,0,20" MinWidth="10" MinHeight="20" Fill="Green" />
        <Rectangle HorizontalAlignment="Right" VerticalAlignment="Bottom" MinWidth="10" MinHeight="20" Fill="Red" />
        <Rectangle HorizontalAlignment="Stretch" VerticalAlignment="Top" Margin="10,0,10,0" MinWidth="10" MinHeight="20" Fill="Green" />
        <Rectangle HorizontalAlignment="Stretch" VerticalAlignment="Stretch" Margin="10,20,10,20" MinWidth="10" MinHeight="20" Fill="Blue" />
        <Rectangle HorizontalAlignment="Stretch" VerticalAlignment="Bottom" Margin="10,0,10,0" MinWidth="10" MinHeight="20" Fill="Green" />
        <Grid Margin="10,20,10,20" >
            <Rectangle Margin="10,10,10,10" Width="100" Height="100" Fill="Yellow" />
        </Grid>
    </Grid>
</Canvas>
The WPF Canvas is used to simulate CGI Studio’s Default Layouter environment with infinite size.
CGI Studio Solution
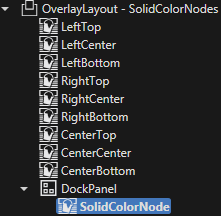
The configuration in CGI Studio is similar, but instead of the grid for the content, the more resource saving Overlay Layouter is used. The colored rectangles are positioned in the OverlayLayouter (OverlayAutoResize). Different horizontal and vertical alignments as well as margins make them visible next to each other.
Dock Panel / Dock Layouter
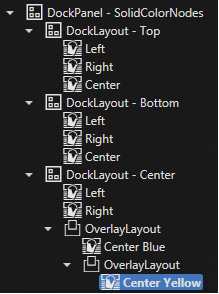
The same can be achieved using a Dock Panel/DockLayouter: A Dock Panel/DockLayouter for the top row is docked to the top and one for the bottom row is docked to the bottom. Another Dock Panel/DockLayouter is used for the middle row. In the center there is a grid with two overlapping rectangles, a blue one as background and a yellow rectangle with a margin of 10 to each direction, to create the blue border.
Solution with WPF
<Canvas>
    <DockPanel>
        <DockPanel DockPanel.Dock="Top">
            <Rectangle MinWidth="10" MinHeight="20" DockPanel.Dock="Left" Fill="Red" />
            <Rectangle MinWidth="10" MinHeight="20" DockPanel.Dock="Right" Fill="Red" />
            <Rectangle MinWidth="10" MinHeight="20" Fill="Green"/>
        </DockPanel>
        <DockPanel DockPanel.Dock="Bottom">
            <Rectangle MinWidth="10" MinHeight="20" DockPanel.Dock="Left" Fill="Red" />
            <Rectangle MinWidth="10" MinHeight="20" DockPanel.Dock="Right" Fill="Red" />
            <Rectangle MinWidth="10" MinHeight="20" Fill="Green"/>
        </DockPanel>
        <DockPanel>
            <Rectangle MinWidth="10" MinHeight="20" DockPanel.Dock="Left" Fill="Green" />
            <Rectangle MinWidth="10" MinHeight="20" DockPanel.Dock="Right" Fill="Green" />
            <Grid>
                <Rectangle MinWidth="10" MinHeight="20" Fill="Blue"/>
                <Grid>
                    <Rectangle Margin="10,10,10,10" Width="100" Height="100" Fill="Yellow" />
                </Grid>
            </Grid>
        </DockPanel>
    </DockPanel>
</Canvas>
CGI Studio Solution
In CGI Studio the solution is similar, but instead of configuring the content as grid, an overlay layouter is used in order to save resources.
Grid Layout
A Grid is defined for the colored rectangles. The left and right column as well as the top and bottom row are configured to be as wide and as high as needed by their child elements. The center row and the center column get the rest of the available space. The content of the centered cell is configured to stretch vertically and horizontally.
Solution using WPF
With a Grid the WPF configuration would look like this:
<Canvas>
    <Grid>
        <Grid.RowDefinitions>
            <RowDefinition Height="auto" />
            <RowDefinition Height="*" />
            <RowDefinition Height="auto" />
        </Grid.RowDefinitions>
        <Grid.ColumnDefinitions>
            <ColumnDefinition Width="auto" />
            <ColumnDefinition Width="*" />
            <ColumnDefinition Width="auto" />
        </Grid.ColumnDefinitions>
        <Rectangle MinWidth="10" MinHeight="20" Grid.Row="0" Grid.Column="0" Fill="Red" />
        <Rectangle MinWidth="10" MinHeight="20" Grid.Row="0" Grid.Column="2" Fill="Red" />
        <Rectangle MinWidth="10" MinHeight="20" Grid.Row="2" Grid.Column="0" Fill="Red" />
        <Rectangle MinWidth="10" MinHeight="20" Grid.Row="2" Grid.Column="2" Fill="Red" />
        <Rectangle MinWidth="10" MinHeight="20" Grid.Row="0" Grid.Column="1" Fill="Green" />
        <Rectangle MinWidth="10" MinHeight="20" Grid.Row="2" Grid.Column="1" Fill="Green" />
        <Rectangle MinWidth="10" MinHeight="20" Grid.Row="1" Grid.Column="0" Fill="Green" />
        <Rectangle MinWidth="10" MinHeight="20" Grid.Row="1" Grid.Column="2" Fill="Green" />
        <Rectangle MinWidth="10" MinHeight="20" Grid.Row="1" Grid.Column="1" Fill="Blue" />
        <Grid Grid.Row="1" Grid.Column="1" >
            <Rectangle Margin="10,10,10,10" HorizontalAlignment="Stretch" Width="100" MinHeight="100" Fill="Yellow" />
        </Grid>
    </Grid>
</Canvas>
CGI Studio Solution
With CGI Studio, the same has been done, but instead of a Grid Layout for the Content, an Overlay Layouter has been used, that consumes less resources.
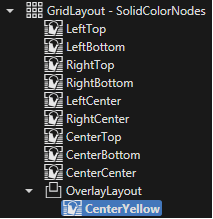
The configuration of the Grid Layouter is mapped like this:
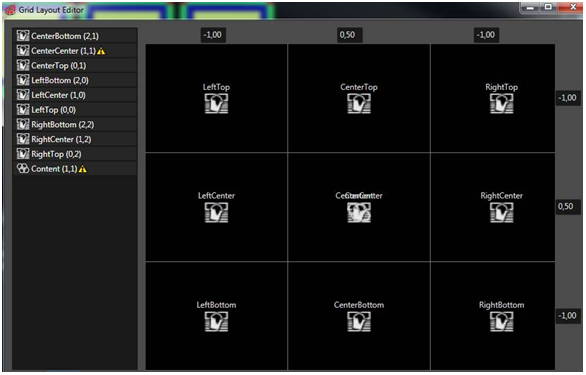
Comparison
WPF row/column auto configuration is the same as the values -1 for the row height/column width configuration in CGI Studio. The WPF row/column fraction configuration (“*”) maps to any value greater than 0 and less than 1 for the row/column configuration in CGI Studio. In the sample 0.5 is configured for the center row height/column width. Note that this is not a percentage value, it is a fraction.
-
Not used in this example, however noted for the sake of completeness: The WPF row/column fixed size configuration (e.g. “10”) maps to the same value for the row/column configuration in CGI Studio, where all values greater than 1 are absolute values in pixel.
WPF has some bugs in the WPF grid when it comes to column/row span that contain fixed size rows/columns or fraction rows/columns (for the fraction it is even possible that the item does not fit into the span).
Conclusion
The solution using an overlay seems to be the approach that needs the minimum number of nodes. However, it requires the most content related configuration, the reason being that the size of the border primitives (WPF rectangle and CGI Studio RenderNode with SolidColorBrush) have to be reflected by the margins of some items. This applies for both WPF and CGI Studio. From the number of nodes point of view the grid approach comes next in the row. However, the grid layout uses the most resources of the considerable layouters: it is not a singleton and uses some internal data structures to perform the layout. The solution with the dock panel layouter uses the highest number of nodes. But, it adapts very flexible to the content, is a singleton and – like the overlay layout - requires only one pass to layout.