
JPEG Decoder Behavior
Feature Description
The JPEG Decoder behavior allows the user to decode JPEG images at runtime using the hardware decoder. This means that the pre-decoded bitmaps need not be included in the assets, reducing the overall asset size. JPEG images are compressed, making them smaller in size, and they can be decoded by supported platforms.
Supported Platforms
At present, the JPEG decoder is exclusively supported on the Infineon Traveo 2 platform.
Limitations
The JPEG Decoder Behavior currently has the following limitations.
Single Image Decoding:Only one image can be decoded at a time.
How to use the JPEG Decoder
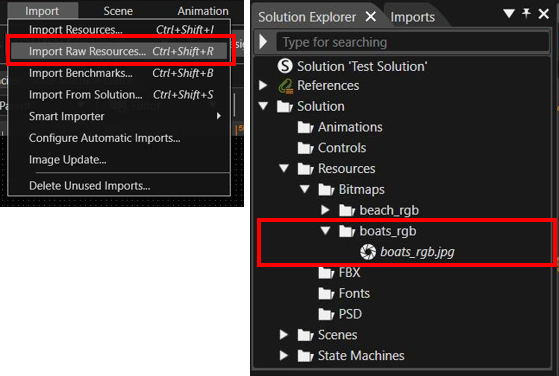
- Import the jpeg image as raw resource: Using the import menu select
““Import RawResources”Resources”. This ensures that the image is available in its original format for further processing
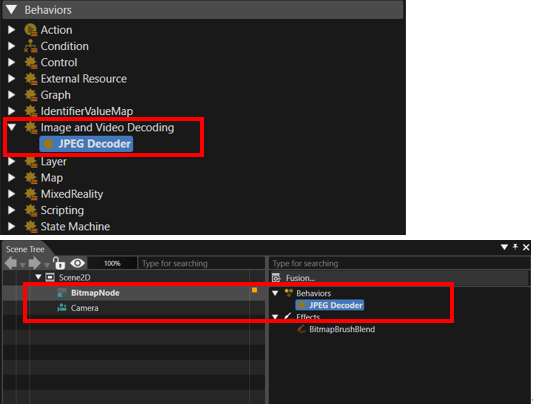
- Add the Bitmap node to the scene: Add a bitmap node to a 2D scene.
- Add the Behavior to a Bitmap Node: Place the JPEG Decoder behavior onto a Bitmap Node in the scene.
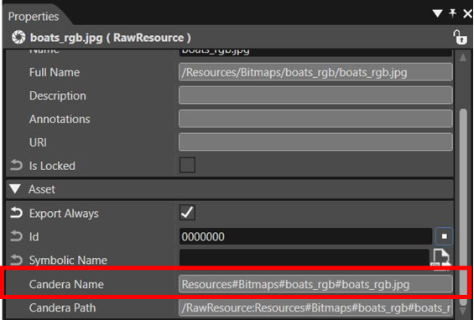
- Set the Resource Candera Name: Paste the Candera Name of the raw JPEG image into the Resource Candera Name property using the steps below.
a. Step 1: Copy the Candera Name of the raw JPEG image from the Solution Explorer under the Asset properties of the JPEG resource.
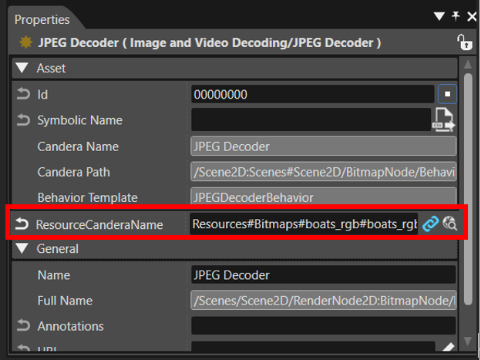
b. Step 2: Paste the Candera Name into the ResourceCanderaName property of the JPEG Decoder Behavior in the Properties panel.
- Enable/Disable the Decoder: You can toggle the decoder using the enabled property.
ChoosingEnabling the correctJPEG toolchainBitmap fileConverter for cross-compilation
feature
If the JPEG decoderbitmap converter feature is being used, ensure that the correctJPEG toolchainDecoder filefeature has been used. Toolchain files are availableenabled in the directoryCMAKE cgi_studio_devices\src\Traveo2\ToolchainFilesoptions. While generating the project for target, turn on the CMAKE flag CGIDEVICE_TRAVEO2_JPEG_DECODER_ENABLED.
Use
If the JPEG decoder is not being used, use the toolchain files that do not have the _JPEG suffix.
Changes in the linker_directives.ld file
The following two lines present in linker directives file create a jpeg decode buffer section to which the JPEG decoder will write the decoded image.
.jpeg_decode_buffer_base ALIGN(1) : > ..jpeg_decode_buffer ALIGN(1) PAD(1M) : > . // JPEG decoder output
The size of the section and the location can be changed according to the target for which the application is being built.For example, in the 6m DDR board, the location of the jpeg_decode_buffer section can be inside the LPDDR4_RAM area, however for the 6m board, it would have to be in either SRAM or VRAM (preferred).
Example for 6m board

Example for 6m DDR board

Converting images to supported format
To ensure compatibility, you may need to convert your JPEG images to an RGB-encoded baseline JPEG format. Follow the steps below to install the necessary tools and use the conversion script.
Software Requirements
The conversion script uses djpeg and cjpeg utilities, which are part of the libjpeg-turbo software. You need to install them and make them accessible via your system’s PATH environment variable.
Installation Steps
Using the Conversion Script
The provided batch script, encode_jpeg_as_rgb.bat, automates the conversion of YCbCr JPEGs into RGB-encoded JPEGs. You simply drag and drop a JPEG file onto the script, and it processes the image automatically.
Steps for Conversion
Example Usage
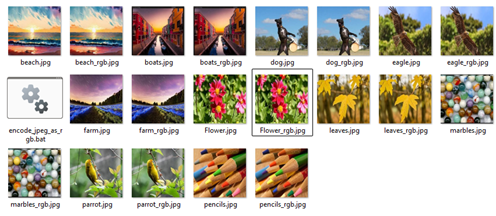
Verifying the Converted Images
To check if the image needs conversion, the following method can be used:

Even when run on single images, the ffprobe command will show the type as mjpeg.
Conversion Script
Paste the following code into a .bat file to create the conversion script.
@echo offsetlocal
:: Check if a file is dragged and droppedif "%~1"=="" ( echo Usage: Drag and drop a JPEG file onto this script to convert it. echo. echo The output file will be saved with "_rgb" appended to the input file name. goto end)
:: Set the input file pathset INPUT_FILE=%~1
:: Check if the input file existsif not exist "%INPUT_FILE%" ( echo Error: Input file "%INPUT_FILE%" not found. goto end)
:: Generate the output file name with "_rgb" suffixset OUTPUT_FILE=%~dpn1_rgb.jpg
:: Temporary PPM fileset TEMP_PPM="%TEMP%\temp.ppm"
:: Step 1: Convert input JPEG to PPM using djpegecho Converting input JPEG to PPM...djpeg -outfile %TEMP_PPM% "%INPUT_FILE%"if errorlevel 1 ( echo Error: Failed to convert input JPEG to PPM. goto end)
:: Step 2: Convert PPM to RGB-encoded JPEG using cjpegecho Converting PPM to RGB-encoded JPEG...cjpeg -rgb -outfile "%OUTPUT_FILE%" %TEMP_PPM%if errorlevel 1 ( echo Error: Failed to convert PPM to RGB-encoded JPEG. goto end)
:: Clean up temporary PPM filedel %TEMP_PPM%
echo Conversion successful!echo Output saved to "%OUTPUT_FILE%"goto end
:endendlocal@echo offsetlocal
:: Check if a file is dragged and droppedif "%~1"=="" ( echo Usage: Drag and drop a JPEG file onto this script to convert it. echo. echo The output file will be saved with "_rgb" appended to the input file name. goto end)
:: Set the input file pathset INPUT_FILE=%~1
:: Check if the input file existsif not exist "%INPUT_FILE%" ( echo Error: Input file "%INPUT_FILE%" not found. goto end)
:: Generate the output file name with "_rgb" suffixset OUTPUT_FILE=%~dpn1_rgb.jpg
:: Temporary PPM fileset TEMP_PPM="%TEMP%\temp.ppm"
:: Step 1: Convert input JPEG to PPM using djpegecho Converting input JPEG to PPM...djpeg -outfile %TEMP_PPM% "%INPUT_FILE%"if errorlevel 1 ( echo Error: Failed to convert input JPEG to PPM. goto end)
:: Step 2: Convert PPM to RGB-encoded JPEG using cjpegecho Converting PPM to RGB-encoded JPEG...cjpeg -rgb -outfile "%OUTPUT_FILE%" %TEMP_PPM%if errorlevel 1 ( echo Error: Failed to convert PPM to RGB-encoded JPEG. goto end)
:: Clean up temporary PPM filedel %TEMP_PPM%
echo Conversion successful!echo Output saved to "%OUTPUT_FILE%"goto end
:endendlocal