
Target Setup Guide for RPi5
Before you Begin
Before starting with the setup guide, we recommend the following to get familiar with CGI-Studio:
- Explore CGI-Studio
Read the Quick Start Guide. - Learn to create SceneComposer Solutions
The documentation provides instructions on how to create simple SceneComposer solutions. To access SceneComposer navigate to:
<cgi-studio-installation-path>\bin\SceneComposer\SceneComposer.exe - Generate Assets for Simulation and Target Environments
You can find guidance on generating assets from solutions (binary files containing solution information for the player) for both simulation and target environments in the documentation.
With this knowledge you should be fit to complete this guide.
Software Image Setup
The CGI Studio Community Edition supports both Raspberry Pi 4 and Raspberry Pi 5. The following section describes how you can install the Community Edition on your Raspberry Pi device. Additional information about the proper setup and configuration of a Raspberry Pi device can be found in the official Raspberry Pi documentation. It also contains information on how to get started with your Raspberry Pi device. Complete the following steps to prepare your Raspberry Pi for the installation of the CGI Studio Community Edition.
- Download and install the Raspberry Pi Imager from this link: Raspberry Pi software – Raspberry Pi.
- Insert a compatible SD card into your computer for flashing the image.
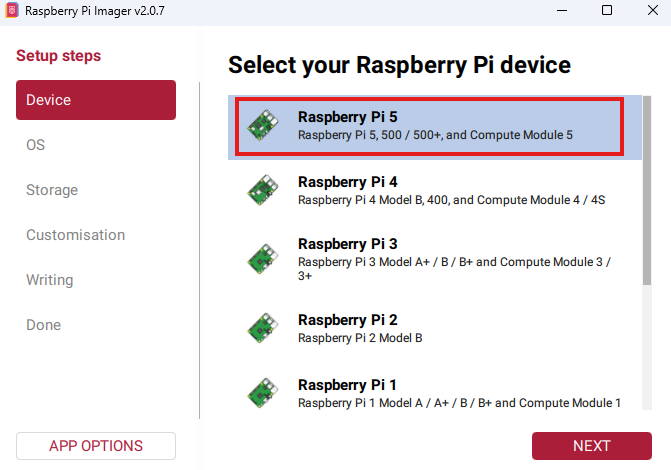
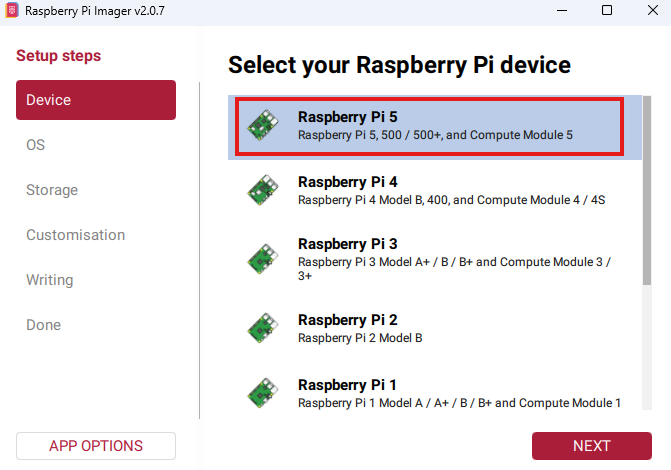
- Open Raspberry Pi Imager and in the Device section select Raspberry Pi 4 or Raspberry Pi 5, depending on your model. Afterwards click "Next".
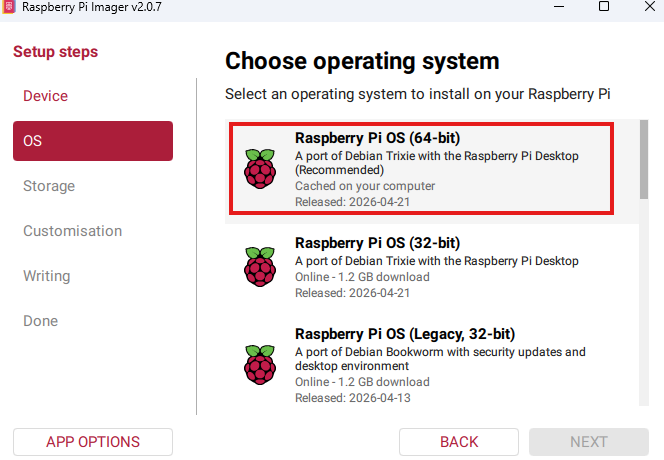
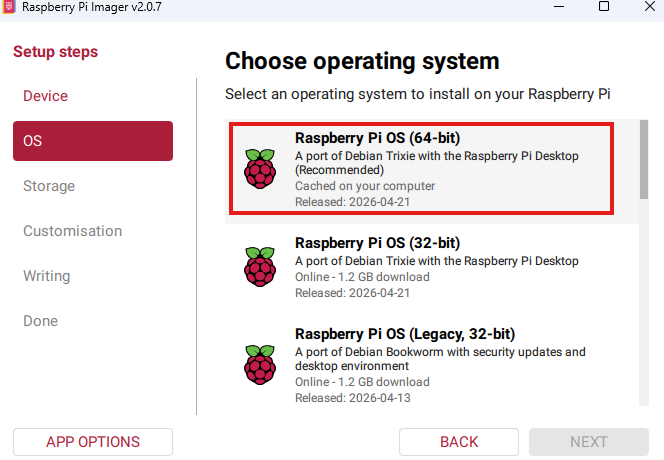
- In the menu Choose operating system select "Raspberry Pi OS (64-bit)". Then click "Next".
- In the storage section, select the inserted SD card, and click "Next".
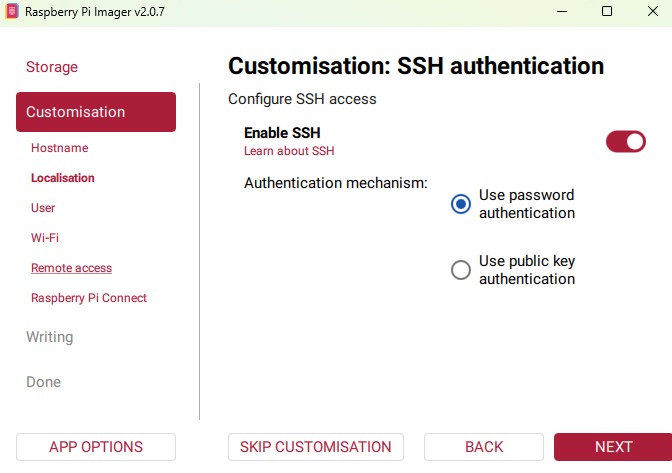
- In the Customization step click "Next" till the "Customisation: SSH authentication" configuration occurs. Make sure that SSH is enabled.
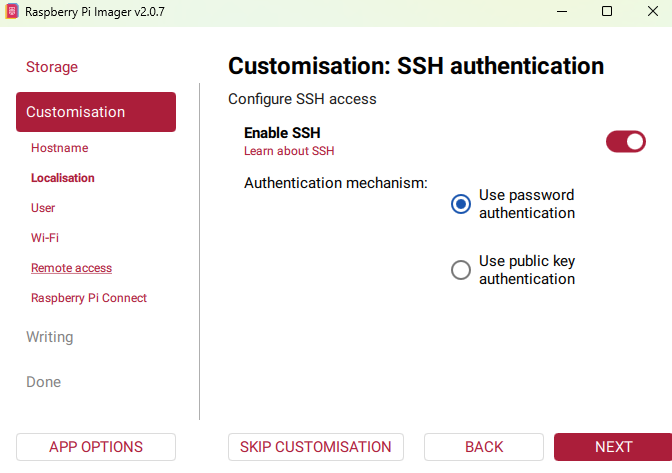
- Click "Next" and write the image to the SD card. This may take some time.
- Finally eject the SD card from your PC.
Raspberry Pi Startup
This section outlines the initial hardware setup, booting, and first-time configuration process for setting up the operating system on a Raspberry Pi 4 or a Raspberry Pi 5.
- Insert the SD Card: Insert the flashed microSD card securely into the dedicated card slot on your Raspberry Pi board.
-
Connect Hardware: Connect your Raspberry Pi to an external display (using a micro-HDMI to HDMI cable), plug in your USB touch interface/peripherals or connect to DSI cable, and connect the official USB-C power supply to power it on.
- Initial Boot & Setup: The OS will automatically begin its initial boot diagnostics. Follow the on-screen configuration wizard to set up your region, skip the Wi-Fi and connect LAN, and establish your core username and password.
- Boot to Desktop: Once you complete the wizard, the system will finalize its settings and boot directly into the desktop user interface.
- Once installed, the OS UI will appear on the display.
Connecting to the Raspberry Pi using SSH (WinSCP)
After booting, connect to the target device via SSH or a serial terminal (e.g., Tera Term). This connection is required to transfer files and execute commands. Additional information on how to connect can be found here.
At Candera we use WinSCP to transfer additional files to the device.
Install DEB package on the RPi5
Installing this Debian (.deb) package configures the native CGI Studio Player application and the CGI Studio Player Connector on your Raspberry Pi. This chapter outlines the process of transferring and installing the CGI Studio Community package onto a Raspberry Pi 4 or Raspberry Pi 5 using WinSCP and a terminal connection.
- Transfer the File: Use WinSCP or SSH to transfer the downloaded
.debfile to your Raspberry Pi (e.g.,/home/username/). - Navigate to the Directory: Use
cdand verify withls. - Install the Package:
sudo apt update
sudo apt install ./cgi-studio-community-rpi5_3.16.0-arm64.deb
Run Blood Pressure Sample with Target Player
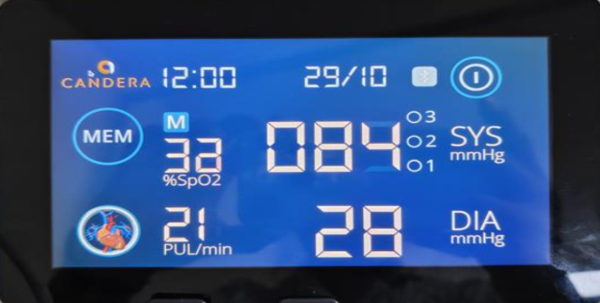
The Blood Pressure Device sample is a Scene Composer sample that demonstrates a blood pressure measurement device with exemplary scenes and animations. General information on this sample can be found in the Blood Pressure Solution documentation.
Execute the following command on the Raspberry Pi device to run the sample using our target player.
Player /opt/candera/Samples/BloodPressureDevice/BloodPressureDevice.binThe asset will be visible on the target device.
Run Blood Pressure Sample with Player Connector Library
The Blood Pressure Sample sample is extended with a data binding programmed in Python. The Python part of the sample relies on the Python-Based Player Data Binding Library to interact with the data bindings of the scene. Once the hardware is set up follow these steps to configure the Python environment and execute the sample.
The Python code for the blood pressure device sample can be found under:
<cgi-studio-installation-path>\bin\CommunityEdition\Python\Samples\BloodPressureDevice on the host computer and in /opt/candera/Python/Samples/BloodPressureDevice on the target, after successful installation of the debian package.
Follow the steps below to run the Blood Pressure Sample with player connector library.
- Move to the directory: Open the terminal on your Raspberry Pi and move to the sample directory.
cd /opt/candera/Python/Samples/BloodPressureDevice - Configure and activate the Python Virtual Environment:
Creating a virtual environment ensures that the dependencies for the Candera sample do not conflict with other system libraries.python -m venv . source bin/activate - Install Dependencies:
Install the required Python packages defined in the project's requirements file.
pip install -r ./requirementsWithoutSoundhound.txt -
Run the Sample:
Execute the Blood Pressure Device python script using the following flags.
- -wsh : Disable SoundHound integration
- -lbp : Library binary path
- -abp : Asset binary path
Verification: Upon execution, the Blood Pressure Device UI should initialize and appear on your connected Raspberry Pi display.python BloodPressureDevice.py -lbp /opt/candera/lib/libPlayerConnectorLibrary.so \ -abp /opt/candera/Python/Samples/BloodPressureDevice/BloodPressureDevice.bin -wsh
NOTE: If the display is portrait mode but it needs to be rotated to landscape mode.
Command -wlr-randr --output DSI-2 --transform 90