
Basic Operation
State Machine in the Menu Bar
The State Machine menu in the menu bar, offers the following options.
| New State Machine... | Select this option to create a new State Machine. For details, refer to How to Create a new State Machine. |
| Attach... | Connect to the currently running CGI Panel. After selecting this option, the Attach to application dialog will be displayed. Enter the IP address and port number of the target CGI Panel. This option is also used when utilizing the Debugger panel. For more details, please refer to State Machine Debugger. |
| Validate Active State Machine | Select this option to perform validation on the currently active State Machine. |
How to Create a New State Machine
There are two ways to create a new State Machine:
1. Create State Machine in Solution Explorer
- In the Solution Explorer, right click any folder (e.g. Solution).
- From this menu, select Add > New Item...
- The Add New Item dialog appears.
- In the list on the left, select StateMachine, then configure the settings displayed on the right side of the dialog. Confirm your configuration by clicking OK.
- A new StateMachine item will be created in the selected location within the Solution Explorer.
2. Create State Machine via the Menu
- From the menu bar, select State Machine > New State Machine... .
- The Add New State Machine dialog appears.
- Configure the available settings (e.g. location, name) in the dialog and click OK.
- A new State Machine item will be created in the selected location within the Solution Explorer.
Multiple State Machines can be created using the Multiple Clones approach in the Solution Explorer.
Each State Machine is associated with a specific scope defined by its placement. For example, you can create a different State Machine for each scene to manage behavior according to scope.
Adding a State Machine to a Node (State Machine behavior)
When a State Machine is created for a node in the scene tree, it is automatically associated with that node. Once the association is complete, the State Machine can be configured using the State Machine Editor.
- In the Scene Tree panel, right click any node of the scene tree.
- The context menu will open.
- From this menu, select Add State Machine...
- The Add New State Machine dialog appears.
- Configure the settings in the dialog and click OK.
- A new State Machine item will be created in the selected location within the Solution Explorer.
- Additionally, this State Machine appears in the extra scene tree of the associated node (see figure below), as it functions as a State Machine behavior.
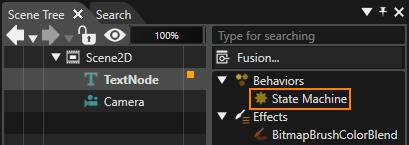
A State Machine created like this is automatically connected as a State Machine behavior in the extra scene tree of the target node. This connection allows the State Machine to receive all events generated by the target node and trigger the appropriate action based on the predefined logic. This mechanism allows for more intuitive and efficient control by linking visual elements (nodes) with behavioral logic (State Machines).
StateMachine Properties
Each State Machine can operate either as a global or a local State Machine. When you create a new, empty Scene Composer solution, a global State Machine is included by default. Any newly created State Machine is a local State Machine unless you explicitly enable the IsGlobal property (see figure below).
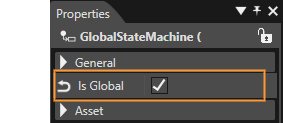
Multiple GlobalStateMachines can be set up as needed. This capability allows you to manage complex, solution-wide behavior by coordinating logic that applies across all scenes.
Global State Machine
A Global State Machine is a State Machine that applies to the entire solution. It is active across all scenes and begins operating automatically when the solution starts.
- If an event occurs on any node in the Scene Tree and is not handled by a Local State Machine, the event is forwarded to the Global State Machine, which can then process it according to its defined logic.
- You can configure multiple Global State Machines. Each of them can receive and handle events that were not processed by any Local State Machines, enabling flexible, solution-wide control and coordination of behavior.
Local State Machine
A Local State Machine is a State Machine that is explicitly associated with a specific node (an element within the application).
- Local State Machines receive all events generated by the node they are connected to.
- You can configure multiple Local State Machines for the same node. If an event is not handled by any of these Local State Machines, it is passed on to other Local State Machines and ultimately to any Global State Machines.
A newly created State Machine is a Local State Machine by default. To convert it into a Global State Machine, enable the Is Global option as described above.
Priority of Transitions
When multiple Transitions originate from the same State, their priority can be configured in two ways. The State Machine evaluates Transition conditions in order of priority, and the first Transition whose condition evaluates to true is executed.
This mechanism is particularly useful when multiple Transitions share the same triggering condition, as it allows you to clearly define which Transition should take precedence and ensures predictable, well-controlled behavior.
Settings on the State/Transition view
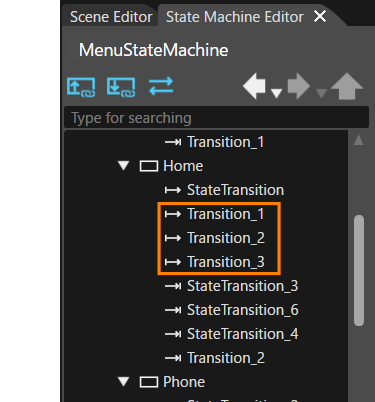
Transitions are displayed in a tree view in the upper-left corner of the State Machine Editor. In this tree view, Transitions are ordered from top to bottom according to their priority - the Transition at the top has the highest priority, and the one at the bottom has the lowest.
You can easily change the priority by dragging and dropping Transitions within the tree view. For example, in the configuration highlighted in orange in the figure below, Transition_1 has the highest priority and Transition_3 has the lowest priority.
Settings on the Properties panel
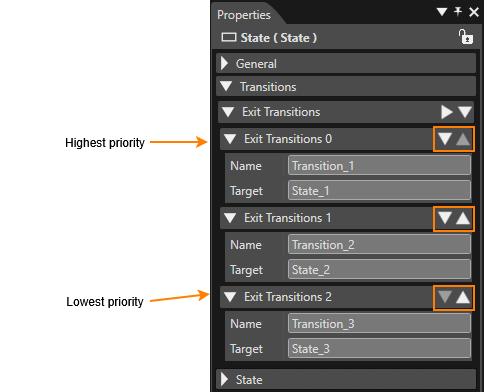
Transitions pointing away from a certain State are called exit transitions. All exit transitions for a certain State are displayed in the properties panel in the Transitions > Exit Transitions section. In this list, Transitions are displayed from the top to bottom in order of priority, with the highest-priority Transition at the top.
You can easily adjust the priority using the Move Item Up and Move Item Down icons (orange-highlighted area in the figure).
Add an Element
Each element available in the State Machine Editor top toolbar can be added to the diagram using drag-and-drop. When placing elements, observe the following restrictions:
- Only one Initial State can be placed in each State Machine.
- History States, Entry Points, and Exit Points can be placed only inside a Subchart.
These constraints ensure correct State Machine structure and prevent invalid configurations.
Add a Transition
Interconnecting States with Transitions is a two-step process:
- Drag and Drop a Transition
Drag a Transition from the top toolbar and drop it onto the source State, releasing the mouse button. - Select the destination State
Move the mouse towards the destination State. As you do so, a Transition arrow will stretch from the source State to the mouse cursor. Drag the arrow onto to the destination State and complete the connection with a mouse click.
This procedure establishes a Transition linking the selected source State to the chosen destination State.
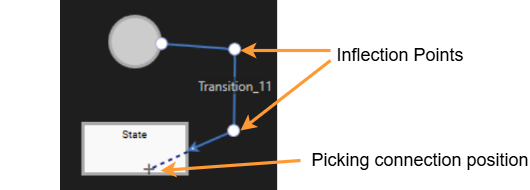
Transition Inflection Points
You can add aan Inflection Point to the location you click by holding down the Ctrl key whileand clicking on athe Transition that has already been placed onin the diagram. By addingAdding an inflectionInflection point,Point allows you canto changeadjust the display formshape of the transitionTransition online, giving you more control over how the Transition is visually routed within the diagram.
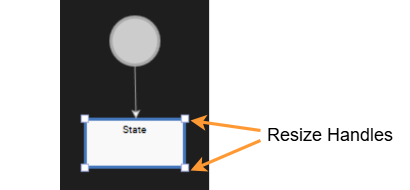
Changing Element Size
State/State, History State/Subchart/State, Subchart and Note elements can be resized tofreely any size onwithin the diagram. After addingplacing itthe element on the diagram,canvas, you can resizeadjust its size it by dragging the resize handlehandles with the mouse.
Deleting an element
Elements placed on the diagram of the State Machine Editor diagram can be deleted by doingin the following ways:
AfterDeleteselectingfrom the diagram
Select the elementto be deletedon the diagram and,press the Deletekey.key on your keyboard.-
InDelete from the editor treeon(State/Transition view)
In theState/Transitioneditorview,tree, select the element you want tobe deleted,remove, thenpresseither right-click and choose Delete(or select [ Delete ]from the contextmenu).menu or press the Delete key on your keyboard.
Subchart
In addition to dragging and dropping a Subchart from the top toolbar onto a diagram, you can also place it oncreate a diagramSubchart by converting it from an existing State.State.
Converting to Subchart
A State can be converted to a subchartSubchart by selecting "Convert to Subchart"Subchart from the context menu after selecting the State to be converted.State. The original State name is still usedretained after the conversion, but it can be changedrenamed toas any name if necessary.needed.
Display and Placement of Entry Point/and Exit Point's PointsPlacement and Display
Entry/Entry Points and Exit Points can be placedpositioned along the edges of the Subchart. ThisSubchart, clearly definesdefining the flow in and out of the Subchart. When viewing the Subchart on a diagram, these points are also visually indicated, making it easier to grasp the overall flow.
Entry and Exit Points can be freely rearranged.rearranged Appropriatealong the subchart's edge. Thoughtful placement of Entry/Exitthese points furtherimproves optimizesreadability, theenhances structurestructural ofclarity, theand contributes to a more intuitive State Machine and makes the design easier to understand.
design.
Note
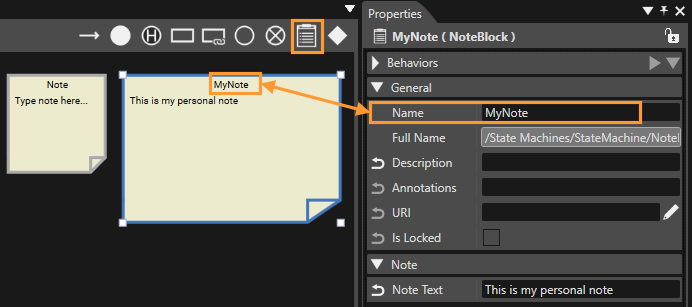
You can add Note to your diagrams in the State Machine Editor. To addinsert a Note, drag the Note element from the State Machine Editor toolbar and drop it onto the diagram.
Note can be resized in the same way as States,States using- simply drag the resize handles.handles to adjust their dimensions. The Note titles can be edited in the Properties panel. Clicking on a Note putsswitches it ininto text text-editing mode.mode allowing you to modify its content directly on the diagram.
Design Options
When State/Transitionright-clicking ison a selected State or Transition on a diagram in the State Machine Editor,Editor, the followinga context menu appears.
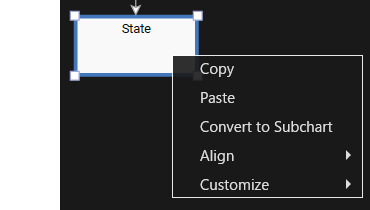
| Copy | Copies |
| Paste | Pastes |
| Convert to Subchart | Convert the selected State to a Subchart. See here for details. |
| Align |
When multiple items are
|
| Customize |
Decorate the selected State |
Changing Styles
The Scene Composer State Machine Editor allows you to customize States and Transitions using background images and color settings. Applying visual styling can improve the readability of the State Machine diagram and enhance its intuitiveness, specially in complex designs.
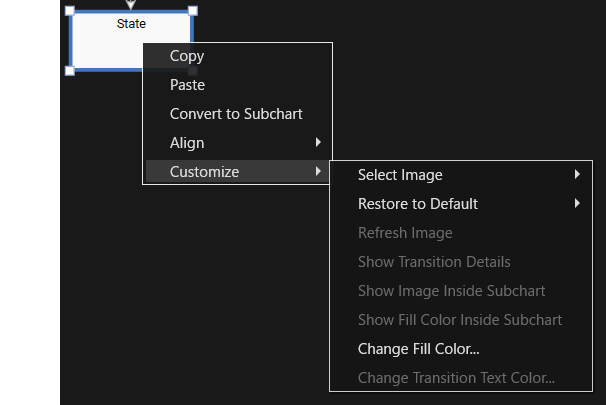
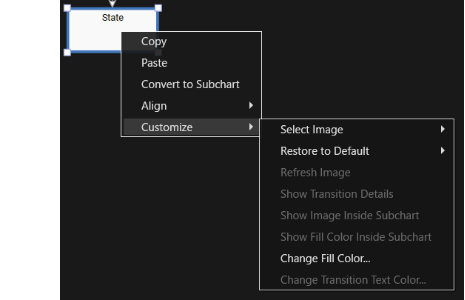
The followingcustomization options provided in the Customize context menu are thedescribed selectionsin availabledetail for Customize menu.below.
Select Image
SetAllows theyou to assign a background image forto State.the selected State in the State Machine diagram. There are two ways to set it.the image:
| From Solution Explorer... | The |
| From Local File... | Opens the Windows OS Select File |
Restore to Defaults
Restores the default settings for elements forthat support design customization options. You can choose which designdefaults optionsto arerestore enabled.by Theselecting rangean of default settings can be selectedoption from the followingavailable menu.
| All | Resets all design settings for the |
| Image | |
| Fill Color | |
| Transition Text Color |
|
| Transition Details Visibility | |
| Connection Type |
|
Refresh Image
This option is only available ifwhen an image is already selectedassigned forto the target State. ReloadReloads the image from athe file or createcaptures a new screenshot from the scene/camera.
Show Transition Details
When this option is enabled, the detailedtransition's informationname portionand ofdetails are displayed next to the texttransition contentarrow. displayedWhen indisabled, only the Transition,transition's suchname asis actions, will be hidden.displayed.

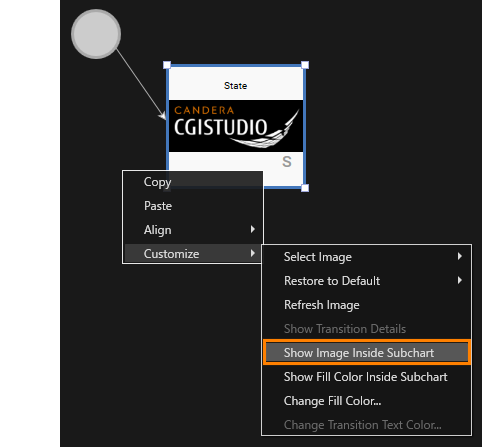
Show Image Inside Subchart
This option is only available for Statea inSubchart Subchart.State. If this option is enabled, the image set for the State can beis displayed asin the Subchart as background image.
Show Fill Color Inside Subchart
This option is also only available for a Subchart State. If the "Change Fill Color"Color option (described below) is setenabled for the targetSubchart State, enablingturning on this option will causeapplies the backgroundState's fill color set forto the StateSubchart's to be reflected in the Subchart background color.background.
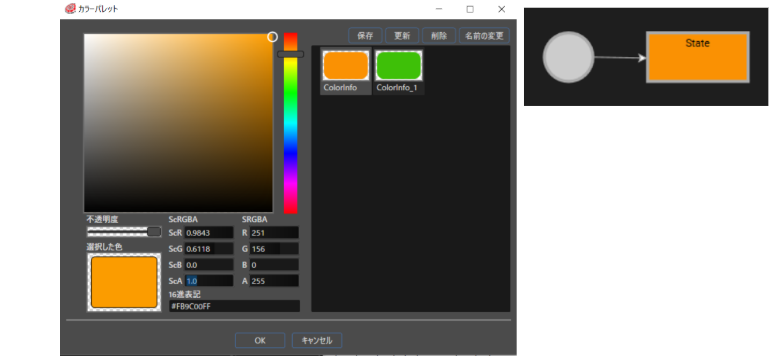
Change Fill Color
YouAllows canyou to change the background color of the State. Selecting this option opens the [ Color Palette ] dialog, setwhere you can choose the desired color and clickconfirm [with OK ].
Change Transition Text Color
Allows you to change the text color of a Transition's text description. You can change the name text color setting for Transition. Selecting this option opens the [ Color Palette ] dialog, setwhere you can choose the desired color and clickconfirm [with OK ].
Using Shortcut Keys
InThe the State Machine Editor,Editor you can usesupports shortcut keys to help you perform some operations more efficiently.efficiently Thisallowing allowsquick you to perform tasks such as adding items easilyaddition and quickly.manipulation of elements.
Operation Procedure with Shortcut Keys
-
Mouse over
Move the mouse cursor to any location or element on the diagram. -
Check
forAvailableshortcut keysShortcuts
All available shortcut keys are displayed in thelowerlower-left corner of the SceneComposer.Composer window. -
Enter a
shortcutShortcutkeyKeySelectPress one of the displayed shortcut keysyou wish to use and enter iton thekeyboard.
keyboard to execute the corresponding action.
In the example below, Transition, State, Subchart, Choice, Initial State, History State,State, and Note can all be added withusing shortcut keys. You can add notes by using the shortcut keys.
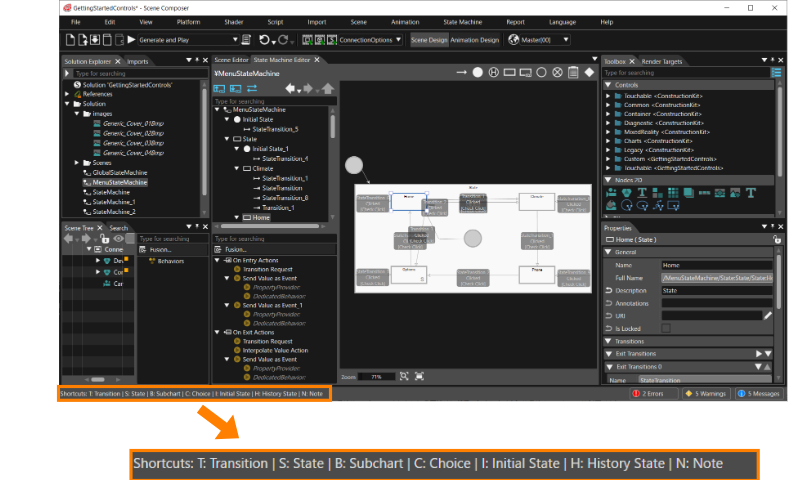
Diagram Bird's Eye Function
TheYou can display the Diagram Bird's Eye panel can be displayed by selecting [ View > State Machine > Diagram Bird's Eye ] from the menu bar. ThisThe panel provides aan bird's eye viewoverview of the entire State Machine Editor panel.workspace, allowing you to quickly navigate large or complex diagrams.
For more informationdetails on how to view the panelviewing and basicoperating operations,this panel, see Diagram Bird's Eye.
Starting with
Undo Studioand 3.13Redo
The State Machine Editor supports "Undo and Redo" operations, enabling safersafe and more flexible editing of State Machine diagrams.
Please note that Limitation: Adding,adding, deleting or editing of a Transition's Inflection Point is not supported by the Undo/Undo and Redo feature.
For more information, see Undo and Redo Operations.