
Font Palette
To use specific fonts in each TextNode (text brush), you need to configure the font settings in advance. By using the Font Palette available in the Solution Options menu, you can create and manage font templates that define the font type, size, scale, face, and other font properties to be used.
The created font templates can be applied to each TextNode through the Text Style Editor and can be used across all solutions and scenes during project development. This allows you to apply consistent font settings efficiently across multiple text elements without the need to specify the fonts individually each time.
Font Palette UI
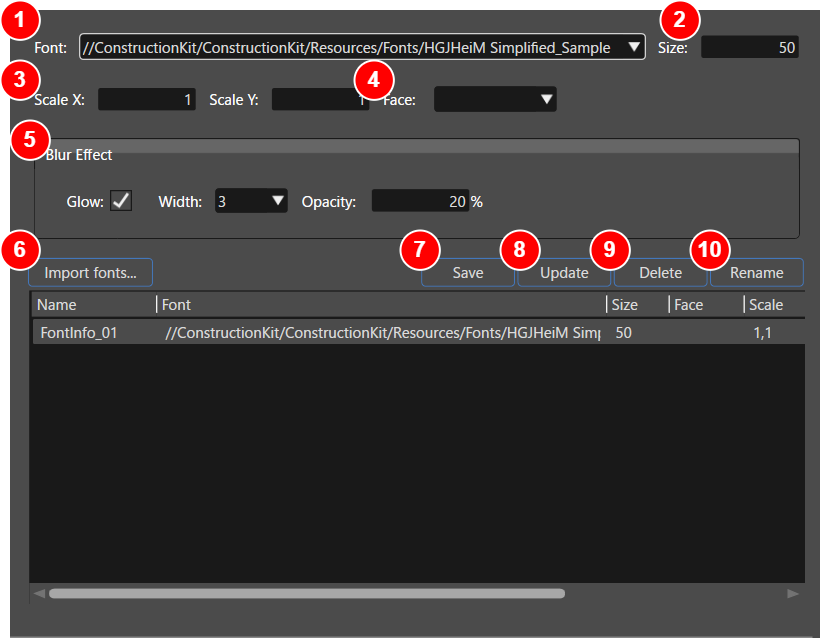
| 1 | Font | Select the font to use. Choose from the fonts available in the system or within the project from the dropdown list. |
| 2 | Size | Specify the font size in points. The larger the number, the larger the text will appear. |
| 3 | Scale X/Y |
Specify the scaling ratio for the horizontal (X) and vertical (Y) directions of the text. The default value is 1 (original size), and setting it to 2 will double the width/height. This option provides the optimal way to scale text without pixelating the glyphs. |
| 4 | Face |
Select the style included in the font (such as Regular, Bold, Italic). This can be used when the selected font contains multiple styles. For TTC fonts, it is recommended to create individual styles for each face included within the font. |
| 5 | Blur Effect |
The Blur Effect is a function that adds a glow effect to the font. It can be used to enhance visibility or to add design accents by applying a soft glow around the text.
For details about this option, please refer to here. |
| /6 | Import fonts | Import external font files into the project. Supports formats such as *.ttf and *.otf. |
| 7 | Save | Save the current settings as a new font definition. It will be registered under a different name from existing definitions. |
| 8 | Update | Overwrite and update the selected font definition with the current settings. |
| 9 | Delete | Delete the selected font definition. Note that deletion is irreversible. |
| 10 | Rename | Rename the selected font definition. The name will serve as the identifier when using the font settings in the Text Style Editor and other areas. |
Procedure to Enable the Blur Effect
This option can only be configured when CANDERA_FONTENGINE is set to MonoTypeMonotype
Configuring the CGI Studio Build Environment (CMake)
For information on building a build environment using CMake, please refer to this page.
-
Open the CMake configuration for your CGI Studio project.
-
Please refer to this page for information on the source directory to specify when using CMake.
-
-
Set the
CANDERA_FONTENGINECMake flag toMonoTypeMonotype-
Please refer to this page for instructions on how to configure
MonoTypeMonotype using CMake.
-
-
Use CMake to “Configure” the changes and then “Generate” the solution files.
Building SCHost.dll
Close SceneComposer before building SCHost.dll, otherwise SCHost.dll cannot be copied to the SceneComposer location.
-
Open the generated Visual Studio solution (e.g.,
Player.sln). -
Build the
SCHostproject. -
Ensure that Scene Composer is not running before starting the build.
-
Copy the built
SCHost.dllto the directory where the Scene Composer executable resides. -
If the CMake variable
CGIAPP_SCENE_COMPOSER_PATHis properly configured, the DLL will be automatically copied to the directory containing the Scene Composer executable. -
If it is not configured, you will need to copy the DLL manually.
-
-
If you are using the 64-bit version of Scene Composer, ensure that
SCHost.dllis also built as a 64-bit DLL.
After completing the above steps, launch Scene Composer and confirm that the Blur Effect option is displayed in the Solution Options > Font Palette dialog box.