
Advanced Cluster Solution
Overview
This solution represents an advanced 2D cluster example. It consists of various scenes that are necessary to represent an advanced Cluster. The Main Scene consists of gauges that can be manipulated with Controls and Behaviors. Other scenes, like the coverflow, show some other interactions in the solution and how this can be achieved with Behaviors. Culture is also used to support switching between display languages. Furthermore, a scene with a dynamic list is included in the sample. The dynamic list is the result of the tutorial that can be found under Dynamic List.
This sample solution serves as an example of how Scene Composer can be used to easily implement an advanced 2D gauge cluster without any coding required.
For information on how to create the main scenes of this sample solution and how to implement HMI logic using controls, please refer to "xxxx".
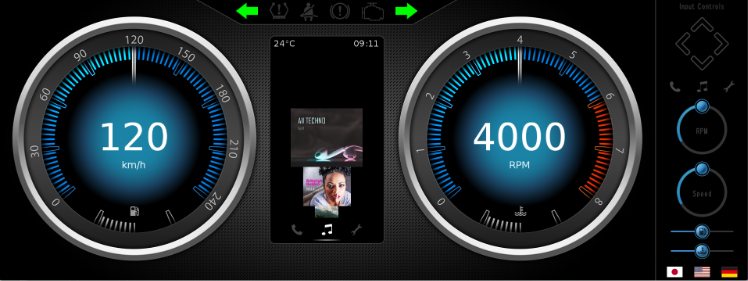
Description
The Advanced Cluster solution consists of multiple scenes to display an advanced 2D gauge cluster. Each scene uses controls suitable for the UI. It also uses Behaviors and State Machine to pass data between scenes and transition between scenes. For more information on scenes, controls, behaviors, and state machines, see the following description.
Scene
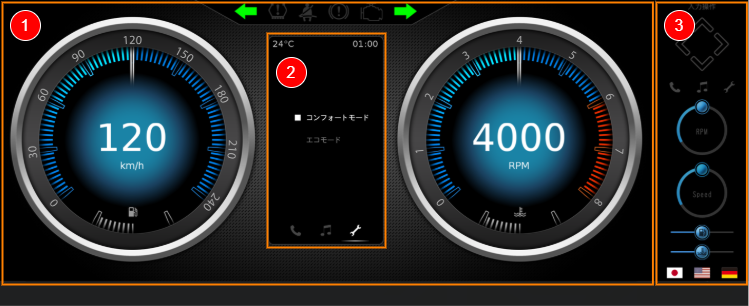
The Advanced Cluster solution consists of five scenes, each of which uses various Controls that come standard with Scene Composer to display an advanced 2D gauge cluster.
| No. | Category | Scene name | Description |
| (1) | Mina | Scene2D_Main |
The main scene of this sample solution. Two gauges are displayed on the left and right, various indicators are displayed at the top, and infotainment is displayed in the center.
|
| (2) | Infotainment |
Scene2D_Music Scene2D_Phone Scene2D_Settings |
A scene that displays infotainment (Music/Phone/Settings). Only the selected scene is displayed in the center of Scene2D_Main.
The following controls are mainly used:
|
| (3) | UI operation | Scene2D_ControlPanel |
A UI for operating the main scene and infotainment scene is displayed. Using the UI, you can change the speedometer/tachometer values, switch infotainment scenes, change the display language, and more.
The following controls are mainly used:
|
Behaviros/State Machine
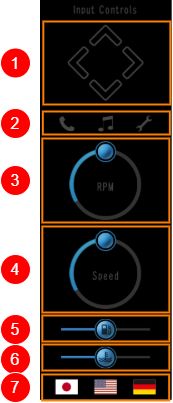
By using Behaviors and State Machine, the screen display can be changed by UI operations as shown in the table below without any coding.
 |
(1) |
The left and right arrows change infotainment (Music/Phone/Settings). The up and down arrows change the content of each infotainment. |
| (2) |
Click on the Phone/Music/Settings icon to change infotainment. |
|
| (3) | The circular slider button changes the tachometer value. | |
| (4) |
The circular slider button changes the speedometer value. |
|
| (5) | The slider button changes the fuelmeter value. | |
| (6) | The slider button changes the water temperature meter value. | |
| (7) | Click the language icon to switch between languages displayed on the main screen and infotainment screen. |
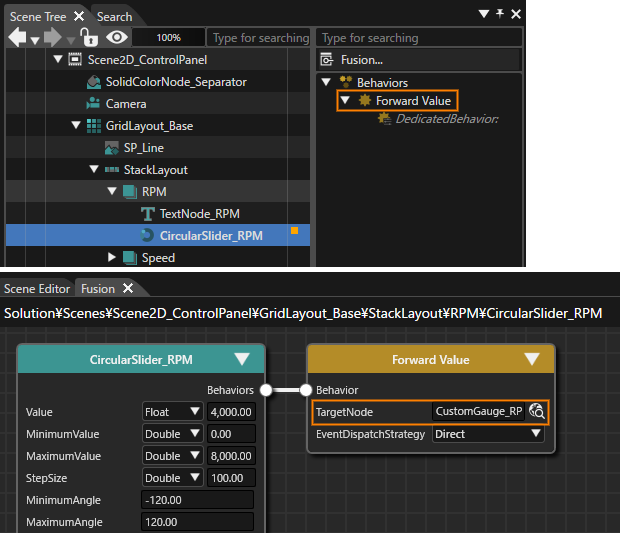
User can check the details of each UI's Behaviors and State Machine settings in the Extra Scene Tree, Fusion panel, and State Machine Editor of the target node.
The image below shows the details of the settings for a tachometer using a circular slider button. In the Extra Scene Tree, you can see that the Forward Value behavior has been added to the CircularSlider_RPM (CircularSlider control) in the Scene2D_ControlPanel scene. User can also use the Fusion panel to confirm that the TargetNode property of the Forward Value behavior is set to CustomGauge_RPM in the Scene2D_Main scene. These settings enable data transfer from CircularSlider_RPM to CustomGauge_RPM.
Play/Operation using Player
Click the [ Play selected scenario… ] icon on the toolbar to launch Player, and the Advanced Cluster solution will be displayed in the Player view. User can operate the display of the main screen using the UI on the right side of the display screen.