
Data Binding: Quick Start
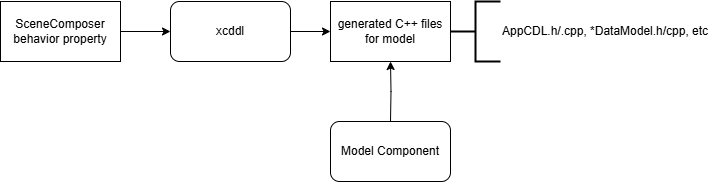
CGI Studio uses data binding to connect data with behavior properties. The connection can be configured inside CGI Studio Scene Composer through an xml file that defines binding sources. This same xml file is used by the Model Component to set/get data.
Creating the Binding Sources
An xcddl (xml) file must first be created to bind the asset in SceneComposer with the application. This same xcddl file is also used to generate code that will be used by the Model Component of the application.
- Use the Courier Editor.exe found in <CGI Studio>\cgi_studio_courier\bin\ to generate an xcddl file. This will contain the data binding sources.
- A binding source is a collection of data items.
- Data items are grouped according to logical interdependencies, update frequencies, etc.
- Scene Composer also reads the XCDDL file to bind behavior properties to data items.
  <bindingSources>
    <bindingSource uid="{ed8e107f-8e21-45d0-805e-99891f6a75a6}" name="CustomData" access="asynchronous">
      <item uid="{7ff9385a-15d9-4cff-852a-fc03c8f841da}" name="CustomValueItem1" type="FeatStd::UInt16" />
      <item uid="{150e6f31-8d88-4d8a-9a2b-7afafa968c83}" name="CustomValueItem2" type="FeatStd::UInt16" />
    </bindingSource>
</bindingSources>- The generated xcddl files must be included in the AppCDL.xcdl. For example "CustomDataModel.xcddl" was generated, then it should be included like below:
<include href="DataModel/CustomDataModel.xcddl" generate="true" />Creating the Model Component
- Next step is to convert xcddl file to C++ code using Courier Generator.exe found in <CGI Studio>\cgi_studio_courier\bin\
- Create ModelComponent class derived from Courier::ModelComponent. Add the generated DataBindingSource inside a DataItemContainer as member. The "CustomDataDataBindingSource" is typically generated in AppCDL.h.
Courier::DataItemContainer< CustomDataDataBindingSource > m_customBindingSource- The header file will look like below:
namespace CustomNamespace {
class CustomModelComponent : public Courier::ModelComponent
{
public:
    CustomModelComponent();

    virtual ~CustomModelComponent();

    // sets the data binding item CustomValue1 from the binding source CustomBindingSource in a thread safe way.
	// updates of the data binding source will be postponed until they are required (call of OnExecute method).
    void SetCustomValue1(CustomValue1Type value);

    // sets the data binding item CustomValue2 from the binding source CustomBindingSource in a thread safe way.
	// updates of the data binding source will be postponed until they are required (call of OnExecute method).
    void SetCustomValue2(CustomValue2Type value);

protected:
    virtual bool OnMessage(const Courier::Message& message) override;
    virtual bool OnExecute() override;


private:
	// critical section for thread safe setting of data binding items via setter functions,
	// thread safe update via update model change requests fromthe view and
	// thread safe sending of the update message
    FeatStd::Internal::CriticalSection m_criticalSection;
	// one customer binding source with several data binding items
	// this is only the model storage of the model values
	// copies of the values will be stored in the corresponding Courier component (e.g. the View Courier component)
    Courier::DataItemContainer< CustomDataDataBindingSource > m_customBindingSource;
};
} //namespace CustomNamespace
Model to View
In databinding, data goes both ways. If any data in the Model Component is changed, all connected Behaviors in the View will be informed of this change. Likewise if the behavior changes the data, the Model Component will be notified.
The sequence diagram from external Data -> Model -> View is shown below:
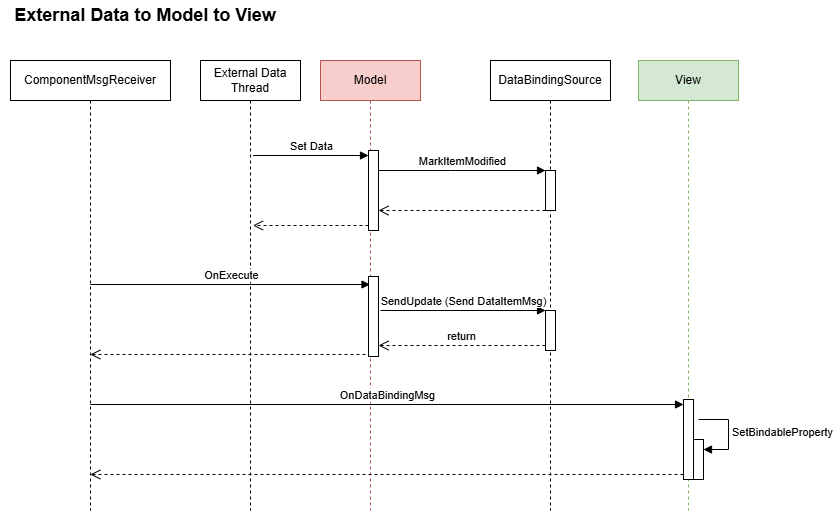
1. Provide setters to allow data to be set externally. Make sure it is thread-safe. Call MarkItemModified() to mark a certain data item that was changed.
MarkItemModified() will mark item with the given key as modified.
  void CustomModelComponent::SetCustomValue1(FeatStd::UInt16 value)
  {
    FeatStd::Internal::CriticalSectionLocker lock(&m_criticalSection);
    (*m_customBindingSource).mCustomValueItem1 = value;
    if (!m_customBindingSource.MarkItemModified(ItemKey::CustomData::CustomValueItem1Item)) {
      FEATSTD_LOG_ERROR("failed to mark data binding item as modified!");
    }
  }

  void CustomModelComponent::SetCustomValue2(FeatStd::UInt16 value)
  {
    FeatStd::Internal::CriticalSectionLocker lock(&m_criticalSection);
    (*m_customBindingSource).mCustomValueItem2 = value;
    if (m_customBindingSource.MarkItemModified(ItemKey::CustomData::CustomValueItem2Item)) {
      FEATSTD_LOG_ERROR("failed to mark data binding item as modified!");
    }
  }
2. OnExecute, check if there are modified items, then call SendUpdate() to send update of the data to the View/Controller Component.
SendUpdate() sends an update of the current data to the view/controller.
  bool CustomModelComponent::OnExecute()
  {
    FeatStd::Internal::CriticalSectionLocker lock(&m_criticalSection);
    if (m_customBindingSource.HasModifiedItems()) {
      if (!m_customBindingSource.SendUpdate()) {
        FEATSTD_LOG_ERROR("failed to send update for binding source!");
      }
    }
    return true;
  }
3. The View Component will receive the message asynchronously and set the properties.
View to Model
The sequence diagram from View -> Model is shown below:
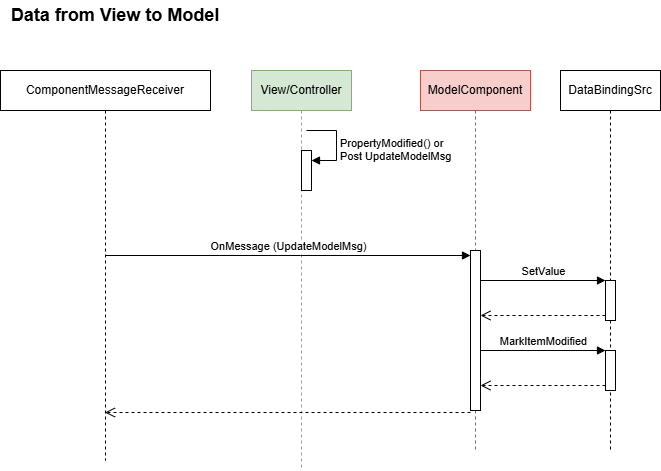
1. In the (View) behavior of the bindable property, when the property value has changed, invoke PropertyModified() to update the Model Component with the changed value. Or in the Controller, you may create and post an UpdateModelMsg to update the Model Component.
To create a bindable property, define behavior properties with CdaBindableProperty instead of CdaProperty.
PropertyModified() in the behavior will trigger so that the changed value is sent to the Model component.
2. OnMessage() of the Model Component, check for UpdateModelMsg and set the data accordingly ( using SetValue()) and MarkItemModified() ).
  bool CustomModelComponent::OnMessage(const Courier::Message& msg)
  {
    bool rc = false;
    switch (msg.GetId()) {
    case Courier::StartupMsg::ID:
      // initialize model here
      break;
    case Courier::UpdateModelMsg::ID: {
      Courier::UpdateModelMsg const* updateModelMsg = Courier::message_cast<const Courier::UpdateModelMsg*>(&msg);
      if (NULL != updateModelMsg) {
        for (FeatStd::SizeType i = 0U; i < updateModelMsg->RequestCount(); ++i) {
          Courier::Request request = updateModelMsg->GetRequest(i);
          switch (request.BindingSourceKey()) {
          case ItemKey::CustomDataItem: {
            FeatStd::Internal::CriticalSectionLocker lock(&m_criticalSection);
            if (!m_customBindingSource.SetValue(request.ItemKey(), request.GetItemValue())) {
              FEATSTD_LOG_ERROR("failed to set data binding!");
            }
            if (!m_customBindingSource.MarkItemModified(request.ItemKey())) {
              FEATSTD_LOG_ERROR("failed to mark data binding item as modified!");
            }
            break;
          }
          default: break;
          }
        }
      }
      break;
    }
    default: break;
    }
    return rc;
  }
UpdateModelMsg is responsible to carry requests to modify or update data back from view/controller to the model component.
Each UpdateModelMsg may contain multiple Courier::Request objects for multiple binding sources. Internally, UpdateModelMsg uses Courier::Internal::DataBinding::ChangeSet to store the request information.
The size of the buffer Courier::Internal::DataBinding::ChangeSet is using to store request data can be controlled with COURIER_CHANGE_SET_BUFFER_SIZE.
Preprocessing the Model Component
Lastly, as seen above, the ComponentMsgReceiver is responsible for the central message processing. All components that have to be processed needs to be attached to it.
As seen in the diagram in Model to View, it takes two frames to send data from Model to the View. An option to solve this is to introduce "pre-processing" in the model. This way, all modifications would be collected in Model::PreProcess() and then sent to the View in Model::Process within a single frame. If the model component is added before the view component, then Model::Process is called before View::Process, and the model updates would be processed within a single frame.
Any PreProcessor is called first by the ComponentMessageReceiver (see ComponentMessageReceiver::Process). A PreProcessor in the model updates all BindingSources which have been modified. Then the ComponentMessageReceiver processes all Messages and finally calls Component::OnExecute. By attaching the model component to the preprocessor, all model updates are handled in one step, and the updates are sent to the view within the same frame.
Therefore in the application initialization, it is advised to attach model component to the preprocessor of ComponentMsgReceiver:
msgReceiver.AttachPreprocessor(CourierModelComponent::GetInstance().GetPreprocessor());Implementing the Model Component Preprocessor
Define the Preprocessor
- First you have to derive from Courier::MessageReceiverPreprocessor to create a custom preprocessor for Model Component
class CourierAppModelComponent;
#include <Courier/Messaging/MessageReceiverPreprocessor.h>
class CourierPreprocessor :public Courier::MessageReceiverPreprocessor {
public:
    CourierPreprocessor(CourierAppModelComponent& model) :m_model(model) { /* Do not use model in constructor */ }

    virtual bool Process() override;

private:
    CourierAppModelComponent& m_model;
};- Then you can call the Preprocess method in your model:
bool CourierPreprocessor::Process()
{
 m_model.Preprocess();
 return true;
}
Modify ModelComponent
- Add Preprocessor to ModelComponent
CourierPreprocessor m_preprocessor;- For initialization in constructor -> m_preprocessor(*this)
- Add Preprocess (called above) and GetPreprocessor methods
void Preprocess();
CourierPreprocessor* CourierAppModelComponent::GetPreprocessor()
{
    return &m_preprocessor;
}- For Preprocess(), check if there are HasModifiedItems in data model and then SendUpdate for example:
void CourierAppModelComponent::Preprocess()
{
    if(mCARH.HasModifiedItems())
    {
        mCARH.SendUpdate();
    }
    if(mCLOCK.HasModifiedItems())
    {
        mCLOCK.SendUpdate();
    }
}