
Asset Shaping Feature Overview
Partitioning
SceneComposer produces one "big" asset as a result of the asset generation process. In the application deployment process, there are often situations where the big contiguous asset needs to be partitioned in multiple data packages to meet deployment requirements.
Assetlib Shaper works on the "big" asset and it is able to partition it in multiple other assets. The resulting assets have exactly the same format as the "big" asset, meaning that they can be loaded by the existing AssetLoader component within Candera.
To partition an asset, besides Assetlib Shaper, you need: 1. the partitioning configuration: .xml file which tells the tool the rules used in this process; 2. the asset file: .bin file produced by SceneComposer at asset generation.
Partitioning configuration file defines:
- set of partitions;
- content of each partition (e.g., a set of bitmaps, one animation, all the vertex buffers of the initial asset);
- location where the partitions will be produced
- form in which the content will be present in each partition (compressed or not compressed)
- reserved spaces for each partition
<?xml version="1.0" encoding="utf-8"?>
<shaper-configuration xmlns="http://tempuri.org/ConfigSchema.xsd">
    <partitions directory="C:/temp" block-size="3KB" reserve-space-names="20%" reserve-space-tree="4KB">
        <partition name="Scenes" master="true" reserve-space-asset="256KB">
        </partition>
        <partition name="BitmapsAndAnimations" reserve-space-lib="10%">
            <compression>
                <lib type="Animation"/>
            </compression>
            <rule type="Animation" item="*">
            <rule type="Bitmap" item="*" reserve-space-lib="20%"></rule>
        </partition>
    </partitions>
</shaper-configuration>
Above you see a partitioning configuration file. Basically, it defines two partitions; one named Scenes and one named BitmapsAndAnimations. The first partition is the master one. Each configuration must have only one master partition. This is the place for all asset elements that are not requested by other partitions.
To partition an asset, you will use this command:
AssetTool -shape -p configurationFilePath assetFilePath
Space Reservation
In production mode it is very common to apply software updates, especially for content (e.g. face-lifts). To be able to minimize the flash time and write only minimum data, an asset size reserving mechanism is offered. The reserved space is an empty space that can be filled during future updates.
Features, expressed via rule-based system, for supporting asset size reservation:
- Reserve a buffer for the name table of the asset of a size provided in KB or as a percentage of the total space occupied by the name table.
- Reserve a buffer for the look-up tree for all or for a certain asset lib type for a specific asset of a size provided in KB or as a percentage of the total space occupied by the look-up tree.
- Reserve a buffer for at the end of each asset entry's data block for all or for a certain asset lib type for a specific asset of a size provided in KB or as a percentage of the total space occupied by that asset entry data block.
- Reserve a buffer for at the end of their data block for a certain asset lib type for a specific asset of a size provided in KB or as a percentage of the total space occupied by that asset lib data block.
- Reserve a buffer for at the end of asset's data block for all or for a specific asset of a size provided in KB or as a percentage of the total space occupied by that asset's data block.
The space to be reserved is defined in the partitioning configuration file. Let's consider the next partitioning configuration:
<?xml version="1.0" encoding="utf-8"?>
<shaper-configuration xmlns="http://tempuri.org/ConfigSchema.xsd">
    <partitions directory="C:/temp" block-size="3KB" reserve-space-names="20%" reserve-space-tree="4KB">
        <partition name="Scenes" master="true">
        </partition>
        <partition name="BitmapsAndAnimations">
            <compression>
                <lib type="Animation"/>
            </compression>
            <rule type="Animation" item="*">
            <rule type="Bitmap" item="*"></rule>
        </partition>
    </partitions>
</shaper-configuration>
This configuration reserves 20% of the name table space, at the end of the name table, and 4Kb of space at the end of all the lookup trees of the asset.
To partition an asset with space reservation, you will use this command:
AssetTool -shape -p configurationFilePath assetFilePath
Compression
Assetlib Shaper is able to compress asset data. Data is compressed at asset entry level for all or for a particular subset of the asset libraries.
You can specify enabled or disabled compression in the partitioning configuration file in two ways for flexibility purposes:
- at partition or partition collection level
        <compression>
             <lib type="Bitmap"/>
        </compression>
- at rule level
<rule type="Bitmap" compress="true"/>
You should regard compression specification as a special request. For example; if you don't specify compression at all, no data will be compressed. Another example: when you want all data to be compressed in a partition, except for that of a particular asset entry, you should specify compression for all libs at partition level and use compress attribute with value "false" in the rule that targets that particular element. The next partitioning configuration file models this situation.
<?xml version="1.0" encoding="utf-8"?>
<shaper-configuration xmlns="http://tempuri.org/ConfigSchema.xsd">
    <partitions directory="C:/temp">
        <partition name="BitmapsAndAnimations" master="true">
            <compression>
              <lib type="Bitmap"/>
              <lib type="ShaderProgram"/>
              <lib type="VertexBuffer"/>
              <lib type="RawResource"/>
              <lib type="Font"/>
            </compression>
            <rule type="Bitmap" item="TheBitmapX" compress="false">
        </partition>
    </partitions>
</shaper-configuration>
Each entry that can be compressed defines in its data section regions, compression being applied to each such region individually. Each region has a so called Reserved field. This contains the value 0, if no compression was applied to the region, or the uncompressed region size, if the region is currently compressed. Please note that entries without data regions cannot be compressed. Only Bitmap, ShaderProgram, VertexBuffer, RawResource and Font entries can be compressed.
To partition an asset with compression, you will use this command:
AssetTool -shape -p configurationFilePath assetFilePath
Language Import
Assets can contain internationalized text resources in a dedicated area. The text resources are storead as language asset entries in form of proprietary compiled language packs. Multi-language aware applications can use the asset to retrieve text items from a specific langauge via a Candera API.
You can import into an asset compiled language packs. Please note that a compiled language pack contains the text translations for one language only. You will specify the name of the language to which the compiled file belongs.
You can add any number of language packs to the asset by using the following command:
AssetTool -shape -l assetFilePath [LanguageCode:CompiledLanguagePackSourceFilePath]+
Language asset entries are considered common asset entries, so anything that you can do with other asset entries, you can do with language asset entries as well. For instance, you can partition an asset so that one language goes in a partition, while all the others are stored in a different partition.
Asset Profiling
Asset profiling is used for reviewing asset content.
To profile an asset, you need:
- the asset to be reviewed
- the block size (data granularity) for profiling output representation
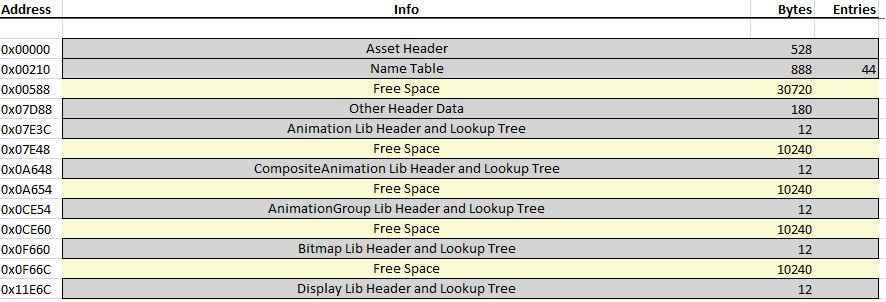
The output is an image, textual (txt file) or graphical (excel file), showing the components of the provided asset including the reserved space represented with the requested granularity.
As mentioned, there are two types profiling:
- Textual: Text file is created showing the content of each data block identified by its address, one data block per line. This type of presentation eases asset content comparison in the updated/new/removed elements identification process.
AssetTool -shape -st blockSizeInBytes assetFilePath destinationFilePath
- Graphical: Excel file is created showing with colors, data entities, multiple data blocks per row, highlighting the free spaces (where new data can be added in case of asset update). Each data entity and free space is shown with size in bytes and, if applicable, number of entries (for name table and lib headers).
AssetTool -shape -sx blockSizeInBytes assetFilePath destinationFilePath
Asset Partition Updating
Software updates are very frequent in production, so that it is critical to reduce the time required to deploy these updates. Flashing might take a large amount of time if for a software update the entire CGI Studio asset or asset partitions are considered. In order to reduce the flashing time and also the amount of data to be written on software update, Assetlib Shaper provides the asset partition updating functionality.
Updating process requires:
- current (original) asset partitions location;
- modified asset;
- partitioning configuration file used in obtaining the current partitions.
The following command is used for asset partitions update:
AssetTool -shape -u currentAssetPartitionsDirPath newAssetFilePath configurationFilePath
It is important to note that for the updating process to work, it is mandatory for each partition of the current asset to have at its location its associated .xml file, with the same name as the partition file, the asset report file. This .xml file was produced during the partitioning of the current asset or during a previous asset update operation.
The updating process is described in more details. There are three basic operations during an asset update:
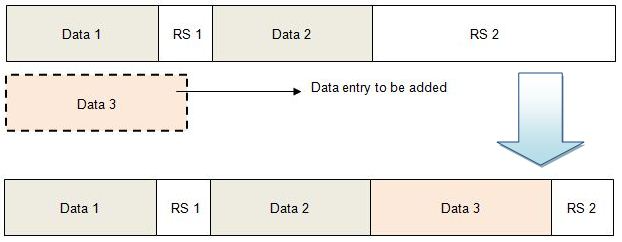
- Adding an Item: If a new data entry is to be added, this new entry will be located into the reserved space (RS) that fits it best or at the end of the asset if no reserved space fits it (in this last case, increasing the size of the asset).
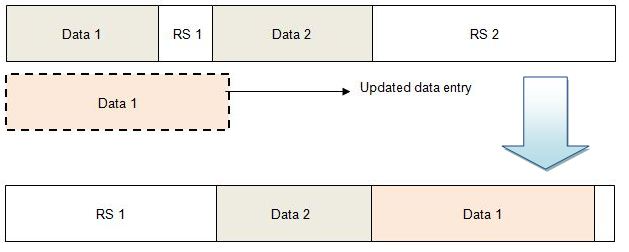
- Updating an Item: If an existing data entry is to be updated, the updated data entry tries to fit the old data entry space including the adjacent reserved space (if there is one). If it doesn't fit this space, the updated data entry is entirely moved to the reserved space that fits it best or to the end of the asset if no reserved space fits it (in this last case, increasing the size of the asset).
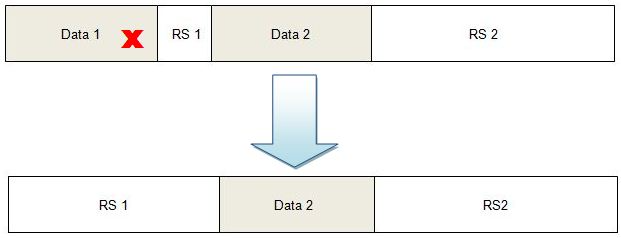
- Deleting an Item: When removing an existing data entry, the space occupied by it is left blank, becoming a reserved space that can be used during the next asset updating operations.
The updating process creates several directories at the location of the modified asset involved, so that full permissions are required for that location (read, write, execute). The output directory that contains the updated asset partitions is named "Result - Updated Partitions" and it is located in the parent directory of the modified asset involved in the process. The other created directories are automatically removed after obtaining the results. Please note that the target directory provided in the partitioning configuration has no effect in the updating process, the output directory being always created at the location of the modified asset involved in the process.
The incremental asset updating is possible. For this, you will use the output of an update operation as input for a new asset update.
Asset Update How To
If an evolution of the original asset content is expected, in order for the asset update process to work, there are some early decisions that you might want to consider:
- Make sure that at the partitioning of the original asset the asset report file exists for the original asset (the asset report file of the original asset was generated by SceneComposer).
- Use a partitioning configuration that reserves space to: name table (mandatory), render-shader zone (recommended), asset library list of items (also knows as look-up trees) where new elements are expected (mandatory); you can optionally reserve space to the end of asset library entries, library data and asset. An example of such a configuration is presented below, also with the structure of the original asset (A) and that of the partitioned asset (B), where RS stands for reserved space:
<?xml version="1.0" encoding="utf-8"?>
<shaper-configuration xmlns="http://tempuri.org/ConfigSchema.xsd">
    <partitions directory="C:/temp" reserve-space-names="2KB" reserve-space-render-shader="40%" reserve-space-tree="1KB">
        <partition name="All" master="true">
             <rule type="Animation"></rule>
             <rule type="Bitmap" reserve-space-entry="30%"></rule>
        </partition>
    </partitions>
</shaper-configuration>
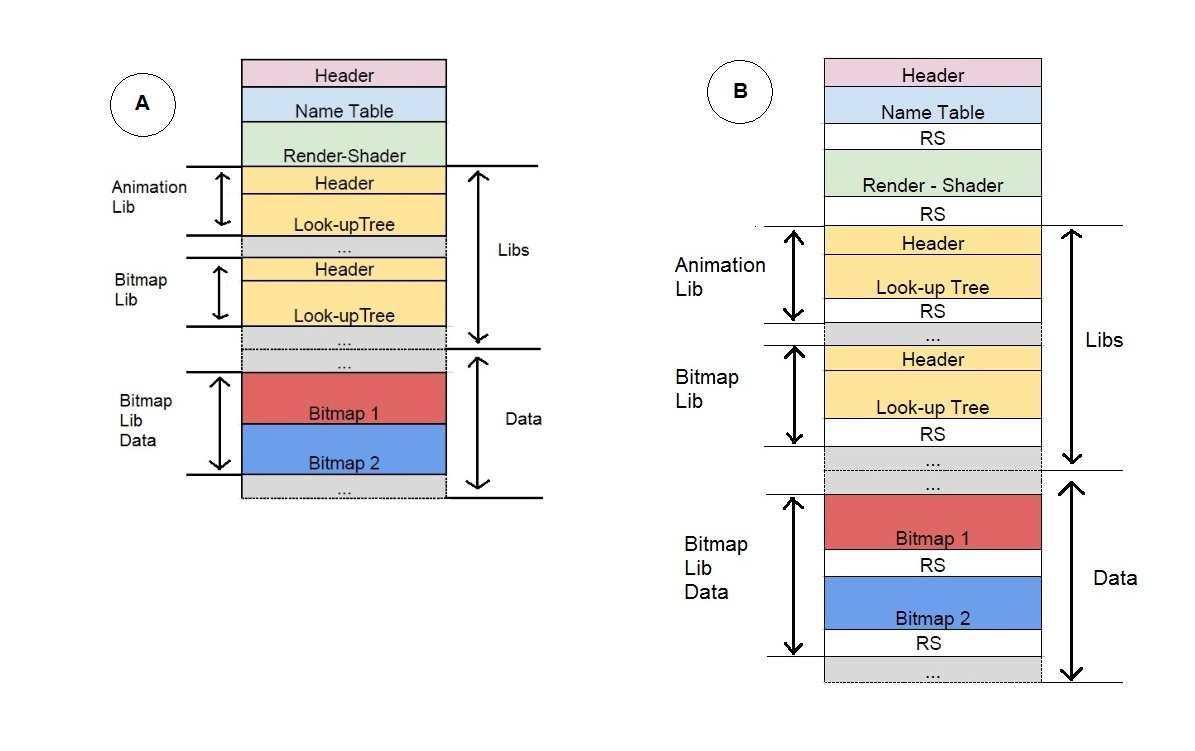
Using the above partitioning configuration implies that the name table of the asset is not expected to extend with more than 2KB, the render-shader zone will not grow in size with more than 40% and the look-up trees (or list of items) of each library are not expected to extend with more than 1KB.
The amount of space to be reserved depends on the asset content evolution expectations. Please note that if the name table, render-shader zone or asset library look-up trees extend beyond the reserved space during the update process, the process fails, so that it is better to reserve more than too little space.
Starting the update process, you'll need:
- Set of partitions to be updated with asset reports for each partition (generated during partitioning or during a previous update process).
- Original partitioning configuration file.
- Modified asset with its asset report (generated by SceneComposer).
Supported Library Types
Supported Asset Library Types
List of supported asset library types:
- Animation
- AnimationGroup
- Bitmap
- CameraGroup
- ClearMode
- Display
- Font
- RawResource
- ReferencedTemplate
- RenderTarget
- Scene2D
- Scene
- ShaderProgram
- Composite2D
- Composite
- TextStyle
- Theme
- Transition
- VertexBuffer
- AppearanceCollection
- Appearance
- Material
- RenderMode
- UniformSetter
- Texture
- Language