
Create and Manage Cultures and Translatable Texts
This page describes the UI of each menu and feature for multi-languages settings. Please refer to the explanation on here for details on how to configure multi-languages settings using this feature.
The translator plugin is fully integrated into SceneComposer. The SceneComposer toolbar provides an icon for opening the [Culture Solution Options] dialog as well as a drop-down menu for selecting an already created culture.

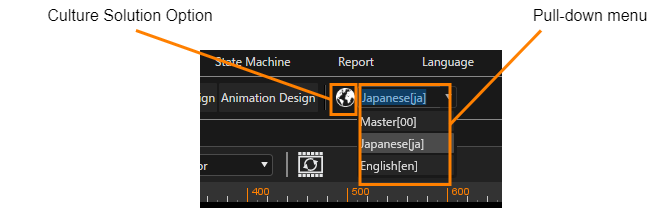
In addition, the [ Language ] menu on the menu bar contains the following five menus.

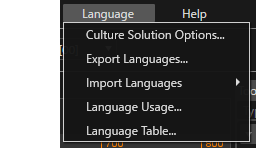
- Culture Solution Option
Open the Culture Solution Option Dialog, where the user can add, edit or remove Culture as the multiple languages setting. By selecting a Culture in SceneComposer, you can switch between the displayed language of the solution. The translated texts displayed when selecting a Culture are configured in the Language Table. - Export Languages
Opens the Select Cultures dialog where you can select the languages you want to export and - after browsing to an export file path - you can export your selected languages in the format you prefer to the location you selected by pressing Export. - Import Languages
Opens the Import Languages Dialog where Languages can be imported into a solution either as Language Pack Source or as Excel file, by going to Language > Import Languages and selecting the desired flavor. - Language Usage
Opens the Language Usage Dialog, where all Text Properties of the solution are listed. For those Text Properties that have a translatable text assigned, the Text Id and the Text value for the current culture are displayed. It is also possible to assign or unassign a translatable text for a Text Property. - Language Table
Opens the Language Table Dialog, where the user can add, edit or remove translatable texts. The Id of each translatable text is unique. The Text value for a certain culture can be accessed by selecting the respective culture in the Current Culture drop-down.
Culture Solution Option
To create text in different languages, a culture must be created. This is done by clicking on the Culture Solution Options button on the toolbar.

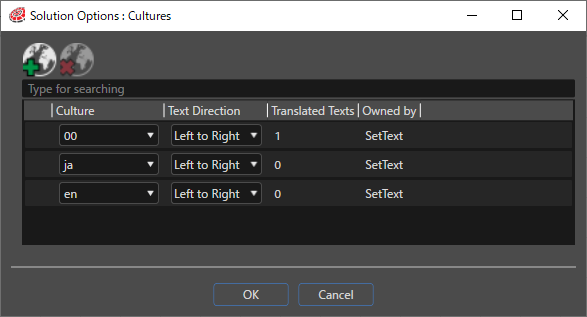
See Solution Options > Culture for a detailed description of each item in the dialog that appears.
Language Table
Through the Language Table, you can configure the text that will be displayed when you select a language configured in Culture. Here, you can add, edit, or delete translated texts for each Culture. The translated text is the text that will be displayed according to the selected Culture in Scene Composer.
The settings can be accessed from the [ Languages > Language Table... ] menu bar. The settings are made in the Language Tables dialog, which can be opened from the menu bar [ Languages>Language Tables... ].

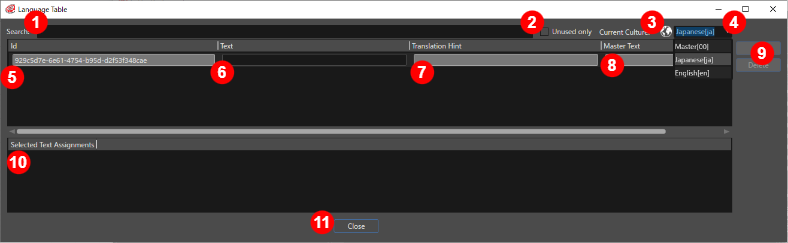
| (1) | Search field |
You can search for a specific text entry by entering any string into the search field. |
| (2) | Unused only check box |
When this check box is enabled, only text that is not assigned to a text object in the solution will be displayed. |
| (3) |
Culture Solution Option button |
Click this icon to display the Cultures dialog box. |
| (4) |
Select Cultures |
Select a configured culture from the pull-down menu. |
| (5) | ID |
A unique identifier assigned to each translation text. It is automatically assigned when you add a translation text line by pressing the Add button. |
| (6) | Text |
Sets the text to be displayed when using the culture currently selected in the Culture Selection pull-down menu. |
| (7) | Translation Hint | Allows you to enter a description for the translated text line. |
| (8) | Master Text |
Displays the text of the master culture. This item is not displayed when a master culture is selected in the culture selection pull-down menu. |
| (9) | Add/Delete button |
This button allows you to add/delete language table setting rows. These buttons are only enabled when the master culture is selected in the [ Current Culture ] field. |
| (10) | Selected Text Assignments | Displays the node to which the translated text line has been set. |
| (11) | Close button | Closes the Localization Table dialog box. |
Language Usage
For editing the texts' properties, Scene Composer provides the Text Properties Dialog, which can be opened via the menu Language > Language Usage....
This dialog lists all Text Properties of the solution. For those Text Properties that have a translatable text assigned, the Text Id and the Text value for the current culture are displayed. The current culture can be changed in the drop-down menu on the right. If necessary, the Solution Options: Cultures dialog can be opened with the globe icon on the left of the drop-down menu.
When pressing Save, the changes made to the Text Properties will be applied to the solution.

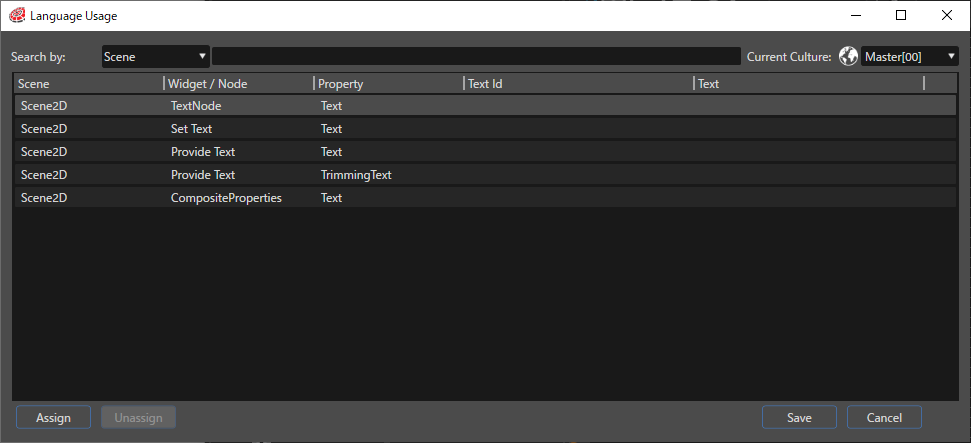
- When pressing the Assign button on the bottom of the dialog, the Language Table Selection dialog is opened where a text can be chosen from the list.
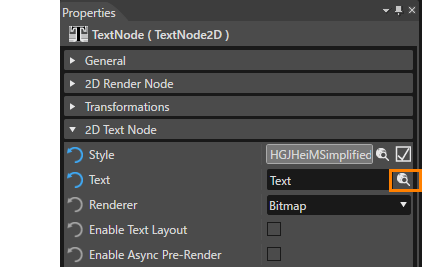
- Assigning texts to Text Properties can either be done in the Language Usage Dialog or in the Text Properties Panel.
The Language Table Selection dialog can also be opened when editing a Text property by clicking on the icon Select template for item.

Switching Cultures
If cultures and texts have been created and the texts are assigned to Text properties, the culture can be switched using the drop-down in the toolbar. As soon as another culture is chosen, the solution will be displayed in the other language.
-
If there is no text configured for a certain language, the Text Id will be displayed instead. Using this id, the missing text can easily be identified and found in the Language Table using the search function.


Import
and Export
The culture and language table settings used in the solution can be imported and exported as follows The file format is Excel or Language Pack Resource (*.lps).
Export


Import
Select [ Languages > Import Languages ] from the menu bar.

Select either Language Pack Resources (*.lps) or Excel format as the file format.
When the [Import Languages] dialog box appears, select the file to be imported.