Figma
Smart Importer can import Figma data. This page explains how to to import Figma data with Smart Importer and how to work with the results.
Please note that you cannot import Figma data for which you do not have editing privileges.
Preparations for Importing Figma Data
Software Environment
The following software is needed in order to perform Figma data imports with Smart Importer:
Node.js (Supported versions: Only 18.x.x and 19.x.x)
Preparing the URL/Access Token
In order to perform Figma data imports with Smart Importer, a URL and Access Token that corresponds with the Figma Data needs to be acquired in advance.
The URL and Access Token can be acquired using the Figma desktop application as below.
Please ensure you have access to the Figma REST API (https://api.figma.com). In case of connectivity issue, please contact your IT as it might be blocked by a firewall.
Acquiring the URL
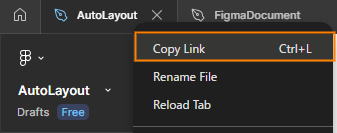
At the topmost bar in the Figma desktop application, right-click the relevant project tab and from the context menu select [Copy Link].
Acquiring the Access Token
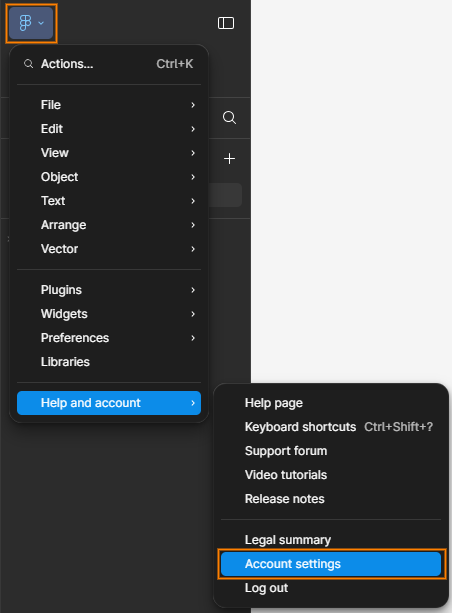
- In the Figma desktop app, select [ Figma Icon > Help and Account > Account Settings ] to open the dialog.
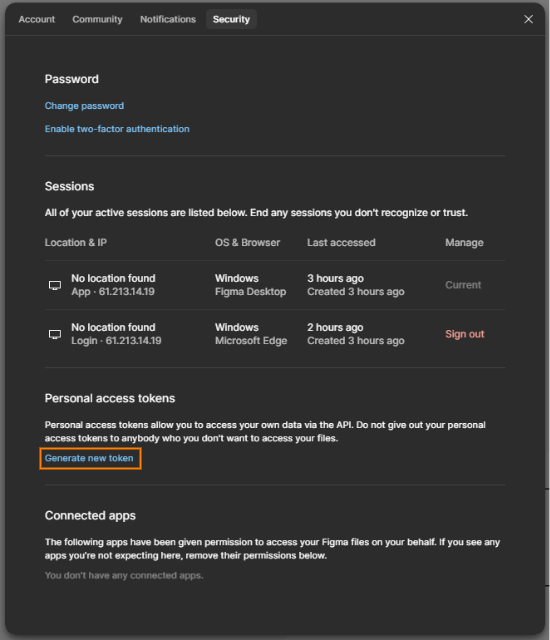
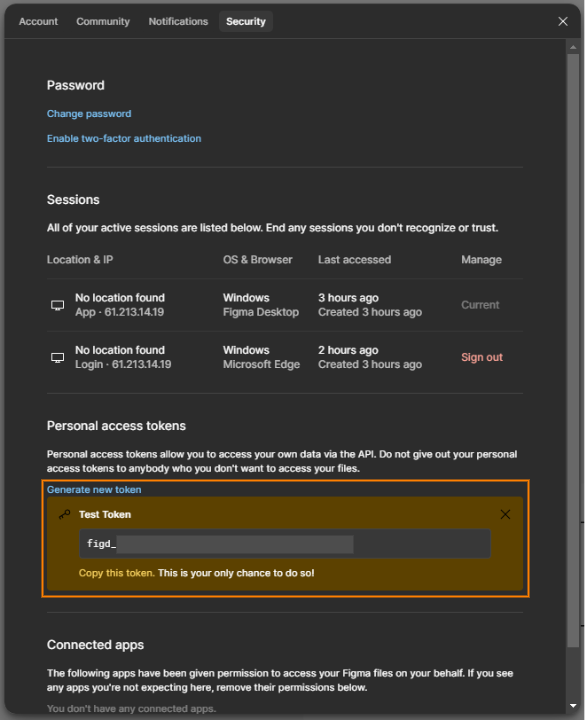
- In the Security tab of the dialog, click [ Generate new token ] under Personal access tokens.
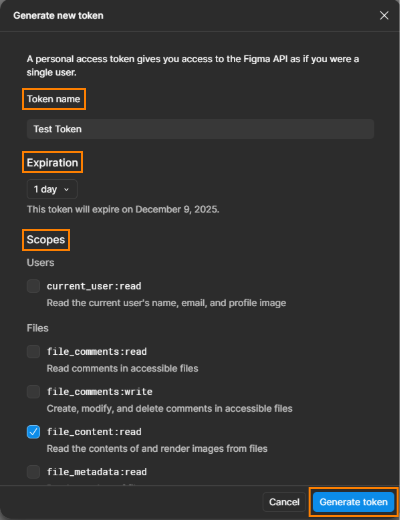
- In the "Generate new token" dialog, set the Token name, Expiration, and Scopes, and then click [Generate token].
- The created access token will be displayed under Personal access tokens on the Security tab of the dialog.
The instructions on how to obtain the URL and access token are for Figma Desktop App version 125.10.8.
How to Import Figma Data
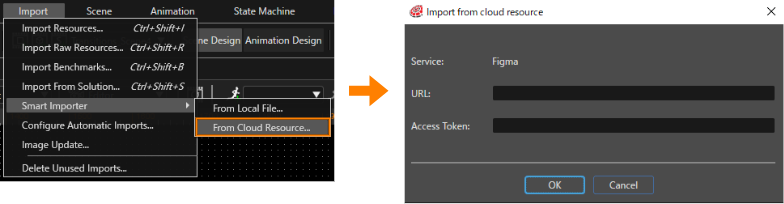
1. From the Scene Composer toolbar select [Import] > [Smart Importer] > [From Cloud Resource...], and a new dialog panel titled [Import from cloud resource] will be displayed.
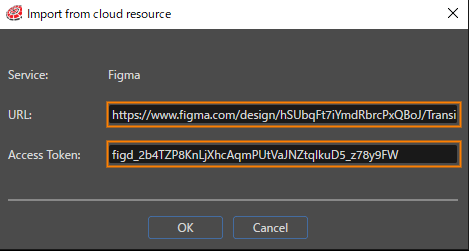
2. Enter the URL and Access Token in the respective fields and click [OK]. Please refer to「Preparing the URL/Access Token」 for acquiring the URL and Access Token.
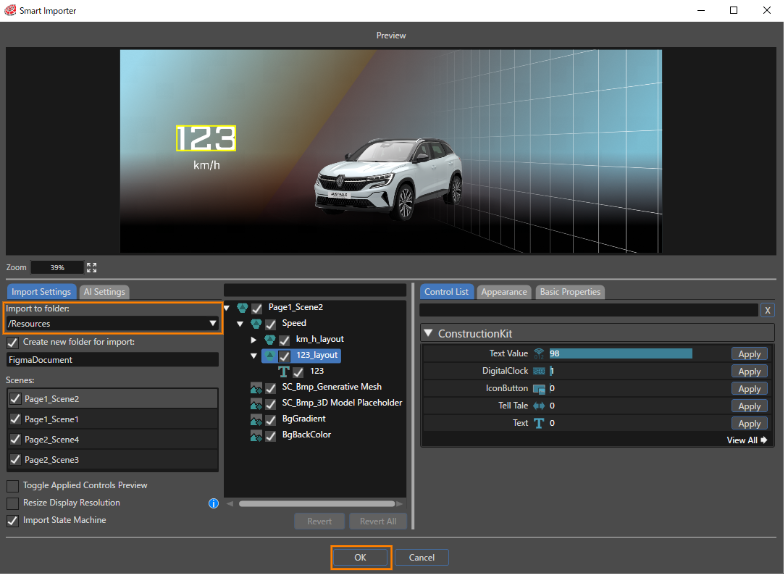
3. The Smart Importer dialog panel will open. Operating Smart Importer here is no different to when importing other filetypes. For details, please see 「3. Scene Composer > Import of Resources > Smart Importer > How to Use the Smart Importer」. After making the necessary setting adjustments and clicking [OK], the data will be imported into the folder designated in [Import to folder: ].
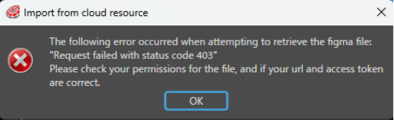
If the URL or the Access Token entered into the "Import from Cloud Resource" dialog is incorrect, the following error dialog will appear, and the import process will be interrupted.
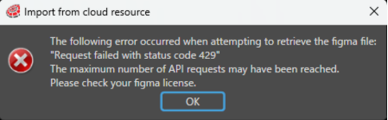
Please note that the Figma Starter plan is limited to five (5) API accesses per month. If you exceed this number of API accesses within the same month, the following error dialog will also appear, and the import process will be interrupted.
Importing Figma Data - Advanced
Importing as a scene
The topmost item of each page included in the Figma data will be imported into Smart Importer as a scene. For this, use the following naming convention: <Page name>_<Parent item name>
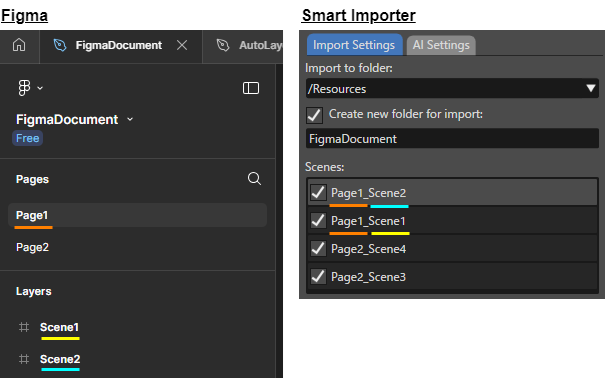
Relationship between Figma items and Scene Composer Nodes
When importing Figma items with Smart Importer, each item will be imported as a specific type of node, as seen in the table below.
| Scene Composer node type |
||||
| Group | Bitmap | Text | ||
| Figma item type |
Component | ✓ | ||
| ComponentSet | ✓ | |||
| Ellipse | ✓ | |||
| Frame | ✓ | |||
| Group | ✓ | |||
| Instance | ✓ | |||
| Line | ✓ | |||
| Polygon | ✓ | |||
| Rectangle | ✓ | |||
| Section | ✓ | |||
| Slice | ✓ | |||
| Star | ✓ | |||
| Text | ✓ | |||
| Vector | ✓ | |||
Bitmaps and texts can only be imported when their render data is made available. For example, should a Figma item be set to "hidden", it cannot be imported.
Importing as Controls or Bitmaps
It is possible with Smart Importer to import as a control or bitmap any Figma items that can hold the following child items:
- Component
- ComponentSet
- Frame
- Group
- Instance
- Section
Importing as a control
An item can be imported as a control when it is named [SC_<control name>]. Furthermore, property values can also be set when using the names of control properties for the names of child items.
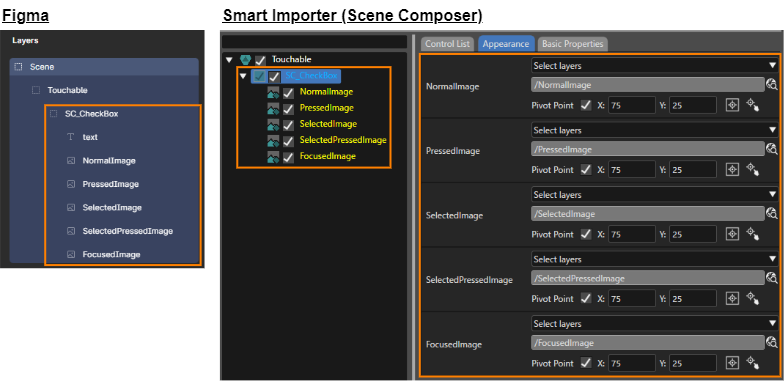
This functionality is only supported with Touchable and Common controls.
Importing as bitmaps
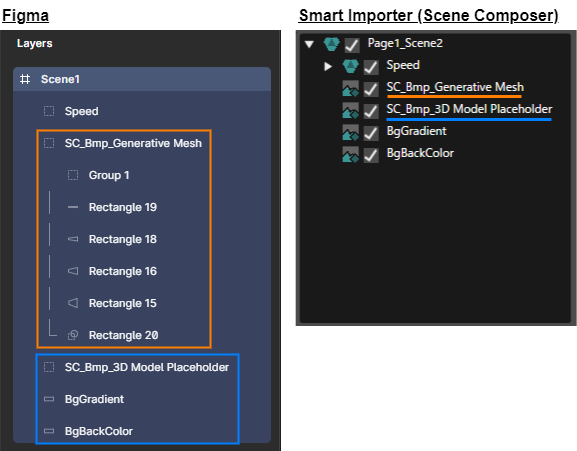
Smart Importer can import group items with child items as bitmaps when the the group item name is prefixed with [SC_Bmp].
Import as state machine
Flows (transitions) in Figma are imported as state machines.
- After import, the flow name will be prefixed with [StateMachine<flow name>].
- After import, names of states will be the same as the Figma items that were imported as scenes.
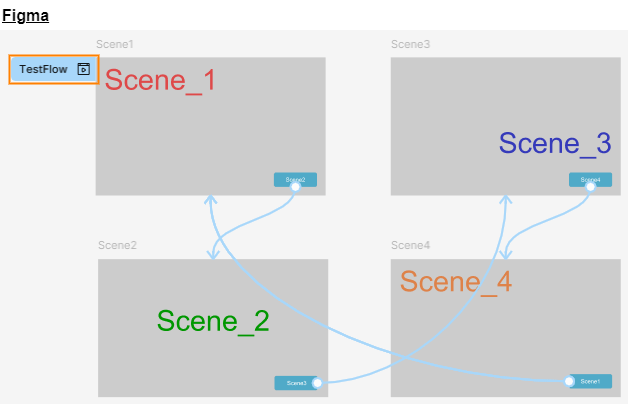
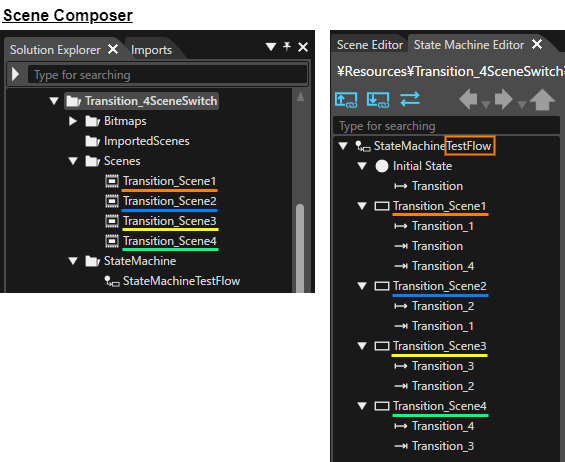
- Transitions will begin from the state that is set to be the Flow Starting Point.
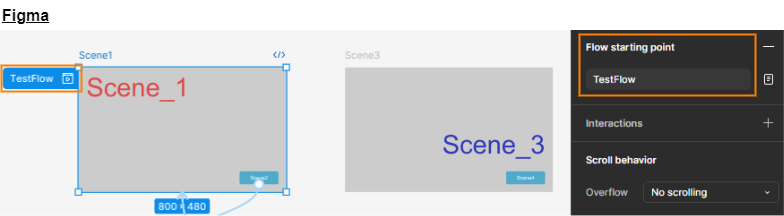
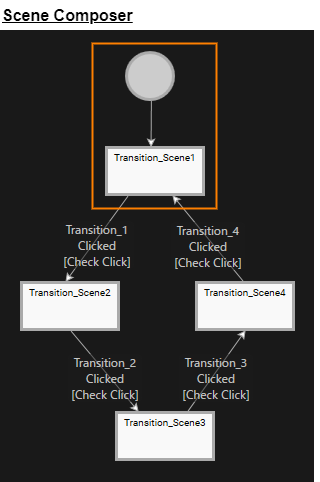
- Multiple Flows can be imported as multiple state machines.
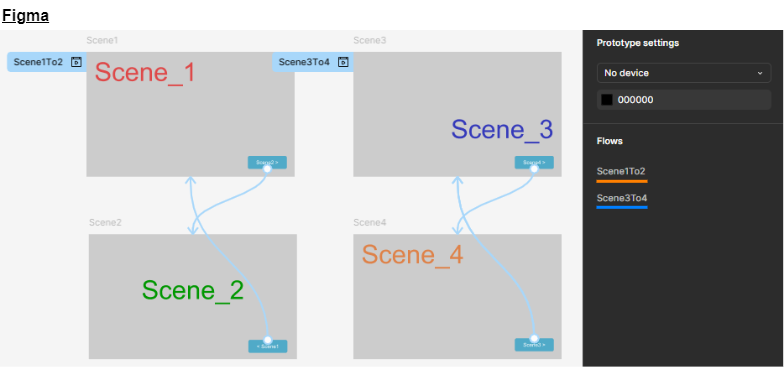
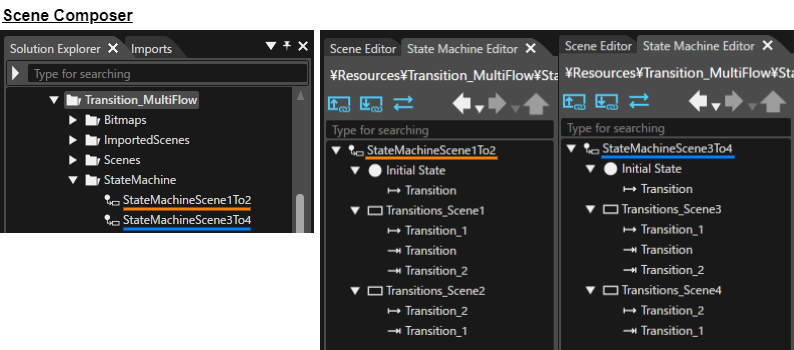
Should a transition in one Flow be included in a separate Flow (ie. when a transition is duplicated), the separate Flow will not be imported.
Although in Figma the type of interaction that triggers a transition can be selected (click, drag, mouse hover, etc.), Scene Composer will upon import set these transition triggers in the following way: Event = "Clicked", Condition = "Check Click".
Importing a Layout
Auto layout
If a Figma Frame has an "Auto layout" set, it will be imported as a "Stack Layout" in Scene Composer, and each setting value of the Auto layout will be inherited as a Stack Layout property.
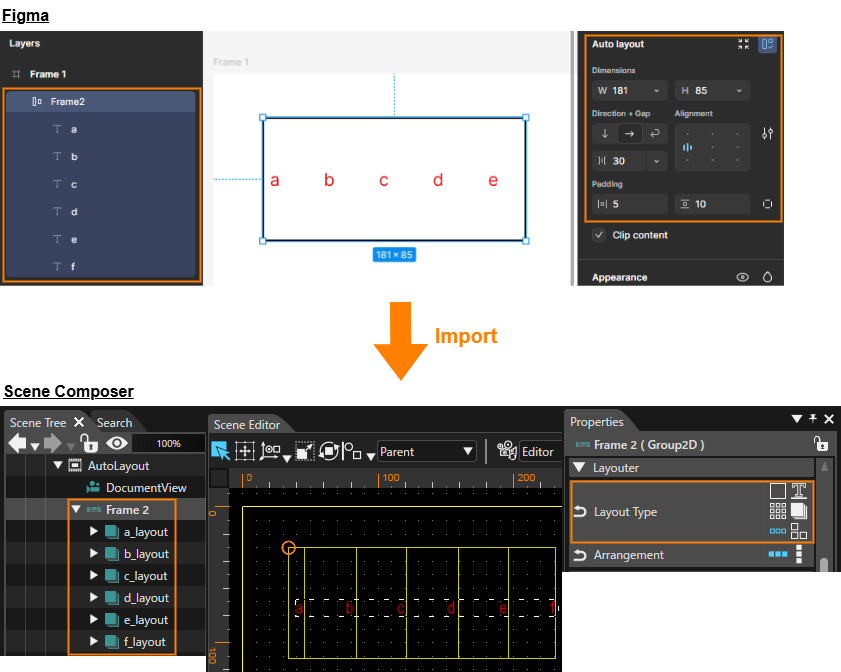
Figma Auto layout settings are inherited as properties of the Stack Layout of Scene Composer:
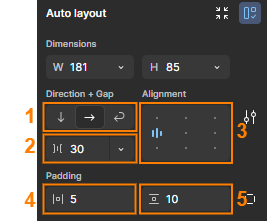
|
Auto layout (Figma) |
Stack Layout propertise (Scene Coposer) |
|||||||
| 1 |
Direction |
Stack Layout [ Layouter > Arrangement ] |
||||||
|
||||||||
| 2 |
Gap |
The node that is placed second or later in the Stack Layout |
||||||
|
||||||||
| 3 | Alignment |
Nodes included in a Stack Layout [ Layout > VerticalAlignment and HorizontalAlignment ] |
||||||
| 4 | Padding (Horizontal) |
The node to be placed at the leftmost position of the Stack Layout |
||||||
| 5 | Padding (Vertical) |
The node to be placed at the most top of the Stack Layout |
||||||
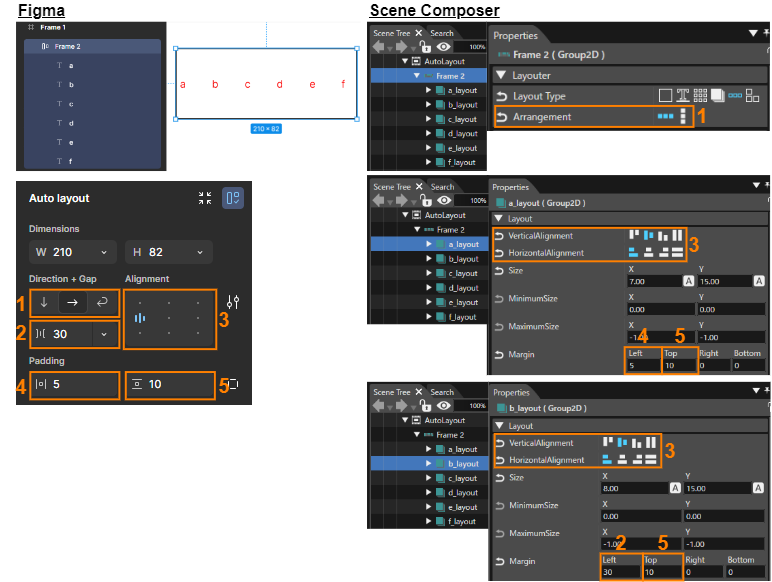
Below is an example of Auto layout (horizontal) from Figma imported into Scene Composer.
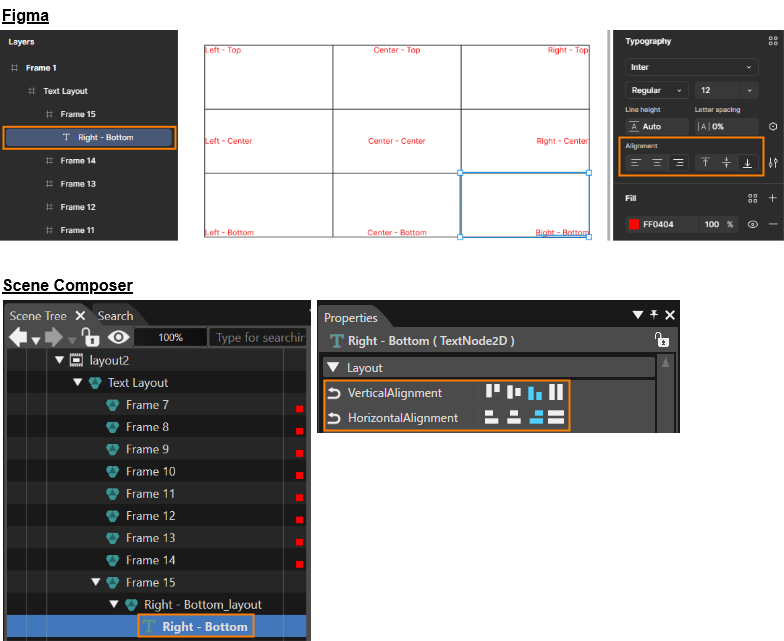
Text Layout
When Figma text layer is imported in Scene Composer, a Group node with LayoutType "Overlay" is created, and a text node is created under it.
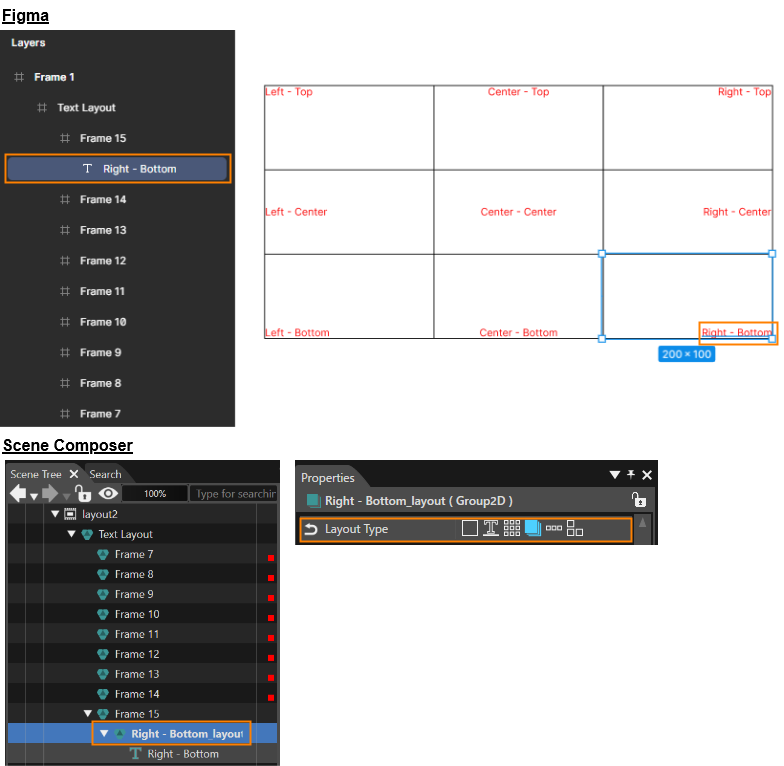
Also, the Typography Alignment of the text layer from Figma is inherited as a layout property of the text node in Scene Composer.