
Multi-languages Settings
CGI Studio's multi-language support feature allows you to easily switch between languages. This section describes thehow operationto ofuse applying the multi-language supportthis feature forto the purpose of switchingswitch between English and Japanese units of measure (miles,such kilometers).as miles and kilometers.
For more information onabout SceneComposer's Multi Language Support and the Culture feature, clickrefer to the documentation for the here.Translator Plugin.
Culture settingsSolution Options
To display text in multiple languages, a cultureyou must first becreate created.a culture.
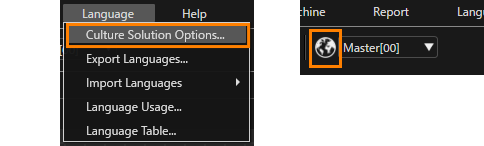
ClickIn the menu bar click [Language] then select [Culture Solution Options...].]Alternativelyonclick themenu[CulturebarSolutionfromOptions][buttonLanguagein].the toolbar.- The [
Cultures ]Cultures] dialog will appear. - The dialog's list of cultures contains one entry: Master [00]
is already set in the dialog.
- The [
You can also display the dialog by clicking on the [ Culture Solution Options ] icon on the toolbar..

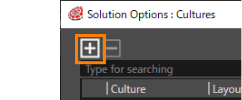
ClickIn the [Solution Options: Cultures] dialog click on the [Culture ]Culture] icon located in theupperupper-left corner of the dialog.- A new culture
setting linewill be added to thedialog.list of cultures.

- A new culture
SelectFor the newly created culture select "English[en]" from the pull-down menu.
- The culture of this list entry is set to English.
You can narrow down the list by typing "English" at the top of the pull-down
menu.
menu, then select your favored list entry with a mouse click.
- The culture of this list entry is set to English.
PerformConfigure thestepEnglish3culture'sthroughLayoutstepDirection to "Left to Right" using the pull-down menu.- The English culture has been configured successfully.
A culture's Layout Direction is usually similar to a language's reading direction.
Press the [

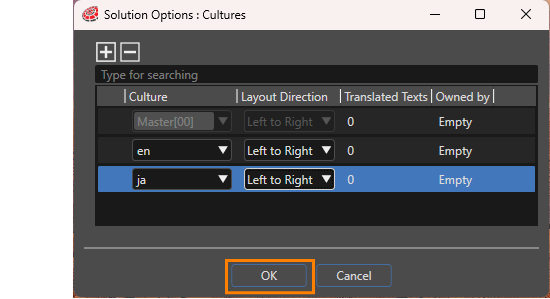
You can setconfigure upmultiple multi-languages as requiredneeded by following the steps above steps..
Language Table settingsConfiguration
After Cultureconfiguring settingsthe areculture completed,settings, you need to set up a Language Table mustthat beincludes setthe uplanguage-specific tovariations of each text. In the steps below we will configure textEnglish switchingand according to eachJapanese language selection.variations for a text of a TextNode2D.
- In the Solution Explorer,
clicknavigate to []scene with a double-click.
- In the Scene Editor you can see that Scene "Car_Cluster"
appearsisinopened.
- In the Scene Editor you can see that Scene "Car_Cluster"
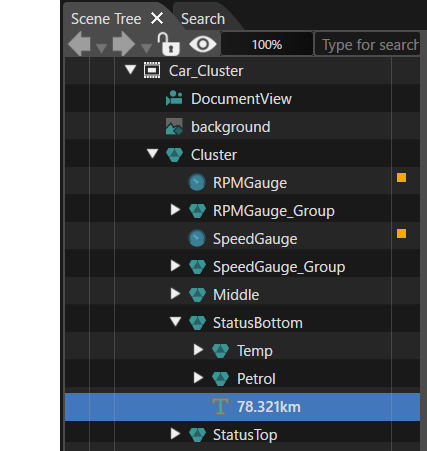
- In the Scene Tree panel you can see the scene
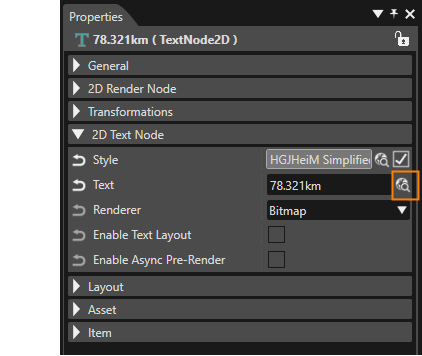
tree.tree of "Car_Cluster" scene. ExpandIn the Scene Tree panel, expand "StatusBottom"in the scene treeand click on "78.321 km" displayed.- In the Properties panel, "78.321km (TextNode2D)" will
appear.be displayed.

- In the Properties panel, "78.321km (TextNode2D)" will
- In the Properties
panel,panel's [2D Text Node] section, click the select item icontoon the right side of the Textsection in the "2D Text Node" category.property.- The [
Selection ]Selection] dialogboxwillappear.
- The [
The[opened
The [Language Table ]Table] dialog box can also be opened by selecting [ Language Tables... ] onvia the menu bar from[Languages] - [Language Languages Tables...].

- A new
settingentrylinewill be added to thedialog.Language Table.

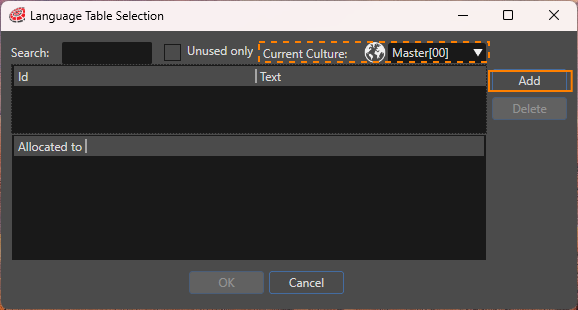
TheThis text input value will be displayed if "Master" is selected as the actively displayed language.If
thisno text for the Master language isnotdefined,entered,the text ID will be displayed.
Similarly, switch [
Press the [
This completes the configuration of text to be displayed in response to language switching.
Operation confirmationConfirmation
Verify that the settings upconfigured toin the aboveprevious section are working properlycorrectly onin Scene Composer.SceneComposer.
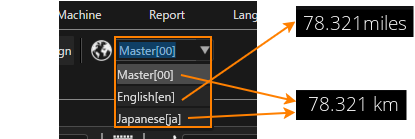
UseIn the SceneComposer's toolbar use the pull-down menu to the right of the [Options ] icon on the toolbarOptions] to switch languages.
- In Scene Editor you can observe the changes in the StatusBottom's range display.
- When English is selected, the unit
of driving distance in the scene editorwill beswitcheddisplayedtoas "miles". - When Japanese or Master is selected, the unit
of driving distancewill be displayed as "km".

For further information and an advanced configuration example, please refer to our Tutorial for Globalization Support.