
Importing resources (Smart Importer)
Import contents into each scene in the solution using the Smart Importer, which uses AI to analyze Photoshop files to detect, suggest, and create controls for the Scene Composer solution. This step describes the operation of assigning appropriate controls to images on a resource using the Smart Importer.
Gauge Control
- From the menu bar, select "Import" and then "Smart Importer > From Local File..."
and, select the resource to beimported.
imported- A file selection dialog will
appear.be
- A file selection dialog will
If your solution contains unsaved changes you
have not saved the solution yet, a dialogwillappearbeprompting youprompted to savetheyourfilesolutionfirst.

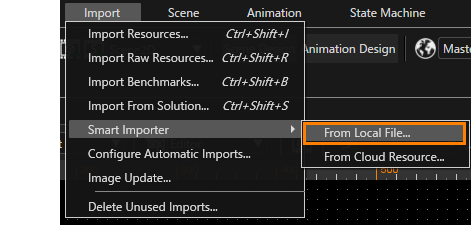
In the Smart Importer file selection dialog choose the resource to be imported as specified in the table below, then click [Open].
- The Smart Importer dialog box
appears.
will - opened.
For more information on the Smart Importer dialog box,
clickclick here.
- A control list appears on the right side of the dialog, listing the available controls.
- The number displayed to the right of each control indicates the AI's detection
rateconfidencebyforthethatAI.specific item.

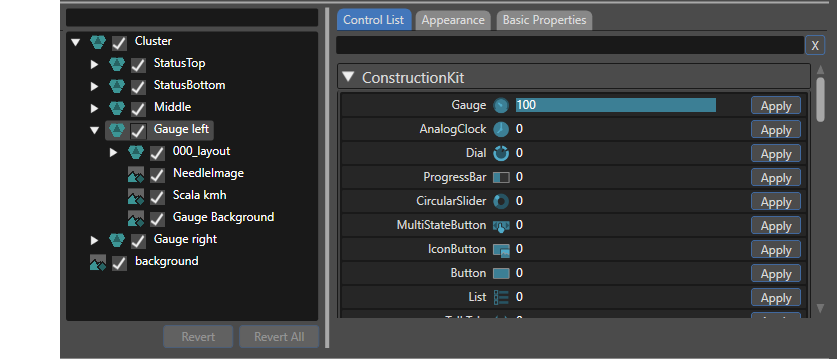
The Gauge control is assigned to"GaugeLeft"left"onwillthebelayerdisplayedtreein("GaugeaLeft"different text colorchangeswithtoablue).different icon. This indicates a successful assignment of a Scene Composer control.- The Appearance tab will be automatically
selectselected on the right side of the dialog.
- For the specifications and specific operation for [
Appearance ]Appearance] and [Properties ]Properties], please refer to here. NoteIf
that ifno "BackgroundImage" isnotset for layer mapping, thestandarddefault background of the Gauge controliswill be used instead of the imageonfrom the Photoshop file.Gauge left Target Tab Target Item Setting Value Appearance SelectTo configure the image properties, select [Select layers] from thepull-drop-downmenumenu.andThissetwillasopenfollows.a dialog where the appropriate ImageLayers can be selected.
After selecting the image, check [Pivot Point].BackgroundImage
Scala kmh
Gauge Background
NeedleImage
NeedleImage
Basic Properties Name
InputMax
RotationMaxSpeedGauge
240
225
below.
| Gauge left | ||
| Target Tab | Target Item | Setting Value |
| Basic properties | ||
|
Name |
SpeedValue |
|
- The
settingsconfigurationforof the Gaugeand Text Valuecontrolsareisshownnowin the table below.
complete.Gauge Control Target Tab Target Item Setting Value Appearance SelectTo configure the image properties, select [Select layers] from thepull-drop-downmenumenu.andThissetwillasopenfollows.a dialog where the appropriate ImageLayers can be selected.
After selecting the image, check [Pivot Point].BackgroundImage
Scala rpm
Gauge Background
NeedleImage
NeedleImage
Basic Properties Name
InputMax
RPMGauge
8000Text Value control Basic Properties Name
RPMValue
Duplicate and setConfigure up scenesScenes
Transitions between scenes are made using State Machine Editor function described below. In this section, duplicate the "Car_Cluster"Smart Importer's Layer Tree expand the Cluster > Middle group. There you can see that the photoshop file to whichbe imported provides 3 scenarios for the controlsmiddle havepart: been
The following operations are performed on the right sidegoal of the Smartfollowing Importersteps dialogis box,to [create Importseparate Settingsscenes ]for tab.each of the 3 scenarios.
SelectIn the Smart Importer's "Import Settings" section under "Scenes" right-click on the Car_Clusterinscene[ Scene Name ]and choose [- The [
appears.will be opened.

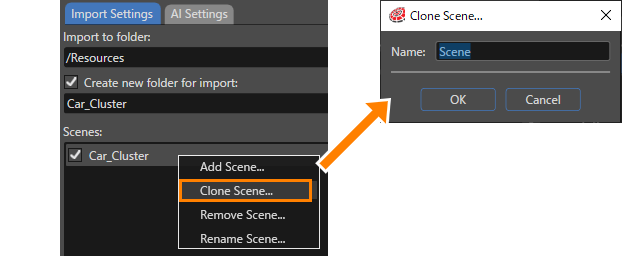
- The [
Enter"Car_Status"asIn thename"CloneofScene..." dialog enter the scenetonamebeasduplicatedandspecifiedpressin the table below, then click [OK ] button.OK].- A new scene
namedconfiguration has been created.
- A new scene
- In the "Import Settings" tab the new "Car_Status"
isscenecreatedwill be displayed anddisplayedactivelyinselected.
the Car_Status scene's layers.
With the "Car_Status" scene
The checkThere is a checked checkbox inplacefronton theof "Car". The checkboxes of "Car Status" and "Incoming Call" are unchecked.
checkboxes as specified in the image and table below.
- The
centerSmartofImporter's Preview window will be updated accordingly, displaying theimagecheckeddisplayedandinhiding thePreviewuncheckedsection changes.
layers.
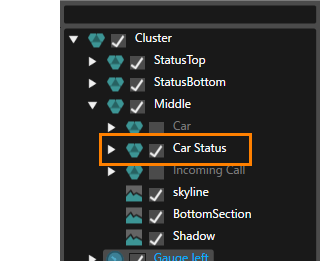
Scene "Car_Status": Cluster > Middle Layer Checkbox Car unchecked Car Status checked Incoming Call unchecked
InTherestepare4,3checkscenes in the "Import Settings" tab's Scenes section: Car_Cluster, Car_Status and Incoming_Call.
Thethe resourceScene's preparationsection workof isthe completed.Import ClickSettings tab select each scene and verify its content in the Preview. Once all of the scenes have been reviewed, click the [ OK ]OK] button in the Smart Importer dialog box to performinitiate the import.