
HMI Logic Configuration
This section describes how to configure the Gauge control to forward its value to the TextValue control using Fusion.
CGI Studio provides a feature called Behaviors to apply logic to nodes without programming. The built-in behaviors provided in SceneComposer offer great versatility, thanks to their extensive configuration possibilities. One common use of behaviors is event-based linking, which allows data to be easily transferred between two behaviors.
Fusion combines a behavior tree view that appears to the right of a selected node in the scene tree (extra scene tree) and a properties panel for the selected node. This provides an alternative way to manage behaviors. As a result, Fusion allows you to structure your scene interactions in a more graphical and intuitive way.
- In the Solution Explorer double-click [Scenes>Car_Cluster].
- "Car_Cluster" will appear in the scene tree.
- An extra scene tree will appear to the right of the scene tree.
- In the Scene Tree panel
selectselect the RPMGaugecontrol,control, then click [Fusion...] in the Extra Scene Tree.- Fusion panel will be opened, displaying the Fusion diagram for the RPMGauge control. The diagram only contains one Fusion Node: RPMGauge.
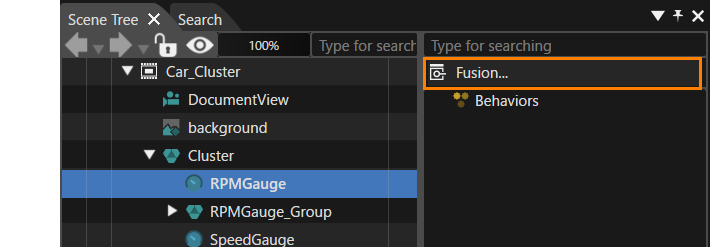
- Fusion panel will be opened, displaying the Fusion diagram for the RPMGauge control. The diagram only contains one Fusion Node: RPMGauge.
- The RPMGauge's Fusion Node offers a Behaviors connector in its top right corner (a white circle next to the label "Behaviors"). Drag this connector, then release it
againagain..- The [Select Behavior] dialog will be
displayeddisplayed..
- The [Select Behavior] dialog will be
- In the [Select Behavior] dialog
enterenter "Forward Value" into the search field at the top.- The list of behaviors in the dialog will be narrowed down to [Value Processing > Forward Value].
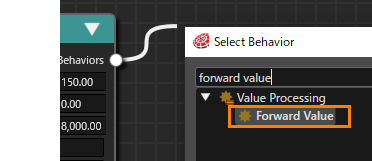
- The list of behaviors in the dialog will be narrowed down to [Value Processing > Forward Value].
- Double-click [Forward Value].
- A new Fusion Node "Forward Value" has been added to the diagram.
- The RPMGauge Fusion node and the Forward Value Fusion node are connected by a link.
- In the Forward Value Fusion node,
clickclick on the select item icon on the right side of the [TargetNode] section.- The [Choose Item] dialog will be
displayed.displayed.
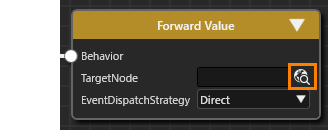
- The [Choose Item] dialog will be
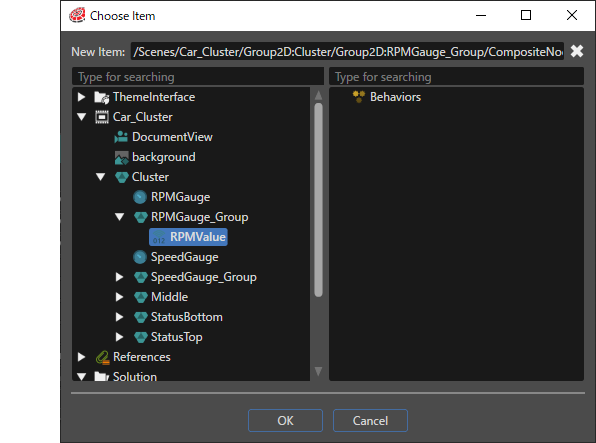
- In the [Choose Item] dialog navigate to the Target Node listed in the table
below,below, then click [OK].- [RPMValue] is configured to be the Target Node of the Forward Value behavior.
- The RPMGauge control is configured to forward its value to the TextValue control "RPMValue".
Fusion Node Target Node RPMGauge > Forward Value Scenes > Car_Cluster > RPMGauge_Group > RPMValue
- In the Scene Tree panel
selectselect the SpeedGaugecontrol,control, then click [Fusion...] in the Extra Scene Tree. Perform steps 2 through step 7 similarly for the "SpeedGauge" control. Configure Forward Value node's Target Node according to the table below.- The SpeedGauge control is configured to forward its value to the TextValue control "SpeedValue".
Fusion Node Target Node SpeedGauge > Forward Value Scenes > Car_Cluster > SpeedGauge_Group > SpeedValue
- The SpeedGauge control is configured to forward its value to the TextValue control "SpeedValue".
With the configuration described above, the values from the RPMGauge and SpeedGauge controls are automatically forwarded to the corresponding TextValue controls, RPMValue and SpeedValue.
To verify the functionality of this configuration switch to the Scene Editor panel. In the Scene Tree panel select one of the Gauge controls and modify its value property in the Properties panel. You should see the corresponding TextValue node update in the Scene Editor accordingly.
If the TextValue node does not update automatically, press the <F5> key on your keyboard to refresh the view.
Operation checks related to this setting can be performed here. During simulation, the value at the center of the gauge dynamically updates in sync with the movement of the gauge needle.