# Warping Library User Guide

This guide gives an overview on development and build folder as well as of the warping library's source code structure.  
The goal is to guide users from build environment preparation through generation of warping component sample applications to the execution of these applications.

# Overview

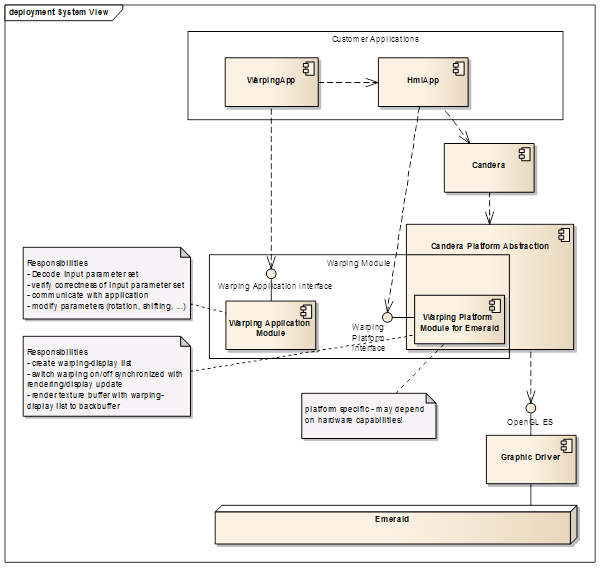
The system view shows the location of the warping library in the system as well as connections to other components.

<div class="contents" id="bkmrk-"><div class="contents"><div class="textblock"><div drawio-diagram="2116"><img src="https://doc316en.candera.eu/uploads/images/drawio/2023-02/drawing-7-1676963083.png" alt=""/></div>

</div></div></div>Globally, the warping library consists of two parts, the warping application module and a warping platform module. The platform module is platform dependent – a version for Windows host platform and a version for iMX6 target hardware are available. Responsibility of each part is described in the system view model.

#### Directory Overview

The directory structure of the delivery package consist of the code *code* and the document *doc* sub directory.   
The *code* directory structure in detail:

- *bin*: Output directory for the host and target "WarpingLibrary" library file (sub directory *WarpingLibrary*) and the executable file for the "WarpSample" application (sub directory *WarpSample*).
- *build*: This sub directory contains the build scripts for all supported host and target variants for "WarpingLibrary" (sub directory *WarpingLibrary*) and the "WarpSample" application (sub directory *WarpSample*).
- *sample*: Storage of the "WarpSample" application source code files.
- *src*: Contains matrix calculation source code needed for the warping library (sub directory \\3rdParty) and the source code for the warping library (sub directory *WarpingLibrary*).   
    The doc directory structure in detail:
- *UserDocumentation*: Location of this user’s guide.
- *ReferenceMaterial* (optional): This sub directory contains the product requirement document (versions) being the base for the software requirements.

<div class="contents" id="bkmrk--0"><div class="contents">  
</div></div>#### Integration Overview

Integration of the <span style="color: rgb(230, 126, 35);">[Candera](http://dev.doc.cgistudio.at/APILINK/namespace_candera.html "[DataBinding_RefTypeSample]")</span> Warping Library is performed in the following steps:

<div class="contents" id="bkmrk-apply-delivery%3A-copy"><div class="contents"><div class="textblock">1. **Apply Delivery:** Copy the delivery contents to the installation directory of the CGI Studio base release package on your hard disk (for further reference, we call the path to this directory ***warp\_base\_path***). The ***warp\_base\_path*** should reside on the same level as the folder ***cgi\_studio\_candera***, containing the <span style="color: rgb(230, 126, 35);">[Candera](http://dev.doc.cgistudio.at/APILINK/namespace_candera.html "[DataBinding_RefTypeSample]")</span> source code, to make CMake auto-detecting of related <span style="color: rgb(230, 126, 35);">[Candera](http://dev.doc.cgistudio.at/APILINK/namespace_candera.html "[DataBinding_RefTypeSample]")</span> source code work. Besides <span style="color: rgb(230, 126, 35);">[Candera](http://dev.doc.cgistudio.at/APILINK/namespace_candera.html "[DataBinding_RefTypeSample]")</span>, also *cgi\_studio\_3psw* and *featstd* folders are needed. The build scripts delivered expect the <span style="color: rgb(230, 126, 35);">[Candera](http://dev.doc.cgistudio.at/APILINK/namespace_candera.html "[DataBinding_RefTypeSample]")</span> sources in these directories – in case on your machine these locations are different, please adapt the paths in the build scripts accordingly.
2. **Create Warping Library:** Building the <span style="color: rgb(230, 126, 35);">[Candera](http://dev.doc.cgistudio.at/APILINK/namespace_candera.html "[DataBinding_RefTypeSample]")</span> independent Warping Library needs to be done in a first step as this is not integrated into the <span style="color: rgb(230, 126, 35);">[Candera](http://dev.doc.cgistudio.at/APILINK/namespace_candera.html "[DataBinding_RefTypeSample]")</span> build scripts. For detailed instruction about this step please refer to chapter 2. Note that in case of binary delivery of Warping Library, there are pre-built libraries provided for all supported host and target variants.
3. **Build and Run Sample:** To build the <span style="color: rgb(230, 126, 35);">[Candera](http://dev.doc.cgistudio.at/APILINK/namespace_candera.html "[DataBinding_RefTypeSample]")</span> Warping sample application, follow the instructions described in 3. For running the sample application in the host environment, please make sure that your machine satisfies Candera’s hardware and software requirements (especially concerning graphic hardware and graphic drivers).

---
</div></div></div>

# Creation

#### Library for Host Environment

The source code for building the Warping Application Module (aka Warping library) is located in the *src/WarpingLibrary* sub directory.

In a console window, run one of the batch files referring to Visual Studio (example: *run\_cmake\_VS2010\_build.bat*) to generate the Microsoft Visual Studio 2010 or 2013 solution and project files for starting the build environment. A successful CMake run will generate these files into directory *build/WarpingLibrary/&lt;device\_platform&gt;Win32*.

To build the warping library, open *WarpingLibrary.sln* with MSVS2010/MSVS2013 and build the library either in Debug or Release mode. After successful build the library file *WarpingLibrary.lib* will be stored in a sub directory of *bin/WarpingLibrary/&lt;device\_platform&gt;Win32*, depending on the build mode selected in MSVS.

#### Library for Integrity Target Environment

Open a MS Windows console window and run the batch file *run\_cmake\_&lt;device\_platform&gt;\_integrity\_build.bat* (located in directory *src/WarpingLibrary*) to generate the device-specific Integrity solution and project files for starting the build environment.   
A successful CMake run will generate these files into directory *build/WarpingLibrary/&lt;device\_platform&gt;Integrity*. The build process is started automatically. If necessary, the path to the MinGW compiler has to be adapted in the batch file.

After successful build the library file *libWarpingLibrary.a* will be stored in directory *bin/WarpingLibrary/&lt;device\_platform&gt;Integrity*.

#### Library for Linux Target Environment  


Use a native Linux based operating system (e.g. Ubuntu) or a version in a virtual environment (e.g. Oracle VirtualBox) to build the Warping Library for the device-specific Linux target environment.

In a Linux terminal, run the shell script “run\_cmake\_&lt;device\_platform\_linux\_build” (located in directory *src/WarpingLibrary*) to generate the project files for starting the build environment (these files will be generated by CMake into directory *build/WarpingLibrary/&lt;device\_platform&gt;Linux*).

After successful build the library file *libWarpingLibrary.a* will be stored in directory *bin/WarpingLibrary/&lt;device\_platform&gt;Linux*.

---

# Build and Run Sample Applications

This page gives an overview and explanations on how to build and execute sample applications for different host or target systems.

---

#### **Host Environment**

##### Build Application WarpingSample1 for Windows Host

The source code of the warping sample application *WarpSample1* is stored in directory apps/WarpSample.

Depending on your needs, run the batch file *run\_cmake\_&lt;device-platform&gt;\_&lt;MSVC-version&gt;\_build.bat* in a windows console window to make CMake generate the project files and build environment for the WarpSample application into directory *build/WarpSample1/&lt;device-platform&gt;Win32*.

For starting the build environment, open the project file *WarpSample1.sln*. Building the project will – if necessary – create the required <span style="color: rgb(230, 126, 35);">[*Candera*](http://dev.doc.cgistudio.at/APILINK/namespace_candera.html)</span> libraries, link in the Warping Library and for a successful build create the executable *WarpSample\_x86\_Win32\_&lt;device-platform&gt;\_Simulation\_MSVC.exe* into the directory <span style="color: rgb(0, 0, 0);">*bin/WarpSample/&lt;device-platform&gt;Win32/Debug*</span>.

##### Run Application WarpingSample on Windows Host

<div class="contents" id="bkmrk-before-you-continue%2C"><div class="contents"><div class="textblock"><dl class="note"><dd><p class="callout info">Before you continue, please make sure that the computer satisfies the hardware requirements (e.g. concerning graphics card) and software requirements (e.g. needed graphic driver version) of CGI Studio/Candera Framework.</p>

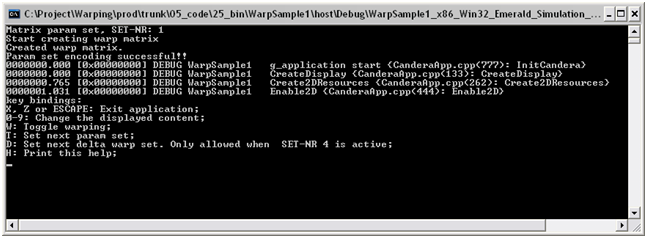
</dd></dl></div></div></div>For starting the WarpingSample1 application, open a MS Windows command shell window and change to the directory of the executable (*bin/WarpSample/*&lt;device-platform&gt;*Win32/Debug*). Start the WarpingSample application by calling *WarpSample\_x86\_Win32\_*&lt;device-platform&gt;*\_Simulation\_MSVC.exe* from the command line. Another option to start the WarpingSample application is to start a debugging session directly from the MSVS2010/MSVS2013 environment.

<div class="contents" id="bkmrk--0"><div class="contents"><div class="textblock"><div drawio-diagram="2117"><img src="https://doc316en.candera.eu/uploads/images/drawio/2023-02/drawing-7-1676965147.png" alt=""/></div>

</div></div></div>  
The last lines show the key bindings for handling the WarpingSample1 test software:

<div class="contents" id="bkmrk-x%2C-z-or-escape%3A-exit"><div class="contents"><div class="textblock">- *X, Z or ESCAPE: Exit application:* These keys have to be used to terminate the test software.
- *0-9: Change the displayed content:* The number keys are used to switch between different test scenes. Key 0 activates a scene implemented with <span style="color: rgb(230, 126, 35);">[Candera](http://dev.doc.cgistudio.at/APILINK/namespace_candera.html "[DataBinding_RefTypeSample]")</span> 2D rendering a predefined text, keys 1 and 2 activate scenes implemented in <span style="color: rgb(230, 126, 35);">[Candera](http://dev.doc.cgistudio.at/APILINK/namespace_candera.html "[DataBinding_RefTypeSample]")</span> 3D displaying fixed bitmaps. Keys 3 to 9 are reserved for future use.
- *W: Toggle warping:* This key switches warping on/off.
- *T: Set next param set:* Pressing this key will cycle the screen through 4 different used warping parameter sets. 
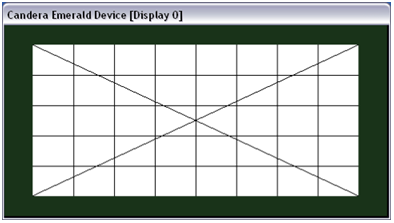
    - SET-NR 1: Input parameter set without rotation and distortion.
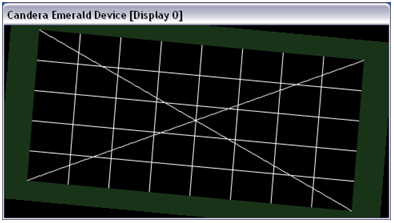
    - SET-NR 2: Input parameter set with rotation and without distortion.
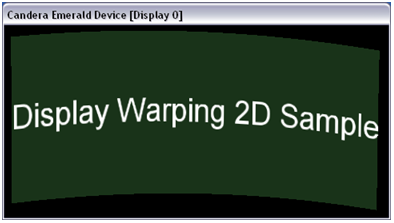
    - SET-NR 3: Input parameter set without rotation and with distortion.
    - SET-NR 4: Same parameter set as SET-NR 1, this is the base parameter set for the delta adjusting.
- *D: Set next delta warp set:* Pressing the D key will cycle the screen through all different delta adjusting modes in combination with each possible direction. This possibility is only enabled when the parameter set *SET-NR 4* is active.
- *H: Print this help:* The H key prints the overview of selectable keys on the command line.

</div></div></div>##### Example Scenes

The following figures show example scenes with applied parameter sets:

<div class="contents" id="bkmrk--1"><div class="contents"><div class="contents"><div class="textblock"><div drawio-diagram="2118"><img src="https://doc316en.candera.eu/uploads/images/drawio/2023-02/drawing-7-1676965200.png" alt=""/></div>

</div></div></div></div>*Scene #1 with Parameter Set 1*

<div class="contents" id="bkmrk--2"><div class="contents"><div class="contents"><div class="textblock"><div drawio-diagram="2119"><img src="https://doc316en.candera.eu/uploads/images/drawio/2023-02/drawing-7-1676965233.png" alt=""/></div>

</div></div></div></div>*Scene #2 with Parameter Set 2*

<div class="contents" id="bkmrk--3"><div class="contents"><div class="contents"><div class="textblock"><div drawio-diagram="2120"><img src="https://doc316en.candera.eu/uploads/images/drawio/2023-02/drawing-7-1676965272.png" alt=""/></div>

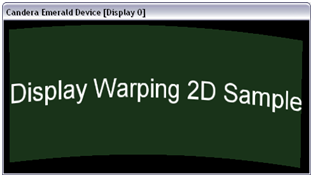
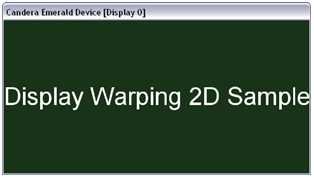
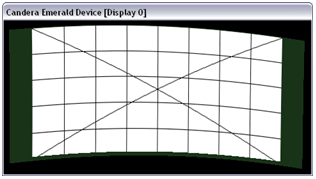
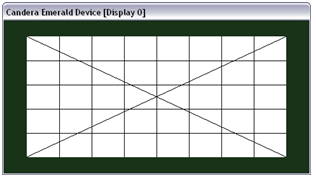
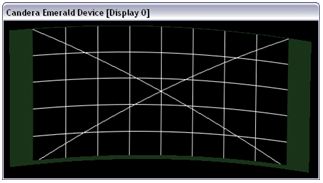
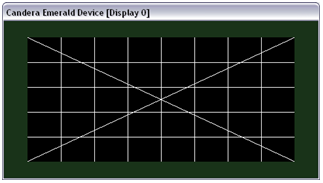
</div></div></div></div><div class="contents" id="bkmrk-scene-%232-with-parame-0"><div class="textblock">Scene #2 with Parameter Set 2</div></div>Further, the following screenshots show the effect of warping in comparison to the original image for the 3 scenes already used in the examples above when warping parameter set *SET-NR 3* is applied:

<div class="contents" id="bkmrk-scene-%230-warped-orig"><div class="contents"><div class="textblock">- **Scene #0**<table border="0" style="width: 88.874%; height: 241.391px;"><tbody><tr style="height: 29.7969px;"><th class="align-center" style="width: 49.9246%; height: 29.7969px;">warped</th><th class="align-center" style="width: 49.9246%; height: 29.7969px;">original</th></tr><tr style="height: 211.594px;"><td style="width: 49.9246%; height: 211.594px;"><div class="image"><div drawio-diagram="2121"><img src="https://doc316en.candera.eu/uploads/images/drawio/2023-02/drawing-7-1676965335.png" alt=""/></div>
    
    </div></td><td style="width: 49.9246%; height: 211.594px;"><div class="image"><div drawio-diagram="2122"><img src="https://doc316en.candera.eu/uploads/images/drawio/2023-02/drawing-7-1676965348.png" alt=""/></div>
    
    </div></td></tr></tbody></table>
- **Scene #1**<table border="0"><tbody><tr><th class="align-center">warped</th><th class="align-center">original</th></tr><tr><td><div class="image"><div drawio-diagram="2123"><img src="https://doc316en.candera.eu/uploads/images/drawio/2023-02/drawing-7-1676965880.png" alt=""/></div>
    
    </div></td><td><div class="image"><div drawio-diagram="2124"><img src="https://doc316en.candera.eu/uploads/images/drawio/2023-02/drawing-7-1676965898.png" alt=""/></div>
    
    </div></td></tr></tbody></table>
- **Scene #2**<table border="0"><tbody><tr><th class="align-center">warped</th><th class="align-center">original</th></tr><tr><td><div class="image"><div drawio-diagram="2125"><img src="https://doc316en.candera.eu/uploads/images/drawio/2023-02/drawing-7-1676965943.png" alt=""/></div>
    
    </div></td><td><div class="image"><div drawio-diagram="2126"><img src="https://doc316en.candera.eu/uploads/images/drawio/2023-02/drawing-7-1676965958.png" alt=""/></div>
    
    </div></td></tr></tbody></table>

</div></div></div>