For instructions on creating a **View**, see the [View feature overview page](https://doc316en.candera.eu/books/view-editor/page/view).
#### View composition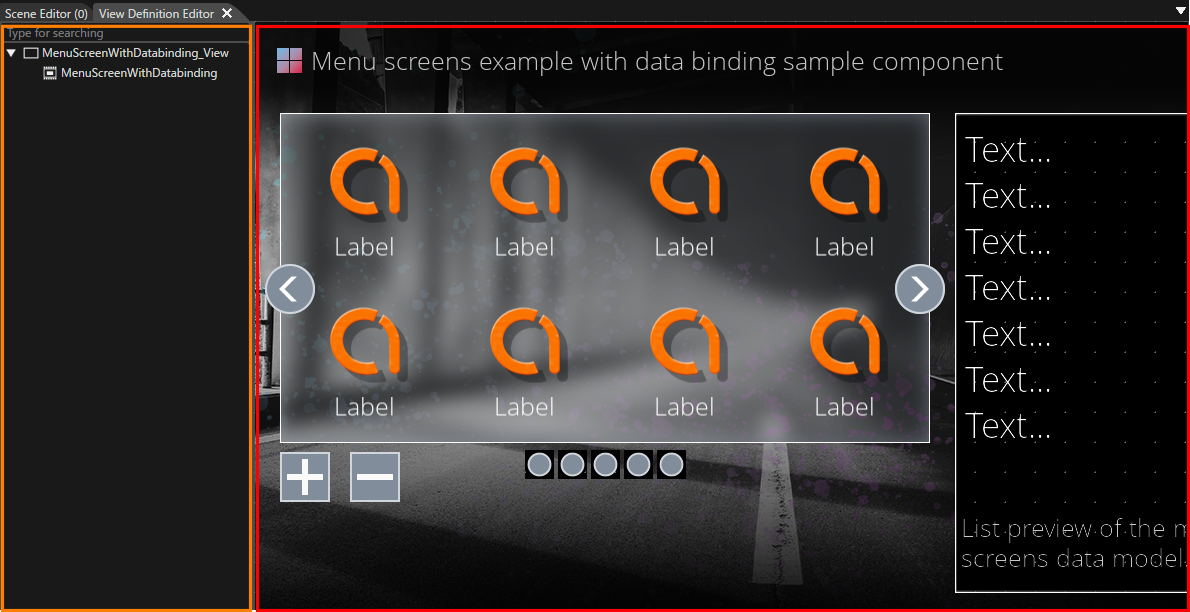
| **UI item** | **Description** |
|---|---|
| **View Composition pane** (orange frame in the figure above) | Lists which **Scenes/Views** the selected **View** is composed of. Add or remove Scenes and existing Views by **drag and drop**. |
| **Preview area** (red frame in the figure above) | Displays preview images of the **Scenes/Views** associated with the View in the right pane, where you can also adjust their layout positions. Useful for improving visual identification when referencing this View from the **State Machine** or **View Tree**. |
For instructions on creating a **View**, see the [View feature overview page](https://doc316en.candera.eu/books/view-editor/page/view).
#### View compositionThe composition editing described here applies to [Views that were created as **new Views**](https://doc316en.candera.eu/link/1318#bkmrk-create-a-view-%28new-i). [Views that were automatically generated from a Scene](https://doc316en.candera.eu/link/1318#bkmrk-create-a-view-%28from-) are treated as simple Views that display the corresponding Scene, and you cannot edit the tree structure in the View Definition Editor or attach child Views or additional Scenes under them.
1. Double-click the View in Solution Explorer whose composition you want to edit. - The View Definition Editor panel opens and displays the composition of the selected View. 2. In the View Composition pane, edit the elements included in the View. - If the target View does not yet have a Scene as a child element, you can add a Scene or an existing View by dragging and dropping it from Solution Explorer. - If the target View already has a *Scene* as a child element, you cannot add any additional Scenes or Views (a View that contains a Scene as a child is always treated as a leaf node). - To remove unnecessary elements (Scenes/Views), select them and choose **Delete** from the context menu. ##### Behavior when dragging and dropping a Scene Only **Views** are shown as nodes in the tree of the View Definition Editor panel. If you want to work with a **Scene**, you add it as internal content of an existing View. - When you drag and drop a Scene from Solution Explorer into the **Composition** pane of the View currently open in the View Definition Editor, the **Create View** dialog appears if there is no existing View that already has that Scene as its child. - If you accept the creation in the dialog, a new View that contains the Scene as its child is automatically generated and added to the tree as a child View of the drop target View. With this mechanism, the View Definition Editor tree can consistently treat the unit of screen transitions and visibility control as **Views**, while still allowing you to build Scene-based content within those Views. ##### Grandchild View In the View Definition Editor panel, a single operation can add Views only up to **the child View directly under the currently open View** (one hierarchy level down). To create a structure with three or more hierarchy levels, such as **Parent View > Child View > Grandchild View**, you must use only Views that meet the following requirements as the starting point: - The View you want to use as the parent level must be a [**newly created View**](https://doc316en.candera.eu/link/1318#bkmrk-create-a-view-%28new-i). - The View you want to use as the parent level must **not** already have a **Scene** as its child element. - [Views that were automatically generated from a](https://doc316en.candera.eu/link/1318#bkmrk-create-a-view-%28from-)[ Scene](https://doc316en.candera.eu/link/1318#bkmrk-create-a-view-%28from-), or Views that already have a **Scene** as a child, **cannot** be used as the starting point for building a grandchild hierarchy (these Views are always treated as **leaf nodes**). Using a View that meets these requirements as the starting point, create a three-level structure (**Parent View > Child View > Grandchild View**) as follows: 1. Open the View you want to use as the parent level, and add a child View under it (**Parent View > Child View**). 2. Double-click the View you added as the child View in step 1 to open it, and then add another View under it as its child (**Child View > Grandchild View**). After performing these steps, reopen the original parent View. You can then confirm in the tree that a three-level hierarchy (**Parent View > Child View > Grandchild View**) is displayed.