# Building Own Application for Linux with a Wayland Display Server

#### Generate Makefiles with CMake

For general information about CGI Studio Build System and CMake properties available to configure Candera applications refer to <span style="color: rgb(230, 126, 35);">[CGI Studio Build System](https://doc316en.candera.eu/books/build-system-setup/chapter/build-system-overview)</span>

To configure and generate makefiles for compiling the CGI Player, follow below steps:   
  
The first step for cross compiling is to make sure all the environment variables for the Yocto SDK are set!

<div class="contents" id="bkmrk-open-a-terminal.-set"><div class="contents"><div class="textblock">1. Open a terminal.
2. Set the environment. This step is mandatory. Omitting this step will cause building with the host systems compiler instead of cross compiling. ```
    $source /<path to the Yocto SDK installation>/environment-setup-<platform specific suffix e.g. aarch64-poky-linux> 


    ```
3. Important! From the same console with the set environment start the CMake GUI or run the CMake commandline. We will continue with the CMake GUI in this guide.
4. Point CMake to source directory 
    - Folder containing top-level "CMakeLists.txt", e.g. /cmake/Candera/Player <div class="image"><div drawio-diagram="2938"><img src="https://doc316en.candera.eu/uploads/images/drawio/2023-02/drawing-4-1677567539.png" alt=""/></div>

        
          
        </div>
5. Point CMake to binary directory 
    - May not exist, create folder with CMake if necessary
    - Root directory for generated makefiles / solutions
    - Root directory for build artifacts <div class="image"><div drawio-diagram="2939"><img src="https://doc316en.candera.eu/uploads/images/drawio/2023-02/drawing-4-1677567561.png" alt=""/></div>

        
          
        </div>
6. Configure 
    - Specify Unix Makefiles as generator for the project.
    - Specify tool-chain file for cross-compiling. <div class="image"><div drawio-diagram="2940"><img src="https://doc316en.candera.eu/uploads/images/drawio/2023-02/drawing-4-1677567581.png" alt=""/></div>
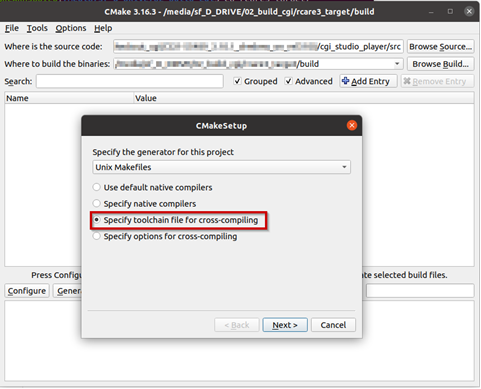
        
          
        </div>
7. Select the toolchain-file from the delivery (adapt for your toolchain installation and application specific needs)  
    ```
    /cgi_studio_devices/src/Wayland/ToolchainFiles/GCC-toolchain-Wayland-Linux.txt


    ```
    
    If Vulkan support is required, use the Vulkan-specific toolchain file.
    
    ```
    /cgi_studio_devices/src/Wayland/ToolchainFiles/GCC-toolchain-Wayland-Vulkan-Linux.txt


    ```
8. Adapt the CMake settings, if necessary, e.g.: 
    - CMAKE\_BUILD\_TYPE-&gt; Debug or Release.
    - Enable/disable features.
    - Press Configure.
9. Press Generate.

</div></div></div>#### Building Application

<div class="contents" id="bkmrk-make-sure-that-the-e"><div class="textblock"><dl class="note"><dd><p class="callout info">Make sure that the environment variables for the Yocto SDK are set in the terminal! Either reuse the terminal used to start CMake for building the Player or call the environment setup script again.</p>

</dd></dl></div></div>```
$source /<path to the Yocto SDK installation>/environment-setup-<platform specific suffix e.g. aarch64-poky-linux> 


```

<div class="contents" id="bkmrk-open-cmake-gui-and-c"><div class="textblock">1. Open CMake GUI and configure the project (e.g Player, CourierSampleApp, CitDemoApp) according to Generate Makefiles with CMake.
2. After generating your cmake files, navigate to the specified build directory (binary directory created in CMake GUI) and type "make" to start the build or “make -j” to build with multithreading.   
    With some hypervisors, the Linux VM may get unresponsive when using the –j option. Reducing the number of used threads to the number of available cores improves the responsiveness of the VM during the build.

</div></div><div class="contents" id="bkmrk-for-couriersampleapp"><div class="textblock"><dl class="note"><dd><p class="callout info">For CourierSampleApp and CitDemoApp asset file must be created with a matching SCHost.dll as the SCHost.dll for the CourierSampleApp and CitDemoApp contain specialized Widgets.</p>

</dd></dl></div><div class="textblock"><dl class="note"><dd>#### Vulkan Packaging Workflow

After a successful Vulkan build:

</dd></dl></div></div>1. Build and copy ANGLE Vulkan Libraries:  
    Build your own ANGLE Vulkan libraries for your target platform:  
    \- libEGL.so   
    \- libGLESv2.so   
      
    These libraries must match your target architecture.
    
    Copy into the same directory where the Player executable is located (the build output directory).
2. Run Packaging Script  
    From the build directory, execute the `package_player.sh` script. After execution, a folder named **vulkan** will be created.   
    Inside this folder you will find **Player.run** this is the only required output package.
3. Run the packaged Player using `./Player.run Your_Asset.bin`

<div class="contents" id="bkmrk-"><div class="textblock"><dl class="note"></dl>  
</div></div>