# Traveo2 BSP

# Traveo2 NoOS BSP: Prerequisites

#### <a class="anchor" id="bkmrk-"></a>Hardware: Infineon Traveo II

CGI Studio has been tested on **Infineon Traveo II (CYTVII-C-2D-6M-500-BGA CPU REV-B) board and Infineon Traveo II (CYTVII-C-2D-4M-216 CPU REV-A) board** .

#### <a class="anchor" id="bkmrk--0"></a>CMake

In order to build Candera, the Meta build system CMake needs to be installed with at least version mentioned <span style="color: rgb(230, 126, 35);">[here](https://doc316en.candera.eu/books/build-system-setup/page/prerequisites)</span>.  
CMake makes it possible to create the cross compilation makefiles that can be used with Green Hills MULTI compiler (or IAR Embedded Workbench for ARM).

#### <a class="anchor" id="bkmrk--1"></a>Generator

To allow cross compilation with makefiles, MinGW 4.2.1 was used for this release.

#### <a class="anchor" id="bkmrk--2"></a>Toolchain

The build tool chain is not part of the delivery.

#### <a class="anchor" id="bkmrk--3"></a>Green Hills

Green Hills MULTI IDE, Green Hills compiler and the corresponding Traveo II graphics driver have to be obtained directly from Green Hills and/or Infineon and should be installed according to their installation guide.   
CGI Studio was tested with **MULTI IDE 7.1.4 (configured as suggested by Infineon - GHS Traveo II Debug Script Environment), Compiler 2017.1.4**   
  
The Green Hills probe 5.6.4 for ARM was used for connection/debug on the target.

#### <a class="anchor" id="bkmrk--4"></a>Embedded Workbench

IAR EW IDE for ARM, compiler and the corresponding Traveo II graphics driver have to be obtained directly from IAR and/or Infineon and should be installed according to their installation guide.   
  
CGI Studio was tested with **IAR EW IDE 8.22.2 (configured as suggested by Infineon), Compiler IAR ANSI C/C++ Compiler 8.22.2.15995/W32 for ARM**   
  
The IAR Systems I-jet probe 2.5.0.0 was used for connection/debug on the target.

#### <a class="anchor" id="bkmrk--5"></a>Infineon Graphics Library

The graphics driver is not part of this release. CGI Studio was integrated and tested with the following versions:

- V1.2.0 for IAR EW
- V2.3.0 for GreenHills

#### <a class="anchor" id="bkmrk--6"></a>Flashing tool

**Infineon Auto Flash Utility 1.2** via MiniProg4 was used in order to flash asset file to the external flash (Hyperflash).

# Traveo2 AUTOSAR BSP: Prerequisites

#### <a class="anchor" id="bkmrk-"></a>Hardware: Infineon Traveo II

CGI Studio has been tested on **Infineon Traveo II (custom 4M) board** .

#### <a class="anchor" id="bkmrk--0"></a>CMake

In order to build Candera, the Meta build system CMake needs to be installed with at least version mentioned <span style="color: rgb(230, 126, 35);">[here](https://doc316en.candera.eu/books/build-system-setup/page/prerequisites)</span>.  
CMake makes it possible to create the cross compilation makefiles that can be used with Green Hills MULTI compiler.

#### <a class="anchor" id="bkmrk--1"></a>Generator

To allow cross compilation with makefiles, MinGW 4.2.1 was used for this release.

#### <a class="anchor" id="bkmrk--2"></a>Toolchain

The build tool chain is not part of the delivery.

#### <a class="anchor" id="bkmrk--3"></a>Green Hills

Green Hills MULTI IDE, Green Hills compiler and the corresponding Traveo II graphics driver have to be obtained directly from Green Hills and/or Infineon and should be installed according to their installation guide.   
CGI Studio was tested with **MULTI IDE 7.1.4 (configured as suggested by Infineon - GHS Traveo II Debug Script Environment), Compiler 2017.1.4**   
  
The Green Hills probe 5.6.4 for ARM was used for connection/debug on the target.

#### <a class="anchor" id="bkmrk--4"></a>AUTOSAR

Autosar environment is not part of this release. The Autosar environment is provided by customer.

#### <a class="anchor" id="bkmrk--5"></a>Infineon Graphics Library

The graphics driver is not part of this release. CGI Studio was integrated and tested with the libraries received from customer (V1e0.0)

#### BSP External memory initialization limitation

Please ensure that the external peripheral on the target device is supported by the BSP initialization routine for the external memory: **Cy\_GfxEnv\_FastInit(bUseSmif0, bUseSmif1, xxx)**  
The support of external memory components can differ between BSP/Graphic driver versions!

In case of unsupported external memory initialization in the specific driver/BSP version compared to the Traveo II evaluation board the value will be set to 0 (disabled) :Cy\_GfxEnv\_FastInit(**0, 0**, xxx) (see corresponding initialization in \\cgi\_studio\_devices\\src\\Traveo2\\CourierPlatformDefs\\Target\_NoOs\_ARM\\KernelTargets\\main.c) .  
In this case, only the internal RAM and FLASH can be used on the target board.

# Running the CGI Player Demo Application on Traveo2

#### <a class="anchor" id="bkmrk-"></a>Download the Application

To download and debug the application you need a Green Hills probe (or IAR Systems I-jet probe) that is configured accordingly for your Infineon Traveo II board.

#### <a class="anchor" id="bkmrk--0"></a>Executable Application

#### <a class="anchor" id="bkmrk--1"></a>Green Hills

<div class="contents" id="bkmrk-in-multi-launcher-se"><div class="contents"><div class="textblock">- In MULTI launcher select "Components" -&gt; "Open debugger" and choose the application from your build folder with extension .ghsmc.
- Then press "D" (for "Detect"), once the script detects the board and sets all needed variables in the debugger window three new symbols will be available "F" "V" and "E".
- Press "F" (for "Flashing") the application on the board.
- Press "F5" on keyboard or "Go on Selected Items" ("Play") button to run the application.

</div></div></div><div class="contents" id="bkmrk-%22surface_blit_displa"><div class="contents"><div class="textblock"><dl class="note"><dd><p class="callout info">"surface\_blit\_display\_basic" graphics driver sample’s project has to be set as WorkingDir (Workspace) in MULTI launcher.</p>

</dd></dl></div></div></div>#### <a class="anchor" id="bkmrk--2"></a>IAR Embedded Workbench

Binary directory contains two IAR EW projects under "iar\_projects" (for flash only and/or flash and debug).

<div class="contents" id="bkmrk-open-the-ew-workspac"><div class="contents"><div class="textblock">- Open the EW workspace \*.eww from the project in which you will select e.g. .eww.
- Rebuild ("Project" -&gt;"Rebuild All") cm0plus project.
- Press ("Project" -&gt;"Download and Debug") to flash the executable.
- Press "F5" on keyboard or "Debug -&gt; Go" to run the application.

</div></div></div>#### <a class="anchor" id="bkmrk--3"></a>Loading the asset

The CGI Player demo application uses an asset file which could be added by the linker or loaded from external flash. CGIDEVICE\_ASSET\_LOCATION holds that information (options: Monolith or Flash).   
  
In case of Monolith option for CGIDEVICE\_ASSET\_LOCATION, the asset file will be loaded to internal flash together with the application. You have to select the asset file in CMake via the variable ASSET\_TARGET\_LOCATION before you build the application.   
  
In case of Flash option for CGIDEVICE\_ASSET\_LOCATION, the asset file will be loaded during startup of the application. A prerequisite is that it must be flashed to the external flash (Hyperflash) on the board before executing the app.

<div class="contents" id="bkmrk-this-is-the-only-ava"><div class="textblock"><dl class="note"><dt></dt><dd><p class="callout info">This is the only available option for IAR Embedded Workbench toolchain.</p>

</dd></dl></div></div>

# Running the CGI CourierSampleAppLight Demo Application on Traveo2

#### <a class="anchor" id="bkmrk-"></a>Download the Application

To download and debug the application you need a Green Hills probe (or IAR Systems I-jet probe) that is configured accordingly for your Infineon Traveo II board.

#### <a class="anchor" id="bkmrk--0"></a>Executable Application

#### <a class="anchor" id="bkmrk--1"></a>Green Hills

<div class="contents" id="bkmrk-in-multi-launcher-se"><div class="contents"><div class="textblock">- In MULTI launcher select "Components" -&gt; "Open debugger" and choose the application from your build folder with extension .ghsmc.
- Then press "D" (for "Detect"), once the script detects the board and sets all needed variables in the debugger window three new symbols will be available "F" "V" and "E".
- Press "F" (for "Flashing") the application on the board.
- Press "F5" on keyboard or "Go on Selected Items" ("Play") button to run the application.

</div></div></div><div class="contents" id="bkmrk-%22surface_blit_displa"><div class="contents"><div class="textblock"><dl class="note"><dd><p class="callout info">"surface\_blit\_display\_basic" graphics driver sample’s project has to be set as WorkingDir (Workspace) in MULTI launcher.</p>

</dd></dl></div></div></div>#### <a class="anchor" id="bkmrk--2"></a>IAR Embedded Workbench

Binary directory contains two IAR EW projects under "iar\_projects" (for flash only and/or flash and debug).

<div class="contents" id="bkmrk-open-the-ew-workspac"><div class="contents"><div class="textblock">- Open the EW workspace \*.eww from the project which you will select e.g. .eww.
- Rebuild ("Project" -&gt;"Rebuild All") cm0plus project. Press ("Project" -&gt;"Download and Debug") to flash the executable.
- Press "F5" on keyboard or "Debug -&gt; Go" to run the application.

</div></div></div>#### <a class="anchor" id="bkmrk--3"></a>Loading the asset

The CGI CourierSampleAppLight demo application uses an asset file which could be added by the linker or loaded from external flash. CGIDEVICE\_ASSET\_LOCATION holds that information (options: Monolith or Flash).   
  
In case of Monolith option for CGIDEVICE\_ASSET\_LOCATION, the asset file will be loaded to internal flash together with the application. You have to copy the asset file in the directory and name it as **“AssetLibCff\_Traveo2\_Target.bin”** before you build the application.   
  
In case of Flash option for CGIDEVICE\_ASSET\_LOCATION, the asset file will be loaded during startup of the application. A prerequisite is that it must be flashed to the external flash (Hyperflash) on the board before executing the app.

<div class="contents" id="bkmrk-this-is-the-only-ava"><div class="textblock"><dl class="note"><dd><p class="callout info">This is the only available option for IAR Embedded Workbench toolchain.</p>

</dd></dl></div></div>

# Building Own Application for Traveo2

#### <a class="anchor" id="bkmrk-"></a>Generate Makefiles with CMake

For general information about CGI Studio Build System and CMake properties available to configure Candera applications, refer to CGI Studio Build System. To configure and generate makefiles for compiling the CGI CourierSampleAppLight, follow the steps below:

<div class="contents" id="bkmrk-point-cmake-to-sourc"><div class="contents"><div class="textblock">1. Point CMake to source directory 
    - Folder containing top-level "CMakeLists.txt", e.g. or \\ LightPlayer
2. Point CMake to build directory 
    - May not exist, create folder with CMake if necessary
    - Root directory for generated makefiles / solutions
    - Root directory for build artifacts
3. Configure 
    - Specify MinGW Makefiles (or Ninja) as generator for the project
    - Specify tool-chain file for cross-compiling
4. Select the toolchain-file from the delivery based on your target. (adapt for your toolchain installation and application specific needs) 
    - (for MULTI) cgi\_studio\_devices\\src\\Traveo2\\ToolchainFiles\\MULTI-toolchain-TraveoII\_C\_6M.txt or cgi\_studio\_devices\\src\\Traveo2\\ToolchainFiles\\MULTI-toolchain-TraveoII\_C\_4M.txt
    - (for IAR EW) cgi\_studio\_devices\\src\\Traveo2\\ToolchainFiles\\IAR-toolchain-TraveoII\_C.txt)
5. Adapt the CMake settings if necessary, e.g.: 
    - CMAKE\_BUILD\_TYPE-&gt; Debug or Release
    - Press Configure
6. Press Generate

</div></div></div>#### <a class="anchor" id="bkmrk--0"></a>Building Application

After generating your cmake files, in Command Prompt simply navigate to the specified build directory and type "mingw32-make" (or "ninja") to start the build.   
  
The output executable file can be found in your build directory.   
  
Load and debug the application as described in the previous chapter.

# Useful Hints and Recommendations

#### <a class="anchor" id="bkmrk--6"></a>Setting for tasks

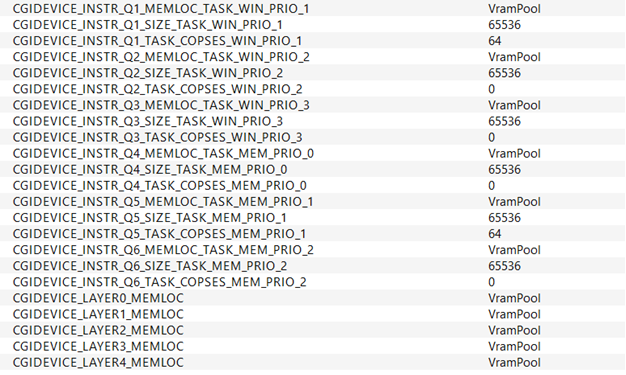
In CMake you have the possibility to set the size and the location of the memory for the command queues and also the COPSes reserved for that task.   
Additionally, you can set the memory location for the frame buffers (in case they exist in the solution) for the layers.   
Disable unused tasks by setting the size to 0. (This has to be in correlation with the solution which you want to execute on the target)

<div drawio-diagram="2963"><img src="https://doc316en.candera.eu/uploads/images/drawio/2023-03/drawing-4-1677720997.png" alt=""/></div>

<div class="contents" id="bkmrk--0"><div class="contents"><div class="textblock"></div></div></div>#### <a class="anchor" id="bkmrk--8"></a>EXTRAM support

By default, all the frame buffers for the layers, the instruction buffers, and the bitmaps (if they are not stored in Client memory) are stored in the VRAM.   
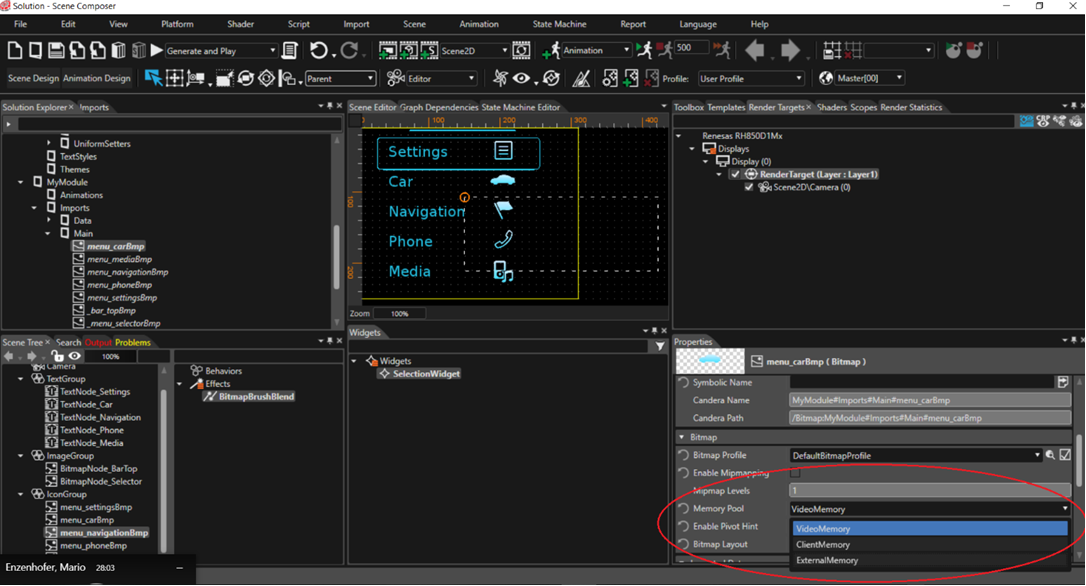
However, it is possible to configure the memory location to EXTRAM (HyperRAM) instead. The memory location of the frame buffers and instruction buffers is configured via CMake (see Figure 2).   
The memory location of the bitmaps is selected via Scene Composer (refer to Figure 3).

<div drawio-diagram="2964"><img src="https://doc316en.candera.eu/uploads/images/drawio/2023-03/drawing-4-1677721008.png" alt=""/></div>

<div class="contents" id="bkmrk--2"><div class="contents"><div class="textblock"><div drawio-diagram="2965"><img src="https://doc316en.candera.eu/uploads/images/drawio/2023-03/drawing-4-1677721028.png" alt=""/></div>

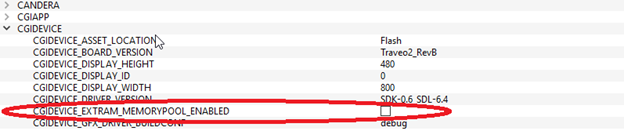
</div></div></div><div class="contents" id="bkmrk--4"><div class="contents"><div class="textblock"></div></div></div>For target build, please keep in mind to check (enable) CGIDEVICE\_EXTRAM\_MEMORYPOOL\_ENABLED in CMake in case you want to store images in external RAM.   
Without that check it is not possible to allocate memory in the HyperRAM and the VRAM will be used instead.

#### <a class="anchor" id="bkmrk--11"></a>Limitations

Each OTF layer (window) must use different TaskPrio ID.   
  
OTF window surface height is minimum two slices (16 lines) and maximum (2 \* window height - 1).   
  
Maximum width for LBO blit area: 1600 (Maximum width for OTF layer (window) is 1600)   
  
Supported values for OTF lines: 16, 32, 64, 128, 256

<p class="callout info">Supported CGI Studio samples for this target are:  
LightPlayer   
 Empty  
 2DBasic  
 2DEffects  
 AdvancedCluster  
 Layouter  
 Transition  
CourierSampleAppLight  
 Default CSALight’s solution  
 New Traveo2Sample (covers few Traveo2 specific features)</p>

<div class="contents" id="bkmrk--5"><div class="textblock"><dl class="note"><dd>  
</dd></dl></div></div>

# Traveo 2 Sample

#### <a class="anchor" id="bkmrk--1"></a>Summary

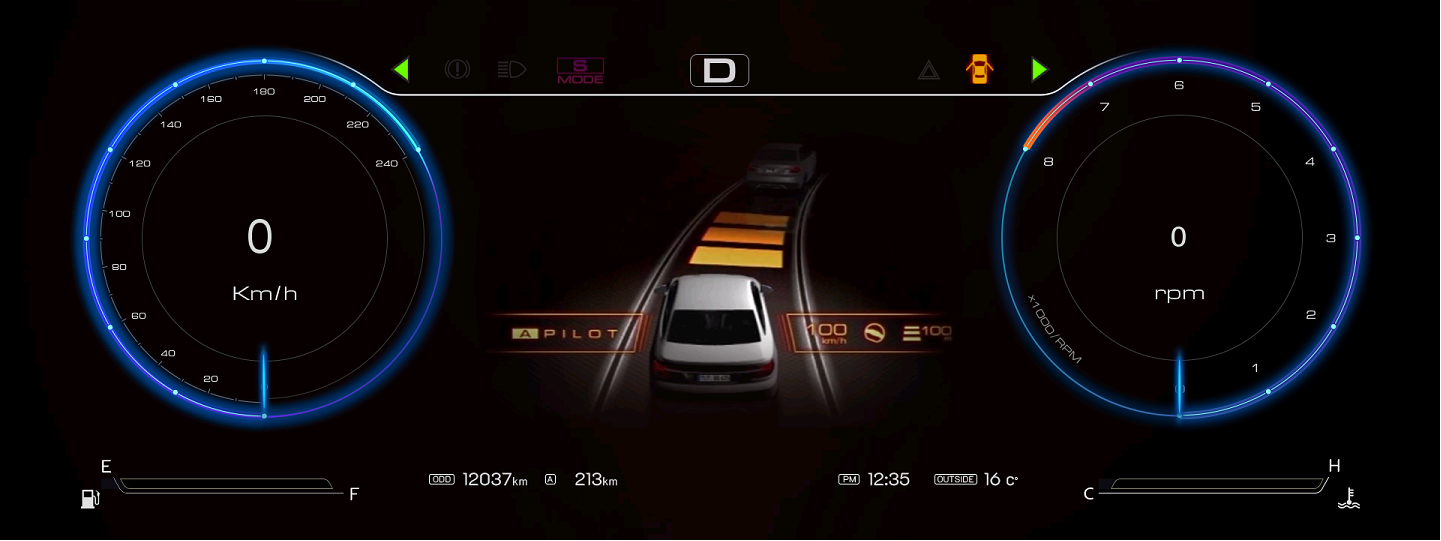
This solution is a sample of a cluster that can be executed on Traveo II and is meant to showcase some of Traveo II's new functionality.

#### <a class="anchor" id="bkmrk--2"></a>Purpose

This solution allows you to see how various Traveo II features work in conjunction to form a cluster sample.

#### <a class="anchor" id="bkmrk--3"></a>Description

<div drawio-diagram="2966"><img src="https://doc316en.candera.eu/uploads/images/drawio/2023-03/drawing-4-1677721086.png" alt=""/></div>

<div class="contents" id="bkmrk--0"><div class="contents"><div class="textblock"><div class="image">  
</div></div></div></div>The sample uses following features:

<div class="contents" id="bkmrk-blending-rotation-bl"><div class="textblock">- Blending
- Rotation
- Blitting
- Scaling
- Decompression
- Line-based (IBO) rendering
- Frame-based (LBO) rendering
- On-the-fly (OTF) rendering

</div></div>