# JPEG Decoder

# JPEG Bitmap Converter

#### Feature Description

<span lang="EN-US" style="mso-ascii-font-family: Aptos; mso-hansi-font-family: Aptos;">The Traveo 2 JPEG Bitmap Converter allows the user to import compressed JPEG images directly into the solution using the JPEG bitmap profile. These JPEG images are then decoded by the onboard JPEG decoder at runtime. This means that the decompressed bitmaps need not be included in the assets, reducing the overall asset size.</span>

#### <span lang="EN-US" style="mso-ascii-font-family: Aptos; mso-hansi-font-family: Aptos;">Supported Platforms</span>

<span lang="EN-US" style="mso-ascii-font-family: Aptos; mso-fareast-font-family: Aptos; mso-hansi-font-family: Aptos; mso-bidi-font-family: Aptos;">At present, the JPEG Bitmap Converter is exclusively supported on the **Infineon Traveo 2** platform.</span>

#### <span lang="EN-US" style="mso-ascii-font-family: Aptos; mso-fareast-font-family: Aptos; mso-hansi-font-family: Aptos; mso-bidi-font-family: Aptos;">Limitations</span>

<span lang="EN-US">The JPEG Bitmap Converter currently has the following limitations.</span>

- **<span lang="EN-US">Preloaded Images in the asset only:</span>**<span lang="EN-US"> The image must be part of the asset and cannot be dynamically supplied at runtime.</span>
- <span lang="EN-US">**Supported pixel formats:** The following table shows the supported pixel formats for JPEG images.</span><table style="height: 182.8px; width: 100%;"><tbody><tr style="height: 29.6px;"><td style="width: 33.299%; height: 29.6px;">**Pixel Format**</td><td style="width: 33.299%; height: 29.6px;">**Sampling Configuration**</td><td style="width: 33.299%; height: 29.6px;">**Description**</td></tr><tr style="height: 63.2px;"><td style="width: 33.299%; height: 63.2px;">YUV444</td><td style="width: 33.299%; height: 63.2px;">Y (Luma) Subsampling: H/V = 1/1
    
    Cb (Chroma) Subsampling: H/V = 1/1
    
    Cr (Chroma) Subsampling: H/V = 1/1
    
    </td><td style="width: 33.299%; height: 63.2px;">No chroma subsampling. Each Y, Cb, and Cr component has the same resolution.</td></tr><tr style="height: 80px;"><td style="width: 33.299%; height: 80px;">YUV420</td><td style="width: 33.299%; height: 80px;">Y (Luma) Subsampling: H/V = 2/2
    
    Cb (Chroma) Subsampling: H/V = 1/1
    
    Cr (Chroma) Subsampling: H/V = 1/1
    
    </td><td style="width: 33.299%; height: 80px;">Cb and Cr components are subsampled by 2 horizontally and vertically. Commonly used in video compression.</td></tr><tr style="height: 10px;"><td style="width: 33.299%; height: 10px;">RGB</td><td style="width: 33.299%; height: 10px;">N/A</td><td style="width: 33.299%; height: 10px;">Standard RGB format without chroma subsampling.</td></tr></tbody></table>
- JPEG images with **YUV420** pixel format must have an **even width**.
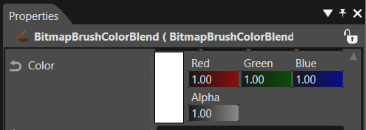
- JPEG images with YUV pixel formats (**YUV420/YUV444**) **do not support** changing of color using the **color property** of the **BitmapBrushColorBlend** (or any similar effects which allow changing of color using this property) **on target**.  
    <div drawio-diagram="8734"><img src="https://doc316en.candera.eu/uploads/images/drawio/2025-11/drawing-7-1763096137.png" alt=""/></div>
- Surfaces with compressed formats such as YUV422 and YUV420 only support simple rotation (ie. multiples of 90)

#### <span lang="EN-US">Enabling the JPEG Decoder feature</span>

<span lang="EN-US">If the JPEG Bitmap Converter feature is being used, ensure that the JPEG Decoder feature has been enabled in the CMAKE options. While generating the project for target, turn on the CMAKE flag CGIDEVICE\_TRAVEO2\_JPEG\_DECODER\_ENABLED or add this flag to the toolchain file.  
</span>

<div drawio-diagram="8746"><img src="https://doc316en.candera.eu/uploads/images/drawio/2025-11/drawing-7-1763097075.png" alt=""/></div>

#### <span lang="EN-US" style="mso-no-proof: yes;">How to use the JPEG Bitmap Converter</span>

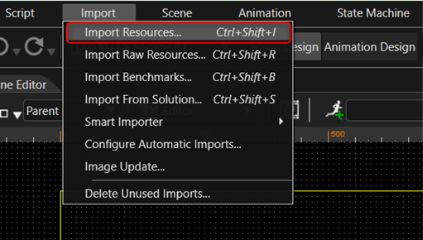
1. <span lang="EN-US" style="mso-no-proof: yes;">**Import the JPEG image**: Using the import menu, select "**Import Resources**"  
    </span><div drawio-diagram="8735"><img src="https://doc316en.candera.eu/uploads/images/drawio/2025-11/drawing-7-1763096261.png" alt=""/></div>
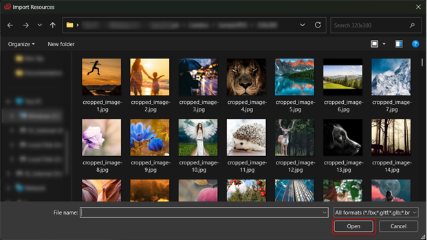
2. Choose a JPEG image and click "Open".  
    <div drawio-diagram="8736"><img src="https://doc316en.candera.eu/uploads/images/drawio/2025-11/drawing-7-1763096332.png" alt=""/></div>
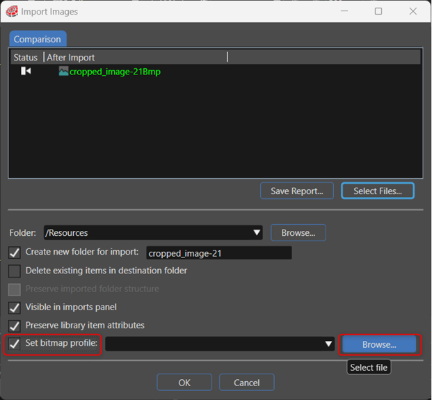
3. In the import dialog box, create a new JPEG bitmap profile by checking the “Set bitmap profile” checkbox and then click the “Browse” button as shown in the image below. This only needs to be done once for a new solution, if a JPEG bitmap profile already exists, skip to Step 7.  
    <div drawio-diagram="8737"><img src="https://doc316en.candera.eu/uploads/images/drawio/2025-11/drawing-7-1763096393.png" alt=""/></div>
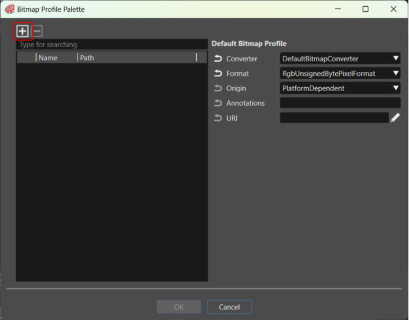
4. In the Bitmap Profile Palette window that opens, click on the add button as shown in the image below. If the Default Bitmap Profile is not populated on the right-hand side, populate it as shown below.  
    <div drawio-diagram="8738"><img src="https://doc316en.candera.eu/uploads/images/drawio/2025-11/drawing-7-1763096814.png" alt=""/></div>
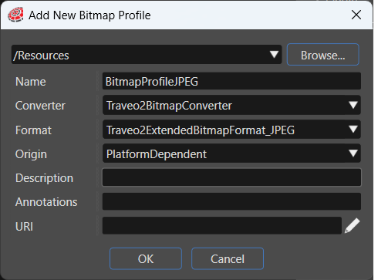
5. In the Add new Bitmap Profile dialog that opens, populate the fields as shown in the image below. Click “Ok” once done.  
    <div drawio-diagram="8740"><img src="https://doc316en.candera.eu/uploads/images/drawio/2025-11/drawing-7-1763096861.png" alt=""/></div>
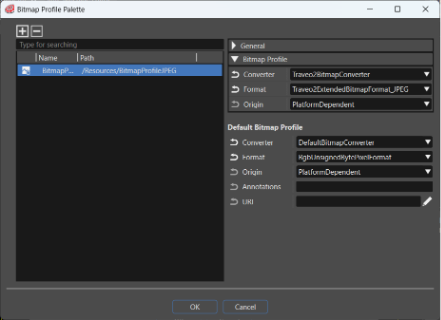
6. On the Bitmap Profile Palette, confirm that the JPEG Bitmap Converter has been added as shown in the image below and press Ok.  
    <div drawio-diagram="8741"><img src="https://doc316en.candera.eu/uploads/images/drawio/2025-11/drawing-7-1763096889.png" alt=""/></div>
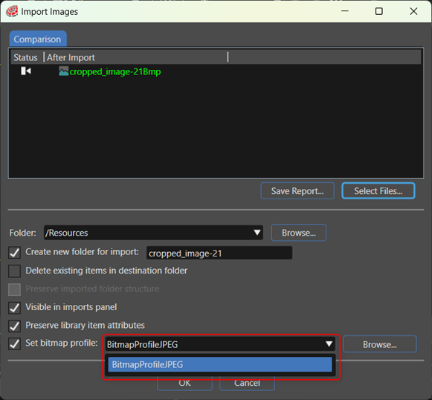
7. Select the JPEG Bitmap Profile from the dropdown menu if it is not already selected as shown in the image below. Click Ok.  
    <div drawio-diagram="8743"><img src="https://doc316en.candera.eu/uploads/images/drawio/2025-11/drawing-7-1763096933.png" alt=""/></div>
8. Add the image to the scene by dragging and dropping it into the scene editor.
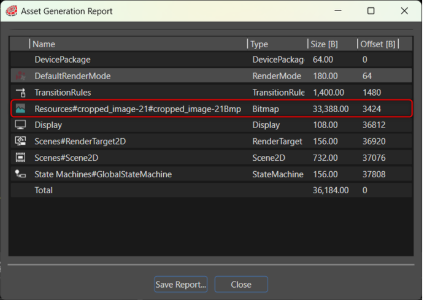
9. Select “Generate Asset Library” option in File menu to generate the asset and check if the compressed JPEG images have been put into the asset.
10. The asset generation export report should show the image of the encoded JPEG image. In the image below it is visible that the image is only 33kb which is much lesser than the decompressed bitmap size for the same image.  
    <div drawio-diagram="8745"><img src="https://doc316en.candera.eu/uploads/images/drawio/2025-11/drawing-7-1763096979.png" alt=""/></div>

# JPEG Decoder Behavior

##### Feature Description  


The JPEG Decoder behavior allows the user to decode JPEG images at runtime using the hardware decoder. This means that the pre-decoded bitmaps need not be included in the assets, reducing the overall asset size. JPEG images are compressed, making them smaller in size, and they can be decoded by supported platforms.

##### Supported Platforms

At present, the JPEG decoder is exclusively supported on the Infineon Traveo 2 platform.

##### Limitations

The JPEG Decoder Behavior currently has the following limitations.

- **Preloaded Images in the asset only:** The image must be part of the asset and cannot be dynamically supplied at runtime.
- Check the <span style="color: rgb(230, 126, 35);">[JPEG Bitmap Converter](https://doc316en.candera.eu/books/target-setup-for-traveo2/page/jpeg-bitmap-converter)</span> documentation for the supported pixel formats.

##### <span lang="EN-US" style="font-size: 14.0pt; line-height: 116%;">Enabling the JPEG Decoder feature</span>

<span lang="EN-US">If the JPEG Decoder Behavior is being used, ensure that the JPEG Decoder feature has been enabled in the CMAKE options. While generating the project for target, turn on the CMAKE flag CGIDEVICE\_TRAVEO2\_JPEG\_DECODER\_ENABLED or add this flag to the toolchain file.  
</span>

<div drawio-diagram="8747"><img src="https://doc316en.candera.eu/uploads/images/drawio/2025-11/drawing-7-1763105200.png" alt=""/></div>

##### How to use the JPEG Decoder

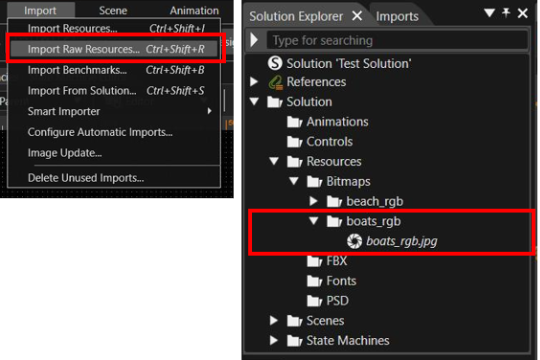
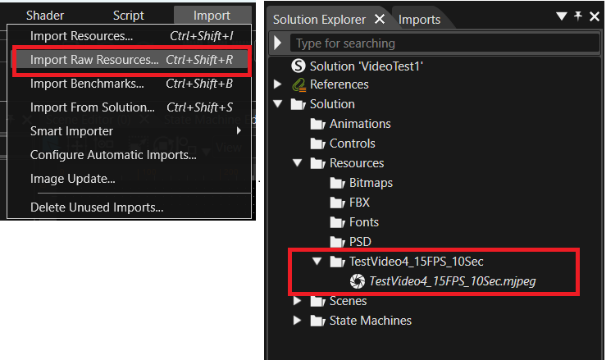
1. **Import the jpeg image as raw resource:** Using the import menu select “Import Raw Resources”. This ensures that the image is available in its original format for further processing  
    <div drawio-diagram="8748"><img src="https://doc316en.candera.eu/uploads/images/drawio/2025-11/drawing-7-1763105227.png" alt=""/></div>
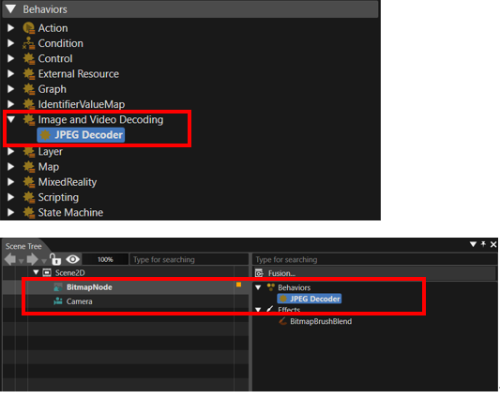
2. **Add the Bitmap node to the scene:** Add a bitmap node to a 2D scene.
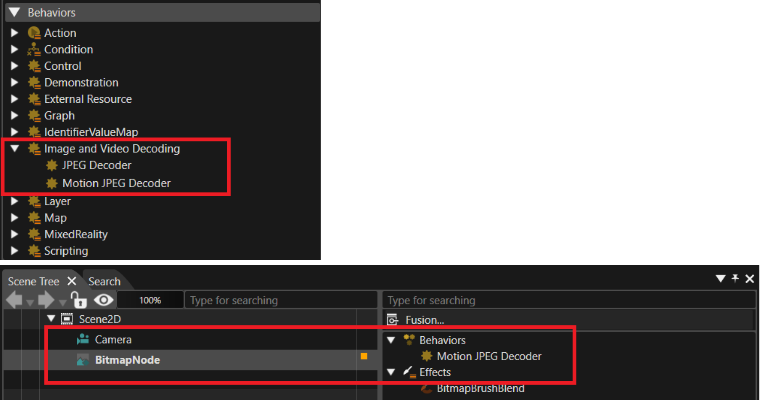
3. **Add the Behavior to a Bitmap Node:** Place the JPEG Decoder behavior onto a Bitmap Node in the scene.  
    <div drawio-diagram="8749"><img src="https://doc316en.candera.eu/uploads/images/drawio/2025-11/drawing-7-1763105255.png" alt=""/></div>
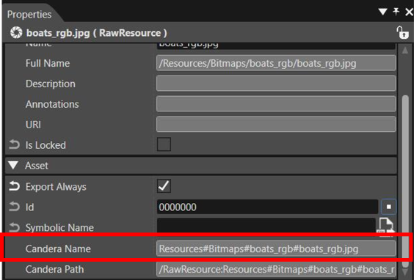
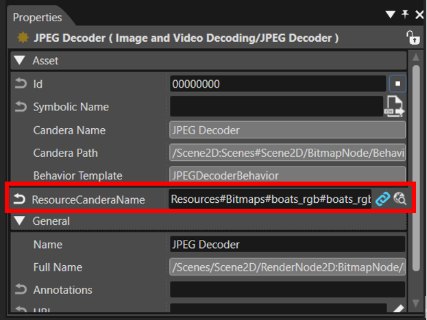
4. **Set the Resource Candera Name:** Paste the Candera Name of the raw JPEG image into the Resource Candera Name property using the steps below.  
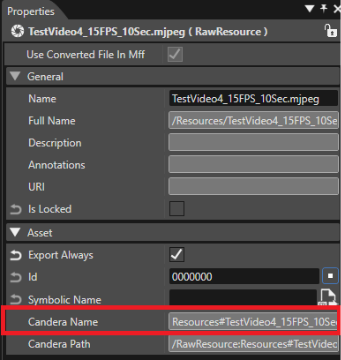
    a. **Step 1:** Copy the Candera Name of the raw JPEG image from the Solution Explorer under the Asset properties of the JPEG resource.  
    <div drawio-diagram="8750"><img src="https://doc316en.candera.eu/uploads/images/drawio/2025-11/drawing-7-1763105284.png" alt=""/></div>
    
      
    b. **Step 2:** Paste the Candera Name into the ResourceCanderaName property of the JPEG Decoder Behavior in the Properties panel.  
    <div drawio-diagram="8751"><img src="https://doc316en.candera.eu/uploads/images/drawio/2025-11/drawing-7-1763105308.png" alt=""/></div>

# MJPEG Stream Behavior

#### Feature Description  


<span data-teams="true">The MJPEG Stream behavior allows the user to decode and play an MJPEG video stream. The MJPEG Stream behavior uses the onboard JPEG Decoder hardware to decode the JPEG frames and display them on a bitmap node.</span>

**<span data-teams="true">Refer to the <span style="color: rgb(230, 126, 35);">[Video Format Conversion](https://doc316en.candera.eu/books/target-setup-for-traveo2/page/video-format-conversion)</span> documentation to convert any video to MJPEG format.</span>**

#### Supported Platforms

At present, the Motion JPEG decoder is exclusively supported on the Infineon Traveo 2 platform.

#### Limitations

The Motion JPEG Decoder Behavior currently has the following limitations.

- The video file must be included as part of the asset and cannot be provided to the hardware dynamically through communication interfaces at runtime.
- Check the <span style="color: rgb(230, 126, 35);">[JPEG Bitmap Converter](https://doc316en.candera.eu/books/target-setup-for-traveo2/page/jpeg-bitmap-converter)</span> documentation for the supported pixel formats.

#### <span lang="EN-US">Enabling the JPEG Decoder feature</span>

<span lang="EN-US">If the MJPEG Decoder Behavior is being used, ensure that the JPEG Decoder feature has been enabled in the CMAKE options. While generating the project for target, turn on the CMAKE flag CGIDEVICE\_TRAVEO2\_JPEG\_DECODER\_ENABLED or add this flag to the toolchain file.  
</span>

<div drawio-diagram="8752"><img src="https://doc316en.candera.eu/uploads/images/drawio/2025-11/drawing-7-1763105526.png" alt=""/></div>

#### How to use the Motion - JPEG Decoder

1. **Import the video as raw resource:** Using the import menu select “Import Raw Resources”. This ensures that the video is available in its original format for further processing.  
    <div drawio-diagram="8754"><img src="https://doc316en.candera.eu/uploads/images/drawio/2025-11/drawing-7-1763105557.png" alt=""/></div>
2. **Add the Bitmap node:** Add a bitmap node to a 2D scene.
3. **Add the Behavior to a Bitmap Node:** Place the Motion - JPEG Decoder behavior onto a Bitmap Node in the scene.   
    <div drawio-diagram="8755"><img src="https://doc316en.candera.eu/uploads/images/drawio/2025-11/drawing-7-1763105604.png" alt=""/></div>
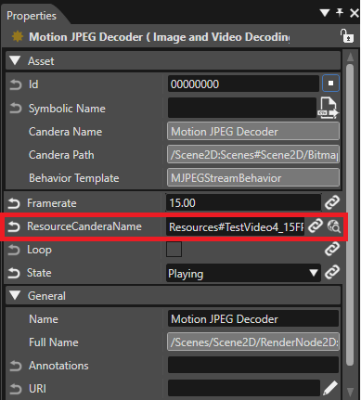
4. **Set the Resource Candera Name:** Paste the Candera Name of the raw MJPEG video into the ResourceCanderaName property using the steps below.  
    **Step 1:** Copy the Candera Name of the raw MJPEG video from the Solution Explorer under the Asset properties of the JPEG resource.  
    <div drawio-diagram="8756"><img src="https://doc316en.candera.eu/uploads/images/drawio/2025-11/drawing-7-1763105627.png" alt=""/></div>
    
      
    **Step 2:** Paste the Candera Name into the ResourceCanderaName property of the Motion - JPEG Decoder Behavior in the Properties panel.  
    <div drawio-diagram="8757"><img src="https://doc316en.candera.eu/uploads/images/drawio/2025-11/drawing-7-1763105646.png" alt=""/></div>
5. <article class="text-token-text-primary w-full focus:outline-none [--shadow-height:45px] has-data-writing-block:pointer-events-none has-data-writing-block:-mt-(--shadow-height) has-data-writing-block:pt-(--shadow-height) [&:has([data-writing-block])>*]:pointer-events-auto [content-visibility:auto] supports-[content-visibility:auto]:[contain-intrinsic-size:auto_100lvh] scroll-mt-[calc(var(--header-height)+min(200px,max(70px,20svh)))]" data-scroll-anchor="true" data-testid="conversation-turn-2" data-turn="assistant" data-turn-id="0b296bab-e20b-479a-b8e7-f7332a2d0ddc" dir="auto" tabindex="-1">**Playing in Loop:** The video can be configured to play continuously in a loop, if required.
    
    </article>
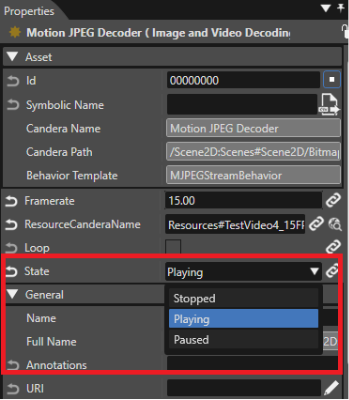
6. **Initial State:** The initial playback state of the video can be selected from the dropdown menu, as shown below.  
    <div drawio-diagram="8758"><img src="https://doc316en.candera.eu/uploads/images/drawio/2025-11/drawing-7-1763105673.png" alt=""/></div>
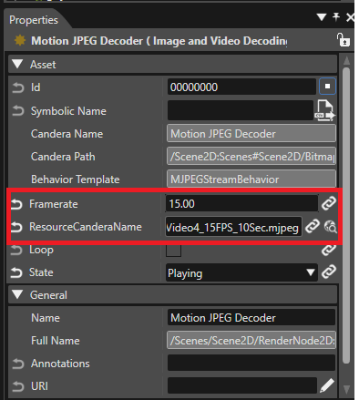
7. **Frame Rate:** Ensure that the frame rate is set to match the actual frame rate of the imported MJPEG video.  
    <div drawio-diagram="8759"><img src="https://doc316en.candera.eu/uploads/images/drawio/2025-11/drawing-7-1763105696.png" alt=""/></div>

The properties for the Motion JPEG Decoder behavior are bindable and therefore can be modified at runtime as well.

# Video Format Conversion

#### Introduction to ffmpeg

**ffmpeg** is a free and opensource tool that can be used to convert images and videos to different formats. The tool can be used to convert any video file to MJPEG format so that it can be imported and played by the MJPEG decoder behavior.

#### Installing ffmpeg

- **ffmpeg** version used in this documentation is 8.0. <span style="color: rgb(230, 126, 35);">[Download ffmpeg](https://ffmpeg.org/download.html)</span>.
- Extract the **ffmpeg** tool from the downloaded archive to a location on disk and add the path to the bin folder in the environment PATH variables.

#### Using the ffmpeg tool to convert MP4 videos to MJPEG

The following command can be used to convert an mp4 file into MJPEG format:

`ffmpeg -i input.mp4 -c:v mjpeg -q:v 2 -pix_fmt yuvj420p -huffman optimal -vf "scale=400:225" -f mjpeg -t 10 -r 15 output.mjpeg`

The breakdown of the arguments in the command is as follow:

- ffmpeg - The name of the tool
- -i - Specifies the input file
- -c:v mjpeg - Encodes all video channels with the mjpeg codec
- -q:v 2 - This is the quality scale for the video stream. Values are from 1=best to 31=worst
- -pix\_fmt yuvj420p - Select the pixel format as YUV420
- -huffman optimal - Use optimal huffman coding
- -vf "scale=400:225" - Set the output video resolution
- -f mjpeg - Force output file format as mjpeg
- -t 10 - Restrict length of output video to 10 seconds
- -r 15 - Set the output video frame rate to 15 fps
- output.mjpeg - name of the output file