# Target setup for R-Car D3

This document describes the setup required to build and run CGI Studio applications with R-Car D3 device package on Renesas R-Car D3 hardware.  
  
Among the Renesas R-Car D3 hardware, there are two variations:  
  
the R-Car D3 Custom Integrity BSP   
the R-Car D3 Draak Integrity BSP   
It is explained how to run the R-Car D3 target demo application part of the release package, how to setup the build environment and how to build own applications for R-Car D3 target (Renesas R-Car D3).

# R-Car D3 Custom Integrity BSP

# R-Car D3 Custom Integrity BSP: Prerequisites

#### <a class="anchor" id="bkmrk-"></a>Hardware: Renesas RCarD3 Draak board

CGI Studio has been tested on Renesas RCarD3 Custom Draak board.

#### <a class="anchor" id="bkmrk--0"></a>CMake

In order to build Candera, the Meta build system CMake needs to be installed with at least version mentioned <span style="color: rgb(230, 126, 35);">[here](https://doc316en.candera.eu/books/build-system-setup/page/prerequisites)</span>.  
CMake is able to create the cross compilation make files that can be used with Green Hills MULTI compiler.

#### <a class="anchor" id="bkmrk--1"></a>MinGW

To allow cross compilation with makefiles, MinGW 5.1.6 was used for this release.

#### <a class="anchor" id="bkmrk--2"></a>Green Hills Toolchain

The build tool chain is not part of the delivery. Green Hills MULTI compiler, Green Hills Integrity and the according Renesas BSP and RGL driver have to be obtained directly from Green Hills or Renesas and installed according to their installation guide.

CGI Studio was tested with **MULTI IDE 7.1.6, Compiler 2018.1.4** and **INTEGRITY for ARM v11.7.7**

The Green Hills Probe was setup with **Green Hills Probe Firmware Version 5.6.4, configuration rcar-d3.ghpcfg (included in BSP)**.

#### <a class="anchor" id="bkmrk--3"></a>Renesas Graphics Library

The graphics driver is not part of this release. CGI Studio was integrated and tested with the D3Hx RGL SGX540 driver Version V1.0

# Running the Player Demo Application on R-Car D3 Custom Integrity

#### <a class="anchor" id="bkmrk-"></a>Preparations

Make sure to have an implementation of cgi\_studio\_3psw\\src\\RCarD3\\enable\_display\\RCarD3\_custom\_EnableDisplays.h in the file cgi\_studio\_3psw\\internal\\Devices\\RCarD3\\enable\_display\\RCarD3\_custom\_EnableDisplays.c in order to set the GPIO pins in a way the displays work. Make also sure to copy the flash wrapper layer to "cgi\_studio\_3psw\\internal\\Devices\\RCarD3\\storage\_driver\_wrapper\_layer" where it is expected to be when using eMMC resp. QSPI as asset repository.

#### <a class="anchor" id="bkmrk--0"></a>Logging Output and Key Input

Use any terminal software to connect to the target via COM to receive logging output and use key input. BaudRate needs to be set to 115200.

#### <a class="anchor" id="bkmrk--1"></a>Download the Application

To download and debug the application you need a Green Hills probe according to the Prerequisites. In the Connection Organizer open the default.con from your BSP (devtree-arm64).

#### <a class="anchor" id="bkmrk--2"></a>Monolith Application

In the MULTI launcher select “Open debugger” and direct to your build folder. There choose the Monolith (this is the file without file extension and the application name and the word Monolith in it). Then hit F5 and connect to target via “Green Hills Probe Connection (mpserv) for SSFTxxx\_RcarD3\_10inch”. Choose “Download to RAM”. After the application is downloaded, the Player application starts. In the terminal press “h” to get the menu.

#### <a class="anchor" id="bkmrk--3"></a>Loading the asset

By default, the Player demo application has the asset file added by the linker. It will be loaded to RAM together with the application. You have to select the asset file in CMake via the variable ASSET\_TARGET\_LOCATION before you build the application.

# Building Own Application for R-Car D3 Custom Integrity

#### <a class="anchor" id="bkmrk-"></a>Generate Makefiles with CMake

For general information about CGI Studio Build System and CMake properties available to configure Candera applications refer to <span style="color: rgb(230, 126, 35);">[CGI Studio Build System](https://doc316en.candera.eu/books/build-system-setup)</span>.

To configure and generate makefiles for compiling the Player, follow below steps:

<div class="contents" id="bkmrk-point-cmake-to-sourc"><div class="contents"><div class="textblock">1. Point CMake to source directory 
    - Folder containing top-level "CMakeLists.txt", e.g. \\cmake\\Candera\\Player
2. Point CMake to binary directory 
    - May not exist, create folder with CMake if necessary
    - Root directory for generated makefiles / solutions
    - Root directory for build artifacts
3. Configure 
    - Specify MinGW Makefiles as generator for the project
    - Specify tool-chain file for cross-compiling
4. Select the toolchain-file from the delivery (adapt for your toolchain installation and application specific needs) 
    - \\cgi\_studio\_devices\\src\\RCarD3\\ToolchainFiles\\MULTI-toolchain-RCarD3\_custom.txt
5. Adapt the CMake settings if necessary, e.g.: 
    - CMAKE\_BUILD\_TYPE-&gt; Debug or Release
    - Press Configure
6. Press Generate

</div></div></div>#### <a class="anchor" id="bkmrk--0"></a>Building Application

Via the CMake variable CGIDEVICE\_BSP\_CFG\_NAME, it is possible to choose the BSP library configuration. By default this is set to release (rel), however, it is also possible to choose debug (dbg), checked (chk) resp. coverage (cov).

On the custom board display id 1 was used for all our. Please make sure to have set display id to 1 in Scene Composer. If you want to change this, this also has to be changed for our samples in CMake via the variable CGIDEVICE\_DISPLAY\_ID.

For this board it is intended to use a shader compiler. By default, the 2D shaders are pre-compiled and already linked to the sample. This is done via the CMake variables CANDERA\_EXTERNAL\_SHADER\_BUILDER\_HEADER\_INCLUDE, CANDERA\_EXTERNAL\_SHADER\_BUILDER\_HEADER\_PATH and CANDERA\_EXTERNAL\_SHADER\_BUILDER\_SOURCE\_PATH. If you want to change this, first uncheck RCARD3\_EXTERNAL\_SHADER\_BUILDER\_USAGE\_DEFAULT, then it is possible to e.g. delete the value of the above mentioned variables in order to not use pre-compiled shaders. For all the other shaders, the compilation is done via plugin in CGI Studio. Please make sure to have the RCarD3 Shader Compiler Plugin (can be found under File/Preferences) set to “Binary”. Additionally, set the absolute path to the shader compiler \*.exe. If the RCarD3 Shader Compiler Plugin is set to “Text”, the shader compiler is not used at all.

It is possible to have the asset stored in the eMMC resp. QSPI flash instead of having it linked to the monolith. Use the writing tool to store the asset into the flash. Make also sure to copy the flash wrapper layer to "cgi\_studio\_3psw\\internal\\Devices\\RCarD3\\storage\_driver\_wrapper\_layer" where it is expected to be when using eMMC resp. QSPI as asset repository. In CMake it is required to change the variable RCARD3\_ASSET\_LOCATION from “Monolith” to “eMMC” resp. “QSPI”. Additionally, it is necessary to verify the path to the Flash tool (RCARD3\_FLASH\_TOOL\_PATH) in order to link the correct libraries.

# R-Car D3 Draak Integrity BSP

# R-Car D3 Draak Integrity BSP: Prerequisites

#### <a class="anchor" id="bkmrk-"></a>Hardware: Renesas RCarD3 Draak board

CGI Studio has been tested on Renesas RCarD3 Draak board.

#### <a class="anchor" id="bkmrk--0"></a>CMake

In order to build Candera, the Meta build system CMake needs to be installed with at least version mentioned <span style="color: rgb(230, 126, 35);">[here](https://doc316en.candera.eu/books/build-system-setup/page/prerequisites)</span>.  
CMake is able to create the cross compilation make files that can be used with Green Hills MULTI compiler.

#### <a class="anchor" id="bkmrk--1"></a>MinGW

To allow cross compilation with makefiles, MinGW 5.1.6 was used for this release.

#### <a class="anchor" id="bkmrk--2"></a>Green Hills Toolchain

The build tool chain is not part of the delivery. Green Hills MULTI compiler, Green Hills Integrity and the according Renesas BSP and RGL driver have to be obtained directly from Green Hills or Renesas and installed according to their installation guide.

CGI Studio was tested with **MULTI IDE 7.1.6, Compiler 2018.1.4** and **INTEGRITY for ARM v11.7.8**

The Green Hills Probe was setup with **Green Hills Probe Firmware Version 5.6.4**, configuration rcar-d3.ghpcfg (included in BSP).

#### <a class="anchor" id="bkmrk--3"></a>Renesas Graphics Library

The graphics driver is not part of this release. CGI Studio was integrated and tested with the D3Hx RGL SGX540 driver Version V1.0

# Running the Player Demo Application on R-Car D3 Draak Integrity

#### <a class="anchor" id="bkmrk-"></a>Logging Output and Key Input

Use any terminal software to connect to the target via COM to receive logging output and use key input. BaudRate needs to be set to 115200.

#### <a class="anchor" id="bkmrk--0"></a>Download the Application

To download and debug the application you need a Green Hills probe according to the Prerequisites. In the Connection Organizer open the default.con from your BSP (devtree-arm64).

#### <a class="anchor" id="bkmrk--1"></a>Monolith Application

In the MULTI launcher select “Open debugger” and direct to your build folder. There choose the Monolith (this is the file without file extension and the application name and the word Monolith in it). Then hit F5 and connect to target via “Green Hills Probe Connection (mpserv) for Renesas R-Car Gen3”. Choose “Download to RAM”. After the application is downloaded, the Player application starts. In the terminal press “h” to get the menu.

#### <a class="anchor" id="bkmrk--2"></a>Loading the asset

The Player demo application has the asset file added by the linker. It will be loaded to RAM together with the application. You have to select the asset file in CMake via the variable ASSET\_TARGET\_LOCATION before you build the application.

# Building Own Application for R-Car D3 Draak Integrity

#### <a class="anchor" id="bkmrk-"></a>Generate Makefiles with CMake

For general information about CGI Studio Build System and CMake properties available to configure Candera applications refer to <span style="color: rgb(230, 126, 35);">[CGI Studio Build System](https://doc316en.candera.eu/books/build-system-setup)</span>.

To configure and generate makefiles for compiling the Player, follow below steps:

<div class="contents" id="bkmrk-point-cmake-to-sourc"><div class="contents"><div class="textblock">1. Point CMake to source directory 
    - Folder containing top-level "CMakeLists.txt", e.g. \\cmake\\Candera\\Player
2. Point CMake to binary directory 
    - May not exist, create folder with CMake if necessary
    - Root directory for generated makefiles / solutions
    - Root directory for build artifacts
3. Configure 
    - Specify MinGW Makefiles as generator for the project
    - Specify tool-chain file for cross-compiling
4. Select the toolchain-file from the delivery (adapt for your toolchain installation and application specific needs) 
    - \\cgi\_studio\_devices\\src\\RCarD3\\ToolchainFiles\\MULTI-toolchain-RCarD3\_draak\_custom\_1.txt
5. Adapt the CMake settings if necessary, e.g.: 
    - CMAKE\_BUILD\_TYPE-&gt; Debug or Release
    - Press Configure
6. Press Generate

</div></div></div>#### <a class="anchor" id="bkmrk--0"></a>Building Application

Via the CMake variable CGIDEVICE\_BSP\_CFG\_NAME, it is possible to choose the BSP library configuration. By default this is set to release (rel), however, it is also possible to choose debug (dbg), checked (chk) resp. coverage (cov).

# Shader Compiler

#### Shader compilation is triggered in the following situations:

<div class="contents" id="bkmrk-during-shader-editin"><div class="contents"><div class="textblock">1. During shader editing, if requested via menu item "Shader" &gt; "Compile Shader" or by pressing F7 key, the selected shader or shader program will be compiled using the platform's shader compiler.
2. During scene editing, when the scene dependencies are generated, the shaders will be compiled using an internal shader compiler (so called "builtin://DefaultShaderCompiler").
3. During asset generation, depending on the selected shader compiler type, the shaders will be compiled using platform's shader compiler (Target) or internal shader compiler (Simulation).

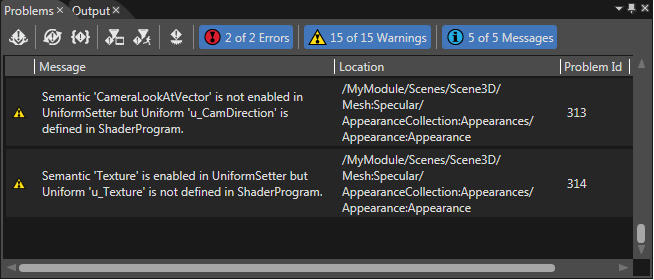
</div></div></div>The compilation result can be seen in the "Problems Browser" panel. For further information please refer to section <span style="color:rgb(230,126,35);">[Problems Browser](https://doc316en.candera.eu/books/solution-handling/page/problems-browser)</span>.

<div drawio-diagram="2970"><img src="https://doc316en.candera.eu/uploads/images/drawio/2023-03/drawing-4-1677733998.png" alt="drawing-4-1677733998.png"/></div>

<div class="contents" id="bkmrk--0"><div class="contents"><div class="textblock">  
</div></div></div>After successful shader compilation, a regarding message is displayed.

---

#### RCarD3 Shader Compiler

RCarD3 Shader Compiler provides support for exporting compiled (and/or linked) shaders to the asset file. It can be configured from File/Preferences section and provides some parameters which can be changed in order to achieve the desired behavior:

<div drawio-diagram="8533"><img src="https://doc316en.candera.eu/uploads/images/drawio/2025-08/drawing-7-1756174290.png" alt="drawing-7-1756174290.png"/></div>

<div class="contents" id="bkmrk--6"><div class="contents"><div class="textblock">  
</div></div></div>1\. Output type:

<table id="bkmrk-text-exports-the-sou" style="border-collapse:collapse;width:95.4762%;"><colgroup><col style="width:14.0644%;"></col><col style="width:85.9356%;"></col></colgroup><tbody><tr><td>Text</td><td>Exports the source code of the shaders (separate source code for vertex and fragment shaders)</td></tr><tr><td>Binary</td><td>Exports compiled shaders (separate compiled vertex and fragment shaders)</td></tr><tr><td>Binary program</td><td>Exports a linked shader pair (in the asset file, the vertex shader will contain the compiled and linked pair and the fragment shader will contain an empty buffer)</td></tr></tbody></table>

<div class="contents" id="bkmrk-a.-binary---exports-"><div class="contents"></div></div>2\. Command line - a configurable string of the following format:

```
<path_to_executable_file> [arg0] [arg1] [arg2] ... [argN] | expectedFileName:<output_file_name>
```

<div class="contents" id="bkmrk-a.-the-path-to-execu"><div class="contents"><div class="textblock">- a. The path to executable to be run in order to generate the compiled/linked shaders along. The executable itself can be specified alone (no path) if the path to it's parent directory is found in the system environment path. Paths which cointain spaces need to be delimited by double quotes. <dl class="note"><dt></dt><dd>  
    </dd><dd></dd></dl>
- b. The arguments (parameters to be passed to execution). Some special parameters which identify the current processed shader can be specified (they are detailed below). Examples: $ShaderPath$, $VsPath$
- c. The expected file name specifier: specifies the name (without extension) of the output file and is separated from the rest of the command (a and b) by a pipe '|'. RCarD3 shader compiler expects output files with the following extensions:   
     i.) .vgcSL - compiled vertex shader (applies for Binary output only)  
     ii.) .pgcSL - compiled fragment shader (applies for Binary output only)   
     iii.) .gcPGM - compiled and linked shader pair (applies for Binary program output only)  
    Example: For binary output, "expectedFileName:output" - requires that a compiled vertex shader file will be named output.vgcSL and a compiled fragment shader file will be named output.pgcSL
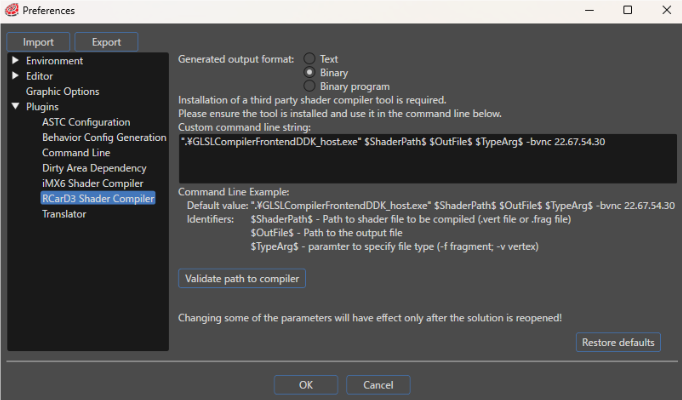
</div></div></div>The command line for "Binary" output is a little bit different than the one for "Binary program" output.

**Binary output command line:**

This command line is invoked separately for each vertex and fragments shader.

```
Example: ".\GLSLCompilerFrontendDDK_host.exe" $ShaderPath$ $OutFile$ $TypeArg$ -bvnc 22.67.54.30

```

Identifiers

<div class="contents" id="bkmrk-%24shaderpath%24---can-b"><div class="contents"><div class="textblock">- $ShaderPath$ - Path to shader file to be compiled (.vert file or .falg file)
- $OutFile$ - Path to the output file
- $TypeArg$ - Parameter to specify file type (-f fragment, -v vertex)

</div></div></div>**Binary program output command line:**

This command is invoked for a shader pair (both vertex and fragment shader)

```
Example: ".\GLSLCompilerFrontendDDK_host.exe" $VsPath$ $FsPath$ $OutFile$ -vf -bvnc 22.67.54.30

```

Identifiers

<div class="contents" id="bkmrk-%24vspath%24---path-to-v"><div class="textblock">- $VsPath$ - Path to vert file to be compiled (.vert file)
- $FsPath$ - Path to frag file to be compiled (.frag file)
- $outFile$ - Path to the output file
- &amp;TypeArg&amp; - Will be automatically replaced with -vf

</div></div>