

# Target setup for QNX Screen

This document describes the setup required to build and run CGI Studio applications with QnxScreen device package.  
  
It is explained how to run the QnxScreen target demo application part of the release package, how to setup the build environment and how to build own applications for QnxScreen target.  
  
Table of Content

# QnxScreen BSP : Table of Content

# QnxScreen BSP: Prerequisites

#### <a class="anchor" id="bkmrk-"></a>Hardware:

##### NXP\_i.MX8DXP/DX board

CGI Studio has been tested on NXP\_i.MX8DXP/DX custom board.

##### Raspberry Pi BCM2711 R-PI4

CGI Studio has been tested on Raspberry Pi 4 board.

#### <a class="anchor" id="bkmrk--0"></a>CMake

In order to build Candera, the Meta build system CMake needs to be installed with at least version mentioned <span style="color: rgb(230, 126, 35);">[here](https://doc316en.candera.eu/books/build-system-setup/page/prerequisites)</span>.

CMake is able to create the cross compilation make files that can be used with QNX compiler.

#### <a class="anchor" id="bkmrk--1"></a>Ninja

To allow cross compilation with makefiles, MinGW 4.2.1 (Ninja 1.9.0) was used for this release.

#### <a class="anchor" id="bkmrk--2"></a>QNX Toolchain

The build tool chain is not part of the delivery. QNX driver and tools have to be obtained directly from QNX and installed according to their installation guide.

##### NXP\_i.MX8DXP/DX board

CGI Studio was tested with **QNX Software Center** with installed **QNX® Software Development Platform 7.0, QNX Momentics® IDE (Windows 64-bit) ver. 7.0.4.201905030129 Build 18**

Compiler/s used for this release **aarch64-unknown-nto-qnx7.0.0-gcc-5.4.0 and aarch64-unknown-nto-qnx7.0.0-g++-5.4.0.**

##### Raspberry Pi BCM2711 R-PI4

CGI Studio was tested with **QNX Software Center** with installed **QNX® Software Development Platform 7.1, Momentics® Integrated Development Environment (Windows 64-bit) ver. 7.1.2.v202203081633**

Compiler/s used for this release **aarch64-unknown-nto-qnx7.1.0-gcc-8.3.0 and aarch64-unknown-nto-qnx7.1.0-g++-8.3.0.**

#### <a class="anchor" id="bkmrk--3"></a>QNX Momentics

The QNX Momentics IDE was used in order to connect to the target board, with the use of an ethernet cable, and a IP connection. Connecting with QNX Momentics IDE is necessary for loading the application, the solution asset, along with other required libraries, on target.

# Running the CGI Player Demo Application on QNX

#### <a class="anchor" id="bkmrk-"></a>Connecting to the board

Using Momentics IDE, one should connect to the board in order to load the CGI application and other libraries. In order to do this one should do the following:

<div class="contents" id="bkmrk-connect-an-ethernet-"><div class="contents"><div class="textblock">1. Connect an Ethernet cable between the PC and the board
2. On PC (only once) configure a network adapter with the following settings: 
    - IP address: 192.168.0.148
    - Subnet Mask: 255.255.255.0
3. Set up a new target connection in Momentics IDE: 
    - Go to "Launch Target", click on " QNX Target" button and “IP”
    - Setup a new QConn Launch Target with the IP: 192.168.0.149, and port 8000 After this you should see in the "Target File System Navigator" view the whole tree directory of the target.

</div></div></div>#### <a class="anchor" id="bkmrk--0"></a>Logging Output and Key Input

Use TeraTerm or another terminal software to connect to the target via micro-USB (debugger) to receive logging output and use key input. BaudRate needs to be setup to 115200 8/n/1/n.

#### <a class="anchor" id="bkmrk--1"></a>Download the Application

Once connected to the board copy your app and asset files in /root (by "drag and drop" in the "Target File System Navigator" view)

On target via TeraTerm, navigate (change directory) into the /root folder and run the applications with following command:

```
 ./<app-name> <asset-name>.bin 
```

# Building Own Application for QnxScreen

#### <a class="anchor" id="bkmrk-"></a>Generate Makefiles with CMake

For general information about CGI Studio Build System and CMake properties available to configure Candera applications refer to <span style="color: rgb(230, 126, 35);">[CGI Studio Build System](https://doc316en.candera.eu/books/build-system-setup)</span>.

To configure and generate makefiles for compiling the CGI Player, follow below steps:

1. Open a terminal.
2. Set the environment. This step is mandatory. Omitting this step will cause building with the host systems compiler instead of cross compiling.   
    ```
    call C:\Users\<username>\qnx<version>\<version>\qnxsdp-env.bat
    ```
3. From this console open CMake.
4. Point CMake to source directory 
    - Folder containing top-level "CMakeLists.txt", e.g. /cmake/Candera/Player <div class="image"><div drawio-diagram="2938"><img src="https://doc316en.candera.eu/uploads/images/drawio/2023-02/drawing-4-1677567539.png" alt=""/></div>
        
        </div>
5. Point CMake to binary directory 
    - May not exist, create folder with CMake if necessary
    - Root directory for generated makefiles / solutions
    - Root directory for build artifacts <div class="image"><div drawio-diagram="2939"><img src="https://doc316en.candera.eu/uploads/images/drawio/2023-02/drawing-4-1677567561.png" alt=""/></div>
        
        </div>
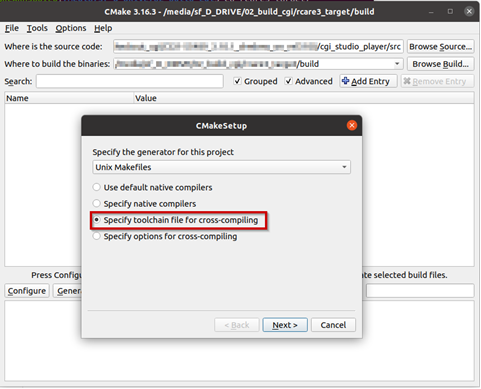
6. Configure 
    - Specify Ninja Makefiles as generator for the project
    - Specify tool-chain file for cross-compiling  
        <div drawio-diagram="2940"><img src="https://doc316en.candera.eu/uploads/images/drawio/2023-02/drawing-4-1677567581.png" alt=""/></div>
7. Select the toolchain-file from the delivery (adapt for your toolchain installation and application specific needs) 
    - ```
         /cgi_studio_devices/src/QnxScreen/ToolchainFiles/GCC-toolchain-<board>-QnxScreen-QNX.txt
        ```
8. Adapt the CMake settings if necessary, e.g.: 
    - CMAKE\_BUILD\_TYPE-&gt; Debug or Release
    - Press Configure
9. Press Generate

#### <a class="anchor" id="bkmrk--3"></a>Building Application

<div class="contents" id="bkmrk-use-same-command-pro"><div class="textblock"><dl class="note"><dt></dt><dd><p class="callout info">Use same Command Prompt window for all steps.</p>

</dd></dl></div></div><div class="contents" id="bkmrk-qnx-environment-vari"><div class="textblock">1. QNX environment variables first have to be set with qnxsdp-env.bat (QNX70\\).
2. Open CMake GUI and configure the project (e.g Player, CourierSampleApp, CitDemoApp) according to Generate Makefiles with CMake
3. After generating your cmake files, simply navigate to the specified build directory (binary directory created in CMake GUI) and type "ninja" to start the build.

</div></div>