The project requirements
- CGI-Player Launcher Android application uses the **Android Gradle Plugin version 7.2.1** and **Gradle version 7.3.3**. - A **custom NDK 26** is required, as described in the [Android Native Development Kit (NDK)](https://doc316en.candera.eu/link/1135#bkmrk-android-native-devel) chapter. - **CMake 3.22.1** is required as described in the [CMake ](https://doc316en.candera.eu/link/1135#bkmrk-cmake)chapter. - **Eclipse Temurin JDK 11** is required as described in [Java Development Kit (JDK)](https://doc316en.candera.eu/link/1135#bkmrk-java-development-kit) chapter. - Supported API levels: **23–28** (The application is compatible with later Android versions up to API 36 on Android 16). - Supported ABIs: **arm64-v8a, x86\_64, x86** - The CGI-Player Launcher Android application integrates the NativeView library, which is provided externally from **../libs/nativeview-lib** and already imported into the project. #### Building and Running the Android Application To build and run the Android application, perform the following steps: 1\. **Substitute the CGI Studio root as described in the [windows-commands/subst](https://learn.microsoft.com/en-us/windows-server/administration/windows-commands/subst) article.** Open a Command Prompt in the CGI Studio root directory (e.g., “...\\cgistudio”) and type: ```shell subst x: . ``` Press **enter**. The CGI root is now available under the **X:** drive in Windows Explorer. 2\. **Open the Android Application:** Launch Android Studio and open the project located at: ```shell X:\cgi_studio_apps\References\Android\AndroidCgiPlayerLauncher ``` 3\. **Configure local.properties:** - - Open **local.properties.sample** file from the root of the Android application. - Copy the content of the sample to the **local.properties** file in the root of the Android application. - Update the **USERNAME** in the SDK and NDK paths to match your system. - How the asset can be loaded is described in the **Asset Configuration** block. - Set the ABI to the target CPU architecture under the **Target ABI** block. - If you need Vulkan support, change `angle_vulkan=off` to `angle_vulkan=on` in **local.properties**. - Save **local.properties** and **sync project with Gradle files** (Ctrl+Shift+O).Note: If the SDK or NDK paths do not exist, Android Studio may reset **local.properties** after syncing the project with Gradle files.
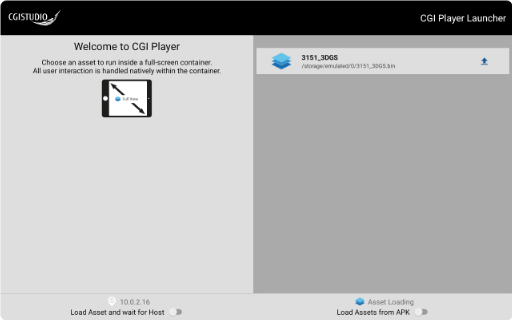
4\. **Create an Android asset** Run the following batch file: ```shell X:\bin\SceneComposer\SceneComposer_Android_OpenGLES30.bat ``` - - Choose an asset template (e.g., “3D Basic”) and save this as Test.bin - **If from sdcard:** to the **/sdcard/** directory of the target or emulator. In Android Studio, this can be done in the "Device Explorer" of the target or emulator. - **If from APK:** to the following folder: ```shell X:\cgi_studio_apps\References\Android\AndroidCgiPlayerLauncher\app\src\main\assets ``` 5\. **Build variant:** - - In Android Studio, open \[View | Tool Window | Build Variants\]. - In the Build Variants tool window, select debug or release under **Active Build Variant.** 6\. **Run the application**: - - Select the target device or emulator in Android Studio. - Click **Run** (the play button) - The first time the Application starts, it will request permissions. Accept and restart the application. - The assets are loaded from the location that is set in the **Asset Location** option in the application. - The desired asset can be clicked on and the asset should be running. 6.1 **Launching an asset via ADB (command-line)** The asset path can be found in the CGI-Player Launcher app. Replace the asset path and asset filename in the command. Use this method to start the CGI-Player Launcher and open a selected asset from cmd: ```shell adb shell am start -n at.cgistudio.player/.presentation.nativeview.NativeViewActivity -e extra_asset_path "/storage/emulated/0/3151_3DGS.bin" -e extra_asset_name "3151_3DGS.bin" -e extra_load_from_assets false -e extra_wait_for_connection false ``` 7\. **APK** After the application is running, the current built APK can be found in the build directory. This can located by opening \[Build | Analyze APK\]. The usual directory would be: ```shell X:\cgi_studio_apps\References\Android\AndroidCgiPlayerLauncher\app\build\intermediates\apk\ ```If the build was for release, the APK will be signed.
#### Troubleshooting - If encountering any issues during the setup, refer to the official documentation for Android Studio, CMake, and NDK for troubleshooting steps. #### Platform Tests - Google Pixel C, ARM Cortex A57, Android 8.1.0, API 27 - Huawei MediaPad M5, ARM Cortex A73, Android 9, EMUI 9.1.0, API28 - Emulator Pixel 2, x86\_64, Android 6, API 23 (Without Play/APIs) - Emulator Medium Phone, x86\_64, Android 9, API 28 (Without Play/APIs) - Emulator Pixel 2, x86, Android 9, API 28 (Without Play/APIs) - Emulator Google Pixel Tablet, x86\_64, Android 14.0, API 34 - Emulator Google Pixel Tablet, x86\_64, Android 16.0, API 36 - Emulator Google Pixel 9 Pro XL, x86\_64, Android 16.0, API 36 ---