# Target setup for Android

This documentation serves as a guide for setting up the developer's system to initiate work with Android for CGI Studio. It is tailored for experienced users, omitting explanations for the more straightforward aspects.

# Android CMake Specific Content

# Candera Device Packages

<div class="contents" id="bkmrk-supported-device-pac"><div class="contents"><div class="textblock"><a class="anchor" id="bkmrk-" style="font-size: 1.666em; font-weight: 400; background-color: rgb(255, 255, 255);"></a><span style="color: rgb(34, 34, 34); font-size: 1.666em; font-weight: 400;">Supported Device Packages</span></div></div></div>Candera provides device implementations for following device types:

<div class="contents" id="bkmrk-name-description-pos"><div class="contents"><div class="textblock"><table border="1" cellpadding="5" cellspacing="0" width="800"><tbody><tr bgcolor="#d4d4d4"><th>Name</th><th>Description</th><th>Possible values</th></tr><tr><td>Android</td><td>  
</td><td>ON/OFF</td></tr><tr><td>Other proprietary devices</td><td>Can be provided upon special request</td><td>ON/OFF</td></tr></tbody></table>

</div></div></div>#### <a class="anchor" id="bkmrk--0"></a>Device-Specific CMake Settings

<div class="contents" id="bkmrk-name-description-pos-0"><div class="contents"><div class="textblock"><table border="1" cellpadding="5" cellspacing="0" width="800"><tbody><tr bgcolor="#d4d4d4"><th>Name</th><th>Description</th><th>Possible values</th></tr><tr><td>CGIDEVICE\_NAME</td><td>The name of the device package</td><td>Each device package following the Candera device CMake rules provided in the folder &lt;CANDERA\_SRC&gt;/CanderaPlatform/Device</td></tr><tr><td>CGIDEVICE\_TARGET\_BUILD</td><td>Enable or disable building for target</td><td>ON/OFF</td></tr><tr><td>CGISTUDIO\_PATH\_3RD\_PARTY</td><td>Path to the 3rd party repository location</td><td>A string value containing the system file location of 3rd party software, auto-detected by finding possible locations of the name "\[ic01\_\]cgi\_studio\_3psw"</td></tr><tr><td>CGIDEVICE\_TARGET\_  
&lt;CGIDEVICE\_NAME&gt;  
\_DRIVER\_PATH\_INCLUDE</td><td>If you don't use the default driver path, the path to the driver include directory can be changed with this setting.</td><td>Path to driver include directory (by default set to include directory in 3rd party repository)</td></tr><tr><td>CGIDEVICE\_TARGET\_  
&lt;CGIDEVICE\_NAME&gt;  
\_DRIVER\_PATH\_LIB</td><td>If you don't use the default driver path, the path to the driver library directory can be changed with this setting.</td><td>Path to driver library directory (by default set to library directory in 3rd party repository)</td></tr></tbody></table>

</div></div></div>  
To build a certain device package selected it from the drop-down list of the CMake property **"CGIDEVICE\_NAME"**:

For each device package, either building OpenGL based host simulation or target binaries can be selected via the Boolean CMake property ***"CGIDEVICE\_TARGET\_BUILD"***.

The following table illustrates configurations available for the supported device package:

<div class="contents" id="bkmrk-cgidevice_name-cgide"><div class="contents"><div class="textblock"><table border="1" cellpadding="5" cellspacing="0" width="800"><tbody><tr bgcolor="#d4d4d4"><th>CGIDEVICE\_NAME</th><th>CGIDEVICE\_TARGET\_BUILD</th><th>PUB\_CGI\_CPU</th><th>PUB\_CGI\_OS</th><th>Default driver path following  
&lt;CGISTUDIO\_PATH\_3RD\_PARTY&gt;  
/\[src/lib\]/</th></tr></tbody></table>

</div></div></div>The CMake properties "PUB\_CGI\_CPU", "PUB\_CGI\_OS" usually cannot be configured via the CMake user interface, but are autonomously detected by  
the build system. The same applies for the variable "PUB\_CGI\_COMPILER".

If you don't use the CGI Studio 3rd party software folder structure, the driver paths can be specified in the variables

<div class="contents" id="bkmrk-cgidevice_target_%3Ccg"><div class="contents"><div class="textblock">- CGIDEVICE\_TARGET\_&lt;CGIDEVICE\_NAME&gt;\_DRIVER\_PATH\_INCLUDE and
- CGIDEVICE\_TARGET\_&lt;CGIDEVICE\_NAME &gt;\_DRIVER\_PATH\_LIB

</div></div></div>Depending on these properties, either MS Visual Studio solutions or Unix makefiles will be generated into the specified build  
directory.

# Android Application Development Environment Setup Guide

To ensure that the system is setup properly to build and run the Android Demo Applications provided, this guide has been created.

# Configuration and System Requirements

By following these steps, you should have a consistent and well-configured development environment for your  
Android application on Windows 10/11. Remember to restart your system after making changes related to CMake  
in Android Studio and after updating Environment Variables.

#### Operating System

Ensure that your development machine is running Windows 10/11. This guide has been refined to work on Windows 10/11. Other Operating Systems might work, but are not supported.

#### Android Studio

Android Studio Jellyfish (2023.3.1) through Android Studio Meerkat (2024.3.2) have been tested and confirmed to work. Android Studio can be downloaded from the official Android Studio archive: <span style="color: rgb(230, 126, 35);">[https://developer.android.com/studio/archive](https://developer.android.com/studio/archive)</span>.

##### Android Studio Emulator

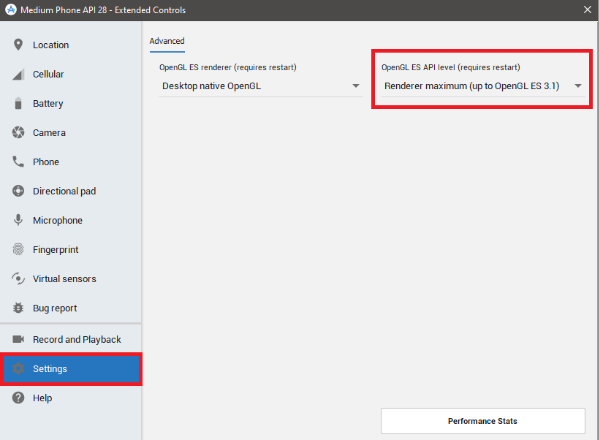
When using the Android Studio Emulator for testing, ensure that the Android version and ABI match those of the Android application. Additionally, make sure that, for the emulator, the OpenGL ES API level (requires a restart) is set to "Renderer maximum (up to OpenGL ES 3.1)." This OpenGL ES API level can be configured in the Android Studio Emulator's Extended Controls.

<div drawio-diagram="5111"><img src="https://doc316en.candera.eu/uploads/images/drawio/2024-01/drawing-7-1706169271.png" alt=""/></div>

<div drawio-diagram="5112"><img src="https://doc316en.candera.eu/uploads/images/drawio/2024-01/drawing-7-1706169286.png" alt=""/></div>

#### Android Software Development Kit (SDK)

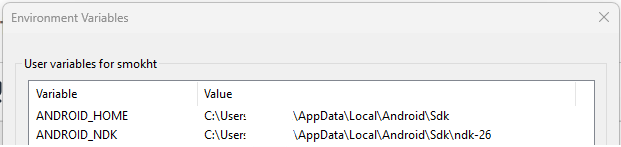
After installing and setting up Android Studio, the SDK path has to be added to the System Environment Variables under the User Variables. After saving make sure to restart the system to apply the changes correctly.

- **Variable Name:** ANDROID\_HOME
- **Variable Value:** %LOCALAPPDATA%\\Android\\Sdk

<div drawio-diagram="5848"><img src="https://doc316en.candera.eu/uploads/images/drawio/2024-05/drawing-7-1716876721.png" alt=""/></div>

#### Android Native Development Kit (NDK)

To make use of NDK 26, we need to manually install this. We would also require some files from the NDK 17 release for the build in this release. Download both NDK 26 <span style="color: rgb(230, 126, 35);">[https://dl.google.com/android/repository/android-ndk-r26b-windows.zip](https://dl.google.com/android/repository/android-ndk-r26b-windows.zip)</span> and NDK 17 <span style="color: rgb(230, 126, 35);">[https://dl.google.com/android/repository/android-ndk-r17c-windows-x86\_64.zip](https://dl.google.com/android/repository/android-ndk-r17c-windows-x86_64.zip)</span> from the official download pages.

1. Navigate to %LOCALAPPDATA%\\Android\\Sdk in Windows File Explorer.
2. Create a new directory named ndk-26.
3. Unzip the contents of android-ndk-r26b-windows.zip into the newly created %LOCALAPPDATA%\\Android\\Sdk\\ndk-26 directory.
4. Unzip the contents (**except llvm)** from android-ndk-r17c-windows-x86\_64.zip\\android-ndk-r17c\\toolchains\\ to %LOCALAPPDATA%\\Android\\Sdk\\ndk-26\\toolchains.
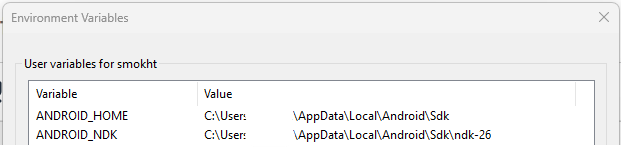
5. After installing and setting up the NDK, the NDK path has to be added to the System Environment Variables under the User Variables. After saving make sure to restart the system to apply the changes correctly.

- **Variable Name:** ANDROID\_NDK
- **Variable Value:** %LOCALAPPDATA%\\Android\\Sdk\\ndk-26

<div drawio-diagram="5849"><img src="https://doc316en.candera.eu/uploads/images/drawio/2024-05/drawing-7-1716876824.png" alt=""/></div>

#### Java Development Kit (JDK)

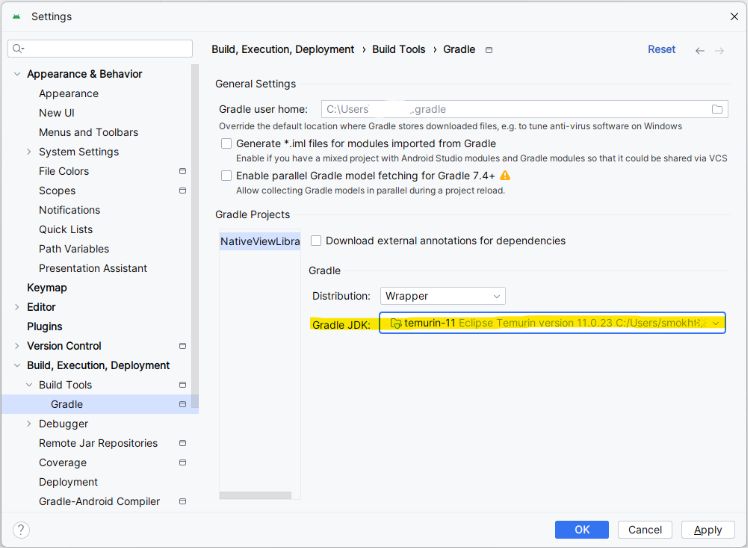
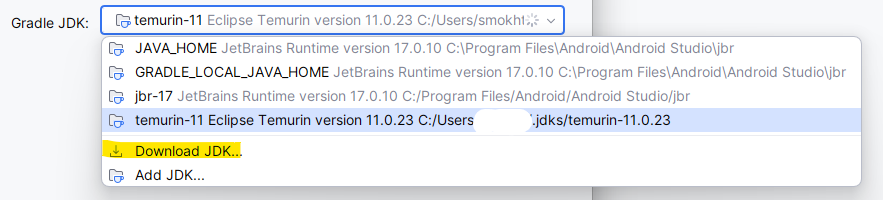
The JDK can be downloaded and used within Android Studio directly. For Android Applications we make use of the Eclipse Temurin 11. When the Android Demo Application has been opened with Android Studio, the Android JDK should be set. On the specific Android Application wiki page the used JDK version is written down.

1. In Android Studio, open \[File | Settings | Build, Execution, Deployment | Build Tools | Gradle\].
2. Choose Gradle JDK: Temurin-11 Eclipse Temurin Version 11.

<div drawio-diagram="5850"><img src="https://doc316en.candera.eu/uploads/images/drawio/2024-05/drawing-7-1716878829.png" alt=""/></div>

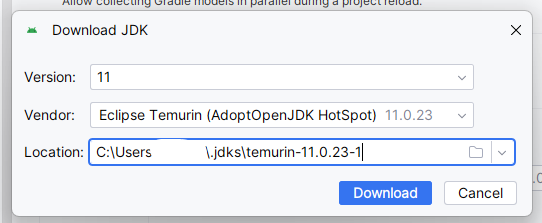
If this version is not available in the dropdown, download it by clicking on “Download JDK…” in the dropdown of Gradle JDK.

<div drawio-diagram="5851"><img src="https://doc316en.candera.eu/uploads/images/drawio/2024-05/drawing-7-1716878853.png" alt=""/></div>

<div drawio-diagram="5852"><img src="https://doc316en.candera.eu/uploads/images/drawio/2024-05/drawing-7-1716878866.png" alt=""/></div>

#### Ninja

The "ninja" version used is 1.10.2 and can be downloaded from <span style="color: rgb(230, 126, 35);">[https://github.com/ninja-build/ninja/releases/download/v1.10.2/ninja-win.zip](https://github.com/ninja-build/ninja/releases/download/v1.10.2/ninja-win.zip).</span> Copy "ninja.exe" to "C:\\Programs\\" and add this path "C:\\Programs\\" to the Environment Variables -&gt; System Variables -&gt; Path.

#### CMake

For the current Android demo applications that use the NativeView approach (e.g., NativeViewLibrary and AndroidCgiPlayerLauncher), we rely on specific CMake versions.

- **Up to CGI 3.14 -&gt; CMake 3.10.2 is used**
- **From CGI 3.15 -&gt; CMake 3.22.1 is used**
- **The supported CMake version can be also found in the Android application module (app) build.gradle.**

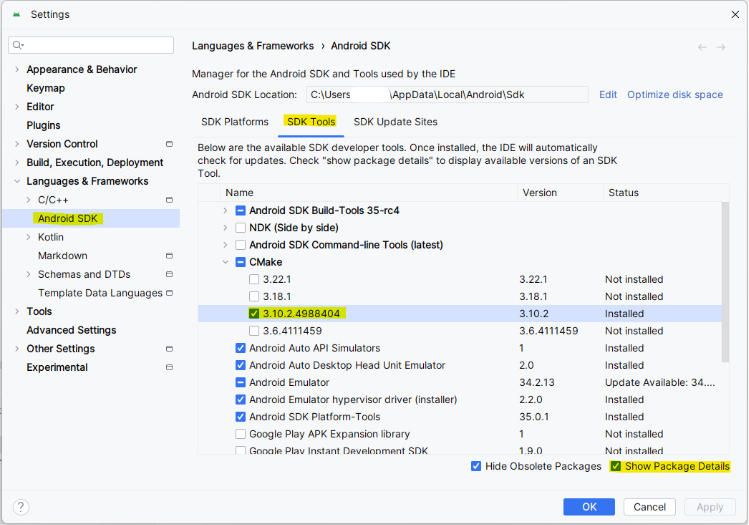
These CMake versions can be installed directly through the Android Studio SDK Manager.

1. In Android Studio, open \[File | Settings | Languages &amp; Frameworks | Android SDK\] and navigate to the SDK Tools tab.
2. Click on Show Package Details on the bottom right of the page.
3. In the list, make sure only CMake 3.10.2 is selected and installed.
4. After installing and closing the settings page, make sure to restart the system to apply the changes correctly.

<div drawio-diagram="5853"><img src="https://doc316en.candera.eu/uploads/images/drawio/2024-05/drawing-7-1716879030.png" alt=""/></div>

##### Alternative CMake Approach

For applications other than the NativeView Library approach, (e.g. SampleApp) the '.so' library must be configured and generated with CMake outside of Android Studio. It should be built using 'ninja' with Windows CMD. We recommend using **CMake 3.24.2**, which can be installed through the CMake installer executable available for download on the official CMake website: <span style="color: rgb(230, 126, 35);">[https://cmake.org/download/](https://cmake.org/download/)</span>. Once the build is complete, manually copy the '.so' library to the corresponding ABI directory in the project. Detailed configuration and build steps will be provided in the respective Android Application Wiki page.

#### Other Dependencies

Depending on your project, additional dependencies might be required (e.g., specific libraries, tools).  
Document and install these as needed.

#### Troubleshooting

- If encountering any issues during the setup, refer to the official documentation for Android Studio,  
    CMake, and NDK for troubleshooting steps.

#### Environment tested with Android Applications

- NativeViewLibrary
- AndroidCgiPlayerLauncher
- SampleApp (Previously known as CourierSampleApp)

# Android Application Guides

This document mandates adherence to the Android Application Development Environment  
Setup Guide, as a prerequisite for system compliance.

# NativeViewLibrary

<div drawio-diagram="8596"><img src="https://doc316en.candera.eu/uploads/images/drawio/2025-10/drawing-7-1759299837.png" alt=""/></div>

#### Requirements

This document mandates adherence to the <span style="color: rgb(230, 126, 35);">[Android Application Development Environment Setup Guide](https://doc316en.candera.eu/books/target-setup-for-android/page/configuration-and-system-requirements)</span>, as a prerequisite for system compliance.


<p class="callout warning">The project requirements </p>

- NativeViewLibrary Android application uses the **Android Gradle Plugin version 7.2.1** and **Gradle version 7.3.3**.
- A **custom NDK 26** is required, as described in the <span style="color: rgb(230, 126, 35);">[Android Native Development Kit (NDK)](https://doc316en.candera.eu/link/1135#bkmrk-android-native-devel)</span> chapter.
- **CMake 3.22.1** is required as described in the <span style="color: rgb(230, 126, 35);">[CMake ](https://doc316en.candera.eu/link/1135#bkmrk-cmake)</span>chapter.
- **Eclipse Temurin JDK 11** is required as described in <span style="color: rgb(230, 126, 35);">[Java Development Kit (JDK)](https://doc316en.candera.eu/link/1135#bkmrk-java-development-kit)</span> chapter.
- Supported API levels: **23–28** (The application is compatible with later Android versions up to API 36 on Android 16).
- Supported ABIs: **arm64-v8a, x86\_64, x86**
- The NativeViewLibrary Android application integrates the NativeView library, which is provided externally from **../libs/nativeview-lib** and already imported into the project.


#### Building and Running the Android Application

To build and run the Android application, perform the following steps:

1\. **Substitute the CGI Studio root as described in the <span style="color: #e67e23;">[windows-commands/subst](https://learn.microsoft.com/en-us/windows-server/administration/windows-commands/subst)</span> article.**

Open a Command Prompt in the CGI Studio root directory (e.g., “...\\cgistudio”) and type:

```shell
subst x: .


```

Press **enter**. The CGI root is now available under the **X:** drive in Windows Explorer.

2\. **Configure local.properties:**

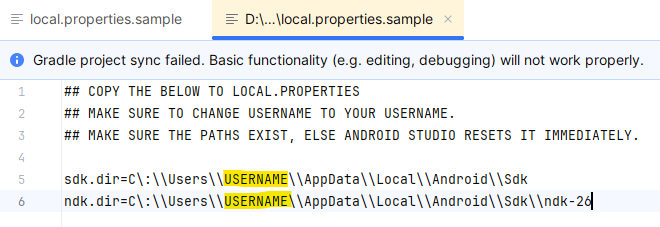
- - Open **local.properties.sample** file from the root of the Android application.
    - Copy the content of the sample to the **local.properties** file in the root of the Android application.
    - Update the **USERNAME** in the SDK and NDK paths to match your system.
    - Configure from where the asset should load under the **Asset Configuration** block.
    - Set the ABI to the target CPU architecture under the **Target ABI** block.
    - Save **local.properties** and **sync project with Gradle files** (Ctrl+Shift+O).

<p class="callout warning">Note: If the SDK or NDK paths do not exist, Android Studio may reset **local.properties** after syncing the project with Gradle files.</p>

3\. **Open the Android Application:**

Launch Android Studio and open the project located at:

```shell
X:\cgi_studio_apps\References\Android\NativeViewLibrary


```

4\. **Create an Android asset**

Run the following batch file:

```shell
X:\bin\SceneComposer\SceneComposer_Android_OpenGLES30.bat


```

- - Choose an asset template (e.g., “3D Basic”) and save this as Test.bin 
        - **If from sdcard:** to the **/sdcard/** directory of the target or emulator. In Android Studio, this can be done in the "Device Explorer" of the target or emulator.
        - **If from APK:** to the following folder:

```shell
X:\cgi_studio_apps\References\Android\NativeViewLibrary\sample\src\main\assets


```

5\. **Build variant:**

- - In Android Studio, open \[View | Tool Window | Build Variants\].
    - In the Build Variants tool window, select debug or release under **Active Build Variant.**

6\. **Run the application**:

- - Select the target device or emulator in Android Studio.
    - Click **Run** (the play button)
    - The first time the Application starts, it will request permissions. Accept and restart the application. The asset should now be running.

7\. **APK**

After the application is running, the current built APK can be found in the build directory. This can located by opening \[Build | Analyze APK\]. The usual directory would be:

```shell
X:\cgi_studio_apps\References\Android\NativeViewLibrary\sample\build\intermediates\apk\


```

<p class="callout info">If the build was for release, the APK will be signed.</p>


#### Troubleshooting

- If encountering any issues during the setup, refer to the official documentation for Android Studio,  
    CMake, and NDK for troubleshooting steps.


#### Platform Tests

- Google Pixel C, ARM Cortex A57, Android 8.1.0, API 27
- Huawei MediaPad M5, ARM Cortex A73, Android 9, EMUI 9.1.0, API28
- Emulator Pixel 2, x86\_64, Android 6, API 23 (Without Play/APIs)
- Emulator Medium Phone, x86\_64, Android 9, API 28 (Without Play/APIs)
- Emulator Pixel 2, x86, Android 9, API 28 (Without Play/APIs)
- Emulator Google Pixel Tablet, x86\_64, Android 14.0, API 34
- Emulator Google Pixel Tablet, x86\_64, Android 16.0, API 36
- Emulator Google Pixel 9 Pro XL, x86\_64, Android 16.0, API 36

---

# CGI-Player Launcher
<div drawio-diagram="8597"><img src="https://doc316en.candera.eu/uploads/images/drawio/2025-10/drawing-7-1759300250.png" alt=""/></div>

#### Requirements

This document mandates adherence to the <span style="color: rgb(230, 126, 35);">[Android Application Development Environment Setup Guide](https://doc316en.candera.eu/books/target-setup-for-android/page/configuration-and-system-requirements)</span>, as a prerequisite for system compliance.


<p class="callout warning">The project requirements </p>

- CGI-Player Launcher Android application uses the **Android Gradle Plugin version 7.2.1** and **Gradle version 7.3.3**.
- A **custom NDK 26** is required, as described in the <span style="color: rgb(230, 126, 35);">[Android Native Development Kit (NDK)](https://doc316en.candera.eu/link/1135#bkmrk-android-native-devel)</span> chapter.
- **CMake 3.22.1** is required as described in the <span style="color: rgb(230, 126, 35);">[CMake ](https://doc316en.candera.eu/link/1135#bkmrk-cmake)</span>chapter.
- **Eclipse Temurin JDK 11** is required as described in <span style="color: rgb(230, 126, 35);">[Java Development Kit (JDK)](https://doc316en.candera.eu/link/1135#bkmrk-java-development-kit)</span> chapter.
- Supported API levels: **23–28** (The application is compatible with later Android versions up to API 36 on Android 16).
- Supported ABIs: **arm64-v8a, x86\_64, x86**
- The CGI-Player Launcher Android application integrates the NativeView library, which is provided externally from **../libs/nativeview-lib** and already imported into the project.


#### Building and Running the Android Application

To build and run the Android application, perform the following steps:

1\. **Substitute the CGI Studio root as described in the <span style="color: #e67e23;">[windows-commands/subst](https://learn.microsoft.com/en-us/windows-server/administration/windows-commands/subst)</span> article.**

Open a Command Prompt in the CGI Studio root directory (e.g., “...\\cgistudio”) and type:

```shell
subst x: .


```

Press **enter**. The CGI root is now available under the **X:** drive in Windows Explorer.

2\. **Open the Android Application:**

Launch Android Studio and open the project located at:

```shell
X:\cgi_studio_apps\References\Android\AndroidCgiPlayerLauncher


```

3\. **Configure local.properties:**

- - Open **local.properties.sample** file from the root of the Android application.
    - Copy the content of the sample to the **local.properties** file in the root of the Android application.
    - Update the **USERNAME** in the SDK and NDK paths to match your system.
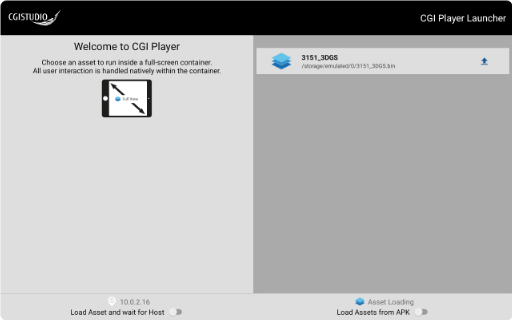
    - How the asset can be loaded is described in the **Asset Configuration** block.
    - Set the ABI to the target CPU architecture under the **Target ABI** block.
    - If you need Vulkan support, change `angle_vulkan=off` to `angle_vulkan=on` in **local.properties**.
    - Save **local.properties** and **sync project with Gradle files** (Ctrl+Shift+O).

<p class="callout warning">Note: If the SDK or NDK paths do not exist, Android Studio may reset **local.properties** after syncing the project with Gradle files.</p>

4\. **Create an Android asset**

Run the following batch file:

```shell
X:\bin\SceneComposer\SceneComposer_Android_OpenGLES30.bat


```

- - Choose an asset template (e.g., “3D Basic”) and save this as Test.bin 
        - **If from sdcard:** to the **/sdcard/** directory of the target or emulator. In Android Studio, this can be done in the "Device Explorer" of the target or emulator.
        - **If from APK:** to the following folder:

```shell
X:\cgi_studio_apps\References\Android\AndroidCgiPlayerLauncher\app\src\main\assets


```

5\. **Build variant:**

- - In Android Studio, open \[View | Tool Window | Build Variants\].
    - In the Build Variants tool window, select debug or release under **Active Build Variant.**

6\. **Run the application**:

- - Select the target device or emulator in Android Studio.
    - Click **Run** (the play button)
    - The first time the Application starts, it will request permissions. Accept and restart the application.
    - The assets are loaded from the location that is set in the **Asset Location** option in the application.
    - The desired asset can be clicked on and the asset should be running.

6.1 **Launching an asset via ADB (command-line)**

<span class="polarion-TextField polarion-RichTextFieldValue" style="font-size: 10pt;">The asset path can be found in the CGI-Player Launcher app. Replace the asset path and asset filename in the command.</span> Use this method to start the CGI-Player Launcher and open a selected asset from cmd:

```shell
adb shell am start -n at.cgistudio.player/.presentation.nativeview.NativeViewActivity -e extra_asset_path "/storage/emulated/0/3151_3DGS.bin" -e extra_asset_name "3151_3DGS.bin" -e extra_load_from_assets false -e extra_wait_for_connection false


```

7\. **APK**

After the application is running, the current built APK can be found in the build directory. This can located by opening \[Build | Analyze APK\]. The usual directory would be:

```shell
X:\cgi_studio_apps\References\Android\AndroidCgiPlayerLauncher\app\build\intermediates\apk\


```

<p class="callout info">If the build was for release, the APK will be signed.</p>


#### Troubleshooting

- If encountering any issues during the setup, refer to the official documentation for Android Studio,  
    CMake, and NDK for troubleshooting steps.


#### Platform Tests

- Google Pixel C, ARM Cortex A57, Android 8.1.0, API 27
- Huawei MediaPad M5, ARM Cortex A73, Android 9, EMUI 9.1.0, API28
- Emulator Pixel 2, x86\_64, Android 6, API 23 (Without Play/APIs)
- Emulator Medium Phone, x86\_64, Android 9, API 28 (Without Play/APIs)
- Emulator Pixel 2, x86, Android 9, API 28 (Without Play/APIs)
- Emulator Google Pixel Tablet, x86\_64, Android 14.0, API 34
- Emulator Google Pixel Tablet, x86\_64, Android 16.0, API 36
- Emulator Google Pixel 9 Pro XL, x86\_64, Android 16.0, API 36

---

# CourierSampleApp

#### System Requirements

This document mandates adherence to the Android Application Development Environment   
Setup Guide, as a prerequisite for system compliance.

By following these steps, you should have a consistent and well-configured development environment for your Android application on Windows 10/11. Remember to restart your system after making changes related to CMake in Android Studio and after updating Environment Variables.
<div drawio-diagram="5296"><img src="https://doc316en.candera.eu/uploads/images/drawio/2024-02/drawing-7-1708568602.png" alt=""/></div>

#### Project Structure

CourierSampleApp is using the Android Gradle Plugin Version 3.5.3 with Gradle Version 5.4.1. The  
Application is tested with ndk-26 that can be installed from the document in chapter <span style="color: rgb(230, 126, 35);">[Configuration and System Requirements](https://doc316en.candera.eu/books/target-setup-for-android/page/configuration-and-system-requirements)</span>. The supported API range is 24-28. The supported ABIs are arm64-v8a, x86\_64, x86. The CourierSampleApp Android Application is NOT using the NativeView library. The build process is different than the Android Applications that use the NativeView library.

#### Building and Running the Android Application

To be able to build and run the Android Application, the following steps must be done.

##### 1. CGI Studio

These steps are required to prepare the asset from the solution to use in the CMake and Android Studio steps.

1. Subst \[<span style="color: rgb(230, 126, 35);">[windows-commands/subst](https://learn.microsoft.com/en-us/windows-server/administration/windows-commands/subst)</span>\] the root of CGI Studio. 
    - Open a Command Prompt in the root of CGI Studio directory e.g., “...\\cgistudio” and type: “subst  
        x: .” and click enter. The CGI root is now available under the subst "x" drive in Windows Explorer.
2. Run CGI Studio by double clicking on “X:\\bin\\SceneComposer\\SceneComposer\_Android\_OpenGLES30.bat”,
3. Open the following solution for CourierSampleApp from X:\\cgi\_studio\_courier\_apps\\src\\CourierSampleApp\\SCSolution\\Android\\Solution.scs”.
4. Save this solution as: 
    1. AssetLibCff\_CourierSampleApp.bin and then copy it into the /sdcard/ directory of the target/emulator. For the emulator this can be done in the "Device Explorer" of the emulator in Android Studio.
    2. AssetLibCff\_Android\_Target.bin and then copy it to “X:\\cgi\_studio\_courier\_apps\\src\\CourierSampleApp\\Assets”. This one is needed to build the ".so" library required by the Android Project.

##### 2. CMake

These steps are to prepare the ".so" library required by the Android application. Make sure the steps of "<span style="color: #e67e23;">[Alternative CMake Approach](https://doc316en.candera.eu/link/1135#bkmrk-alternative-cmake-ap)</span>" have been done prior to the next step.

1. Open CMake and choose "X:\\cmake\\Apps\\Courier\\CourierSampleApp" as source code and e.g. X:\\build for where to build the binaries. Click Configure.
2. Specify "Ninja" as the generator for this project and choose "Specify toolchain file for cross-compiling". Click Next.
3. Choose "X:\\cgi\_studio\_devices\\src\\Android\\ToolchainFiles\\android.toolchain-ndk26-generic.cmake". Click Finish.
4. The first "error" will ask to set the "ANDROID\_ABI", choose the ABI required. This should match the target/emulator CPU Architecture. Click Configure.
5. The next "error" will ask to set the ANDROID\_PLATFORM. This should match the target/emulator Android version. Click Configure until there are no red lines anymore and then click on Generate.
6. Open CMD and navigate to "X:\\build" by typing first "x:" and clicking enter, and then "cd X:\\build" and clicking enter.
7. Type "ninja" and click enter for the build to start.
8. After the build is done, copy "X:\\build\\libApplicationLib.so" to the directory matching the ABI previously selected e.g. "X:\\cgi\_studio\_apps\\References\\Android\\SampleApp\\app\\native-libs\\x86\_64\\libApplicationLib.so".

##### 3. Android Studio

These steps are to prepare the Android Studio to build and run the Android application.

1. Open the Android Application in Android Studio from “X:\\cgi\_studio\_apps\\References\\Android\\SampleApp”.
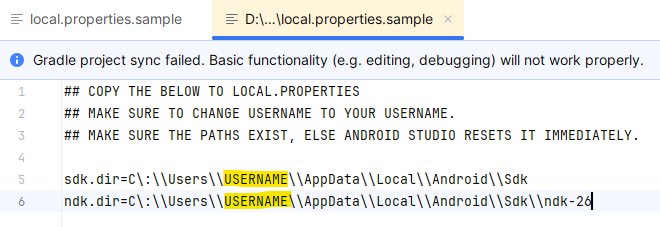
2. Open the “local.properties.sample” file and change the “USERNAME” in the SDK and NDK path to match the  
    system it will be used on.  
    <div drawio-diagram="5857"><img src="https://doc316en.candera.eu/uploads/images/drawio/2024-05/drawing-7-1716882921.png" alt=""/></div>
3. Copy the contents of the "local.properties.sample" to “local.properties”. Note that if the SDK or NDK paths do not exist, Android Studio will reset the “local.properties” again after trying to Sync Project with Gradle Files.
4. Make sure the JDK is set to 11 in \[File | Settings | Build, Execution, Deployment | Build Tools | Gradle\]  
    like described in chapter [<span style="color: #e67e23;">Java Development Kit (JDK)</span>](https://doc316en.candera.eu/link/1135#bkmrk-java-development-kit).
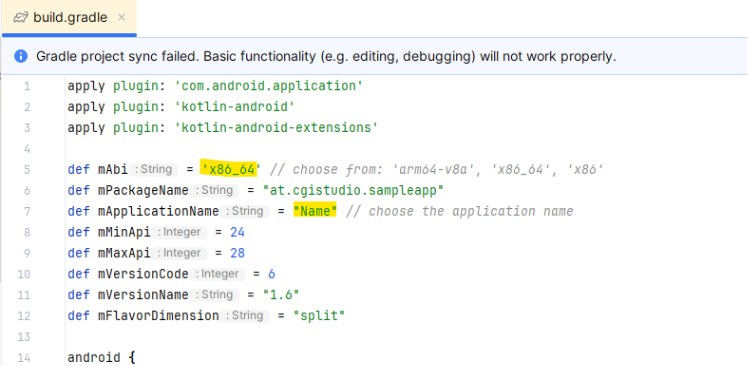
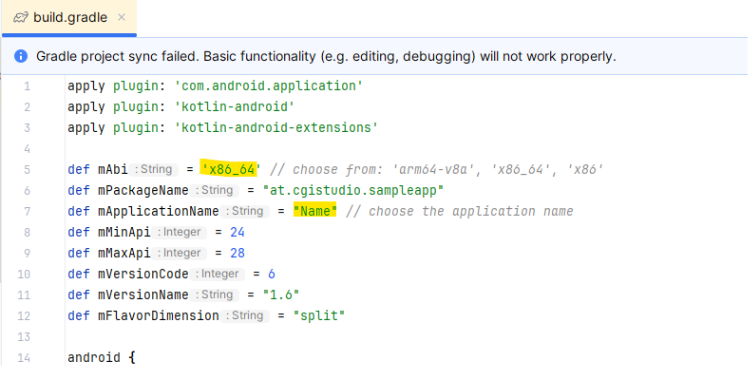
5. Choose the supported \['arm64-v8a', 'x86\_64', 'x86'\] ABI "mAbi" and set the application name "mApplicationName" in “build.gradle (Project: Module :app)”.  
    <div drawio-diagram="5858"><img src="https://doc316en.candera.eu/uploads/images/drawio/2024-05/drawing-7-1716883026.png" alt=""/></div>
6. Run the Application by selecting the target/emulator and clicking on “run app”.
7. The first time the Application starts, it will request permissions. Click accept and restart the application. The solution should be running.

#### Troubleshooting

- If encountering any issues during the setup, refer to the official documentation for Android Studio,  
    CMake, and NDK for troubleshooting steps.
- If you encounter any issues linked to outdated source code, reach out to the Android developers for  
    assistance in implementing a resolution.
- Check for updates regularly and keep your development environment components up to date.

#### Platform Tests

<div class="pointer-container" id="bkmrk-%C2%A0"><div class="pointer anim is-page-editable"><svg class="svg-icon" data-icon="link" role="presentation" viewbox="0 0 24 24" xmlns="http://www.w3.org/2000/svg"></svg><div class="input-group inline block"> <button class="button outline icon" data-clipboard-target="#pointer-url" title="Copy Link" type="button"><svg class="svg-icon" data-icon="copy" role="presentation" viewbox="0 0 24 24" xmlns="http://www.w3.org/2000/svg"></svg></button></div><svg class="svg-icon" data-icon="edit" role="presentation" viewbox="0 0 24 24" xmlns="http://www.w3.org/2000/svg"></svg></div></div>- Google Pixel C, ARM Cortex A57, Android 8.1.0, API 27
- Huawei MediaPad M5, ARM Cortex A73, Android 9, EMUI 9.1.0, API28
- Emulator Pixel 2, x86\_64, Android 6, API 23 (Without Play/APIs)
- Emulator Medium Phone, x86\_64, Android 9, API 28 (Without Play/APIs)
- Emulator Pixel 2, x86, Android 9, API 28 (Without Play/APIs)

# MLC

#### System Requirements

This document mandates adherence to the Android Application Development Environment   
Setup Guide, as a prerequisite for system compliance.

By following these steps, you should have a consistent and well-configured development environment for your Android application on Windows 10/11. Remember to restart your system after making changes related to CMake in Android Studio and after updating Environment Variables.
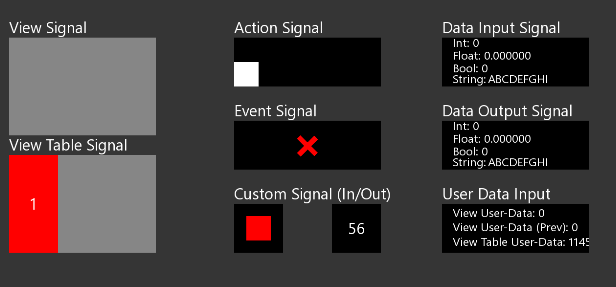
&lt;Signals&gt;

<div drawio-diagram="5295"><img src="https://doc316en.candera.eu/uploads/images/drawio/2024-02/drawing-7-1708558794.png" alt=""/></div>

#### Project Structure

NativeViewLibrary is using the Android Gradle Plugin Version 3.5.3 with Gradle Version 5.4.1. The  
Application is tested with ndk-26 that can be installed from the document in chapter <span style="color: #e67e23;">[Configuration and System Requirements](https://doc316en.candera.eu/books/target-setup-for-android/page/configuration-and-system-requirements)</span>. The supported API range is 24-28. The supported ABIs are arm64-v8a, x86\_64, x86. The MLC Android Application is NOT using the NativeView library. The build process is different than the Android Applications that use the NativeView library.

#### Building and Running the Android Application

To be able to build and run the Android Application, the following steps must be done.

##### 1. CGI Studio

These steps are required to prepare the asset from the solution to use in the CMake and Android Studio steps.

1. Subst \[<span style="color: rgb(230, 126, 35);">[windows-commands/subst](https://learn.microsoft.com/en-us/windows-server/administration/windows-commands/subst)</span>\] the root of CGI Studio. 
    - Open a Command Prompt in the root of CGI Studio directory e.g., “...\\cgistudio” and type: “subst  
        x: .” and click enter. The CGI root is now available under the subst "x" drive in Windows Explorer.
2. Run CGI Studio by double clicking on “X:\\bin\\SceneComposer\\SceneComposer\_Android\_OpenGLES30.bat”,
3. Open the following solution for MLC &lt;Signals/Cluster&gt; from X:\\cgi\_studio\_matlab\_connector\\apps\\sample\\&lt;Signals/Cluster&gt;\\src\\SCSolution\\Android\\Solution.scs”.
4. Save this solution as: 
    1. AssetLibCff.bin and then copy it into the /sdcard/ directory of the target/emulator. For the emulator this can be done in the "Device Explorer" of the emulator in Android Studio.
    2. AssetLibCff\_Android\_Target.bin and then copy it to “X:\\cgi\_studio\_matlab\_connector\\apps\\sample\\&lt;Signals/Cluster&gt;\\src\\Asset”. This one is needed to build the ".so" library required by the Android Project.

##### 2. CMake

These steps are to prepare the ".so" library required by the Android application. Make sure the steps of "<span style="color: #e67e23;">[Alternative CMake Approach](https://doc316en.candera.eu/link/1135#bkmrk-alternative-cmake-ap)</span>" have been done prior to the next step. Note: Currently the ninja build can only succeed when the \[cmake | CMAKE\_BUILD\_TYPE = Release\] in CMake during configuration.

1. Open CMake and choose "X:\\cgi\_studio\_matlab\_connector\\apps\\sample\\Signals\\src\\Application" as source code and e.g. X:/build for where to build the binaries. Click Configure.
2. Specify "Ninja" as the generator for this project and choose "Specify toolchain file for cross-compiling". Click Next.
3. Choose "X:\\cgi\_studio\_devices\\src\\Android\\ToolchainFiles\\android.toolchain-ndk26-generic.cmake". Click Finish.
4. The first "error" will ask to set the "ANDROID\_ABI", choose the ABI required. This should match the target/emulator CPU Architecture. Click Configure.
5. The next "error" will ask to set the ANDROID\_PLATFORM. This should match the target/emulator Android version. Click Configure until there are no red lines anymore and then click on Generate.
6. Open CMD and navigate to "X:\\build" by typing first "x:" and clicking enter, and then "cd X:\\build" and clicking enter.
7. Type "ninja" and click enter for the build to start.
8. After the build is done, copy "X:\\build\\libApplicationLib.so" to the directory matching the ABI previously selected e.g. "X:\\cgi\_studio\_apps\\References\\Android\\SampleApp\\app\\native-libs\\x86\_64\\libApplicationLib.so".

##### 3. Android Studio

These steps are to prepare the Android Studio to build and run the Android application.

1. Open the Android Application in Android Studio from “X:\\cgi\_studio\_apps\\References\\Android\\SampleApp”.
2. Open the “local.properties.sample” file and change the “USERNAME” in the SDK and NDK path to match the  
    system it will be used on.  
    <div drawio-diagram="5859"><img src="https://doc316en.candera.eu/uploads/images/drawio/2024-05/drawing-7-1716888598.png" alt=""/></div>
3. Copy the contents of the "local.properties.sample" to “local.properties”. Note that if the SDK or NDK paths do not exist, Android Studio will reset the “local.properties” again after trying to Sync Project with Gradle Files.
4. Make sure the JDK is set to 11 in \[File | Settings | Build, Execution, Deployment | Build Tools | Gradle\]  
    like described in chapter [<span style="color: #e67e23;">Java Development Kit (JDK)</span>](https://doc316en.candera.eu/link/1135#bkmrk-java-development-kit).
5. Choose the supported \['arm64-v8a', 'x86\_64', 'x86'\] ABI "mAbi" and set the application name "mApplicationName" in “build.gradle (Project: Module :app)”.  
    <div drawio-diagram="5861"><img src="https://doc316en.candera.eu/uploads/images/drawio/2024-05/drawing-7-1716888625.png" alt=""/></div>
6. Run the Application by selecting the target/emulator and clicking on “run app”.
7. The first time the Application starts, it will request permissions. Click accept and restart the application. The solution should be running.

#### Troubleshooting

- If encountering any issues during the setup, refer to the official documentation for Android Studio,  
    CMake, and NDK for troubleshooting steps.
- If you encounter any issues linked to outdated source code, reach out to the Android developers for  
    assistance in implementing a resolution.
- Check for updates regularly and keep your development environment components up to date.

#### Platform Tests

<div class="pointer-container" id="bkmrk-%C2%A0"><div class="pointer anim is-page-editable"><svg class="svg-icon" data-icon="link" role="presentation" viewbox="0 0 24 24" xmlns="http://www.w3.org/2000/svg"></svg><div class="input-group inline block"> <button class="button outline icon" data-clipboard-target="#pointer-url" title="Copy Link" type="button"><svg class="svg-icon" data-icon="copy" role="presentation" viewbox="0 0 24 24" xmlns="http://www.w3.org/2000/svg"></svg></button></div><svg class="svg-icon" data-icon="edit" role="presentation" viewbox="0 0 24 24" xmlns="http://www.w3.org/2000/svg"></svg></div></div>- &lt;Signals&gt; Emulator Medium Phone, x86\_64, Android 9, API 28 (Without Play/APIs)