# New Solution

#### <a class="anchor" id="bkmrk--2"></a>Create a New Solution

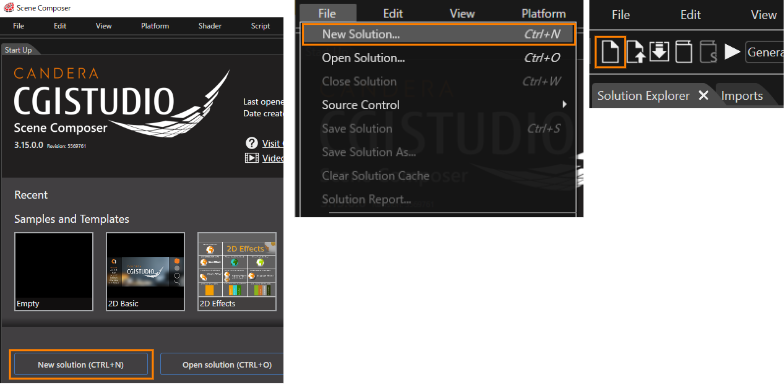
A new solution with all the basic elements can be created via Startup Panel item or menu "File" &gt; "New Solution" or Toolbar item.

<div drawio-diagram="7137"><img src="https://doc316en.candera.eu/uploads/images/drawio/2024-10/drawing-7-1729755619.png" alt=""/></div>

<div class="contents" id="bkmrk--0"><div class="contents"><div class="textblock">  
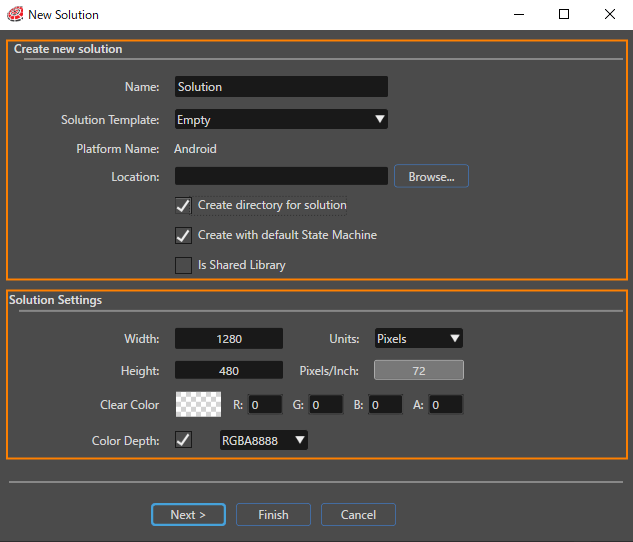
</div></div></div>In the "New Solution" dialog that appears after selecting one of the above, you can set basic information for your solution using two items: "Create new solution" and "Solution Settings."

<div drawio-diagram="7537"><img src="https://doc316en.candera.eu/uploads/images/drawio/2024-11/drawing-7-1732586426.png" alt=""/></div>

##### Create new solution

<table border="1" id="bkmrk-%E5%90%8D%E5%89%8D-%E3%82%BD%E3%83%AA%E3%83%A5%E3%83%BC%E3%82%B7%E3%83%A7%E3%83%B3%E3%81%AE%E5%90%8D%E5%89%8D-%E3%82%BD%E3%83%AA%E3%83%A5%E3%83%BC%E3%82%B7%E3%83%A7"><colgroup><col></col><col></col></colgroup><tbody><tr><td>**Name**</td><td>Solution name</td></tr><tr><td>**Solution Template**</td><td>Solution template to use for the solution

(There are several for different purposes, such as Empty, 2D Basic, and 3D Basic.)

</td></tr><tr><td>**Platform Name**</td><td>Target platform

</td></tr><tr><td>**Location**</td><td>Save the location of solution

(Use the \[Browse...\] button to select the location to save the new solution.)

</td></tr><tr><td>**Create directory for solution**</td><td>Create a folder to save the new solution.

</td></tr><tr><td>**Create with default State Machine**</td><td>Include a GlobalStateMachine in the new solution.

(This item can only be set if "Empty" is selected in the Solution Template.)

</td></tr><tr><td>**Is Shared Library**</td><td>Set it as a Shareable Component Library (SCL).  
(For more information on SCL, see <span style="color: rgb(230, 126, 35);">[Reusable Solution Libraries](https://doc316en.candera.eu/link/47#bkmrk-page-title)</span>.)

</td></tr></tbody></table>

##### Solution Settings

<table border="1" id="bkmrk-%E5%B9%85%EF%BC%8F%E9%AB%98%E3%81%95-%E3%83%87%E3%82%A3%E3%82%B9%E3%83%97%E3%83%AC%E3%82%A4%EF%BC%8F%E3%83%AC%E3%83%B3%E3%83%80%E3%83%BC%E3%82%BF%E3%83%BC%E3%82%B2%E3%83%83"><colgroup><col></col><col></col></colgroup><tbody><tr><td>**Width／Height**</td><td>Display/RenderTarget/2D Camera size</td></tr><tr><td>**Units**</td><td>Width/Height unit</td></tr><tr><td>**Pixels/Inch**</td><td>Resolution</td></tr><tr><td>**Clear Color**</td><td>Set the Clear Color.</td></tr><tr><td>**Color Depth**</td><td>True: The Color Depth set in this option will be applied to the Render Target.

False: The Color Depth of the selected Solution Template will be applied to the Render Target.

</td></tr></tbody></table>

Once you have completed configuring the solution, click the \[ Finish \] button to create the new solution.

To configure more solution details at solution creation time, use the New Solution Wizard by clicking "Next &gt;". About details, please refer to <span style="color: rgb(230, 126, 35);">[New Solution Wizard](https://doc316en.candera.eu/link/39#bkmrk-page-title)</span>.