# Import and Export of Language Packs

#### <span style="background-color: rgb(251, 238, 184);">Importing Language Data</span>

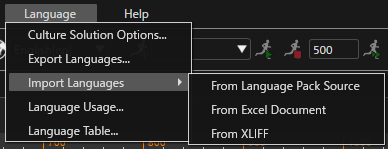
<span style="background-color: rgb(251, 238, 184);">You can import the solution’s cultures and language tables from a Language Pack Source (.lps), an Excel file (.xlsx/.xls), or an XLIFF file (.xlf). Start the import from \[ Language &gt; Import Languages \], choose the source file type, and then select the target file.</span>

<p class="callout info"><span style="background-color: rgb(251, 238, 184);">If you choose XLIFF (.xlf), select and import the individual .xlf files prepared for each culture (specify the files for each language/culture separately).</span></p>

<div drawio-diagram="8911"><img src="https://doc316en.candera.eu/uploads/images/drawio/2026-01/drawing-4-1769071075.png" alt=""/></div>

<div class="contents" id="bkmrk--0"><div class="contents"><div class="textblock">  
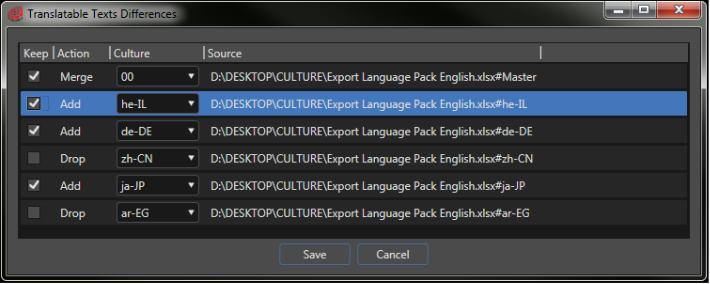
</div></div></div>The final step of the language import process is to show the differences between the texts in the import file and the texts in solution. There are three possible actions:

<div class="contents" id="bkmrk-add-%3A-indicates-that"><div class="contents"><div class="contents"><div class="textblock">- **Add** : Indicates that the language does not already exist in the solution and will be imported from the file.
- **Merge**: Means that the language already exists in the solution and only the content differs. New texts will be added and already existing texts will be updated.
- **Drop** : When unchecking a language entry in the Translatable Text Differences dialogue, the Action changes automatically from Add/Merge to Drop. If the initial action was *Add*, this means that the language will not be added to the solution. If the initial action was *Merge*, this means its texts will not be updated and new texts from the import files will not be added to this language in the solution.

</div><div class="textblock"><dl class="note"><dd><p class="callout info">The *Drop* action does not mean that the language will be removed from the solution. The removal of a language can be done from *File &gt; Solution Options* in the *Cultures* tab.</p>

</dd></dl></div></div></div></div><div drawio-diagram="3329"><img src="https://doc316en.candera.eu/uploads/images/drawio/2023-04/drawing-4-1682585540.png" alt=""/></div>

<div class="contents" id="bkmrk--2"><div class="contents"><div class="textblock">  
</div></div></div>#### <a class="anchor" id="bkmrk--10"></a>Export of Language Pack Sources

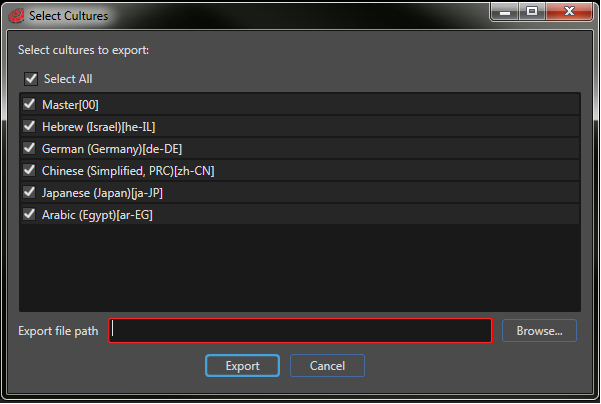
The translatable texts of the current solution can be exported by going to *Language &gt; Export Languages...*, which opens the *Select Cultures* dialog.

<div drawio-diagram="1006"><img src="https://doc316en.candera.eu/uploads/images/drawio/2023-02/drawing-4-1676445765.png" alt=""/></div>

<div class="contents" id="bkmrk--4"><div class="contents"><div class="textblock">  
</div></div></div>- The *Select Cultures* dialog allows the choice of which cultures to be exported or not.
- <span style="background-color: rgb(251, 238, 184);">Languages can be exported to a Language Pack Source (.lps), an Excel file (.xlsx/.xls), or an XLIFF file (.xlf).</span>
- Click the *Browse* button to select the *Export file path*, choose the format in the *Save as type* drop down and click *Save*.
- Click the *Export* button to finalize the languages export.

Please note that only the texts that have a correspondent in the master language texts, considering their Id, are included in the export, all the others being ignored. In this case warnings will be added to the Output tab in Scene Composer.

<div class="contents" id="bkmrk-exporting-languages-"><div class="contents"><div class="textblock">- Exporting languages as Language Pack Source file creates a .LPS file that contains the master language and all the other languages available in the solution. The exported .LPS file can be compiled and appended using the CGI Studio Language Appender.
- <span style="background-color: rgb(251, 238, 184);">When exporting in XLIFF format, a separate .xlf file is generated for each language (culture). The culture identifier is appended to the file name: the Master language is exported as `Languages_00.xlf`, and each language as `Languages_{culture}.xlf` (e.g., `en`, `ja-JP`).</span>
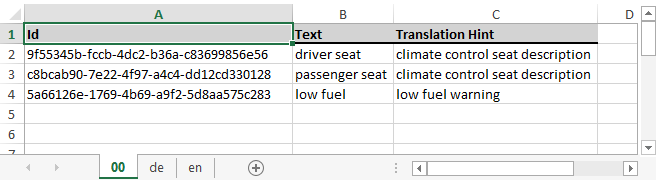
- Exporting languages as Excel document creates an Excel file that contains one sheet for the master language (named Master) and a sheet for each of the other languages in the solution having an identical name with the respective culture (e.g. de-DE, en-US, fr-FR). Each sheet has a header on the first row, with 3 columns: *Id*, *Text*, and *Translation Hint*. The following rows contain the translatable texts.
</div></div></div><div drawio-diagram="3330"><img src="https://doc316en.candera.eu/uploads/images/drawio/2023-04/drawing-4-1682585591.png" alt=""/></div>

<div class="contents" id="bkmrk--6"><div class="textblock">  
</div></div>