# Embedded Player

#### Overview

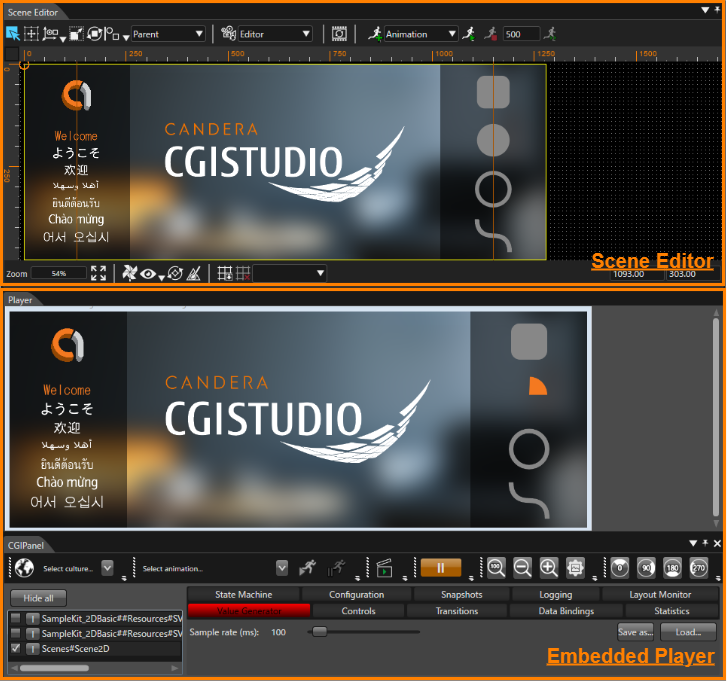
The Embedded Player is a runtime environment for validating solutions created or in progress in Scene Composer. The Embedded Player operates as a panel in Scene Composer, allowing you to view the Scene Editor and Embedded Player side by side, and instantly view updates to your Scene Composer solution in the Embedded Player panel.

<div drawio-diagram="8514"><img src="https://doc316en.candera.eu/uploads/images/drawio/2025-08/drawing-7-1754977241.png" alt=""/></div>

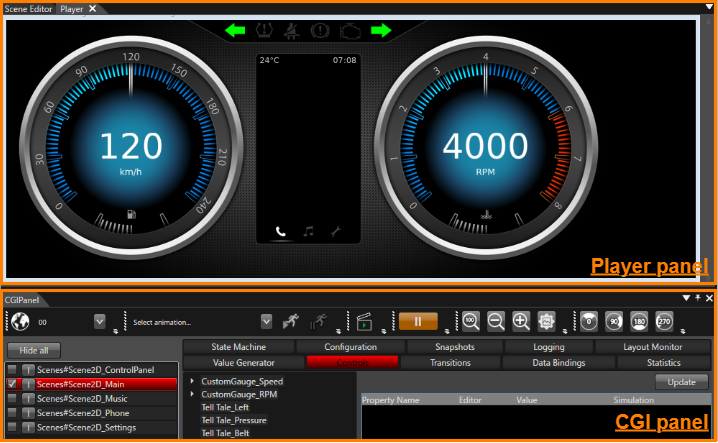
The Embedded Player consists of two panels: "Player Panel" and "CGI Panel".

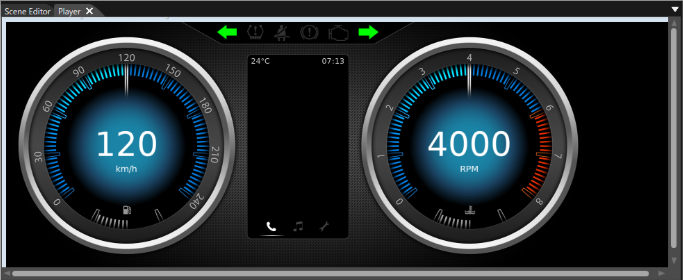
The Player Panel is used to display the solution being created in Scene Composer. It allows you to view the nodes created in Scene Composer and their associated actions, such as 2D/3D nodes, animations, behavior effects, and scene transitions using transitions.

The CGI Panel is used to control the display of the Player Panel. The Player Panel UI allows you to easily switch displayed scenes, play animations, zoom in/out, and rotate the display. You can also run simulations of node values, transitions, state machines, and more.

<div drawio-diagram="8515"><img src="https://doc316en.candera.eu/uploads/images/drawio/2025-08/drawing-7-1754979114.png" alt=""/></div>

---

##### Embedded Player UI

##### Player panel

The Player panel can be displayed by selecting \[ View &gt; Embedded Player &gt; Player \] from the menu bar, or click the \[ Player/EmbeddedPlayer \] icon on the toolbar after selecting "Embedded Player". Scroll bars will appear on the right and bottom of the panel depending on the panel size.

<div drawio-diagram="8516"><img src="https://doc316en.candera.eu/uploads/images/drawio/2025-08/drawing-7-1754979219.png" alt=""/></div>

##### CGI panel

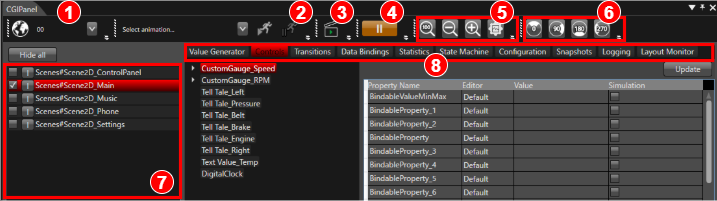
The CGI panel, similar to the Player panel, can be displayed by selecting \[ View &gt; Embedded Player &gt; CGIPanel \] from the menu bar, or click the \[ Player/EmbeddedPlayer \] icon on the toolbar after selecting "Embedded Player".

This panel controls the display of the Player panel.

<div drawio-diagram="8529"><img src="https://doc316en.candera.eu/uploads/images/drawio/2025-08/drawing-7-1755496881.png" alt=""/></div>

<table border="1" id="bkmrk-%281%29-%E3%82%AB%E3%83%AB%E3%83%81%E3%83%A3%E3%83%BC-%E8%A8%80%E8%AA%9E%E3%81%AE%E5%88%87%E3%82%8A%E6%9B%BF%E3%81%88%E3%82%92%E5%8F%AF%E8%83%BD" style="border-collapse: collapse; width: 94.881%; height: 650.281px;"><colgroup><col style="width: 5.90657%;"></col><col style="width: 20.8522%;"></col><col style="width: 19.4724%;"></col><col style="width: 53.7688%;"></col></colgroup><tbody><tr style="height: 29.7969px;"><td style="height: 29.7969px;">(1)</td><td style="height: 29.7969px;">Culture</td><td colspan="2" style="height: 29.7969px;">Allows you to switch languages. If used, Globalization must be enabled.  
</td></tr><tr style="height: 46.5938px;"><td style="height: 46.5938px;">(2)</td><td style="height: 46.5938px;">Animation</td><td colspan="2" style="height: 46.5938px;">All playable animations will be listed in the drop-down menu. Select an animation from the drop-down menu and click the \[ Start \] icon to play the animation.  
</td></tr><tr style="height: 29.7969px;"><td style="height: 29.7969px;">(3)</td><td style="height: 29.7969px;">Value generation</td><td colspan="2" style="height: 29.7969px;">Starts/Stops the Value Generator simulation.</td></tr><tr><td>(4)</td><td>Rendering process</td><td colspan="2">Run or Pause the processing of rendering components.</td></tr><tr style="height: 63.3906px;"><td style="height: 63.3906px;">(5)</td><td style="height: 63.3906px;">Zooming</td><td colspan="2" style="height: 63.3906px;">This function is created to assist in the development of high-resolution or low-resolution HMIs. It allows you to zoom in on low-resolution HMIs and zoom out on high-resolution HMIs.  
</td></tr><tr style="height: 46.5938px;"><td style="height: 46.5938px;">(6)</td><td style="height: 46.5938px;">Rotae</td><td colspan="2" style="height: 46.5938px;">Simulates physical display rotation. The toolbar icon allows you to rotate the Player panel display clockwise.  
</td></tr><tr style="height: 46.5938px;"><td style="height: 46.5938px;">(7)</td><td style="height: 46.5938px;">Scene view panel</td><td colspan="2" style="height: 46.5938px;">All scenes included in the solution are listed. To enable any scene, select the corresponding checkbox.  
</td></tr><tr style="height: 35.3906px;"><td rowspan="10" style="height: 387.516px;">(8)  
</td><td rowspan="10" style="height: 387.516px;">Function tab  
</td><td style="height: 35.3906px;"><span style="color: rgb(230, 126, 35);">[Value Generator](https://doc316en.candera.eu/books/player/page/value-generator)</span></td><td style="height: 35.3906px;">You can simulate view elements changing their values without implementing any logic.</td></tr><tr style="height: 35.3906px;"><td style="height: 35.3906px;"><span style="color: rgb(230, 126, 35);">[Controls](https://doc316en.candera.eu/books/player/page/controls-view)</span></td><td style="height: 35.3906px;">Displays all controls for the selected scene. Selecting a control opens a table with all properties and their values. Changing the value will change it in the application.</td></tr><tr style="height: 35.3906px;"><td style="height: 35.3906px;"><span style="color: rgb(230, 126, 35);">[Transitions](https://doc316en.candera.eu/books/player/page/transitions-view)</span></td><td style="height: 35.3906px;">You can trigger transitions.</td></tr><tr style="height: 35.3906px;"><td style="height: 35.3906px;"><span style="color: rgb(230, 126, 35);">[Data Bindings](https://doc316en.candera.eu/books/player/page/data-bindings)</span></td><td style="height: 35.3906px;">You can load predefined data binding files to customize the layout and perform simulations with Value Generator.</td></tr><tr style="height: 35.3906px;"><td style="height: 35.3906px;"><span style="color: rgb(230, 126, 35);">[Statistics](https://doc316en.candera.eu/books/player/page/statistics-view)</span></td><td style="height: 35.3906px;">Memory consumption statistics are displayed.</td></tr><tr style="height: 35.3906px;"><td style="height: 35.3906px;"><span style="color: rgb(230, 126, 35);">[State Machine](https://doc316en.candera.eu/books/player/page/state-machine-view)</span></td><td style="height: 35.3906px;">The states of all State Machines are displayed.</td></tr><tr style="height: 35.3906px;"><td style="height: 35.3906px;"><span style="color: rgb(230, 126, 35);">[Configration](https://doc316en.candera.eu/books/player/page/configuration-view)</span></td><td style="height: 35.3906px;">Information about the features enabled in the Embedded Player is displayed. </td></tr><tr style="height: 46.5938px;"><td style="height: 46.5938px;"><span style="color: rgb(230, 126, 35);">[Snapshots](https://doc316en.candera.eu/books/player/page/snapshots-view)</span></td><td style="height: 46.5938px;">You can create snapshots on the host. The last snapshot created is displayed.</td></tr><tr style="height: 46.5938px;"><td style="height: 46.5938px;"><span style="color: rgb(230, 126, 35);">[Logging](https://doc316en.candera.eu/books/player/page/logging-view)</span></td><td style="height: 46.5938px;">You can also enable or disable logging and set the log level for the main area.</td></tr><tr style="height: 46.5938px;"><td style="height: 46.5938px;"><span style="color: rgb(230, 126, 35);">[Layout Monitor](https://doc316en.candera.eu/books/player/page/layout-monitor-4Tv)</span></td><td style="height: 46.5938px;">The relevant areas calculated by the layouter are displayed as an overlay on top of the application rendering.</td></tr></tbody></table>

<p class="callout info">The Embedded Player has basically the same functions as the Player, so for some explanations in the documentation, please refer to the link to the Player page.</p>

---

#### Basic Operation

##### Embedded Player Playback

- First, click the \[ Player/EmbeddedPlayer \] icon on the toolbar after selecting "Embedded Player".  
    
    - Once the Player Panel and CGI Panel are launched, Embedded Player playback is complete.  

        <div drawio-diagram="8763"><img src="https://doc316en.candera.eu/uploads/images/drawio/2025-11/drawing-7-1763365030.png" alt=""/></div>
        
        <p class="callout info">If you want the currently edited scene to be displayed when launching the Embedded Player, select \[ Generate and Play Selected Scene \] from the pull-down menu located to the right of the \[ Play selected scenario... \] icon.</p>

##### Stopping Embedded Player

- While the Embedded Player is running, click the \[ Close Player \] icon on the toolbar. 
    - The Embedded player will stop and the Player panel and CGI Panel will close.  


        <div drawio-diagram="8764"><img src="https://doc316en.candera.eu/uploads/images/drawio/2025-11/drawing-7-1763365075.png" alt=""/></div>

##### Updating Embedded Player

- While the Embedded Player is playing, click the \[ Refresh \] icon on the toolbar.  
    
    - Updates made to the solution while the Embedded Player is playing will be reflected in the Embedded Player playback.  
        <div drawio-diagram="8765"><img src="https://doc316en.candera.eu/uploads/images/drawio/2025-11/drawing-7-1763365104.png" alt=""/></div>
        
        <p class="callout info">Using Embedded Player Update allows you to immediately see updates to your solution in the Embedded Player. Also, unlike playback using the Player, there is no need to save your solution before playback.</p>

---