# Advanced Cluster Solution

#### Overview

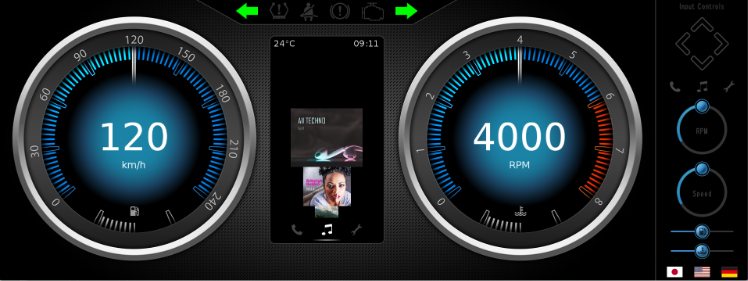
<span style="color: rgb(0,0,0);">This <span style="background-color: rgb(255,255,255);">solution shows an advanced 2D cluster example. I</span>t consists of various scenes that are necessary to represent an advanced Cluster. The Main Scene consists of gauges that can be manipulated with Controls and Behaviors. Other scenes, like ControlPanel scene, show various interactions within the solution and how this can be achieved with Behaviors. The ControlPanel scene also demonstrates how to switch between display languages. </span>

<span style="color: rgb(0,0,0);">This sample solution serves as an example of how Scene Composer can be used to easily implement an advanced 2D gauge cluster without requiring any coding.</span>

For information on how to create the main scenes of this sample solution and how to implement HMI logic using controls, please refer to<span style="color: rgb(0,0,0);"> the</span> [<span style="color: rgb(230,126,35);">Advanced Cluster Solution tutorial</span>](https://doc316en.candera.eu/books/best-practice/chapter/advanced-cluster-solution).

<div drawio-diagram="8448"><img src="https://doc316en.candera.eu/uploads/images/drawio/2025-06/drawing-7-1749619187.png" alt="drawing-7-1749619187.png"/></div>

---

#### Description

<span style="color: rgb(0,0,0);">The Advanced Cluster solution consists of multiple scenes to display an advanced 2D gauge cluster. Each scene uses controls suitable for the UI. It also uses Behaviors and a State Machine to pass data between scenes and transition between scenes. For more information about the scenes, controls, behaviors, and the state machine used in this solution, please see the following description.</span>

##### <span style="color: rgb(0,0,0);">Scene</span>

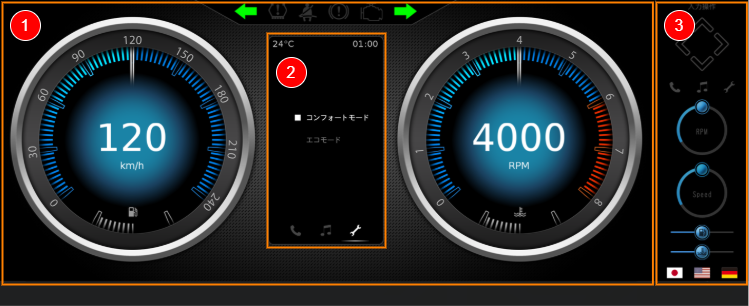
<span style="color: rgb(0,0,0);">The Advanced Cluster solution consists of five scenes, using Scene Composer's versatile built in Controls to display an advanced 2D gauge cluster.</span>

<table id="bkmrk-no.-%E3%82%AB%E3%83%86%E3%82%B4%E3%83%AA-%E3%82%B7%E3%83%BC%E3%83%B3%E5%90%8D-%E8%AA%AC%E6%98%8E-%281%29" style="border-collapse: collapse; width: 100%;"><colgroup><col style="width: 5.7211%;"></col><col style="width: 18.1168%;"></col><col style="width: 18.9565%;"></col><col style="width: 57.2056%;"></col></colgroup><tbody><tr><td class="align-center" style="background-color: rgb(230,126,35);"><span style="color: rgb(255,255,255);">**No.**</span></td><td class="align-center" style="background-color: rgb(230,126,35);"><span style="color: rgb(255,255,255);">**Category**</span></td><td class="align-center" style="background-color: rgb(230,126,35);"><span style="color: rgb(255,255,255);">**Scene name**</span></td><td class="align-center" style="background-color: rgb(230,126,35);"><span style="color: rgb(255,255,255);">**Description**</span></td></tr><tr><td>(1)</td><td><span style="color: rgb(0,0,0);">Main</span></td><td><span style="color: rgb(0,0,0);">Scene2D\_Main</span></td><td><span style="color: rgb(0,0,0);">The main scene of this sample solution. Two gauges are displayed on the left and right side, various indicators are displayed in the top area. In the center some space is reserved to display one of the infotainment scenes Music, Phone or Settings.</span>

  
<span style="color: rgb(0,0,0);">The following controls are mainly used:</span>

- <span style="color: rgb(0,0,0);">Speedometer: Gauge</span>
- <span style="color: rgb(0,0,0);">Tachometer: Gauge</span>
- <span style="color: rgb(0,0,0);">Top indicators: Tell Tale</span>

</td></tr><tr><td>(2)</td><td><span style="color: rgb(0,0,0);">Infotainment</span></td><td><span style="color: rgb(0,0,0);">Scene2D\_Music</span>

<span style="color: rgb(0,0,0);">Scene2D\_Phone</span>

<span style="color: rgb(0,0,0);">Scene2D\_Settings</span>

</td><td><span style="color: rgb(0,0,0);">This area displays the active infotainment scene (Music/Phone/Settings). Only the selected scene is displayed in the center of Scene2D\_Main.</span>

<span style="color: rgb(0,0,0);">The following controls are mainly used:</span>

- <span style="color: rgb(0,0,0);">Music contents: CoverFlow</span>

</td></tr><tr><td>(3)</td><td><span style="color: rgb(0,0,0);">UI operation</span></td><td><span style="color: rgb(0,0,0);">Scene2D\_ControlPanel</span></td><td><span style="color: rgb(0,0,0);">A UI for operating the main scene and infotainment scene is displayed.</span>

<span style="color: rgb(0,0,0);">Using this UI, you can change the speedometer/tachometer values, switch infotainment scenes, change the display language, and more.</span>

<span style="color: rgb(0,0,0);">The following controls are mainly used:</span>

- <span style="color: rgb(0,0,0);">D-pad button: Button</span>
- <span style="color: rgb(0,0,0);">Buttons for each infotainment: Button</span>
- <span style="color: rgb(0,0,0);">Buttons for Speedmeter/Tachometer: CircularSlider</span>
- <span style="color: rgb(0,0,0);">Buttons for Fuel gauge/Water temperature gauge: Slider</span>

</td></tr></tbody></table>

<div drawio-diagram="8449"><img src="https://doc316en.candera.eu/uploads/images/drawio/2025-06/drawing-7-1749619207.png" alt="drawing-7-1749619207.png"/></div>

##### <span style="color: rgb(0,0,0);">Behaviors/State Machine</span>

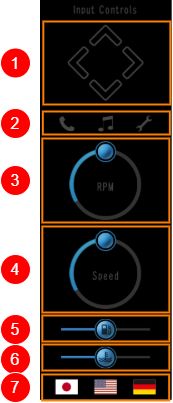
<span style="color: rgb(0,0,0);">This solution offers the possibility to change the screen display via UI operation as described in the table below. This kind of interaction is achieved without any coding, but solely by configuring behaviors and a state machine.</span>

<table id="bkmrk-%281%29-%E5%B7%A6%E5%8F%B3%E7%9F%A2%E5%8D%B0%E3%81%AB%E3%82%88%E3%82%8A%E3%80%81%E3%82%A4%E3%83%B3%E3%83%95%E3%82%A9%E3%83%86%E3%82%A4%E3%83%A1%E3%83%B3" style="border-collapse: collapse; width: 100%;"><colgroup><col style="width: 25.3874%;"></col><col style="width: 4.41299%;"></col><col style="width: 70.1996%;"></col></colgroup><tbody><tr><td rowspan="7"><div drawio-diagram="8450"><img src="https://doc316en.candera.eu/uploads/images/drawio/2025-06/drawing-7-1749619235.png" alt="drawing-7-1749619235.png"/></div>

</td><td>(1)</td><td><span style="color: rgb(0,0,0);">The left and right arrows switch infotainment (Music/Phone/Settings).</span>

<span style="color: rgb(0,0,0);">The up and down arrows change the content of each infotainment.</span>

</td></tr><tr><td>(2)</td><td><span style="color: rgb(0,0,0);">Click on the Phone/Music/Settings icon to switch the infotainment scenes.</span>

</td></tr><tr><td>(3)</td><td><span style="color: rgb(0,0,0);">The circular slider control changes the tachometer value.</span></td></tr><tr><td>(4)</td><td><span style="color: rgb(0,0,0);">The circular slider control changes the speedometer value.</span>

</td></tr><tr><td>(5)</td><td><span style="color: rgb(0,0,0);">The slider control changes the fuelmeter value.</span></td></tr><tr><td>(6)</td><td><span style="color: rgb(0,0,0);">The slider control changes the water temperature meter value.</span></td></tr><tr><td>(7)</td><td>Click the language icon to switch between languages ​​displayed on the main screen and infotainment screen.</td></tr></tbody></table>

<span style="color: rgb(0,0,0);">The user can explore and study the details of each UI's Behavior and State Machine setting using all of Extra Scene Tree, Fusion panel, and State Machine Editor of the target node.</span>

<span style="color: rgb(0,0,0);">The following description and images provide an example on how to explore a specific configuration:</span>

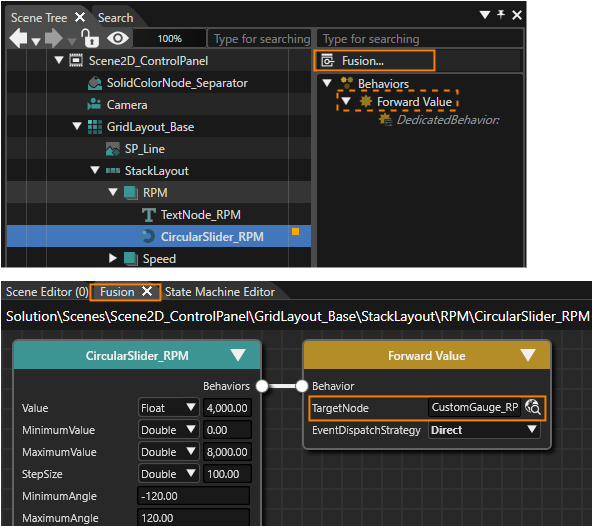
<span style="color: rgb(0,0,0);">One of the ControlPanel's CircularSlider controls (**CircularSlider\_RPM**) is used to remotely control the Main scene's tachometer value. The connection between CircularSlider\_RPM and the tachometer (Scene2D\_Main's **CustomGauge\_RPM**) is a **Forward Value** behavior with CustomGauge\_RPM as TargetNode.</span>

<span style="color: rgb(0,0,0);">When selecting the **CircularSlider\_RPM** in the Scene Tree panel, the **Forward Value** behavior can be seen in the Extra Scene Tree. Pressing on the **Fusion...** button right above the Extra Scene Tree panel, Fusion will be opened displaying the CircularSlider\_RPM's Fusion diagram. This diagram contains a Fusion Node **Forward Value** with a **TargetNode** property that can be confirmed to be set to **Scene2D\_Main's CustomGauge\_RPM.**</span>

<div drawio-diagram="8592"><img src="https://doc316en.candera.eu/uploads/images/drawio/2025-09/drawing-5-1758275723.png" alt="drawing-5-1758275723.png"/></div>


##### <span style="color: rgb(0,0,0);">Play/Operation Using the Player</span>

<span style="color: rgb(0,0,0);">Click the \[ Play selected scenario… \] icon on the toolbar to launch the Player. The Advanced Cluster solution will be displayed in the Player view. The user can operate the display of the main screen using the ControlPanel scene's UI on the right side of the display screen.</span>

---