CGI Studio Optimization Techniques
This chapter describes performance optimization techniques for Candera based applications.
- Rendering Only Updated Content
- Multi Frequency Rendering
- VRAM Upload Culling
- Occlusion Queries and Occlusion Culling
- Bitmap Compression
- Drawcall Batching/Geometry Instancing
- Courier Specific
Rendering Only Updated Content
Description
This chapter briefly describes how to achieve performance optimization by rendering only updated content.
Introduction
Invalidation Introduction
Basic principles for composing graphical content:
- Place content which is never changed in an own scene and render it to an own layer.
- Partition content which is frequently changed by widgets or animations. Use several cameras for this purpose.
- If rarely modified graphical content is part of a dynamic scenery then think about using Texture Render Targets.
How is it done?
In the render loop of the application all Widgets are updated by calling Candera::WidgetBase::Update(). The basic render loop looks like this:
// 3D Render Loop
// handle input events
// ...
// update animations by calling AnimationDispatcher::DispatchTime()
if (m_animationDispatcher3D != 0) {
m_animationDispatcher3D->SetWorldTimeMs(nowMs);
m_animationDispatcher3D->DispatchTime();
}
// update all widgets
CgiApp::GetInstance().Update();
Renderer::RenderAllCameras();
// end 3D Render Loop
The widgets must now implement a mechanism to tell the application whether associated graphical content needs to be rendered. The following pages explain two ways to achieve this:
Use SetRenderingEnabled()
Use Candera::Camera::SetRenderingEnabled() / Candera::Camera2D::SetRenderingEnabled()
The example below shows how in CGIApplication all 3D cameras are turned off in first step of render loop.
void CgiApp3dGc::Update() {
Base::Update();
// Turn off all cameras
UInt32 cameraCount = Renderer::GetCameraCount();
for (UInt32 i = 0; i < cameraCount; i++)
{
Camera* cam = Renderer::GetCamera(i);
cam->SetRenderingEnabled(false);
}
// Update widgets in all visible scenes
WidgetBase* widget = 0;
Vector<SceneContext*>::ConstIterator it = m_sceneContexts.ConstBegin();
for (; it != m_sceneContexts.ConstEnd(); it++) {
if ((*it) != 0 && (*it)->GetScene() != 0 && (*it)->GetScene()->IsRenderingEnabled()) {
widget = (*it)->GetFirstWidget();
while (widget != 0) {
widget->Update();
widget = (*it)->GetNextWidget();
}
}
}
}
The Candera::Widget::Update() method needs to be implemented such that the recently turned off camera is turned on again whenever rendering is required. The Candera::Camera can be either set as a widget property or retrieved inside the scene by masking the widget and the associated camera with the same Candera::ScopeMask value.
void SampleBaseWidget3D::InvalidateCamera(bool value)
{
m_camera->SetRenderingEnabled(true);
}
void MyWidget::Update()
{
// update graphical content from cached property value(s)
//...
Base::InvalidateCamera(true);
}
Pick Camera to Render
Explicitly Pick Camera to Render
Another method is to maintain a list of cameras by the application.
The render loop has to be changed
- to call Candera::Renderer::RenderCamera( Camera * camera )
- instead of Candera::Renderer::RenderAllCameras().
-
The application needs to take care on Render Buffer Swapping.
Multi Frequency Rendering
Description
This chapter briefly describes the Multi Frequency Rendering technique supported by Candera.
It allows to split rendering of complex parts to several frames, to achieve an overall higher frame rate.
Introduction
Multi Frequency Rendering Introduction
Multi Frequency Rendering allows using different update rates for multiple render targets. For example
- Fix framerate for tubes.
- Adaptive framerate for center use case.
- Details of entire content are preserved.

Workflow
| CGI Analyzer | SceneComposer | Application |
|
|
|
|
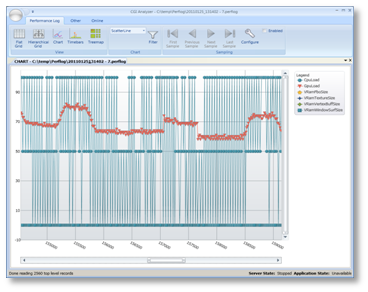
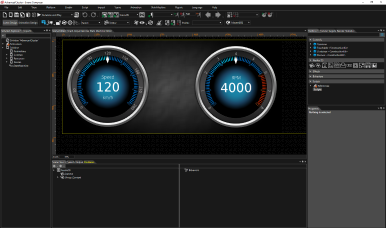
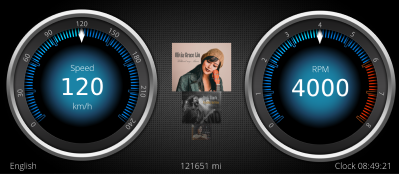
| CGI Analyzer determines benchmark values for each node of a scene given. The benchmarks are exported to a *.crsms file. | The benchmarks are assigned to nodes benchmark property. SceneComposer stores nodes incl. benchmark values in Asset File. | The Application renders multiple cameras with different framerates with help of Benchmark-CameraRenderStrategy. |
Candera::CameraRenderStrategy
The following sections explain how an application can use the Candera::CameraRenderStrategy to implement multi frequency rendering based on given benchmark values within the scene tree.
References
For details about how to calculate benchmark values and how to assign them to a scene tree, please refer to:
- CGI-Analyzer_User_Manual.pdf: Calculate benchmark values and export to a *.crsms file.
- SceneComposer Help: Import benchmark values from a *.crsms file into a given solution.
Candera - Camera Render Strategy
Partitioning Render Passes
A Camera render pass renders all scene nodes in one sweep.
Candera::CameraRenderStrategy enables to partition a Camera render pass, if e.g. complete processing in one frame is not possible.
Examples of Usage
- Omit rendering of nodes with low priority like decorations.
- Multi Frequency Rendering: Suspend and continue Camera render pass next time Camera renders. Unless render pass is complete, render target is not swapped.

Both, Candera::BreakNodeCameraRenderStrategy and Candera::BenchmarkCameraRenderStrategy are concrete implementations of the interface Candera::CameraRenderStrategy to cover most typical Camera render pass partitioning.
Candera - Break Node Camera Render Strategy
Splitting Render Pass on specific Break Nodes
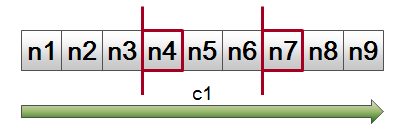
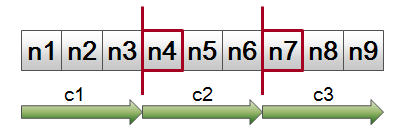
The Candera::BreakNodeCameraRenderStrategy is populated with a list of arbitrary break nodes.
Defined by RenderPassAction a break node can pause or stop a Camera render pass, if encountered.
breakNodeStrategy = new BreakNodeCameraRenderStrategy(); breakNodeStrategy->AddBreakNode(node4); breakNodeStrategy->AddBreakNode(node7); breakNodeStrategy->SetRenderPassActionOnBreakNode(renderPassAction); camera->SetCameraRenderStrategy(breakNodeStrategy);

Candera - Benchmark Camera Render Strategy
Splitting Render Pass on Benchmark Threshold Values
Each node has a benchmark property that describes a custom reference value for render duration.
During Camera render pass benchmarks are accumulated until threshold of Candera::BenchmarkCameraRenderStrategy is reached. RenderPassAction defines to suspend or stop render pass.
benchmarkStrategy = new BenchmarkCameraRenderStrategy(); node1->SetRenderBenchmark(250.0f); node2->SetRenderBenchmark(330.0f); node3->SetRenderBenchmark(220.0f); node4->SetRenderBenchmark(400.0f); node5->SetRenderBenchmark(390.0f); benchmarkStrategy->SetThreshold(1000.0f); benchmarkStrategy->SetRenderPassActionOnThreshold(renderPassAction); camera->SetCameraRenderStrategy(benchmarkStrategy);

Candera - Render Pass Actions
Render Pass Actions
|
|
|
|
| Proceed Render Pass | Pause Render Pass | Stop Render Pass |
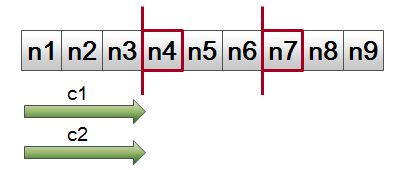
| Proceeds Rendering. Rendering is not interrupted. Break nodes are ignored. | Pauses rendering. The next time the Camera is rendered it restarts from the node that has been paused. Swaps render target when Camera completes. Usage: Entire content captured by Camera shall be displayed |
Stops rendering. The next time the Camera renders it restarts from the very first node in render order. Swaps render target at each render cycle. Usage: Nodes with lower priority shall be omitted. |
Example - Multi Frequency Rendering
Example: Different Frame Rates for several Cameras
- Fix framerate for speedometer.
- Adaptive framerate for car.
- Details of entire content is preserved.
Cycle 1
|
|
| Camera 1 : Renders the speedometer and swaps render target. Camera 2 : Renders car until benchmark threshold is exceeded. Render target is not swapped. |

Cycle 2
|
|
| Camera 1 : Renders the speedometer and swaps render target. Camera 2 : Completes render pass and swaps render target. Thus Camera2 renders with half frames per second (FPS) than Camera1. |

Multi Frequency Rendering in 2D
Analogous to Candera::CameraRenderStrategy, there is an abstract class Candera::Camera2DRenderStrategy available.
This class is intended to be derived to tell the Candera::Renderer2D, if rendering shall proceed, pause, or stop for a given node in a camera's render pass.
BreakNodeCamera2DRenderStrategy
In difference to 3D, Candera 2D Engine only provides a Candera::BreakNodeCamera2DRenderStrategy to split a 2D render pass along specific break nodes.
Limitations
MFR animation issue
Using an AnimationReq-Message in combination with MFR results in an wrong output since the animation progresses during each partial drawn frame. One idea is to check if the view uses MFR and if used the view would provide it's own AnimationTime-Dispatcher which only gets updated during the Update call. The animation for this view would then be added to this time dispatcher. This allows to use animations as long as they only affect a single scene.
MFR transition issue
Using a Scene-Transition in combination with MFR results in an wrong output since the transition progresses during each partial drawn frame. Transitions should check the status of the camera and only perform a modification if the Render-Pass is complete. This would allow transitions to be used if only one Scene is active per Render-Target. To allow multiple scenes per Render-Target (more common case) all Cameras in the transition need to be "synced".
VRAM Upload Culling
Description
This chapter briefly describes how to use scope masks for uploading only dedicated content to VRAM.
VRAM Upload using Scope Masks
content to VRAM in succeeding steps.
VRAM Upload Policies
Refer to Startup and Asset Management for how to load scenes from assets and upload to VRAM with the default upload policy Candera::ContentLoader::DefaultUploadPolicy.
To implement VRAM upload culling with scopes, use Candera::ContentLoader::NoVramUploadPolicy and upload dedicated content based on scope masks later.
Scoping Concept
Refer to Scoping how to use and configure scope masks in SceneComposer.
Code Example
The following scene graph is a simple example where two parts of the scene have different scopes. Think about a use case where one part of the scene has to be displayed immediately after loading the scene and the second part has to be displayed only later in some special situations. To save time for uploading the content to VRAM not all of the content has to be uploaded immediately.

Using NoVramUploadPolicy
Loading the scene from the asset has to be triggered without loading the content to VRAM.
using namespace Candera; ContentLoader& contentLoader = ContentLoader::GetInstance(); ContentLoader::BuildState buildState = contentLoader.BuildSceneContext("Scene", ContentLoader::NoVramUploadPolicy); if (buildState == ContentLoader::Completed) { SceneContext* sceneContext = contentLoader.GetSceneContext("Scene"); Scene* scene = sceneContext->GetScene(); }
Upload Nodes with Scope 1
using namespace Candera; ScopeMask scopeMask1(false); // all scopes are disabled... scopeMask1.SetScopeEnabled(1, true); // ...and only scope 1 gets enabled. scene->Upload(scopeMask1);
The scene can be rendered now as long as those nodes with scope 2 are not needed (e.g. rendering is disabled).
Deferred Upload of Nodes with Scope 2
using namespace Candera; ScopeMask scopeMask2(false); scopeMask2.SetScopeEnabled(2, true); scene->Upload(scopeMask2);
Now the whole scene is uploaded to VRAM and can be rendered completely.
-
In that simple use case the scopes are already set to the nodes e.g. during design phase in SceneComposer. The scopes can also be set during runtime by calling Candera::Node::SetScopeMask() or Candera::Node::SetScopeEnabled().
This example is written for Candera 3D, for 2D please refer to Candera::Scene2D::Upload(), Candera::Node2D::SetScopeMask() and Candera::Node2D::SetScopeEnabled().
Occlusion Queries and Occlusion Culling
Description
In scenes containing nodes with lots of vertices or expensive fragment shaders, the rendering speed can be drastically improved by avoiding to render occluded objects. For this purpose Candera offers the Occlusion Queries and Occlusion Culling, which are described on this page.
Occlusion Queries
Overview
Occlusion queries are the collective name for a particular type of queries, which are useful to detect whether an object is visible or not. They interrogate asynchronously the Render Device to determine whether the scoped rendering commands pass the depth test and if so, how many samples pass. Occlusion queries are typically used to enable features like occlusion culling and varying lens flare or bloom intensity.
Occlusion Query Types
There are three types of occlusion queries:
- Query::QueryAnySamplesPassed: query determines, if any sample passes the depth test.
- Query::QueryAnySamplesPassedConservative: similar to QueryAnySamplesPassed type except that the implementation may use a less accurate algorithm, which may be faster, but at the cost of more false positives.
- Query::QueryTransformFeedbackPrimitivesWritten: query determines how many vertices have been written into bound transform feedback buffer.
Conditional Rendering Example
The figure below depicts the demand for occlusion queries to determine and subsequently discard occluded objects in a highly populated scene:

Find below an abstract code sample for occlusion queries to obtain information whether any pixels have been rendered or not:
SharedPointer<Query> query; query = Query::Create(Query::QueryAnySamplesPassed); query.Upload(); query.Begin(); // Do some rendering here. query.End(); // Process other operations to provide GPU with sufficient time to complete query or skip query evaluation, if result is not available yet. if (query.IsResultAvailable()) { if (query.GetResult() > 0)) { // Samples have been written to framebuffer while query was active, this is between query.Begin() and query.End(). // In case low resolution model was rendered, render next frame with high resolution model. } else { // No sample has been written to framebuffer while query was active. // In case high resolution model was rendered, render next frame with low resolution model. } }
Occlusion Culling
Overview
Occlusion Culling is a feature that disables rendering of objects when they are not currently seen by the camera because they are obscured by other objects. The feature can be enabled by setting the render strategy for camera to OcclusionCullingCameraRenderStrategy. During the rendering, all nodes initialized by the strategy will issue occlusion queries. If query results are available from the previous frame, they are evaluated and all nodes deemed occluded will have their bounding box rendered invisibly instead of the node itself. Visible nodes, or nodes not having a QueryProperty attached, will be rendered as usual. A new query to determine visibility for the next frame will be issued regardless the result of the previous query.
-
A performance increase by using occlusion culling can only be expected when objects occlude each other, and occluded objects consist of lots of vertices, have expensive fragment shaders, or both.
Workflow
- Attach an OcclusionCullingCameraRenderStrategy to the camera.
m_occlusionCullingStrategy = CANDERA_NEW(OcclusionCullingCameraRenderStrategy)();
m_camera->SetCameraRenderStrategy(m_occlusionCullingStrategy);
- Initialize the rootNode's subtree for use by the render strategy.
m_occlusionCullingStrategy->Initialize(m_group, Query::QueryAnySamplesPassedConservative);
-
-
This camera render strategy requires nodes to have a valid bounding box. This camera render strategy reaches its full potential when nodes were sorted front to back first.
-
- Render camera
m_gdu->ToRenderTarget3D()->Activate(); RenderDevice::ClearDepthBuffer(1.0f); Renderer::RenderAllCameras();
- OcclusionCullingCameraRenderStrategy interface provides also methods to get the number of occluded and non-occluded nodes since last render pass by using the methods OcclusionCullingCameraRenderStrategy::GetOccludedNodesCount() and OcclusionCullingCameraRenderStrategy::GetVisibleNodesCount().
- Before destroying the render strategy remove the association with nodes by calling the OcclusionCullingCameraRenderStrategy::Reset() method
m_occlusionCullingStrategy->Reset(m_group);
CANDERA_DELETE(m_occlusionCullingStrategy);
-
The nodes removed from the subtree are automatically detached from the render strategy
Occlusion Culling in SceneComposer
Refer to chapter Occlusion Culling to see how to configure occlusion culling in SceneComposer.
Bitmap Compression
Introduction
Bitmap compression aims to improve the application performance by reducing the bandwidth consumption and asset size and also by speeding up the bitmaps load and upload.
Candera supports following formats for compressing bitmaps, that are described in detail on this page:
- Run-legth Encoding
- Color Look-Up Table
- Erricson Texture Compression
Run-legth Encoding
Description
Run-length encoding (RLE) is a simple form of data compression in which runs of data are stored as a single data value and count, rather than as the original run. This is most useful on data that contains many such runs so, the content of the data will affect the compression ratio achieved by RLE. Although most RLE algorithms cannot achieve the high compression ratios of the more advanced compression methods, RLE is both easy to implement and quick to execute, making it a good alternative to either using a complex compression algorithm or leaving the image data uncompressed.
RLE compression example
For example, consider an image containing plain black text on a solid white background. There will be many long runs of white pixels in the blank space, and many short runs of black pixels within the text. A hypothetical scan line, with B representing a black pixel and W representing white, might read as follows:
WWWWWWWWWWBBWWWWWBWWWWWWWWWWW
With a run-length encoding (RLE) data compression algorithm applied to the above hypothetical scan line, it can be rendered as follows:
10W2B5W1B11W
The run-length code represents the original 30 characters in only 13.
RLE Compression in SC
You can take advantage of using the RLE compression on a bitmap by setting an appropriate pair of converter and format for its bitmap profile as described in the SceneComposer documentation in the Bitmap Profile chapter.
Color Look-Up Table
Description
A color lookup table (CLUT) is a table which associates a numeric pixel value with a color to be displayed on the output device. The color is typically specified as a mixture of varying levels of alpha, red, green, and blue, and thus a color lookup table will usually contain three or four components for each possible pixel value. The number of entries in the palette determines the maximum number of colours which can appear simultaneously in the bitmap. Changes to the palette affect the whole image at once and can be used to produce special effects which would be much slower to produce by updating pixels.
CLUT Example
For instance, if a CLUT bitmap has a palette of 256 available colors, the index can be represented by an 8-bit value. The color table is then used to lookup a corresponding 24-bit color value (eight bits of red, green, and blue). Thus, comparing to a full RGB color bitmap, the CLUT bitmap size is roughly one-third.

The key to the efficiency of the indexed color approach is limiting the number of colors that can be represented.
CLUT Compression in SC
In order to use CLUT compression, set the bitmap with a bitmap profile that uses an appropriate converter and one of the 72 preset CLUT compressions as format. Please consult in the SceneComposer documentation the Bitmap Profile chapter for more details.
Erricson Texture Compression
Description
Ericsson Texture Compression (ETC) is a lossy texture compression scheme which was mandated as part of the OpenGL ES specification for the versions 3.0 and 4.3. The original 'ETC1' compression scheme provides 6x compression of 24-bit RGB data and it does not support the compression of images with Alpha components. 'ETC2' is an updated version of 'ETC1' which offers higher quality than its predecessor and also introduces support for alpha pixels and R-/RG- textures.
ETC2 allows for more textures to fit in video memory, leads to less traffic on the bus for higher performance and lower power consumption, and it becomes cheaper to transit textures over networks.
The following ETC2 codecs are supported in Candera:
- Candera::Bitmap::Etc2CompressedRgbPixelFormat : Compresses RGB888 data.
- Candera::Bitmap::Etc2EacCompressedRgbaPixelFormat : Compresses RGBA8888 data with full alpha support.
- Candera::Bitmap::Etc2Alpha1CompressedRgbaPixelFormat : Compresses RGBA data where pixels are either fully transparent or fully opaque.
sRGB variants of the above codecs are also available.
EAC is built on the same principles as ETC1/ETC2 but is used for one- or two-channel data. The following EAC codecs are supported:
- Candera::Bitmap::EacCompressedUnsignedRPixelFormat : 4 bpp compressed single channel unsigned R format
- Candera::Bitmap::EacCompressedSignedRPixelFormat : 4 bpp compressed single channel signed R format (can preserve 0 exactly)
- Candera::Bitmap::EacCompressedUnsignedRGPixelFormat : 8 bpp compressed two channel unsigned RG format
- Candera::Bitmap::EacCompressedSignedRGPixelFormat : 8 bpp compressed two channel signed RG format (can preserve 0 exactly)
ETC2/EAC Compression in SC
Please consult in the SceneComposer documentation the chapter Import .KTX Image Format, to find out how to generate and import ETC2/EAC compressed textures.
Drawcall Batching/Geometry Instancing
Description
This chapter describes how Candera's Drawcall Batching utilizes Geometry Instancing and how to set it up.
Introduction
OpenGL ES3.0 introduced a feature called Geometry Instancing. With this feature, a vertex buffer can be drawn several times using a single draw call. This single draw call uses exactly one shader and render state for all instances of that vertex buffer. The instances can have different shader parameters to individually customize their appearance on screen. Basically, this feature renders multiple copies of the same mesh at once, with the ability to parameterize each copy.
Use Case
Whenever objects share a mesh, render state, shader and textures, these are potential candidates for geometry instancing. E.g. trees that only have a different size and color, houses which share the same shader using a uniform as an offset for a shared texture atlas, street lamps, or any other recurring or repeating geometry that only differs in shader parameters is a use case for geometry instancing.
Motivation
Submitting drawcalls to the GPU is a relatively slow operation due to the necessary overhead caused by OpenGL and the driver. When drawing thousands of small objects individually, chances are that this overhead is leaving the GPU underutilized, and thus becoming a bottleneck. In such a scenario, batching several objects together to be submitted in a single drawcall decreases the total CPU overhead to be performed, which in turn increases overall performance.
-
The GPU still has to perform the same amount of work, so if the bottleneck of your application is the GPU (e.g. pixel or vertex operations are the limiting factor), don't expect significant performance gains by using geometry instancing.
Geometry Instancing and Shaders
Dedicated shaders are required to utilize geometry instancing. In a shader the reserved keyword gl_InstanceID represents the index of the instance currently being rendered. This index can be used to fetch instance specific parameters from arrays of uniforms.
Example of a geometry instancing vertex shader:
/* Uniforms */
#define MAX_INSTANCE_COUNT 100 // Used for the size of the uniform arrays
uniform mat4 u_MVPMatrix[MAX_INSTANCE_COUNT]; // Model-View-Projection matrices for each instance
uniform vec4 u_Color[MAX_INSTANCE_COUNT]; // Color for each instance
/* Attributes */
in vec4 a_Position;
/* Varyings */
out mediump vec4 v_Color;
void main(void)
{
/* Transform vertex into world space using the MVP matrix of the instance indexed by gl_InstanceID */
gl_Position = u_MVPMatrix[gl_InstanceID] * a_Position;
/* Pass the color of the instance indexed by gl_InstanceID to the pixel shader */
v_Color = u_Color[gl_InstanceID];
}
The pixel shader for the vertex shader above:
in mediump vec4 v_Color;
out mediump vec4 FragColor;
void main(void)
{
FragColor = v_Color;
}
-
OpenGL ES3.0 pixel shaders can only index uniform arrays using a constant index. Therefore the vertex shader has to index and pass any uniforms required by the pixel shader.
This shader uses a different color and model view projection matrix for each instance of the mesh. It supports drawing of up to 100 (MAX_INSTANCE_COUNT) instances. Therefore the model view projection matrix array and the color array have a size of 100 to hold the individual values for each instance. The maximum array size that can be used depends on the total number of uniforms in the shader as well as the target platform.
-
Array sizes that are too big for the platform will not throw an error during shader compilation, but only during linking the shader. Therefore you have to export shader binaries to verify if the shader can be used on your target platform.
Geometry Instancing in Candera
Candera does not expose geometry instancing explicitly, instead it is used automatically (if possible). This approach is called Drawcall Batching.
After renderable objects have been culled and sorted (ideally by the BatchOrderCriterion to produce as big sequences of batchable objects as possible), the Renderer identifies sequences of objects that can be batched, and submits those objects in a single drawcall using geometry instancing. Each such sequence is a batch. Each batch corresponds to one draw call.
Prerequisites for Drawcall Batching
The following list of prerequisites must be met to facilitate draw call batching in Candera:
- The target platform must support geometry instancing (i.e. OpenGL ES3.0 or better).
- The object must be a Mesh or PointSprite (Billboard, LineList, MorphingMesh are currently not supported).
- The object must have an Appearance.
- The Appearance must not be a multi-pass appearance.
- The Appearance must have a Shader with a maximum instance count bigger than 1. I.e. the shader supports instancing.
- The Appearance must have a ShaderParamSetter.
- The ShaderParamSetter must support instancing. (Candera's ShaderParamSetter and GenericShaderParamSetter support instancing. Existing custom AbstractShaderParamSetter implementations will need to be adapted to support instancing.)
- If a GenericShaderParamSetter is used with lights activation enabled, the light coordinate space must be World space.
- Objects to be batched must share:
- the VertexBuffer
- the RenderMode
- the Shader
- the Textures
How to increase the Drawcall Batching rate.
The Renderer does not alter the order of contents of RenderOrderBins. In order to maximize the drawcall batching rate (i.e. the amount of objects that are batched versus the total amount of objects), objects have to be sorted by the criteria matching the prerequisites listed above. Candera'a BatchOrderCriterion offers two sorting modes to facilitate batching:
- Sort by Appearance
- Sort by Shader and RenderMode
Both modes sort by the Batchable flag (used by Mesh and PointSprite), the VertexBuffex, and either Appearance or Shader plus RenderMode to produce batches.
Drawcall Batching in SceneComposer
To configure SceneComposer solutions for drawcall batching, the following steps have to be performed:
Use an instanceable shader
The shader of an object must support instancing. See this section for a detailed explanation.
If a shader was recognized as instanceable by SceneComposer, "Max Instance Count" listed in the Properties of the Shader is bigger than one. The shader in the following example is able to draw batches of up to 50 instances.

Configure the Uniform Setter
If the shader uses lighting, the Light Coordinate Space must be set to World.

Share Assets
To utilize drawcall batching, vertex buffers, shaders, render modes and textures have to be shared as detailed in this section.
SceneComposer offers the option to optimize asset usage by identifying assets that are identical and substituting these assets by a single shared instance. After selecting a node or a group, and pressing the right mouse button, the following context menu will appear:


Sort Render Order Bins using the Batch Order Sort Criterion
To maximize the batching rate, use "Batch Order" as the Render Order Bin's sort criterion.

-
A Render Strategy set on a camera can influence batching. E.g. the Occlusion Culling, and the Benchmark Render Strategy do not utilize drawcall batching due to their specific needs.
Renderer Statistics
The Renderer Statistics window (which can be opened via View->Renderer Statistics), provides per frame information about what is being drawn by the cameras in the current scene. The values are updated in realtime, and directly correspond to the rendering performed in the "Display" window.

Courier Specific
MFR - Multi-Frequency Rendering in Courier
Multi-Frequency rendering in Courier can be used to create custom sort criteria for the render jobs.
By default, the Courier::RenderJobStrategy sorts them like this:
- offscreen render jobs before Display render jobs.
- 2d render jobs before 3d render jobs
- clear render jobs before normal view render jobs
- lower camera sequence number before higher camera sequence number
One can create a custom sort criteria, simply by deriving from Courier::RenderJobStrategy and then use the Courier::Renderer::SetRenderJobStrategy() method to use this custom one.IE: SampleApp.cpp mRenderer.SetRenderJobStrategy(CANDERA_NEW(PriorityRenderJobStrategy)(1000));
For example, PriorityRenderStrategy class uses such a custom sort criteria.
In this sample, the PriorityRenderStrategy demonstrates the ability to use the Renderer to sort the render targets depending on the layer they are on, and the sequence number of the associated camera.
bool PriorityRenderJobStrategy::IsPriorityRenderJob(const Courier::RenderJob& renderJob) const { bool res; if (renderJob.IsClear()) { res = IsPriorityRenderTarget(renderJob.GetGdu()); return res; } res = GetRenderJobCameraSequenceNumber(renderJob) <= m_lastPriorityCameraSequenceNumber; return res; } // ------------------------------------------------------------------------ bool PriorityRenderJobStrategy::IsPriorityRenderTarget(Courier::Gdu* gdu) const { for (FeatStd::Int i = 0; i < m_priorityRenderTargets.Size(); ++i) { if (gdu == m_priorityRenderTargets[i]) { return true; } } return false; }
Also as you can see in RenderTargetPerformanceData class, we can compute the cost of rendering a frame and see how many frame drops we had.
The PriorityRenderStrategy uses two other classes, PriorityCamera2DRenderStrategy and PriorityCamera3DRenderStrategy which are derived from RendererListenerBase, and Candera::Camera2DRenderStrategy and these classes compute the render cost for each node.
Example of the application running:

As you can see, the FPS is kept the same for all the layers, but the drops vary depending on the Layer/Nodes/Camera Sequence Number of each render target, some of the render jobs being skipped by the custom sort criteria in the PriorityRenderStrategy class.
In the sample output, red arrows mark skipped render jobs:

SceneComposer solution
In this demo application, there are three layers: Layer0, Layer1 and Layer2 displayed bellow:

For Layer 2 – which has the most content – the backgrounds, the respective cameras have the highest Sequence Number to have priority being rendered.

Invalidation
Description
Courier introduces an invalidation mechanism by providing Courier::FrameworkWidget::Invalidate and Courier::View::Invalidate methods, which shall be called if ViewScenes Candera::Camera(s) shall be rendered. Only enabled and invalidated cameras will be rendered. Cameras can be enabled/disabled by sending the appropriate Courier::ActivationReqMsg or by manually maintaining the state of the cameras via widget implementation.
The invalidation of the cameras causes appending a Courier::RenderJob to a Courier::RenderJobs array inside the Courier::Renderer. This array is then used for rendering the cameras when Courier::RenderComponent executes the Render method. If the render counter of a RenderJob reaches 0 then the RenderJob is removed from the array of RenderJobs. If a new RenderJob is appended with an already existing RenderJob for this camera, the older entry will be removed.
2D and 3D RenderJobs are processed in their own arrays. This is necessary because of above threading configuration scenarios.
Every Candera::Rendertarget used by a rendered camera will be swapped once after rendering the cameras.
A more specific method of invalidation is the usage of the methods:
- Courier::ViewScene2D::Invalidate(Candera::Camera2D * invalidatedCamera, UInt8 renderCounter = cDefaultRenderCounter)
- Courier::ViewScene3D::Invalidate(Candera::Camera * invalidatedCamera, UInt8 renderCounter = cDefaultRenderCounter)
Those methods allow invalidating the specified cameras (not necessarily all cameras of a view) and might also be used in the widget implementations. The widget has therefore use method Courier::FrameworkWidget::GetParentView, cast the returned pointer to ViewScene2D or ViewScene3D and then call the appropriate 2D or 3D Invalidation method.
Update & Invalidation Sample
For example the BindeableValueWidget in our GettingStarted App invalidates if the bound value has changed and it shall be redrawn.
void BindableValueWidget::OnChanged(Candera::UInt32 propertyId) { if(!mBuffered) { if(propertyId == ValuePropertyId) { UpdateValue(GetValue()); } Invalidate(); } }
Invalidation in General
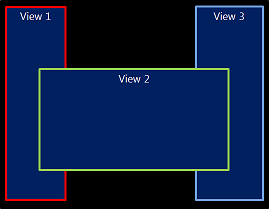
Most views are not overlapping, so there is no dependency between the displayed view. However, depending on the design, this may not always be the case.
The following examples demonstrate various combinations of overlapping views and their dependencies regarding invalidation:
Example 1
|
|
Whenever View2 is invalidated, View1 must be invalidated too, because they are overlapping. View3 has to be invalidated as well, because it is overlapping with View2.
|
|||||||||||||||
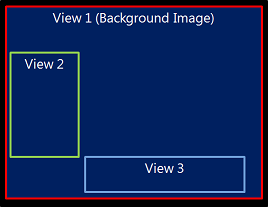

When a ViewContainer ("Folder" in SceneComposer) is invalidated, all its child views are invalidated.
View1-3 can set an invalidation dependency to the ViewGroup "Folder" to implement the mutual invalidation.
Example 2
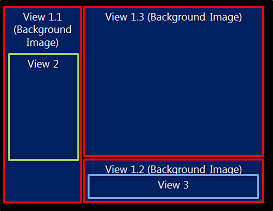
This is a possible solution for a shared background: Split the background into multiple views.
|
|
View2 is invalidated -> Overlap with View 1.1 -> View 1.1 must be invalidated View 3 is invalidated -> Overlap with View 1.2 -> View 1.2 must be invalidated |

Example 3
Sometimes overlap can not be avoided because of the design.
|
|
An invalidation dependency between all 3 views exists. Possible solution: If only 1 hardware layer is available, invalidation dependencies must be set. |

Wakeup Render Mechanism
Description
Courier::RenderConfiguration::UseWakeUpRenderMechanism: The default value for this is false. If this is set to true, each widget should call WakeUpAllRenderComponents() whenever a property setter is called. Otherwise the Update method will not be called if the RenderComponent is currently in sleep mode. If implemented correctly this setting will result in the best possible performance optimization, therefore it can be recommended.