# Manage Imports

#### Manage Imports

Scene Composer’s Solution Explorer provides the possibility to manage and organize the solution’s files. Imported resources are organized in folders according to the user's needs. This folder structure is linked to the locally stored solution folder structure.

<p class="callout info">For more information on solution management using folders, please also see <span style="color: rgb(230, 126, 35);">[here](https://doc316en.candera.eu/books/solution-handling/page/organize-a-solution-using-folders)</span>.</p>

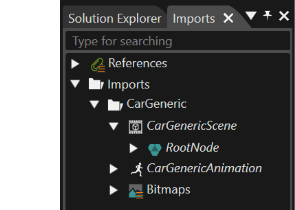
You can modify the folder structure of imported resources in the Solution Explorer panel. In addition to Solution Explorer, some of imported resources can also be made visible in the "Imports" panel.

#### Original image file retention

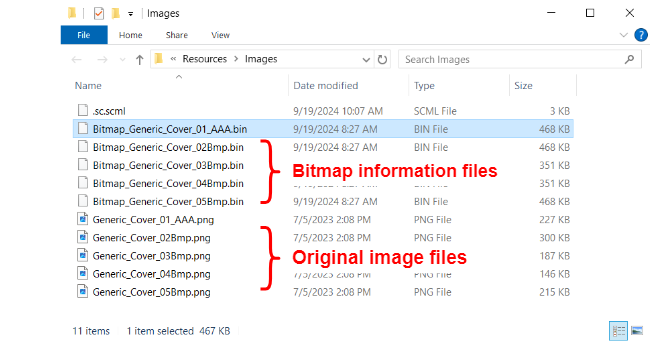
When an image file is imported using the File menu \[ Import &gt; Import Resources \], the original image file is retained along with the bitmap information file (\*.bin file) used in Scene Composer.

<p class="callout info">The original image file is not retained if the file format is FBX, glTF and so on, or if the file is imported using the **Smart Importer**.  
</p>

##### Original image file name  


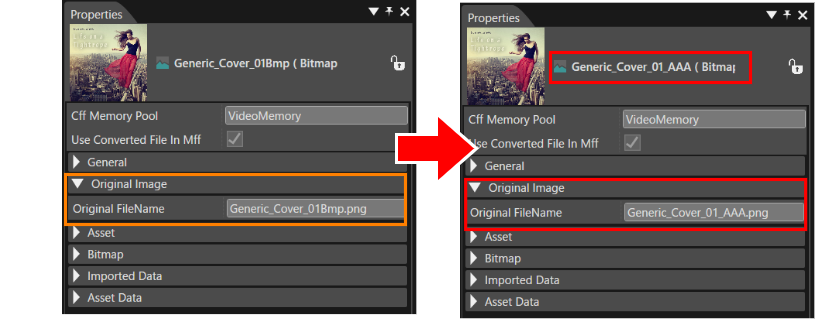
The original image file can be found in the \[ Original Image \] section of the Properties panel of the imported resource. The original image file name is "the image information name" + "the original image file extension".

When the resource file name is renamed in Solution Explorer, the original image file name is also renamed.
<div drawio-diagram="6826"><img src="https://doc316en.candera.eu/uploads/images/drawio/2024-09/drawing-4-1726708047.png" alt=""/></div>

##### Original Image File Location  


Solution Explorer displays only the bitmap information file. The original image files are stored in the local Solution folder (the same location as the folder displayed in Solution Explorer).

<div drawio-diagram="6827"><img src="https://doc316en.candera.eu/uploads/images/drawio/2024-09/drawing-4-1726708917.png" alt=""/></div>

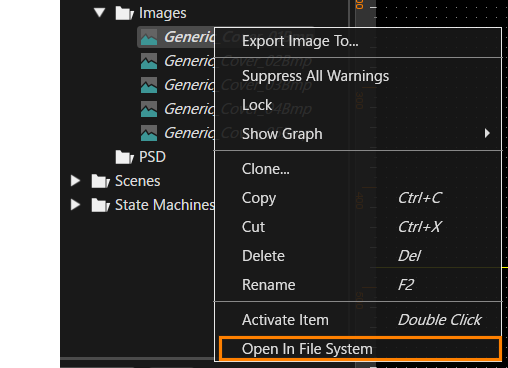
Select a resource file in Solution Explorer and use \[ Open In File System \] from the context menu to view its local location in Windows Explorer.

<div drawio-diagram="6825"><img src="https://doc316en.candera.eu/uploads/images/drawio/2024-09/drawing-4-1726707944.png" alt=""/></div>

##### Moving original image files  


When you move an imported resource in Solution Explorer, the original image file is moved along with the locally stored bitmap information file.

#### Imports Panel

The Import panel can be shown or hidden by selecting "View &gt; Libraries &gt; Imports" from the menu bar. This panel displays imported resources in a hierarchical manner. They can be placed on the scene editor by drag-and-drop operations.

<div drawio-diagram="5921"><img src="https://doc316en.candera.eu/uploads/images/drawio/2024-05/drawing-5-1717167173.png" alt=""/></div>

#### Properties of Imported resources

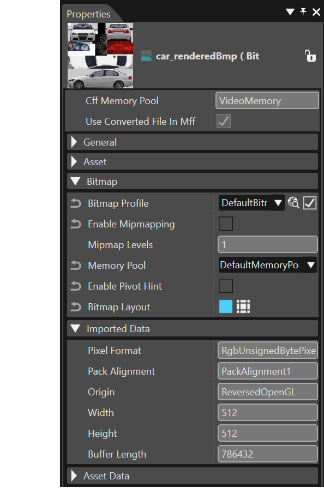
When you select an imported resource either in Solution Explorer or Import panel, its properties are shown in Properties panel. Information about the selected resource is displayed in Properties panel.

<div drawio-diagram="5922"><img src="https://doc316en.candera.eu/uploads/images/drawio/2024-05/drawing-5-1717167248.png" alt=""/></div>


#### Clone, Delete and Rename Items

Imported resources can be cloned, renamed or deleted in the Solution Explorer panel. Right-click an imported item in the Solution Explorer and choose the desired option from the context menu. You can also right-click on a folder containing imported files to bulk delete them.

For further information refer to Solution Explorer <span style="color: rgb(230, 126, 35);">[Context Menu](https://doc316en.candera.eu/link/46#bkmrk-copy%2C-clone%2C-rename-)</span>.

#### Delete Unused Imports  


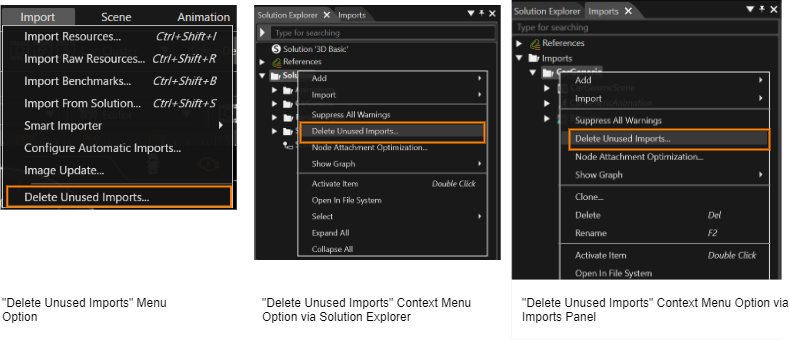
If there are unused imports or import parts, it is possible to clean up the solution by using the "Delete Unused Imports..." option. This option is available in the

<div class="contents" id="bkmrk-import-menu-solution"><div class="contents"><div class="textblock">- Import menu
- Solution Explorer
- Imports Panel

</div></div></div><div drawio-diagram="6870"><img src="https://doc316en.candera.eu/uploads/images/drawio/2024-09/drawing-4-1727160497.png" alt=""/></div>

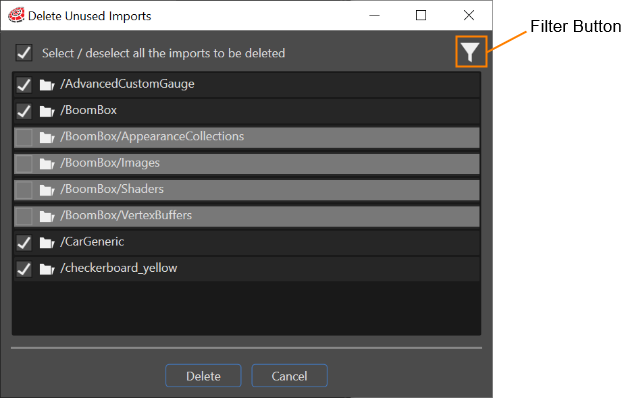
The "Delete Unused Imports" dialog will list all the imports from a solution.

<div class="contents" id="bkmrk-the-only-imports-whi"><div class="contents"><div class="textblock"><dl class="note"><dt></dt><dd><p class="callout info">Import items that can be displayed and deleted as unused imports are images, raw resources, fonts, fragment shaders, vertex shaders, 3D model files, and scripts.</p>

</dd></dl></div></div></div>The filter button allows to hide/show the unused (= undeletable) imports. Tick the checkboxes for unused imports to delete them with the Delete button.

<div drawio-diagram="5929"><img src="https://doc316en.candera.eu/uploads/images/drawio/2024-05/drawing-5-1717168584.png" alt=""/></div>

<div class="contents" id="bkmrk-if-an-import-folder-"><div class="textblock"><dl class="note"><dd><p class="callout info">If an import folder contains other folders or files, which are not imported, this folder won't be deleted. Only the imported files that are unused.</p>

</dd></dl><dl class="note"><dd>#### Export Imported Images

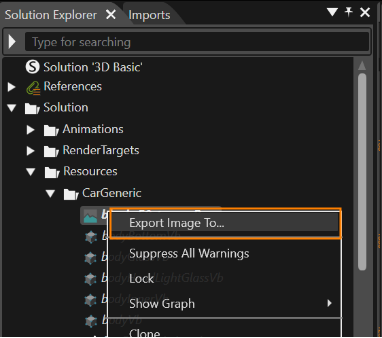
If necessary, it is possible to export any imported image from solution to a .png file. This operation can be done through the context menu which is available when right click on any image. This operation can also be performed after selecting multiple image resources.

<div drawio-diagram="5927"><img src="https://doc316en.candera.eu/uploads/images/drawio/2024-05/drawing-5-1717168526.png" alt=""/></div>

<div class="contents" id="bkmrk--13"><div class="contents"><div class="textblock">  
</div></div></div><div class="contents" id="bkmrk-the-image-can-be-exp"><div class="contents"><div class="textblock"><dl class="note"><dd><p class="callout info">The image can be exported even though it is locked.</p>

</dd><dd>This export operation can be done in different contexts of the application:</dd></dl></div></div></div><div class="contents"><div class="contents"><div class="textblock">- From Solution Explorer
- From Imports
- From Canvas Node
- From Canvas sprite
- From Billboard

<dl class="note"><dd><p class="callout info">Currently the original image is exported, not the asset one.</p>

</dd></dl></div></div></div><div class="contents" id="bkmrk-from-solution-explor"><div class="textblock"><dl class="note"><dd><dl class="note"><dd>#### Edit an imported script resource

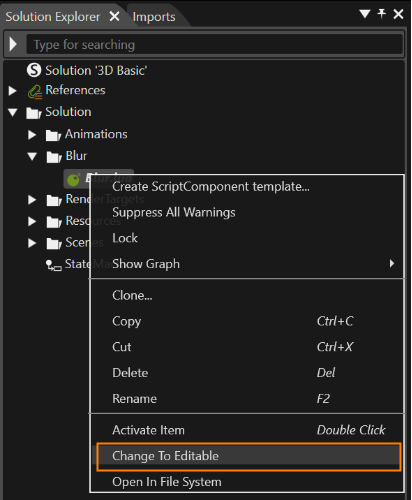
You can import any type of script by using the \[ Import Resources... \] menu. Imported scripts are read-only, but can be changed to editable format.  
Select the target script in Solution Explorer and choose \[ Change to Editable \] from the context menu.

<div drawio-diagram="5926"><img src="https://doc316en.candera.eu/uploads/images/drawio/2024-05/drawing-5-1717168517.png" alt=""/></div>

<div class="contents" id="bkmrk--16"><div class="contents"><div class="textblock">  
</div></div></div><div class="contents" id="bkmrk-please-refer-to-scri"><div class="contents"><div class="textblock"><dl class="note"><dd><p class="callout info">Please refer to <span style="color: rgb(230, 126, 35);">[Scripting](https://doc316en.candera.eu/books/scripting)</span> for instructions on how to operate script resources.</p>

</dd></dl></div></div></div></dd></dl></dd></dl></div></div></dd></dl></div></div>