# Transitions configuration

<span data-dl-original="true" data-dl-translated="true" data-dl-uid="53" style="color: rgb(0, 0, 0);"><span data-dl-original="true" data-dl-translated="true" data-dl-uid="54">This page describes how to set up transitions between the three States created in the previous operation. These state transitions can be configured in the State Machine Editor. </span></span>

<p class="callout info"><span data-dl-original="true" data-dl-translated="true" data-dl-uid="53" style="color: rgb(0, 0, 0);"><span data-dl-original="true" data-dl-translated="true" data-dl-uid="54">More information about state transitions can be found [here](https://doc316en.candera.eu/books/state-machine/page/components-in-state-machine#bkmrk-transition).</span></span></p>

##### <span data-dl-original="true" data-dl-translated="true" data-dl-uid="56" style="color: rgb(0, 0, 0);"><span data-dl-original="true" data-dl-translated="true" data-dl-uid="57">State Transition Configuration</span></span>

<span style="color: rgb(0, 0, 0);">The Transition function of the State Machine Editor defines how and when the system moves from one state to another. Transitions are indicated by connecting two states with an arrow.</span>

1. <span data-dl-original="true" data-dl-translated="true" data-dl-uid="59" style="color: rgb(0, 0, 0);"><span data-dl-original="true" data-dl-translated="true" data-dl-uid="60">Drag a State Transition from the State Machine Editor's top toolbar, and <span data-dl-original="true" data-dl-translated="true" data-dl-uid="61"><span data-dl-original="true" data-dl-translated="true" data-dl-uid="62">drop it onto the</span></span> "Car\_Cluster" State (<span data-dl-translated="true" data-dl-uid="61"><span data-dl-translated="true" data-dl-uid="62">Transition start side).</span></span></span></span>
    - <span data-dl-original="true" data-dl-translated="true" data-dl-uid="63" style="color: rgb(0, 0, 0);"><span data-dl-original="true" data-dl-translated="true" data-dl-uid="63"><span data-dl-original="true" data-dl-translated="true" data-dl-uid="64"><span data-dl-original="true" data-dl-translated="true" data-dl-uid="65"><span data-dl-original="true" data-dl-translated="true" data-dl-uid="66"><span data-dl-original="true" data-dl-translated="true" data-dl-uid="67">A State Transition arrow is created, the tail of which is linked to the "Car\_Cluster" State.</span></span></span></span></span></span>
    - <span data-dl-original="true" data-dl-translated="true" data-dl-uid="63" style="color: rgb(0, 0, 0);"><span data-dl-original="true" data-dl-translated="true" data-dl-uid="63"><span data-dl-original="true" data-dl-translated="true" data-dl-uid="64"><span data-dl-original="true" data-dl-translated="true" data-dl-uid="65"><span data-dl-original="true" data-dl-translated="true" data-dl-uid="66"><span data-dl-original="true" data-dl-translated="true" data-dl-uid="67">The State Transition arrow's head can now be dragged across the diagram to define the target state.</span></span></span></span></span></span><div drawio-diagram="5680"><img src="https://doc316en.candera.eu/uploads/images/drawio/2024-04/drawing-4-1714458011.png" alt=""/></div>
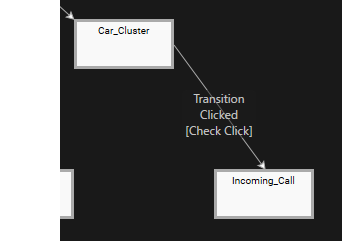
2. <span data-dl-original="true" data-dl-translated="true" data-dl-uid="69" style="color: rgb(0, 0, 0);"><span data-dl-original="true" data-dl-translated="true" data-dl-uid="70">Drag the State Transition arrow's head onto the "Incoming\_Call" State and attach it with a mouse-click.</span></span>  
    
    - <span style="color: rgb(0, 0, 0);">The two states, "Car\_Cluster" and "Incoming\_Call", are connected by a State Transition arrow.</span>  
        <div drawio-diagram="5666"><img src="https://doc316en.candera.eu/uploads/images/drawio/2024-04/drawing-4-1714392159.png" alt=""/></div>
3. <span style="color: rgb(0, 0, 0);">Select the State Transition in the State Machine diagram and click the \[Fusion...\] button in the Behavior/Fusion Configuration Panel in the State Machine Editor's bottom left.</span>
    - <span style="color: rgb(0, 0, 0);">Fusion will be opened, displaying the Transition's Fusion diagram.</span>
    - <span style="color: rgb(0, 0, 0);">A Check Click Fusion node is connected to the Transition Fusion node's Condition connector.</span>
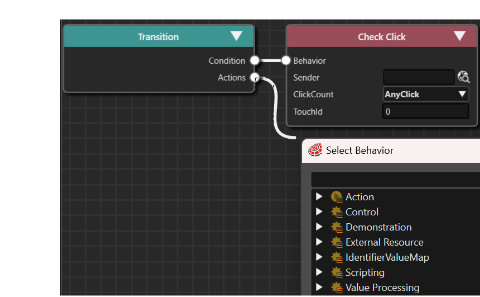
4. <span style="color: rgb(0, 0, 0);">Click on the Transition Fusion node's Actions connector.</span>
    - <span style="color: rgb(0, 0, 0);">The \[Select Behavior\] dialog will be opened.</span><p class="callout info"><span style="color: rgb(0, 0, 0);">Instead of clicking on the Actions connector, you can click and drag the connector to a desired location in the diagram where the new Fusion node will be positioned.</span></p>
        
        <div drawio-diagram="8676"><img src="https://doc316en.candera.eu/uploads/images/drawio/2025-11/drawing-5-1762512316.png" alt=""/></div>
5. <span style="color: rgb(0, 0, 0);">Enter "Transition Request" in the search field at the top of the dialog.</span>
    - <span style="color: rgb(0, 0, 0);">While typing, the list of behaviors in the dialog will be narrowed down.</span>
6. <span style="color: rgb(0, 0, 0);">Double-click \[Action &gt; Transition &gt; Transition Request\].</span>
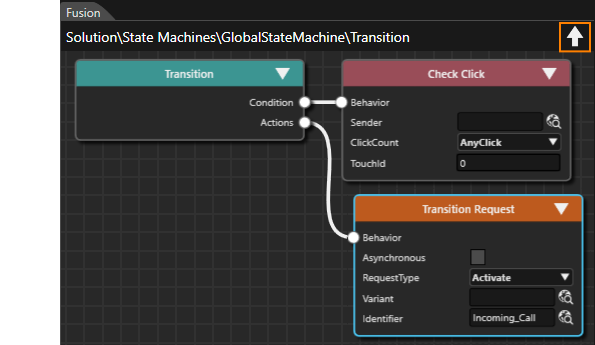
    - <span style="color: rgb(0, 0, 0);">A new Transition Request Fusion node will be created. It is linked to the Actions connector of the Transition Fusion node.</span>
7. <span style="color: rgb(0, 0, 0);">Configure the Transition Request Fusion node according to the table below. The scene assigned to the property \[Identifier\] determines the destination of the transition.</span>
    - <span style="color: rgb(0, 0, 0);">This operation completes the configuration of the transition from "Car\_Cluster" to "Incoming\_Call".</span>
    - <span style="color: rgb(0, 0, 0);">Click the up arrow icon in the upper right corner of the Fusion panel to navigate back to the State Machine Editor.</span>  
        <table border="1" class="align-center" data-dl-original="true" data-dl-translated="true" data-dl-uid="130" id="bkmrk-items-setting-value--0" style="border-collapse: collapse; width: 500px; border-width: 1px;"><colgroup data-dl-original="true" data-dl-translated="true" data-dl-uid="131"><col data-dl-original="true" data-dl-translated="true" data-dl-uid="132"></col><col data-dl-original="true" data-dl-translated="true" data-dl-uid="133"></col></colgroup><tbody data-dl-original="true" data-dl-translated="true" data-dl-uid="134"><tr><td style="border-width: 1px; background-color: rgb(35, 111, 161);"><span style="color: rgb(0, 0, 0);">**Property**</span></td><td style="border-width: 1px; background-color: rgb(35, 111, 161);"><span style="color: rgb(0, 0, 0);">**Configuration**</span></td></tr><tr data-dl-original="true" data-dl-translated="true" data-dl-uid="135"><td data-dl-original="true" data-dl-translated="true" data-dl-uid="136" style="border-width: 1px;"><span data-dl-original="true" data-dl-translated="true" data-dl-uid="137" style="color: rgb(0, 0, 0);"><span data-dl-original="true" data-dl-translated="true" data-dl-uid="138">RequestType</span></span></td><td data-dl-original="true" data-dl-translated="true" data-dl-uid="139" style="border-width: 1px;"><span data-dl-original="true" data-dl-translated="true" data-dl-uid="140" style="color: rgb(0, 0, 0);"><span data-dl-original="true" data-dl-translated="true" data-dl-uid="141">Activate</span></span></td></tr><tr data-dl-original="true" data-dl-translated="true" data-dl-uid="142"><td data-dl-original="true" data-dl-translated="true" data-dl-uid="143" style="border-width: 1px;"><span data-dl-original="true" data-dl-translated="true" data-dl-uid="144" style="color: rgb(0, 0, 0);"><span data-dl-original="true" data-dl-translated="true" data-dl-uid="145">Identifier</span></span></td><td data-dl-original="true" data-dl-translated="true" data-dl-uid="146" style="border-width: 1px;"><span data-dl-original="true" data-dl-translated="true" data-dl-uid="147" style="color: rgb(0, 0, 0);"><span data-dl-original="true" data-dl-translated="true" data-dl-uid="148">Solution &gt; Scenes &gt; Incoming\_Call</span></span></td></tr></tbody></table>
        
          
        <div drawio-diagram="8677"><img src="https://doc316en.candera.eu/uploads/images/drawio/2025-11/drawing-5-1762513559.png" alt=""/></div>
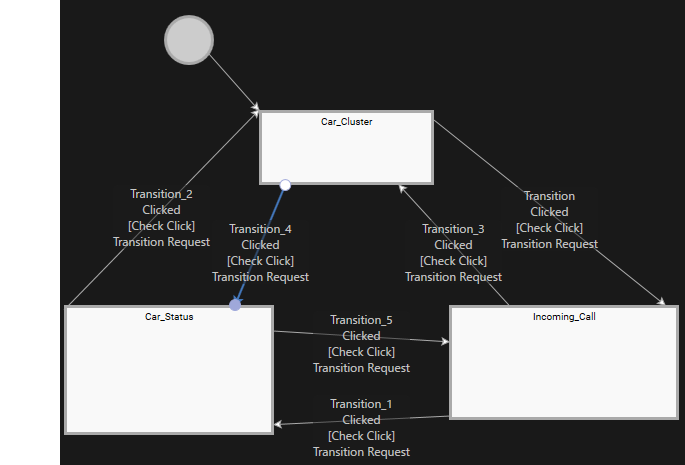
8. <span style="color: rgb(0, 0, 0);">Repeat steps 1 through step 7 to configure the following five transitions.</span>
    - <span style="color: rgb(0, 0, 0);">This finalizes the configuration of our State Transitions.</span>
    - <span style="color: rgb(0, 0, 0);">Scene Car\_Status is activated whenever State Car\_Status is entered. Scene Car\_Cluster is entered whenever State Car\_Cluster is entered etc.</span>
    - <span style="color: rgb(0, 0, 0);">The final State Machine diagram will look like the image shown below.</span><table border="1" class="align-center" style="border-collapse: collapse; width: 601px; border-width: 1px;"><colgroup><col style="width: 113px;"></col><col style="width: 113px;"></col><col style="width: 123px;"></col><col style="width: 251px;"></col></colgroup><tbody><tr><td colspan="2" style="border-width: 1px; background-color: rgb(35, 111, 161);"><span style="color: rgb(0, 0, 0);">**Transition**</span></td><td rowspan="2" style="border-width: 1px; background-color: rgb(35, 111, 161);"><span style="color: rgb(0, 0, 0);">**RequestType**</span></td><td rowspan="2" style="border-width: 1px; background-color: rgb(35, 111, 161);"><span style="color: rgb(0, 0, 0);">**Identifier**</span></td></tr><tr><td style="border-width: 1px; background-color: rgb(35, 111, 161);"><span style="color: rgb(0, 0, 0);">**From**</span></td><td style="border-width: 1px; background-color: rgb(35, 111, 161);"><span style="color: rgb(0, 0, 0);">**To**</span></td></tr><tr><td class="align-left" data-="" style="border-width: 1px;"><span style="color: rgb(0, 0, 0);">Incoming\_Call</span></td><td style="border-width: 1px;"><span style="color: rgb(0, 0, 0);">Car\_Status</span></td><td style="border-width: 1px;"><span style="color: rgb(0, 0, 0);">Activate</span></td><td class="align-left" style="border-width: 1px;"><span style="color: rgb(0, 0, 0);">Solution&gt;Scenes&gt;Car\_Status</span></td></tr><tr><td class="align-left" style="border-width: 1px;"><span style="color: rgb(0, 0, 0);">Car\_Status</span></td><td style="border-width: 1px;"><span style="color: rgb(0, 0, 0);">Car\_Cluster</span></td><td style="border-width: 1px;"><span style="color: rgb(0, 0, 0);">Activate</span></td><td class="align-left" style="border-width: 1px;"><span style="color: rgb(0, 0, 0);">Solution&gt;Scenes&gt;Car\_Cluster</span></td></tr><tr><td class="align-left" style="border-width: 1px;"><span style="color: rgb(0, 0, 0);">Car\_Cluster</span></td><td style="border-width: 1px;"><span style="color: rgb(0, 0, 0);">Car\_Status</span></td><td style="border-width: 1px;"><span style="color: rgb(0, 0, 0);">Activate</span></td><td class="align-left" style="border-width: 1px;"><span style="color: rgb(0, 0, 0);">Solution&gt;Scenes&gt;Car\_Status</span></td></tr><tr><td class="align-left" style="border-width: 1px;"><span style="color: rgb(0, 0, 0);">Car\_Status</span></td><td style="border-width: 1px;"><span style="color: rgb(0, 0, 0);">Incoming\_Call</span></td><td style="border-width: 1px;"><span style="color: rgb(0, 0, 0);">Activate</span></td><td class="align-left" style="border-width: 1px;"><span style="color: rgb(0, 0, 0);">Solution&gt;Scenes&gt;Incoming\_Call</span></td></tr><tr><td class="align-left" style="border-width: 1px;"><span style="color: rgb(0, 0, 0);">Incoming\_Call</span></td><td style="border-width: 1px;"><span style="color: rgb(0, 0, 0);">Car\_Cluster</span></td><td style="border-width: 1px;"><span style="color: rgb(0, 0, 0);">Activate</span></td><td class="align-left" style="border-width: 1px;"><span style="color: rgb(0, 0, 0);">Solution&gt;Scenes&gt;Car\_Cluster</span></td></tr></tbody></table>
    
    <div drawio-diagram="5515"><img src="https://doc316en.candera.eu/uploads/images/drawio/2024-04/drawing-4-1712032875.png" alt=""/></div>

##### <span data-dl-original="true" data-dl-translated="true" data-dl-uid="196" style="color: rgb(0, 0, 0);"><span data-dl-original="true" data-dl-translated="true" data-dl-uid="197">Handle Control State</span></span>

<span style="color: rgb(0, 0, 0);">In the previous section, we configured the State Transitions and the activation of the respective scene. Next, we will define the conditions for triggering these transitions . Each State Transition has an attached "Check Click" Condition Behavior by default. In the following steps we will add a "Handle Control State" behavior to the TellTale controls "IndicatorLeft" and "IndicatorRight". This makes the Indicators behave like a control, enabling them e.g. to emit click events.</span>

1. <span style="color: rgb(0, 0, 0);">In the Solution Explorer, navigate to \[Solution &gt; Scenes &gt; Car\_Cluster\] and double-click the scene.</span>
    - <span style="color: rgb(0, 0, 0);">The Scene Editor will be opened, displaying the scene "Car\_Cluster".</span>
    - <span style="color: rgb(0, 0, 0);">The Scene Tree panel will show the scene's scene tree.</span>
    - <span style="color: rgb(0, 0, 0);">In the Scene Tree panel's right side, an extra scene tree is available, displaying the \[Fusion...\] button and the currently selected RenderNode's Behaviors and Effects.</span>
2. <span data-dl-original="true" data-dl-translated="true" data-dl-uid="206" style="color: rgb(0, 0, 0);"><span data-dl-original="true" data-dl-translated="true" data-dl-uid="207">In the Scene Tree panel, expand the scene tree along the following path: Cluster &gt; StatusTop &gt; Telltales. </span></span>  
    
    - <span style="color: rgb(0, 0, 0);"><span data-dl-original="true" data-dl-translated="true" data-dl-uid="210"><span data-dl-original="true" data-dl-translated="true" data-dl-uid="211">The Group2D nodes Brake, AirBag, Engine, OpenDoors, IndicatorRight, and</span></span> IndicatorLeft will be displayed.</span><p class="callout info"><span style="color: rgb(0, 0, 0);">To expand a Group2D node, you can either double-click it or you can single-click on the little triangle to it's left.</span></p>
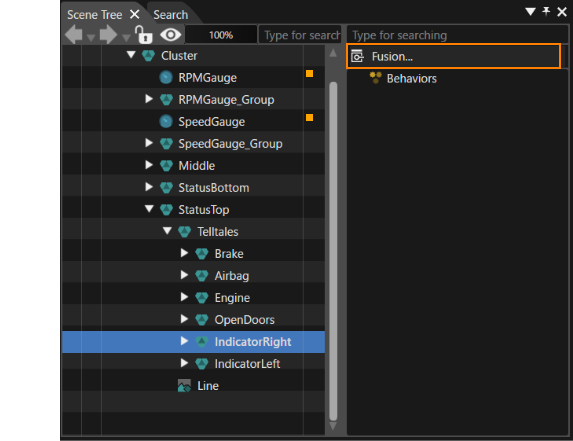
3. <span data-dl-original="true" data-dl-translated="true" data-dl-uid="216" style="color: rgb(0, 0, 0);"><span data-dl-original="true" data-dl-translated="true" data-dl-uid="217"><span data-dl-original="true" data-dl-translated="true" data-dl-uid="218"><span data-dl-original="true" data-dl-translated="true" data-dl-uid="219">In the Scene Tree panel, select the IndicatorRight Group2D node, then click on the \[Fusion...\] button in the Extra Scene tree.</span></span></span></span>
    - <span style="color: rgb(0, 0, 0);">Fusion will be opened, displaying the Fusion diagram of <span data-dl-original="true" data-dl-translated="true" data-dl-uid="221"><span data-dl-original="true" data-dl-translated="true" data-dl-uid="222"><span data-dl-original="true" data-dl-translated="true" data-dl-uid="223"><span data-dl-original="true" data-dl-translated="true" data-dl-uid="224">IndicatorRight</span></span></span></span>.</span>  
        <div drawio-diagram="8679"><img src="https://doc316en.candera.eu/uploads/images/drawio/2025-11/drawing-5-1762524801.png" alt=""/></div>
4. <span style="color: rgb(0, 0, 0);">In Fusion, click the Behaviors connector on the <span data-dl-original="true" data-dl-translated="true" data-dl-uid="231"><span data-dl-original="true" data-dl-translated="true" data-dl-uid="232"><span data-dl-original="true" data-dl-translated="true" data-dl-uid="233"><span data-dl-original="true" data-dl-translated="true" data-dl-uid="234">IndicatorRight</span></span></span></span> Fusion node.</span>
    - <span style="color: rgb(0, 0, 0);">The \[Select Behavior\] dialog will be opened.</span>
5. <span style="color: rgb(0, 0, 0);">In the Select Behavior dialog, enter "<span data-dl-original="true" data-dl-translated="true" data-dl-uid="240"><span data-dl-original="true" data-dl-translated="true" data-dl-uid="241">Handle Control State</span></span>" in the search field at the top.</span>
    - <span style="color: rgb(0, 0, 0);">The list of behaviors in the dialog will be narrowed down to \[<span data-dl-original="true" data-dl-translated="true" data-dl-uid="244"><span data-dl-original="true" data-dl-translated="true" data-dl-uid="245">Control &gt; Internal &gt; Handle Control State\]</span></span>.</span>
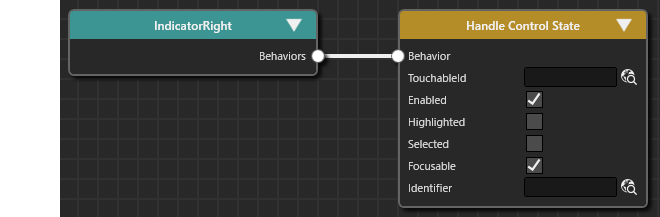
6. <span style="color: rgb(0, 0, 0);">Double-click the "<span data-dl-original="true" data-dl-translated="true" data-dl-uid="249"><span data-dl-original="true" data-dl-translated="true" data-dl-uid="250">Handle Control State"</span></span>.</span>
    - <span style="color: rgb(0, 0, 0);">A <span data-dl-original="true" data-dl-translated="true" data-dl-uid="253"><span data-dl-original="true" data-dl-translated="true" data-dl-uid="254">Handle Control State</span></span> Fusion node will be linked to the IndicatorRight Fusion node.</span>  
        <div drawio-diagram="5670"><img src="https://doc316en.candera.eu/uploads/images/drawio/2024-04/drawing-4-1714394152.png" alt=""/></div>
7. <span style="color: rgb(0, 0, 0);">Perform steps 3 through 6 for "IndicatorLeft" as well.</span>
    - <span style="color: rgb(0, 0, 0);">IndicatorLeft and IndicatorRight are now behaving like controls. They are e.g. able to emit click events.  
          
        </span>
8. <span style="color: rgb(0, 0, 0);">Repeat steps 1 through 7 for scenes "Car\_Status" and "Incoming\_Call", adding Handle Control State behaviors to their IndicatorLeft and IndicatorRight component in the same manner.</span>

<span style="color: rgb(0, 0, 0);">With the configurations above, IndicatorLeft and IndicatorRight are configured to behave like a control. They are e.g. able to emit click events.</span>

#### <span style="color: rgb(0, 0, 0);">Conditions for the State Transitions</span>

<span style="color: rgb(0, 0, 0);">Finally, each State Transition's 'Check Click Condition Behavior' has to be configured with a sender - the control that emits the click event. We have set up IndicatorLeft and IndicatorRight to send click events, so they can be configured as senders.</span>

1. <span style="color: rgb(0, 0, 0);">In the State Machine Editor<span data-dl-original="true" data-dl-translated="true" data-dl-uid="266"><span data-dl-original="true" data-dl-translated="true" data-dl-uid="267">, select the state transition from "Car\_Cluster" to "Incoming\_Call"</span></span>.<span data-dl-translated="true" data-dl-uid="266"><span data-dl-translated="true" data-dl-uid="267">  
      
    </span></span></span>
2. <span style="color: rgb(0, 0, 0);">Click the \[Fusion...\] button in the lower left of the State Machine Editor .</span>
    - <span style="color: rgb(0, 0, 0);">Fusion will be opened, displaying the Fusion diagram of the selected state transition.</span>
    - <span style="color: rgb(0, 0, 0);">The Transition Fusion node's Condition connector is linked to the Check Click Fusion node.</span>
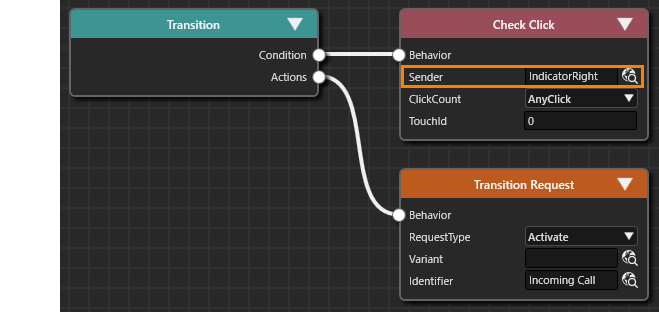
3. <span style="color: rgb(0, 0, 0);">In Fusion at the Check Click Fusion node, click the 'Select item' icon to the right of the \[Sender\] property.</span>
    - <span style="color: rgb(0, 0, 0);">The \[Choose Item\] dialog will be opened.</span>
4. <span style="color: rgb(0, 0, 0);"><span data-dl-original="true" data-dl-translated="true" data-dl-uid="283"><span data-dl-original="true" data-dl-translated="true" data-dl-uid="284">In the Choose Item dialog, navigate to and select </span></span>\[Solution &gt; Car\_Cluster &gt; Cluster &gt; StatusTop &gt; IndicatorRight\], then click \[OK\].</span>
    - <span style="color: rgb(0, 0, 0);">IndicationRight will be displayed in the Sender property of Check Click.</span>  
        <div drawio-diagram="5671"><img src="https://doc316en.candera.eu/uploads/images/drawio/2024-04/drawing-4-1714394249.png" alt=""/></div>
5. <span style="color: rgb(0, 0, 0);">Click the up arrow icon located in the upper-right corner of the Fusion panel.</span>
    - <span style="color: rgb(0, 0, 0);">The State Machine Editor panel will be opened, displaying the State Machine diagram.</span>
6. <span data-dl-original="true" data-dl-translated="true" data-dl-uid="298" style="color: rgb(0, 0, 0);"><span data-dl-original="true" data-dl-translated="true" data-dl-uid="299">Repeat steps 1 through 5 to configure the sender property for the remaining Check Click Condition behaviors, applying the configurations from the table below.</span></span>
    - <span data-dl-original="true" data-dl-translated="true" data-dl-uid="300" style="color: rgb(0, 0, 0);"><span data-dl-original="true" data-dl-translated="true" data-dl-uid="301"><span data-dl-original="true" data-dl-translated="true" data-dl-uid="302">All state transitions are now configured correctly.  
        </span></span></span><table border="1" class="align-center" style="border-collapse: collapse; width: 501px; border-width: 1px;"><colgroup><col style="width: 116px;"></col><col style="width: 116px;"></col><col style="width: 268px;"></col></colgroup><tbody><tr><td data-dl-original="true" data-dl-translated="true" data-dl-uid="304" style="border-width: 1px; background-color: rgb(35, 111, 161);"><span style="color: rgb(0, 0, 0);">**Transition**</span></td><td style="border-width: 1px; background-color: rgb(35, 111, 161);"><span style="color: rgb(0, 0, 0);">  
        </span></td><td data-dl-original="true" data-dl-translated="true" data-dl-uid="305" style="border-width: 1px; background-color: rgb(35, 111, 161);"><span style="color: rgb(0, 0, 0);">**<span data-dl-original="true" data-dl-translated="true" data-dl-uid="306"><span data-dl-original="true" data-dl-translated="true" data-dl-uid="307">Check Click &gt; Sender</span></span>**</span></td></tr><tr><td style="border-width: 1px; background-color: rgb(35, 111, 161);"><span style="color: rgb(0, 0, 0);">**From**</span></td><td style="border-width: 1px; background-color: rgb(35, 111, 161);"><span style="color: rgb(0, 0, 0);">**To**</span></td><td style="border-width: 1px; background-color: rgb(35, 111, 161);"><span style="color: rgb(0, 0, 0);">**<span data-dl-original="true" data-dl-translated="true" data-dl-uid="306"><span data-dl-original="true" data-dl-translated="true" data-dl-uid="307">  
        </span></span>**</span></td></tr><tr><td class="align-left" data-dl-original="true" data-dl-translated="true" data-dl-uid="308" style="border-width: 1px;"><span style="color: rgb(0, 0, 0);">Incoming\_Call</span></td><td style="border-width: 1px;"><span style="color: rgb(0, 0, 0);">Car\_Status</span></td><td class="align-left" data-dl-original="true" data-dl-translated="true" data-dl-uid="309" style="border-width: 1px;"><span data-dl-original="true" data-dl-translated="true" data-dl-uid="310" style="color: rgb(0, 0, 0);"><span data-dl-original="true" data-dl-translated="true" data-dl-uid="311">Incoming\_Call &gt; ... &gt;IndicatorRight</span></span></td></tr><tr><td class="align-left" data-dl-original="true" data-dl-translated="true" data-dl-uid="312" style="border-width: 1px;"><span style="color: rgb(0, 0, 0);">Car\_Status</span></td><td style="border-width: 1px;"><span style="color: rgb(0, 0, 0);">Car\_Cluster</span></td><td class="align-left" data-dl-original="true" data-dl-translated="true" data-dl-uid="313" style="border-width: 1px;"><span data-dl-original="true" data-dl-translated="true" data-dl-uid="314" style="color: rgb(0, 0, 0);"><span data-dl-original="true" data-dl-translated="true" data-dl-uid="315">Car\_Status &gt; ... &gt; IndicatorRight</span></span></td></tr><tr><td class="align-left" data-dl-original="true" data-dl-translated="true" data-dl-uid="316" style="border-width: 1px;"><span style="color: rgb(0, 0, 0);">Car\_Cluster</span></td><td style="border-width: 1px;"><span style="color: rgb(0, 0, 0);">Car\_Status</span></td><td class="align-left" data-dl-original="true" data-dl-translated="true" data-dl-uid="317" style="border-width: 1px;"><span data-dl-original="true" data-dl-translated="true" data-dl-uid="318" style="color: rgb(0, 0, 0);"><span data-dl-original="true" data-dl-translated="true" data-dl-uid="319">Car\_Cluster &gt; ... &gt; IndicatorLeft</span></span></td></tr><tr><td class="align-left" data-dl-original="true" data-dl-translated="true" data-dl-uid="320" style="border-width: 1px;"><span style="color: rgb(0, 0, 0);">Car\_Status</span></td><td style="border-width: 1px;"><span style="color: rgb(0, 0, 0);">Incoming\_Call</span></td><td class="align-left" data-dl-original="true" data-dl-translated="true" data-dl-uid="321" style="border-width: 1px;"><span data-dl-original="true" data-dl-translated="true" data-dl-uid="322" style="color: rgb(0, 0, 0);"><span data-dl-original="true" data-dl-translated="true" data-dl-uid="323">Car\_Status &gt; ... &gt; IndicatorLeft</span></span></td></tr><tr><td class="align-left" data-dl-original="true" data-dl-translated="true" data-dl-uid="324" style="border-width: 1px;"><span style="color: rgb(0, 0, 0);">Incoming\_Call</span></td><td style="border-width: 1px;"><span style="color: rgb(0, 0, 0);">Car\_Cluster</span></td><td class="align-left" data-dl-original="true" data-dl-translated="true" data-dl-uid="325" style="border-width: 1px;"><span data-dl-original="true" data-dl-translated="true" data-dl-uid="326" style="color: rgb(0, 0, 0);"><span data-dl-original="true" data-dl-translated="true" data-dl-uid="327">Incoming\_Call &gt; ... &gt; IndicatorLeft</span></span></td></tr></tbody></table>

<span data-dl-original="true" data-dl-translated="true" data-dl-uid="329" style="color: rgb(0, 0, 0);"><span data-dl-original="true" data-dl-translated="true" data-dl-uid="330">This completes the setup of the state transitions triggered by click events emitted by a control, which then leads to an activation of a new scene. On the next page, we will confirm the functionality of our configuration.</span></span>