# Getting Started

This document describes briefly how to get started with CGI Studio, Player and SceneComposer.  
  
Note:  
The following information is given to describe certain components or functionalities and shall not be considered as warranted characteristics.

# Candera CGI Studio Editions

Candera CGI Studio is currently available in three different editions:

1. <span style="color:rgb(230,126,35);">[**Enterprise Edition**](https://doc316en.candera.eu/books/cgi-studio-enterprise-edition "Candera CGI Studio - Enterprise Edition") </span>- provides the maximum level of features and flexibility for embedded projects
2. <span style="color:rgb(230,126,35);">[**Professional Edition**](https://doc316en.candera.eu/books/cgi-studio-professional-edition "Candera CGI Studio - Professional Edition")</span> - focuses on ease of use for creating embedded projects
3. <span style="color:rgb(230,126,35);">[**Community Edition**](https://doc316en.candera.eu/books/cgi-studio-community-edition "Candera CGI Studio - Community Edition")</span> - a free edition for creating projects for non-commercial applications

#### Documentation

The documentation is created for all versions of CGI Studio, as the differences are only affecting the data binding and platform support. The Professional Edition has an easier <span style="color:rgb(230,126,35);">[Python based data binding](https://doc316en.candera.eu/books/cgi-studio-professional-edition/page/python-based-data-binding "Python-based Data Binding")</span> and supports a selected set of platforms. Moreover, there is a specific <span style="color:rgb(230,126,35);">[blood pressure sample](https://doc316en.candera.eu/books/cgi-studio-professional-edition/page/blood-pressure-sample "Blood Pressure Sample")</span> for the Professional Edition to explain how its data binding works, but the sample would work for all version.

# Release Package Signature

CGI Studio Release Packages are released with a Release Package Signature. This way you can always make sure that the delivery is from Candera GmbH and it includes the original files without any change.

#### The Signature File  


The signature is a CGI Studio File Catalog that can be found here:

/cgi\_studio\_docs/Signature/CGIStudioFileCatalog.cat

- It contains a complete list of files that are part of the delivery.
- It lists all filepaths and filenames.
- It includes a thumbprint of each file's content.
- It is signed using the certificate purchased by Candera GmbH issued by a Certificate Authority.

#### Required Tools  


The **CGI Studio File Catalog** is created using the following windows batch file script that is also part of the delivery:

/cgi\_studio\_docs/Signature/catalog.bat

- Microsoft MakeCat is used to create an unsigned catalog file, which is part of Microsoft Windows Kits 8.1.
- The following path should be in the "PATH" environment variable: C:\\Program Files (x86)\\Windows Kits\\8.1\\bin\\x64

#### Creating a signature file  


To create a CGI Studio File Catalog your own, please follow the steps below.

1. Make sure, that Windows Kits 8.1 is installed on your PC (should be the case for all Windows7 and Windows10 installations).
2. Add the following to your "PATH" environment variable: C:\\Program Files (x86)\\Windows Kits\\8.1\\bin\\x64
3. Check that the path length to the /cgi\_studio\_docs/Signature/catalog.bat batch file is minimal.
4. Run the /cgi\_studio\_docs/Signature/catalog.bat batch file.

---

# System Requirements and Preparation

#### CGI Studio Package Installation/Unpacking Requirements  


Please be aware of the following requirements when installing CGI Studio,

- Make sure you have administrator privileges.
- As some .dll files may be blocked by Windows due to security reasons, you may have to manually unblock individual .dll files to complete the installation process.
- For safety reasons, please notify your IT department when installing this software.

#### Software Development Environment Required  


##### Software Development Environment for Host  


Install the following software for host development if not yet available:

- Microsoft Visual Studio 2015 (Update 3) or 2017
- Microsoft Visual C++ 2015 Redistributable Package x64
- .NET Runtime 4.8 - Redistributable Package and .Net FW can be downloaded free of charge from [<span style="color:rgb(230,126,35);">http://www.microsoft.com/downloads/</span>](http://www.microsoft.com/downloads/)
- CMake 3.19.0 - CMake can be downloaded free of charge from [<span style="color:rgb(230,126,35);">http://www.cmake.org/</span>](http://www.cmake.org/)
- Python 2.7.x or 3.6.5 (or higher)

<p class="callout info">For execution only, redistributable package is sufficient. For widget development,  
 MS Visual Studio (min. C++ and C#) or   
 MS Visual Studio C++ Express Edition and MS Visual Studio 2015 (minimal) C# Express Edition is mandatory.   
</p>

#### Software Development Environment for Target Platforms  


Please refer to the <span style="color:rgb(230,126,35);">[Application Development](https://doc316en.candera.eu/shelves/5-application-development)</span> section of this document for device specific target setup documentation.

#### Monitor resolution (recommended)

FHD(1920×1080) or higher display

---

# CGI Studio Installation

Unzip the delivered zip file to the desired installation root directory. The installation root directory &lt;installation-path&gt;/CGI-Studio\_&lt;version\_number&gt;\_&lt;package\_type&gt; is further referenced in this document as &lt;cgi-studio-root&gt;.

---

#### HASP License Activation  


<p class="callout info">Note that the HASP license applies only to the Enterprise Edition.</p>

For a **Dongle** or **client-side Network License**, the following installations steps are required:

1. Execute instlic.cmd after unziping hasp\_installer.zip delivered within &lt;cgi-studio-root&gt;/cgi\_studio\_3psw/bin/HASP. This will install the HASP License software driver.
2. Insert the dongle to a USB port.
3. Invoke SceneComposer or other protected software from the CGI Studio installation directory to prove a successful HASP installation.

<p class="callout info">In Windows 10 environments, the license driver is automatically installed by simply inserting the dongle on a USB port the first time.   
Local admin rights are required to install the HASP driver.  
</p>

For a **Software License** (time-limited trial license), please perform the following installation steps:

1. Execute instlic.cmd delivered by CGI Studio Customer Support. This will install the HASP License software driver.
2. Access http://localhost:1947 via your browser and select 'Update/Attach' in the left menu
3. Click 'Browse ..." and select the according .v2c file, which has been sent to you by customer support; confirm with 'Apply File' button.
4. Invoke SceneComposer or other protected software from the CGI Studio installation directory. The software license will be active for a certain period of time as agreed in your specific license agreement.

<p class="callout info">Take care to call HASP installation files from a local directory. There are known issues related to installing licenses from a network drive.</p>

For HASP license server installation and configuration for floating licenses of CGI Studio.

- check the information available in the <span style="color:rgb(230,126,35);">[CGI Studio FAQ](https://forum.cgistudio.at/viewtopic.php?f=28&t=2622)</span> in the Candera Lighthouse.
- or contact Candera support

---

#### Running SceneComposer and Player  


Refer to [<span style="color:rgb(230,126,35);">Starting SceneComposer</span>](https://doc316en.candera.eu/link/8#bkmrk-page-title) for options as how to start SceneComposer.

To load a SceneComposer asset in the Player demo application on Windows host simulation, execute

- &lt;cgi-studio-root&gt;/bin/Player/CGIPanel.exe

For instructions as how to build an own version of the Player demo application, please refer to section CGI Studio Build System.

---

#### HASP License Updates  


<p class="callout info">Note that the HASP license applies only to the Enterprise Edition.</p>

To perform an upgrade of your dongle or network license, the following steps are required:

**1. Create a HASP C2V file and send to Candera GmbH**

- Execute licenseupdate.exe delivered by CGI Studio Customer Support on a PC having HASP driver installed.
- Connect one dongle to the machine.
- Press the "Collect Information" button in the HASP license update tool.
- In case the HASP license update tool asks for a license, select "HASP HL license" (HL stands for hardware license).
- Save the file with current date and dongle name. Example: "20160131\_Max\_H00052.c2v"
- Connect the next dongle and proceed like above.

**2. Apply HASP V2C file received from Candera GmbH**

- Execute licenseupdate.exe delivered by CGI Studio Customer Support.
- Connect one dongle to the machine.
- Press the button "..." and select the received V2C file for the connected dongle.   
    Example: "HaspUpdate\_20130131\_20230131\_Max\_H00052.v2c"
- Press the button "Apply Update"
- Connect the next dongle and proceed like above.

<p class="callout info">In some cases, it is required to format the dongle for updating the license.  
 When you apply an update file that formats the dongle, a new c2v file is generated by the license-update-tool.   
 This new c2v file needs to be transmitted to [Candera](http://dev.doc.cgistudio.at/APILINK/namespace_candera.html) GmbH again.   
 [Candera](http://dev.doc.cgistudio.at/APILINK/namespace_candera.html) GmbH will return another update v2c file. After applying this file, the final license is installed. </p>

---

#### Running CGI Studio Android Evaluation Package on Target  


The release contains two ready-made Android installer packages with file extension APK (which stands for Android Package Kit) named:

- CourierSampleApp.apk - found in cgi\_studio\_apps\\References\\Android\\CourierSampleApp
- CGIPlayerLauncher.apk - found in: cgi\_studio\_apps\\References\\Android\\AndroidCgiPlayerLauncher

<p class="callout info">There's no need to individually compile binaries for your Android device. An Android installer package can be run by copying it to the device and opening it with a local file manager.</p>

The CourierSampleApp application is used to run the specific CGI-Studio Asset, generated from the Solution file found in: cgi\_studio\_courier\_apps\\src\\CourierSampleApp\\SCSolution\\Android.   
It should be generated as "AssetLibCff\_CourierSampleApp.bin" and placed in the /sdcard location in the target device.

The CGIPlayerLauncher application is a generic player application that will play a number of CGI-Studio Sample Assets.   
Those can be placed in /sdcard and in any subfolder below /sdcard and can conveniently be run from a selection list after starting the CGIPlayerLauncher application.

---

# Patch installation procedure

After downloading the patch executable from bitbox or from the download link provided you can start the patch installation by running the installer.

1. When you run the installer, you will be asked if you want to apply the patch if this installer has your permission to make changes to your computer. If not, this process will stop. You can restart at any time.
2. You will be asked if you want to apply the CGI-Studio patch. 
    - Select \[ Yes \] to continue with the installation.
    - Click the \[ No \] button to cancel applying the patch.   
        <div drawio-diagram="6142"><img src="https://doc316en.candera.eu/uploads/images/drawio/2024-06/drawing-4-1718277985.png" alt="drawing-4-1718277985.png"/></div>
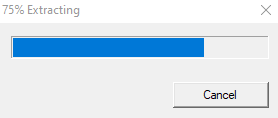
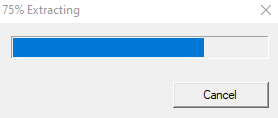
3. A window will open with a progress bar for extracting compressed data. 
    - After the extraction process, the CGI patch installer will open.   
        <div drawio-diagram="6135"><img src="https://doc316en.candera.eu/uploads/images/drawio/2024-06/drawing-4-1718277994.png" alt="drawing-4-1718277994.png"/></div>


        - To cancel the extraction process, press the \[ X \] button (orange box below) or the \[ Cancel \] button (red box below) in the upper right corner of the window.  
            <div drawio-diagram="6144"><img src="https://doc316en.candera.eu/uploads/images/drawio/2024-06/drawing-4-1718277999.png" alt="drawing-4-1718277999.png"/></div>


            - Pressing any of the buttons will bring up a dialog to reconfirm work cancellation.
            - To execute the work cancellation, press the \[ Yes \] button.
            - To cancel the work cancellation and continue the extraction process, press any button other than the \[ Yes \] button.
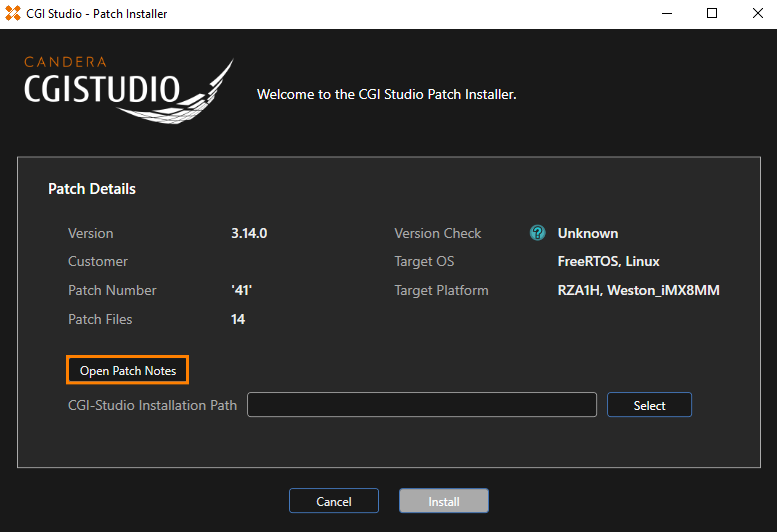
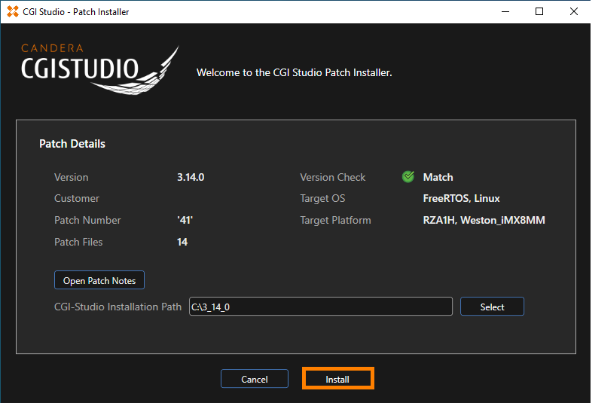
4. After the extraction process, the CGI Studio Patch Installer dialog opens.   
    <div drawio-diagram="6138"><img src="https://doc316en.candera.eu/uploads/images/drawio/2024-06/drawing-4-1718278024.png" alt="drawing-4-1718278024.png"/></div>


    - To open the release notes (PDF) about the patch, click the \[ Open Patch Notes \] button (orange box above).
    - The patch installer displays the following patch information.
        
        <table class="align-center" id="bkmrk-version-cgi-studio%E3%81%AE%E3%83%90"><colgroup><col></col></colgroup><tbody><tr><td class="align-left">Version</td><td class="align-left">CGI Studio version.
        
        </td></tr><tr><td class="align-left">Customer</td><td class="align-left">Patch provider (customer name).
        
        </td></tr><tr><td class="align-left">Target OS</td><td class="align-left">Target operating system on which Player can run.</td></tr><tr><td class="align-left">Target Platform</td><td class="align-left">Target machine name on which thePlayer will run.</td></tr><tr><td class="align-left">Patch Number</td><td class="align-left">The sequence number of the patches. Patches must be applied in the correct sequence.</td></tr><tr><td class="align-left">Patch Files</td><td class="align-left">Number of files to which the patch will be applied.</td></tr><tr><td class="align-left">Version Check</td><td class="align-left">Compatibility check of the patch.</td></tr></tbody></table>
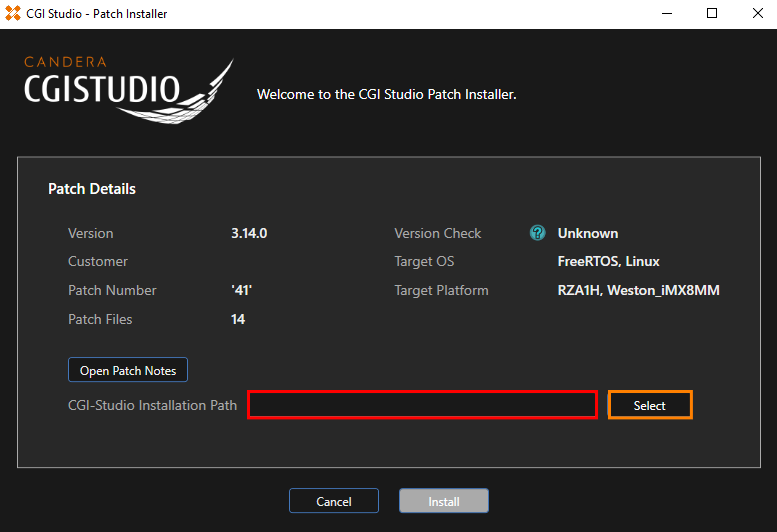
5. To start the Version Check and continue the installation process, press the \[ Select \] button (orange box below) and select the path where CGI Studio is currently installed. 
    - You can also enter the path directly in the red box below.   
        <div drawio-diagram="6145"><img src="https://doc316en.candera.eu/uploads/images/drawio/2024-06/drawing-4-1718278049.png" alt="drawing-4-1718278049.png"/></div>
6. As soon as \[ CGI-Studio Installation Path \] is selected, a Version Check will begin. 
    - If all Patches with lower Patch Numbers are applied and target the same Customer, Operating System, CGI Version (Note: Patch Number is different from CGI Version), and Target Platform, then the Patches are compatible. The patches are compatible if they target the same Customer, Operating System, CGI Version (Note: Patch Number is different from CGI Version), and Target Platform.
7. The results of the check are displayed in the \[ Version Check \] part of the dialog.   
    
    - If this check fails (Mismatch), the installation will stop.
    - If Match is not displayed, try a different folder path.
    - If the check results in confirmed compatibility (Match) or unknown compatibility (Unknown), installation is enabled and the \[ Install \] button is activated.
8. If the \[ Install \] button is enabled, press the \[ Install \] button to continue the installation. 
    - The Install window opens and the patch is applied.   
        <div drawio-diagram="6140"><img src="https://doc316en.candera.eu/uploads/images/drawio/2024-06/drawing-4-1718278044.png" alt="drawing-4-1718278044.png"/></div>
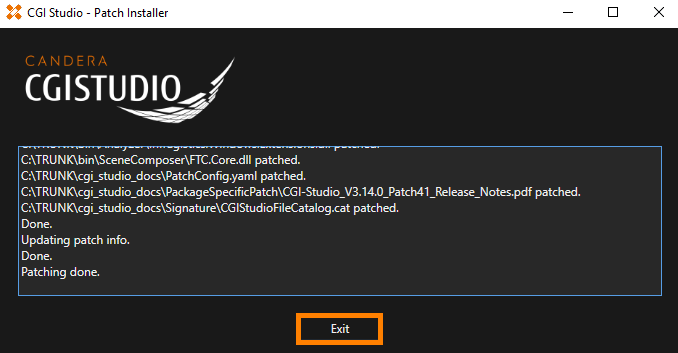
9. If the Patch installation is successful, the message shown below will be displayed. 
    - Press the \[ Exit \] button to complete the Patch installation.   
        <div drawio-diagram="6147"><img src="https://doc316en.candera.eu/uploads/images/drawio/2024-06/drawing-4-1718198430.png" alt="drawing-4-1718198430.png"/></div>


<p class="callout info">In case of any questions, please contact our Support team on <span style="color:rgb(230,126,35);">[CGI Studio Lighthouse](https://forum.cgistudio.at/)</span>.</p>

# CGI Studio Components

#### CGI Studio Components  


CGI Studio consists of the following Components

- Bin
- CGI Studio 3PSW
- CGI Studio Apps
- CGI Studio Candera
- CGI Studio Content
- CGI Studio Controls
- CGI Studio Courier
- CGI Studio Courier Apps
- CGI Studio Docs
- Player
- CGI Studio Schost
- FeatStd

---

#### Bin  


The **Bin** component contains all binaries for CGI Studio Tools:

- Analyzer
- AssetTool
- Player
- Easy mode
- Light Player
- Photoshop Exporter
- Photoshop Export Plugin
- SceneComposer <span style="color:rgb(230,126,35);">[\[more\]](https://doc316en.candera.eu/shelves/3-scene-composer)</span>
- SceneComposer SDK

#### CGI Studio 3PSW  


"**Third Party Software**" comprises a set of external software (in library or source) that are used by CGI Studio:

<table id="bkmrk-3rd-party-software-v" style="border-collapse:collapse;width:60.4938%;height:506.547px;"><colgroup><col style="width:36.8098%;"></col><col style="width:25.3495%;"></col><col style="width:37.8407%;"></col></colgroup><tbody><tr style="height:29.7969px;"><td class="align-center" style="height:29.7969px;"><span style="color:rgb(0,0,0);">**3rd Party Software**</span></td><td class="align-center" style="height:29.7969px;"><span style="color:rgb(0,0,0);">**Version**</span></td><td class="align-center" style="height:29.7969px;"><span style="color:rgb(0,0,0);">**More Information**</span></td></tr><tr style="height:29.7969px;"><td style="height:29.7969px;">bin2srec</td><td style="height:29.7969px;">V2014.12.119.1</td><td style="height:29.7969px;">  
</td></tr><tr style="height:29.7969px;"><td style="height:29.7969px;">HASP</td><td style="height:29.7969px;">  
</td><td style="height:29.7969px;">  
</td></tr><tr style="height:29.7969px;"><td style="height:29.7969px;">DevIL (lib)</td><td style="height:29.7969px;">  
</td><td style="height:29.7969px;">  
</td></tr><tr style="height:29.7969px;"><td style="height:29.7969px;">OpenGLES (lib)</td><td style="height:29.7969px;">  
</td><td style="height:29.7969px;">  
</td></tr><tr style="height:29.7969px;"><td style="height:29.7969px;">ComplexScriptLib</td><td style="height:29.7969px;">  
</td><td style="height:29.7969px;">[<span style="color:rgb(230,126,35);">\[more\]</span>](https://doc316en.candera.eu/link/484#bkmrk-complex-script-langu)</td></tr><tr style="height:29.7969px;"><td style="height:29.7969px;">DevIL (src)</td><td style="height:29.7969px;">1.7.8</td><td style="height:29.7969px;">  
</td></tr><tr style="height:29.7969px;"><td style="height:29.7969px;">freetype</td><td style="height:29.7969px;">2.14.1</td><td style="height:29.7969px;">  
</td></tr><tr style="height:29.7969px;"><td style="height:29.7969px;">GStreamer</td><td style="height:29.7969px;">1.22.7</td><td style="height:29.7969px;">[<span style="color:rgb(230,126,35);">\[more\]</span>](https://doc316en.candera.eu/link/468#bkmrk-page-title)</td></tr><tr style="height:29.7969px;"><td style="height:29.7969px;">harfbuzz</td><td style="height:29.7969px;">12.1.0</td><td style="height:29.7969px;">  
</td></tr><tr style="height:29.7969px;"><td style="height:29.7969px;">json</td><td style="height:29.7969px;">0.5.0</td><td style="height:29.7969px;">  
</td></tr><tr style="height:29.7969px;"><td style="height:29.7969px;">libpng</td><td style="height:29.7969px;">1.5.9</td><td style="height:29.7969px;">  
</td></tr><tr style="height:29.7969px;"><td style="height:29.7969px;">libunibreak</td><td style="height:29.7969px;">1.0</td><td style="height:29.7969px;">  
</td></tr><tr style="height:29.7969px;"><td style="height:29.7969px;">Lua 5.3.5</td><td style="height:29.7969px;">5.3.5</td><td style="height:29.7969px;"><span style="color:rgb(230,126,35);">[\[more\]](https://doc316en.candera.eu/books/candera/chapter/tutorial-for-lua-scripting)</span></td></tr><tr style="height:29.7969px;"><td style="height:29.7969px;">Monotype <span lang="en-us" style="font-size:11pt;font-family:Calibri, sans-serif;">iType</span>  
</td><td style="height:29.7969px;">6.2.2  
</td><td style="height:29.7969px;">[<span style="color:rgb(230,126,35);">\[more\]</span>](https://doc316en.candera.eu/link/294#bkmrk-the-font-engine%3A-ity)</td></tr><tr><td>Monotype WT-Shaper  
</td><td>5.0.0  
</td><td>[<span style="color:rgb(230,126,35);">\[more\]</span>](https://doc316en.candera.eu/link/295#bkmrk-integration-of-wt-sh)</td></tr><tr style="height:29.7969px;"><td style="height:29.7969px;">OpenGLES (src)</td><td style="height:29.7969px;">  
</td><td style="height:29.7969px;">  
</td></tr><tr style="height:29.7969px;"><td style="height:29.7969px;">zlib</td><td style="height:29.7969px;">1.2.8</td><td style="height:29.7969px;">  
</td></tr></tbody></table>

#### CGI Studio Apps  


This component contains the Scene Composer Solution of the Construction Kit. The Construction Kit provides predefined 3D Shapes, Building Blocks, Controls, and various Resources, like Appearances, Fonts, Icons, Meshes, Shaders, TextStyles and Textures.

#### CGI Studio Candera  


The **Candera Graphic Engine** enables embedded applications to render and control externally designed content, especially 3D content.

- Candera requires small integration layers for graphical output devices, hardware accelerated or software realised basic mathematical functions, access to system memory and other platform related functionality which is typically implemented in scope of the hosting application.
- Candera provides a set of interfaces which need to be connected with platform functionality for this purpose.
- Candera is intended to drive different graphic systems, such as OpenGL ES 2.0 which are also required to be provided by the hosting platform. [<span style="color:rgb(230,126,35);">\[more\]</span>](https://doc316en.candera.eu/books/candera)

#### CGI Studio Content  


The component **Content** contains some resources (fonts, images and shaders).

#### CGI Studio Controls  


This component consists of **Controls** and **Behaviors**.  
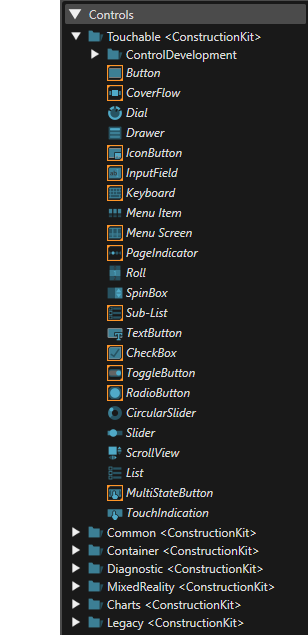
A **Control** is a reusable structure that can have a specific functionality, which is delegated to the **Behaviors** it consists of. A **Control** is created in SceneComposer only while a **Behavior** must be implemented.

**Controls** are template scenes created for later reuse via control nodes. They are meant to be interactive. To make them interactive they can be filled with Behaviors. A control collects part of the scene graph and Behaviors into a single entity, which can be instantiated in another scene.

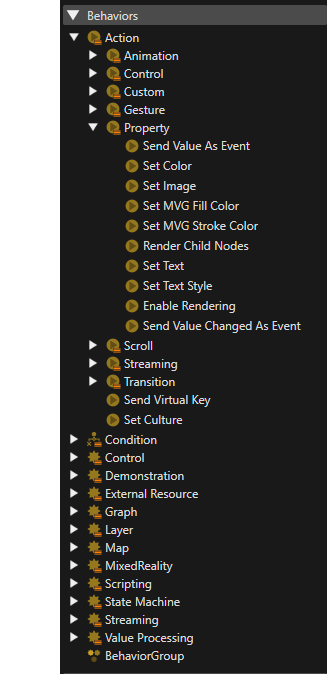
**Behaviors** are small re-usable functional blocks that communicate via events. Together they process input from application and use the Candera engine API to manipulate graphical objects. There is a huge amount of predefined Behaviors that comes with CGI Studio. Combining the Behaviors offers a great variety of functionalities. \[more\]

#### CGI Studio Courier  


The Courier framework implements the Model-View-Control architecture pattern. It has defined extension points for 3rd party state machine integration. Courier is focusing on Message Handling and Data Binding and depends on CGI Studio Candera graphics functionality. [<span style="color:rgb(230,126,35);">\[more\]</span>](https://doc316en.candera.eu/books/courier)

#### CGI Studio Courier Apps  


The Courier Apps component comprises the CourierSampleApp and the IpcApplications "CourierIpcHaroldApp" and "CourierIpsMaudeApp".

#### CGI Studio Docs  


Docs contains documentation, release notes, license information and test reports.

#### Player  


The Player is an application which provides insights into a generic CGI Studio application driven by the courier messaging framework. It also provides samples of several features. These features are core components like showing or hiding views or trigger animations but also sample implementation of models with databinding. On top of that, the Player shall be an application to test and play around with an asset and the functionality of the framework itself. The focus is not on the customer specific logic but on the core logic of the customer’s specific asset. <span style="color:rgb(230,126,35);">[\[more\]](https://doc316en.candera.eu/books/player)</span>

#### CGI Studio Schost  


SCHost is a device specific dynamic library (dll) used by SceneComposer to render the content of the current solution and to provide editing support including widgets manipulation. It represents the "glue" between the Scene Composer graphical user interface and the Candera engine.

#### FeatStd  


FeatStd is the short form for FEAT Standard library. It's purpose is to provide common basic functionalities, like Datatypes, Classes, Macros, Platform/OS abstraction, etc. for various FEAT products. FeatStd is also configurable to the needs of a software product, having feature flags to enable self-contained functionalities, like IPC support, UnitTest framework (based on google test), logging, etc. resp. overall settings like thread-safety support, fractional number handling, etc. [<span style="color:rgb(230,126,35);">\[more\]</span>](https://doc316en.candera.eu/books/featstd)

---

# 64-bit support Scene Composer

Since CGI3.13, Scene Composer has become a 64-bit support application. As a result, the following benefits are expected when compared to the 32-bit Scene Composer

- Enables creation of complex, large-scale HMI solutions that exceed 32-bit memory limitations
- Ability to import and memory process large, complex assets via the Smart Importer

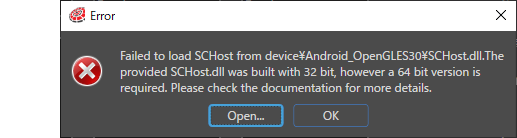
On the other hand, the C++ SCHost.dll used for launching Scene Composer has to be built as well in 64-bit mode. For this reason, CGI 3.14 or later has a function to automatically check if SCHost.dll is properly built when starting Scene Composer. If you are using SCHost.dll built in 32-bit, the following error dialog will be displayed.

<div drawio-diagram="5545"><img src="https://doc316en.candera.eu/uploads/images/drawio/2024-04/drawing-4-1712904349.png" alt="drawing-4-1712904349.png"/></div>

The two buttons on the dialog perform the following actions.

<table class="align-center" id="bkmrk-%5B-ok-%5D-button-closes" style="border-collapse:collapse;width:81.6049%;border-width:1px;"><colgroup><col style="width:22.6205%;"></col><col style="width:77.3795%;"></col></colgroup><tbody><tr><td class="align-left" style="border-width:1px;">\[ OK \] button</td><td class="align-left" style="border-width:1px;">Closes the Scene Composer.</td></tr><tr><td class="align-left" style="border-width:1px;">\[ Open... \] button</td><td class="align-left" style="border-width:1px;">Opens the Scene Composer log file with any editor.</td></tr></tbody></table>

<p class="callout info">For information on building SCHost.dll for 64-bit support, please refer to <span style="color:rgb(230,126,35);">[Build System Setup](https://doc316en.candera.eu/books/build-system-setup)</span> document.</p>

The 32/64bit compatibility table for each version of CGI Studio is shown below.

<table class="align-center" id="bkmrk-cgi-version-scene-co" style="border-collapse:collapse;width:665px;border-width:1px;"><colgroup><col style="width:210.667px;"></col><col style="width:210.667px;"></col><col style="width:210.667px;"></col></colgroup><tbody><tr><td style="border-width:1px;background-color:rgb(35,111,161);">**<span style="color:rgb(255,255,255);">CGI Version</span>**</td><td style="border-width:1px;background-color:rgb(35,111,161);">**<span style="color:rgb(255,255,255);">Scene Composer and SCHost.dll</span>**</td><td style="border-width:1px;background-color:rgb(35,111,161);">**<span style="color:rgb(255,255,255);">CGI Player</span>**</td></tr><tr><td style="border-width:1px;">Up to CGI3.3</td><td style="border-width:1px;">32bit required</td><td style="border-width:1px;">32bit required</td></tr><tr><td style="border-width:1px;">From CGI3.4 to CGI3.12</td><td style="border-width:1px;">32bit required</td><td style="border-width:1px;">32bit or 64bit required</td></tr><tr><td style="border-width:1px;">CGI3.13 and later</td><td style="border-width:1px;">64bit required</td><td style="border-width:1px;">32bit or 64bit required</td></tr></tbody></table>

# CGI Studio Glossary

This glossary has been created to help users who are new to CGI Studio understand the names of unique features and components used in CGI Studio. It does not include terms related to general HMI development or 2D/3D graphics.

##### <span style="color:rgb(230,126,35);">[Analyzer](https://doc316en.candera.eu/books/analyzer)</span>

A tool for analyzing how smoothly an application runs on a special computer (such as an in-vehicle device) and how much memory it uses. It helps identify issues when displaying images on the screen and pinpoint causes of slow performance (bottlenecks).  
This tool records app activity (events, time, values) and allows you to analyze it on a PC in various views (graphs, tables, etc.). It also includes features for analyzing memory usage and viewing screen display processes in detail (frame debugger). This helps developers identify and resolve performance and resource issues. It can also be launched from the <span style="color:rgb(230,126,35);">[Control Center](#bkmrk-control-center)</span> dashboard.

##### <span style="color:rgb(230,126,35);">[Asset Tool](https://doc316en.candera.eu/books/asset-tool)</span>

This tool is designed to efficiently manage and reuse assets such as images, text, motion data, and screen components (<span style="color:rgb(230,126,35);">[Control](#bkmrk-control)</span>) used in screen design within a project. Specifically, it includes features such as importing external files (images, fonts, 3D models, etc.), organizing unused assets, making animations and components reusable as templates, and sharing assets with other projects (SCL).

##### <span style="color:rgb(230,126,35);">[Behavior](https://doc316en.candera.eu/books/controls-and-behaviors/chapter/behaviors)</span>

Settings and mechanisms that determine the “movement” and “behavior” of screens created in Scene Composer. By incorporating them into components <span style="color:rgb(230,126,35);">([Control](#bkmrk-control))</span> such as buttons and meters on the screen, you can define component-specific behaviors such as “change color when pressed” or “move the needle when the value changes. [Behavior ](#bkmrk-behavior) can be used to achieve more complex screen movements and application functions by combining multiple settings and linking them to [ State Machine ](#bkmrk-state-machine) s. This allows you to create not only the screen design but also the interactive movements in detail.

For available behaviors, please refer to <span style="color:rgb(230,126,35);">[this page](https://doc316en.candera.eu/books/controls-and-behaviors/chapter/predefined-behaviors)</span>.

##### <span style="color:rgb(230,126,35);">[Candera Engine](https://doc316en.candera.eu/books/candera)</span>

Candera Engine is a graphics engine developed by Candera that enables embedded applications to render and control externally designed content, particularly 3D content. Guidelines are provided to optimize content according to the constraints of embedded hardware. It renders both 2D and 3D content via the OpenGL ES API.

##### <span style="color:rgb(230,126,35);">[CGI Studio Connector](https://doc316en.candera.eu/books/cgi-studio-connector)</span>

This tool enables you to seamlessly connect screens (user interfaces) created with Scene Composer.  
Using this tool, you can define how screens and control systems exchange information (data, operations, events, etc.) and automatically generate the necessary code for integration. This makes it easy to implement integration such as specific functions being activated when a button on the screen is pressed. It is also possible to connect to simulations of other systems (such as IAR visualSTATE) to verify functionality. This tool helps streamline the development of the entire system.

##### <span style="color:rgb(230,126,35);">[CGI Studio Enterprise Edition](https://doc316en.candera.eu/books/cgi-studio-enterprise-edition)</span>

One of the two editions of CGI Studio.  
This version provides maximum flexibility for embedded system screen development. You can customize the program (<span style="color:rgb(230,126,35);">[Player](#bkmrk-player)</span>) that runs the screens to optimize performance and memory usage. <span style="color:rgb(230,126,35);">[Data Binding](#bkmrk-data-binding)</span> can also be freely customized and programmed. It is suitable for developing complex screens or in special environments.

##### <span style="color:rgb(230,126,35);">[CGI Studio Professional Edition](https://doc316en.candera.eu/books/cgi-studio-professional-edition)</span>

This version is designed to simplify and accelerate the development of screens for embedded systems.  
Even users with limited specialized knowledge can get started easily. There is no need to prepare (compile) the program (<span style="color:rgb(230,126,35);">[Player](#bkmrk-player)</span>) that runs the screens yourself, and data integration (<span style="color:rgb(230,126,35);">[Data Binding](#bkmrk-data-binding)</span>) can be done with simple settings or predefined methods. This version is ideal for designers and others who want to focus on creating screens.

##### <span style="color:rgb(230,126,35);">[Control Center](https://doc316en.candera.eu/books/control-center)</span>

This integrates various CGI Studio tools such as Scene Composer, <span style="color:rgb(230,126,35);">[Player](#bkmrk-player)</span>, and <span style="color:rgb(230,126,35);">[Analyzer](#bkmrk-analyzer)</span> into a single interface.  
From here, you can manage and edit the launch of each tool, app builds, detailed settings, and more. Beginners can use it to launch main tools, while advanced users can also edit data binding definitions and more. Information is stored in units called Control Center solutions, which can be easily shared among multiple users. You can edit solution details and reference paths in the General &amp; CGI Studio tab. This tool is useful for accessing the functions necessary for development and working efficiently.

##### <span style="color:rgb(230,126,35);">[Control](https://doc316en.candera.eu/books/controls-and-behaviors/chapter/controls)</span>

Pre-built “components” used to create application screens (user interfaces). Examples include commonly used controls such as Button, Slider, and List, which have predefined appearances and behaviors.  
These components can be placed directly on the screen or used as “templates” for creating new components. They are convenient for reusing the same components across multiple screens, and by adding additional elements or setting behaviors, they help streamline and accelerate screen development. They can be easily placed on the screen from the Toolbox, and their properties can be modified or their structure edited.

For a list of available controls, please refer to <span style="color:rgb(230,126,35);">[this page](https://doc316en.candera.eu/books/controls-and-behaviors/chapter/predefined-controls)</span>. You can also learn how to use the main controls in the GettingStarted Control s sample solution.

##### <span style="color:rgb(230,126,35);">[Core Control](https://doc316en.candera.eu/books/controls-and-behaviors/page/core)</span>

A lightweight set of controls with minimal standard control. These controls reduce size and improve performance, making them ideal for low-end platforms and as a foundation for creating custom controls.

##### <span style="color:rgb(230,126,35);">[Courier Editor](https://doc316en.candera.eu/books/courier/page/courier-editor)</span>

Courier Editor is part of CGI Studio's [Courier ](#bkmrk-courier) system, which facilitates data exchange between screen designs and applications. This tool allows you to edit files (<span style="color:rgb(230,126,35);">[XCDL/XHCDL](#bkmrk-xcdl%2Fxhcdl)</span>) that define the rules for how data (e.g., temperature or speed) and messages are sent and received between screen designs and applications. These rules are managed in a clear, list-based format.

##### <span style="color:rgb(230,126,35);">[Courier](https://doc316en.candera.eu/books/courier)</span>

An important framework that serves as the foundation for building applications. It is designed to enable various elements within an app (such as screens, data, and operations) to communicate with each other through messages, thereby enabling seamless integration.  
In particular, it includes a <span style="color:rgb(230,126,35);">[Data Binding](#bkmrk-data-binding)</span> feature that automatically connects app data (such as numerical values) with the visual appearance on the screen (such as buttons and text). When data changes, the screen updates automatically, streamlining development. It also handles screen display, integration with external systems, and touch operations.

##### <span style="color:rgb(230,126,35);">[Culture](https://doc316en.candera.eu/books/scene-design/chapter/scenecomposer-translator-plugin)</span>

A feature that enables text displayed on screen designs to be switched between multiple languages. By registering translated text for each language you wish to display (e.g., Japanese, English), you can easily switch the language of text displayed on screen with simple operations. This is a crucial feature when developing HMI with multilingual support.

##### <span style="color:rgb(230,126,35);">[Data Binding](https://doc316en.candera.eu/books/scene-design/page/databinding-ui)</span>

A feature that automatically links various elements displayed on the application screen (meter needles, text, buttons, etc.) with data handled within the program (numbers, states, etc.).  
This allows the appearance of the screen to be automatically updated in real time as data changes. This eliminates the need for manual screen updates, significantly improving development efficiency. You can set up binding by clicking the dedicated button for the desired item and verify the behavior in the live preview panel.

##### <span style="color:rgb(230,126,35);">[Diagram Bird's Eye](https://doc316en.candera.eu/books/solution-handling/page/diagram-birds-eye)</span>

This feature allows you to display complex diagrams (diagrams) showing screen designs and movement flows, such as [ Fusion ](#bkmrk-fusion) and [ State Machine ](#bkmrk-state-machine) , in a separate window. It is useful for confirming where you are looking in the diagram and where you are in the whole diagram, and for quickly moving to the part you want to see by moving the small window. This helps you to proceed with your work without losing sight of the big picture, even with complex settings.

##### <span style="color:rgb(230,126,35);">[Dirty Area Management](https://doc316en.candera.eu/books/courier/page/dirty-area-management)</span>

This feature optimizes screen updates by updating only the parts of the screen that have actually been changed, thereby improving performance. It provides automatic calculation of invalidation dependencies for Dirty Area Management, along with new scene and camera invalidation handling based on the invalidation dependencies stored in assets.

##### <span style="color:rgb(230,126,35);">[Easy Mode](https://doc316en.candera.eu/books/preferences/page/easy-mode)</span>

This feature allows you to adjust properties related to various elements used in a project, such as colors and shapes, in an easy-to-view manner. Among numerous settings, you can hide unused settings or prevent accidental changes by making them uneditable.  
This enables you to display only the necessary settings based on the user (e.g., designers or programmers), thereby helping to streamline development work. Settings can also be saved and shared as files.

##### <span style="color:rgb(230,126,35);">[Embedded Player](https://doc316en.candera.eu/books/scene-design/page/embedded-player)</span>

Like the Player, the Embedded Player is an application for actually running and displaying HMI screens (user interfaces) created with Scene Composer.  
It can load screen information (assets) designed in Scene Composer and simulate screen behavior and switching (transitions). You can test the movement of screen components (controls), animations, transitions between screens, and more.  
In addition, because the Embedded Player operates as a Scene Composer panel, you can display the Scene Editor and Embedded Player side by side, allowing you to instantly check updates to your Scene Composer solution.

##### <span style="color:rgb(230,126,35);">[FeatStd](https://doc316en.candera.eu/books/featstd)</span>

Abbreviation for FEAT Standard Library. It provides basic functions (data types, classes, macros, platform/OS abstraction, etc.). It includes feature flags to enable self-contained functions such as IPC support, UnitTest framework, logging, and thread-safe support. It serves as the foundation for multithreading-related features (asynchronous jobs, asynchronous asset loading, asynchronous text rendering). It is one of the components of CGI Studio.

##### <span style="color:rgb(230,126,35);">[Fusion](https://doc316en.candera.eu/books/fusion)</span>

A feature in Scene Composer that allows you to define the movement and <span style="color:rgb(230,126,35);">[Behavior](#bkmrk-behavior)</span> of components <span style="color:rgb(230,126,35);">([Control](#bkmrk-control)</span> and <span style="color:rgb(230,126,35);">[Nodes](#bkmrk-node))</span> on the screen. This is an editor that allows you to intuitively create complex HMI logic without programming by combining multiple “behaviors” (sets of movements and settings) while viewing diagrams. Select components and connect them with lines to create a mechanism. It also works with [ State Machine ](#bkmrk-state-machine) . You can also use the [Diagram Bird's Eye](#bkmrk-diagram-bird%27s-eye) function to get an overview of the entire system.

##### <span style="color:rgb(230,126,35);">[HASP License](https://doc316en.candera.eu/books/getting-started/page/cgi-studio-installation)</span>

A system used for license management in CGI Studio. Depending on the license type (dongle, client-side network license, software license, etc.), specific activation procedures are required. It is listed as one of the third-party software components used in CGI Studio.

##### <span style="color:rgb(230,126,35);">[HMI Report](https://doc316en.candera.eu/books/solution-handling/page/hmi-report)</span>

This feature compiles information about the entire screen created in CGI Studio. It automatically collects information such as how many images are used in the created project and where buttons and other components (controls) are located.  
This report is output in a web browser-friendly format (such as HTML), making it easy to understand the overall status of the HMI. This helps identify unnecessary data, understand the structure, and efficiently advance HMI development.

##### <span style="color:rgb(230,126,35);">[Node](https://doc316en.candera.eu/books/scene-design/page/create-nodes)</span>

A “component” that serves as the basis for creating screen designs. All elements displayed on the screen (<span style="color:rgb(230,126,35);">[Scene Editor](#bkmrk-scene-editor)</span>), such as images, text, shapes, and even groups that organize the screen's structure, are treated as nodes. When creating a screen, you select the necessary nodes (such as buttons, meters, or images) from the toolbox and place them in the <span style="color:rgb(230,126,35);">[Scene Editor](#bkmrk-scene-editor)</span> or <span style="color:rgb(230,126,35);">[Scene Tree](#bkmrk-scene-tree)</span>. You then configure various settings for each node, such as position, size, color, and visibility. Nodes can also be grouped into parent-child relationships for easier management, which helps organize the screen's structure.

##### <span style="color:rgb(230,126,35);">[Player](https://doc316en.candera.eu/books/player)</span>

An application that runs and displays HMI screens (user interfaces) created in Scene Composer.  
It can load the information (assets) of screens designed in Scene Composer and simulate screen operations and transitions (transitions). You can test the movement of screen components (controls), animations, and transitions between screens.

##### <span style="color:rgb(230,126,35);">[Render Target](https://doc316en.candera.eu/books/display-configuration)</span>

This is where CGI Studio draws the “image” of the screen. It serves as the location for displaying the final image on the screen or as a temporary “image” (texture) of what the camera sees, which can then be applied to other screen components. It determines what content to draw through the camera. This is an essential feature for achieving complex screen layouts and special visual effects.##### <span style="color:rgb(230,126,35);">[Scene Composer](https://doc316en.candera.eu/shelves/3-scene-composer)</span>

The main development tool in CGI Studio, used to create screen designs (HMI) for in-vehicle systems and other applications. It allows you to place images, text, 3D models, and other elements on the screen, add animations, and build mechanisms (logic) such as button responses. The created screens can be tested within the tool, enabling visual and intuitive operations. In addition, up to four scene editors can be displayed, allowing you to check the screen design from multiple angles simultaneously.

##### <span style="color:rgb(230,126,35);">[Scene Editor](https://doc316en.candera.eu/link/9#bkmrk-scenecomposer-gui)</span>

The Scene Editor is the main part of Scene Composer. Here, you can freely place “components,” such as images, text, and shapes, that you want to display on the screen. Once you've placed nodes on the screen, you can adjust their appearance in detail, such as position, color, and size. You can drag nodes from the toolbox on the left side of the screen to place them, or manipulate nodes selected in the scene tree on the left side of the screen, working in conjunction with other features.  
When you want to add movement (animation) to nodes, you can visually adjust their motion directly within the Scene Editor. This is the central location where you work while keeping an eye on the overall design of the screen.

##### <span style="color:rgb(230,126,35);">[Scene Tree](https://doc316en.candera.eu/link/9#bkmrk-scenecomposer-gui)</span>

A place where all elements (called <span style="color:rgb(230,126,35);">[Nodes](#bkmrk-node)</span>) in the screen design (scene) being created, such as images, text, and shapes, can be viewed in an organized list format. The parent-child relationships between elements are displayed in a hierarchical structure, making it easy to understand the screen structure at a glance. From this list, you can select elements and perform basic operations such as renaming, toggling display/hide, and deleting.

##### <span style="color:rgb(230,126,35);">[SCHost](https://doc316en.candera.eu/books/build-system-setup/page/building-schost-for-scenecomposer)</span>

This is the part responsible for executing the application to actually display the screens (user interfaces) created in CGI Studio as images. It receives information designed in Scene Composer, moves screen components, updates information, and applies basic settings for how images are drawn.  
This is a critical component prepared (built) for specific target devices where the app runs, enabling the screen design to be realized as actual visuals. It supports both 2D and 3D display processing.

##### <span style="color:rgb(230,126,35);">[Smart Importer](https://doc316en.candera.eu/books/import-of-resources/chapter/smart-importer)</span>

A feature that allows you to import files directly from Photoshop and other design tools (Adobe XD, Axure RP, Sketch, etc.) and map elements within the files to <span style="color:rgb(230,126,35);">[Control](#bkmrk-control)</span> using built-in AI services. This improves the import and memory processing of large and complex assets.

##### <span style="color:rgb(230,126,35);">[Solution](https://doc316en.candera.eu/books/solution-handling)</span>

A project unit for developing screen designs (HMI) using Scene Composer. All data required for a single screen design project, such as image files, fonts, screen layout information, animation settings, and operation mechanisms, is managed within this “ [ Solution ](#bkmrk-solution) .” When starting a new HMI project, you first create this [ Solution ](#bkmrk-solution) .

##### <span style="color:rgb(230,126,35);">[State Machine](https://doc316en.candera.eu/books/state-machine)</span>

This mechanism manages the “states” of applications developed with Scene Composer and defines “state transition rules” that determine how to transition from one state to another when specific conditions (events) are met.

This allows you to easily configure and build the flow of the entire app using a dedicated “State Machine Editor” without programming, while viewing diagrams. It is used to coordinate the movements of components <span style="color:rgb(230,126,35);">([Behavior](#bkmrk-behavior)</span> and <span style="color:rgb(230,126,35);">[Control](#bkmrk-control))</span> on the screen and to control the switching between multiple screens in detail. Advanced elements such as Subchart and History State are also available for complex movements.  
The <span style="color:rgb(230,126,35);">[Diagram Bird's Eye](#bkmrk-diagram-bird%27s-eye)</span> feature allows you to see the big picture.

##### <span style="color:rgb(230,126,35);">[Toolbox](https://doc316en.candera.eu/link/9#bkmrk-scenecomposer-gui)</span>

One of the panels in the Scene Composer screen, this is where various “components” used to create screen designs (HMI) are organized by type. It includes <span style="color:rgb(230,126,35);">[Control](#bkmrk-control)</span> elements such as buttons and sliders, elements that display images and text (<span style="color:rgb(230,126,35);">[Nodes](#bkmrk-node)</span>), and settings that give elements specific movements or reactions <span style="color:rgb(230,126,35);">([Behavior](#bkmrk-behavior)).</span> You can select items here, then drag and drop them into the Scene Editor or the Scene Tree to use them.

##### Construction Kit

A collection of pre-built components (such as <span style="color:rgb(230,126,35);">[Control](#bkmrk-control)</span> and <span style="color:rgb(230,126,35);">[Behavior](#bkmrk-behavior))</span> used to develop application screens (user interfaces). Examples include Button, Slider, and List controls.  
These components can be used as is in your project or copied as templates to create new ones. Using the Construction Kit lets you develop screens faster and more efficiently. The kit is also used in many sample projects.

##### XCDL/XHCDL

An XML-formatted definition file used in CGI Studio's [Courier ](#bkmrk-courier)data exchange mechanism to describe information about screen design (HMI) elements (such as messages and data items). Based on the information in this file, the Courier Generator generates program code, and the Scene Composer performs <span style="color:rgb(230,126,35);">[Data Binding](#bkmrk-data-binding)</span> settings to link screen elements with data items.

# Scene Composer main features Overview

This section provides an overview of the Scene Composer main features and links to pages describing their general use.

<table id="bkmrk-1-%E3%82%BD%E3%83%AA%E3%83%A5%E3%83%BC%E3%82%B7%E3%83%A7%E3%83%B3-scene-comp" style="width:100%;"><colgroup><col style="width:4.82077%;"></col><col style="width:21.7537%;"></col><col style="width:73.4255%;"></col></colgroup><tbody><tr><td>1</td><td>Solution</td><td>GUI creation in Scene Composer is managed in units called "solutions”. Therefore, to use Scene Composer, you must first create a Solution. There are also various features for editing solutions.

<span style="color:rgb(230,126,35);">[Manage Solutions](https://doc316en.candera.eu/books/solution-handling/chapter/manage-solutions)</span>

</td></tr><tr><td>2</td><td>Import of Resources</td><td>Scene Composer can import various file formats (images, fonts, shaders, SVG, FBX, glTF and so on) as resources.

<span style="color:rgb(230,126,35);">[Import of Resources](https://doc316en.candera.eu/books/import-of-resources)</span>

</td></tr><tr><td>3</td><td>Smart Importer</td><td>The Smart Importer allows AI to analyze imported files and automatically apply controls with optimal HMI functionality. The Smart Importer can also import files designed in Photoshop (.psd), Adobe XD (\*.xd), Axure RP (,rp), Sketch (\*.sketch), and Figma.

<span style="color:rgb(230,126,35);">[Smart Importer](https://doc316en.candera.eu/books/import-of-resources/chapter/smart-importer)</span>

</td></tr><tr><td class="align-left">4</td><td class="align-left">Creating a Scene</td><td class="align-left">In Scene Compsoer, you build a "scene" of the content you actually want to display. There are two types of scenes, 2D scenes and 3D scenes, so create scenes according to the content you wish to create.

<span style="color:rgb(230,126,35);">[Manage Scenes](https://doc316en.candera.eu/books/scene-design/chapter/manage-scenes)</span>

</td></tr><tr><td>5</td><td>Editing a Scene</td><td>Edit a scene by using the Scene Editor, the main panel of Scene Composer. You can also see how the scene will appear. Editing tools are available to adjust the position, size, and rotation of the nodes you have created, as well as to manipulate the camera and display options.

<span style="color:rgb(230,126,35);">[2D Scene Editor](https://doc316en.candera.eu/books/scene-design/page/2d-scene-editor)</span>

<span style="color:rgb(230,126,35);">[3D Scene Editor](https://doc316en.candera.eu/books/scene-design/page/3d-scene-editor)</span>

</td></tr><tr><td>6</td><td>Fusion</td><td>Fusion is a highly usable editor that allows you to graphically and intuitively structure scene interactions, easily manage the functionality and logic in your scene, and build complex HMI elements.

<span style="color:rgb(230,126,35);">[Fusion](https://doc316en.candera.eu/books/fusion)</span>

</td></tr><tr><td class="align-left">7</td><td class="align-left">State Machine</td><td class="align-left">The State Machine Editor allows you to visually compose complex state transitions in your application. Specifically, you can define a state of a specific object or node at a certain point in time and configure the following settings with simple operations.

- Transition to another state based on input/events received by the state.
- perform any "Action"

[State Machine](https://doc316en.candera.eu/books/state-machine)

</td></tr><tr><td class="align-left">8</td><td class="align-left">Animation</td><td class="align-left">Each parameter (position, size, color and so on) of the nodes in the scene can be set the animation. The animation-related panels (Animation Timeline, Animation Values) allow you to set up animations with only a few simple operations.

<span style="color:rgb(230,126,35);">[Animation Design](https://doc316en.candera.eu/books/animation-design)</span>

</td></tr><tr><td>9</td><td>Culture (Localization)</td><td>This feature switches the text in a scene to be displayed in multiple languages.

<span style="color:rgb(230,126,35);">[SceneComposer Translator Plugin](https://doc316en.candera.eu/books/scene-design/chapter/scenecomposer-translator-plugin)</span>

</td></tr><tr><td>10</td><td>Behavior</td><td>Behaviors allow you to set various behaviors and controls for the nodes in a scene with simple operations, even if you have no coding knowledge. Behaviors are configured in the extra scene tree and in Fusion, so please refer to the pages related to them as well.

<span style="color:rgb(230,126,35);">[Behavior](https://doc316en.candera.eu/books/controls-and-behaviors/chapter/behaviors)</span>

</td></tr><tr><td class="align-left">11</td><td class="align-left">Control</td><td class="align-left">Controls are UI elements such as buttons or progress bars. Scene Composer provides a number of ready-to-use controls, or you can create your own.

<span style="color:rgb(230,126,35);">[Control](https://doc316en.candera.eu/books/controls-and-behaviors/chapter/controls)</span>

</td></tr></tbody></table>

---

# Scene Composer User Interface

# Overview

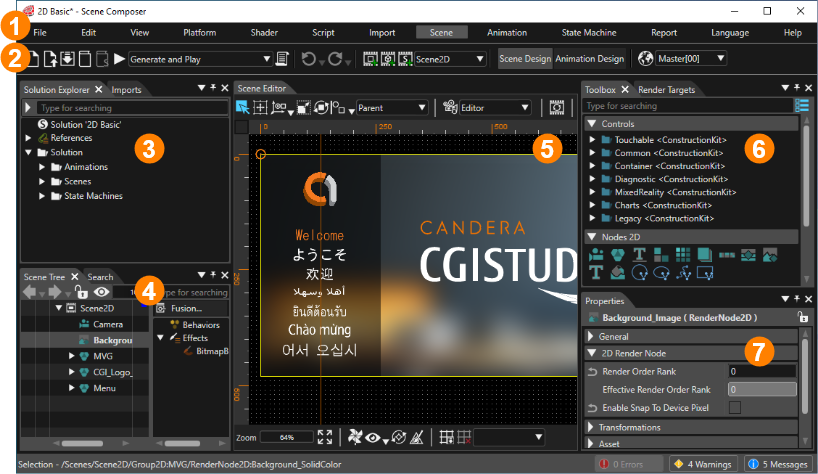
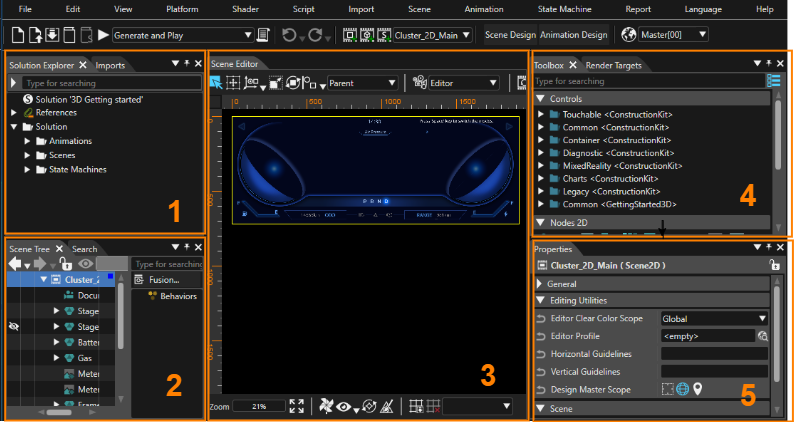
The Scene Composer interface consists of three parts: the menu bar, the toolbar, and the panels. The menu bar contains operation menus arranged by category, such as File and Edit. The toolbar contains icons for frequently used operations. In addition, for each function, a window called a panel is provided for working with Scene Composer. For more information, see the description page for each part.

1. <span style="color: rgb(230, 126, 35);">[Menu bar](https://doc316en.candera.eu/books/getting-started/page/menu-bar)</span>
2. <span style="color: rgb(230, 126, 35);">[Tool bar](https://doc316en.candera.eu/books/getting-started/page/tool-bar)</span>
3. <span style="color: rgb(230, 126, 35);">[Panel: Solution Explorer/Imports](https://doc316en.candera.eu/link/1162#bkmrk-3.-%E3%82%BD%E3%83%AA%E3%83%A5%E3%83%BC%E3%82%B7%E3%83%A7%E3%83%B3%E3%82%A8%E3%82%AF%E3%82%B9%E3%83%97%E3%83%AD%E3%83%BC%E3%83%A9%E3%83%BC%EF%BC%8F%E3%82%A4)</span>
4. <span style="color: rgb(230, 126, 35);">[Panel: Scene Tree/Search/Output etc.](https://doc316en.candera.eu/link/1162#bkmrk-4.-%E3%82%B7%E3%83%BC%E3%83%B3%E3%83%84%E3%83%AA%E3%83%BC%EF%BC%8F%E6%A4%9C%E7%B4%A2%EF%BC%8F%E5%87%BA%E5%8A%9B%E3%80%80%E4%BB%96)</span>
5. <span style="color: rgb(230, 126, 35);">[Panel: Scene Editor/State Machine Editor/Fusion etc.](https://doc316en.candera.eu/link/1162#bkmrk-5.-%E3%82%B7%E3%83%BC%E3%83%B3%E3%82%A8%E3%83%87%E3%82%A3%E3%82%BF%E3%83%BC%EF%BC%8F%E3%82%B9%E3%83%86%E3%83%BC%E3%83%88%E3%83%9E%E3%82%B7%E3%83%B3%E3%82%A8)</span>
6. <span style="color: rgb(230, 126, 35);">[Panel: Toolbox/Render Targets etc.](https://doc316en.candera.eu/link/1162#bkmrk-6.-%E3%83%84%E3%83%BC%E3%83%AB%E3%83%9C%E3%83%83%E3%82%AF%E3%82%B9%EF%BC%8F%E3%83%AC%E3%83%B3%E3%83%80%E3%83%BC%E3%82%BF%E3%83%BC%E3%82%B2%E3%83%83%E3%83%88)</span>
7. <span style="color: rgb(230, 126, 35);">[Panel: Properties](https://doc316en.candera.eu/link/1162#bkmrk-7.-%E3%83%97%E3%83%AD%E3%83%91%E3%83%86%E3%82%A3)</span>

<div drawio-diagram="7538"><img src="https://doc316en.candera.eu/uploads/images/drawio/2024-11/drawing-5-1732867854.png" alt=""/></div>

<p class="callout info">Panels 3 through 7 above can be customized to any layout. Customized layouts can also be managed as perspectives. (For more information, see <span style="color: rgb(230, 126, 35);">[Perspective Support](https://doc316en.candera.eu/link/9#bkmrk-perspective-support)</span>.)</p>

---

# Menu bar

Each feature of Scene Composer can be selected and executed from the menu bar. The menu bar contains "File," "Edit," "View," and other major items, and each feature and various settings are arranged under these major items, just as in a general application. Each feature and setting can also be executed using the key commands at the right end of the menu bar. This page explains the functions and various settings for each major item.

---

#### File

<table border="1" id="bkmrk-%E3%83%A1%E3%83%8B%E3%83%A5%E3%83%BC%E5%90%8D-%E8%AA%AC%E6%98%8E-%E5%82%99%E8%80%83-%E3%82%BD%E3%83%AA%E3%83%A5%E3%83%BC%E3%82%B7%E3%83%A7%E3%83%B3%E3%82%92" style="border-collapse: collapse; width: 800px; height: 758.609px; border-width: 1px;"><colgroup><col style="width: 239px;"></col><col style="width: 488px;"></col><col style="width: 72px;"></col></colgroup><tbody><tr style="height: 29.7969px;"><td class="align-center" style="background-color: rgb(230, 126, 35); height: 29.7969px; border-width: 1px;">**Menu name**</td><td class="align-center" style="background-color: rgb(230, 126, 35); height: 29.7969px; border-width: 1px;">**Description**</td><td class="align-center" style="background-color: rgb(230, 126, 35); height: 29.7969px; border-width: 1px;">**Note**</td></tr><tr style="height: 35.3906px;"><td style="height: 35.3906px; border-width: 1px;">New Solution...</td><td style="height: 35.3906px; border-width: 1px;">Create a new solution.</td><td class="align-center" style="height: 35.3906px; border-width: 1px;"><span style="color: rgb(230, 126, 35);">[\[ Detail \]](https://doc316en.candera.eu/books/solution-handling/page/new-solution)</span></td></tr><tr style="height: 35.3906px;"><td style="height: 35.3906px; border-width: 1px;">Open Solution...</td><td style="height: 35.3906px; border-width: 1px;">Opens an existing solution.</td><td class="align-center" style="height: 35.3906px; border-width: 1px;"><span style="color: rgb(230, 126, 35);">[\[ Detail \]](https://doc316en.candera.eu/books/solution-handling/page/open-solution)</span></td></tr><tr style="height: 29.7969px;"><td style="height: 29.7969px; border-width: 1px;">Close Solution</td><td style="height: 29.7969px; border-width: 1px;">Closes the currently open solution.</td><td class="align-center" style="height: 29.7969px; border-width: 1px;">ー</td></tr><tr style="height: 35.3906px;"><td style="height: 35.3906px; border-width: 1px;">Source Control</td><td style="height: 35.3906px; border-width: 1px;">Import/checkout source control.</td><td class="align-center" style="height: 35.3906px; border-width: 1px;"><span style="color: rgb(230, 126, 35);">[\[ Detail \]](https://doc316en.candera.eu/books/solution-handling/page/source-control-support)</span></td></tr><tr style="height: 35.3906px;"><td style="height: 35.3906px; border-width: 1px;">Save Solution</td><td style="height: 35.3906px; border-width: 1px;">Overwrites the currently open Solution.</td><td class="align-center" style="height: 35.3906px; border-width: 1px;"><span style="color: rgb(230, 126, 35);">[\[ Detail \]](https://doc316en.candera.eu/link/43#bkmrk-save-a-solution)</span></td></tr><tr style="height: 35.3906px;"><td style="height: 35.3906px; border-width: 1px;">Save Solution As...</td><td style="height: 35.3906px; border-width: 1px;">Save the currently open solution as.</td><td class="align-center" style="height: 35.3906px; border-width: 1px;"><span style="color: rgb(230, 126, 35);">[\[ Detail \]](https://doc316en.candera.eu/link/43#bkmrk-save-a-solution-in-a)</span></td></tr><tr style="height: 35.3906px;"><td style="height: 35.3906px; border-width: 1px;">Clear Solution Cache</td><td style="height: 35.3906px; border-width: 1px;">Clears the solution cache.</td><td class="align-center" style="height: 35.3906px; border-width: 1px;"><span style="color: rgb(230, 126, 35);">[\[ Detail \]](https://doc316en.candera.eu/books/solution-handling/page/clear-solution-cache)</span></td></tr><tr style="height: 35.3906px;"><td style="height: 35.3906px; border-width: 1px;">Recent Soltions</td><td style="height: 35.3906px; border-width: 1px;">Displays recently opened solutions.</td><td class="align-center" style="height: 35.3906px; border-width: 1px;"><span style="color: rgb(230, 126, 35);">[\[ Detail \]](https://doc316en.candera.eu/link/42#bkmrk-recent-solutions)</span></td></tr><tr style="height: 35.3906px;"><td style="border-width: 1px; height: 35.3906px;">Solution Reports...</td><td style="border-width: 1px; height: 35.3906px;">Displays the Solution Report.</td><td class="align-center" style="border-width: 1px; height: 35.3906px;"><span style="color: rgb(230, 126, 35);">[\[ Detail \]](https://doc316en.candera.eu/books/solution-handling/page/solution-report)</span></td></tr><tr style="height: 35.3906px;"><td style="height: 35.3906px; border-width: 1px;">Preferences...</td><td style="height: 35.3906px; border-width: 1px;">Opens the "Preferences" dialog.</td><td class="align-center" style="height: 35.3906px; border-width: 1px;"><span style="color: rgb(230, 126, 35);">[\[ Detail \]](https://doc316en.candera.eu/books/preferences)</span></td></tr><tr style="height: 35.3906px;"><td style="height: 35.3906px; border-width: 1px;">Solution Options...</td><td style="height: 35.3906px; border-width: 1px;">Opens the "Solution Options" dialog.</td><td class="align-center" style="height: 35.3906px; border-width: 1px;"><span style="color: rgb(230, 126, 35);">[\[ Detail \]](https://doc316en.candera.eu/books/solution-handling/chapter/solution-options)</span></td></tr><tr style="height: 35.3906px;"><td style="height: 35.3906px; border-width: 1px;">Generate Asset Library...</td><td style="height: 35.3906px; border-width: 1px;">Generate Asset Library</td><td class="align-center" style="height: 35.3906px; border-width: 1px;"><span style="color: rgb(230, 126, 35);">[\[ Detail \]](https://doc316en.candera.eu/books/asset-library-generation/page/generate-asset-library)</span></td></tr><tr style="height: 35.3906px;"><td style="height: 35.3906px; border-width: 1px;">Export SCL...</td><td style="height: 35.3906px; border-width: 1px;">Exports SCLs (Shared Component Libraries).</td><td class="align-center" style="height: 35.3906px; border-width: 1px;"><span style="color: rgb(230, 126, 35);">[\[ Detail \]](https://doc316en.candera.eu/books/solution-handling/page/reusable-solution-libraries)</span></td></tr><tr style="height: 15.3906px;"><td style="height: 15.3906px; border-width: 1px;">Automation Scripts...</td><td style="height: 15.3906px; border-width: 1px;">Sets up automatic execution of user-defined scripts.</td><td class="align-center" style="height: 15.3906px; border-width: 1px;"><span style="color: rgb(230, 126, 35);">[\[ Detail \]](https://doc316en.candera.eu/books/extending-scenecomposer/page/executable-generation)</span></td></tr><tr style="height: 35.3906px;"><td style="height: 35.3906px; border-width: 1px;">Export Symbolic Names...</td><td style="height: 35.3906px; border-width: 1px;">Exports a header file (.h) with a list of symbolic names.</td><td class="align-center" style="height: 35.3906px; border-width: 1px;"><span style="color: rgb(230, 126, 35);">[\[ Detail \]](https://doc316en.candera.eu/link/418#bkmrk-accessing-items-via-)</span></td></tr><tr style="height: 57.7812px;"><td style="height: 57.7812px; border-width: 1px;">Define application specification</td><td style="height: 57.7812px; border-width: 1px;">Sets up application specifications (definitions for the connection between the Scene Composer solution and the CGI Panel).

</td><td class="align-center" style="height: 57.7812px; border-width: 1px;"><span style="color: rgb(230, 126, 35);">[\[ Detail \]](https://doc316en.candera.eu/link/312#bkmrk-application-specific)</span></td></tr><tr style="height: 35.3906px;"><td style="height: 35.3906px; border-width: 1px;">Set External Resources Path…</td><td style="height: 35.3906px; border-width: 1px;">Sets the folder where external resources will be placed.</td><td class="align-center" style="height: 35.3906px; border-width: 1px;"><span style="color: rgb(230, 126, 35);">[\[ Detail \]](https://doc316en.candera.eu/link/1073#bkmrk-resource-reference-m)</span></td></tr><tr style="height: 29.7969px;"><td style="height: 29.7969px; border-width: 1px;">Exit</td><td style="height: 29.7969px; border-width: 1px;">Exit Scene Composer.</td><td class="align-center" style="height: 29.7969px; border-width: 1px;">ー</td></tr></tbody></table>

#### Edit

<table border="1" id="bkmrk-%E3%83%A1%E3%83%8B%E3%83%A5%E3%83%BC%E5%90%8D-%E8%AA%AC%E6%98%8E-%E5%82%99%E8%80%83-%E3%83%AC%E3%82%A4%E3%82%A2%E3%82%A6%E3%83%88%E3%82%92%E5%AE%9F%E8%A1%8C" style="border-collapse: collapse; width: 800px; height: 148.984px; border-width: 1px;"><colgroup><col style="width: 242px;"></col><col style="width: 484px;"></col><col style="width: 74px;"></col></colgroup><tbody><tr style="height: 29.7969px;"><td class="align-center" style="background-color: rgb(230, 126, 35); height: 29.7969px; border-width: 1px;">**Menu name**</td><td class="align-center" style="background-color: rgb(230, 126, 35); height: 29.7969px; border-width: 1px;">**Description**</td><td class="align-center" style="background-color: rgb(230, 126, 35); height: 29.7969px; border-width: 1px;">**Note**</td></tr><tr><td style="border-width: 1px;">Undo</td><td style="border-width: 1px;">Undo the previous operation.</td><td class="align-center" style="border-width: 1px;">[\[ Detail \]](https://doc316en.candera.eu/books/solution-handling/page/undo-and-redo-operations)</td></tr><tr><td style="border-width: 1px;">Redo</td><td style="border-width: 1px;">Redo the previous operation.</td><td class="align-center" style="border-width: 1px;">[\[ Detail \]](https://doc316en.candera.eu/books/solution-handling/page/undo-and-redo-operations)</td></tr><tr><td style="border-width: 1px;">Go To Previous Element</td><td style="border-width: 1px;">Moves to the previous element.</td><td class="align-center" style="border-width: 1px;">ー</td></tr><tr style="height: 29.7969px;"><td style="height: 29.7969px; border-width: 1px;">Do Layout</td><td style="height: 29.7969px; border-width: 1px;">Apply layout.</td><td class="align-center" style="height: 29.7969px; border-width: 1px;">ー</td></tr><tr style="height: 29.7969px;"><td style="height: 29.7969px; border-width: 1px;">Go To Next Element</td><td style="height: 29.7969px; border-width: 1px;">Moves to the next element.</td><td class="align-center" style="height: 29.7969px; border-width: 1px;">ー</td></tr></tbody></table>

#### View

<table border="1" id="bkmrk-%E3%83%A1%E3%83%8B%E3%83%A5%E3%83%BC%E5%90%8D-%E8%AA%AC%E6%98%8E-%E5%82%99%E8%80%83-%E6%96%B0%E8%A6%8F%E3%81%AE%E3%83%91%E3%83%BC%E3%82%B9%E3%83%9A%E3%82%AF" style="border-collapse: collapse; width: 800px; height: 268.937px; border-width: 1px;"><colgroup><col style="width: 241px;"></col><col style="width: 486px;"></col><col style="width: 73px;"></col></colgroup><tbody><tr style="height: 29.7969px;"><td class="align-center" style="background-color: rgb(230, 126, 35); height: 29.7969px; border-width: 1px;">**Menu name**</td><td class="align-center" style="background-color: rgb(230, 126, 35); height: 29.7969px; border-width: 1px;">**Description**</td><td class="align-center" style="background-color: rgb(230, 126, 35); height: 29.7969px; border-width: 1px;">**Note**</td></tr><tr style="height: 35.3906px;"><td style="height: 35.3906px; border-width: 1px;">New perspective</td><td style="height: 35.3906px; border-width: 1px;">Saves a new perspective (Scene Composer layout).</td><td class="align-center" style="height: 35.3906px; border-width: 1px;">[\[ Detail \]](https://doc316en.candera.eu/link/9#bkmrk-perspective-support)</td></tr><tr style="height: 35.3906px;"><td style="height: 35.3906px; border-width: 1px;">Delete Perspective</td><td style="height: 35.3906px; border-width: 1px;">Deletes the active perspective.</td><td class="align-center" style="height: 35.3906px; border-width: 1px;">[\[ Detail \]](https://doc316en.candera.eu/link/9#bkmrk-perspective-support)</td></tr><tr style="height: 29.7969px;"><td style="height: 29.7969px; border-width: 1px;">Restore Default Layout</td><td style="height: 29.7969px; border-width: 1px;">Resets the Scene Composer layout to default.</td><td class="align-center" style="height: 29.7969px; border-width: 1px;">ー</td></tr><tr style="height: 57.7812px;"><td style="height: 57.7812px; border-width: 1px;">Toolbar</td><td style="height: 57.7812px; border-width: 1px;">Shows/hides the icons related to the Navigation/Animation/Editor Profile/Script System contained in the toolbar.

</td><td class="align-center" style="height: 57.7812px; border-width: 1px;">[\[ Detail \]](https://doc316en.candera.eu/books/getting-started/page/tool-bar)</td></tr><tr style="height: 35.3906px;"><td style="height: 35.3906px; border-width: 1px;">2D Editing Utilities</td><td style="height: 35.3906px; border-width: 1px;">Enables/disables various features of the 2D scene editor.</td><td class="align-center" style="height: 35.3906px; border-width: 1px;">[\[ Detail \]](https://doc316en.candera.eu/books/preferences/page/2d-editing-helpers)</td></tr><tr style="height: 35.3906px;"><td style="height: 35.3906px; border-width: 1px;">3D Editing Helpers</td><td style="height: 35.3906px; border-width: 1px;">Enables/disables various 3D scene editor features.</td><td class="align-center" style="height: 35.3906px; border-width: 1px;">[\[ Detail \]](https://doc316en.candera.eu/books/preferences/page/3d-editing-helpers)</td></tr><tr style="height: 10px;"><td style="height: 10px; border-width: 1px;">Panels</td><td style="height: 10px; border-width: 1px;">Display/Hide various panels.</td><td class="align-center" style="height: 10px; border-width: 1px;">[\[ Detail \]](https://doc316en.candera.eu/books/getting-started/page/panel)</td></tr></tbody></table>

<p class="callout info">The Render Slots panel cannot be used unless Safety function is enabled. For more information about the Safety function, please contact our representative.</p>

#### Platform

<table border="1" id="bkmrk-%E3%83%A1%E3%83%8B%E3%83%A5%E3%83%BC%E5%90%8D-%E8%AA%AC%E6%98%8E-%E5%82%99%E8%80%83-%E6%96%B0%E8%A6%8F%E3%83%87%E3%82%A3%E3%82%B9%E3%83%97%E3%83%AC%E3%82%A4" style="border-collapse: collapse; width: 800px; height: 195.562px; border-width: 1px;"><colgroup><col style="width: 242px;"></col><col style="width: 485px;"></col><col style="width: 73px;"></col></colgroup><tbody><tr style="height: 29.7969px;"><td class="align-center" style="background-color: rgb(230, 126, 35); height: 29.7969px; border-width: 1px;">**Menu name**</td><td class="align-center" style="background-color: rgb(230, 126, 35); height: 29.7969px; border-width: 1px;">**Description**</td><td class="align-center" style="background-color: rgb(230, 126, 35); height: 29.7969px; border-width: 1px;">**Note**</td></tr><tr style="height: 35.3906px;"><td style="height: 35.3906px; border-width: 1px;">New Display...</td><td style="height: 35.3906px; border-width: 1px;">Add a new display.</td><td class="align-center" style="height: 35.3906px; border-width: 1px;">[\[ Detail \]](https://doc316en.candera.eu/books/display-configuration/page/add-a-new-display)</td></tr><tr style="height: 35.3906px;"><td style="height: 35.3906px; border-width: 1px;">New Render Target...</td><td style="height: 35.3906px; border-width: 1px;">Add a new render target.</td><td class="align-center" style="height: 35.3906px; border-width: 1px;">[\[ Detail \]](https://doc316en.candera.eu/books/display-configuration/page/add-a-new-render-target)</td></tr><tr style="height: 10px;"><td style="height: 10px; border-width: 1px;">Manage Render Targets...</td><td style="height: 10px; border-width: 1px;">Opens the Manage Render Targets dialog included in the solution.</td><td class="align-center" style="height: 10px; border-width: 1px;">[\[ Detail \]](https://doc316en.candera.eu/books/display-configuration/page/manage-render-targets)</td></tr><tr style="height: 49.5938px;"><td style="height: 49.5938px; border-width: 1px;">Device Capabilities...</td><td style="height: 49.5938px; border-width: 1px;">The specifications of the simulation device and target device are displayed</td><td class="align-center" style="height: 49.5938px; border-width: 1px;">[\[ Detail \]](https://doc316en.candera.eu/books/solution-handling/page/device-capabilities-and-constraint-violations)</td></tr><tr style="height: 35.3906px;"><td style="height: 35.3906px; border-width: 1px;">SCHost Information...</td><td style="height: 35.3906px; border-width: 1px;">SCHost information is displayed.</td><td class="align-center" style="height: 35.3906px; border-width: 1px;">[\[ Detail \]](https://doc316en.candera.eu/books/solution-handling/page/schost-information)</td></tr></tbody></table>

#### Shader

<table border="1" id="bkmrk-%E3%83%A1%E3%83%8B%E3%83%A5%E3%83%BC%E5%90%8D-%E8%AA%AC%E6%98%8E-%E5%82%99%E8%80%83-%E6%96%B0%E8%A6%8F%E3%82%B7%E3%82%A7%E3%83%BC%E3%83%80%E3%83%BC." style="border-collapse: collapse; width: 800px; height: 148.984px; border-width: 1px;"><colgroup><col style="width: 242px;"></col><col style="width: 485px;"></col><col style="width: 73px;"></col></colgroup><tbody><tr style="height: 29.7969px;"><td class="align-center" style="background-color: rgb(230, 126, 35); height: 29.7969px; border-width: 1px;">**Menu name**</td><td class="align-center" style="background-color: rgb(230, 126, 35); height: 29.7969px; border-width: 1px;">**Description**</td><td class="align-center" style="background-color: rgb(230, 126, 35); height: 29.7969px; border-width: 1px;">**Note**</td></tr><tr style="height: 29.7969px;"><td style="height: 29.7969px; border-width: 1px;">New Shader...</td><td style="height: 29.7969px; border-width: 1px;">Add a new shader.</td><td class="align-center" style="height: 29.7969px; border-width: 1px;">[\[ Detail \]](https://doc316en.candera.eu/link/146#bkmrk-add-a-new-vertex-or--0)</td></tr><tr style="height: 29.7969px;"><td style="height: 29.7969px; border-width: 1px;">New Shader Program...</td><td style="height: 29.7969px; border-width: 1px;">Add a new shader program.</td><td class="align-center" style="height: 29.7969px; border-width: 1px;">[\[ Detail \]](https://doc316en.candera.eu/link/146#bkmrk-add-a-new-shader-pro)</td></tr><tr style="height: 29.7969px;"><td style="height: 29.7969px; border-width: 1px;">Compile Shader</td><td style="height: 29.7969px; border-width: 1px;">Compile shaders.</td><td class="align-center" style="height: 29.7969px; border-width: 1px;">[\[ Detail \]](https://doc316en.candera.eu/link/146#bkmrk-compile-shaders%C2%A0)</td></tr></tbody></table>

#### Script

<table border="1" id="bkmrk-%E3%83%A1%E3%83%8B%E3%83%A5%E3%83%BC%E5%90%8D-%E8%AA%AC%E6%98%8E-%E5%82%99%E8%80%83-%E6%96%B0%E8%A6%8F%E3%82%B9%E3%82%AF%E3%83%AA%E3%83%97%E3%83%88%E2%80%A6" style="border-collapse: collapse; width: 800px; height: 145.969px; border-width: 1px;"><colgroup><col style="width: 242px;"></col><col style="width: 484px;"></col><col style="width: 74px;"></col></colgroup><tbody><tr style="height: 29.7969px;"><td class="align-center" style="background-color: rgb(230, 126, 35); height: 29.7969px; border-width: 1px;">**Menu name**</td><td class="align-center" style="background-color: rgb(230, 126, 35); height: 29.7969px; border-width: 1px;">**Description**</td><td class="align-center" style="background-color: rgb(230, 126, 35); height: 29.7969px; border-width: 1px;">**Note**</td></tr><tr style="height: 35.3906px;"><td style="height: 35.3906px; border-width: 1px;">New Script...</td><td style="height: 35.3906px; border-width: 1px;">Create a new script.</td><td class="align-center" style="height: 35.3906px; border-width: 1px;">[\[ Detail \]](https://doc316en.candera.eu/books/scripting/page/new-script)</td></tr><tr style="height: 10px;"><td style="height: 10px; border-width: 1px;">Validate Script</td><td style="height: 10px; border-width: 1px;">Validate a script.</td><td class="align-center" style="height: 10px; border-width: 1px;">[\[ Detail \]](https://doc316en.candera.eu/books/scripting/page/script-editor-and-script-validation)</td></tr><tr style="height: 35.3906px;"><td style="height: 35.3906px; border-width: 1px;">Start | Pause Script System</td><td style="height: 35.3906px; border-width: 1px;">Runs a script system or pauses a running script system.</td><td class="align-center" style="height: 35.3906px; border-width: 1px;">[\[ Detail \]](https://doc316en.candera.eu/books/scripting/page/script-execution)</td></tr><tr style="height: 35.3906px;"><td style="height: 35.3906px; border-width: 1px;">Stop Script System</td><td style="height: 35.3906px; border-width: 1px;">Stops the script system from running.</td><td class="align-center" style="height: 35.3906px; border-width: 1px;">[\[ Detail \]](https://doc316en.candera.eu/books/scripting/page/script-execution)</td></tr></tbody></table>

#### Import

<table border="1" id="bkmrk-%E3%83%A1%E3%83%8B%E3%83%A5%E3%83%BC%E5%90%8D-%E8%AA%AC%E6%98%8E-%E5%82%99%E8%80%83-%E3%83%AA%E3%82%BD%E3%83%BC%E3%82%B9%E3%81%AE%E3%82%A4%E3%83%B3%E3%83%9D" style="border-collapse: collapse; width: 800px; height: 148.984px; border-width: 1px;"><colgroup><col style="width: 242px;"></col><col style="width: 485px;"></col><col style="width: 73px;"></col></colgroup><tbody><tr style="height: 29.7969px;"><td class="align-center" style="background-color: rgb(230, 126, 35); height: 29.7969px; border-width: 1px;">**Menu name**</td><td class="align-center" style="background-color: rgb(230, 126, 35); height: 29.7969px; border-width: 1px;">**Description**</td><td class="align-center" style="background-color: rgb(230, 126, 35); height: 29.7969px; border-width: 1px;">**Note**</td></tr><tr style="height: 29.7969px;"><td style="height: 29.7969px; border-width: 1px;">Import Resources....</td><td style="height: 29.7969px; border-width: 1px;">Imports various resources.</td><td class="align-center" style="height: 29.7969px; border-width: 1px;">[\[ Detail \]](https://doc316en.candera.eu/books/import-of-resources/page/how-to-import-resources)</td></tr><tr style="height: 29.7969px;"><td style="height: 29.7969px; border-width: 1px;">Import Raw Resources...</td><td style="height: 29.7969px; border-width: 1px;">Import raw resources.</td><td class="align-center" style="height: 29.7969px; border-width: 1px;">[\[ Detail \]](https://doc316en.candera.eu/books/import-of-resources/page/import-raw-resources)</td></tr><tr style="height: 29.7969px;"><td style="height: 29.7969px; border-width: 1px;">Import Benchmarks...</td><td style="height: 29.7969px; border-width: 1px;">Import render benchmarks (.crsms) exported from CGI Analyzer.</td><td class="align-center" style="height: 29.7969px; border-width: 1px;">[\[ Detail \]](https://doc316en.candera.eu/books/import-of-resources/page/import-benchmarks)</td></tr><tr><td style="border-width: 1px;">Import From Solution...</td><td style="border-width: 1px;">mport various resources from existing solution files.</td><td class="align-center" style="border-width: 1px;">[\[ Detail \]](https://doc316en.candera.eu/books/import-of-resources/page/import-from-solution)</td></tr><tr><td style="border-width: 1px;">Smart Importer</td><td style="border-width: 1px;">Import various graphics resources via the Smart Importer.</td><td class="align-center" style="border-width: 1px;">[\[ Detail \]](https://doc316en.candera.eu/books/import-of-resources/chapter/smart-importer)</td></tr><tr><td style="border-width: 1px;">Configure Automatic Imports,,,</td><td style="border-width: 1px;">Set up automatic import (image and fbx files only).   
</td><td class="align-center" style="border-width: 1px;">[\[ Detail \]](https://doc316en.candera.eu/books/import-of-resources/page/automatic-imports)</td></tr><tr><td style="border-width: 1px;">Image Update...</td><td style="border-width: 1px;">Import images from any folder at once.</td><td class="align-center" style="border-width: 1px;">[\[ Detail \]](https://doc316en.candera.eu/books/import-of-resources/page/image-update)</td></tr><tr><td style="border-width: 1px;">Delete Unused Imports...</td><td style="border-width: 1px;">Delete imported but unused items.</td><td class="align-center" style="border-width: 1px;">[\[ Detail \]](https://doc316en.candera.eu/link/74#bkmrk-delete-unused-import)</td></tr></tbody></table>

#### Scene

<table border="1" id="bkmrk-%E3%83%A1%E3%83%8B%E3%83%A5%E3%83%BC%E5%90%8D-%E8%AA%AC%E6%98%8E-%E5%82%99%E8%80%83-%E6%96%B0%E8%A6%8F2d%E3%82%B7%E3%83%BC%E3%83%B3%E2%80%A6" style="border-collapse: collapse; width: 800px; height: 148.984px; border-width: 1px;"><colgroup><col style="width: 241px;"></col><col style="width: 486px;"></col><col style="width: 73px;"></col></colgroup><tbody><tr style="height: 29.7969px;"><td class="align-center" style="background-color: rgb(230, 126, 35); height: 29.7969px; border-width: 1px;">**Menu name**</td><td class="align-center" style="background-color: rgb(230, 126, 35); height: 29.7969px; border-width: 1px;">**Description**</td><td class="align-center" style="background-color: rgb(230, 126, 35); height: 29.7969px; border-width: 1px;">**Note**</td></tr><tr style="height: 29.7969px;"><td style="height: 29.7969px; border-width: 1px;">New 2D Scene...</td><td style="height: 29.7969px; border-width: 1px;">Create a new 2D scene.</td><td class="align-center" style="height: 29.7969px; border-width: 1px;">[\[ Detail \]](https://doc316en.candera.eu/books/scene-design/page/create-a-new-scene)</td></tr><tr style="height: 29.7969px;"><td style="height: 29.7969px; border-width: 1px;">New 3D Scene...</td><td style="height: 29.7969px; border-width: 1px;">Create a new 3D scene.</td><td class="align-center" style="height: 29.7969px; border-width: 1px;">[\[ Detail \]](https://doc316en.candera.eu/books/scene-design/page/create-a-new-scene)</td></tr><tr style="height: 29.7969px;"><td style="height: 29.7969px; border-width: 1px;">Refresh Scene</td><td style="height: 29.7969px; border-width: 1px;">Reload the active scene.</td><td class="align-center" style="height: 29.7969px; border-width: 1px;">[\[ Detail \]](https://doc316en.candera.eu/books/scene-design/page/refresh-a-scene)</td></tr></tbody></table>

#### Animation

<table border="1" id="bkmrk-%E3%83%A1%E3%83%8B%E3%83%A5%E3%83%BC%E5%90%8D-%E8%AA%AC%E6%98%8E-%E5%82%99%E8%80%83-%E6%96%B0%E8%A6%8F%E3%82%A2%E3%83%8B%E3%83%A1%E3%83%BC%E3%82%B7%E3%83%A7" style="border-collapse: collapse; width: 800px; height: 148.984px; border-width: 1px;"><colgroup><col style="width: 241px;"></col><col style="width: 485px;"></col><col style="width: 74px;"></col></colgroup><tbody><tr style="height: 29.7969px;"><td class="align-center" style="background-color: rgb(230, 126, 35); height: 29.7969px; border-width: 1px;">**Menu name**</td><td class="align-center" style="background-color: rgb(230, 126, 35); height: 29.7969px; border-width: 1px;">**Description**</td><td class="align-center" style="background-color: rgb(230, 126, 35); height: 29.7969px; border-width: 1px;">**Note**</td></tr><tr style="height: 29.7969px;"><td style="height: 29.7969px; border-width: 1px;">New Animation Group...</td><td style="height: 29.7969px; border-width: 1px;">Creates a new animation group.</td><td class="align-center" style="height: 29.7969px; border-width: 1px;">[\[ Detail \]](https://doc316en.candera.eu/link/25#bkmrk-create-an-animation-)</td></tr><tr style="height: 29.7969px;"><td style="height: 29.7969px; border-width: 1px;">Start Animation</td><td style="height: 29.7969px; border-width: 1px;">Start an existing animation.</td><td class="align-center" style="height: 29.7969px; border-width: 1px;">[\[ Detail \]](https://doc316en.candera.eu/books/animation-design/page/play-animation)</td></tr><tr style="height: 29.7969px;"><td style="height: 29.7969px; border-width: 1px;">New Animation...</td><td style="height: 29.7969px; border-width: 1px;">Create a new animation.</td><td class="align-center" style="height: 29.7969px; border-width: 1px;">[\[ Detail \]](https://doc316en.candera.eu/link/14#bkmrk-create-a-new-empty-a-0)</td></tr><tr style="height: 29.7969px;"><td style="height: 29.7969px; border-width: 1px;">Stop Animation</td><td style="height: 29.7969px; border-width: 1px;">Stops an existing animation that is starting.</td><td class="align-center" style="height: 29.7969px; border-width: 1px;">[\[ Detail \]](https://doc316en.candera.eu/link/24#bkmrk-stop-animation)</td></tr></tbody></table>

#### State Machine

<table border="1" id="bkmrk-%E3%83%A1%E3%83%8B%E3%83%A5%E3%83%BC%E5%90%8D-%E8%AA%AC%E6%98%8E-%E5%82%99%E8%80%83-%E6%96%B0%E8%A6%8F%E3%82%B9%E3%83%86%E3%83%BC%E3%83%88%E3%83%9E%E3%82%B7" style="border-collapse: collapse; width: 800px; height: 148.984px; border-width: 1px;"><colgroup><col style="width: 241px;"></col><col style="width: 486px;"></col><col style="width: 73px;"></col></colgroup><tbody><tr><td class="align-center" style="background-color: rgb(230, 126, 35); height: 29.7969px; border-width: 1px;">**Menu name**</td><td class="align-center" style="background-color: rgb(230, 126, 35); height: 29.7969px; border-width: 1px;">**Description**</td><td class="align-center" style="background-color: rgb(230, 126, 35); height: 29.7969px; border-width: 1px;">**Note**</td></tr><tr style="height: 29.7969px;"><td style="height: 29.7969px; border-width: 1px;">New State Machines...</td><td style="height: 29.7969px; border-width: 1px;">Create a new state machine.</td><td class="align-center" style="height: 29.7969px; border-width: 1px;">ー</td></tr><tr style="height: 29.7969px;"><td style="height: 29.7969px; border-width: 1px;">Attach...</td><td style="height: 29.7969px; border-width: 1px;">Make a TCP connection to the application.</td><td class="align-center" style="height: 29.7969px; border-width: 1px;">ー</td></tr><tr style="height: 29.7969px;"><td style="height: 29.7969px; border-width: 1px;">Validate Active State Machine</td><td style="height: 29.7969px; border-width: 1px;">Validate the active state machine.</td><td class="align-center" style="height: 29.7969px; border-width: 1px;">ー</td></tr></tbody></table>

#### Report

<table border="1" id="bkmrk-%E3%83%A1%E3%83%8B%E3%83%A5%E3%83%BC%E5%90%8D-%E8%AA%AC%E6%98%8E-%E5%82%99%E8%80%83-hmi%E3%83%AC%E3%83%9D%E3%83%BC%E3%83%88%E2%80%A6" style="border-collapse: collapse; width: 800px; height: 148.984px; border-width: 1px;"><colgroup><col style="width: 240px;"></col><col style="width: 487px;"></col><col style="width: 73px;"></col></colgroup><tbody><tr style="height: 29.7969px;"><td class="align-center" style="background-color: rgb(230, 126, 35); height: 29.7969px; border-width: 1px;">**Menu name**</td><td class="align-center" style="background-color: rgb(230, 126, 35); height: 29.7969px; border-width: 1px;">**Description**</td><td class="align-center" style="background-color: rgb(230, 126, 35); height: 29.7969px; border-width: 1px;">**Note**</td></tr><tr style="height: 29.7969px;"><td style="height: 29.7969px; border-width: 1px;">HMI Report...</td><td style="height: 29.7969px; border-width: 1px;">Opens the HMI Report dialog, where you can configure various settings related to HMI reports and create HMI reports.

</td><td class="align-center" style="height: 29.7969px; border-width: 1px;">[\[ Detail \]](https://doc316en.candera.eu/books/solution-handling/page/hmi-report)</td></tr><tr style="height: 29.7969px;"><td style="height: 29.7969px; border-width: 1px;">Text Size Report...</td><td style="height: 29.7969px; border-width: 1px;">Open the Text Size Report dialog. Select the scene and culture for which you want to run the text size report and run the text size report.

</td><td class="align-center" style="height: 29.7969px; border-width: 1px;">[\[ Detail \]](https://doc316en.candera.eu/books/solution-handling/page/text-size-report-KPG)</td></tr></tbody></table>

#### Language

<table border="1" id="bkmrk-%E3%83%A1%E3%83%8B%E3%83%A5%E3%83%BC%E5%90%8D-%E8%AA%AC%E6%98%8E-%E5%82%99%E8%80%83-%E3%82%AB%E3%83%AB%E3%83%81%E3%83%A3%E3%83%BC%E3%82%BD%E3%83%AA%E3%83%A5" style="border-collapse: collapse; width: 800px; height: 148.984px; border-width: 1px;"><colgroup><col style="width: 241px;"></col><col style="width: 485px;"></col><col style="width: 74px;"></col></colgroup><tbody><tr style="height: 29.7969px;"><td class="align-center" style="background-color: rgb(230, 126, 35); height: 29.7969px; border-width: 1px;">**Menu name**</td><td class="align-center" style="background-color: rgb(230, 126, 35); height: 29.7969px; border-width: 1px;">**Description**</td><td class="align-center" style="background-color: rgb(230, 126, 35); height: 29.7969px; border-width: 1px;">**Note**</td></tr><tr style="height: 29.7969px;"><td style="height: 29.7969px; border-width: 1px;">Culture Solution Options...</td><td style="height: 29.7969px; border-width: 1px;">Opens the Culture Solution option.</td><td class="align-center" style="height: 29.7969px; border-width: 1px;">[\[ Detail \]](https://doc316en.candera.eu/books/scene-design/page/create-and-manage-cultures-and-translatable-texts#bkmrk-culture-solution-opt-1)</td></tr><tr style="height: 29.7969px;"><td style="height: 29.7969px; border-width: 1px;">Export Languages...</td><td style="height: 29.7969px; border-width: 1px;">Open the Select Cultures dialog. Select the language for output.</td><td class="align-center" style="height: 29.7969px; border-width: 1px;">[\[ Detail \]](https://doc316en.candera.eu/books/scene-design/page/create-and-manage-cultures-and-translatable-texts#bkmrk-culture-solution-opt-1)</td></tr><tr style="height: 29.7969px;"><td style="height: 29.7969px; border-width: 1px;">Import languages</td><td style="height: 29.7969px; border-width: 1px;">Opens the Import Languages dialog. Select the file to import.  
</td><td class="align-center" style="height: 29.7969px; border-width: 1px;">[\[ Detail \]](https://doc316en.candera.eu/books/scene-design/page/create-and-manage-cultures-and-translatable-texts#bkmrk-culture-solution-opt-1)</td></tr><tr style="height: 29.7969px;"><td style="height: 29.7969px; border-width: 1px;">Language Usage...</td><td style="height: 29.7969px; border-width: 1px;">Opens the Language Usage dialog where all text properties of the solution are listed.

</td><td class="align-center" style="height: 29.7969px; border-width: 1px;">[\[ Detail \]](https://doc316en.candera.eu/books/scene-design/page/create-and-manage-cultures-and-translatable-texts#bkmrk-culture-solution-opt-1)</td></tr><tr><td style="border-width: 1px;">Language Table...</td><td style="border-width: 1px;">Opens the Language Table dialog where users can add, edit, or delete translatable text.

</td><td class="align-center" style="border-width: 1px;">[\[ Detail \]](https://doc316en.candera.eu/books/scene-design/page/create-and-manage-cultures-and-translatable-texts#bkmrk-culture-solution-opt-1)</td></tr></tbody></table>

#### Help

<table border="1" id="bkmrk-%E3%83%A1%E3%83%8B%E3%83%A5%E3%83%BC%E5%90%8D-%E8%AA%AC%E6%98%8E-%E5%82%99%E8%80%83-%E3%83%98%E3%83%AB%E3%83%97-cgi-" style="border-collapse: collapse; width: 800px; height: 315.734px; border-width: 1px;"><colgroup><col style="width: 241px;"></col><col style="width: 485px;"></col><col style="width: 74px;"></col></colgroup><tbody><tr style="height: 29.7969px;"><td class="align-center" style="background-color: rgb(230, 126, 35); height: 29.7969px; border-width: 1px;">**Menu name**</td><td class="align-center" style="background-color: rgb(230, 126, 35); height: 29.7969px; border-width: 1px;">**Description**</td><td class="align-center" style="background-color: rgb(230, 126, 35); height: 29.7969px; border-width: 1px;">**Note**</td></tr><tr style="height: 35.3906px;"><td style="height: 35.3906px; border-width: 1px;">Help</td><td style="height: 35.3906px; border-width: 1px;">Open the CGI Studio help documentation (this document).</td><td class="align-center" style="height: 35.3906px; border-width: 1px;">[\[ Detail \]](https://doc316en.candera.eu/books/about-this-document)</td></tr><tr style="height: 35.3906px;"><td style="height: 35.3906px; border-width: 1px;">Quick Start Guide</td><td style="height: 35.3906px; border-width: 1px;">Open the CGI Studio Basic Usage tutorial.</td><td class="align-center" style="height: 35.3906px; border-width: 1px;">[\[ Detail \]](https://doc316en.candera.eu/books/getting-started/chapter/quick-start-guide)</td></tr><tr style="height: 29.7969px;"><td style="height: 29.7969px; border-width: 1px;">Welcom Screen</td><td style="height: 29.7969px; border-width: 1px;">Opens the Welcome to Scene Composer dialog.</td><td class="align-center" style="height: 29.7969px; border-width: 1px;">ー</td></tr><tr style="height: 35.3906px;"><td style="height: 35.3906px; border-width: 1px;">Hot keys.,,</td><td style="height: 35.3906px; border-width: 1px;">Opens a list of shortcut keys.</td><td class="align-center" style="height: 35.3906px; border-width: 1px;">[\[ Detail \]](https://doc316en.candera.eu/books/appendix/page/shortcut-commands)</td></tr><tr style="height: 35.3906px;"><td style="height: 35.3906px; border-width: 1px;">Licenses...</td><td style="height: 35.3906px; border-width: 1px;">Opens the License dialog.</td><td class="align-center" style="height: 35.3906px; border-width: 1px;">[\[ Detail \]](https://doc316en.candera.eu/books/starting-scenecomposer/page/using-licenses)</td></tr><tr style="height: 29.7969px;"><td style="height: 29.7969px; border-width: 1px;">Visit Lighthouse</td><td style="height: 29.7969px; border-width: 1px;">Opens the Lighthouse (support/forums page).</td><td class="align-center" style="height: 29.7969px; border-width: 1px;">ー</td></tr><tr style="height: 19.5938px;"><td style="height: 19.5938px; border-width: 1px;">Feedback</td><td style="height: 19.5938px; border-width: 1px;">Opens a dialog for submitting feedback about CGI Studio.</td><td class="align-center" style="height: 19.5938px; border-width: 1px;">ー</td></tr><tr style="height: 29.7969px;"><td style="height: 29.7969px; border-width: 1px;">About...</td><td style="height: 29.7969px; border-width: 1px;">Displays information about Scene Composer.</td><td class="align-center" style="height: 29.7969px; border-width: 1px;">ー</td></tr></tbody></table>

---

# Tool bar

The toolbar is lined with icons for frequently used operations.

---

Each number in the image below corresponds to the below icon descriptions.

<div drawio-diagram="8762"><img src="https://doc316en.candera.eu/uploads/images/drawio/2025-11/drawing-7-1763364625.png" alt=""/></div>

1. Create a new solution
2. Opne an existing solution
3. Save solution...
4. Open asset library generator dialog...
5. Open safety asset library generator dialog...
6. Run/Stop Player/Embedded Player, Update Embedded Player
7. Select Player/Embedded Player setting (6. Select the player to launch when clicked.)
8. Open automation scripts dialog...
9. Undo
10. Redo
11. Add a new 2D scene
12. Add a new 3D scene
13. Add a new safety scene
14. Select active scene
15. Select perspective (Scene Design/Animation Design/User created perspective）
16. Display/Hide Scene Editor
17. Open Culture solution option dialog
18. Select culture
19. Create new animation
20. Select animation
21. Start animation
22. Stop animation
23. Animation fast forward speed
24. Animation fast forward
25. Go back to one previous active item
26. Go forward to one previous active item
27. Edit current profile
28. Add a new profile
29. Delete current profile
30. Select profile
31. Start the execution of the script system
32. Stop the execution of the script system

<p class="callout info">Icons through 19 to 32 can be shown or hidden from the menu bar under \[ View &gt; Toolbars \]. (Animation: 19 to 24, Navigation: 25 and 26, Editor Profiles: 27 to 30, Scripting System: 31 and 32)</p>

<p class="callout info">By mousing the separators in the toolbar, you can customize the placement of icons on a separator-by-separator basis.</p>

---

# Panel

The Scene Composer user interface is composed of parts called panels. This page describes each panel, for which corresponding explanations can be found below.

<div drawio-diagram="7856"><img src="https://doc316en.candera.eu/uploads/images/drawio/2025-02/drawing-4-1738545034.png" alt=""/></div>

<p class="callout info">This page is explained according to the default layout for convenience.</p>

---

#### 1. Solution Explorer/Imports

<table border="1" id="bkmrk-%E3%82%BD%E3%83%AA%E3%83%A5%E3%83%BC%E3%82%B7%E3%83%A7%E3%83%B3%E3%82%A8%E3%82%AF%E3%82%B9%E3%83%97%E3%83%AD%E3%83%BC%E3%83%A9%E3%83%BC-%E3%82%BD%E3%83%AA%E3%83%A5%E3%83%BC" style="border-collapse: collapse; width: 800px; height: 75.1875px; border-width: 1px;"><colgroup><col style="width: 236px;"></col><col style="width: 488px;"></col><col style="width: 75px;"></col></colgroup><tbody><tr style="background-color: rgb(230, 126, 35); height: 29.7969px;"><td class="align-center" style="border-width: 1px; height: 29.7969px;">**Panel name**</td><td class="align-center" style="border-width: 1px; height: 29.7969px;">**Description**</td><td class="align-center" style="border-width: 1px; height: 29.7969px;">**<span style="color: rgb(0, 0, 0);">Note</span>**</td></tr><tr style="height: 10px;"><td style="height: 10px; border-width: 1px;">Solution Explorer</td><td style="height: 10px; border-width: 1px;">All items in the solution are displayed.

You can add new items, edit existing items and so on.

</td><td class="align-center" style="height: 10px; border-width: 1px;"><span style="color: rgb(230, 126, 35);">[\[ Detail \]](https://doc316en.candera.eu/books/solution-handling/page/organize-a-solution-using-folders)</span></td></tr><tr style="height: 35.3906px;"><td style="height: 35.3906px; border-width: 1px;">Imports</td><td style="height: 35.3906px; border-width: 1px;">Displays all items imported into the solution.

</td><td class="align-center" style="height: 35.3906px; border-width: 1px;"><span style="color: rgb(230, 126, 35);">[\[ Detail \]](https://doc316en.candera.eu/link/74#bkmrk-imports-panel)</span></td></tr></tbody></table>


#### 2. Scene Tree/Search/Output etc.

<table border="1" id="bkmrk-%E3%82%B7%E3%83%BC%E3%83%B3%E3%83%84%E3%83%AA%E3%83%BC-%E3%82%B7%E3%83%BC%E3%83%B3%E3%81%AB%E5%90%AB%E3%81%BE%E3%82%8C%E3%82%8B%E3%81%99%E3%81%B9%E3%81%A6%E3%81%AE%E3%83%8E" style="border-collapse: collapse; width: 800px; height: 181.359px; border-width: 1px;"><colgroup><col style="width: 181px;"></col><col style="width: 544px;"></col><col style="width: 74px;"></col></colgroup><tbody><tr style="background-color: rgb(230, 126, 35); height: 29.7969px;"><td class="align-center" style="border-width: 1px; height: 29.7969px;">**Panel name**</td><td class="align-center" style="border-width: 1px; height: 29.7969px;">**Description**</td><td class="align-center" style="border-width: 1px; height: 29.7969px;">**<span style="color: rgb(0, 0, 0);">Note</span>**</td></tr><tr style="height: 10px;"><td style="height: 10px; border-width: 1px;">Scene Tree</td><td style="height: 10px; border-width: 1px;">All nodes in the scene are displayed in a tree format.

You can add, edit, delete, etc. nodes.

</td><td class="align-center" style="border-width: 1px; height: 10px;"><span style="color: rgb(230, 126, 35);">[\[ Detail \]](https://doc316en.candera.eu/books/scene-design/chapter/scene-tree-editing)</span></td></tr><tr style="height: 35.3906px;"><td style="height: 35.3906px; border-width: 1px;">Search</td><td style="height: 35.3906px; border-width: 1px;">Displays trace information about the Scene Composer.

</td><td class="align-center" style="border-width: 1px; height: 35.3906px;"><span style="color: rgb(230, 126, 35);">[\[ Detail \]](https://doc316en.candera.eu/books/solution-handling/page/searching)</span></td></tr><tr style="height: 35.3906px;"><td style="height: 35.3906px; border-width: 1px;">Output</td><td style="height: 35.3906px; border-width: 1px;">Displays trace information about the Scene Composer.

</td><td class="align-center" style="border-width: 1px; height: 35.3906px;"><span style="color: rgb(230, 126, 35);">[\[ Detail \]](https://doc316en.candera.eu/books/solution-handling/page/output)</span></td></tr><tr style="height: 35.3906px;"><td style="height: 35.3906px; border-width: 1px;">Problems</td><td style="height: 35.3906px; border-width: 1px;">Displays errors/warnings/messages.

</td><td class="align-center" style="border-width: 1px; height: 35.3906px;"><span style="color: rgb(230, 126, 35);">[\[ Detail \]](https://doc316en.candera.eu/books/solution-handling/page/problems-browser)</span></td></tr><tr style="height: 35.3906px;"><td style="height: 35.3906px; border-width: 1px;">Text Size Report</td><td style="height: 35.3906px; border-width: 1px;">Displays a text size report.

</td><td class="align-center" style="border-width: 1px; height: 35.3906px;"><span style="color: rgb(230, 126, 35);">[\[ Detail \]](https://doc316en.candera.eu/books/solution-handling/page/text-size-report-KPG)</span></td></tr></tbody></table>


#### 3. Scene Editor/State Machine Editor/ Fusion etc.

<table border="1" id="bkmrk-%E3%82%B7%E3%83%BC%E3%83%B3%E3%82%A8%E3%83%87%E3%82%A3%E3%82%BF%E3%83%BC-%E8%A9%B3%E7%B4%B0%E3%81%AF%E3%80%81%E3%80%8C2d%E3%82%B7%E3%83%BC%E3%83%B3%E3%82%A8" style="border-collapse: collapse; width: 800px; height: 398.453px; border-width: 1px;"><colgroup><col style="width: 210px;"></col><col style="width: 495px;"></col><col style="width: 94px;"></col></colgroup><tbody><tr style="background-color: rgb(230, 126, 35); height: 29.7969px;"><td class="align-center" style="border-width: 1px; height: 29.7969px;">**Panel name**</td><td class="align-center" style="border-width: 1px; height: 29.7969px;">**Description**</td><td class="align-center" style="border-width: 1px; height: 29.7969px;">**<span style="color: rgb(0, 0, 0);">Note</span>**</td></tr><tr style="height: 40.75px;"><td style="height: 40.75px; border-width: 1px;">Scene Editor</td><td style="height: 40.75px; border-width: 1px;">The main panel of Scene Composer allows you to view and edit the nodes contained in a scene.

</td><td class="align-center" style="border-width: 1px; height: 40.75px;"><span style="color: rgb(230, 126, 35);">[\[ 2D Scene \]](https://doc316en.candera.eu/books/scene-design/page/2d-scene-editor)  
[\[ 3D Scene \]](https://doc316en.candera.eu/books/scene-design/page/3d-scene-editor)</span></td></tr><tr style="height: 57.7812px;"><td style="height: 57.7812px; border-width: 1px;">Fusion</td><td style="height: 57.7812px; border-width: 1px;">Various actions can be configured by adding Fusion nodes to the nodes selected in the scene tree.

</td><td class="align-center" style="border-width: 1px; height: 57.7812px;"><span style="color: rgb(230, 126, 35);">[\[ Detail \]](https://doc316en.candera.eu/books/fusion/page/fusion-editor-ui)</span></td></tr><tr style="height: 35.3906px;"><td style="height: 35.3906px; border-width: 1px;">State Machine Editor</td><td style="height: 35.3906px; border-width: 1px;">You can edit the selected state machine in the Solution Explorer.

</td><td class="align-center" style="border-width: 1px; height: 35.3906px;"><span style="color: rgb(230, 126, 35);">[\[ Detail \]](https://doc316en.candera.eu/books/state-machine)</span></td></tr><tr style="height: 35.3906px;"><td style="height: 35.3906px; border-width: 1px;">Shader Editor</td><td style="height: 35.3906px; border-width: 1px;">You can edit the selected shaders in the Shaders panel.

</td><td class="align-center" style="border-width: 1px; height: 35.3906px;"><span style="color: rgb(230, 126, 35);">[\[ Detail \]](https://doc316en.candera.eu/link/146#bkmrk-shader-editor%C2%A0)</span></td></tr><tr style="height: 35.3906px;"><td style="height: 35.3906px; border-width: 1px;">Script Editor</td><td style="height: 35.3906px; border-width: 1px;">You can edit the selected script in the Solution Explorer or in the Toolbox.

</td><td class="align-center" style="border-width: 1px; height: 35.3906px;"><span style="color: rgb(230, 126, 35);">[\[ Detail \]](https://doc316en.candera.eu/books/scripting/page/script-editor-and-script-validation)</span></td></tr><tr style="height: 35.3906px;"><td style="height: 35.3906px; border-width: 1px;">SCML Editor</td><td style="height: 35.3906px; border-width: 1px;">You can edit the SCML.

</td><td class="align-center" style="border-width: 1px; height: 35.3906px;"><span style="color: rgb(230, 126, 35);">[\[ Detail \]](https://doc316en.candera.eu/books/scenecomposer-markup-language/page/scml-editor)</span></td></tr><tr style="height: 35.3906px;"><td style="height: 35.3906px; border-width: 1px;">Appearance Editor</td><td style="height: 35.3906px; border-width: 1px;">You can edit node attachment templates.

</td><td class="align-center" style="border-width: 1px; height: 35.3906px;"><span style="color: rgb(230, 126, 35);">[\[ Detail \]](https://doc316en.candera.eu/link/132#bkmrk-appearance-editor)</span></td></tr><tr style="height: 35.3906px;"><td style="height: 35.3906px; border-width: 1px;">Graph Dependencies</td><td style="height: 35.3906px; border-width: 1px;">Visualize the dependencies of the nodes in the scene tree.

</td><td class="align-center" style="border-width: 1px; height: 35.3906px;"><span style="color: rgb(230, 126, 35);">[\[ Detail \]](https://doc316en.candera.eu/books/scene-design/page/usage-and-dependencies)</span></td></tr><tr style="height: 57.7812px;"><td style="height: 57.7812px; border-width: 1px;">Transition Rules Editor

/Transition Execution

</td><td style="height: 57.7812px; border-width: 1px;">Transitions between scenes can be set up.

</td><td class="align-center" style="border-width: 1px; height: 57.7812px;"><span style="color: rgb(230, 126, 35);">[\[ Detail \]](https://doc316en.candera.eu/link/1194#bkmrk-page-title)</span></td></tr><tr><td style="border-width: 1px;">Player/CGIPane

</td><td style="border-width: 1px;">The Embedded Player validates solutions created with Scene Composer.

</td><td class="align-center" style="border-width: 1px;"><span style="color: rgb(230, 126, 35);">[\[ Detail \]](https://doc316en.candera.eu/books/scene-design/page/embedded-player)</span></td></tr></tbody></table>


#### 4. Toolbox/Render Targets etc.

<table border="1" id="bkmrk-%E3%83%84%E3%83%BC%E3%83%AB%E3%83%9C%E3%83%83%E3%82%AF%E3%82%B9-%E3%82%B7%E3%83%BC%E3%83%B3%E3%81%AA%E3%81%A9%E3%81%AB%E8%BF%BD%E5%8A%A0%E5%8F%AF%E8%83%BD%E3%81%AA%E3%82%A2" style="border-collapse: collapse; width: 800px; border-width: 1px;"><colgroup><col style="width: 164px;"></col><col style="width: 530px;"></col><col style="width: 105px;"></col></colgroup><tbody><tr style="background-color: rgb(230, 126, 35);"><td class="align-center" style="border-width: 1px; height: 29.7969px;">**Panel name**</td><td class="align-center" style="border-width: 1px; height: 29.7969px;">**Description**</td><td class="align-center" style="border-width: 1px; height: 29.7969px;">**<span style="color: rgb(0, 0, 0);">Note</span>**</td></tr><tr><td style="border-width: 1px;">Toolbox</td><td style="border-width: 1px;">Items (controls, nodes, effects, behaviors, and scripts) that can be added to scenes and other objects are listed.

</td><td class="align-center" style="border-width: 1px;"><span style="color: rgb(230, 126, 35);">[\[ 2D Toolbox \]](https://doc316en.candera.eu/link/147#bkmrk-2d-toolbox)  
[\[ 3D Toolbox \]](https://doc316en.candera.eu/link/130#bkmrk-3d-toolbox)</span></td></tr><tr><td style="border-width: 1px;">RenderTargets</td><td style="border-width: 1px;">Create/edit new render targets.

</td><td class="align-center" style="border-width: 1px;"><span style="color: rgb(230, 126, 35);">[\[ Detail \]](https://doc316en.candera.eu/books/display-configuration)</span>

</td></tr><tr><td style="border-width: 1px;">Tempates</td><td style="border-width: 1px;">View templates included in the solution.

</td><td class="align-center" style="border-width: 1px;"><span style="color: rgb(230, 126, 35);">[\[ Detail \]](https://doc316en.candera.eu/link/1193#bkmrk-page-title)</span>

</td></tr><tr><td style="border-width: 1px;">Diagram Bird's Eye</td><td style="border-width: 1px;">View a bird's eye view of the Fusion diagram or the entire State Machine Editor.

</td><td class="align-center" style="border-width: 1px;"><span style="color: rgb(230, 126, 35);">[\[ Detail \]](https://doc316en.candera.eu/books/solution-handling/page/diagram-birds-eye)</span>

</td></tr><tr><td style="border-width: 1px;">Scopes</td><td style="border-width: 1px;">Set up camera culling and light culling.

</td><td class="align-center" style="border-width: 1px;"><span style="color: rgb(230, 126, 35);">[\[ Detail \]](https://doc316en.candera.eu/books/scene-design/chapter/scoping)</span>

</td></tr><tr><td style="border-width: 1px;">Shaders</td><td style="border-width: 1px;">Shaders included in the solution are displayed.

</td><td class="align-center" style="border-width: 1px;"><span style="color: rgb(230, 126, 35);">[\[ Detail \]](https://doc316en.candera.eu/books/scene-design/page/shader-configuration)</span>

</td></tr><tr><td style="border-width: 1px;">Render Statistics</td><td style="border-width: 1px;">A performance indicator for the display is shown during rendering.

</td><td class="align-center" style="border-width: 1px;"><span style="color: rgb(230, 126, 35);">[\[ Detail \]](https://doc316en.candera.eu/books/display-configuration/page/display-renderer-statistics)</span>

</td></tr><tr><td style="border-width: 1px;">Text Search</td><td style="border-width: 1px;">This panel allows you to search for text contained in the solution or selected scenes.

</td><td style="border-width: 1px;"><span style="color: rgb(230, 126, 35);">[\[ Detail \]](https://doc316en.candera.eu/link/16#bkmrk-text-search)</span>

</td></tr></tbody></table>


#### 5. Properties

Here displays the properties of the selected item in the Solution Explorer, scene tree, and various editors. You can also edit the value of each property.

#### Animation Panels

The animation-related panel appears when \[ Animation Design \] is enabled via the mode-switching button on the toolbar.
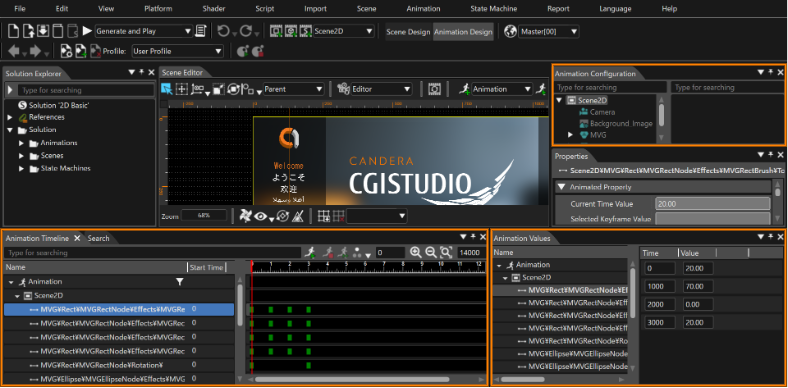
<div drawio-diagram="7857"><img src="https://doc316en.candera.eu/uploads/images/drawio/2025-02/drawing-4-1738545071.png" alt=""/></div>

<table border="1" id="bkmrk-%E3%82%A2%E3%83%8B%E3%83%A1%E3%83%BC%E3%82%B7%E3%83%A7%E3%83%B3%E3%82%BF%E3%82%A4%E3%83%A0%E3%83%A9%E3%82%A4%E3%83%B3-%E3%82%A2%E3%83%8B%E3%83%A1%E3%83%BC%E3%82%B7%E3%83%A7" style="border-collapse: collapse; width: 800px; border-width: 1px;"><colgroup><col style="width: 200px;"></col><col style="width: 525px;"></col><col style="width: 74px;"></col></colgroup><tbody><tr style="background-color: rgb(230, 126, 35);"><td class="align-center" style="border-width: 1px; height: 29.7969px;">**Panel name**</td><td class="align-center" style="border-width: 1px; height: 29.7969px;">**Description**</td><td class="align-center" style="border-width: 1px; height: 29.7969px;">**<span style="color: rgb(0, 0, 0);">Note</span>**</td></tr><tr><td style="border-width: 1px;">Animation Timeline</td><td style="border-width: 1px;">Graphically view or edit animation-related settings.

</td><td class="align-center" style="border-width: 1px;"><span style="color: rgb(230, 126, 35);">[\[ Detail \]](https://doc316en.candera.eu/books/animation-design/page/timeline-editor)</span>

</td></tr><tr><td style="border-width: 1px;">Animation Values</td><td style="border-width: 1px;">View or edit animation-related settings with information in text format.

</td><td class="align-center" style="border-width: 1px;"><span style="color: rgb(230, 126, 35);">[\[ Detail \]](https://doc316en.candera.eu/books/animation-design/page/animation-values-keyframes)</span>

</td></tr><tr><td style="border-width: 1px;">Animation Configuration</td><td style="border-width: 1px;">Nodes in the solution are displayed in a tree format, with only the nodes related to the active animation highlighted.

</td><td class="align-center" style="border-width: 1px;"><span style="color: rgb(230, 126, 35);">[\[ Detail \]](https://doc316en.candera.eu/link/17#bkmrk-animation-configurat)</span></td></tr></tbody></table>

#### Other panels

<table border="1" id="bkmrk-%E3%83%A9%E3%82%A4%E3%83%96%E3%83%97%E3%83%AC%E3%83%93%E3%83%A5%E3%83%BC-candera%E3%83%AD%E3%82%AE%E3%83%B3%E3%82%B0" style="border-collapse: collapse; width: 800px; border-width: 1px; height: 194.531px;"><colgroup><col style="width: 203px;"></col><col style="width: 522px;"></col><col style="width: 74px;"></col></colgroup><tbody><tr style="background-color: rgb(230, 126, 35); height: 29.7969px;"><td class="align-center" style="border-width: 1px; height: 29.7969px;">**Panel name**</td><td class="align-center" style="border-width: 1px; height: 29.7969px;">**Description**</td><td class="align-center" style="border-width: 1px; height: 29.7969px;">**<span style="color: rgb(0, 0, 0);">Note</span>**</td></tr><tr style="height: 23.1719px;"><td style="border-width: 1px; height: 23.1719px;">Live Preview

</td><td style="border-width: 1px; height: 23.1719px;">The definition of the data binding used in the selected scene can be displayed. You can also simulate the behavior of data binding by dynamically setting values for the definitions.

</td><td class="align-center" style="border-width: 1px; height: 23.1719px;"><span style="color: rgb(230, 126, 35);">[\[ Detail \]](https://doc316en.candera.eu/link/100#bkmrk-%E3%83%A9%E3%82%A4%E3%83%96%E3%83%97%E3%83%AC%E3%83%93%E3%83%A5%E3%83%BC%E3%83%91%E3%83%8D%E3%83%AB)</span>

</td></tr><tr style="height: 35.3906px;"><td style="border-width: 1px; height: 35.3906px;">Candera Logging

</td><td style="border-width: 1px; height: 35.3906px;">Trace information about the Candera Graphic Engine is displayed.

</td><td class="align-center" style="border-width: 1px; height: 35.3906px;"><span style="color: rgb(230, 126, 35);">[\[ Detail \]](https://doc316en.candera.eu/books/solution-handling/page/candera-logging)</span>

</td></tr><tr style="height: 35.3906px;"><td style="border-width: 1px; height: 35.3906px;">Widgets</td><td style="border-width: 1px; height: 35.3906px;">User custom widgets can be used.  
</td><td class="align-center" style="border-width: 1px; height: 35.3906px;"><span style="color: rgb(230, 126, 35);">[\[ Detail \]](https://doc316en.candera.eu/link/200#bkmrk-widgets-panel)</span></td></tr><tr style="height: 35.3906px;"><td style="border-width: 1px; height: 35.3906px;">Render Order Bins</td><td style="border-width: 1px; height: 35.3906px;">Manage the rendering order in a 3D scene.  
</td><td class="align-center" style="border-width: 1px; height: 35.3906px;"><span style="color: rgb(230, 126, 35);">[\[ Detail \]](https://doc316en.candera.eu/link/132#bkmrk-render-order-bins)</span></td></tr></tbody></table>

---

# CGI Panel Overview

The CGI Panel (Player) is an application which provides insides into a generic CGI Studio application driven by the courier messaging framework. It also provides samples of several features. These features are core components like showing or hiding views or trigger animations but also sample implementation of models with databinding.

On top of that, the CGI Panel (Player) shall be an application to test and play around with an asset and the functionality of the framework itself. The focus is not on the customer specific logic but on the core logic of the customer’s specific asset. Therefore, some of the content within the application is not required for customer made applications. Especially the Features and Sample Components folder.

For more information on CGI Panel, please refer to this <span style="color:rgb(230,126,35);">[Chapter](https://doc316en.candera.eu/books/player)</span>.

# Controls and Behaviors

#### Controls and Behaviors

A Control is a reusable structure for a control that can have specific functionality. This means that a Control can exist of Behaviors (or Widgets). It is recommended that a Control is composed of Behaviors instead of Widgets because Behaviors are more flexible. There is no way to implement a Control as its functionality is delegated to the Behaviors it consists of. A Control is created in SceneComposer only while a Behavior must be implemented. It is possible to expose the properties of a Behavior to the Control which makes them public in the scene in which the Control exists.

More detailed information about Controls and Behaviors can be found in chapter [<span style="color:rgb(230,126,35);">Controls and Behaviors.</span>](https://doc316en.candera.eu/books/controls-and-behaviors)

#### Predefined Controls

SceneComposer comes with a variety of predefined Controls. They are placed in the Construction Kit which is referenced in every sample Solution. They consist of HMI controls that allow to design a user interface in a simple way. Controls for Cluster- and IVI-HMIs exist. The IVI-Controls even react on touch-input. Sample Controls for IVI use cases are a button, list, slider, check-box and radio button. For Cluster-HMIs, Controls for telltales, progress-bars and gauges exist, for instance.

For a complete list of controls please refer to <span style="color:rgb(230,126,35);">[Predefined Controls](https://doc316en.candera.eu/books/controls-and-behaviors/chapter/predefined-controls)</span>.

<div drawio-diagram="6831"><img src="https://doc316en.candera.eu/uploads/images/drawio/2024-09/drawing-5-1726816811.png" alt="drawing-5-1726816811.png"/></div>

#### Predefined Behaviors

SceneComposer also includes a huge variety of predefined Behaviors in order to add dynamics to a static scene structure. Behaviors can easily be used in Scene-Composer by people without any coding knowledge. With their configurable properties they can be adapted to apply in multiple different scenarios. Reacting on a user's input or setting a timer or a condition for a certain action, all those things can be configured using the predefined behaviors that are included in the Construction Kit that comes with CGI Studio SceneComposer. For a complete list of behaviors please refer to <span style="color:rgb(230,126,35);">[Predefined Behaviors](https://doc316en.candera.eu/books/controls-and-behaviors/chapter/predefined-behaviors)</span>.

<div drawio-diagram="6832"><img src="https://doc316en.candera.eu/uploads/images/drawio/2024-09/drawing-5-1726816874.png" alt="drawing-5-1726816874.png"/></div>

<div class="contents" id="bkmrk--0"><div class="contents"><div class="textblock">---

</div></div></div>

# Quick Start Guide

The purpose of this tutorial is to explain how to create a basic dashboard cluster solution with CGI Studio Scene Composer and how to simulate it with CGI Player.

# Creating a new Solution

<span style="color: rgb(0, 0, 0);">The first step is to create a new solution with Scene Composer. A solution is a project file containing resources for a single project. Selecting a template makes it easy to create a new Solution.</span>

1. <span data-dl-original="true" data-dl-translated="true" data-dl-uid="50" style="color: rgb(0, 0, 0);"><span data-dl-original="true" data-dl-translated="true" data-dl-uid="51">Double-click on the Empty template in Samples and Templates.</span></span>
    - <span data-dl-original="true" data-dl-translated="true" data-dl-uid="52" style="color: rgb(0, 0, 0);"><span data-dl-original="true" data-dl-translated="true" data-dl-uid="52"><span data-dl-original="true" data-dl-translated="true" data-dl-uid="53"><span data-dl-original="true" data-dl-translated="true" data-dl-uid="54">Selecting an Empty template creates a solution based on the template.  
        </span></span></span></span><div drawio-diagram="5199"><img src="https://doc316en.candera.eu/uploads/images/drawio/2024-02/drawing-4-1707807542.png" alt=""/></div>
2. <span style="color: rgb(0, 0, 0);">Click the "Save solution..." icon on the toolbar or use the keyboard shortcut **Ctrl + S**.</span>
    - <span style="color: rgb(0, 0, 0);">The Windows "Save As" dialog will be opened, where you can define the location and file name for your solution.</span><p class="callout info"><span style="color: rgb(0, 0, 0);">You can also save a your solution via the menu: "File" - "Save Solution" or "File" - "Save Solution as...".</span></p>
        
        <div drawio-diagram="5633"><img src="https://doc316en.candera.eu/uploads/images/drawio/2024-04/drawing-4-1714387445.png" alt=""/></div>
3. <span style="color: rgb(0, 0, 0);">In the "Save As" dialog choose a location, enter a suitable filename and click \[Save\].</span>
    - <span style="color: rgb(0, 0, 0);">Your solution will be saved at the specified location. </span>
    - <span style="color: rgb(0, 0, 0);">This completes the creation of a new solution.</span>

# Importing resources (Smart Importer)

<span style="color: rgb(0, 0, 0);">Import contents into each scene in the solution using the Smart Importer, which uses AI to analyze Photoshop files to detect, suggest, and create controls for the Scene Composer solution. This step describes the operation of assigning appropriate controls to images on a resource using the Smart Importer.</span>

#### <span style="color: rgb(0, 0, 0);">Gauge Control</span>

1. <span style="color: rgb(0, 0, 0);">From the menu bar, select "Import" and then "Smart Importer &gt; From Local File...", select the resource to be imported</span>
    - <span style="color: rgb(0, 0, 0);">A file selection dialog will be opened.</span>  
        <p class="callout info"><span style="color: rgb(0, 0, 0);">If your solution contains unsaved changes you will be prompted to save your solution before importing. Clicking \[OK\] in the prompt will save your solution.</span></p>
        
          
        <table border="1" class="align-center" data-dl-original="true" data-dl-translated="true" data-dl-uid="135" id="bkmrk-operational-tab-targ" style="border-collapse: collapse; width: 601px; border-width: 1px; height: 88.4001px;"><colgroup data-dl-original="true" data-dl-translated="true" data-dl-uid="136"><col data-dl-original="true" data-dl-translated="true" data-dl-uid="137" style="width: 300px;"></col><col data-dl-original="true" data-dl-translated="true" data-dl-uid="138" style="width: 300px;"></col></colgroup><tbody data-dl-original="true" data-dl-translated="true" data-dl-uid="140"><tr data-dl-original="true" data-dl-translated="true" data-dl-uid="141" style="height: 29.4667px;"><td colspan="2" data-dl-original="true" data-dl-translated="true" data-dl-uid="142" style="background-color: rgb(35, 111, 161); border-width: 1px; height: 29.4667px;"><span data-dl-original="true" data-dl-translated="true" data-dl-uid="143" style="color: rgb(0, 0, 0);">**<span data-dl-original="true" data-dl-translated="true" data-dl-uid="145"><span data-dl-original="true" data-dl-translated="true" data-dl-uid="146">Resource to be Imported</span></span>**</span></td></tr><tr data-dl-original="true" data-dl-translated="true" data-dl-uid="147" style="height: 29.4667px;"><td data-dl-original="true" data-dl-translated="true" data-dl-uid="148" style="border-width: 1px; background-color: rgb(53, 152, 219); height: 29.4667px;"><span data-dl-original="true" data-dl-translated="true" data-dl-uid="149" style="color: rgb(0, 0, 0);">**<span data-dl-original="true" data-dl-translated="true" data-dl-uid="151"><span data-dl-original="true" data-dl-translated="true" data-dl-uid="152"><span data-dl-original="true" data-dl-translated="true" data-dl-uid="226">**<span data-dl-original="true" data-dl-translated="true" data-dl-uid="228"><span data-dl-original="true" data-dl-translated="true" data-dl-uid="229">Path</span></span>**</span></span></span>**</span></td><td data-dl-original="true" data-dl-translated="true" data-dl-uid="153" style="border-width: 1px; background-color: rgb(53, 152, 219); height: 29.4667px;"><span data-dl-original="true" data-dl-translated="true" data-dl-uid="154" style="color: rgb(0, 0, 0);">**<span data-dl-original="true" data-dl-translated="true" data-dl-uid="156"><span data-dl-original="true" data-dl-translated="true" data-dl-uid="157">Filename</span></span>**</span></td></tr><tr data-dl-original="true" data-dl-translated="true" data-dl-uid="163" style="height: 29.4667px;"><td class="align-left" data-dl-original="true" data-dl-translated="true" data-dl-uid="164" style="border-width: 1px; height: 29.4667px;"><span data-dl-original="true" data-dl-translated="true" data-dl-uid="165" style="color: rgb(0, 0, 0);"><span data-dl-original="true" data-dl-translated="true" data-dl-uid="166">\\cgi\_studio\_content\\2D\\PSD\\</span></span></td><td class="align-left" data-dl-original="true" data-dl-translated="true" data-dl-uid="167" style="border-width: 1px; height: 29.4667px;"><span style="color: rgb(0, 0, 0);">Car\_Cluster.psd</span></td></tr></tbody></table>
        
          
        <div drawio-diagram="5634"><img src="https://doc316en.candera.eu/uploads/images/drawio/2024-04/drawing-4-1714387557.png" alt=""/></div>
2. <span style="color: rgb(0, 0, 0);">In the Smart Importer file selection dialog choose the resource to be imported as specified in the table below, then click \[Open\]. </span>
    - <span style="color: rgb(0, 0, 0);">The Smart Importer dialog box will be opened.</span><p class="callout info"><span style="color: rgb(0, 0, 0);">For more information on the Smart Importer dialog box, click [here.](https://doc316en.candera.eu/books/import-of-resources/page/smart-importer-ui)</span></p>
    - <span style="color: rgb(0, 0, 0);">Before clicking the \[OK\] button at the bottom of the Smart Importer dialog box, follow the configuration instructions in the steps below.</span>
3. <span style="color: rgb(0, 0, 0);"><span data-dl-original="true" data-dl-translated="true" data-dl-uid="79"><span data-dl-original="true" data-dl-translated="true" data-dl-uid="80">In the Smart Importer dialog's</span></span><span data-dl-original="true" data-dl-translated="true" data-dl-uid="79"><span data-dl-original="true" data-dl-translated="true" data-dl-uid="80"> Layer tree</span></span><span data-dl-original="true" data-dl-translated="true" data-dl-uid="79"><span data-dl-original="true" data-dl-translated="true" data-dl-uid="80"> expand "Cluster" by clicking on the white triangle on its left and select "Gauge Left".</span></span></span>
    - <span style="color: rgb(0, 0, 0);">A control list appears on the right side of the dialog, listing the available controls.</span>
    - <span style="color: rgb(0, 0, 0);">The number displayed to the right of each control indicates the AI's detection confidence for that specific item.</span>  
        <div drawio-diagram="6833"><img src="https://doc316en.candera.eu/uploads/images/drawio/2024-09/drawing-5-1726817579.png" alt=""/></div>
4. <span data-dl-original="true" data-dl-translated="true" data-dl-uid="112" style="color: rgb(0, 0, 0);"><span data-dl-original="true" data-dl-translated="true" data-dl-uid="113">In the Control list press the \[Apply\] button on the right side of the Gauge control.</span></span>
    - <span data-dl-original="true" data-dl-translated="true" data-dl-uid="115" style="color: rgb(0, 0, 0);"><span data-dl-original="true" data-dl-translated="true" data-dl-uid="116">"Gauge left" will be displayed in a different text color with a different icon. This indicates a successful assignment of a Scene Composer control.</span></span>
    - <span data-dl-original="true" data-dl-translated="true" data-dl-uid="119" style="color: rgb(0, 0, 0);"><span data-dl-original="true" data-dl-translated="true" data-dl-uid="120">The Appearance tab will be automatically selected on the right side of the dialog.  
          
        </span></span>
5. <span data-dl-original="true" data-dl-translated="true" data-dl-uid="123" style="color: rgb(0, 0, 0);"><span data-dl-original="true" data-dl-translated="true" data-dl-uid="124"><span data-dl-original="true" data-dl-translated="true" data-dl-uid="125">Configure the following settings under \[Appearance\] and \[Basic Properties\] sections of "Gauge Left".</span></span></span>
    - <span style="color: rgb(0, 0, 0);">For the specifications and specific operation for \[Appearance\] and \[Basic Properties\], please refer to [here](https://doc316en.candera.eu/link/1148#bkmrk-%E3%82%B3%E3%83%B3%E3%83%88%E3%83%AD%E3%83%BC%E3%83%AB).</span><p class="callout info"><span style="color: rgb(0, 0, 0);">If no "BackgroundImage" is set for layer mapping, the default background of the Gauge control will be used instead of the image from the Photoshop file.<span data-dl-original="true" data-dl-translated="true" data-dl-uid="131"><span data-dl-original="true" data-dl-translated="true" data-dl-uid="132"><span data-dl-original="true" data-dl-translated="true" data-dl-uid="133">  
        </span></span></span></span></p>
        
        <table border="1" class="align-center" data-dl-original="true" data-dl-translated="true" data-dl-uid="135" id="bkmrk-gauge-left-target-ta" style="border-collapse: collapse; width: 600px; border-width: 1px;"><colgroup data-dl-original="true" data-dl-translated="true" data-dl-uid="136"><col data-dl-original="true" data-dl-translated="true" data-dl-uid="137" style="width: 200px;"></col><col data-dl-original="true" data-dl-translated="true" data-dl-uid="138" style="width: 168px;"></col><col data-dl-original="true" data-dl-translated="true" data-dl-uid="139" style="width: 232px;"></col></colgroup><tbody data-dl-original="true" data-dl-translated="true" data-dl-uid="140"><tr data-dl-original="true" data-dl-translated="true" data-dl-uid="141"><td colspan="3" data-dl-original="true" data-dl-translated="true" data-dl-uid="142" style="background-color: rgb(35, 111, 161); border-width: 1px;"><span data-dl-original="true" data-dl-translated="true" data-dl-uid="143" style="color: rgb(0, 0, 0);">**<span data-dl-original="true" data-dl-translated="true" data-dl-uid="145"><span data-dl-original="true" data-dl-translated="true" data-dl-uid="146">Gauge left</span></span>**</span></td></tr><tr data-dl-original="true" data-dl-translated="true" data-dl-uid="147"><td data-dl-original="true" data-dl-translated="true" data-dl-uid="148" style="border-width: 1px; background-color: rgb(53, 152, 219);"><span data-dl-original="true" data-dl-translated="true" data-dl-uid="149" style="color: rgb(0, 0, 0);">**<span data-dl-original="true" data-dl-translated="true" data-dl-uid="151"><span data-dl-original="true" data-dl-translated="true" data-dl-uid="152"><span data-dl-original="true" data-dl-translated="true" data-dl-uid="226">**<span data-dl-original="true" data-dl-translated="true" data-dl-uid="228"><span data-dl-original="true" data-dl-translated="true" data-dl-uid="229">Target Tab</span></span>**</span></span></span>**</span></td><td data-dl-original="true" data-dl-translated="true" data-dl-uid="153" style="border-width: 1px; background-color: rgb(53, 152, 219);"><span data-dl-original="true" data-dl-translated="true" data-dl-uid="154" style="color: rgb(0, 0, 0);">**<span data-dl-original="true" data-dl-translated="true" data-dl-uid="156"><span data-dl-original="true" data-dl-translated="true" data-dl-uid="157">Target Item</span></span>**</span></td><td data-dl-original="true" data-dl-translated="true" data-dl-uid="158" style="border-width: 1px; background-color: rgb(53, 152, 219);"><span data-dl-original="true" data-dl-translated="true" data-dl-uid="159" style="color: rgb(0, 0, 0);">**<span data-dl-original="true" data-dl-translated="true" data-dl-uid="161"><span data-dl-original="true" data-dl-translated="true" data-dl-uid="162">Setting Value</span></span>**</span></td></tr><tr data-dl-original="true" data-dl-translated="true" data-dl-uid="163"><td class="align-left" data-dl-original="true" data-dl-translated="true" data-dl-uid="164" style="border-width: 1px;"><span data-dl-original="true" data-dl-translated="true" data-dl-uid="165" style="color: rgb(0, 0, 0);"><span data-dl-original="true" data-dl-translated="true" data-dl-uid="166">Appearance</span></span></td><td class="align-left" data-dl-original="true" data-dl-translated="true" data-dl-uid="167" style="border-width: 1px;">  
        </td><td class="align-left" data-dl-original="true" data-dl-translated="true" data-dl-uid="169" style="border-width: 1px;"> </td></tr><tr data-dl-original="true" data-dl-translated="true" data-dl-uid="170"><td class="align-left" colspan="3" data-dl-original="true" data-dl-translated="true" data-dl-uid="171" style="border-width: 1px; padding-left: 40px;"><span data-dl-original="true" data-dl-translated="true" data-dl-uid="172" style="color: rgb(0, 0, 0);"><span data-dl-original="true" data-dl-translated="true" data-dl-uid="173">To configure the image properties, select \[Select layers\] from the drop-down menu. This will open a dialog where the appropriate ImageLayers can be selected.  
        After selecting the image, check \[Pivot Point\].</span></span>
        
        </td></tr><tr data-dl-original="true" data-dl-translated="true" data-dl-uid="174"><td data-dl-original="true" data-dl-translated="true" data-dl-uid="175" style="border-width: 1px;"><span data-dl-original="true" data-dl-translated="true" data-dl-uid="176" style="color: rgb(0, 0, 0);"><span data-dl-original="true" data-dl-translated="true" data-dl-uid="177">  
        </span></span></td><td style="border-width: 1px; height: 57.7812px;"><span style="color: rgb(0, 0, 0);">BackgroundImage</span>
        
        </td><td style="border-width: 1px; height: 57.7812px;"><span style="color: rgb(0, 0, 0);">Scala kmh</span>
        
        <span style="color: rgb(0, 0, 0);">Gauge Background</span>
        
        <span style="color: rgb(0, 0, 0);">Pivot Point: Center (X: 209, Y: 209)</span>
        
        </td></tr><tr data-dl-original="true" data-dl-translated="true" data-dl-uid="191"><td data-dl-original="true" data-dl-translated="true" data-dl-uid="192" style="border-width: 1px;">  
        </td><td style="border-width: 1px;"><span style="color: rgb(0, 0, 0);">NeedleImage</span>
        
        </td><td style="border-width: 1px;"><span style="color: rgb(0, 0, 0);">NeedleImage</span>
        
        </td></tr><tr data-dl-original="true" data-dl-translated="true" data-dl-uid="196"><td class="align-left" colspan="3" data-dl-original="true" data-dl-translated="true" data-dl-uid="197" style="border-width: 1px;"><span data-dl-original="true" data-dl-translated="true" data-dl-uid="198" style="color: rgb(0, 0, 0);"><span data-dl-original="true" data-dl-translated="true" data-dl-uid="199">Basic Properties</span></span></td></tr><tr data-dl-original="true" data-dl-translated="true" data-dl-uid="200"><td data-dl-original="true" data-dl-translated="true" data-dl-uid="201" style="border-width: 1px;"><span data-dl-original="true" data-dl-translated="true" data-dl-uid="202" style="color: rgb(0, 0, 0);"><span data-dl-original="true" data-dl-translated="true" data-dl-uid="203">  
        </span></span></td><td data-dl-original="true" data-dl-translated="true" data-dl-uid="205" style="border-width: 1px;"><span style="color: rgb(0, 0, 0);">Name</span>
        
        <span style="color: rgb(0, 0, 0);">InputMax</span>  
        <span style="color: rgb(0, 0, 0);">RotationMax</span>
        
        </td><td data-dl-original="true" data-dl-translated="true" data-dl-uid="211" style="border-width: 1px;"><span style="color: rgb(0, 0, 0);">SpeedGauge</span>
        
        <span style="color: rgb(0, 0, 0);">240</span>  
        <span style="color: rgb(0, 0, 0);">225</span>
        
        </td></tr></tbody></table>
6. <span data-dl-original="true" data-dl-translated="true" data-dl-uid="217" style="color: rgb(0, 0, 0);"><span data-dl-original="true" data-dl-translated="true" data-dl-uid="218"><span data-dl-original="true" data-dl-translated="true" data-dl-uid="79"><span data-dl-original="true" data-dl-translated="true" data-dl-uid="80">In the Smart Importer dialog's</span></span><span data-dl-original="true" data-dl-translated="true" data-dl-uid="79"><span data-dl-original="true" data-dl-translated="true" data-dl-uid="80"> Layer tree</span></span> select the Text "000" which can be found directly below "Speed Gauge". In the Control List apply the control "Text Value" and configure its properties according to the table below.</span></span><table border="1" class="align-center" id="bkmrk-gauge-left-%E6%93%8D%E4%BD%9C%E5%AF%BE%E8%B1%A1%E3%82%BF%E3%83%96-%E6%93%8D%E4%BD%9C" style="border-collapse: collapse; width: 600px; border-width: 1px;"><colgroup><col></col><col></col><col></col></colgroup><tbody><tr><td colspan="3" data-dl-original="true" data-dl-translated="true" data-dl-uid="220" style="border-width: 1px; background-color: rgb(35, 111, 161);"><span data-dl-original="true" data-dl-translated="true" data-dl-uid="221" style="color: rgb(0, 0, 0);">**<span data-dl-original="true" data-dl-translated="true" data-dl-uid="223"><span data-dl-original="true" data-dl-translated="true" data-dl-uid="224">Gauge left</span></span>**</span></td></tr><tr><td data-dl-original="true" data-dl-translated="true" data-dl-uid="225" style="border-width: 1px; background-color: rgb(53, 152, 219);"><span data-dl-original="true" data-dl-translated="true" data-dl-uid="226" style="color: rgb(0, 0, 0);">**<span data-dl-original="true" data-dl-translated="true" data-dl-uid="228"><span data-dl-original="true" data-dl-translated="true" data-dl-uid="229">Target Tab</span></span>**</span></td><td data-dl-original="true" data-dl-translated="true" data-dl-uid="230" style="border-width: 1px; background-color: rgb(53, 152, 219);"><span data-dl-original="true" data-dl-translated="true" data-dl-uid="231" style="color: rgb(0, 0, 0);">**<span data-dl-original="true" data-dl-translated="true" data-dl-uid="233"><span data-dl-original="true" data-dl-translated="true" data-dl-uid="234"><span data-dl-original="true" data-dl-translated="true" data-dl-uid="154">**<span data-dl-original="true" data-dl-translated="true" data-dl-uid="156"><span data-dl-original="true" data-dl-translated="true" data-dl-uid="157">Target Item</span></span>**</span></span></span>**</span></td><td data-dl-original="true" data-dl-translated="true" data-dl-uid="235" style="border-width: 1px; background-color: rgb(53, 152, 219);"><span data-dl-original="true" data-dl-translated="true" data-dl-uid="236" style="color: rgb(0, 0, 0);">**<span data-dl-original="true" data-dl-translated="true" data-dl-uid="238"><span data-dl-original="true" data-dl-translated="true" data-dl-uid="239"><span data-dl-original="true" data-dl-translated="true" data-dl-uid="159">**<span data-dl-original="true" data-dl-translated="true" data-dl-uid="161"><span data-dl-original="true" data-dl-translated="true" data-dl-uid="162">Setting Value</span></span>**</span></span></span>**</span></td></tr><tr><td class="align-left" colspan="3" data-dl-original="true" data-dl-translated="true" data-dl-uid="240" style="border-width: 1px;"><span data-dl-original="true" data-dl-translated="true" data-dl-uid="241" style="color: rgb(0, 0, 0);"><span data-dl-original="true" data-dl-translated="true" data-dl-uid="242">Basic properties</span></span></td></tr><tr><td style="border-width: 1px;">  
    </td><td style="border-width: 1px;"><span style="color: rgb(0, 0, 0);">Name</span>
    
    </td><td class="align-left" style="border-width: 1px;"><span style="color: rgb(0, 0, 0);">SpeedValue</span>
    
    </td></tr></tbody></table>
7. <span data-dl-original="true" data-dl-translated="true" data-dl-uid="245" style="color: rgb(0, 0, 0);"><span data-dl-original="true" data-dl-translated="true" data-dl-uid="246"><span data-dl-original="true" data-dl-translated="true" data-dl-uid="247">Configure "Gauge Right" in the same manner by following the instructions from step 3 through step 7. Apply the settings provided in the table below.</span></span></span>
    - <span data-dl-original="true" data-dl-translated="true" data-dl-uid="248" style="color: rgb(0, 0, 0);"><span data-dl-original="true" data-dl-translated="true" data-dl-uid="249"><span data-dl-original="true" data-dl-translated="true" data-dl-uid="250">The configuration of the Gauge controls is now complete.</span></span></span><table border="1" class="align-center" id="bkmrk-gauge%E3%82%B3%E3%83%B3%E3%83%88%E3%83%AD%E3%83%BC%E3%83%AB-%E6%93%8D%E4%BD%9C%E5%AF%BE%E8%B1%A1%E3%82%BF%E3%83%96-%E6%93%8D" style="border-collapse: collapse; width: 600px; border-width: 1px;"><colgroup><col style="width: 200px;"></col><col style="width: 166px;"></col><col style="width: 234px;"></col></colgroup><tbody><tr><td colspan="3" data-dl-original="true" data-dl-translated="true" data-dl-uid="252" style="border-width: 1px; background-color: rgb(35, 111, 161);"><span data-dl-original="true" data-dl-translated="true" data-dl-uid="253" style="color: rgb(0, 0, 0);">**<span data-dl-original="true" data-dl-translated="true" data-dl-uid="255"><span data-dl-original="true" data-dl-translated="true" data-dl-uid="256">Gauge Control</span></span>**</span></td></tr><tr><td data-dl-original="true" data-dl-translated="true" data-dl-uid="257" style="border-width: 1px; background-color: rgb(53, 152, 219);"><span data-dl-original="true" data-dl-translated="true" data-dl-uid="258" style="color: rgb(0, 0, 0);">**<span data-dl-original="true" data-dl-translated="true" data-dl-uid="260"><span data-dl-original="true" data-dl-translated="true" data-dl-uid="261">Target Tab</span></span>**</span></td><td data-dl-original="true" data-dl-translated="true" data-dl-uid="262" style="border-width: 1px; background-color: rgb(53, 152, 219);"><span data-dl-original="true" data-dl-translated="true" data-dl-uid="263" style="color: rgb(0, 0, 0);">**<span data-dl-original="true" data-dl-translated="true" data-dl-uid="265"><span data-dl-original="true" data-dl-translated="true" data-dl-uid="266"><span data-dl-original="true" data-dl-translated="true" data-dl-uid="154">**<span data-dl-original="true" data-dl-translated="true" data-dl-uid="156"><span data-dl-original="true" data-dl-translated="true" data-dl-uid="157">Target Item</span></span>**</span></span></span>**</span></td><td data-dl-original="true" data-dl-translated="true" data-dl-uid="267" style="border-width: 1px; background-color: rgb(53, 152, 219);"><span data-dl-original="true" data-dl-translated="true" data-dl-uid="268" style="color: rgb(0, 0, 0);">**<span data-dl-original="true" data-dl-translated="true" data-dl-uid="270"><span data-dl-original="true" data-dl-translated="true" data-dl-uid="271"><span data-dl-original="true" data-dl-translated="true" data-dl-uid="159">**<span data-dl-original="true" data-dl-translated="true" data-dl-uid="161"><span data-dl-original="true" data-dl-translated="true" data-dl-uid="162">Setting Value</span></span>**</span></span></span>**</span></td></tr><tr><td class="align-left" data-dl-original="true" data-dl-translated="true" data-dl-uid="272" style="border-width: 1px;"><span data-dl-original="true" data-dl-translated="true" data-dl-uid="273" style="color: rgb(0, 0, 0);"><span data-dl-original="true" data-dl-translated="true" data-dl-uid="274">Appearance</span></span></td><td class="align-left" style="border-width: 1px;">  
        </td><td class="align-left" style="border-width: 1px;"> </td></tr><tr><td class="align-left" colspan="3" data-dl-original="true" data-dl-translated="true" data-dl-uid="275" style="border-width: 1px; padding-left: 40px;"><span data-dl-original="true" data-dl-translated="true" data-dl-uid="276" style="color: rgb(0, 0, 0);"><span data-dl-original="true" data-dl-translated="true" data-dl-uid="277"><span data-dl-original="true" data-dl-translated="true" data-dl-uid="172"><span data-dl-original="true" data-dl-translated="true" data-dl-uid="173">To configure the image properties, select \[Select layers\] from the drop-down menu. This will open a dialog where the appropriate ImageLayers can be selected.  
        After selecting the image, check \[Pivot Point\].</span></span></span></span></td></tr><tr><td style="border-width: 1px;">  
        </td><td style="border-width: 1px;"><span style="color: rgb(0, 0, 0);">BackgroundImage</span>
        
        </td><td style="border-width: 1px;"><span style="color: rgb(0, 0, 0);">Scala rpm</span>
        
        <span style="color: rgb(0, 0, 0);">Gauge Background</span>
        
        <span style="color: rgb(0, 0, 0);">Pivot Point: Center (X: 209, Y: 209)</span>
        
        </td></tr><tr><td style="border-width: 1px;">  
        </td><td style="border-width: 1px;"><span style="color: rgb(0, 0, 0);">NeedleImage</span>
        
        </td><td style="border-width: 1px;"><span style="color: rgb(0, 0, 0);">NeedleImage</span>
        
        </td></tr><tr><td class="align-left" colspan="3" data-dl-original="true" data-dl-translated="true" data-dl-uid="289" style="border-width: 1px;"><span data-dl-original="true" data-dl-translated="true" data-dl-uid="290" style="color: rgb(0, 0, 0);"><span data-dl-original="true" data-dl-translated="true" data-dl-uid="291"><span data-dl-original="true" data-dl-translated="true" data-dl-uid="198"><span data-dl-original="true" data-dl-translated="true" data-dl-uid="199">Basic Properties</span></span></span></span></td></tr><tr><td style="border-width: 1px;">  
        </td><td style="border-width: 1px;"><span style="color: rgb(0, 0, 0);">Name</span>
        
        <span style="color: rgb(0, 0, 0);">InputMax</span>
        
        </td><td class="align-left" style="border-width: 1px;"><span style="color: rgb(0, 0, 0);">RPMGauge</span>  
        <span style="color: rgb(0, 0, 0);">8000</span>
        
        </td></tr><tr><td colspan="3" data-dl-original="true" data-dl-translated="true" data-dl-uid="298" style="border-width: 1px; background-color: rgb(35, 111, 161);"><span style="color: rgb(0, 0, 0);">**<span data-dl-original="true" data-dl-translated="true" data-dl-uid="300">Text Value control</span>**</span></td></tr><tr><td class="align-left" colspan="3" data-dl-original="true" data-dl-translated="true" data-dl-uid="301" style="border-width: 1px;"><span data-dl-original="true" data-dl-translated="true" data-dl-uid="302" style="color: rgb(0, 0, 0);"><span data-dl-original="true" data-dl-translated="true" data-dl-uid="303"><span data-dl-original="true" data-dl-translated="true" data-dl-uid="198"><span data-dl-original="true" data-dl-translated="true" data-dl-uid="199">Basic Properties</span></span></span></span></td></tr><tr><td style="border-width: 1px;">  
        </td><td style="border-width: 1px;"><span style="color: rgb(0, 0, 0);">Name</span>
        
        </td><td style="border-width: 1px;"><span style="color: rgb(0, 0, 0);">RPMValue</span>
        
        </td></tr></tbody></table>

#### <span data-dl-original="true" data-dl-translated="true" data-dl-uid="307" style="color: rgb(0, 0, 0);"><span data-dl-original="true" data-dl-translated="true" data-dl-uid="308">Duplicate and Configure Scenes</span></span>  


<span style="color: rgb(0, 0, 0);">In the Smart Importer's Layer Tree expand the Cluster &gt; Middle group. There you can see that the photoshop file to be imported provides 3 scenarios for the middle part: </span>

- <span style="color: rgb(0, 0, 0);">Car</span>
- <span style="color: rgb(0, 0, 0);">Car Status</span>
- <span style="color: rgb(0, 0, 0);">Incoming Call. </span>

<span style="color: rgb(0, 0, 0);">The goal of the following steps is to create separate scenes for each of the 3 scenarios.</span>

1. <span data-dl-original="true" data-dl-translated="true" data-dl-uid="313" style="color: rgb(0, 0, 0);"><span data-dl-original="true" data-dl-translated="true" data-dl-uid="314">In the Smart Importer's "Import Settings" section under "Scenes" right-click on the Car\_Cluster scene and choose \[Duplicate Scene...\] from the context menu.</span></span>
    - <span data-dl-original="true" data-dl-translated="true" data-dl-uid="315" style="color: rgb(0, 0, 0);"><span data-dl-original="true" data-dl-translated="true" data-dl-uid="315"><span data-dl-original="true" data-dl-translated="true" data-dl-uid="316"><span data-dl-original="true" data-dl-translated="true" data-dl-uid="317">The \[Clone Scene...\] dialog will be opened.  
        </span></span></span></span><div drawio-diagram="5203"><img src="https://doc316en.candera.eu/uploads/images/drawio/2024-02/drawing-4-1707873213.png" alt=""/></div>
2. <span data-dl-original="true" data-dl-translated="true" data-dl-uid="324" style="color: rgb(0, 0, 0);"><span data-dl-original="true" data-dl-translated="true" data-dl-uid="325"><span data-dl-original="true" data-dl-translated="true" data-dl-uid="326"><span data-dl-original="true" data-dl-translated="true" data-dl-uid="327"><span data-dl-original="true" data-dl-translated="true" data-dl-uid="328"><span data-dl-original="true" data-dl-translated="true" data-dl-uid="329"><span data-dl-original="true" data-dl-translated="true" data-dl-uid="330"><span data-dl-original="true" data-dl-translated="true" data-dl-uid="331">In the "Clone Scene..." dialog enter the scene name as specified in the table below, then click \[OK\].</span></span></span></span></span></span></span></span>
    - <span data-dl-original="true" data-dl-translated="true" data-dl-uid="324" style="color: rgb(0, 0, 0);"><span data-dl-original="true" data-dl-translated="true" data-dl-uid="325"><span data-dl-original="true" data-dl-translated="true" data-dl-uid="326"><span data-dl-original="true" data-dl-translated="true" data-dl-uid="327"><span data-dl-original="true" data-dl-translated="true" data-dl-uid="328"><span data-dl-original="true" data-dl-translated="true" data-dl-uid="329"><span data-dl-original="true" data-dl-translated="true" data-dl-uid="330"><span data-dl-original="true" data-dl-translated="true" data-dl-uid="331">A new scene configuration has been created.</span></span></span></span></span></span></span></span>
    - <span data-dl-original="true" data-dl-translated="true" data-dl-uid="324" style="color: rgb(0, 0, 0);"><span data-dl-original="true" data-dl-translated="true" data-dl-uid="325"><span data-dl-original="true" data-dl-translated="true" data-dl-uid="326"><span data-dl-original="true" data-dl-translated="true" data-dl-uid="327"><span data-dl-original="true" data-dl-translated="true" data-dl-uid="328"><span data-dl-original="true" data-dl-translated="true" data-dl-uid="329"><span data-dl-original="true" data-dl-translated="true" data-dl-uid="330"><span data-dl-original="true" data-dl-translated="true" data-dl-uid="331">In the "Import Settings" tab the new "Car\_Status" scene will be displayed and actively selected.</span></span></span></span></span></span></span></span>
    - <span data-dl-original="true" data-dl-translated="true" data-dl-uid="324" style="color: rgb(0, 0, 0);"><span data-dl-original="true" data-dl-translated="true" data-dl-uid="325"><span data-dl-original="true" data-dl-translated="true" data-dl-uid="326"><span data-dl-original="true" data-dl-translated="true" data-dl-uid="327"><span data-dl-original="true" data-dl-translated="true" data-dl-uid="328"><span data-dl-original="true" data-dl-translated="true" data-dl-uid="329"><span data-dl-original="true" data-dl-translated="true" data-dl-uid="330"><span data-dl-original="true" data-dl-translated="true" data-dl-uid="331">The Preview window displays the Car\_Status scene.</span></span></span></span></span></span></span></span>
    - <span data-dl-original="true" data-dl-translated="true" data-dl-uid="324" style="color: rgb(0, 0, 0);"><span data-dl-original="true" data-dl-translated="true" data-dl-uid="325"><span data-dl-original="true" data-dl-translated="true" data-dl-uid="326"><span data-dl-original="true" data-dl-translated="true" data-dl-uid="327"><span data-dl-original="true" data-dl-translated="true" data-dl-uid="328"><span data-dl-original="true" data-dl-translated="true" data-dl-uid="329"><span data-dl-original="true" data-dl-translated="true" data-dl-uid="330"><span data-dl-original="true" data-dl-translated="true" data-dl-uid="331">The Layer tree displays the Car\_Status scene's layers.</span></span></span></span></span></span></span></span><table border="1" class="align-center" id="bkmrk-clone-scenes...-prop" style="border-collapse: collapse; width: 601px; border-width: 1px;"><colgroup><col style="width: 300px;"></col><col style="width: 300px;"></col></colgroup><tbody><tr><td colspan="2" data-dl-original="true" data-dl-translated="true" data-dl-uid="252" style="border-width: 1px; background-color: rgb(35, 111, 161);"><span data-dl-original="true" data-dl-translated="true" data-dl-uid="253" style="color: rgb(0, 0, 0);">**<span data-dl-original="true" data-dl-translated="true" data-dl-uid="255"><span data-dl-original="true" data-dl-translated="true" data-dl-uid="256">Clone Scenes...</span></span>**</span></td></tr><tr><td data-dl-original="true" data-dl-translated="true" data-dl-uid="257" style="border-width: 1px; background-color: rgb(53, 152, 219);"><span data-dl-original="true" data-dl-translated="true" data-dl-uid="258" style="color: rgb(0, 0, 0);">**<span data-dl-original="true" data-dl-translated="true" data-dl-uid="260"><span data-dl-original="true" data-dl-translated="true" data-dl-uid="261">Property</span></span>**</span></td><td data-dl-original="true" data-dl-translated="true" data-dl-uid="262" style="border-width: 1px; background-color: rgb(53, 152, 219);"><span data-dl-original="true" data-dl-translated="true" data-dl-uid="263" style="color: rgb(0, 0, 0);">**<span data-dl-original="true" data-dl-translated="true" data-dl-uid="265"><span data-dl-original="true" data-dl-translated="true" data-dl-uid="266"><span data-dl-original="true" data-dl-translated="true" data-dl-uid="154">**<span data-dl-original="true" data-dl-translated="true" data-dl-uid="156"><span data-dl-original="true" data-dl-translated="true" data-dl-uid="157">Value</span></span>**</span></span></span>**</span></td></tr><tr><td class="align-left" data-dl-original="true" data-dl-translated="true" data-dl-uid="272" style="border-width: 1px;"><span data-dl-original="true" data-dl-translated="true" data-dl-uid="273" style="color: rgb(0, 0, 0);"><span data-dl-original="true" data-dl-translated="true" data-dl-uid="274">Name</span></span></td><td class="align-left" style="border-width: 1px;"><span style="color: rgb(0, 0, 0);">Car\_Status</span></td></tr></tbody></table>
        
        <span data-dl-original="true" data-dl-translated="true" data-dl-uid="324" style="color: rgb(0, 0, 0);"><span data-dl-original="true" data-dl-translated="true" data-dl-uid="325"><span data-dl-original="true" data-dl-translated="true" data-dl-uid="326"><span data-dl-original="true" data-dl-translated="true" data-dl-uid="327"><span data-dl-original="true" data-dl-translated="true" data-dl-uid="328"><span data-dl-original="true" data-dl-translated="true" data-dl-uid="329"><span data-dl-original="true" data-dl-translated="true" data-dl-uid="330"><span data-dl-original="true" data-dl-translated="true" data-dl-uid="331">  
        </span></span></span></span></span></span></span></span>
3. <span data-dl-original="true" data-dl-translated="true" data-dl-uid="334" style="color: rgb(0, 0, 0);"><span data-dl-original="true" data-dl-translated="true" data-dl-uid="335">With the "Car\_Status" scene selected in the "Import Settings" tab under "Scenes", expand "Cluster" &gt; "Middle" in the Layer Tree. </span></span>
    - <span style="color: rgb(0, 0, 0);"><span data-dl-original="true" data-dl-translated="true" data-dl-uid="334"><span data-dl-original="true" data-dl-translated="true" data-dl-uid="335">There is a checked checkbox in front of "Car". The checkboxes of "Car Status" and "Incoming Call" are unchecked.</span></span><span data-dl-original="true" data-dl-translated="true" data-dl-uid="337"><span data-dl-original="true" data-dl-translated="true" data-dl-uid="338">  
          
        </span></span></span>
4. <span data-dl-original="true" data-dl-translated="true" data-dl-uid="340" style="color: rgb(0, 0, 0);"><span data-dl-original="true" data-dl-translated="true" data-dl-uid="341">In the Layer Tree uncheck and uncheck the checkboxes as specified in the image and table below.</span></span>
    - <span data-dl-original="true" data-dl-translated="true" data-dl-uid="343" style="color: rgb(0, 0, 0);"><span data-dl-original="true" data-dl-translated="true" data-dl-uid="343"><span data-dl-original="true" data-dl-translated="true" data-dl-uid="344"><span data-dl-original="true" data-dl-translated="true" data-dl-uid="345">The Smart Importer's Preview window will be updated accordingly, displaying the checked and hiding the unchecked layers.</span></span></span></span><div drawio-diagram="5636"><img src="https://doc316en.candera.eu/uploads/images/drawio/2024-04/drawing-4-1714388079.png" alt=""/></div>
        
        <table border="1" class="align-center" id="bkmrk-scene-%22car_status%22%3A-" style="border-collapse: collapse; width: 601px; border-width: 1px;"><colgroup><col style="width: 300px;"></col><col style="width: 300px;"></col></colgroup><tbody><tr><td colspan="2" data-dl-original="true" data-dl-translated="true" data-dl-uid="252" style="border-width: 1px; background-color: rgb(35, 111, 161);"><span data-dl-original="true" data-dl-translated="true" data-dl-uid="253" style="color: rgb(0, 0, 0);">**<span data-dl-original="true" data-dl-translated="true" data-dl-uid="255"><span data-dl-original="true" data-dl-translated="true" data-dl-uid="256">Scene "Car\_Status": Cluster &gt; Middle</span></span>**</span></td></tr><tr><td data-dl-original="true" data-dl-translated="true" data-dl-uid="257" style="border-width: 1px; background-color: rgb(53, 152, 219);"><span data-dl-original="true" data-dl-translated="true" data-dl-uid="258" style="color: rgb(0, 0, 0);">**<span data-dl-original="true" data-dl-translated="true" data-dl-uid="260"><span data-dl-original="true" data-dl-translated="true" data-dl-uid="261">Layer</span></span>**</span></td><td data-dl-original="true" data-dl-translated="true" data-dl-uid="262" style="border-width: 1px; background-color: rgb(53, 152, 219);"><span data-dl-original="true" data-dl-translated="true" data-dl-uid="263" style="color: rgb(0, 0, 0);">**<span data-dl-original="true" data-dl-translated="true" data-dl-uid="265"><span data-dl-original="true" data-dl-translated="true" data-dl-uid="266"><span data-dl-original="true" data-dl-translated="true" data-dl-uid="154">**<span data-dl-original="true" data-dl-translated="true" data-dl-uid="156"><span data-dl-original="true" data-dl-translated="true" data-dl-uid="157">Checkbox</span></span>**</span></span></span>**</span></td></tr><tr><td class="align-left" data-dl-original="true" data-dl-translated="true" data-dl-uid="272" style="border-width: 1px;"><span data-dl-original="true" data-dl-translated="true" data-dl-uid="273" style="color: rgb(0, 0, 0);"><span data-dl-original="true" data-dl-translated="true" data-dl-uid="274">Car</span></span></td><td class="align-left" style="border-width: 1px;"><span style="color: rgb(0, 0, 0);">unchecked</span></td></tr><tr><td class="align-left" style="border-width: 1px;"><span data-dl-original="true" data-dl-translated="true" data-dl-uid="273" style="color: rgb(0, 0, 0);"><span data-dl-original="true" data-dl-translated="true" data-dl-uid="274">Car Status</span></span></td><td class="align-left" style="border-width: 1px;"><span style="color: rgb(0, 0, 0);">checked</span></td></tr><tr><td class="align-left" style="border-width: 1px;"><span data-dl-original="true" data-dl-translated="true" data-dl-uid="273" style="color: rgb(0, 0, 0);"><span data-dl-original="true" data-dl-translated="true" data-dl-uid="274">Incoming Call</span></span></td><td class="align-left" style="border-width: 1px;"><span style="color: rgb(0, 0, 0);">unchecked</span></td></tr></tbody></table>
        
        <span data-dl-original="true" data-dl-translated="true" data-dl-uid="343" style="color: rgb(0, 0, 0);"><span data-dl-original="true" data-dl-translated="true" data-dl-uid="344"><span data-dl-original="true" data-dl-translated="true" data-dl-uid="345">  
        </span></span></span>
5. <span data-dl-original="true" data-dl-translated="true" data-dl-uid="347" style="color: rgb(0, 0, 0);"><span data-dl-original="true" data-dl-translated="true" data-dl-uid="348">Repeat operations 1 through 4 above, this time checking and unchecking the Layers as provided in the table below.</span></span>
    - <span data-dl-original="true" data-dl-translated="true" data-dl-uid="350" style="color: rgb(0, 0, 0);"><span data-dl-original="true" data-dl-translated="true" data-dl-uid="351">There are 3 scenes in the "Import Settings" tab's Scenes section: Car\_Cluster, Car\_Status and Incoming\_Call.</span></span>
    - <span data-dl-original="true" data-dl-translated="true" data-dl-uid="350" style="color: rgb(0, 0, 0);"><span data-dl-original="true" data-dl-translated="true" data-dl-uid="351">The import configuration is completed.</span></span><table border="1" class="align-center" id="bkmrk-clone-scenes...-prop-1" style="border-collapse: collapse; width: 601px; border-width: 1px;"><colgroup><col style="width: 300px;"></col><col style="width: 300px;"></col></colgroup><tbody><tr><td colspan="2" data-dl-original="true" data-dl-translated="true" data-dl-uid="252" style="border-width: 1px; background-color: rgb(35, 111, 161);"><span data-dl-original="true" data-dl-translated="true" data-dl-uid="253" style="color: rgb(0, 0, 0);">**<span data-dl-original="true" data-dl-translated="true" data-dl-uid="255"><span data-dl-original="true" data-dl-translated="true" data-dl-uid="256">Clone Scenes...</span></span>**</span></td></tr><tr><td data-dl-original="true" data-dl-translated="true" data-dl-uid="257" style="border-width: 1px; background-color: rgb(53, 152, 219);"><span data-dl-original="true" data-dl-translated="true" data-dl-uid="258" style="color: rgb(0, 0, 0);">**<span data-dl-original="true" data-dl-translated="true" data-dl-uid="260"><span data-dl-original="true" data-dl-translated="true" data-dl-uid="261">Property</span></span>**</span></td><td data-dl-original="true" data-dl-translated="true" data-dl-uid="262" style="border-width: 1px; background-color: rgb(53, 152, 219);"><span data-dl-original="true" data-dl-translated="true" data-dl-uid="263" style="color: rgb(0, 0, 0);">**<span data-dl-original="true" data-dl-translated="true" data-dl-uid="265"><span data-dl-original="true" data-dl-translated="true" data-dl-uid="266"><span data-dl-original="true" data-dl-translated="true" data-dl-uid="154">**<span data-dl-original="true" data-dl-translated="true" data-dl-uid="156"><span data-dl-original="true" data-dl-translated="true" data-dl-uid="157">Value</span></span>**</span></span></span>**</span></td></tr><tr><td class="align-left" data-dl-original="true" data-dl-translated="true" data-dl-uid="272" style="border-width: 1px;"><span data-dl-original="true" data-dl-translated="true" data-dl-uid="273" style="color: rgb(0, 0, 0);"><span data-dl-original="true" data-dl-translated="true" data-dl-uid="274">Name</span></span></td><td class="align-left" style="border-width: 1px;"><span style="color: rgb(0, 0, 0);">Incoming Calls</span></td></tr></tbody></table>
        
        <table border="1" class="align-center" id="bkmrk-scene-%22incoming_call" style="border-collapse: collapse; width: 601px; border-width: 1px;"><colgroup><col style="width: 300px;"></col><col style="width: 300px;"></col></colgroup><tbody><tr><td colspan="2" data-dl-original="true" data-dl-translated="true" data-dl-uid="252" style="border-width: 1px; background-color: rgb(35, 111, 161);"><span data-dl-original="true" data-dl-translated="true" data-dl-uid="253" style="color: rgb(0, 0, 0);">**<span data-dl-original="true" data-dl-translated="true" data-dl-uid="255"><span data-dl-original="true" data-dl-translated="true" data-dl-uid="256">Scene "Incoming\_Call": Cluster &gt; Middle</span></span>**</span></td></tr><tr><td data-dl-original="true" data-dl-translated="true" data-dl-uid="257" style="border-width: 1px; background-color: rgb(53, 152, 219);"><span data-dl-original="true" data-dl-translated="true" data-dl-uid="258" style="color: rgb(0, 0, 0);">**<span data-dl-original="true" data-dl-translated="true" data-dl-uid="260"><span data-dl-original="true" data-dl-translated="true" data-dl-uid="261">Layer</span></span>**</span></td><td data-dl-original="true" data-dl-translated="true" data-dl-uid="262" style="border-width: 1px; background-color: rgb(53, 152, 219);"><span data-dl-original="true" data-dl-translated="true" data-dl-uid="263" style="color: rgb(0, 0, 0);">**<span data-dl-original="true" data-dl-translated="true" data-dl-uid="265"><span data-dl-original="true" data-dl-translated="true" data-dl-uid="266"><span data-dl-original="true" data-dl-translated="true" data-dl-uid="154">**<span data-dl-original="true" data-dl-translated="true" data-dl-uid="156"><span data-dl-original="true" data-dl-translated="true" data-dl-uid="157">Checkbox</span></span>**</span></span></span>**</span></td></tr><tr><td class="align-left" data-dl-original="true" data-dl-translated="true" data-dl-uid="272" style="border-width: 1px;"><span data-dl-original="true" data-dl-translated="true" data-dl-uid="273" style="color: rgb(0, 0, 0);"><span data-dl-original="true" data-dl-translated="true" data-dl-uid="274">Car</span></span></td><td class="align-left" style="border-width: 1px;"><span style="color: rgb(0, 0, 0);">unchecked</span></td></tr><tr><td class="align-left" style="border-width: 1px;"><span data-dl-original="true" data-dl-translated="true" data-dl-uid="273" style="color: rgb(0, 0, 0);"><span data-dl-original="true" data-dl-translated="true" data-dl-uid="274">Car Status</span></span></td><td class="align-left" style="border-width: 1px;"><span style="color: rgb(0, 0, 0);">unchecked</span></td></tr><tr><td class="align-left" style="border-width: 1px;"><span data-dl-original="true" data-dl-translated="true" data-dl-uid="273" style="color: rgb(0, 0, 0);"><span data-dl-original="true" data-dl-translated="true" data-dl-uid="274">Incoming Call</span></span></td><td class="align-left" style="border-width: 1px;"><span style="color: rgb(0, 0, 0);">checked</span></td></tr></tbody></table>
6. <span style="color: rgb(0, 0, 0);">In the Scene's section of the Import Settings tab select each scene and verify its content in the Preview. Once all of the scenes have been reviewed, click the \[OK\] button in the Smart Importer dialog box to initiate the import.</span>

# 2D scene composition

<span style="color: rgb(0, 0, 0);">Once the import operation is initiated in the Smart Importer, the data is transformed into editable scenes based on the configurations specified within the Smart Importer. These are located in the Solution Explorer panel under \[Resources &gt; Car\_Cluster &gt; Scenes\].</span>

<p class="callout info"><span data-dl-original="true" data-dl-translated="true" data-dl-uid="55" style="color: rgb(0, 0, 0);"><span data-dl-original="true" data-dl-translated="true" data-dl-uid="56">If the Solution Explorer is not displayed, you can enable it via the menu bar choosing **\[View\] &gt; \[Solution Explorer\]**.</span></span></p>

#### <span style="color: rgb(0, 0, 0);">Imported Scenes</span>

1. <span style="color: rgb(0, 0, 0);">In the Solution Explorer move the three scenes to the Scenes folder according to the table below.</span>
    - <span style="color: rgb(0, 0, 0);">The scenes have been moved as shown in the image below.</span>  
        <table border="1" class="align-center" id="bkmrk-import-resources-pat" style="border-collapse: collapse; width: 600px; border-width: 1px; height: 59.6px;"><tbody><tr><td style="background-color: rgb(53, 152, 219); width: 137.583px;"><span style="color: rgb(0, 0, 0);">**Scenes**</span></td><td style="background-color: rgb(53, 152, 219); width: 310.883px;"><span style="color: rgb(0, 0, 0);">**Move From Folder**</span></td><td style="background-color: rgb(53, 152, 219); width: 150.867px;"><span style="color: rgb(0, 0, 0);">**Move To Folder**</span></td></tr><tr><td style="width: 137.583px;"><span style="color: rgb(0, 0, 0);">Car\_Cluster</span>
        
        <span style="color: rgb(0, 0, 0);">Car\_Status</span>
        
        <span style="color: rgb(0, 0, 0);">Incoming\_Call</span>
        
        </td><td style="width: 310.883px;"><span style="color: rgb(0, 0, 0);">Solution &gt; Resources &gt; Car\_Cluster &gt; Scenes</span></td><td style="width: 150.867px;"><span style="color: rgb(0, 0, 0);">Solution &gt; Scenes</span></td></tr></tbody></table>

<div drawio-diagram="7105"><img src="https://doc316en.candera.eu/uploads/images/drawio/2024-10/drawing-4-1729471278.png" alt=""/></div>

##### <span style="color: rgb(0, 0, 0);">Configure Controls</span>

<span style="color: rgb(0, 0, 0);">The default text setting is "Trip: 0000km" for the areas where the Text Value control was applied during import. In order to display the appropriate speed and RPM values, the formatting of the Text Value control must be changed.</span>

1. <span data-dl-original="true" data-dl-translated="true" data-dl-uid="84" style="color: rgb(0, 0, 0);"><span data-dl-original="true" data-dl-translated="true" data-dl-uid="85"><span data-dl-original="true" data-dl-translated="true" data-dl-uid="86"><span data-dl-original="true" data-dl-translated="true" data-dl-uid="87">In the Solution Explorer, double-click \[ Scenes&gt;Car\_Cluster \].</span></span></span></span>
    - <span data-dl-original="true" data-dl-translated="true" data-dl-uid="89" style="color: rgb(0, 0, 0);"><span data-dl-original="true" data-dl-translated="true" data-dl-uid="90"><span data-dl-original="true" data-dl-translated="true" data-dl-uid="91"><span data-dl-original="true" data-dl-translated="true" data-dl-uid="92">The "Car\_Cluster" scene appears in the scene tree.  
          
        </span></span></span></span>
2. <span data-dl-original="true" data-dl-translated="true" data-dl-uid="95" style="color: rgb(0, 0, 0);"><span data-dl-original="true" data-dl-translated="true" data-dl-uid="96">In the Scene Tree panel select \[SpeedGauge\_Group &gt; SpeedValue\].</span></span>
    - <span data-dl-original="true" data-dl-translated="true" data-dl-uid="97" style="color: rgb(0, 0, 0);"><span data-dl-original="true" data-dl-translated="true" data-dl-uid="97"><span data-dl-original="true" data-dl-translated="true" data-dl-uid="98"><span data-dl-original="true" data-dl-translated="true" data-dl-uid="99">In the Properties panel the SpeedValue property will be displayed.  
        </span></span></span></span>
3. <span data-dl-original="true" data-dl-translated="true" data-dl-uid="101" style="color: rgb(0, 0, 0);"><span data-dl-original="true" data-dl-translated="true" data-dl-uid="102"><span data-dl-original="true" data-dl-translated="true" data-dl-uid="103">In the Properties panel's Control section configure the SpeedValue's properties according to the table below.</span></span></span>
    - <span data-dl-original="true" data-dl-translated="true" data-dl-uid="105" style="color: rgb(0, 0, 0);"><span data-dl-original="true" data-dl-translated="true" data-dl-uid="106"><span data-dl-original="true" data-dl-translated="true" data-dl-uid="107"><span data-dl-original="true" data-dl-translated="true" data-dl-uid="108">The %d is a format string used in programming, representing a placeholder for text in integer format.</span></span></span></span>
    - <span data-dl-original="true" data-dl-translated="true" data-dl-uid="109" style="color: rgb(0, 0, 0);"><span data-dl-original="true" data-dl-translated="true" data-dl-uid="110"><span data-dl-original="true" data-dl-translated="true" data-dl-uid="111"><span data-dl-original="true" data-dl-translated="true" data-dl-uid="112">Represents the way text is dynamically formatted.</span></span></span></span>  
        <table border="1" class="align-center" id="bkmrk-target-item-setting-" style="border-collapse: collapse; width: 600px; border-width: 1px;"><colgroup><col></col><col></col></colgroup><tbody><tr><td data-dl-original="true" data-dl-translated="true" data-dl-uid="113" style="border-width: 1px; background-color: rgb(53, 152, 219);"><span data-dl-original="true" data-dl-translated="true" data-dl-uid="114" style="color: rgb(0, 0, 0);">**<span data-dl-original="true" data-dl-translated="true" data-dl-uid="116"><span data-dl-original="true" data-dl-translated="true" data-dl-uid="117"><span data-dl-original="true" data-dl-translated="true" data-dl-uid="154">**<span data-dl-original="true" data-dl-translated="true" data-dl-uid="156"><span data-dl-original="true" data-dl-translated="true" data-dl-uid="157">Target Item</span></span>**</span></span></span>**</span></td><td data-dl-original="true" data-dl-translated="true" data-dl-uid="118" style="border-width: 1px; background-color: rgb(53, 152, 219);"><span data-dl-original="true" data-dl-translated="true" data-dl-uid="119" style="color: rgb(0, 0, 0);">**<span data-dl-original="true" data-dl-translated="true" data-dl-uid="121"><span data-dl-original="true" data-dl-translated="true" data-dl-uid="122"><span data-dl-original="true" data-dl-translated="true" data-dl-uid="159">**<span data-dl-original="true" data-dl-translated="true" data-dl-uid="161"><span data-dl-original="true" data-dl-translated="true" data-dl-uid="162">Setting Value</span></span>**</span></span></span>**</span></td></tr><tr><td data-dl-original="true" data-dl-translated="true" data-dl-uid="123" style="border-width: 1px;"><span data-dl-original="true" data-dl-translated="true" data-dl-uid="124" style="color: rgb(0, 0, 0);"><span data-dl-original="true" data-dl-translated="true" data-dl-uid="125">Format Text</span></span></td><td data-dl-original="true" data-dl-translated="true" data-dl-uid="126" style="border-width: 1px;"><span data-dl-original="true" data-dl-translated="true" data-dl-uid="127" style="color: rgb(0, 0, 0);"><span data-dl-original="true" data-dl-translated="true" data-dl-uid="128">%d</span></span></td></tr><tr><td data-dl-original="true" data-dl-translated="true" data-dl-uid="129" style="border-width: 1px;"><span data-dl-original="true" data-dl-translated="true" data-dl-uid="130" style="color: rgb(0, 0, 0);"><span data-dl-original="true" data-dl-translated="true" data-dl-uid="131">Text Alignment</span></span></td><td data-dl-original="true" data-dl-translated="true" data-dl-uid="132" style="border-width: 1px;"><span style="color: rgb(0, 0, 0);">center</span></td></tr></tbody></table>
        
        <div drawio-diagram="6836"><img src="https://doc316en.candera.eu/uploads/images/drawio/2024-09/drawing-5-1726820313.png" alt=""/></div>
4. <span data-dl-original="true" data-dl-translated="true" data-dl-uid="134" style="color: rgb(0, 0, 0);"><span data-dl-original="true" data-dl-translated="true" data-dl-uid="135"><span data-dl-original="true" data-dl-translated="true" data-dl-uid="136"><span data-dl-original="true" data-dl-translated="true" data-dl-uid="137">In the Scene Tree panel select \[RPMGauge\_Group &gt; RPMValue\] and apply the same configuration as for the SpeedValue in step 3.</span></span></span></span>

<details id="bkmrk-%E3%82%B3%E3%83%B3%E3%83%88%E3%83%AD%E3%83%BC%E3%83%AB%EF%BC%9A%E3%83%93%E3%83%98%E3%82%A4%E3%83%93%E3%82%A2%E3%81%A8fusion-"><summary data-dl-original="true" data-dl-translated="true" data-dl-uid="138">Control: Behaviors and Fusion</summary>

<span style="color: rgb(0, 0, 0);">As demonstrated in the previous step, using the Smart Importer for an import operation enables you to apply available controls during the import process. Each item shown in the scene tree is referred to as a node. Nodes with applied controls are marked with the control's distinct icon. A control represents a compound node, consisting of multiple nodes and behaviors designed to achieve a specific functionality.</span>

<p class="callout info"><span style="color: rgb(0, 0, 0);">Behaviors are general-purpose functions that provide interactions or small operations to graphics nodes.</span></p>

##### <span style="color: rgb(0, 0, 0);">Confirm behavior configuration</span>

<span style="color: rgb(0, 0, 0);">The behavior configuration for controls can be viewed following the steps below. The operation is performed on the scene tree of Car\_Cluster.</span>

1. <span style="color: rgb(0, 0, 0);">In the Scene Tree panel double-click the \[RPMGauge\] control.</span>
    - <span style="color: rgb(0, 0, 0);">The Scene Tree panel changes from displaying the Car\_Cluster scene tree to displaying the Gauge control's tree.</span>
    - <span style="color: rgb(0, 0, 0);">The behavior configuration of the Gauge control will be displayed in the Extra Scene Tree.</span>
    - <span style="color: rgb(0, 0, 0);">Additionally, by clicking \[ Fusion... \] at the top of the Extra Scene Tree the [Fusion panel ](https://doc316en.candera.eu/books/fusion)will be opened, displaying the Gauge Control's Fusion diagram.</span>
2. <span style="color: rgb(0, 0, 0);">To return to the 'Car\_Cluster' view, click the left-arrow button located in the upper-left corner of the scene tree panel.</span>

<p class="callout info"><span style="color: rgb(0, 0, 0);">[Fusion ](https://doc316en.candera.eu/books/fusion "Fusion")combines a behavior tree view, and a properties panel for selected nodes. This provides an alternative way to manage behaviors.</span></p>

</details>##### <span data-dl-original="true" data-dl-translated="true" data-dl-uid="154" style="color: rgb(0, 0, 0);"><span data-dl-original="true" data-dl-translated="true" data-dl-uid="155">Display Settings</span></span>

<span style="color: rgb(0, 0, 0);">Configure the display in the Render Target panel. This tutorial uses the Empty template, so by default, a camera is configured for a 2D scene (Scene2D\\Camera) and a camera for a 3D scene (Scene3D\\Camera). Since each scene's camera has been added by importing resources, the next step is to link it to the render target.</span>

<p class="callout info"><span data-dl-original="true" data-dl-translated="true" data-dl-uid="158" style="color: rgb(0, 0, 0);"><span data-dl-original="true" data-dl-translated="true" data-dl-uid="159">For more information on display configuration, see <span data-dl-original="true" data-dl-translated="true" data-dl-uid="160">[Display Configuration](https://doc316en.candera.eu/books/display-configuration)</span>.</span></span></p>

1. <span style="color: rgb(0, 0, 0);">Displays the \[Render Targets\] panel.</span>  
    
    - <span style="color: rgb(0, 0, 0);">The \[Render Targets\] panel is located in the upper right corner of Scene Composer by default.</span>
    - <span style="color: rgb(0, 0, 0);">If it is hidden, select \[Libraries &gt; Render Targets\] from the menu bar <span data-dl-original="true" data-dl-translated="true" data-dl-uid="55"><span data-dl-original="true" data-dl-translated="true" data-dl-uid="56">under "View" </span></span>.</span>
2. <span style="color: rgb(0, 0, 0);">Uncheck the default cameras (Scene2D\\Camera and Scene3D\\Camera).</span>
    - <span style="color: rgb(0, 0, 0);">The checkboxes associated with the cameras toggle.</span><table border="1" class="align-center" id="bkmrk-default-cameras-acti" style="border-collapse: collapse; width: 600px; border-width: 1px;"><colgroup><col></col><col></col></colgroup><tbody><tr><td data-dl-original="true" data-dl-translated="true" data-dl-uid="113" style="border-width: 1px; background-color: rgb(53, 152, 219);"><span data-dl-original="true" data-dl-translated="true" data-dl-uid="114" style="color: rgb(0, 0, 0);">**<span data-dl-original="true" data-dl-translated="true" data-dl-uid="116"><span data-dl-original="true" data-dl-translated="true" data-dl-uid="117"><span data-dl-original="true" data-dl-translated="true" data-dl-uid="154">**<span data-dl-original="true" data-dl-translated="true" data-dl-uid="156"><span data-dl-original="true" data-dl-translated="true" data-dl-uid="157">Default Cameras</span></span>**</span></span></span>**</span></td><td data-dl-original="true" data-dl-translated="true" data-dl-uid="118" style="border-width: 1px; background-color: rgb(53, 152, 219);"><span data-dl-original="true" data-dl-translated="true" data-dl-uid="119" style="color: rgb(0, 0, 0);">**<span data-dl-original="true" data-dl-translated="true" data-dl-uid="121"><span data-dl-original="true" data-dl-translated="true" data-dl-uid="122"><span data-dl-original="true" data-dl-translated="true" data-dl-uid="159">**<span data-dl-original="true" data-dl-translated="true" data-dl-uid="161"><span data-dl-original="true" data-dl-translated="true" data-dl-uid="162">Action in Render Targets Panel</span></span>**</span></span></span>**</span></td></tr><tr><td data-dl-original="true" data-dl-translated="true" data-dl-uid="123" style="border-width: 1px;"><span data-dl-original="true" data-dl-translated="true" data-dl-uid="124" style="color: rgb(0, 0, 0);"><span data-dl-original="true" data-dl-translated="true" data-dl-uid="125">Scene2D\\Camera</span></span></td><td data-dl-original="true" data-dl-translated="true" data-dl-uid="126" style="border-width: 1px;"><span data-dl-original="true" data-dl-translated="true" data-dl-uid="127" style="color: rgb(0, 0, 0);"><span data-dl-original="true" data-dl-translated="true" data-dl-uid="128">uncheck</span></span></td></tr><tr><td data-dl-original="true" data-dl-translated="true" data-dl-uid="129" style="border-width: 1px;"><span data-dl-original="true" data-dl-translated="true" data-dl-uid="130" style="color: rgb(0, 0, 0);"><span data-dl-original="true" data-dl-translated="true" data-dl-uid="131">Scene3D\\Camera</span></span></td><td data-dl-original="true" data-dl-translated="true" data-dl-uid="132" style="border-width: 1px;"><span style="color: rgb(0, 0, 0);">uncheck</span></td></tr></tbody></table>
3. <span style="color: rgb(0, 0, 0);">Check the checkboxes for the three cameras added during the resource import (Car\_Cluster\\DocumentView(0), Car\_Status\\DocumentView(0), and Incoming\_Call\\DocumentView(0)).</span>
    - <span style="color: rgb(0, 0, 0);">The checkboxes associated with the cameras toggle.</span>  
        <table border="1" class="align-center" id="bkmrk-imported-cameras-act" style="border-collapse: collapse; width: 600px; border-width: 1px;"><colgroup><col></col><col></col></colgroup><tbody><tr><td data-dl-original="true" data-dl-translated="true" data-dl-uid="113" style="border-width: 1px; background-color: rgb(53, 152, 219);"><span data-dl-original="true" data-dl-translated="true" data-dl-uid="114" style="color: rgb(0, 0, 0);">**<span data-dl-original="true" data-dl-translated="true" data-dl-uid="116"><span data-dl-original="true" data-dl-translated="true" data-dl-uid="117"><span data-dl-original="true" data-dl-translated="true" data-dl-uid="154">**<span data-dl-original="true" data-dl-translated="true" data-dl-uid="156"><span data-dl-original="true" data-dl-translated="true" data-dl-uid="157">Imported Cameras</span></span>**</span></span></span>**</span></td><td data-dl-original="true" data-dl-translated="true" data-dl-uid="118" style="border-width: 1px; background-color: rgb(53, 152, 219);"><span data-dl-original="true" data-dl-translated="true" data-dl-uid="119" style="color: rgb(0, 0, 0);">**<span data-dl-original="true" data-dl-translated="true" data-dl-uid="121"><span data-dl-original="true" data-dl-translated="true" data-dl-uid="122"><span data-dl-original="true" data-dl-translated="true" data-dl-uid="159">**<span data-dl-original="true" data-dl-translated="true" data-dl-uid="161"><span data-dl-original="true" data-dl-translated="true" data-dl-uid="162">Action in Render Targets Panel</span></span>**</span></span></span>**</span></td></tr><tr><td data-dl-original="true" data-dl-translated="true" data-dl-uid="123" style="border-width: 1px;"><span style="color: rgb(0, 0, 0);">Car\_Cluster\\DocumentView</span></td><td data-dl-original="true" data-dl-translated="true" data-dl-uid="126" style="border-width: 1px;"><span data-dl-original="true" data-dl-translated="true" data-dl-uid="127" style="color: rgb(0, 0, 0);"><span data-dl-original="true" data-dl-translated="true" data-dl-uid="128">check</span></span></td></tr><tr><td data-dl-original="true" data-dl-translated="true" data-dl-uid="129" style="border-width: 1px;"><span style="color: rgb(0, 0, 0);">Car\_Status\\DocumentView</span></td><td data-dl-original="true" data-dl-translated="true" data-dl-uid="132" style="border-width: 1px;"><span style="color: rgb(0, 0, 0);">check</span></td></tr><tr><td style="border-width: 1px;"><span style="color: rgb(0, 0, 0);">Incoming\_Call\\DocumentView</span></td><td style="border-width: 1px;"><span style="color: rgb(0, 0, 0);">check</span></td></tr></tbody></table>
        
          
        <div drawio-diagram="6837"><img src="https://doc316en.candera.eu/uploads/images/drawio/2024-09/drawing-5-1726820557.png" alt=""/></div>

<p class="callout info"><span style="color: rgb(0, 0, 0);">To see a preview of the display, select \[Display &gt; Display-0\] from the menu bar under "View".</span></p>

<span style="color: rgb(0, 0, 0);">The 2D scene configuration work is completed. In the next step, we will explain how to configure HMI logic using Fusion.</span>

# HMI Logic Configuration

<span data-dl-original="true" data-dl-translated="true" data-dl-uid="49" style="color: rgb(0, 0, 0);"><span data-dl-original="true" data-dl-translated="true" data-dl-uid="50">This section describes how to configure the Gauge control to forward its value to the TextValue control using Fusion.</span></span>

<p class="callout info"><span data-dl-original="true" data-dl-translated="true" data-dl-uid="52" style="color: rgb(0, 0, 0);"><span data-dl-original="true" data-dl-translated="true" data-dl-uid="53">CGI Studio provides a feature called <span data-dl-original="true" data-dl-translated="true" data-dl-uid="54">[Behaviors](https://doc316en.candera.eu/books/controls-and-behaviors/chapter/behaviors)</span> to apply logic to nodes without programming. The built-in behaviors provided in SceneComposer offer great versatility, thanks to their extensive configuration possibilities. One common use of behaviors is event-based linking, which allows data to be easily transferred between two behaviors.</span></span></p>

<p class="callout info"><span data-dl-original="true" data-dl-translated="true" data-dl-uid="57" style="color: rgb(0, 0, 0);"><span data-dl-original="true" data-dl-translated="true" data-dl-uid="58"><span data-dl-original="true" data-dl-translated="true" data-dl-uid="59">[Fusion](https://doc316en.candera.eu/books/fusion)</span> combines a behavior tree view that appears to the right of a selected node in the scene tree (extra scene tree) and a properties panel for the selected node. This provides an alternative way to manage behaviors. As a result, Fusion allows you to structure your scene interactions in a more graphical and intuitive way.</span></span></p>

1. <span style="color: rgb(0, 0, 0);">In the Solution Explorer double-<span data-dl-original="true" data-dl-translated="true" data-dl-uid="62"><span data-dl-original="true" data-dl-translated="true" data-dl-uid="63">click \[Scenes&gt;Car\_Cluster\]</span></span>.</span>
    - <span style="color: rgb(0, 0, 0);">"Car\_Cluster" will appear in the scene tree.</span>
    - <span data-dl-original="true" data-dl-translated="true" data-dl-uid="67" style="color: rgb(0, 0, 0);"><span data-dl-original="true" data-dl-translated="true" data-dl-uid="68">An extra scene tree will appear to the right of the scene tree.  
          
        </span></span>
2. <span data-dl-original="true" data-dl-translated="true" data-dl-uid="71" style="color: rgb(0, 0, 0);"><span data-dl-original="true" data-dl-translated="true" data-dl-uid="72"><span data-dl-original="true" data-dl-translated="true" data-dl-uid="73"><span data-dl-original="true" data-dl-translated="true" data-dl-uid="74">In the Scene Tree panel select the RPMGauge control, then click \[Fusion...\] in the Extra Scene Tree.</span></span></span></span>
    - <span data-dl-original="true" data-dl-translated="true" data-dl-uid="75" style="color: rgb(0, 0, 0);"><span data-dl-original="true" data-dl-translated="true" data-dl-uid="75"><span data-dl-original="true" data-dl-translated="true" data-dl-uid="76"><span data-dl-original="true" data-dl-translated="true" data-dl-uid="77">Fusion panel will be opened, displaying the Fusion diagram for the RPMGauge control. The diagram only contains one Fusion Node: RPMGauge.</span></span></span></span><div drawio-diagram="7242"><img src="https://doc316en.candera.eu/uploads/images/drawio/2024-11/drawing-4-1730460832.png" alt=""/></div>
3. <span style="color: rgb(0, 0, 0);">The RPMGauge's Fusion Node offers a Behaviors connector in its top right corner (a white circle next to the label "Behaviors"). Drag this connector, then release it again.</span>
    - <span style="color: rgb(0, 0, 0);">The \[Select Behavior\] dialog will be displayed.</span>
4. <span style="color: rgb(0, 0, 0);">In the \[Select Behavior\] dialog enter "<span data-dl-original="true" data-dl-translated="true" data-dl-uid="87"><span data-dl-original="true" data-dl-translated="true" data-dl-uid="88">Forward Value</span></span>" into the search field at the top.</span>
    - <span data-dl-original="true" data-dl-translated="true" data-dl-uid="91" style="color: rgb(0, 0, 0);"><span data-dl-original="true" data-dl-translated="true" data-dl-uid="91"><span data-dl-original="true" data-dl-translated="true" data-dl-uid="92"><span data-dl-original="true" data-dl-translated="true" data-dl-uid="93">The list of behaviors in the dialog will be narrowed down to \[Value Processing &gt; Forward Value\].  
        </span></span></span></span><div drawio-diagram="5642"><img src="https://doc316en.candera.eu/uploads/images/drawio/2024-04/drawing-4-1714388659.png" alt=""/></div>
5. <span data-dl-original="true" data-dl-translated="true" data-dl-uid="122" style="color: rgb(0, 0, 0);"><span data-dl-original="true" data-dl-translated="true" data-dl-uid="123">Double-click \[Forward Value\].</span></span>
    - <span data-dl-original="true" data-dl-translated="true" data-dl-uid="125" style="color: rgb(0, 0, 0);"><span data-dl-original="true" data-dl-translated="true" data-dl-uid="126">A new Fusion Node "Forward Value" has been added to the diagram.</span></span>
    - <span data-dl-original="true" data-dl-translated="true" data-dl-uid="125" style="color: rgb(0, 0, 0);"><span data-dl-original="true" data-dl-translated="true" data-dl-uid="126">The RPMGauge Fusion node and the Forward Value Fusion node are connected by a link.  
          
        </span></span>
6. <span data-dl-original="true" data-dl-translated="true" data-dl-uid="129" style="color: rgb(0, 0, 0);"><span data-dl-original="true" data-dl-translated="true" data-dl-uid="130">In the Forward Value Fusion node, click on the select item icon on the right side of the \[TargetNode\] section.</span></span>
    - <span data-dl-original="true" data-dl-translated="true" data-dl-uid="131" style="color: rgb(0, 0, 0);"><span data-dl-original="true" data-dl-translated="true" data-dl-uid="131"><span data-dl-original="true" data-dl-translated="true" data-dl-uid="132"><span data-dl-original="true" data-dl-translated="true" data-dl-uid="133">The \[Choose Item\] dialog will be displayed.  
        </span></span></span></span><div drawio-diagram="5644"><img src="https://doc316en.candera.eu/uploads/images/drawio/2024-04/drawing-4-1714388721.png" alt=""/></div>
7. <span style="color: rgb(0, 0, 0);"><span data-dl-original="true" data-dl-translated="true" data-dl-uid="135"><span data-dl-original="true" data-dl-translated="true" data-dl-uid="136"><span data-dl-original="true" data-dl-translated="true" data-dl-uid="137"><span data-dl-original="true" data-dl-translated="true" data-dl-uid="138">In the \[Choose Item\] dialog navigate to the Target Node listed in the table below, then click \[OK\]</span></span></span></span><span data-dl-original="true" data-dl-translated="true" data-dl-uid="139"><span data-dl-original="true" data-dl-translated="true" data-dl-uid="140"><span data-dl-original="true" data-dl-translated="true" data-dl-uid="141"><span data-dl-original="true" data-dl-translated="true" data-dl-uid="142">.</span></span></span></span></span>
    - <span style="color: rgb(0, 0, 0);"><span data-dl-original="true" data-dl-translated="true" data-dl-uid="143"><span data-dl-original="true" data-dl-translated="true" data-dl-uid="143"><span data-dl-original="true" data-dl-translated="true" data-dl-uid="144"><span data-dl-original="true" data-dl-translated="true" data-dl-uid="145">\[RPMValue\] is configured to be the Target Node of the Forward Value behavior</span></span></span></span><span data-dl-original="true" data-dl-translated="true" data-dl-uid="143"><span data-dl-original="true" data-dl-translated="true" data-dl-uid="143"><span data-dl-original="true" data-dl-translated="true" data-dl-uid="144"><span data-dl-original="true" data-dl-translated="true" data-dl-uid="145">.</span></span></span></span></span>
    - <span data-dl-original="true" data-dl-translated="true" data-dl-uid="143" style="color: rgb(0, 0, 0);"><span data-dl-original="true" data-dl-translated="true" data-dl-uid="143"><span data-dl-original="true" data-dl-translated="true" data-dl-uid="144"><span data-dl-original="true" data-dl-translated="true" data-dl-uid="145"><span data-dl-original="true" data-dl-translated="true" data-dl-uid="156"><span data-dl-original="true" data-dl-translated="true" data-dl-uid="157"><span data-dl-original="true" data-dl-translated="true" data-dl-uid="158"><span data-dl-original="true" data-dl-translated="true" data-dl-uid="159">The RPMGauge control is configured to forward its value to the TextValue control "RPMValue".</span></span></span></span></span></span></span></span><table border="1" class="align-center" id="bkmrk-import-resources-pat" style="border-collapse: collapse; width: 600px; border-width: 1px; height: 59.6px;"><tbody><tr><td style="background-color: rgb(53, 152, 219); width: 203.867px;"><span style="color: rgb(0, 0, 0);">**Fusion Node**</span></td><td style="background-color: rgb(53, 152, 219); width: 395.467px;"><span style="color: rgb(0, 0, 0);">**Target Node**</span></td></tr><tr><td style="width: 203.867px;"><span style="color: rgb(0, 0, 0);">RPMGauge &gt; Forward Value</span></td><td style="width: 395.467px;"><span data-dl-original="true" data-dl-translated="true" data-dl-uid="135" style="color: rgb(0, 0, 0);"><span data-dl-original="true" data-dl-translated="true" data-dl-uid="136"><span data-dl-original="true" data-dl-translated="true" data-dl-uid="137"><span data-dl-original="true" data-dl-translated="true" data-dl-uid="138"> Scenes &gt; Car\_Cluster &gt; RPMGauge\_Group &gt; RPMValue</span></span></span></span></td></tr></tbody></table>
        
        <span data-dl-original="true" data-dl-translated="true" data-dl-uid="143" style="color: rgb(0, 0, 0);"><span data-dl-original="true" data-dl-translated="true" data-dl-uid="143"><span data-dl-original="true" data-dl-translated="true" data-dl-uid="144"><span data-dl-original="true" data-dl-translated="true" data-dl-uid="145">  
        </span></span></span></span><div drawio-diagram="5645"><img src="https://doc316en.candera.eu/uploads/images/drawio/2024-04/drawing-4-1714389489.png" alt=""/></div>
8. <span data-dl-original="true" data-dl-translated="true" data-dl-uid="147" style="color: rgb(0, 0, 0);"><span data-dl-original="true" data-dl-translated="true" data-dl-uid="148"><span data-dl-original="true" data-dl-translated="true" data-dl-uid="71"><span data-dl-original="true" data-dl-translated="true" data-dl-uid="72"><span data-dl-original="true" data-dl-translated="true" data-dl-uid="73"><span data-dl-original="true" data-dl-translated="true" data-dl-uid="74">In the Scene Tree panel select the SpeedGauge control, then click \[Fusion...\] in the Extra Scene Tree</span></span></span></span>. Perform steps 2 through step 7 similarly for the "SpeedGauge" control. Configure Forward Value node's Target Node according to the table below.</span></span>
    - <span data-dl-original="true" data-dl-translated="true" data-dl-uid="156" style="color: rgb(0, 0, 0);"><span data-dl-original="true" data-dl-translated="true" data-dl-uid="157"><span data-dl-original="true" data-dl-translated="true" data-dl-uid="158"><span data-dl-original="true" data-dl-translated="true" data-dl-uid="159">The SpeedGauge control is configured to forward its value to the TextValue control "SpeedValue".</span></span></span></span><table border="1" class="align-center" id="bkmrk-fusion-node-target-n" style="border-collapse: collapse; width: 600px; border-width: 1px; height: 59.6px;"><tbody><tr><td style="background-color: rgb(53, 152, 219); width: 203.867px;"><span style="color: rgb(0, 0, 0);">**Fusion Node**</span></td><td style="background-color: rgb(53, 152, 219); width: 395.467px;"><span style="color: rgb(0, 0, 0);">**Target Node**</span></td></tr><tr><td style="width: 203.867px;"><span style="color: rgb(0, 0, 0);">SpeedGauge &gt; Forward Value</span></td><td style="width: 395.467px;"><span data-dl-original="true" data-dl-translated="true" data-dl-uid="135" style="color: rgb(0, 0, 0);"><span data-dl-original="true" data-dl-translated="true" data-dl-uid="136"><span data-dl-original="true" data-dl-translated="true" data-dl-uid="137"><span data-dl-original="true" data-dl-translated="true" data-dl-uid="138"> Scenes &gt; Car\_Cluster &gt; SpeedGauge\_Group &gt; SpeedValue</span></span></span></span></td></tr></tbody></table>

<span data-dl-original="true" data-dl-translated="true" data-dl-uid="161" style="color: rgb(0, 0, 0);"><span data-dl-original="true" data-dl-translated="true" data-dl-uid="162">With the configuration described above, the values from the RPMGauge and SpeedGauge controls are automatically forwarded to the corresponding TextValue controls, RPMValue and SpeedValue. </span></span>

<span data-dl-original="true" data-dl-translated="true" data-dl-uid="161" style="color: rgb(0, 0, 0);"><span data-dl-original="true" data-dl-translated="true" data-dl-uid="162">To verify the functionality of this configuration switch to the Scene Editor panel. In the Scene Tree panel select one of the Gauge controls and modify its value property in the Properties panel. You should see the corresponding TextValue node update in the Scene Editor accordingly.</span></span>

<p class="callout info"><span data-dl-original="true" data-dl-translated="true" data-dl-uid="161" style="color: rgb(0, 0, 0);"><span data-dl-original="true" data-dl-translated="true" data-dl-uid="162">If the TextValue node does not update automatically, press the &lt;F5&gt; key on your keyboard to refresh the view.</span></span></p>

<p class="callout info"><span data-dl-original="true" data-dl-translated="true" data-dl-uid="161" style="color: rgb(0, 0, 0);"><span data-dl-original="true" data-dl-translated="true" data-dl-uid="162">Operation checks related to this setting can be performed [here](https://doc316en.candera.eu/link/1145#bkmrk-run-simulation-by-va). During simulation, the value at the center of the gauge dynamically updates in sync with the movement of the gauge needle.</span></span></p>

# Multi-languages Settings

<span style="color: rgb(0, 0, 0);">CGI Studio's multi-language support feature allows you to easily switch between languages. This section describes how to use this feature to switch between English and Japanese units of measure such as miles and kilometers.</span>

<p class="callout info"><span style="color: rgb(0, 0, 0);">For more information about SceneComposer's Multi Language Support and the Culture feature, refer to the documentation for the <span data-dl-original="true" data-dl-translated="true" data-dl-uid="54">[Translator Plugin.](https://doc316en.candera.eu/books/scene-design/chapter/scenecomposer-translator-plugin)</span></span></p>

#### <span style="color: rgb(0, 0, 0);">Culture Solution Options</span>

<span style="color: rgb(0, 0, 0);">To display text in multiple languages, you must first create a culture.</span>

1. <span style="color: rgb(0, 0, 0);">In the menu bar click \[Language\] then select \[Culture Solution Options...\]. Alternatively click the \[Culture Solution Options\] button in the toolbar.</span>
    - <span style="color: rgb(0, 0, 0);">The \[Solution Options: Cultures\] dialog will appear.</span>
    - <span style="color: rgb(0, 0, 0);">The dialog's list of cultures contains one entry: Master \[00\].</span>  
        <div drawio-diagram="5646"><img src="https://doc316en.candera.eu/uploads/images/drawio/2024-04/drawing-4-1714390665.png" alt=""/></div>
2. <span style="color: rgb(0, 0, 0);">In the \[Solution Options: Cultures\] dialog click on the \[Add Culture\] icon located in the upper-left corner of the dialog.</span>
    - <span data-dl-original="true" data-dl-translated="true" data-dl-uid="74" style="color: rgb(0, 0, 0);"><span data-dl-original="true" data-dl-translated="true" data-dl-uid="74"><span data-dl-original="true" data-dl-translated="true" data-dl-uid="75"><span data-dl-original="true" data-dl-translated="true" data-dl-uid="76">A new culture will be added to the list of cultures.  
        </span></span></span></span><div drawio-diagram="5647"><img src="https://doc316en.candera.eu/uploads/images/drawio/2024-04/drawing-4-1714390750.png" alt=""/></div>
        
        <span data-dl-translated="true" data-dl-uid="74" style="color: rgb(0, 0, 0);"><span data-dl-translated="true" data-dl-uid="75"><span data-dl-translated="true" data-dl-uid="76">  
        </span></span></span>
3. <span style="color: rgb(0, 0, 0);"><span data-dl-original="true" data-dl-translated="true" data-dl-uid="85"><span data-dl-original="true" data-dl-translated="true" data-dl-uid="86">For the newly created culture select "English\[en\]" from</span></span> the pull-down menu.</span>
    - <span style="color: rgb(0, 0, 0);">The culture of this list entry is set to English.</span><p class="callout info"><span style="color: rgb(0, 0, 0);">You can narrow down the list by typing "English" at the top of the pull-down menu, then select your favored list entry with a mouse click.</span></p>
4. <span style="color: rgb(0, 0, 0);">Configure the English culture's Layout Direction to "Left to Right" using the pull-down menu.</span>
    - <span style="color: rgb(0, 0, 0);">The English culture has been configured successfully.</span><p class="callout info"><span style="color: rgb(0, 0, 0);">A culture's Layout Direction is usually similar to a language's reading direction.</span></p>
5. <span style="color: rgb(0, 0, 0);">Repeat steps 2 to 4 to add another culture entry for Japan. From the pull-down menu, select "Japanese \[ja\]". To narrow down the list, type "Japanese" at the top of the pull-down menu.</span>
    - <span style="color: rgb(0, 0, 0);">A new culture for Japan has been created and configured.  
          
        </span>
6. <span style="color: rgb(0, 0, 0);">Press the \[OK\] button at the bottom of the dialog to confirm your configurations and close the dialog.</span>  
    <div drawio-diagram="8641"><img src="https://doc316en.candera.eu/uploads/images/drawio/2025-10/drawing-5-1761304340.png" alt=""/></div>

<span style="color: rgb(0, 0, 0);">You can configure multiple languages as needed by following the steps above.</span>

#### <span style="color: rgb(0, 0, 0);">Language Table Configuration</span>

<span style="color: rgb(0, 0, 0);">After configuring the culture settings, you need to set up a Language Table that includes the language-specific variations of each text. In the steps below we will configure English and Japanese language variations for a text of a TextNode2D.</span>

1. <span data-dl-original="true" data-dl-translated="true" data-dl-uid="129" style="color: rgb(0, 0, 0);"><span data-dl-original="true" data-dl-translated="true" data-dl-uid="130">In the Solution Explorer, navigate to \[Scenes&gt;Car\_Cluster\] and open the Car\_Cluster scene with a double-click.  
    </span></span>
    - <span style="color: rgb(0, 0, 0);">In the Scene Editor you can see that Scene "Car\_Cluster" is opened.</span>
    - <span style="color: rgb(0, 0, 0);">In the Scene Tree panel you can see the scene tree of "Car\_Cluster" scene.</span>
2. <span style="color: rgb(0, 0, 0);">In the Scene Tree panel, expand "StatusBottom" and click on "78.321 km" displayed.</span>
    - <span style="color: rgb(0, 0, 0);">In the Properties panel, "78.321km (TextNode2D)" will be displayed.</span>  
        <div drawio-diagram="7241"><img src="https://doc316en.candera.eu/uploads/images/drawio/2024-11/drawing-4-1730460725.png" alt=""/></div>
3. <span style="color: rgb(0, 0, 0);">In the Properties panel's \[2D Text Node\] section, click the select item icon on the right side of the Text property.</span>
    - <span style="color: rgb(0, 0, 0);">The \[Language Table Selection\] dialog will be opened.</span><p class="callout info"><span style="color: rgb(0, 0, 0);">The \[Language Table\] dialog box can also be opened via the menu bar \[Languages\] - \[Language Tables...\].</span></p>
        
        <div drawio-diagram="6838"><img src="https://doc316en.candera.eu/uploads/images/drawio/2024-09/drawing-5-1726821534.png" alt=""/></div>
4. <span style="color: rgb(0, 0, 0);">In the \[Language Table Selection\] dialog, make sure that "Master\[00\]" is selected as Current Culture, them click the \[Add\] button </span>  
    
    - <span style="color: rgb(0, 0, 0);">A new entry will be added to the Language Table.</span>  
        <div drawio-diagram="8644"><img src="https://doc316en.candera.eu/uploads/images/drawio/2025-10/drawing-5-1761314131.png" alt=""/></div>
5. <span style="color: rgb(0, 0, 0);">In the \[Language Table Selection\] dialog, enter "78.321 km" into the \[Text\] input field of the newly added Language Table entry.</span>
    - <span style="color: rgb(0, 0, 0);">This text input value will be displayed if "Master" is selected as the actively displayed language.</span><p class="callout info"><span style="color: rgb(0, 0, 0);">If no text for the Master language is defined, the <span data-dl-original="true" data-dl-translated="true" data-dl-uid="166">[text ID](https://doc316en.candera.eu/link/162#bkmrk-switching-cultures)</span> will be displayed.</span></p>
6. <span style="color: rgb(0, 0, 0);">In the upper-right corner of the \[Language Table Selection\] dialog, switch the \[Current Culture\] to "English" and enter "78.321miles" into the \[Text\] input field of the displayed Language Table.</span>
    - <span style="color: rgb(0, 0, 0);">After switching to "English", only the texts defined for the English language will be displayed.</span>
    - <span style="color: rgb(0, 0, 0);">You might have noticed that the ID stayed the same after switching to English.</span>
    - <span style="color: rgb(0, 0, 0);">This text input value will be displayed whenever "English" is selected as the actively displayed language.</span>
7. <span style="color: rgb(0, 0, 0);">Similarly, switch \[Current Culture\] to "Japanese" and enter "78.321 km" in the \[Text\] input field of the displayed Language Table.</span>
    - <span style="color: rgb(0, 0, 0);">After switching to "Japanese", only the texts defined for the Japanese language will be displayed.</span>
    - <span style="color: rgb(0, 0, 0);">This text input value will be displayed when "Japanese" is selected as the actively displayed language.  
        </span>
8. <span style="color: rgb(0, 0, 0);">Press the \[OK\] button at the bottom of the dialog to close it.</span>
    - <span style="color: rgb(0, 0, 0);">The Language Table Selection dialog will be closed.</span>

<span style="color: rgb(0, 0, 0);">This completes the configuration of text to be displayed in response to language switching.</span>

#### <span style="color: rgb(0, 0, 0);">Operation Confirmation</span>

<span style="color: rgb(0, 0, 0);">Verify that the settings configured in the previous section are working correctly in SceneComposer.</span>

1. <span style="color: rgb(0, 0, 0);">In the SceneComposer's toolbar use the pull-down menu to the right of the \[Cultural Solution Options\] to switch languages. </span>  
    
    - <span style="color: rgb(0, 0, 0);">In Scene Editor you can observe the changes in the StatusBottom's range display.</span>
    - <span style="color: rgb(0, 0, 0);">When English is selected, the unit will be displayed as "miles".</span>
    - <span style="color: rgb(0, 0, 0);">When Japanese or Master is selected, the unit will be displayed as "km".</span>  
        <div drawio-diagram="8647"><img src="https://doc316en.candera.eu/uploads/images/drawio/2025-10/drawing-5-1761316106.png" alt=""/></div>

<p class="callout info"><span style="color: rgb(0, 0, 0);">For further information and an advanced configuration example, please refer to our [Tutorial for Globalization Support](https://doc316en.candera.eu/books/candera/chapter/tutorial-for-globalization-support).</span></p>

# State Configuration

<span style="color: rgb(0, 0, 0);">CGI Studio enables application logic through an integrated state machine model. State machines, combined with controls and behaviors, support the construction of complex application logic without programming.</span>

<span style="color: rgb(0, 0, 0);">This section describes how to set up transitions between scenes using state machines. The ultimate goal is to trigger scene transitions by clicking on specific nodes within a scene.</span>

#####   


#### <span data-dl-original="true" data-dl-translated="true" data-dl-uid="55" style="color: rgb(0, 0, 0);"><span data-dl-original="true" data-dl-translated="true" data-dl-uid="56">Opening the State Machine Editor</span></span>

<span style="color: rgb(0, 0, 0);">The state machine editor is displayed by the following operations</span>

1. <span style="color: rgb(0, 0, 0);"><span data-dl-original="true" data-dl-translated="true" data-dl-uid="58"><span data-dl-original="true" data-dl-translated="true" data-dl-uid="59">Expand \[</span></span><span data-dl-original="true" data-dl-translated="true" data-dl-uid="58"><span data-dl-original="true" data-dl-translated="true" data-dl-uid="59">Solution &gt; State Machines\] in the Solution Explorer.</span></span></span>  
    
    - <span data-dl-original="true" data-dl-translated="true" data-dl-uid="60" style="color: rgb(0, 0, 0);"><span data-dl-original="true" data-dl-translated="true" data-dl-uid="60"><span data-dl-original="true" data-dl-translated="true" data-dl-uid="61"><span data-dl-original="true" data-dl-translated="true" data-dl-uid="62">"State Machines" is expanded and "<span data-dl-original="true" data-dl-translated="true" data-dl-uid="63"><span data-dl-original="true" data-dl-translated="true" data-dl-uid="64">GlobalStateMachine" is displayed.  
        </span></span></span></span></span></span><div drawio-diagram="5653"><img src="https://doc316en.candera.eu/uploads/images/drawio/2024-04/drawing-4-1714391154.png" alt=""/></div>
        
        <span data-dl-original="true" data-dl-translated="true" data-dl-uid="60" style="color: rgb(0, 0, 0);">  
        </span>
2. <span style="color: rgb(0, 0, 0);">In the Solution Explorer select the "GlobalStateMachine". In the Properties panel check the \[IsGlobal\] property if it isn't checked already.</span>
    - <span style="color: rgb(0, 0, 0);">The \[IsGlobal\] checkbox is checked.</span>
    - <span style="color: rgb(0, 0, 0);">The "GlobalStateMachine" is global.  
        </span>
3. <span style="color: rgb(0, 0, 0);">In the Solution Explorer double-click the "GlobalStateMachine".</span>
    - <span style="color: rgb(0, 0, 0);">The State Machine Editor will be opened.</span><p class="callout info"><span style="color: rgb(0, 0, 0);">The State Machine Editor panel can also be opened via the menu bar \[View &gt; State Machine &gt; State Machine Editor\].</span></p>

<span style="color: rgb(0, 0, 0);">The State Machine Editor displays the GlobalStateMachine's diagram. Like any newly created StateMachine, it contains the following elements:</span>

<table border="1" class="align-center" id="bkmrk-connect-to-fusion-no-2" style="border-collapse: collapse; width: 601px; border-width: 1px; height: 134.667px;"><tbody><tr><td style="background-color: rgb(53, 152, 219); width: 124.167px;"> </td><td style="width: 118.583px; background-color: rgb(53, 152, 219);"><span style="color: rgb(0, 0, 0);">**Visual representation**</span></td><td style="width: 357.583px; background-color: rgb(53, 152, 219);"><span style="color: rgb(0, 0, 0);">**Explanation**</span></td></tr><tr style="height: 29.4667px;"><td style="background-color: rgb(53, 152, 219); width: 124.167px;"><span style="color: rgb(0, 0, 0);">**Initial State**</span></td><td style="width: 118.583px;"><span style="color: rgb(0, 0, 0);">circle</span></td><td class="align-left" style="width: 357.583px;"><span style="color: rgb(0, 0, 0);">Entry point for the state machine.</span></td></tr><tr><td style="background-color: rgb(53, 152, 219); width: 124.167px;"><span style="color: rgb(0, 0, 0);">**State**</span></td><td style="width: 118.583px;"><span style="color: rgb(0, 0, 0);">rectangle</span>

</td><td style="width: 357.583px;"><span style="color: rgb(0, 0, 0);">Represents a certain logic status. OnEntryActions and OnExitActions can be configured.</span>

</td></tr><tr><td style="background-color: rgb(53, 152, 219); width: 124.167px;"><span style="color: rgb(0, 0, 0);">**Transition**</span></td><td style="width: 118.583px;"><span style="color: rgb(0, 0, 0);">arrow</span>

</td><td style="width: 357.583px;"><span style="color: rgb(0, 0, 0);">Transition from one State to another. Sender, Event and Condition for triggering the transition can be configured.</span>

</td></tr></tbody></table>

<div drawio-diagram="6839"><img src="https://doc316en.candera.eu/uploads/images/drawio/2024-09/drawing-5-1726822092.png" alt=""/></div>

#### <span data-dl-original="true" data-dl-translated="true" data-dl-uid="97" style="color: rgb(0, 0, 0);"><span data-dl-original="true" data-dl-translated="true" data-dl-uid="98">State Configuration for Scene Car\_Cluster</span></span>

<span style="color: rgb(0, 0, 0);">The following steps configure the GlobalStateMachine to activate scene Car\_Cluster when the entering the State Machine's "State" and to deactivate scene Car\_Cluster when exiting the "State".</span>

1. <span data-dl-original="true" data-dl-translated="true" data-dl-uid="102" style="color: rgb(0, 0, 0);"><span data-dl-original="true" data-dl-translated="true" data-dl-uid="103">In the State Machine Editor select the State.</span></span>
    - <span data-dl-original="true" data-dl-translated="true" data-dl-uid="105" style="color: rgb(0, 0, 0);"><span data-dl-original="true" data-dl-translated="true" data-dl-uid="106">The properties of the selected State are displayed in the Properties panel.  
          
        </span></span>
2. <span data-dl-original="true" data-dl-translated="true" data-dl-uid="109" style="color: rgb(0, 0, 0);"><span data-dl-original="true" data-dl-translated="true" data-dl-uid="110">In the Properties panel, change the \[Name\] of the General category to "Car\_Cluster".</span></span>
    - <span data-dl-original="true" data-dl-translated="true" data-dl-uid="111" style="color: rgb(0, 0, 0);"><span data-dl-original="true" data-dl-translated="true" data-dl-uid="111"><span data-dl-original="true" data-dl-translated="true" data-dl-uid="112"><span data-dl-original="true" data-dl-translated="true" data-dl-uid="113">In the State Machine Editor, the name of the State is changed to "Car\_Cluster".  
        </span></span></span></span><div drawio-diagram="6840"><img src="https://doc316en.candera.eu/uploads/images/drawio/2024-09/drawing-5-1726822161.png" alt=""/></div>
3. <span style="color: rgb(0, 0, 0);">While "Car\_Cluster" is selected in the State Machine Editor, click on the \[Fusion...\] button in the State Machine Editor's left lower half.</span>  
    
    - <span data-dl-original="true" data-dl-translated="true" data-dl-uid="120" style="color: rgb(0, 0, 0);"><span data-dl-original="true" data-dl-translated="true" data-dl-uid="121"><span data-dl-original="true" data-dl-translated="true" data-dl-uid="122"><span data-dl-original="true" data-dl-translated="true" data-dl-uid="123">Fusion will be opened, displaying the Fusion diagram for "Car\_Cluster".  
        </span></span></span></span>
    - <span data-dl-original="true" data-dl-translated="true" data-dl-uid="126" style="color: rgb(0, 0, 0);"><span data-dl-original="true" data-dl-translated="true" data-dl-uid="127"><span data-dl-original="true" data-dl-translated="true" data-dl-uid="128"><span data-dl-original="true" data-dl-translated="true" data-dl-uid="129"><span data-dl-original="true" data-dl-translated="true" data-dl-uid="130"><span data-dl-original="true" data-dl-translated="true" data-dl-uid="131"><span data-dl-original="true" data-dl-translated="true" data-dl-uid="132"><span data-dl-original="true" data-dl-translated="true" data-dl-uid="133"><span data-dl-original="true" data-dl-translated="true" data-dl-uid="134"><span data-dl-original="true" data-dl-translated="true" data-dl-uid="135"><span data-dl-original="true" data-dl-translated="true" data-dl-uid="136"><span data-dl-original="true" data-dl-translated="true" data-dl-uid="137">The diagram contains two fusion nodes: **Car\_Cluster** and **Transition Request**. The <span data-dl-original="true" data-dl-translated="true" data-dl-uid="138"><span data-dl-original="true" data-dl-translated="true" data-dl-uid="139"><span data-dl-original="true" data-dl-translated="true" data-dl-uid="140"><span data-dl-original="true" data-dl-translated="true" data-dl-uid="141"><span data-dl-original="true" data-dl-translated="true" data-dl-uid="142"><span data-dl-original="true" data-dl-translated="true" data-dl-uid="143"><span data-dl-original="true" data-dl-translated="true" data-dl-uid="144"><span data-dl-original="true" data-dl-translated="true" data-dl-uid="145">Transition Request Fusion node</span></span></span></span></span></span></span></span> is connected to the **Car\_Cluster** at the **On Entry Actions** connector.</span></span></span></span></span></span></span></span></span></span></span></span>
    - <span data-dl-original="true" data-dl-translated="true" data-dl-uid="146" style="color: rgb(0, 0, 0);"><span data-dl-original="true" data-dl-translated="true" data-dl-uid="146"><span data-dl-original="true" data-dl-translated="true" data-dl-uid="147"><span data-dl-original="true" data-dl-translated="true" data-dl-uid="148"><span data-dl-original="true" data-dl-translated="true" data-dl-uid="149"><span data-dl-original="true" data-dl-translated="true" data-dl-uid="150"><span data-dl-original="true" data-dl-translated="true" data-dl-uid="151"><span data-dl-original="true" data-dl-translated="true" data-dl-uid="152"><span data-dl-original="true" data-dl-translated="true" data-dl-uid="153"><span data-dl-original="true" data-dl-translated="true" data-dl-uid="154"><span data-dl-original="true" data-dl-translated="true" data-dl-uid="155"><span data-dl-original="true" data-dl-translated="true" data-dl-uid="156"><span data-dl-original="true" data-dl-translated="true" data-dl-uid="157"><span data-dl-original="true" data-dl-translated="true" data-dl-uid="158">In the **Transition Request** Node, the \[RequestType\] is set to "Active".  
        </span></span></span></span></span></span></span></span></span></span></span></span></span></span><div drawio-diagram="5656"><img src="https://doc316en.candera.eu/uploads/images/drawio/2024-04/drawing-4-1714391578.png" alt=""/></div>
4. <span data-dl-original="true" data-dl-translated="true" data-dl-uid="160" style="color: rgb(0, 0, 0);"><span data-dl-original="true" data-dl-translated="true" data-dl-uid="161"><span data-dl-original="true" data-dl-translated="true" data-dl-uid="162"><span data-dl-original="true" data-dl-translated="true" data-dl-uid="163"><span data-dl-original="true" data-dl-translated="true" data-dl-uid="164"><span data-dl-original="true" data-dl-translated="true" data-dl-uid="165"><span data-dl-original="true" data-dl-translated="true" data-dl-uid="166"><span data-dl-original="true" data-dl-translated="true" data-dl-uid="167">In the Transition Request Fusion node, click on the Select item icon to the right of the \[Identifier\].</span></span></span></span></span></span></span></span>
    - <span data-dl-original="true" data-dl-translated="true" data-dl-uid="168" style="color: rgb(0, 0, 0);"><span data-dl-original="true" data-dl-translated="true" data-dl-uid="168"><span data-dl-original="true" data-dl-translated="true" data-dl-uid="169"><span data-dl-original="true" data-dl-translated="true" data-dl-uid="170"><span data-dl-original="true" data-dl-translated="true" data-dl-uid="171"><span data-dl-original="true" data-dl-translated="true" data-dl-uid="172"><span data-dl-original="true" data-dl-translated="true" data-dl-uid="173"><span data-dl-original="true" data-dl-translated="true" data-dl-uid="174"><span data-dl-original="true" data-dl-translated="true" data-dl-uid="175"><span data-dl-original="true" data-dl-translated="true" data-dl-uid="176">The \[Choose Item\] dialog will be opened.  
        </span></span></span></span></span></span></span></span></span></span><div drawio-diagram="5659"><img src="https://doc316en.candera.eu/uploads/images/drawio/2024-04/drawing-4-1714391725.png" alt=""/></div>
5. <span style="color: rgb(0, 0, 0);">In the Choose Item dialog, navigate to and select \[Solution &gt; Scenes &gt; Car\_Cluster\], then press the \[OK\] button.</span>  
    
    - <span style="color: rgb(0, 0, 0);">The \[Choose Item\] dialog will be closed.</span>
    - <span style="color: rgb(0, 0, 0);">With this setting, the "Car\_Cluster" scene will be activated when entering State "Car\_Cluster".</span>  
        <div drawio-diagram="5660"><img src="https://doc316en.candera.eu/uploads/images/drawio/2024-04/drawing-4-1714391771.png" alt=""/></div>
6. <span data-dl-original="true" data-dl-translated="true" data-dl-uid="187" style="color: rgb(0, 0, 0);"><span data-dl-original="true" data-dl-translated="true" data-dl-uid="188"><span data-dl-original="true" data-dl-translated="true" data-dl-uid="189"><span data-dl-original="true" data-dl-translated="true" data-dl-uid="190">In the State Machine Editor, click the Car\_Cluster Fusion node's **On Exit Actions** connector.</span></span></span></span>
    - <span data-dl-original="true" data-dl-translated="true" data-dl-uid="191" style="color: rgb(0, 0, 0);"><span data-dl-original="true" data-dl-translated="true" data-dl-uid="191"><span data-dl-original="true" data-dl-translated="true" data-dl-uid="192"><span data-dl-original="true" data-dl-translated="true" data-dl-uid="193"><span data-dl-original="true" data-dl-translated="true" data-dl-uid="194"><span data-dl-original="true" data-dl-translated="true" data-dl-uid="195">The \[Select Behavior\] dialog will be opened.  
        </span></span></span></span></span></span><div drawio-diagram="5661"><img src="https://doc316en.candera.eu/uploads/images/drawio/2024-04/drawing-4-1714391809.png" alt=""/></div>
7. <span data-dl-original="true" data-dl-translated="true" data-dl-uid="198" style="color: rgb(0, 0, 0);"><span data-dl-original="true" data-dl-translated="true" data-dl-uid="199"><span data-dl-original="true" data-dl-translated="true" data-dl-uid="200"><span data-dl-original="true" data-dl-translated="true" data-dl-uid="201">In the \[Select Behavior\] dialog's search field, enter "<span data-dl-original="true" data-dl-translated="true" data-dl-uid="202"><span data-dl-original="true" data-dl-translated="true" data-dl-uid="203"><span data-dl-original="true" data-dl-translated="true" data-dl-uid="204"><span data-dl-original="true" data-dl-translated="true" data-dl-uid="205">Transition Request</span></span></span></span>".</span></span></span></span>
    - <span data-dl-original="true" data-dl-translated="true" data-dl-uid="207" style="color: rgb(0, 0, 0);"><span data-dl-original="true" data-dl-translated="true" data-dl-uid="208"><span data-dl-original="true" data-dl-translated="true" data-dl-uid="209"><span data-dl-original="true" data-dl-translated="true" data-dl-uid="210">The list of behaviors in the dialog is narrowed down to \[Action &gt; Transition &gt; <span data-dl-original="true" data-dl-translated="true" data-dl-uid="211"><span data-dl-original="true" data-dl-translated="true" data-dl-uid="212"><span data-dl-original="true" data-dl-translated="true" data-dl-uid="213"><span data-dl-original="true" data-dl-translated="true" data-dl-uid="214"><span data-dl-original="true" data-dl-translated="true" data-dl-uid="215"><span data-dl-original="true" data-dl-translated="true" data-dl-uid="216"><span data-dl-original="true" data-dl-translated="true" data-dl-uid="217"><span data-dl-original="true" data-dl-translated="true" data-dl-uid="218">Transition Request\]</span></span></span></span></span></span></span></span>.  
          
        </span></span></span></span>
8. <span data-dl-original="true" data-dl-translated="true" data-dl-uid="221" style="color: rgb(0, 0, 0);"><span data-dl-original="true" data-dl-translated="true" data-dl-uid="222"><span data-dl-original="true" data-dl-translated="true" data-dl-uid="198"><span data-dl-original="true" data-dl-translated="true" data-dl-uid="199"><span data-dl-original="true" data-dl-translated="true" data-dl-uid="200"><span data-dl-original="true" data-dl-translated="true" data-dl-uid="201">In the \[Select Behavior\] dialog</span></span></span></span>, double-click "<span data-dl-original="true" data-dl-translated="true" data-dl-uid="223"><span data-dl-original="true" data-dl-translated="true" data-dl-uid="224"><span data-dl-original="true" data-dl-translated="true" data-dl-uid="225"><span data-dl-original="true" data-dl-translated="true" data-dl-uid="226"><span data-dl-original="true" data-dl-translated="true" data-dl-uid="227"><span data-dl-original="true" data-dl-translated="true" data-dl-uid="228"><span data-dl-original="true" data-dl-translated="true" data-dl-uid="229"><span data-dl-original="true" data-dl-translated="true" data-dl-uid="230">Transition Request"</span></span></span></span></span></span></span></span>.</span></span>
    - <span data-dl-original="true" data-dl-translated="true" data-dl-uid="231" style="color: rgb(0, 0, 0);"><span data-dl-original="true" data-dl-translated="true" data-dl-uid="231"><span data-dl-original="true" data-dl-translated="true" data-dl-uid="232"><span data-dl-original="true" data-dl-translated="true" data-dl-uid="233">A <span data-dl-original="true" data-dl-translated="true" data-dl-uid="234"><span data-dl-original="true" data-dl-translated="true" data-dl-uid="235"><span data-dl-original="true" data-dl-translated="true" data-dl-uid="236"><span data-dl-original="true" data-dl-translated="true" data-dl-uid="237"><span data-dl-original="true" data-dl-translated="true" data-dl-uid="238"><span data-dl-original="true" data-dl-translated="true" data-dl-uid="239"><span data-dl-original="true" data-dl-translated="true" data-dl-uid="240"><span data-dl-original="true" data-dl-translated="true" data-dl-uid="241"><span data-dl-original="true" data-dl-translated="true" data-dl-uid="242"><span data-dl-original="true" data-dl-translated="true" data-dl-uid="243"><span data-dl-original="true" data-dl-translated="true" data-dl-uid="244"><span data-dl-original="true" data-dl-translated="true" data-dl-uid="245"><span data-dl-original="true" data-dl-translated="true" data-dl-uid="246"><span data-dl-original="true" data-dl-translated="true" data-dl-uid="247">Transition Request</span></span></span></span></span></span></span></span></span></span></span></span></span></span> Fusion node is linked to the "<span data-dl-translated="true" data-dl-uid="234"><span data-dl-translated="true" data-dl-uid="235"><span data-dl-translated="true" data-dl-uid="236"><span data-dl-translated="true" data-dl-uid="237">On Exit Actions" connector of the Car\_Cluster Fusion node</span></span></span></span>.  
        </span></span></span></span><div drawio-diagram="5663"><img src="https://doc316en.candera.eu/uploads/images/drawio/2024-04/drawing-4-1714391889.png" alt=""/></div>
9. <span data-dl-original="true" data-dl-translated="true" data-dl-uid="249" style="color: rgb(0, 0, 0);"><span data-dl-original="true" data-dl-translated="true" data-dl-uid="250"><span data-dl-original="true" data-dl-translated="true" data-dl-uid="251"><span data-dl-original="true" data-dl-translated="true" data-dl-uid="252"><span data-dl-original="true" data-dl-translated="true" data-dl-uid="253"><span data-dl-original="true" data-dl-translated="true" data-dl-uid="254"><span data-dl-original="true" data-dl-translated="true" data-dl-uid="255"><span data-dl-original="true" data-dl-translated="true" data-dl-uid="256"><span data-dl-original="true" data-dl-translated="true" data-dl-uid="257"><span data-dl-original="true" data-dl-translated="true" data-dl-uid="258"><span data-dl-original="true" data-dl-translated="true" data-dl-uid="259"><span data-dl-original="true" data-dl-translated="true" data-dl-uid="260"><span data-dl-original="true" data-dl-translated="true" data-dl-uid="261"><span data-dl-original="true" data-dl-translated="true" data-dl-uid="262"><span data-dl-original="true" data-dl-translated="true" data-dl-uid="263"><span data-dl-original="true" data-dl-translated="true" data-dl-uid="264"><span data-dl-original="true" data-dl-translated="true" data-dl-uid="265"><span data-dl-original="true" data-dl-translated="true" data-dl-uid="266"><span data-dl-original="true" data-dl-translated="true" data-dl-uid="267">In Fusion configure the newly created <span data-dl-original="true" data-dl-translated="true" data-dl-uid="268"><span data-dl-original="true" data-dl-translated="true" data-dl-uid="269"><span data-dl-original="true" data-dl-translated="true" data-dl-uid="270"><span data-dl-original="true" data-dl-translated="true" data-dl-uid="271"><span data-dl-original="true" data-dl-translated="true" data-dl-uid="272"><span data-dl-original="true" data-dl-translated="true" data-dl-uid="273"><span data-dl-original="true" data-dl-translated="true" data-dl-uid="274"><span data-dl-original="true" data-dl-translated="true" data-dl-uid="275"><span data-dl-original="true" data-dl-translated="true" data-dl-uid="276"><span data-dl-original="true" data-dl-translated="true" data-dl-uid="277"><span data-dl-original="true" data-dl-translated="true" data-dl-uid="278"><span data-dl-original="true" data-dl-translated="true" data-dl-uid="279"><span data-dl-original="true" data-dl-translated="true" data-dl-uid="280"><span data-dl-original="true" data-dl-translated="true" data-dl-uid="281"><span data-dl-original="true" data-dl-translated="true" data-dl-uid="282"><span data-dl-original="true" data-dl-translated="true" data-dl-uid="283">Transition Request</span></span></span></span></span></span></span></span></span></span></span></span></span></span> Fusion node, that is <span data-dl-translated="true" data-dl-uid="270"><span data-dl-translated="true" data-dl-uid="271"><span data-dl-translated="true" data-dl-uid="272"><span data-dl-translated="true" data-dl-uid="273">connected to the "On Exit Actions" connector, according to the table below</span></span></span></span></span></span>.</span></span></span></span></span></span></span></span></span></span></span></span></span></span></span></span></span></span></span>
    - <span data-dl-original="true" data-dl-translated="true" data-dl-uid="284" style="color: rgb(0, 0, 0);"><span data-dl-original="true" data-dl-translated="true" data-dl-uid="285"><span data-dl-original="true" data-dl-translated="true" data-dl-uid="286"><span data-dl-original="true" data-dl-translated="true" data-dl-uid="287"><span data-dl-original="true" data-dl-translated="true" data-dl-uid="288"><span data-dl-original="true" data-dl-translated="true" data-dl-uid="289"><span data-dl-original="true" data-dl-translated="true" data-dl-uid="290"><span data-dl-original="true" data-dl-translated="true" data-dl-uid="291"><span data-dl-original="true" data-dl-translated="true" data-dl-uid="292"><span data-dl-original="true" data-dl-translated="true" data-dl-uid="293"><span data-dl-original="true" data-dl-translated="true" data-dl-uid="294"><span data-dl-original="true" data-dl-translated="true" data-dl-uid="295"><span data-dl-original="true" data-dl-translated="true" data-dl-uid="296"><span data-dl-original="true" data-dl-translated="true" data-dl-uid="297"><span data-dl-original="true" data-dl-translated="true" data-dl-uid="298"><span data-dl-original="true" data-dl-translated="true" data-dl-uid="299"><span data-dl-original="true" data-dl-translated="true" data-dl-uid="300"><span data-dl-original="true" data-dl-translated="true" data-dl-uid="301"><span data-dl-original="true" data-dl-translated="true" data-dl-uid="302"><span data-dl-original="true" data-dl-translated="true" data-dl-uid="303">With this setting, the Car\_Cluster scene is deactivated when exiting State "Car\_Cluster".  
        </span></span></span></span></span></span></span></span></span></span></span></span></span></span></span></span></span></span></span></span><table border="1" class="align-center" style="border-collapse: collapse; width: 500px; border-width: 1px;"><colgroup><col></col><col></col></colgroup><tbody><tr><td style="border-width: 1px; background-color: rgb(53, 152, 219);"><span style="color: rgb(0, 0, 0);">**RequestType**</span></td><td class="align-left" style="border-width: 1px;"><span style="color: rgb(0, 0, 0);">Deactivate</span></td></tr><tr><td style="border-width: 1px; background-color: rgb(53, 152, 219);"><span style="color: rgb(0, 0, 0);">**Identifier**</span></td><td class="align-left" data-dl-original="true" data-dl-translated="true" data-dl-uid="310" style="border-width: 1px;"><span style="color: rgb(0, 0, 0);">Solution &gt; Scenes &gt; Car\_Cluster</span></td></tr></tbody></table>
10. <span style="color: rgb(0, 0, 0);">Switch back to the State Machine Editor either via the up arrow icon in the upper right corner of the Fusion panel or using the tabs of the open Scene Composer editors.</span>
    - <span style="color: rgb(0, 0, 0);">The State Machine Editor is opened, displaying the GlobalStateMachine's diagram</span>

#### <span style="color: rgb(0, 0, 0);">Adding and Configuring States for Scene Car\_Status and Incoming\_Call</span>

1. <span data-dl-original="true" data-dl-translated="true" data-dl-uid="313" style="color: rgb(0, 0, 0);"><span data-dl-original="true" data-dl-translated="true" data-dl-uid="313"><span data-dl-original="true" data-dl-translated="true" data-dl-uid="314"><span data-dl-original="true" data-dl-translated="true" data-dl-uid="315">In the State Machine Editor, select the "Car\_Cluster" State. Copy the state either by right-clicking and selecting \[Copy\] from the context menu or via the keyboard-shortcut &lt;Strg + C&gt;.</span></span></span></span><div drawio-diagram="5224"><img src="https://doc316en.candera.eu/uploads/images/drawio/2024-02/drawing-4-1707889373.png" alt=""/></div>
2. <span data-dl-original="true" data-dl-translated="true" data-dl-uid="317" style="color: rgb(0, 0, 0);"><span data-dl-original="true" data-dl-translated="true" data-dl-uid="318">Click anywhere into the State Machine Editor to deselect the Car\_Cluster state. Then paste the state either by right-clicking and selecting \[Paste\] form the context menu or via the keyboard-shortcut &lt;Strg + P&gt;.</span></span>
    - <span style="color: rgb(0, 0, 0);">A State named "Car\_Cluster\_1" will be added to the State Machine diagram.</span>
3. <span data-dl-original="true" data-dl-translated="true" data-dl-uid="322" style="color: rgb(0, 0, 0);"><span data-dl-original="true" data-dl-translated="true" data-dl-uid="323">In the State Machine Editor, select the new state "Car\_Cluster\_1". In the Properties panel, change the \[Name\] of the General category to "Car\_Status".</span></span>
    - <span data-dl-original="true" data-dl-translated="true" data-dl-uid="332" style="color: rgb(0, 0, 0);"><span data-dl-original="true" data-dl-translated="true" data-dl-uid="333">In the State Machine Editor, the name of State will be changed to "Car\_Status".  
          
        </span></span>
4. <span style="color: rgb(0, 0, 0);">While "Car\_Status" is selected in the State Machine Editor, click on the \[Fusion...\] button in the State Machine Editor's left lower half.</span>  
    
    - <span data-dl-original="true" data-dl-translated="true" data-dl-uid="341" style="color: rgb(0, 0, 0);"><span data-dl-original="true" data-dl-translated="true" data-dl-uid="342"><span data-dl-original="true" data-dl-translated="true" data-dl-uid="343"><span data-dl-original="true" data-dl-translated="true" data-dl-uid="344">Fusion will be opened, displaying the Fusion diagram for "Car\_Status".  
        </span></span></span></span>
    - <span data-dl-original="true" data-dl-translated="true" data-dl-uid="347" style="color: rgb(0, 0, 0);"><span data-dl-original="true" data-dl-translated="true" data-dl-uid="348"><span data-dl-original="true" data-dl-translated="true" data-dl-uid="349"><span data-dl-original="true" data-dl-translated="true" data-dl-uid="350"><span data-dl-original="true" data-dl-translated="true" data-dl-uid="351"><span data-dl-original="true" data-dl-translated="true" data-dl-uid="352"><span data-dl-original="true" data-dl-translated="true" data-dl-uid="353"><span data-dl-original="true" data-dl-translated="true" data-dl-uid="354"><span data-dl-original="true" data-dl-translated="true" data-dl-uid="355"><span data-dl-original="true" data-dl-translated="true" data-dl-uid="356"><span data-dl-original="true" data-dl-translated="true" data-dl-uid="357"><span data-dl-original="true" data-dl-translated="true" data-dl-uid="358">The diagram contains a Car\_Status Fusion node and two Transition Request Fusion nodes, connected via the On Entry Actions and On Exit Actions connectors.  
          
        </span></span></span></span></span></span></span></span></span></span></span></span>
5. <span data-dl-original="true" data-dl-translated="true" data-dl-uid="369" style="color: rgb(0, 0, 0);"><span data-dl-original="true" data-dl-translated="true" data-dl-uid="370"><span data-dl-original="true" data-dl-translated="true" data-dl-uid="371"><span data-dl-original="true" data-dl-translated="true" data-dl-uid="372"><span data-dl-original="true" data-dl-translated="true" data-dl-uid="373"><span data-dl-original="true" data-dl-translated="true" data-dl-uid="374"><span data-dl-original="true" data-dl-translated="true" data-dl-uid="375"><span data-dl-original="true" data-dl-translated="true" data-dl-uid="376"><span data-dl-original="true" data-dl-translated="true" data-dl-uid="377"><span data-dl-original="true" data-dl-translated="true" data-dl-uid="378"><span data-dl-original="true" data-dl-translated="true" data-dl-uid="379"><span data-dl-original="true" data-dl-translated="true" data-dl-uid="380"><span data-dl-original="true" data-dl-translated="true" data-dl-uid="381">In Fusion, configure the Transition Request according to the table below.</span></span></span></span></span></span></span></span></span></span></span></span></span>
    - <span style="color: rgb(0, 0, 0);">The configuration of State Car\_Status is completed.</span><table border="1" class="align-center" style="border-collapse: collapse; width: 500px; border-width: 1px;"><colgroup><col></col><col></col></colgroup><tbody><tr><td colspan="2" data-dl-original="true" data-dl-translated="true" data-dl-uid="383" style="border-width: 1px; background-color: rgb(35, 111, 161);"><span data-dl-original="true" data-dl-translated="true" data-dl-uid="384" style="color: rgb(0, 0, 0);">**On Entry Actions**</span></td></tr><tr><td data-dl-original="true" data-dl-translated="true" data-dl-uid="386" style="border-width: 1px;"><span style="color: rgb(0, 0, 0);">RequestType</span></td><td class="align-center" data-dl-original="true" data-dl-translated="true" data-dl-uid="387" style="border-width: 1px;"><span style="color: rgb(0, 0, 0);">Activate</span></td></tr><tr><td data-dl-original="true" data-dl-translated="true" data-dl-uid="388" style="border-width: 1px;"><span style="color: rgb(0, 0, 0);">Identifier</span></td><td data-dl-original="true" data-dl-translated="true" data-dl-uid="389" style="border-width: 1px;"><span style="color: rgb(0, 0, 0);">Solution&gt;Scenes&gt;Car\_Status</span></td></tr><tr><td colspan="2" data-dl-original="true" data-dl-translated="true" data-dl-uid="390" style="border-width: 1px; background-color: rgb(35, 111, 161);"><span data-dl-original="true" data-dl-translated="true" data-dl-uid="391" style="color: rgb(0, 0, 0);">**On Exit Actions**</span></td></tr><tr><td data-dl-original="true" data-dl-translated="true" data-dl-uid="393" style="border-width: 1px;"><span style="color: rgb(0, 0, 0);">RequestType</span></td><td data-dl-original="true" data-dl-translated="true" data-dl-uid="394" style="border-width: 1px;"><span style="color: rgb(0, 0, 0);">Deactivate</span></td></tr><tr><td data-dl-original="true" data-dl-translated="true" data-dl-uid="395" style="border-width: 1px;"><span style="color: rgb(0, 0, 0);">Identifier</span></td><td data-dl-original="true" data-dl-translated="true" data-dl-uid="396" style="border-width: 1px;"><span style="color: rgb(0, 0, 0);">Solution&gt;Scenes&gt;Car\_Status</span></td></tr></tbody></table>
6. <span data-dl-original="true" data-dl-translated="true" data-dl-uid="397" style="color: rgb(0, 0, 0);"><span data-dl-original="true" data-dl-translated="true" data-dl-uid="398">Repeat steps 1 through 6 above, to add another State for the Incoming\_Call scene. Configure the State according to the table below.</span></span>
    - <span style="color: rgb(0, 0, 0);">A new state for Incoming\_Call has been created and configured.</span>
    - <span style="color: rgb(0, 0, 0);">In State Machine Editor, the diagram of the GlobalStateMachine looks like in the figure below.</span><table border="1" class="align-center" style="border-collapse: collapse; width: 500px; border-width: 1px;"><colgroup><col></col><col></col></colgroup><tbody><tr><td colspan="2" data-dl-original="true" data-dl-translated="true" data-dl-uid="399" style="border-width: 1px; background-color: rgb(35, 111, 161);"><span data-dl-original="true" data-dl-translated="true" data-dl-uid="400" style="color: rgb(0, 0, 0);">**Name**</span></td></tr><tr><td colspan="2" data-dl-original="true" data-dl-translated="true" data-dl-uid="402" style="border-width: 1px;"><span data-dl-original="true" data-dl-translated="true" data-dl-uid="403" style="color: rgb(0, 0, 0);">Incoming\_Call</span></td></tr><tr><td colspan="2" data-dl-original="true" data-dl-translated="true" data-dl-uid="404" style="border-width: 1px; background-color: rgb(35, 111, 161);"><span data-dl-original="true" data-dl-translated="true" data-dl-uid="405" style="color: rgb(0, 0, 0);">**On Entry Actions**</span></td></tr><tr><td data-dl-original="true" data-dl-translated="true" data-dl-uid="407" style="border-width: 1px;"><span style="color: rgb(0, 0, 0);">RequestType</span></td><td class="align-center" data-dl-original="true" data-dl-translated="true" data-dl-uid="408" style="border-width: 1px;"><span style="color: rgb(0, 0, 0);">Activate</span></td></tr><tr><td data-dl-original="true" data-dl-translated="true" data-dl-uid="409" style="border-width: 1px;"><span style="color: rgb(0, 0, 0);">Identifier</span></td><td data-dl-original="true" data-dl-translated="true" data-dl-uid="410" style="border-width: 1px;"><span data-dl-original="true" data-dl-translated="true" data-dl-uid="411" style="color: rgb(0, 0, 0);">Solution&gt;Scenes&gt;Incoming\_Call</span></td></tr><tr><td colspan="2" data-dl-original="true" data-dl-translated="true" data-dl-uid="412" style="border-width: 1px; background-color: rgb(35, 111, 161);"><span data-dl-original="true" data-dl-translated="true" data-dl-uid="413" style="color: rgb(0, 0, 0);">**On Exit Actions**</span></td></tr><tr><td data-dl-original="true" data-dl-translated="true" data-dl-uid="415" style="border-width: 1px;"><span style="color: rgb(0, 0, 0);">RequestType</span></td><td data-dl-original="true" data-dl-translated="true" data-dl-uid="416" style="border-width: 1px;"><span style="color: rgb(0, 0, 0);">Deactivate</span></td></tr><tr><td data-dl-original="true" data-dl-translated="true" data-dl-uid="417" style="border-width: 1px;"><span style="color: rgb(0, 0, 0);">Identifier</span></td><td data-dl-original="true" data-dl-translated="true" data-dl-uid="418" style="border-width: 1px;"><span data-dl-original="true" data-dl-translated="true" data-dl-uid="419" style="color: rgb(0, 0, 0);">Solution&gt;Scenes&gt;Incoming\_Call</span></td></tr></tbody></table>
        
          
        <div drawio-diagram="5664"><img src="https://doc316en.candera.eu/uploads/images/drawio/2024-04/drawing-4-1714391994.png" alt=""/></div>

<span style="color: rgb(0, 0, 0);">The above operation completes creating States for our Cluster scenes. The next step is to configure the transition logic between these States.</span>

# Transitions configuration

<span data-dl-original="true" data-dl-translated="true" data-dl-uid="53" style="color: rgb(0, 0, 0);"><span data-dl-original="true" data-dl-translated="true" data-dl-uid="54">This page describes how to set up transitions between the three States created in the previous operation. These state transitions can be configured in the State Machine Editor. </span></span>

<p class="callout info"><span data-dl-original="true" data-dl-translated="true" data-dl-uid="53" style="color: rgb(0, 0, 0);"><span data-dl-original="true" data-dl-translated="true" data-dl-uid="54">More information about state transitions can be found [here](https://doc316en.candera.eu/books/state-machine/page/components-in-state-machine#bkmrk-transition).</span></span></p>

##### <span data-dl-original="true" data-dl-translated="true" data-dl-uid="56" style="color: rgb(0, 0, 0);"><span data-dl-original="true" data-dl-translated="true" data-dl-uid="57">State Transition Configuration</span></span>

<span style="color: rgb(0, 0, 0);">The Transition function of the State Machine Editor defines how and when the system moves from one state to another. Transitions are indicated by connecting two states with an arrow.</span>

1. <span data-dl-original="true" data-dl-translated="true" data-dl-uid="59" style="color: rgb(0, 0, 0);"><span data-dl-original="true" data-dl-translated="true" data-dl-uid="60">Drag a State Transition from the State Machine Editor's top toolbar, and <span data-dl-original="true" data-dl-translated="true" data-dl-uid="61"><span data-dl-original="true" data-dl-translated="true" data-dl-uid="62">drop it onto the</span></span> "Car\_Cluster" State (<span data-dl-translated="true" data-dl-uid="61"><span data-dl-translated="true" data-dl-uid="62">Transition start side).</span></span></span></span>
    - <span data-dl-original="true" data-dl-translated="true" data-dl-uid="63" style="color: rgb(0, 0, 0);"><span data-dl-original="true" data-dl-translated="true" data-dl-uid="63"><span data-dl-original="true" data-dl-translated="true" data-dl-uid="64"><span data-dl-original="true" data-dl-translated="true" data-dl-uid="65"><span data-dl-original="true" data-dl-translated="true" data-dl-uid="66"><span data-dl-original="true" data-dl-translated="true" data-dl-uid="67">A State Transition arrow is created, the tail of which is linked to the "Car\_Cluster" State.</span></span></span></span></span></span>
    - <span data-dl-original="true" data-dl-translated="true" data-dl-uid="63" style="color: rgb(0, 0, 0);"><span data-dl-original="true" data-dl-translated="true" data-dl-uid="63"><span data-dl-original="true" data-dl-translated="true" data-dl-uid="64"><span data-dl-original="true" data-dl-translated="true" data-dl-uid="65"><span data-dl-original="true" data-dl-translated="true" data-dl-uid="66"><span data-dl-original="true" data-dl-translated="true" data-dl-uid="67">The State Transition arrow's head can now be dragged across the diagram to define the target state.</span></span></span></span></span></span><div drawio-diagram="5680"><img src="https://doc316en.candera.eu/uploads/images/drawio/2024-04/drawing-4-1714458011.png" alt=""/></div>
2. <span data-dl-original="true" data-dl-translated="true" data-dl-uid="69" style="color: rgb(0, 0, 0);"><span data-dl-original="true" data-dl-translated="true" data-dl-uid="70">Drag the State Transition arrow's head onto the "Incoming\_Call" State and attach it with a mouse-click.</span></span>  
    
    - <span style="color: rgb(0, 0, 0);">The two states, "Car\_Cluster" and "Incoming\_Call", are connected by a State Transition arrow.</span>  
        <div drawio-diagram="5666"><img src="https://doc316en.candera.eu/uploads/images/drawio/2024-04/drawing-4-1714392159.png" alt=""/></div>
3. <span style="color: rgb(0, 0, 0);">Select the State Transition in the State Machine diagram and click the \[Fusion...\] button in the Behavior/Fusion Configuration Panel in the State Machine Editor's bottom left.</span>
    - <span style="color: rgb(0, 0, 0);">Fusion will be opened, displaying the Transition's Fusion diagram.</span>
    - <span style="color: rgb(0, 0, 0);">A Check Click Fusion node is connected to the Transition Fusion node's Condition connector.</span>
4. <span style="color: rgb(0, 0, 0);">Click on the Transition Fusion node's Actions connector.</span>
    - <span style="color: rgb(0, 0, 0);">The \[Select Behavior\] dialog will be opened.</span><p class="callout info"><span style="color: rgb(0, 0, 0);">Instead of clicking on the Actions connector, you can click and drag the connector to a desired location in the diagram where the new Fusion node will be positioned.</span></p>
        
        <div drawio-diagram="8676"><img src="https://doc316en.candera.eu/uploads/images/drawio/2025-11/drawing-5-1762512316.png" alt=""/></div>
5. <span style="color: rgb(0, 0, 0);">Enter "Transition Request" in the search field at the top of the dialog.</span>
    - <span style="color: rgb(0, 0, 0);">While typing, the list of behaviors in the dialog will be narrowed down.</span>
6. <span style="color: rgb(0, 0, 0);">Double-click \[Action &gt; Transition &gt; Transition Request\].</span>
    - <span style="color: rgb(0, 0, 0);">A new Transition Request Fusion node will be created. It is linked to the Actions connector of the Transition Fusion node.</span>
7. <span style="color: rgb(0, 0, 0);">Configure the Transition Request Fusion node according to the table below. The scene assigned to the property \[Identifier\] determines the destination of the transition.</span>
    - <span style="color: rgb(0, 0, 0);">This operation completes the configuration of the transition from "Car\_Cluster" to "Incoming\_Call".</span>
    - <span style="color: rgb(0, 0, 0);">Click the up arrow icon in the upper right corner of the Fusion panel to navigate back to the State Machine Editor.</span>  
        <table border="1" class="align-center" data-dl-original="true" data-dl-translated="true" data-dl-uid="130" id="bkmrk-items-setting-value--0" style="border-collapse: collapse; width: 500px; border-width: 1px;"><colgroup data-dl-original="true" data-dl-translated="true" data-dl-uid="131"><col data-dl-original="true" data-dl-translated="true" data-dl-uid="132"></col><col data-dl-original="true" data-dl-translated="true" data-dl-uid="133"></col></colgroup><tbody data-dl-original="true" data-dl-translated="true" data-dl-uid="134"><tr><td style="border-width: 1px; background-color: rgb(35, 111, 161);"><span style="color: rgb(0, 0, 0);">**Property**</span></td><td style="border-width: 1px; background-color: rgb(35, 111, 161);"><span style="color: rgb(0, 0, 0);">**Configuration**</span></td></tr><tr data-dl-original="true" data-dl-translated="true" data-dl-uid="135"><td data-dl-original="true" data-dl-translated="true" data-dl-uid="136" style="border-width: 1px;"><span data-dl-original="true" data-dl-translated="true" data-dl-uid="137" style="color: rgb(0, 0, 0);"><span data-dl-original="true" data-dl-translated="true" data-dl-uid="138">RequestType</span></span></td><td data-dl-original="true" data-dl-translated="true" data-dl-uid="139" style="border-width: 1px;"><span data-dl-original="true" data-dl-translated="true" data-dl-uid="140" style="color: rgb(0, 0, 0);"><span data-dl-original="true" data-dl-translated="true" data-dl-uid="141">Activate</span></span></td></tr><tr data-dl-original="true" data-dl-translated="true" data-dl-uid="142"><td data-dl-original="true" data-dl-translated="true" data-dl-uid="143" style="border-width: 1px;"><span data-dl-original="true" data-dl-translated="true" data-dl-uid="144" style="color: rgb(0, 0, 0);"><span data-dl-original="true" data-dl-translated="true" data-dl-uid="145">Identifier</span></span></td><td data-dl-original="true" data-dl-translated="true" data-dl-uid="146" style="border-width: 1px;"><span data-dl-original="true" data-dl-translated="true" data-dl-uid="147" style="color: rgb(0, 0, 0);"><span data-dl-original="true" data-dl-translated="true" data-dl-uid="148">Solution &gt; Scenes &gt; Incoming\_Call</span></span></td></tr></tbody></table>
        
          
        <div drawio-diagram="8677"><img src="https://doc316en.candera.eu/uploads/images/drawio/2025-11/drawing-5-1762513559.png" alt=""/></div>
8. <span style="color: rgb(0, 0, 0);">Repeat steps 1 through step 7 to configure the following five transitions.</span>
    - <span style="color: rgb(0, 0, 0);">This finalizes the configuration of our State Transitions.</span>
    - <span style="color: rgb(0, 0, 0);">Scene Car\_Status is activated whenever State Car\_Status is entered. Scene Car\_Cluster is entered whenever State Car\_Cluster is entered etc.</span>
    - <span style="color: rgb(0, 0, 0);">The final State Machine diagram will look like the image shown below.</span><table border="1" class="align-center" style="border-collapse: collapse; width: 601px; border-width: 1px;"><colgroup><col style="width: 113px;"></col><col style="width: 113px;"></col><col style="width: 123px;"></col><col style="width: 251px;"></col></colgroup><tbody><tr><td colspan="2" style="border-width: 1px; background-color: rgb(35, 111, 161);"><span style="color: rgb(0, 0, 0);">**Transition**</span></td><td rowspan="2" style="border-width: 1px; background-color: rgb(35, 111, 161);"><span style="color: rgb(0, 0, 0);">**RequestType**</span></td><td rowspan="2" style="border-width: 1px; background-color: rgb(35, 111, 161);"><span style="color: rgb(0, 0, 0);">**Identifier**</span></td></tr><tr><td style="border-width: 1px; background-color: rgb(35, 111, 161);"><span style="color: rgb(0, 0, 0);">**From**</span></td><td style="border-width: 1px; background-color: rgb(35, 111, 161);"><span style="color: rgb(0, 0, 0);">**To**</span></td></tr><tr><td class="align-left" data-="" style="border-width: 1px;"><span style="color: rgb(0, 0, 0);">Incoming\_Call</span></td><td style="border-width: 1px;"><span style="color: rgb(0, 0, 0);">Car\_Status</span></td><td style="border-width: 1px;"><span style="color: rgb(0, 0, 0);">Activate</span></td><td class="align-left" style="border-width: 1px;"><span style="color: rgb(0, 0, 0);">Solution&gt;Scenes&gt;Car\_Status</span></td></tr><tr><td class="align-left" style="border-width: 1px;"><span style="color: rgb(0, 0, 0);">Car\_Status</span></td><td style="border-width: 1px;"><span style="color: rgb(0, 0, 0);">Car\_Cluster</span></td><td style="border-width: 1px;"><span style="color: rgb(0, 0, 0);">Activate</span></td><td class="align-left" style="border-width: 1px;"><span style="color: rgb(0, 0, 0);">Solution&gt;Scenes&gt;Car\_Cluster</span></td></tr><tr><td class="align-left" style="border-width: 1px;"><span style="color: rgb(0, 0, 0);">Car\_Cluster</span></td><td style="border-width: 1px;"><span style="color: rgb(0, 0, 0);">Car\_Status</span></td><td style="border-width: 1px;"><span style="color: rgb(0, 0, 0);">Activate</span></td><td class="align-left" style="border-width: 1px;"><span style="color: rgb(0, 0, 0);">Solution&gt;Scenes&gt;Car\_Status</span></td></tr><tr><td class="align-left" style="border-width: 1px;"><span style="color: rgb(0, 0, 0);">Car\_Status</span></td><td style="border-width: 1px;"><span style="color: rgb(0, 0, 0);">Incoming\_Call</span></td><td style="border-width: 1px;"><span style="color: rgb(0, 0, 0);">Activate</span></td><td class="align-left" style="border-width: 1px;"><span style="color: rgb(0, 0, 0);">Solution&gt;Scenes&gt;Incoming\_Call</span></td></tr><tr><td class="align-left" style="border-width: 1px;"><span style="color: rgb(0, 0, 0);">Incoming\_Call</span></td><td style="border-width: 1px;"><span style="color: rgb(0, 0, 0);">Car\_Cluster</span></td><td style="border-width: 1px;"><span style="color: rgb(0, 0, 0);">Activate</span></td><td class="align-left" style="border-width: 1px;"><span style="color: rgb(0, 0, 0);">Solution&gt;Scenes&gt;Car\_Cluster</span></td></tr></tbody></table>
    
    <div drawio-diagram="5515"><img src="https://doc316en.candera.eu/uploads/images/drawio/2024-04/drawing-4-1712032875.png" alt=""/></div>

##### <span data-dl-original="true" data-dl-translated="true" data-dl-uid="196" style="color: rgb(0, 0, 0);"><span data-dl-original="true" data-dl-translated="true" data-dl-uid="197">Handle Control State</span></span>

<span style="color: rgb(0, 0, 0);">In the previous section, we configured the State Transitions and the activation of the respective scene. Next, we will define the conditions for triggering these transitions . Each State Transition has an attached "Check Click" Condition Behavior by default. In the following steps we will add a "Handle Control State" behavior to the TellTale controls "IndicatorLeft" and "IndicatorRight". This makes the Indicators behave like a control, enabling them e.g. to emit click events.</span>

1. <span style="color: rgb(0, 0, 0);">In the Solution Explorer, navigate to \[Solution &gt; Scenes &gt; Car\_Cluster\] and double-click the scene.</span>
    - <span style="color: rgb(0, 0, 0);">The Scene Editor will be opened, displaying the scene "Car\_Cluster".</span>
    - <span style="color: rgb(0, 0, 0);">The Scene Tree panel will show the scene's scene tree.</span>
    - <span style="color: rgb(0, 0, 0);">In the Scene Tree panel's right side, an extra scene tree is available, displaying the \[Fusion...\] button and the currently selected RenderNode's Behaviors and Effects.</span>
2. <span data-dl-original="true" data-dl-translated="true" data-dl-uid="206" style="color: rgb(0, 0, 0);"><span data-dl-original="true" data-dl-translated="true" data-dl-uid="207">In the Scene Tree panel, expand the scene tree along the following path: Cluster &gt; StatusTop &gt; Telltales. </span></span>  
    
    - <span style="color: rgb(0, 0, 0);"><span data-dl-original="true" data-dl-translated="true" data-dl-uid="210"><span data-dl-original="true" data-dl-translated="true" data-dl-uid="211">The Group2D nodes Brake, AirBag, Engine, OpenDoors, IndicatorRight, and</span></span> IndicatorLeft will be displayed.</span><p class="callout info"><span style="color: rgb(0, 0, 0);">To expand a Group2D node, you can either double-click it or you can single-click on the little triangle to it's left.</span></p>
3. <span data-dl-original="true" data-dl-translated="true" data-dl-uid="216" style="color: rgb(0, 0, 0);"><span data-dl-original="true" data-dl-translated="true" data-dl-uid="217"><span data-dl-original="true" data-dl-translated="true" data-dl-uid="218"><span data-dl-original="true" data-dl-translated="true" data-dl-uid="219">In the Scene Tree panel, select the IndicatorRight Group2D node, then click on the \[Fusion...\] button in the Extra Scene tree.</span></span></span></span>
    - <span style="color: rgb(0, 0, 0);">Fusion will be opened, displaying the Fusion diagram of <span data-dl-original="true" data-dl-translated="true" data-dl-uid="221"><span data-dl-original="true" data-dl-translated="true" data-dl-uid="222"><span data-dl-original="true" data-dl-translated="true" data-dl-uid="223"><span data-dl-original="true" data-dl-translated="true" data-dl-uid="224">IndicatorRight</span></span></span></span>.</span>  
        <div drawio-diagram="8679"><img src="https://doc316en.candera.eu/uploads/images/drawio/2025-11/drawing-5-1762524801.png" alt=""/></div>
4. <span style="color: rgb(0, 0, 0);">In Fusion, click the Behaviors connector on the <span data-dl-original="true" data-dl-translated="true" data-dl-uid="231"><span data-dl-original="true" data-dl-translated="true" data-dl-uid="232"><span data-dl-original="true" data-dl-translated="true" data-dl-uid="233"><span data-dl-original="true" data-dl-translated="true" data-dl-uid="234">IndicatorRight</span></span></span></span> Fusion node.</span>
    - <span style="color: rgb(0, 0, 0);">The \[Select Behavior\] dialog will be opened.</span>
5. <span style="color: rgb(0, 0, 0);">In the Select Behavior dialog, enter "<span data-dl-original="true" data-dl-translated="true" data-dl-uid="240"><span data-dl-original="true" data-dl-translated="true" data-dl-uid="241">Handle Control State</span></span>" in the search field at the top.</span>
    - <span style="color: rgb(0, 0, 0);">The list of behaviors in the dialog will be narrowed down to \[<span data-dl-original="true" data-dl-translated="true" data-dl-uid="244"><span data-dl-original="true" data-dl-translated="true" data-dl-uid="245">Control &gt; Internal &gt; Handle Control State\]</span></span>.</span>
6. <span style="color: rgb(0, 0, 0);">Double-click the "<span data-dl-original="true" data-dl-translated="true" data-dl-uid="249"><span data-dl-original="true" data-dl-translated="true" data-dl-uid="250">Handle Control State"</span></span>.</span>
    - <span style="color: rgb(0, 0, 0);">A <span data-dl-original="true" data-dl-translated="true" data-dl-uid="253"><span data-dl-original="true" data-dl-translated="true" data-dl-uid="254">Handle Control State</span></span> Fusion node will be linked to the IndicatorRight Fusion node.</span>  
        <div drawio-diagram="5670"><img src="https://doc316en.candera.eu/uploads/images/drawio/2024-04/drawing-4-1714394152.png" alt=""/></div>
7. <span style="color: rgb(0, 0, 0);">Perform steps 3 through 6 for "IndicatorLeft" as well.</span>
    - <span style="color: rgb(0, 0, 0);">IndicatorLeft and IndicatorRight are now behaving like controls. They are e.g. able to emit click events.  
          
        </span>
8. <span style="color: rgb(0, 0, 0);">Repeat steps 1 through 7 for scenes "Car\_Status" and "Incoming\_Call", adding Handle Control State behaviors to their IndicatorLeft and IndicatorRight component in the same manner.</span>

<span style="color: rgb(0, 0, 0);">With the configurations above, IndicatorLeft and IndicatorRight are configured to behave like a control. They are e.g. able to emit click events.</span>

#### <span style="color: rgb(0, 0, 0);">Conditions for the State Transitions</span>

<span style="color: rgb(0, 0, 0);">Finally, each State Transition's 'Check Click Condition Behavior' has to be configured with a sender - the control that emits the click event. We have set up IndicatorLeft and IndicatorRight to send click events, so they can be configured as senders.</span>

1. <span style="color: rgb(0, 0, 0);">In the State Machine Editor<span data-dl-original="true" data-dl-translated="true" data-dl-uid="266"><span data-dl-original="true" data-dl-translated="true" data-dl-uid="267">, select the state transition from "Car\_Cluster" to "Incoming\_Call"</span></span>.<span data-dl-translated="true" data-dl-uid="266"><span data-dl-translated="true" data-dl-uid="267">  
      
    </span></span></span>
2. <span style="color: rgb(0, 0, 0);">Click the \[Fusion...\] button in the lower left of the State Machine Editor .</span>
    - <span style="color: rgb(0, 0, 0);">Fusion will be opened, displaying the Fusion diagram of the selected state transition.</span>
    - <span style="color: rgb(0, 0, 0);">The Transition Fusion node's Condition connector is linked to the Check Click Fusion node.</span>
3. <span style="color: rgb(0, 0, 0);">In Fusion at the Check Click Fusion node, click the 'Select item' icon to the right of the \[Sender\] property.</span>
    - <span style="color: rgb(0, 0, 0);">The \[Choose Item\] dialog will be opened.</span>
4. <span style="color: rgb(0, 0, 0);"><span data-dl-original="true" data-dl-translated="true" data-dl-uid="283"><span data-dl-original="true" data-dl-translated="true" data-dl-uid="284">In the Choose Item dialog, navigate to and select </span></span>\[Solution &gt; Car\_Cluster &gt; Cluster &gt; StatusTop &gt; IndicatorRight\], then click \[OK\].</span>
    - <span style="color: rgb(0, 0, 0);">IndicationRight will be displayed in the Sender property of Check Click.</span>  
        <div drawio-diagram="5671"><img src="https://doc316en.candera.eu/uploads/images/drawio/2024-04/drawing-4-1714394249.png" alt=""/></div>
5. <span style="color: rgb(0, 0, 0);">Click the up arrow icon located in the upper-right corner of the Fusion panel.</span>
    - <span style="color: rgb(0, 0, 0);">The State Machine Editor panel will be opened, displaying the State Machine diagram.</span>
6. <span data-dl-original="true" data-dl-translated="true" data-dl-uid="298" style="color: rgb(0, 0, 0);"><span data-dl-original="true" data-dl-translated="true" data-dl-uid="299">Repeat steps 1 through 5 to configure the sender property for the remaining Check Click Condition behaviors, applying the configurations from the table below.</span></span>
    - <span data-dl-original="true" data-dl-translated="true" data-dl-uid="300" style="color: rgb(0, 0, 0);"><span data-dl-original="true" data-dl-translated="true" data-dl-uid="301"><span data-dl-original="true" data-dl-translated="true" data-dl-uid="302">All state transitions are now configured correctly.  
        </span></span></span><table border="1" class="align-center" style="border-collapse: collapse; width: 501px; border-width: 1px;"><colgroup><col style="width: 116px;"></col><col style="width: 116px;"></col><col style="width: 268px;"></col></colgroup><tbody><tr><td data-dl-original="true" data-dl-translated="true" data-dl-uid="304" style="border-width: 1px; background-color: rgb(35, 111, 161);"><span style="color: rgb(0, 0, 0);">**Transition**</span></td><td style="border-width: 1px; background-color: rgb(35, 111, 161);"><span style="color: rgb(0, 0, 0);">  
        </span></td><td data-dl-original="true" data-dl-translated="true" data-dl-uid="305" style="border-width: 1px; background-color: rgb(35, 111, 161);"><span style="color: rgb(0, 0, 0);">**<span data-dl-original="true" data-dl-translated="true" data-dl-uid="306"><span data-dl-original="true" data-dl-translated="true" data-dl-uid="307">Check Click &gt; Sender</span></span>**</span></td></tr><tr><td style="border-width: 1px; background-color: rgb(35, 111, 161);"><span style="color: rgb(0, 0, 0);">**From**</span></td><td style="border-width: 1px; background-color: rgb(35, 111, 161);"><span style="color: rgb(0, 0, 0);">**To**</span></td><td style="border-width: 1px; background-color: rgb(35, 111, 161);"><span style="color: rgb(0, 0, 0);">**<span data-dl-original="true" data-dl-translated="true" data-dl-uid="306"><span data-dl-original="true" data-dl-translated="true" data-dl-uid="307">  
        </span></span>**</span></td></tr><tr><td class="align-left" data-dl-original="true" data-dl-translated="true" data-dl-uid="308" style="border-width: 1px;"><span style="color: rgb(0, 0, 0);">Incoming\_Call</span></td><td style="border-width: 1px;"><span style="color: rgb(0, 0, 0);">Car\_Status</span></td><td class="align-left" data-dl-original="true" data-dl-translated="true" data-dl-uid="309" style="border-width: 1px;"><span data-dl-original="true" data-dl-translated="true" data-dl-uid="310" style="color: rgb(0, 0, 0);"><span data-dl-original="true" data-dl-translated="true" data-dl-uid="311">Incoming\_Call &gt; ... &gt;IndicatorRight</span></span></td></tr><tr><td class="align-left" data-dl-original="true" data-dl-translated="true" data-dl-uid="312" style="border-width: 1px;"><span style="color: rgb(0, 0, 0);">Car\_Status</span></td><td style="border-width: 1px;"><span style="color: rgb(0, 0, 0);">Car\_Cluster</span></td><td class="align-left" data-dl-original="true" data-dl-translated="true" data-dl-uid="313" style="border-width: 1px;"><span data-dl-original="true" data-dl-translated="true" data-dl-uid="314" style="color: rgb(0, 0, 0);"><span data-dl-original="true" data-dl-translated="true" data-dl-uid="315">Car\_Status &gt; ... &gt; IndicatorRight</span></span></td></tr><tr><td class="align-left" data-dl-original="true" data-dl-translated="true" data-dl-uid="316" style="border-width: 1px;"><span style="color: rgb(0, 0, 0);">Car\_Cluster</span></td><td style="border-width: 1px;"><span style="color: rgb(0, 0, 0);">Car\_Status</span></td><td class="align-left" data-dl-original="true" data-dl-translated="true" data-dl-uid="317" style="border-width: 1px;"><span data-dl-original="true" data-dl-translated="true" data-dl-uid="318" style="color: rgb(0, 0, 0);"><span data-dl-original="true" data-dl-translated="true" data-dl-uid="319">Car\_Cluster &gt; ... &gt; IndicatorLeft</span></span></td></tr><tr><td class="align-left" data-dl-original="true" data-dl-translated="true" data-dl-uid="320" style="border-width: 1px;"><span style="color: rgb(0, 0, 0);">Car\_Status</span></td><td style="border-width: 1px;"><span style="color: rgb(0, 0, 0);">Incoming\_Call</span></td><td class="align-left" data-dl-original="true" data-dl-translated="true" data-dl-uid="321" style="border-width: 1px;"><span data-dl-original="true" data-dl-translated="true" data-dl-uid="322" style="color: rgb(0, 0, 0);"><span data-dl-original="true" data-dl-translated="true" data-dl-uid="323">Car\_Status &gt; ... &gt; IndicatorLeft</span></span></td></tr><tr><td class="align-left" data-dl-original="true" data-dl-translated="true" data-dl-uid="324" style="border-width: 1px;"><span style="color: rgb(0, 0, 0);">Incoming\_Call</span></td><td style="border-width: 1px;"><span style="color: rgb(0, 0, 0);">Car\_Cluster</span></td><td class="align-left" data-dl-original="true" data-dl-translated="true" data-dl-uid="325" style="border-width: 1px;"><span data-dl-original="true" data-dl-translated="true" data-dl-uid="326" style="color: rgb(0, 0, 0);"><span data-dl-original="true" data-dl-translated="true" data-dl-uid="327">Incoming\_Call &gt; ... &gt; IndicatorLeft</span></span></td></tr></tbody></table>

<span data-dl-original="true" data-dl-translated="true" data-dl-uid="329" style="color: rgb(0, 0, 0);"><span data-dl-original="true" data-dl-translated="true" data-dl-uid="330">This completes the setup of the state transitions triggered by click events emitted by a control, which then leads to an activation of a new scene. On the next page, we will confirm the functionality of our configuration.</span></span>

# Simulation by Player

Use Player to check the behavior of the newly created cluster. This application allows you to view scenes from asset files and run simulations. An asset file is a file output by Scene Composer that contains the graphic resources of a scene and is loaded into Candera's graphics engine so that rendering can be performed.

#### <span style="vertical-align: inherit;"><span style="vertical-align: inherit;">Run Player </span></span>  


To start the Player, press the \[ Play selected scenario... \] icon in the toolbar.

<div drawio-diagram="5672"><img src="https://doc316en.candera.eu/uploads/images/drawio/2024-04/drawing-4-1714394310.png" alt=""/></div>

If the solution saving operation has not been performed before this operation is executed, a dialog box will appear prompting you to save the solution. In this case, press the \[ OK \] button in the dialog. An asset file will be automatically generated and opened with CGI Player.

When CGI Player is executed, three windows will appear as shown in the figure below.

<div drawio-diagram="6842"><img src="https://doc316en.candera.eu/uploads/images/drawio/2024-09/drawing-5-1726824092.png" alt=""/></div>

<div drawio-diagram="6093"></div>

<table border="1" class="align-center" id="bkmrk-window-1-this-is-a-c" style="border-collapse: collapse; width: 91.7284%; height: 104.188px; border-width: 0px; border-style: hidden;"><colgroup><col style="width: 13.9973%;"></col><col style="width: 86.0027%;"></col></colgroup><tbody><tr style="height: 28.7969px;"><td class="align-right" style="border-width: 0px; height: 28.7969px;"><span style="vertical-align: inherit;"><span style="vertical-align: inherit;">Window 1</span></span></td><td class="align-left" style="border-width: 0px; height: 28.7969px;">A command line interface for sending commands to CGI Panel.</td></tr><tr style="height: 29.7969px;"><td class="align-right" style="border-width: 0px; height: 29.7969px;"><span style="vertical-align: inherit;"><span style="vertical-align: inherit;">Window 2</span></span></td><td class="align-left" style="border-width: 0px; height: 29.7969px;">This display panel shows a simulation of the scene according to the settings.</td></tr><tr style="height: 45.5938px;"><td class="align-right" style="border-width: 0px; height: 45.5938px;"><span style="vertical-align: inherit;"><span style="vertical-align: inherit;">Window 3</span></span></td><td class="align-left" style="border-width: 0px; height: 45.5938px;">A graphical user interface (GUI) for detailed configuration of asset files called CGI Panel.

</td></tr></tbody></table>


#### Screen Transition confirmation

Player is used to confirm the screen transitions set up on the previous page.

1. <span style="vertical-align: inherit;"><span style="vertical-align: inherit;">Press the \[ Play selected scenario... \] icon on the toolbar to launch Player.  
      
    </span></span>
2. Click on the left and right indicators at the top left and right of the Player display.  
    
    - Click on the indicator on the right side of the "Car\_Cluster" scene to move to the "Incoming Call" scene.
    - Click on the indicator on the left side of the "Car\_Cluster" scene to move to the "Car\_Status" scene.  
        <div drawio-diagram="5292"><img src="https://doc316en.candera.eu/uploads/images/drawio/2024-02/drawing-4-1708474552.png" alt=""/></div>
3. Close the CGI Panel and exit Player. 
    - All three windows that were running will close.

#### Run simulation by Value Generator <span style="vertical-align: inherit;"><span style="vertical-align: inherit;"> </span></span>  


This section describes the simulation operation using the Player's Value Generator.

1. <span style="vertical-align: inherit;"><span style="vertical-align: inherit;">Press the \[ Play selected scenario... \] icon on the toolbar to <span style="vertical-align: inherit;"><span style="vertical-align: inherit;">launch </span></span>Player.  
      
    </span></span>
2. <span style="vertical-align: inherit;"><span style="vertical-align: inherit;">From the items displayed in the scene view of the CGI Panel, make sure that the "Scenes#Car\_Cluster" checkbox is checked.</span></span>  
    
    - If it is not checked, check it.
    - The checked scene will appear in the display panel.
3. <span style="vertical-align: inherit;"><span style="vertical-align: inherit;">Click "Scenes#Car\_Cluster".</span></span>
    
    
    - "Scenes#Car\_Cluster" will be highlighted in red.
4. Click "Controls" tab in the CGI Panel.  
    
    - \[ Controls \] will be highlighted in red.
    - The controls included in the "Car\_Cluster" scene will be listed.
5. Click "SpeedGauge". 
    - The properties for "SpeedGauge" will be listed.
6. In the property list, check the Simulation checkbox under Value.  
    
    - "Value" is set to "Int32" by default, and simulation by Wave (sine) is applied.
7. Click the \[ Start and Stop Value Generation Mode \] icon on the CGI Panel toolbar to start the simulation.  
    
    - <span style="vertical-align: inherit;"><span style="vertical-align: inherit;"><span style="vertical-align: inherit;">Values are automatically generated based on the settings in the Value Generator tab.  
        </span></span></span><div drawio-diagram="6844"><img src="https://doc316en.candera.eu/uploads/images/drawio/2024-09/drawing-5-1726824244.png" alt=""/></div>
        
        <span style="vertical-align: inherit;"><span style="vertical-align: inherit;"> </span></span>

<p class="callout info">If Forward Value is set in the <span style="color: rgb(230, 126, 35);">[HMI Logic Configuration](https://doc316en.candera.eu/books/getting-started/page/hmi-logic-configuration)</span>, the gauge center value changes in accordance with the movement of the gauge needle.</p>


The Value Generator can be used to simulate changes in control values. This makes it easy to simulate controls without having to implement logic.

# Getting Started on Android

# Introduction

<span lang="EN-US" style="mso-fareast-language: ZH-CN;">This manual gives brief instructions to get the Matlab-Connector sample applications built and deployed on Android. Namely, those are MLC-Cluster and MLC-Signals.</span>

<span lang="EN-US" style="mso-fareast-language: ZH-CN;">This Guide addresses the experienced user, therefore the obvious points will not be explained here. Topic are only the essential steps, but not things like the usage of the build tool CMake.</span>

#### <span lang="EN-US" style="mso-fareast-language: ZH-CN;">Abbreviations / Terminology</span>

<table border="1" id="bkmrk-abbreviation-termino" style="border-collapse: collapse; width: 100%; height: 89.3907px;"><colgroup><col style="width: 50%;"></col><col style="width: 50%;"></col></colgroup><tbody><tr style="height: 29.7969px;"><td style="background-color: rgb(35, 111, 161); height: 29.7969px;"><span style="color: rgb(255, 255, 255);">**Abbreviation**</span></td><td style="background-color: rgb(35, 111, 161); height: 29.7969px;"><span style="color: rgb(255, 255, 255);">**Terminology**</span></td></tr><tr style="height: 29.7969px;"><td style="height: 29.7969px;">CANDERA</td><td style="height: 29.7969px;">CANDERA GmbH</td></tr><tr style="height: 29.7969px;"><td style="height: 29.7969px;">ADB</td><td style="height: 29.7969px;">Android Debug Bridge, an important management tool</td></tr></tbody></table>

# Prerequisites

#### CMake GUI

For building, the tool cmake-gui is needed. Navigate to <span style="color: rgb(230, 126, 35);">[https://cmake.org/download/](https://cmake.org/download/)</span> and download the latest stable version for your PC, 64bit etition and install it.

#### Ninja build tool

For building android applications, yet another build tool is required.

- Navigate to <span style="color: rgb(230, 126, 35);">[https://ninja-build.org/](https://ninja-build.org/)</span> and download the ninja binary (yes, it’s only **ninja.exe**)  
    <div drawio-diagram="3103"><img src="https://doc316en.candera.eu/uploads/images/drawio/2023-03/drawing-4-1678168606.png" alt=""/></div>
- Save it at **C:\\Programs\\Ninja\\** and add this path to your **PATH** environment variable.

#### Android Studio

- Download the latest stable version of Android-Studio from Google and install it.
- Next, a special version of the Android-NDK is required because the newer ones are broken:  
    Navigate to: <span style="color: rgb(230, 126, 35);">[https://developer.android.com/ndk/downloads/older\_releases ](https://developer.android.com/ndk/downloads/older_releases)</span>and download the android-NDK-r17c as shown below.  
      
    <div drawio-diagram="3105"><img src="https://doc316en.candera.eu/uploads/images/drawio/2023-03/drawing-4-1678168826.png" alt=""/></div>
- Extract the downloaded zip file, rename the unpacked folder to **ndk-r17c** and move it to:  
    **%USERPROFILE%\\AppData\\Local\\Android\\Sdk\\**  
    This way, the NDK-r17c exists in parallel to the delivered one and will not be affected by updates.
- Set the environment variable **ANDROID\_NDK** to the path where you saved ndk-r17c:  
    here it is: **%USERPROFILE%\\AppData\\Local\\Android\\Sdk\\ndk-r17c\\**  
    This is mandatory for the toolchain file.
- Finally extend the **PATH** environment variable to the **platform tools directory**:  
    Here, this is **%USERPROFILE% \\AppData\\Local\\Android\\Sdk\\platform-tools\\**  
    This makes tools like **adb** available on **CMD**, which makes live a lot easier.

# Building an Application Library

- Open CMake Gui, fill in source and build directory and click Configure.
- A Dialog opens: Select “Ninja” as build system and check “Select toolchain file”
- Select: **cgi\_studio\_devices\\src\\Android\\ToolchainFiles\\GCC-toolchain-x86\_64-Android.cmake**  
    or **cgi\_studio\_devices\\src\\Android\\ToolchainFiles\\GCC-toolchain-ARM64-Android.cmake**  
    depending what you need.
- After first configure run, perform following cmake configurations:  
    **MLC\_SIMULATION**:=OFF (This is only relevant in case of an MLC application)  
    **ANDROID\_PLATFORM\_LEVEL**:=&lt;number between 21 and 28, which is the android api level&gt;  
    This should be **smaller or equal** the android version of your device.  
    (If you don’t select a level, the toolchain file decides. This might then not be what you want)
- Finally click “Configure” once more, then “Generate” afterwards.  
    If you created the corresponding Asset-Libraries within the designated “Assets” directory before, the platform-specific one gets also copied to the build folder, which is very handy for deploying (see next section).
- In a CMD window navigate to you build folder and type ninja.
- This builds the application and should deliver you a **libApplicationLib.so** file, which we’ll need for the next steps.

# Deploying the Asset Library

Before an android application can be launched, the asset library has to be deployed on the Android device. Now the tool ADB (Android Debug Bridge) comes into play, which is part of the sdk-platform tools. It is a command line tool which has to be called e.g. within a Windows CMD. ADB is a general device management tool for Android.

The most important tasks are:

- Pushing and pulling files between the host computer and the android device
- Installing/uninstalling android apps on the device
- Viewing the logcat
- It even provides a bash terminal access (yes, even root user) to the android device

The most important commands for this work are:

- adb help  
    Show help and description of supported commands
- adb devices   
    List all connected android devices
- adb push &lt;source-file&gt; &lt;target-file or target-folder&gt;  
    Push a local file to the android device
- adb shell  
    Open a bash terminal session on the android device – this is the god-mode, so be careful!

<div drawio-diagram="5116"><img src="https://doc316en.candera.eu/uploads/images/drawio/2024-01/drawing-5-1706252739.png" alt=""/></div>

 Steps for deploying the AssetLib on the Android device:

- Open a Windows CMD and navigate to the build folder (or where you generated the asset library)
- Type e.g.: adb push AssetLibCff\_Android\_Target.bin /sdcard/AssetLibCff.bin

<p class="callout info"> /sdcard is the internal or external storage on Android. That’s the location, where the app expects the asset library.  
</p>

# Generating and deploying an Android-App

Now an android studio project skeleton is needed for constructing a so-called apk file, which is the format of android app packages, like those on Google AppStore.

- Navigate to cgi\_studio\_apps/references/Android/ and copy the MlcSample project to a location you like
- From your build directory, copy the file libApplicationLib.so to following location of your project skeleton:  
    &lt;MlcProject&gt;/app/native-libs/&lt;architecture&gt;/
- Open Android-Studio and open your MlcSample project. This wil take a few seconds, wait till everything is ready.
- Click at “Syncronise Project” like shown below and wait again till everything is ready:  
    (This is only needed when the project is opened the first time)  
    <div drawio-diagram="3108"><img src="https://doc316en.candera.eu/uploads/images/drawio/2023-03/drawing-4-1678169637.png" alt=""/></div>
- Next click at “Show Project-Structure” like shown below:  
    (This is only needed when the project is opened the first time)  
    <div drawio-diagram="3109"><img src="https://doc316en.candera.eu/uploads/images/drawio/2023-03/drawing-4-1678169672.png" alt=""/></div>
- A dialog opens. Select the tab “SDK Location” and there ensure that the field “Android NDK location” (the bottom-most one) is set to the ndk-r17c, which you installed previously:  
    <div drawio-diagram="3110"><img src="https://doc316en.candera.eu/uploads/images/drawio/2023-03/drawing-4-1678169700.png" alt=""/></div>
- Click OK and you’re ready to build and deploy.
- Ensure that you connected your android device to an USB port and enabled “USB debugging” on that device.
- Finally klick the “Run-Button”, like shown below and await what will happen:  
    <div drawio-diagram="3111"><img src="https://doc316en.candera.eu/uploads/images/drawio/2023-03/drawing-4-1678169731.png" alt=""/></div>
- Sometimes Android Studio asks for device selection – do so and proceed…  
    <div drawio-diagram="3112"><img src="https://doc316en.candera.eu/uploads/images/drawio/2023-03/drawing-4-1678169743.png" alt=""/></div>
- Sometimes Android Studio asks to install missing platforms. Simply do so and proceed…  
    <div drawio-diagram="3113"><img src="https://doc316en.candera.eu/uploads/images/drawio/2023-03/drawing-4-1678169765.png" alt=""/></div>
- And if you’re using an absolutely new platform like shown in the dialog above, Android-Studio still cries around: Simply klick OK to proceed and forget about that:  
    <div drawio-diagram="3114"><img src="https://doc316en.candera.eu/uploads/images/drawio/2023-03/drawing-4-1678169782.png" alt=""/></div>
- Finally if the application is deployed and running, Android Studio should look like this:  
    <div drawio-diagram="3115"><img src="https://doc316en.candera.eu/uploads/images/drawio/2023-03/drawing-4-1678169797.png" alt=""/></div>

# Trouble-Shooting

- If you experience Problems, sometimes the so called “Log Cat” is quite helpful, which also allows live filtering by keywords like e.g. “myappname” or “failed” and thelike.  
    <div drawio-diagram="3116"><img src="https://doc316en.candera.eu/uploads/images/drawio/2023-03/drawing-4-1678169896.png" alt=""/></div>
- Depending on the kind of your Android OS, sometimes the Permissions-Dialog is not displayed.  
    In such a case, the user has no chance to grant the needed permissions, when the app is installed the first time. That’s how to solve this problem:  
    Click “app-&gt;Edit Configurations”, like shown below:  
    <div drawio-diagram="3117"><img src="https://doc316en.candera.eu/uploads/images/drawio/2023-03/drawing-4-1678169914.png" alt=""/></div>
    
      
    A dialog opens; In the field “Install Flags” input “-g” which pre-grants all permissions on installing.  
    <div drawio-diagram="3118"><img src="https://doc316en.candera.eu/uploads/images/drawio/2023-03/drawing-4-1678169928.png" alt=""/></div>
    
      
    After saving this configuration, clicking at the Build-Button should do it’s job.
- When you want to debug your application and encounter that your breakpoints are ignored, you can try following: go to the run-configurations at the top right toolbar of android studio as shown below.  
    <div drawio-diagram="3119"><img src="https://doc316en.candera.eu/uploads/images/drawio/2023-03/drawing-4-1678169948.png" alt=""/></div>
    
      
    A Popup appears, navigate do “Debugger” and ensure that “Dual” is set for the field: Debug types:  
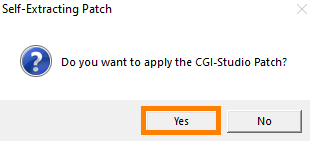
    <div drawio-diagram="3120"><img src="https://doc316en.candera.eu/uploads/images/drawio/2023-03/drawing-4-1678169961.png" alt=""/></div>