# Add a new Render Target

#### Add Render Target  


A render target is an abstraction of a rendering surface. In the field of 3D computer graphics, it is a feature of modern graphics processing units (GPUs) that allows a 3D scene to be rendered to an intermediate memory buffer, or Render Target Texture (RTT). It can then be manipulated by shaders in order to apply additional effects to the final image before displaying it.

As mentioned before, there are two types of render targets:

- Display Render Targets: They address the rendering in a native surface of the graphic device.
- Texture Render Targets: They represent textures which can be used in the scene to render into them.

A new render target can be added using one of the following possibilities:

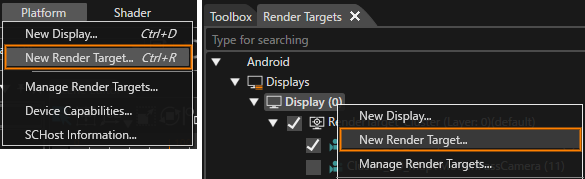
Go to "Platform" &gt; "New Render Target" in the menu bar or go to the Render Targets panel, right click on a node under the display and select "New Render Target" from the context menu.

<div drawio-diagram="8490"><img src="https://doc316en.candera.eu/uploads/images/drawio/2025-07/drawing-7-1753492131.png" alt=""/></div>

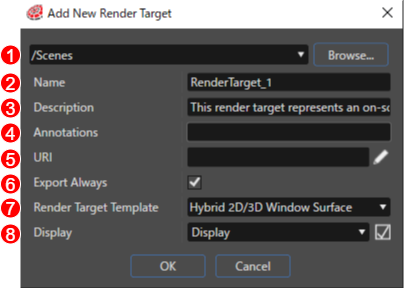
Set the following items in the Add New Render Target dialog box and click \[ OK \] to create a new Render Target.

<div drawio-diagram="8492"><img src="https://doc316en.candera.eu/uploads/images/drawio/2025-07/drawing-7-1753839682.png" alt=""/></div>

<table border="1" id="bkmrk-%E9%A0%85%E7%9B%AE-%E8%AA%AC%E6%98%8E-%E6%9C%80%E4%B8%8A%E6%AE%B5%E3%81%AE%E5%85%A5%E5%8A%9B%E6%AC%84-%E3%82%BD%E3%83%AA%E3%83%A5%E3%83%BC%E3%82%B7%E3%83%A7" style="width: 95.119%;"><tbody><tr><td style="width: 5.99755%;">(1)</td><td style="width: 21.5422%;">Top input field</td><td style="width: 72.4602%;">The location where the Render Target is saved in Solution Explorer</td></tr><tr><td style="width: 5.99755%;">(2)</td><td style="width: 21.5422%;">Name</td><td style="width: 72.4602%;">The Render Target Name</td></tr><tr><td style="width: 5.99755%;">(3)</td><td style="width: 21.5422%;">Description</td><td style="width: 72.4602%;">The Render Target Description</td></tr><tr><td style="width: 5.99755%;">(4)</td><td style="width: 21.5422%;">Annotations</td><td style="width: 72.4602%;">The Render Target Annotations</td></tr><tr><td style="width: 5.99755%;">(5)</td><td style="width: 21.5422%;">URI</td><td style="width: 72.4602%;">The Render Target URI</td></tr><tr><td style="width: 5.99755%;">(6)</td><td style="width: 21.5422%;">Export Always</td><td style="width: 72.4602%;">If enabled, the Render Target selected at the time of asset generation is always exported to the asset.</td></tr><tr><td style="width: 5.99755%;">(7)</td><td style="width: 21.5422%;">Render Target Template</td><td style="width: 72.4602%;">The Render Target template</td></tr><tr><td style="width: 5.99755%;">(8)</td><td style="width: 21.5422%;">Display</td><td style="width: 72.4602%;">The display that is linked to the Render Target</td></tr></tbody></table>

<p class="callout info">The types available depend on the SceneComposer platform of a given solution, respectively of the feature set of the Candera Device specified by the platform.</p>

The newly added render target can have the properties listed in the table below set in the Properties panel. The properties of the display render targets "Width", "Height" and "X", "Y" coordinates have to be configured with appropriate values that can be changed via Properties panel. The displays and the display render targets associated can be seen in the Render targets panel.

<table border="1" id="bkmrk-%E3%82%BB%E3%82%AF%E3%82%B7%E3%83%A7%E3%83%B3-%E3%83%97%E3%83%AD%E3%83%91%E3%83%86%E3%82%A3%E5%90%8D-%E8%AA%AC%E6%98%8E-%E3%83%AC%E3%83%B3%E3%83%80%E3%83%BC" style="border-collapse: collapse; width: 95.9524%; height: 1640.47px;"><colgroup><col style="width: 17.764%;"></col><col style="width: 27.4571%;"></col><col style="width: 54.6547%;"></col></colgroup><tbody><tr style="height: 29.7969px;"><td class="align-center" style="height: 29.7969px; background-color: rgb(230, 126, 35);"><span style="color: rgb(255, 255, 255);">**Section**</span></td><td class="align-center" style="height: 29.7969px; background-color: rgb(230, 126, 35);"><span style="color: rgb(255, 255, 255);">**Property name**</span></td><td class="align-center" style="height: 29.7969px; background-color: rgb(230, 126, 35);"><span style="color: rgb(255, 255, 255);">**Description**</span></td></tr><tr style="height: 142.812px;"><td rowspan="10" style="height: 578.937px;">Render Target  
</td><td style="height: 142.812px;">Render Target Template</td><td style="height: 142.812px;">The Render Target template

Select the Render Target template from the following:

- **Hybrid 2D/3D Window Surface**
- **Hybrid 2D/3D Off-Screen Surface**
- **Software Layer**

For details, please refer to [<span style="color: rgb(230, 126, 35);">Cameras and Render Targets</span>](https://doc316en.candera.eu/link/536#bkmrk-page-title).

</td></tr><tr style="height: 29.7969px;"><td style="height: 29.7969px;">Display

</td><td style="height: 29.7969px;">The Display that is linked to the Render Target

This property can only be set when Render Target Template = Hybrid 2D/3D Window Surface.

</td></tr><tr style="height: 29.7969px;"><td style="height: 29.7969px;">Owner</td><td style="height: 29.7969px;">Hybrid 2D/3D Off-Screen Surface: Surface owner  
Software Layer: Software Layer owner

This property can only be set when the Render Target Template is set to Hybrid 2D/3D Window Surface or Software Layer.

</td></tr><tr style="height: 29.7969px;"><td style="height: 29.7969px;">Type</td><td style="height: 29.7969px;">The Render Target type</td></tr><tr style="height: 63.3906px;"><td style="height: 63.3906px;">Auto Swap</td><td style="height: 63.3906px;">If enabled, the buffer will be automatically swapped (switched to new drawing) once all cameras linked to the Render Target have completed drawing.</td></tr><tr style="height: 80.1875px;"><td style="height: 80.1875px;">Auto Clear</td><td style="height: 80.1875px;">If enabled, the relevant buffers (color, depth, and stencil buffers) are automatically cleared before a rendering operation to a Render Target is performed.

The depth buffer is cleared with "1.0" values.

</td></tr><tr style="height: 52.1875px;"><td style="height: 52.1875px;">Is Default</td><td style="height: 52.1875px;">If enabled, it will be set as the default Render Target.

For details, please refer to <span style="color: rgb(230, 126, 35);">[Default Render Target](https://doc316en.candera.eu/link/4#bkmrk-page-title)</span>.

</td></tr><tr style="height: 52.1875px;"><td style="height: 52.1875px;">Orientation</td><td style="height: 52.1875px;">Rotation angle of the rendered image (0°/90°/180°/270°)

For details, please refer to <span style="color: rgb(230, 126, 35);">[Rotate Display Preview](https://doc316en.candera.eu/link/3#bkmrk--7)</span>.

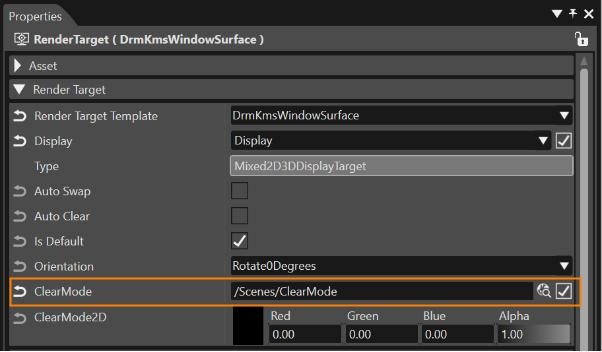
</td></tr><tr style="height: 68.9844px;"><td style="height: 68.9844px;">ClearMode</td><td style="height: 68.9844px;">A ClearMode item used to clear the buffer associated with a 3D Render Target.

For instructions on how to create a ClearMode item, see [<span style="color: rgb(230, 126, 35);">ClearMode</span>](https://doc316en.candera.eu/books/solution-handling/page/clear-mode).

</td></tr><tr style="height: 29.7969px;"><td style="height: 29.7969px;">ClearMode2D</td><td style="height: 29.7969px;">Color to clear the color buffer of a 2D Render Target</td></tr></tbody></table>

The properties in the Edting Utilities section vary depending on the Render Target Template selected.

**Render Target Template: Hybrid 2D/3D Window Surface Edting Utilities section properties:**

<table border="1" id="bkmrk-section-property-nam" style="border-collapse: collapse; width: 95.9524%; height: 1640.47px;"><colgroup><col style="width: 17.764%;"></col><col style="width: 27.4571%;"></col><col style="width: 54.6547%;"></col></colgroup><tbody><tr style="height: 29.7969px;"><td class="align-center" style="height: 29.7969px; background-color: rgb(230, 126, 35);"><span style="color: rgb(255, 255, 255);">**Section**</span></td><td class="align-center" style="height: 29.7969px; background-color: rgb(230, 126, 35);"><span style="color: rgb(255, 255, 255);">**Property name**</span></td><td class="align-center" style="height: 29.7969px; background-color: rgb(230, 126, 35);"><span style="color: rgb(255, 255, 255);">**Description**</span></td></tr><tr style="height: 76.422px;"><td rowspan="21" style="height: 1031.74px;">Edting Utilities  
</td><td style="height: 76.422px;">Preview Border Scope</td><td style="height: 76.422px;">Preview borders for the targeted Render Target

Available in Global Preferences.

- **None:** Border is hidden
- **Global:** Border based on global coordinates
- **Local:** Border based on local coordinates

</td></tr><tr style="height: 46.5938px;"><td style="height: 46.5938px;">Preview Border Color</td><td style="height: 46.5938px;">Preview border color for the target Render Target

Available in Global Preferences.

</td></tr><tr style="height: 29.7969px;"><td style="height: 29.7969px;">Width</td><td style="height: 29.7969px;">Render target width (horizontal pixels)

If this value is "-1", it is calculated from the Display value.

</td></tr><tr style="height: 29.7969px;"><td style="height: 29.7969px;">Height</td><td style="height: 29.7969px;">Render target height (vertical pixels)

If this value is "-1", it is calculated from the Display value.

</td></tr><tr style="height: 46.5938px;"><td style="height: 46.5938px;">X</td><td style="height: 46.5938px;">The position of the Render Target along the X axis (horizontal direction) in the display linked to the Render Target</td></tr><tr style="height: 46.5938px;"><td style="height: 46.5938px;">Y</td><td style="height: 46.5938px;">The position of the Render Target along the Y axis (vertical direction) in the display linked to the Render Target</td></tr><tr style="height: 63.3906px;"><td style="height: 63.3906px;">Layer</td><td style="height: 63.3906px;">Window Surface Layer ID

When there are multiple render targets, you can set the rendering order.The higher the number, the higher the layer will be.

- Bottom layer: Layer = 0
- Middle layer: Layer = 1
- Top layer: Layer = 2

The number of layers supported varies by device. Also, Window Surfaces with the same layer ID cannot be uploaded at the same time.

For details, please refer to <span style="color: rgb(230, 126, 35);">[Multiple Render Targets](https://doc316en.candera.eu/link/538#bkmrk-page-title)</span>.

</td></tr><tr style="height: 137.219px;"><td style="height: 137.219px;">BlendMode</td><td style="height: 137.219px;">Blend mode

- **BlendModeStandard:** A common blend mode that represents transparency based on the alpha value of the source pixel.
- **BlendModePreMultiplied:** Performs blending as if the source pixel is already multiplied by the alpha value.
- **BlendModeOff:** Blending disabled

For details, please refer to <span style="color: rgb(230, 126, 35);">[Blend Modes](https://doc316en.candera.eu/link/536#bkmrk-blend-modes)</span>.

</td></tr><tr style="height: 29.7969px;"><td style="height: 29.7969px;">AntiAliasingSampleBuffers</td><td style="height: 29.7969px;">Number of sample buffers to use for anti-aliasing</td></tr><tr style="height: 46.5938px;"><td style="height: 46.5938px;">AntiAliasingMultiSamplingFactor</td><td style="height: 46.5938px;">Minimum number of samples to use for multi-sample buffers used for anti-aliasing</td></tr><tr style="height: 46.5938px;"><td style="height: 46.5938px;">MaxSwapInterval</td><td style="height: 46.5938px;">Maximum swap interval

Set when using EGL settings. If this value is "-1", the maximum swap interval is not limited.

</td></tr><tr style="height: 46.5938px;"><td style="height: 46.5938px;">MinSwapInterval</td><td style="height: 46.5938px;">Minimum swap interval

Set when using EGL settings. If this value is "-1", the minimum swap interval is not limited.

</td></tr><tr style="height: 96.9844px;"><td style="height: 96.9844px;">SwapInterval</td><td style="height: 96.9844px;">Swap Interval

Applies to the Window Surface. The initial value is "1".

If the value is "0", the buffer swap is not synchronized with the video frame, and the swap is performed as soon as rendering is completed.

If the value is "1" or more, the buffer swap is performed every time the vertical synchronization signal (V-sync) is received the number of times specified by the value.

</td></tr><tr style="height: 29.7969px;"><td style="height: 29.7969px;">RedSize</td><td style="height: 29.7969px;">The number of bits for the Red color in the color buffer.</td></tr><tr style="height: 29.7969px;"><td style="height: 29.7969px;">GreenSize</td><td style="height: 29.7969px;">The number of bits for the Green color in the color buffer.

</td></tr><tr style="height: 29.7969px;"><td style="height: 29.7969px;">BlueSize</td><td style="height: 29.7969px;">The number of bits for the Blue color in the color buffer.</td></tr><tr style="height: 29.7969px;"><td style="height: 29.7969px;">AlphaSize</td><td style="height: 29.7969px;">The number of bits for the Alpha in the color buffer.</td></tr><tr style="height: 46.5938px;"><td style="height: 46.5938px;">Conformant</td><td style="height: 46.5938px;">Set this property to enabled if Render Target is OpenGL ES compliant.</td></tr><tr style="height: 29.7969px;"><td style="height: 29.7969px;">DepthSize</td><td style="height: 29.7969px;">Number of bits in the depth buffer

</td></tr><tr style="height: 29.7969px;"><td style="height: 29.7969px;">StencilSize</td><td style="height: 29.7969px;">Number of bits in the stencil buffer</td></tr><tr style="height: 63.3906px;"><td style="height: 63.3906px;">BufferPreservedBit</td><td style="height: 63.3906px;">If enabled, Render Target contents are preserved after buffer swapping, potentially improving performance by reducing GPU strain when only a portion of the screen changes.</td></tr></tbody></table>

**Render Target Template：Hybrid 2D/3D Off-Screen Surface Edting Utilities section properties:**

<table border="1" id="bkmrk-section-property-nam-1" style="border-collapse: collapse; width: 95.9524%; height: 522.891px;"><colgroup><col style="width: 17.764%;"></col><col style="width: 27.4534%;"></col><col style="width: 54.7826%;"></col></colgroup><tbody><tr style="height: 29.7969px;"><td class="align-center" style="height: 29.7969px; background-color: rgb(230, 126, 35);"><span style="color: rgb(255, 255, 255);">**Section**</span></td><td class="align-center" style="height: 29.7969px; background-color: rgb(230, 126, 35);"><span style="color: rgb(255, 255, 255);">**Property Name**</span></td><td class="align-center" style="height: 29.7969px; background-color: rgb(230, 126, 35);"><span style="color: rgb(255, 255, 255);">**Description**</span></td></tr><tr style="height: 120.422px;"><td rowspan="11" style="height: 493.094px;">Edting Utilities  
</td><td style="height: 120.422px;">Preview Border Scope</td><td style="height: 120.422px;">Preview borders for the targeted Render Target

Available in Global Preferences.

- **None:** Border is hidden
- **Global:** Border based on global coordinates
- **Local:** Border based on local coordinates

</td></tr><tr style="height: 46.5938px;"><td style="height: 46.5938px;">Preview Border Color</td><td style="height: 46.5938px;">Preview border color for the target Render Target

Available in Global Preferences.

</td></tr><tr style="height: 29.7969px;"><td style="height: 29.7969px;">ColorFormat</td><td style="height: 29.7969px;">Color buffer format</td></tr><tr style="height: 32.4219px;"><td style="height: 32.4219px;">DepthFormat

</td><td style="height: 32.4219px;">Depth buffer format</td></tr><tr style="height: 32.4219px;"><td style="height: 32.4219px;">StencilFormat</td><td style="height: 32.4219px;">Stencil buffer format</td></tr><tr style="height: 32.4219px;"><td style="height: 32.4219px;">ExternalColorTexture</td><td style="height: 32.4219px;">Attaches an external color buffer to a Render Target.</td></tr><tr style="height: 29.5938px;"><td style="height: 29.5938px;">ExternalDepthBuffer</td><td style="height: 29.5938px;">Attaches an external depth buffer to a Render Target.

</td></tr><tr style="height: 35.25px;"><td style="height: 35.25px;">ExternalStencilBuffer</td><td style="height: 35.25px;">Attaches an external stencil buffer to a Render Target.</td></tr><tr style="height: 29.7969px;"><td style="height: 29.7969px;">Width</td><td style="height: 29.7969px;">Render target width (horizontal pixels)

If this value is "-1", it is calculated from the Display value.

</td></tr><tr style="height: 29.7969px;"><td style="height: 29.7969px;">Height</td><td style="height: 29.7969px;">Render target height (vertical pixels)

If this value is "-1", it is calculated from the Display value.

</td></tr><tr style="height: 74.5781px;"><td style="height: 74.5781px;">MsaaSamples</td><td style="height: 74.5781px;">MSAA (Multisample Anti-Aliasing) Sample Count

For details, please refer to <span style="color: rgb(230, 126, 35);">[Multisample Anti-Aliasing Offscreen Render Targets](https://doc316en.candera.eu/link/542#bkmrk-page-title)</span>.

</td></tr></tbody></table>

**Render Target Template：Software Layer Edting Utilities section properties:**

<table border="1" id="bkmrk-section-property-nam-2" style="border-collapse: collapse; width: 95.9524%; height: 296.844px;"><colgroup><col style="width: 17.764%;"></col><col style="width: 27.4534%;"></col><col style="width: 54.7826%;"></col></colgroup><tbody><tr style="height: 29.7969px;"><td class="align-center" style="height: 29.7969px; background-color: rgb(230, 126, 35);"><span style="color: rgb(255, 255, 255);">**Section**</span></td><td class="align-center" style="height: 29.7969px; background-color: rgb(230, 126, 35);"><span style="color: rgb(255, 255, 255);">**Property Name**</span></td><td class="align-center" style="height: 29.7969px; background-color: rgb(230, 126, 35);"><span style="color: rgb(255, 255, 255);">**Description**</span></td></tr><tr style="height: 15.344px;"><td rowspan="19" style="height: 267.047px;">Edting Utilities  
</td><td style="height: 120.422px;">Preview Border Scope</td><td style="height: 120.422px;">Preview borders for the targeted Render Target

Available in Global Preferences.

- **None:** Border is hidden
- **Global:** Border based on global coordinates
- **Local:** Border based on local coordinates

</td></tr><tr><td style="height: 46.5938px;">Preview Border Color</td><td style="height: 46.5938px;">Preview border color for the target Render Target

Available in Global Preferences.

</td></tr><tr><td style="height: 15.344px;">ColorFormat</td><td style="height: 15.344px;">Color buffer format</td></tr><tr style="height: 32.4219px;"><td style="height: 32.4219px;">DepthFormat

</td><td style="height: 32.4219px;">Depth buffer format</td></tr><tr style="height: 32.4219px;"><td style="height: 32.4219px;">StencilFormat</td><td style="height: 32.4219px;">Stencil buffer format</td></tr><tr style="height: 32.4219px;"><td style="height: 32.4219px;">ExternalColorTexture</td><td style="height: 32.4219px;">Attaches an external color buffer to a Render Target.</td></tr><tr style="height: 29.7969px;"><td style="height: 29.7969px;">ExternalDepthBuffer</td><td style="height: 29.5938px;">Attaches an external depth buffer to a Render Target.

</td></tr><tr style="height: 35.25px;"><td style="height: 35.25px;">ExternalStencilBuffer</td><td style="height: 35.25px;">Attaches an external stencil buffer to a Render Target.</td></tr><tr style="height: 29.7969px;"><td style="height: 29.7969px;">Width</td><td style="height: 29.7969px;">Render target width (horizontal pixels)

</td></tr><tr style="height: 29.7969px;"><td style="height: 29.7969px;">Height</td><td style="height: 29.7969px;">Render target height (vertical pixels)

</td></tr><tr style="height: 29.7969px;"><td style="height: 29.7969px;">X</td><td style="height: 46.5938px;">The position of the Render Target along the X axis (horizontal direction) in the Render Target's owner (drawing area).</td></tr><tr><td>Y</td><td style="height: 46.5938px;">The position of the Render Target along the Y axis (vertical direction) in the Render Target's owner (drawing area).</td></tr><tr><td>Layer</td><td>Software Layer ID

When a Software Layer is made up of multiple layers, you can set the rendering order. The higher the number, the higher the layer.

</td></tr><tr><td>BlendMode</td><td>Blend mode

For details, please refer to <span style="color: rgb(230, 126, 35);">[Blend Modes](https://doc316en.candera.eu/link/536#bkmrk-blend-modes)</span>.

</td></tr><tr><td>ConstantAlpha</td><td>Alpha (transparency) applied to the entire Software Layer</td></tr><tr><td>BufferCount</td><td>Number of buffers used by the Software Layer

- SoftwareLayerSingleBuffered
- SoftwareLayerDoubleBuffered

</td></tr><tr><td>Enabled</td><td>Enable (show)/disable (hide) Software Layers</td></tr><tr><td>CompositionCamera</td><td>CompositionCamera

The drawing of each layer in the Software Layer is used by the Composition Camera to generate the final display image. For details please refer to [<span style="color: rgb(230, 126, 35);">Software Layers</span>](https://doc316en.candera.eu/link/536#bkmrk-software-layers%C2%A0).

</td></tr><tr><td>BorderEnabled</td><td>Show/Hide Layer Borders

Each Software Layer is separated by a one-pixel border.

</td></tr></tbody></table>

<p class="callout info">Please refer to the <span style="color: rgb(230, 126, 35);">[Candera](http://dev.doc.cgistudio.at/APILINK/namespace_candera.html)</span> API Documentation to learn about device-specific render target properties:   
Candera::RenderTarget</p>

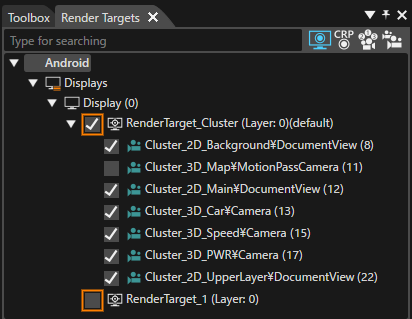
Every new created render target could be enabled or disabled by ticking the checkbox. When deactivating/activating a render target by unchecking/checking the checkbox, the render target gets also unloaded/uploaded. Therefore, one can make use of several WindowSurfaceRenderTarget objects having the same layer by activating only one of them; the others will not be uploaded.
<div drawio-diagram="8491"><img src="https://doc316en.candera.eu/uploads/images/drawio/2025-07/drawing-7-1753492872.png" alt=""/></div>

<p class="callout info">A render target can be deleted using the context menu option "Delete" in the Render Targets panel.</p>

---

<span style="color: rgb(34, 34, 34); font-family: -apple-system, BlinkMacSystemFont, 'Segoe UI', Oxygen, Ubuntu, Roboto, Cantarell, 'Fira Sans', 'Droid Sans', 'Helvetica Neue', sans-serif; font-size: 1.666em; font-weight: 400;">Configure Render Target</span>

##### Configure a Display Render Target  


In the "Render Targets" panel, the Display Render Targets are organized in the DisplayRenderTargets collection of a Display node.   
New display render targets will be listed under this category.

##### Configure a Texture Render Target

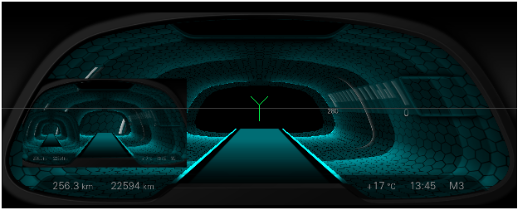
Rendering to a texture is simple on one hand, but on the other hand it is powerful and enables numerous special effects. It is an extension to rendering to a surface.   
Usually, for a texture render target, the texture render target properties "Width" and "Height" must be configured according to the required size of the texture.

To use a texture render target as a texture, SceneComposer allows selecting a texture render target in the "Choose Item" dialogs, whenever a texture shall be selected during composing a scene.
<div drawio-diagram="14"><img src="https://doc316en.candera.eu/uploads/images/drawio/2023-02/drawing-7-1676268209.png" alt=""/></div>

#### Clear Mode Item

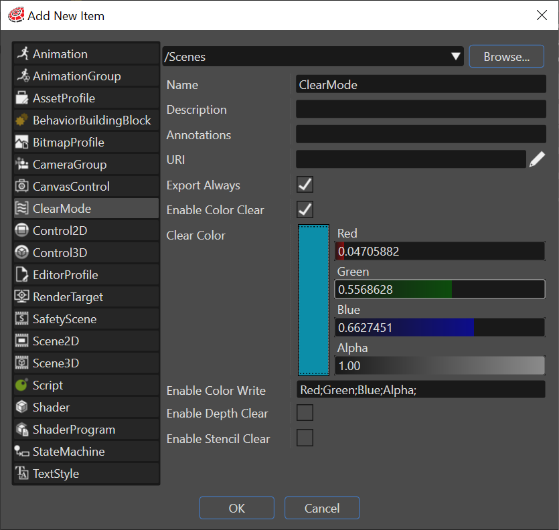
The "Clear Mode" item can be created via "Solution Explorer" panel by using the context menu option ("Add" &gt; "New Item"). In this way, all its specific properties ("Clear Color", "Enable Color Write", "Enable Depth Clear" and "Enable Stencil Clear") are related with just one item instead of being included among many other properties of every render target. If there are many render targets which are referencing the same clear mode item, it is enough to modify just one time the desired property rather than modifying every of them.

<div drawio-diagram="6295"><img src="https://doc316en.candera.eu/uploads/images/drawio/2024-06/drawing-5-1718955412.png" alt=""/></div>

After the creation of a "Clear Mode" item, it can be used after being referenced from a specific Render Target. This operation can be done by using the "Clear Mode" property available in the "Properties" panel associated with any available render target.

<div drawio-diagram="6296"><img src="https://doc316en.candera.eu/uploads/images/drawio/2024-06/drawing-5-1718955548.png" alt=""/></div>

<p class="callout info">If a ClearMode is a associated to a RenderTarget, the RenderTarget is cleared using that clearmode before any of the attached cameras renders to it.</p>

<p class="callout info">Clear Mode Property  
See also: <span style="color: rgb(230, 126, 35);">[Candera::ClearMode](http://dev.doc.cgistudio.at/APILINK/class_candera_1_1_clear_mode.html)</span></p>

---