# Display Configuration

# Add a new Display

#### Add display  


There are two options available on how to add a new display:

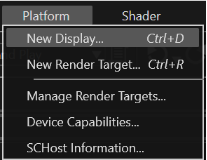
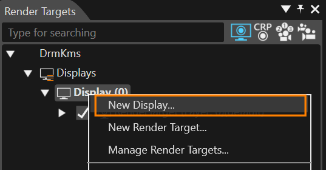
Go to "Platform" &gt; "New Display" in the menu bar or go to the Render Targets panel, right click on the Displays node and select "New Display".

<div drawio-diagram="6288"><img src="https://doc316en.candera.eu/uploads/images/drawio/2024-06/drawing-5-1718951112.png" alt="drawing-5-1718951112.png"/></div>

"New Display" Menu

<div drawio-diagram="6289"><img src="https://doc316en.candera.eu/uploads/images/drawio/2024-06/drawing-5-1718954300.png" alt="drawing-5-1718954300.png"/></div>

 "Render Targets" panel

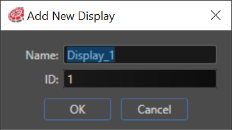
Specify the desired display name and display id in the "Add New Display" dialog:

<div drawio-diagram="5047"><img src="https://doc316en.candera.eu/uploads/images/drawio/2024-01/drawing-5-1705069666.png" alt="drawing-5-1705069666.png"/></div>

 "Add New Display" Dialog

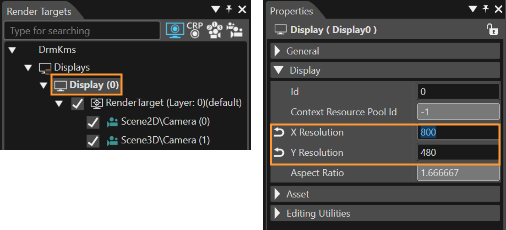
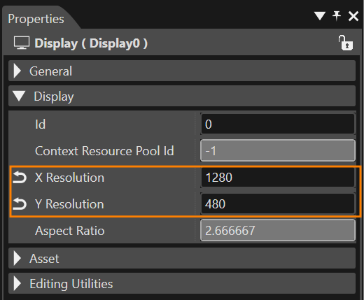
Set the desired resolution of the display via Properties panel by editing ResolutionX and ResolutionY.

<div drawio-diagram="6290"><img src="https://doc316en.candera.eu/uploads/images/drawio/2024-06/drawing-5-1718954437.png" alt="drawing-5-1718954437.png"/></div>

Properties Panel of Display

<p class="callout info">A display can be deleted in the "Render Targets" panel. Right click on the display and select the "Delete" option from the context menu or press the Delete key.</p>

# Add a new Render Target

#### Add Render Target  


A render target is an abstraction of a rendering surface. In the field of 3D computer graphics, it is a feature of modern graphics processing units (GPUs) that allows a 3D scene to be rendered to an intermediate memory buffer, or Render Target Texture (RTT). It can then be manipulated by shaders in order to apply additional effects to the final image before displaying it.

As mentioned before, there are two types of render targets:

- Display Render Targets: They address the rendering in a native surface of the graphic device.
- Texture Render Targets: They represent textures which can be used in the scene to render into them.

A new render target can be added using one of the following possibilities:

Go to "Platform" &gt; "New Render Target" in the menu bar or go to the Render Targets panel, right click on a node under the display and select "New Render Target" from the context menu.
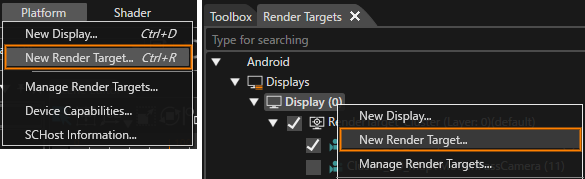
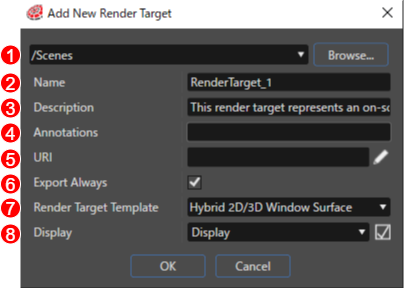
<div drawio-diagram="8490"><img src="https://doc316en.candera.eu/uploads/images/drawio/2025-07/drawing-7-1753492131.png" alt="drawing-7-1753492131.png"/></div>

Set the following items in the Add New Render Target dialog box and click \[ OK \] to create a new Render Target.

<div drawio-diagram="8492"><img src="https://doc316en.candera.eu/uploads/images/drawio/2025-07/drawing-7-1753839682.png" alt="drawing-7-1753839682.png"/></div>

<table id="bkmrk-%E9%A0%85%E7%9B%AE-%E8%AA%AC%E6%98%8E-%E6%9C%80%E4%B8%8A%E6%AE%B5%E3%81%AE%E5%85%A5%E5%8A%9B%E6%AC%84-%E3%82%BD%E3%83%AA%E3%83%A5%E3%83%BC%E3%82%B7%E3%83%A7" style="width:95.119%;"><tbody><tr><td style="width:5.99755%;">(1)</td><td style="width:21.5422%;">Top input field</td><td style="width:72.4602%;">The location where the Render Target is saved in Solution Explorer</td></tr><tr><td style="width:5.99755%;">(2)</td><td style="width:21.5422%;">Name</td><td style="width:72.4602%;">The Render Target Name</td></tr><tr><td style="width:5.99755%;">(3)</td><td style="width:21.5422%;">Description</td><td style="width:72.4602%;">The Render Target Description</td></tr><tr><td style="width:5.99755%;">(4)</td><td style="width:21.5422%;">Annotations</td><td style="width:72.4602%;">The Render Target Annotations</td></tr><tr><td style="width:5.99755%;">(5)</td><td style="width:21.5422%;">URI</td><td style="width:72.4602%;">The Render Target URI</td></tr><tr><td style="width:5.99755%;">(6)</td><td style="width:21.5422%;">Export Always</td><td style="width:72.4602%;">If enabled, the Render Target selected at the time of asset generation is always exported to the asset.</td></tr><tr><td style="width:5.99755%;">(7)</td><td style="width:21.5422%;">Render Target Template</td><td style="width:72.4602%;">The Render Target template</td></tr><tr><td style="width:5.99755%;">(8)</td><td style="width:21.5422%;">Display</td><td style="width:72.4602%;">The display that is linked to the Render Target</td></tr></tbody></table>

<p class="callout info">The types available depend on the SceneComposer platform of a given solution, respectively of the feature set of the Candera Device specified by the platform.</p>

The newly added render target can have the properties listed in the table below set in the Properties panel. The properties of the display render targets "Width", "Height" and "X", "Y" coordinates have to be configured with appropriate values that can be changed via Properties panel. The displays and the display render targets associated can be seen in the Render targets panel.

<table id="bkmrk-%E3%82%BB%E3%82%AF%E3%82%B7%E3%83%A7%E3%83%B3-%E3%83%97%E3%83%AD%E3%83%91%E3%83%86%E3%82%A3%E5%90%8D-%E8%AA%AC%E6%98%8E-%E3%83%AC%E3%83%B3%E3%83%80%E3%83%BC" style="border-collapse:collapse;width:95.9524%;height:1640.47px;"><colgroup><col style="width:17.764%;"></col><col style="width:27.4571%;"></col><col style="width:54.6547%;"></col></colgroup><tbody><tr style="height:29.7969px;"><td class="align-center" style="height:29.7969px;background-color:rgb(230,126,35);"><span style="color:rgb(255,255,255);">**Section**</span></td><td class="align-center" style="height:29.7969px;background-color:rgb(230,126,35);"><span style="color:rgb(255,255,255);">**Property name**</span></td><td class="align-center" style="height:29.7969px;background-color:rgb(230,126,35);"><span style="color:rgb(255,255,255);">**Description**</span></td></tr><tr style="height:142.812px;"><td rowspan="10" style="height:578.937px;">Render Target  
</td><td style="height:142.812px;">Render Target Template</td><td style="height:142.812px;">The Render Target template

Select the Render Target template from the following:

- **Hybrid 2D/3D Window Surface**
- **Hybrid 2D/3D Off-Screen Surface**
- **Software Layer**

For details, please refer to [<span style="color:rgb(230,126,35);">Cameras and Render Targets</span>](https://doc316en.candera.eu/link/536#bkmrk-page-title).

</td></tr><tr style="height:29.7969px;"><td style="height:29.7969px;">Display

</td><td style="height:29.7969px;">The Display that is linked to the Render Target

This property can only be set when Render Target Template = Hybrid 2D/3D Window Surface.

</td></tr><tr style="height:29.7969px;"><td style="height:29.7969px;">Owner</td><td style="height:29.7969px;">Hybrid 2D/3D Off-Screen Surface: Surface owner  
Software Layer: Software Layer owner

This property can only be set when the Render Target Template is set to Hybrid 2D/3D Window Surface or Software Layer.

</td></tr><tr style="height:29.7969px;"><td style="height:29.7969px;">Type</td><td style="height:29.7969px;">The Render Target type</td></tr><tr style="height:63.3906px;"><td style="height:63.3906px;">Auto Swap</td><td style="height:63.3906px;">If enabled, the buffer will be automatically swapped (switched to new drawing) once all cameras linked to the Render Target have completed drawing.</td></tr><tr style="height:80.1875px;"><td style="height:80.1875px;">Auto Clear</td><td style="height:80.1875px;">If enabled, the relevant buffers (color, depth, and stencil buffers) are automatically cleared before a rendering operation to a Render Target is performed.

The depth buffer is cleared with "1.0" values.

</td></tr><tr style="height:52.1875px;"><td style="height:52.1875px;">Is Default</td><td style="height:52.1875px;">If enabled, it will be set as the default Render Target.

For details, please refer to <span style="color:rgb(230,126,35);">[Default Render Target](https://doc316en.candera.eu/link/4#bkmrk-page-title)</span>.

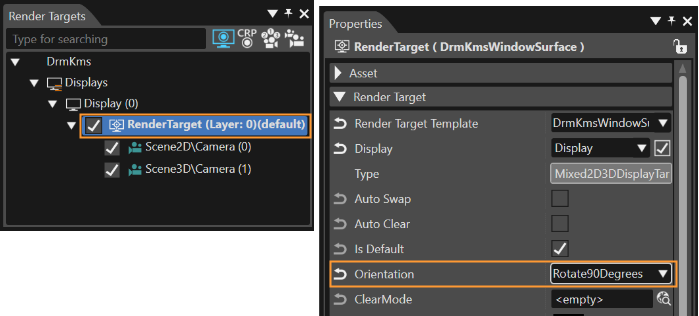
</td></tr><tr style="height:52.1875px;"><td style="height:52.1875px;">Orientation</td><td style="height:52.1875px;">Rotation angle of the rendered image (0°/90°/180°/270°)

For details, please refer to <span style="color:rgb(230,126,35);">[Rotate Display Preview](https://doc316en.candera.eu/link/3#bkmrk--7)</span>.

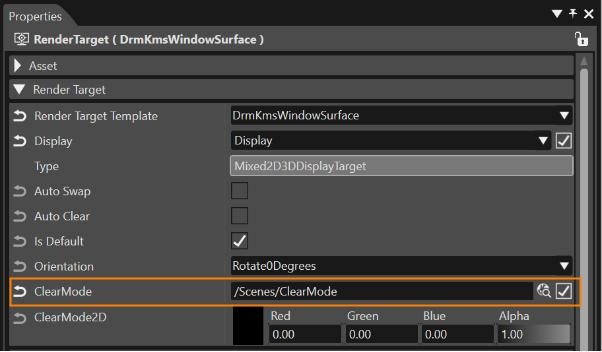
</td></tr><tr style="height:68.9844px;"><td style="height:68.9844px;">ClearMode</td><td style="height:68.9844px;">A ClearMode item used to clear the buffer associated with a 3D Render Target.

For instructions on how to create a ClearMode item, see [<span style="color:rgb(230,126,35);">ClearMode</span>](https://doc316en.candera.eu/books/solution-handling/page/clear-mode).

</td></tr><tr style="height:29.7969px;"><td style="height:29.7969px;">ClearMode2D</td><td style="height:29.7969px;">Color to clear the color buffer of a 2D Render Target</td></tr></tbody></table>

The properties in the Edting Utilities section vary depending on the Render Target Template selected.

**Render Target Template: Hybrid 2D/3D Window Surface Edting Utilities section properties:**

<table id="bkmrk-section-property-nam" style="border-collapse:collapse;width:95.9524%;height:1640.47px;"><colgroup><col style="width:17.764%;"></col><col style="width:27.4571%;"></col><col style="width:54.6547%;"></col></colgroup><tbody><tr style="height:29.7969px;"><td class="align-center" style="height:29.7969px;background-color:rgb(230,126,35);"><span style="color:rgb(255,255,255);">**Section**</span></td><td class="align-center" style="height:29.7969px;background-color:rgb(230,126,35);"><span style="color:rgb(255,255,255);">**Property name**</span></td><td class="align-center" style="height:29.7969px;background-color:rgb(230,126,35);"><span style="color:rgb(255,255,255);">**Description**</span></td></tr><tr style="height:76.422px;"><td rowspan="21" style="height:1031.74px;">Edting Utilities  
</td><td style="height:76.422px;">Preview Border Scope</td><td style="height:76.422px;">Preview borders for the targeted Render Target

Available in Global Preferences.

- **None:** Border is hidden
- **Global:** Border based on global coordinates
- **Local:** Border based on local coordinates

</td></tr><tr style="height:46.5938px;"><td style="height:46.5938px;">Preview Border Color</td><td style="height:46.5938px;">Preview border color for the target Render Target

Available in Global Preferences.

</td></tr><tr style="height:29.7969px;"><td style="height:29.7969px;">Width</td><td style="height:29.7969px;">Render target width (horizontal pixels)

If this value is "-1", it is calculated from the Display value.

</td></tr><tr style="height:29.7969px;"><td style="height:29.7969px;">Height</td><td style="height:29.7969px;">Render target height (vertical pixels)

If this value is "-1", it is calculated from the Display value.

</td></tr><tr style="height:46.5938px;"><td style="height:46.5938px;">X</td><td style="height:46.5938px;">The position of the Render Target along the X axis (horizontal direction) in the display linked to the Render Target</td></tr><tr style="height:46.5938px;"><td style="height:46.5938px;">Y</td><td style="height:46.5938px;">The position of the Render Target along the Y axis (vertical direction) in the display linked to the Render Target</td></tr><tr style="height:63.3906px;"><td style="height:63.3906px;">Layer</td><td style="height:63.3906px;">Window Surface Layer ID

When there are multiple render targets, you can set the rendering order.The higher the number, the higher the layer will be.

- Bottom layer: Layer = 0
- Middle layer: Layer = 1
- Top layer: Layer = 2

The number of layers supported varies by device. Also, Window Surfaces with the same layer ID cannot be uploaded at the same time.

For details, please refer to <span style="color:rgb(230,126,35);">[Multiple Render Targets](https://doc316en.candera.eu/link/538#bkmrk-page-title)</span>.

</td></tr><tr style="height:137.219px;"><td style="height:137.219px;">BlendMode</td><td style="height:137.219px;">Blend mode

- **BlendModeStandard:** A common blend mode that represents transparency based on the alpha value of the source pixel.
- **BlendModePreMultiplied:** Performs blending as if the source pixel is already multiplied by the alpha value.
- **BlendModeOff:** Blending disabled

For details, please refer to <span style="color:rgb(230,126,35);">[Blend Modes](https://doc316en.candera.eu/link/536#bkmrk-blend-modes)</span>.

</td></tr><tr style="height:29.7969px;"><td style="height:29.7969px;">AntiAliasingSampleBuffers</td><td style="height:29.7969px;">Number of sample buffers to use for anti-aliasing</td></tr><tr style="height:46.5938px;"><td style="height:46.5938px;">AntiAliasingMultiSamplingFactor</td><td style="height:46.5938px;">Minimum number of samples to use for multi-sample buffers used for anti-aliasing</td></tr><tr style="height:46.5938px;"><td style="height:46.5938px;">MaxSwapInterval</td><td style="height:46.5938px;">Maximum swap interval

Set when using EGL settings. If this value is "-1", the maximum swap interval is not limited.

</td></tr><tr style="height:46.5938px;"><td style="height:46.5938px;">MinSwapInterval</td><td style="height:46.5938px;">Minimum swap interval

Set when using EGL settings. If this value is "-1", the minimum swap interval is not limited.

</td></tr><tr style="height:96.9844px;"><td style="height:96.9844px;">SwapInterval</td><td style="height:96.9844px;">Swap Interval

Applies to the Window Surface. The initial value is "1".

If the value is "0", the buffer swap is not synchronized with the video frame, and the swap is performed as soon as rendering is completed.

If the value is "1" or more, the buffer swap is performed every time the vertical synchronization signal (V-sync) is received the number of times specified by the value.

</td></tr><tr style="height:29.7969px;"><td style="height:29.7969px;">RedSize</td><td style="height:29.7969px;">The number of bits for the Red color in the color buffer.</td></tr><tr style="height:29.7969px;"><td style="height:29.7969px;">GreenSize</td><td style="height:29.7969px;">The number of bits for the Green color in the color buffer.

</td></tr><tr style="height:29.7969px;"><td style="height:29.7969px;">BlueSize</td><td style="height:29.7969px;">The number of bits for the Blue color in the color buffer.</td></tr><tr style="height:29.7969px;"><td style="height:29.7969px;">AlphaSize</td><td style="height:29.7969px;">The number of bits for the Alpha in the color buffer.</td></tr><tr style="height:46.5938px;"><td style="height:46.5938px;">Conformant</td><td style="height:46.5938px;">Set this property to enabled if Render Target is OpenGL ES compliant.</td></tr><tr style="height:29.7969px;"><td style="height:29.7969px;">DepthSize</td><td style="height:29.7969px;">Number of bits in the depth buffer

</td></tr><tr style="height:29.7969px;"><td style="height:29.7969px;">StencilSize</td><td style="height:29.7969px;">Number of bits in the stencil buffer</td></tr><tr style="height:63.3906px;"><td style="height:63.3906px;">BufferPreservedBit</td><td style="height:63.3906px;">If enabled, Render Target contents are preserved after buffer swapping, potentially improving performance by reducing GPU strain when only a portion of the screen changes.</td></tr></tbody></table>

**Render Target Template：Hybrid 2D/3D Off-Screen Surface Edting Utilities section properties:**

<table id="bkmrk-section-property-nam-1" style="border-collapse:collapse;width:95.9524%;height:522.891px;"><colgroup><col style="width:17.764%;"></col><col style="width:27.4534%;"></col><col style="width:54.7826%;"></col></colgroup><tbody><tr style="height:29.7969px;"><td class="align-center" style="height:29.7969px;background-color:rgb(230,126,35);"><span style="color:rgb(255,255,255);">**Section**</span></td><td class="align-center" style="height:29.7969px;background-color:rgb(230,126,35);"><span style="color:rgb(255,255,255);">**Property Name**</span></td><td class="align-center" style="height:29.7969px;background-color:rgb(230,126,35);"><span style="color:rgb(255,255,255);">**Description**</span></td></tr><tr style="height:120.422px;"><td rowspan="11" style="height:493.094px;">Edting Utilities  
</td><td style="height:120.422px;">Preview Border Scope</td><td style="height:120.422px;">Preview borders for the targeted Render Target

Available in Global Preferences.

- **None:** Border is hidden
- **Global:** Border based on global coordinates
- **Local:** Border based on local coordinates

</td></tr><tr style="height:46.5938px;"><td style="height:46.5938px;">Preview Border Color</td><td style="height:46.5938px;">Preview border color for the target Render Target

Available in Global Preferences.

</td></tr><tr style="height:29.7969px;"><td style="height:29.7969px;">ColorFormat</td><td style="height:29.7969px;">Color buffer format</td></tr><tr style="height:32.4219px;"><td style="height:32.4219px;">DepthFormat

</td><td style="height:32.4219px;">Depth buffer format</td></tr><tr style="height:32.4219px;"><td style="height:32.4219px;">StencilFormat</td><td style="height:32.4219px;">Stencil buffer format</td></tr><tr style="height:32.4219px;"><td style="height:32.4219px;">ExternalColorTexture</td><td style="height:32.4219px;">Attaches an external color buffer to a Render Target.</td></tr><tr style="height:29.5938px;"><td style="height:29.5938px;">ExternalDepthBuffer</td><td style="height:29.5938px;">Attaches an external depth buffer to a Render Target.

</td></tr><tr style="height:35.25px;"><td style="height:35.25px;">ExternalStencilBuffer</td><td style="height:35.25px;">Attaches an external stencil buffer to a Render Target.</td></tr><tr style="height:29.7969px;"><td style="height:29.7969px;">Width</td><td style="height:29.7969px;">Render target width (horizontal pixels)

If this value is "-1", it is calculated from the Display value.

</td></tr><tr style="height:29.7969px;"><td style="height:29.7969px;">Height</td><td style="height:29.7969px;">Render target height (vertical pixels)

If this value is "-1", it is calculated from the Display value.

</td></tr><tr style="height:74.5781px;"><td style="height:74.5781px;">MsaaSamples</td><td style="height:74.5781px;">MSAA (Multisample Anti-Aliasing) Sample Count

For details, please refer to <span style="color:rgb(230,126,35);">[Multisample Anti-Aliasing Offscreen Render Targets](https://doc316en.candera.eu/link/542#bkmrk-page-title)</span>.

</td></tr></tbody></table>

**Render Target Template：Software Layer Edting Utilities section properties:**

<table id="bkmrk-section-property-nam-2" style="border-collapse:collapse;width:95.9524%;height:296.844px;"><colgroup><col style="width:17.764%;"></col><col style="width:27.4534%;"></col><col style="width:54.7826%;"></col></colgroup><tbody><tr style="height:29.7969px;"><td class="align-center" style="height:29.7969px;background-color:rgb(230,126,35);"><span style="color:rgb(255,255,255);">**Section**</span></td><td class="align-center" style="height:29.7969px;background-color:rgb(230,126,35);"><span style="color:rgb(255,255,255);">**Property Name**</span></td><td class="align-center" style="height:29.7969px;background-color:rgb(230,126,35);"><span style="color:rgb(255,255,255);">**Description**</span></td></tr><tr style="height:15.344px;"><td rowspan="19" style="height:267.047px;">Edting Utilities  
</td><td style="height:120.422px;">Preview Border Scope</td><td style="height:120.422px;">Preview borders for the targeted Render Target

Available in Global Preferences.

- **None:** Border is hidden
- **Global:** Border based on global coordinates
- **Local:** Border based on local coordinates

</td></tr><tr><td style="height:46.5938px;">Preview Border Color</td><td style="height:46.5938px;">Preview border color for the target Render Target

Available in Global Preferences.

</td></tr><tr><td style="height:15.344px;">ColorFormat</td><td style="height:15.344px;">Color buffer format</td></tr><tr style="height:32.4219px;"><td style="height:32.4219px;">DepthFormat

</td><td style="height:32.4219px;">Depth buffer format</td></tr><tr style="height:32.4219px;"><td style="height:32.4219px;">StencilFormat</td><td style="height:32.4219px;">Stencil buffer format</td></tr><tr style="height:32.4219px;"><td style="height:32.4219px;">ExternalColorTexture</td><td style="height:32.4219px;">Attaches an external color buffer to a Render Target.</td></tr><tr style="height:29.7969px;"><td style="height:29.7969px;">ExternalDepthBuffer</td><td style="height:29.5938px;">Attaches an external depth buffer to a Render Target.

</td></tr><tr style="height:35.25px;"><td style="height:35.25px;">ExternalStencilBuffer</td><td style="height:35.25px;">Attaches an external stencil buffer to a Render Target.</td></tr><tr style="height:29.7969px;"><td style="height:29.7969px;">Width</td><td style="height:29.7969px;">Render target width (horizontal pixels)

</td></tr><tr style="height:29.7969px;"><td style="height:29.7969px;">Height</td><td style="height:29.7969px;">Render target height (vertical pixels)

</td></tr><tr style="height:29.7969px;"><td style="height:29.7969px;">X</td><td style="height:46.5938px;">The position of the Render Target along the X axis (horizontal direction) in the Render Target's owner (drawing area).</td></tr><tr><td>Y</td><td style="height:46.5938px;">The position of the Render Target along the Y axis (vertical direction) in the Render Target's owner (drawing area).</td></tr><tr><td>Layer</td><td>Software Layer ID

When a Software Layer is made up of multiple layers, you can set the rendering order. The higher the number, the higher the layer.

</td></tr><tr><td>BlendMode</td><td>Blend mode

For details, please refer to <span style="color:rgb(230,126,35);">[Blend Modes](https://doc316en.candera.eu/link/536#bkmrk-blend-modes)</span>.

</td></tr><tr><td>ConstantAlpha</td><td>Alpha (transparency) applied to the entire Software Layer</td></tr><tr><td>BufferCount</td><td>Number of buffers used by the Software Layer

- SoftwareLayerSingleBuffered
- SoftwareLayerDoubleBuffered

</td></tr><tr><td>Enabled</td><td>Enable (show)/disable (hide) Software Layers</td></tr><tr><td>CompositionCamera</td><td>CompositionCamera

The drawing of each layer in the Software Layer is used by the Composition Camera to generate the final display image. For details please refer to [<span style="color:rgb(230,126,35);">Software Layers</span>](https://doc316en.candera.eu/link/536#bkmrk-software-layers%C2%A0).

</td></tr><tr><td>BorderEnabled</td><td>Show/Hide Layer Borders

Each Software Layer is separated by a one-pixel border.

</td></tr></tbody></table>

<p class="callout info">Please refer to the <span style="color:rgb(230,126,35);">[Candera](http://dev.doc.cgistudio.at/APILINK/namespace_candera.html)</span> API Documentation to learn about device-specific render target properties:   
Candera::RenderTarget</p>

Every new created render target could be enabled or disabled by ticking the checkbox. When deactivating/activating a render target by unchecking/checking the checkbox, the render target gets also unloaded/uploaded. Therefore, one can make use of several WindowSurfaceRenderTarget objects having the same layer by activating only one of them; the others will not be uploaded.
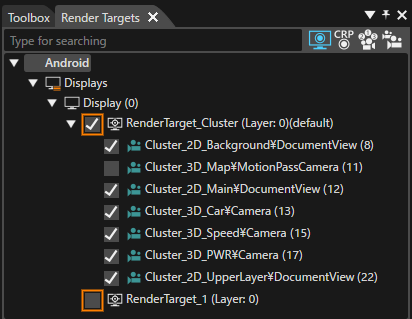
<div drawio-diagram="8491"><img src="https://doc316en.candera.eu/uploads/images/drawio/2025-07/drawing-7-1753492872.png" alt="drawing-7-1753492872.png"/></div>

<p class="callout info">A render target can be deleted using the context menu option "Delete" in the Render Targets panel.</p>

---

<span style="color:rgb(34,34,34);font-family:'-apple-system', BlinkMacSystemFont, 'Segoe UI', Oxygen, Ubuntu, Roboto, Cantarell, 'Fira Sans', 'Droid Sans', 'Helvetica Neue', sans-serif;font-size:1.666em;font-weight:400;">Configure Render Target</span>

##### Configure a Display Render Target  


In the "Render Targets" panel, the Display Render Targets are organized in the DisplayRenderTargets collection of a Display node.   
New display render targets will be listed under this category.

##### Configure a Texture Render Target

Rendering to a texture is simple on one hand, but on the other hand it is powerful and enables numerous special effects. It is an extension to rendering to a surface.   
Usually, for a texture render target, the texture render target properties "Width" and "Height" must be configured according to the required size of the texture.

To use a texture render target as a texture, SceneComposer allows selecting a texture render target in the "Choose Item" dialogs, whenever a texture shall be selected during composing a scene.
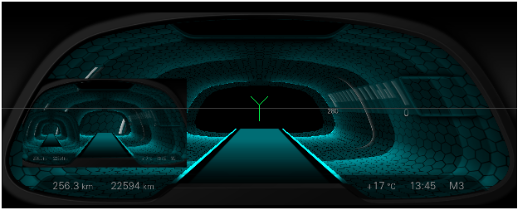
<div drawio-diagram="14"><img src="https://doc316en.candera.eu/uploads/images/drawio/2023-02/drawing-7-1676268209.png" alt="drawing-7-1676268209.png"/></div>

#### Clear Mode Item

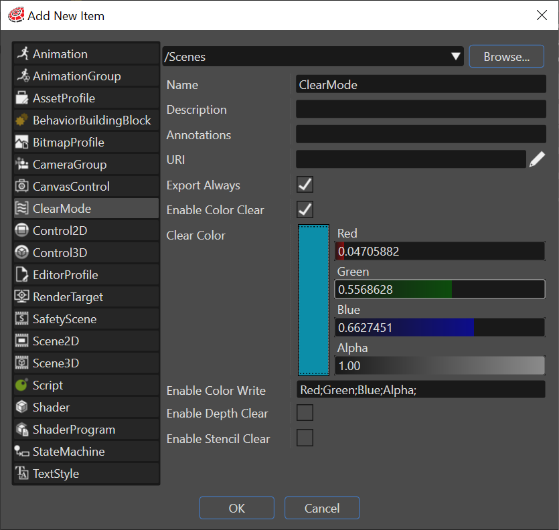
The "Clear Mode" item can be created via "Solution Explorer" panel by using the context menu option ("Add" &gt; "New Item"). In this way, all its specific properties ("Clear Color", "Enable Color Write", "Enable Depth Clear" and "Enable Stencil Clear") are related with just one item instead of being included among many other properties of every render target. If there are many render targets which are referencing the same clear mode item, it is enough to modify just one time the desired property rather than modifying every of them.

<div drawio-diagram="6295"><img src="https://doc316en.candera.eu/uploads/images/drawio/2024-06/drawing-5-1718955412.png" alt="drawing-5-1718955412.png"/></div>

After the creation of a "Clear Mode" item, it can be used after being referenced from a specific Render Target. This operation can be done by using the "Clear Mode" property available in the "Properties" panel associated with any available render target.

<div drawio-diagram="6296"><img src="https://doc316en.candera.eu/uploads/images/drawio/2024-06/drawing-5-1718955548.png" alt="drawing-5-1718955548.png"/></div>

<p class="callout info">If a ClearMode is a associated to a RenderTarget, the RenderTarget is cleared using that clearmode before any of the attached cameras renders to it.</p>

<p class="callout info">Clear Mode Property  
See also: <span style="color:rgb(230,126,35);">[Candera::ClearMode](http://dev.doc.cgistudio.at/APILINK/class_candera_1_1_clear_mode.html)</span></p>

---

# Link a Camera to a Render Target

#### Link a Camera to a Render Target

There are two options on how to create a link between a camera and a render target:

- Camera to render target: Drag the camera in the Scene Tree panel and drop it on the desired render target in the Render Targets panel.
- Render target to camera: Drag a render target in the Render Targets panel and drop it on the desired camera in the Scene Tree panel.

Existing links will be overridden by a new drag and drop operation.
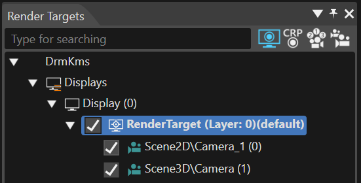
<div drawio-diagram="6297"><img src="https://doc316en.candera.eu/uploads/images/drawio/2024-06/drawing-5-1718955616.png" alt="drawing-5-1718955616.png"/></div>

Render Targets Panel with Camera enabled

<p class="callout info">A camera can be associated to exactly one render target at a moment.   
A render target can be associated to one or more cameras, hence one or more cameras can use the same render target as output target.</p>

---

#### Render Target Swapping

Once all cameras are finished with rendering their content onto a render target, the render target must be swapped. There are two options to ensure this:

- Enable the "Enable Swapping" property of exactly one camera linked to the render target. In case of more cameras, take the camera with the highest sequence numbers, so only the last camera linked to a render target will trigger the swap of the render target buffers.
- If no camera has "Enable Swapping" property enabled, the application must take care to swap the buffers during the render loop correctly.
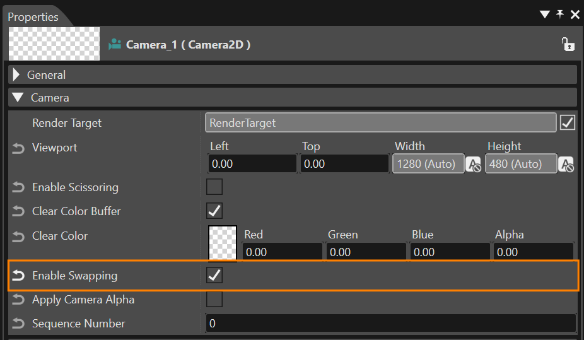
<div drawio-diagram="6298"><img src="https://doc316en.candera.eu/uploads/images/drawio/2024-06/drawing-5-1718955742.png" alt="drawing-5-1718955742.png"/></div>

"Enable Swapping" property of Camera

<p class="callout info">In case no swapping is done, the display will remain black.   
In case more than one swapping is done during a render pass, the display will flicker.</p>

---

#### Additional Info about Rendering

This section explains the render loop performed by SCHost for the Scene Editor part of SceneComposer. For each frame, the following procedure is executed:

Displays are cleared (all the render targets are cleared) - due to specific requirements.

All cameras are rendered in the order specified by the camera property "Sequence Number". A camera is rendered only if it is explicitly enabled in the Render Targets panel.

##### Active Camera Rendering:

- 3D: Active camera attached to scene render panel is about to be rendered.   
    &gt; If the camera has any ReflectionCamera children, they will be placed in a list along with the active camera.   
    &gt; The list is sorted considering the Sequence Number property of the cameras.   
    &gt; All the cameras in the list are rendered.   
    &gt; The scene render panel render target is swapped.
- 2D: Active camera attached to scene render panel is rendered.
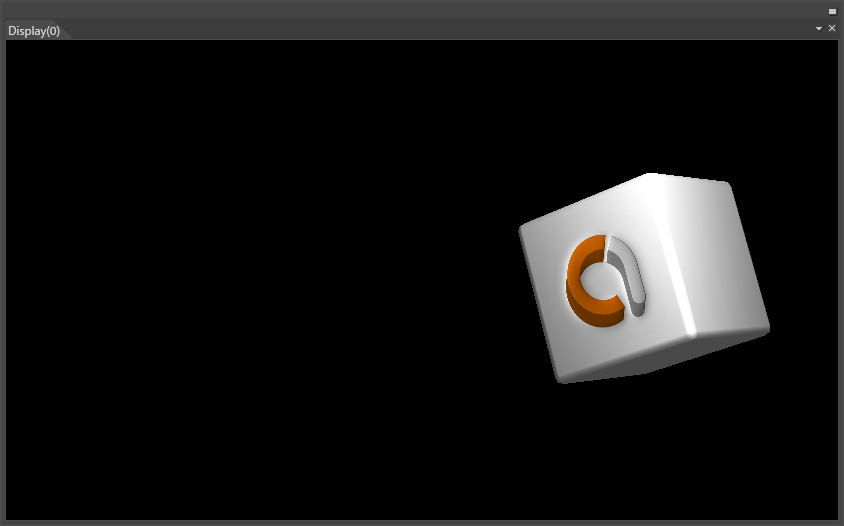
<div drawio-diagram="4735"><img src="https://doc316en.candera.eu/uploads/images/drawio/2023-11/drawing-4-1699592111.png" alt="drawing-4-1699592111.png"/></div>

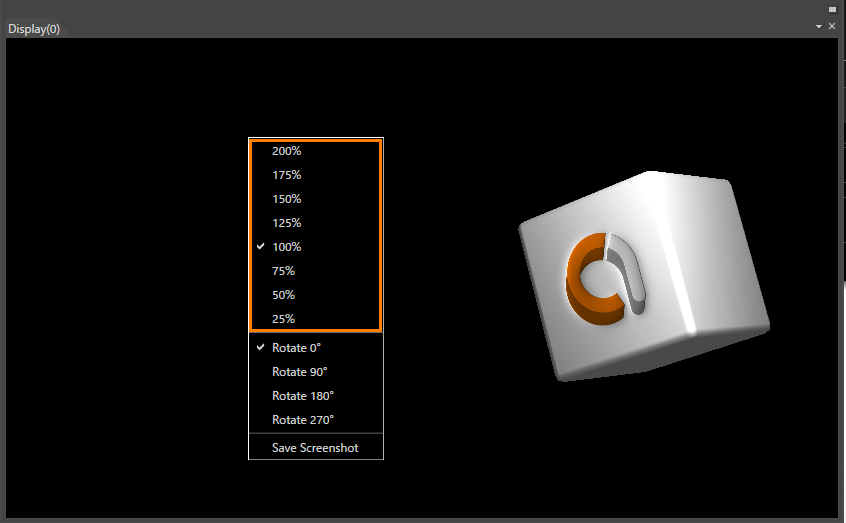
Scene Rendered on a Configured Display

##### Zoom Display Preview:

In some particular situations, the user could need an option to switch back to 100% of a display if its size has been modified. Consequently, the possibility to zoom in Display Preview through options in the context menu of the view is available. In the context menu which can be opened by right click anywhere in the display, eight given values are available: 200%, 175%, 150%, 125%, 100%, 75%, 50%, and 25%.

<div drawio-diagram="4734"><img src="https://doc316en.candera.eu/uploads/images/drawio/2023-11/drawing-4-1699591998.png" alt="drawing-4-1699591998.png"/></div>

Context Menu with Zoom Options on a Preview Display

---

##### Rotate Display Preview:

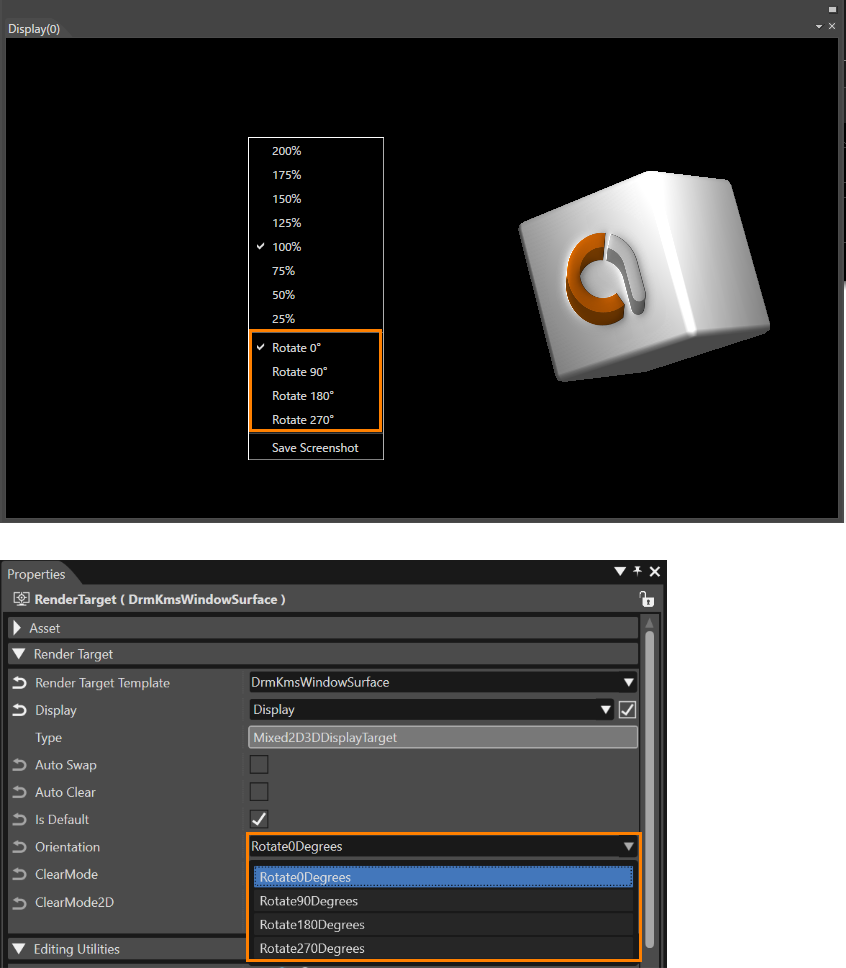
This function is used to rotate the orientation of the display preview to match the orientation of the target device (landscape/portrait). The CGI Player also has a similar function. See [<span style="color:rgb(230,126,35);">"Rotate"</span>](https://doc316en.candera.eu/books/player/page/rotate) for details.

The display preview can be rotated in the below two ways.

- Set the rotation angle (0°/90°/180°/270°) from the context menu of the display preview.
- Set the rotation angle (0°/90°/180°/270°) from the Orientation property of the render target. This setting also applies to the rotation angle of the CGI Player.

<div drawio-diagram="6299"><img src="https://doc316en.candera.eu/uploads/images/drawio/2024-06/drawing-5-1718955881.png" alt="drawing-5-1718955881.png"/></div>

# Default Render Target

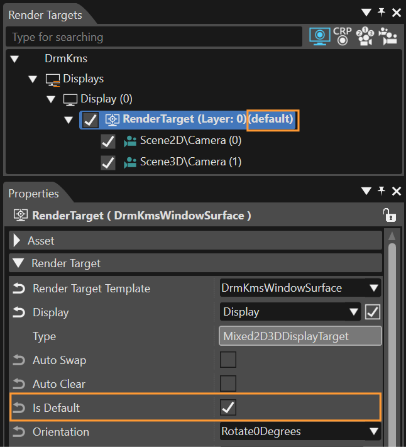
The default render target is the render target that new cameras are attached to by default. Visually, the default render target is identifiable by the "(default)" text near it's name or by the "Is Default" property which is checked. Also, its tooltip displays additional information.

<div drawio-diagram="6300"><img src="https://doc316en.candera.eu/uploads/images/drawio/2024-06/drawing-5-1718955974.png" alt="drawing-5-1718955974.png"/></div>

Default Render Target Example

<p class="callout info">The default render target works with Camera, Reflection Camera and Stereo Camera.</p>

---

#### Manually Setting

Setting the default render target can be done in one of the following ways:

- via context command using the "Set As Default Render Target" option
- by enabling the property "Is Default" from the Property panel
- via \[ <span style="color:rgb(230,126,35);">[Solutions Options &gt; Default Render Target Configuration](https://doc316en.candera.eu/books/solution-handling/page/default-render-target-configuration)</span> \] window

---

#### Automatically Setting

The default render target is set automatically in one of the following two situations:

- when adding a new render target if there is no other
- when deleting the current default render target, if another one is available

---

# Manage Render Targets

Manage Render Targets dialog allows you to view and edit the various settings of the render targets included in solution.

#### Open the Manage Render Targets dialog

The Manage Render Targets dialog can be opened in two ways:

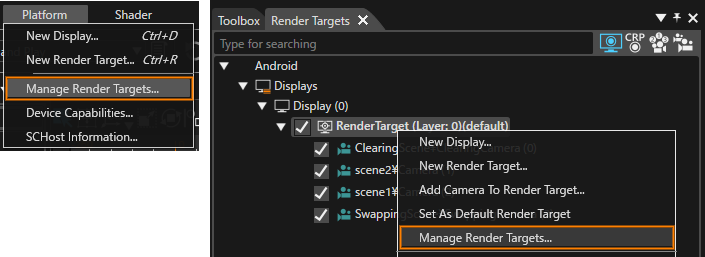
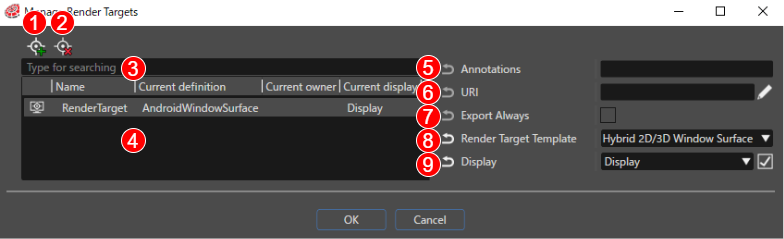
- From the \[ Platform &gt; Manage Render Targets… \] menu on the menu bar
- The context menu of any render target in the Render Targets panel
<div drawio-diagram="7802"><img src="https://doc316en.candera.eu/uploads/images/drawio/2025-01/drawing-7-1737348842.png" alt="drawing-7-1737348842.png"/></div>

#### Manage Render Targets dialog details

<div drawio-diagram="7858"><img src="https://doc316en.candera.eu/uploads/images/drawio/2025-02/drawing-7-1738564898.png" alt="drawing-7-1738564898.png"/></div>

<table class="align-center" id="bkmrk-%281%29-%E3%82%A4%E3%83%B3%E3%83%9D%E3%83%BC%E3%83%88%E5%AF%BE%E8%B1%A1%E3%83%95%E3%82%A1%E3%82%A4%E3%83%AB%E3%81%A8%E3%81%97%E3%81%A6%E6%8C%87%E5%AE%9A" style="width:100%;"><tbody><tr><td style="width:7.38975%;">(1)</td><td class="align-left" style="width:19.7866%;">Create Render Target

</td><td class="align-left" style="width:72.8237%;">Create a new Render Target.

</td></tr><tr><td style="width:7.38975%;">(2)</td><td class="align-left" style="width:19.7866%;">Delete Render Target

</td><td class="align-left" style="width:72.8237%;">Delete a Render Target.

</td></tr><tr><td style="width:7.38975%;">(3)</td><td style="width:19.7866%;">Search

</td><td class="align-left" style="width:72.8237%;">If multiple Render Targets are set, you can enter a search term to narrow the number of results.

</td></tr><tr><td style="width:7.38975%;">(4)</td><td style="width:19.7866%;">Render Target list

</td><td class="align-left" style="width:72.8237%;">A list of Render Targets included in the solution is displayed.  
(If a search term is set, only Render Targets that correspond to the search results are displayed.)

</td></tr><tr><td style="width:7.38975%;">(5)</td><td class="align-left" style="width:19.7866%;">Annotations

</td><td class="align-left" style="width:72.8237%;">The Render Target Annotations

</td></tr><tr><td style="width:7.38975%;">(6)</td><td class="align-left" style="width:19.7866%;">URI

</td><td class="align-left" style="width:72.8237%;">The Render Target URI

</td></tr><tr><td style="width:7.38975%;">(7)</td><td class="align-left" style="width:19.7866%;">Export Always

</td><td class="align-left" style="width:72.8237%;">If enabled, the Render Target selected at the time of asset generation is always exported to the asset.

</td></tr><tr><td style="width:7.38975%;">(8)</td><td class="align-left" style="width:19.7866%;">Render Target Template

</td><td class="align-left" style="width:72.8237%;">The Render Target type

</td></tr><tr><td style="width:7.38975%;">(9)</td><td style="width:19.7866%;">Display

</td><td class="align-left" style="width:72.8237%;">The display that is linked to the Render Target

</td></tr></tbody></table>

---

# Smart Scene/Camera Preview

#### Smart Scene/Camera Preview

It is possible to enable/disable camera visualization into the display(s) based on scenes. Depending (offscreen) cameras are automatically activated. The actions are offered via context menu on the camera, render target, display objects, and scenes. This option is available for the user via the following context menus:

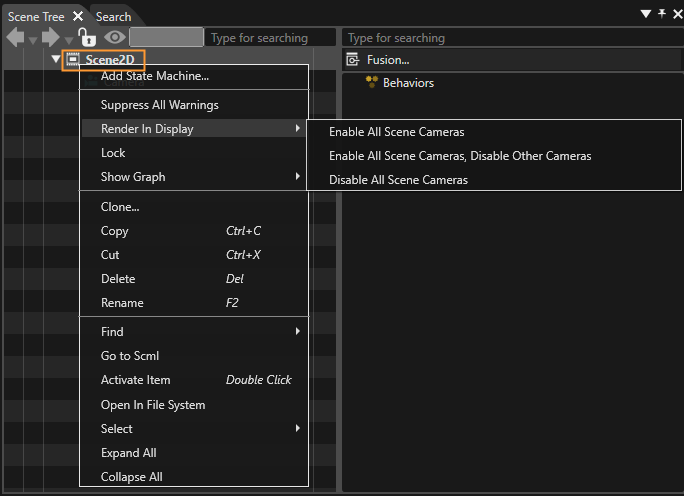
1\. Scene - Render in display (menu having children items):

- Enable all cameras
- Disable all cameras

<div drawio-diagram="7599"><img src="https://doc316en.candera.eu/uploads/images/drawio/2024-12/drawing-5-1733486479.png" alt="drawing-5-1733486479.png"/></div>

"Render in Display" Option in the Scene's Context Menu

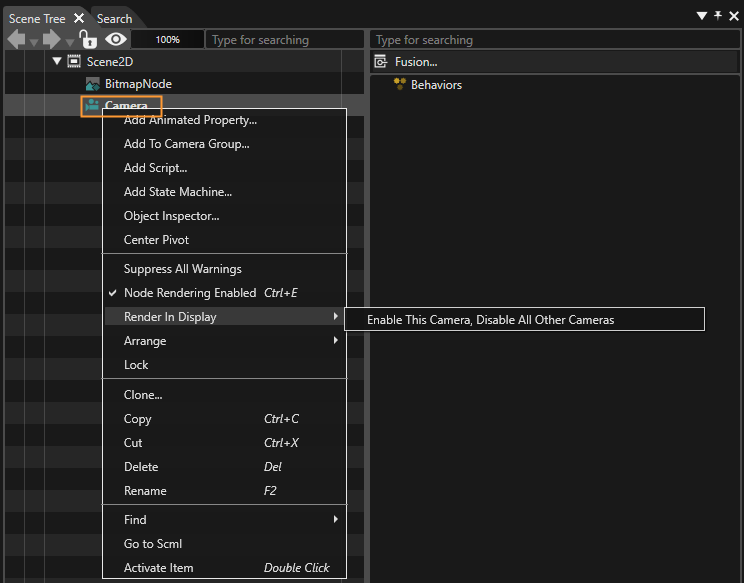
2\. Camera - Render in display (menu item having children items):

- Render only this camera - clears all cameras and enables only this camera
- Render all except this camera

<div drawio-diagram="7600"><img src="https://doc316en.candera.eu/uploads/images/drawio/2024-12/drawing-5-1733486605.png" alt="drawing-5-1733486605.png"/></div>

"Render in Display" Option in the Camera's Context Menu

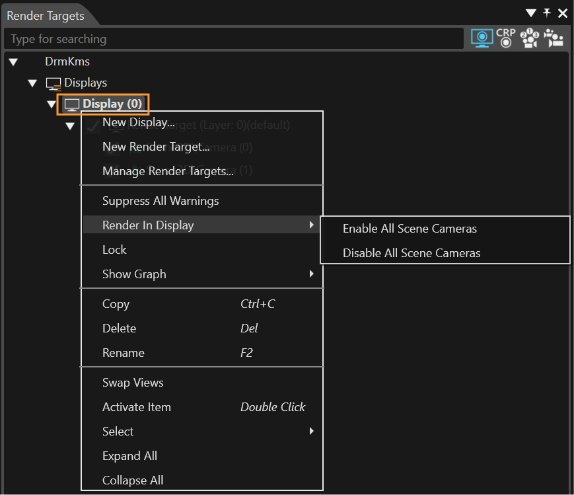
3\. Display - Render in display (menu having children items):

- Enable all cameras
- Disable all cameras

<div drawio-diagram="6303"><img src="https://doc316en.candera.eu/uploads/images/drawio/2024-06/drawing-5-1718956586.png" alt="drawing-5-1718956586.png"/></div>

"Render in Display" Option in the Display's Context Menu

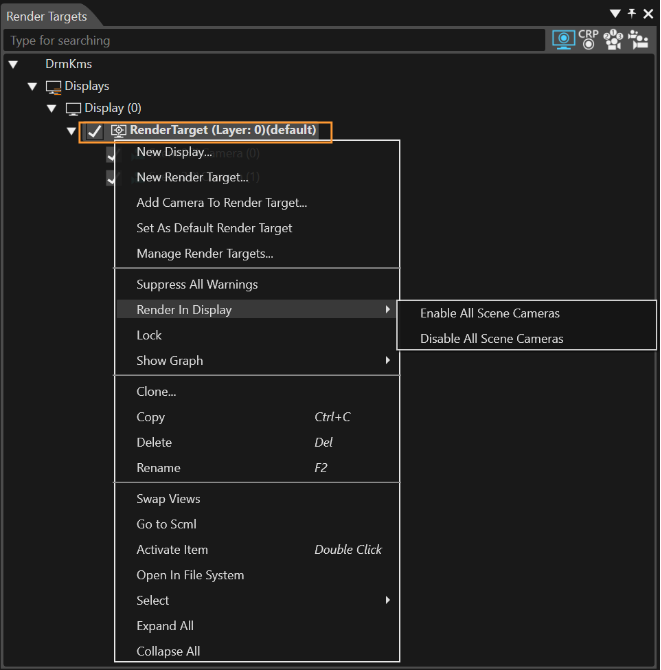
4\. RenderTarget - Render in display (menu having children items):

- Enable all cameras
- Disable all cameras

<div drawio-diagram="6305"><img src="https://doc316en.candera.eu/uploads/images/drawio/2024-06/drawing-5-1718956714.png" alt="drawing-5-1718956714.png"/></div>

"Render in Display" Option in the Render Target's Context Menu

<p class="callout info">Dependent cameras are 2D and 3D cameras which render in off-screen RenderTargets and the offscreen RenderTarget is used in a 3D scene as texture (e.g. billboard). </p>

---

# Rendering Order

#### Rendering Order

The order in which the rendering occurs in SceneComposer follows the next rules:

1. All the widgets from the active scene get updated;
2. All the 2D cameras are rendered: all the cameras are sorted by following the sequence number; all the cameras are rendered on associated surfaces;
3. All the 3D cameras are rendered: all the cameras are sorted by following the sequence number; all the cameras are rendered on associated surfaces;
4. Active camera and all reflection cameras (if existing) are rendered on Scene Editor panel: a) The active camera is added on a list of cameras; b) On the same list all the "reflection camera" children type are added; c) The list is sorted by following the sequence number; d) The cameras from the list are rendered on Scene Editor panel.

#### Buffer Swapping Rules (available for both 2D and 3D)

Usually, the last camera (based on the sequence number) that is rendered on a surface performs a buffer swap (being the latest camera, the frame is completely updated so it can be displayed).

Clearing rules:

- 2D: a) Scissoring not active: cameras clear the surface on the region which is indicated by the viewport b) Scissoring active: cameras clear the surface on the region which is indicated by the scissoring rectangle
- 3D: the cameras clear the surfaces inside the region created by the scissor box (when scissoring is enabled). By default, the scissor box is equivalent with the whole surface (-0, 0, 1, 1). In conformity with OpenGL specifications, the viewport does not affect the clearing region (this is a driver dependent rule).

---

# Display Renderer Statistics

#### Add display

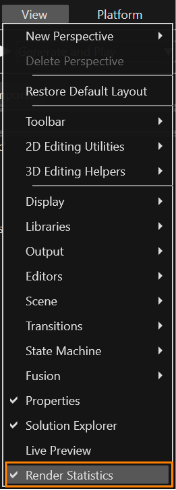
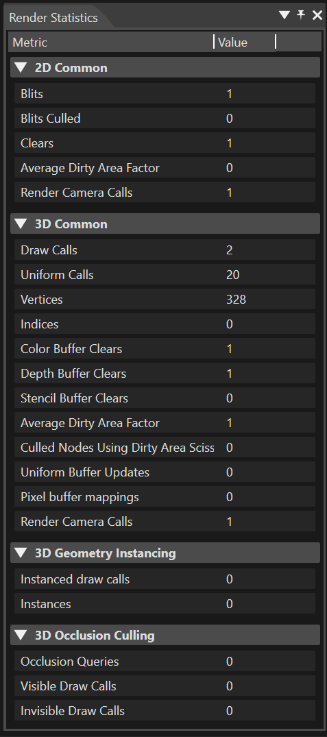
Render Statistics inform the user about current performance indicators during rendering. Therefore they are of major help when trying to identify performance bottlenecks. This information is presented to the user in a dedicated panel which can be made visible through the "Render Statistics" menu item from the "View" menu.
<div drawio-diagram="6306"><img src="https://doc316en.candera.eu/uploads/images/drawio/2024-06/drawing-5-1718957494.png" alt="drawing-5-1718957494.png"/></div>

"Render Statistics" Menu

The panel will be displayed by default in the top right region of the SceneComposer user interface. Also this panel can be moved in any other area.

<div drawio-diagram="6307"><img src="https://doc316en.candera.eu/uploads/images/drawio/2024-06/drawing-5-1718957595.png" alt="drawing-5-1718957595.png"/></div>

"Render Statistics" panel

The Renderer Statistics structure keeps track of per pass data that is relevant to the user. This includes statistics about the metrics of:

- Draw Calls
- Uniform Calls
- Vertices
- Indices
- ColorBufferClears
- DepthBufferClears
- StencilBufferClears
- AverageDirtyAreaFactor
- CulledNodesUsingDirtyAreaScissor
- Uniform Buffer Updates
- Pixcel buffer mappings
- Render Camera Calls
- Occlusion Queries (available on OpenGL ES 3.0 API only)
- Visible Draw Calls (available on OpenGL ES 3.0 API only)
- Invisible Draw Calls (available on OpenGL ES 3.0 API only)

Some specific pieces of information are the following:

2D:

- Uploaded BitmapImages
- Total Uploaded BitmapImages
- Render Camera2D Calls

3D:

- Uploaded Textures (incl. breakdown to BitmapTextureImages, CubeMapTextureImages, DirectTextureImages)
- Total Uploaded Textures (incl. breakdown to BitmapTextureImages, CubeMapTextureImages, DirectTextureImages)
- Uploaded Shader Programs
- Total Uploaded Shader Programs
- Uploaded VertexBuffers
- Total Uploaded VertexBuffers
- Render Camera Calls

The numbers shown in the statistic accumulate a typical render pass conducted by RenderAllCameras. The user can disable or enable cameras and render targets within the RenderTarget panel to sum up and view statistics for only those selected items. To gather statistics, three basic conditions have to be fulfilled. First, the display has to be set active. Second, the "Enable Rendering" property of any camera has to be checked. Third, the camera(s) should have the rendering enabled.

<p class="callout info">This selection is already available, see the panels RenderTargets/RenderTargetView or RenderTargets/CameraGroupView. The render statistics dialog may display values which are different than zero on some platforms, even if there is no camera configured to render. This may happen, for example, on iMX6 platform, because of the software layers rendering simulation.  
</p>

To see how the Geometry Instancing feature works, the user has the opportunity to observe its functionality through Render Statistics. The next steps will be followed:   
(To perform these steps, you need a system that supports OpenGL ES 3.0.)

- Open/create an OpenGL ES 3.0 Solution like 3D Basic Solution;
- Import an .fbx object;
- Create a 3D scene containing the object and a camera (do not activate occlusion culling render strategy);
- Create a display, a render target and set the camera to render on the display;
- Add shader with instancing support (ex: RefTransLight1Inst\_RefColorTex ) to the appearance;
- Add UniformSetter to the appearance;
- Set either "Lights Activation" to false or "Light Coordinate Space" to World on the UniformSetter;
- Save its appearance collection as a template and enable Instance Sharing;
- Drag the newly created template back on the mesh;
- Clone the object a few times;
- At this point each Cube must have a shared Appearance with a shader that supports instancing and a uniform setter;
- Enable the Render Statistics Panel;
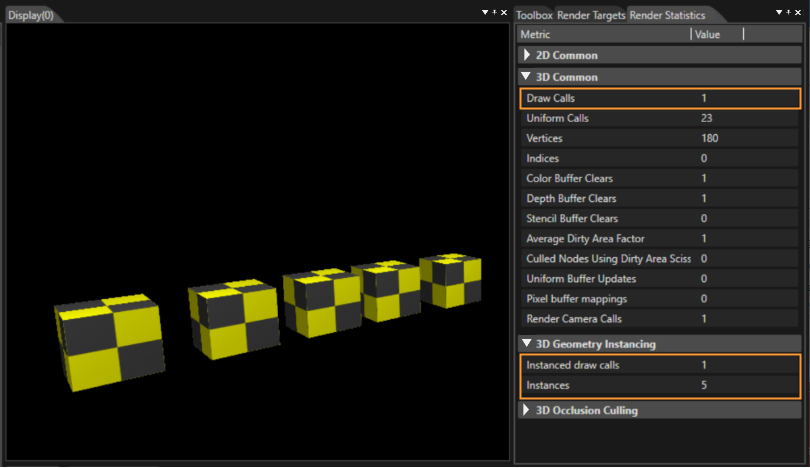
- If Geometry Instancing IS NOT working then Draw Calls will be "N", Instanced Draw Calls will be "0" and Instances will be "0" (where "N" is the number of identical meshes);
- If Geometry Instancing IS working then Draw Calls will be "1", Instanced Draw Calls will be "1", Instances will be "N" (where "N" is the number of identical meshes).
<div drawio-diagram="6308"><img src="https://doc316en.candera.eu/uploads/images/drawio/2024-06/drawing-5-1718958032.png" alt="drawing-5-1718958032.png"/></div>

Geometry Instancing through "Render Statistics" panel

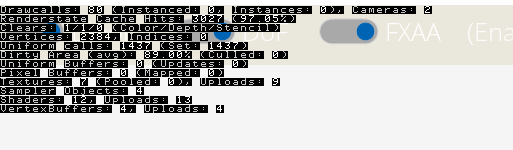
If CANDERA\_RENDER\_STATE\_CACHING\_ENABLED and CANDERA\_DETAIL\_STATISTICS\_ENABLED are set to true, additional information about Render State Cache Effectivity is available.

- Render State Cache Hits informs about the number of OpenGL state changes that were saved because the value was already cached.
- Render State Cache Misses informs about the number of OpenGL state changes that had to be executed because the new value was not in the cache.
- With these values the Render State Cache Hit Rate can be calculated, where 100% would mean no state changes.

These values are visible either in the Render Statistics Overlay of the Player, the Render Statistics Panel in SceneComposer (only for applicable properties) or directly accessible from the API.

<div drawio-diagram="4728"><img src="https://doc316en.candera.eu/uploads/images/drawio/2023-11/drawing-7-1699422235.png" alt="drawing-7-1699422235.png"/></div>

Render Statistic Overlay

---

# CGI Studio HMI Rotation

It might occur that a hardware display that is designed for landscape mode (horizontal orientation) is installed into an environment where it is actually used in portrait mode (vertical orientation). This would mean, the designers and programmers would have to create the HMI rotated by 90° and arch their neck whenever they want to check if it looks fine.

![grafik.png](https://doc316en.candera.eu/uploads/images/gallery/2023-06/scaled-1680-/qLGgrafik.png)

To support tricky usecases like that, CGI Studio Scene Composer offers a convenient HMI rotation feature that goes far beyond this particular case. The user can design and program his HMI the way it will finally be displayed. The necessary rotation will be added separately. You can configure to rotate the HMI by 0° (default), 90°, 180° or 270° clockwise.

##### Example and Configuration

In the following example configuration we will simulate the usecase from above: a display that is designed for landscape mode will be used in portrait mode.

**1.** Create a Scene Composer solution with a 2D scene (you can e.g. use the empty solution provided on the Scene Composer's Start Up screen).

<div drawio-diagram="3645"><img src="https://doc316en.candera.eu/uploads/images/drawio/2023-06/drawing-5-1685722091.png" alt="drawing-5-1685722091.png"/></div>

**2.** Configure the Display for landscape mode.

<div drawio-diagram="6309"><img src="https://doc316en.candera.eu/uploads/images/drawio/2024-06/drawing-5-1718960609.png" alt="drawing-5-1718960609.png"/></div>

**3.** Configure the Render Target to be rotated by 90° clockwise.

<div drawio-diagram="6311"><img src="https://doc316en.candera.eu/uploads/images/drawio/2024-06/drawing-5-1718960756.png" alt="drawing-5-1718960756.png"/></div>

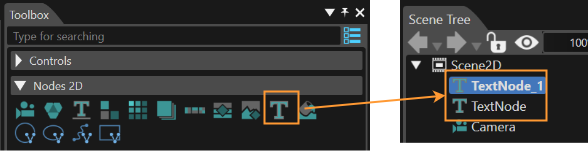
**4.** Add 2 TextNodes to the scene by dragging 2 them from the Toolbox to the Scene Editor or Scene Tree Panel.

<div drawio-diagram="6312"><img src="https://doc316en.candera.eu/uploads/images/drawio/2024-06/drawing-5-1718961460.png" alt="drawing-5-1718961460.png"/></div>

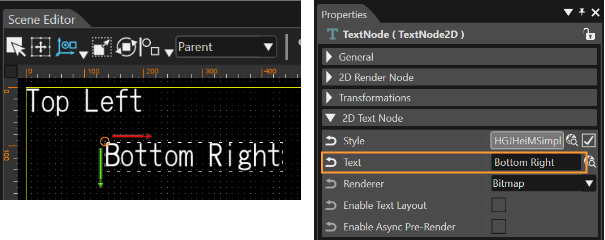
**5.** Move the TextNodes apart in the Scene Editor so that they are clearly visible. Then change their Text property in the Properties Panel to "Top Left" and "Bottom Right".

<div drawio-diagram="6314"><img src="https://doc316en.candera.eu/uploads/images/drawio/2024-06/drawing-5-1718961610.png" alt="drawing-5-1718961610.png"/></div>

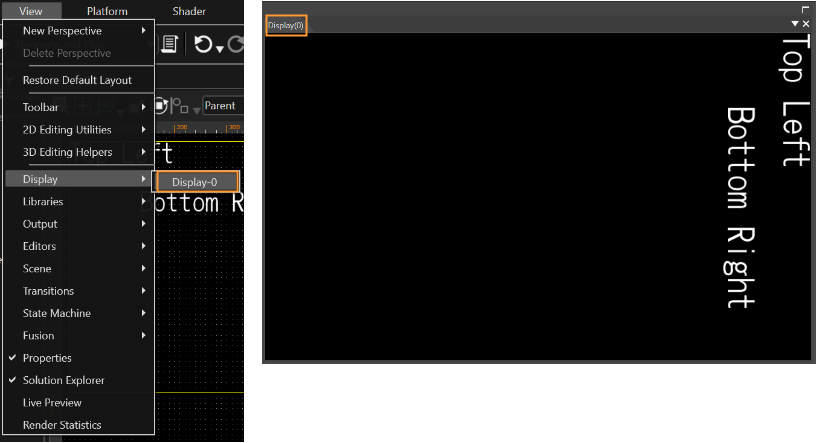
**6.** Open the Display preview through the menu "View - Display - Display (0)".

<div drawio-diagram="6317"><img src="https://doc316en.candera.eu/uploads/images/drawio/2024-06/drawing-5-1718963583.png" alt="drawing-5-1718963583.png"/></div>

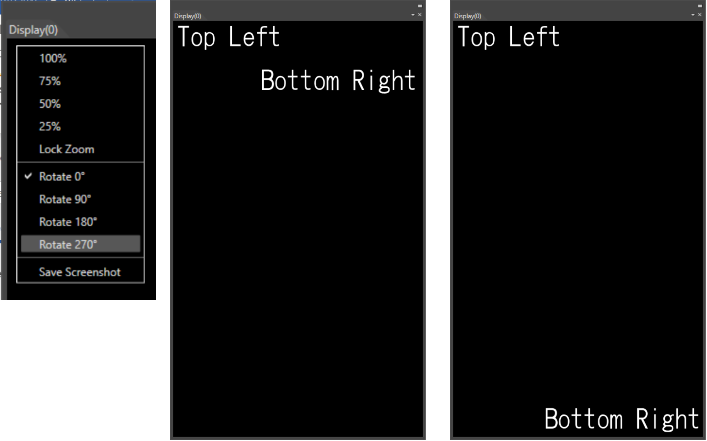
**7.** You can see that the Display's orientation is still landscape. We have to physically rotate the display by 270°. This is like rotating the physical hardware device that is in front of you. To do this, right click into the display window and choose "Rotate 270°".

The Display window will display your HMI as intended. You can now reposition the TextNode "Bottom Right" to the bottom right and the configuration example is done.

<div drawio-diagram="3654"><img src="https://doc316en.candera.eu/uploads/images/drawio/2023-06/drawing-5-1685724037.png" alt="drawing-5-1685724037.png"/></div>

##### Rotation in Player

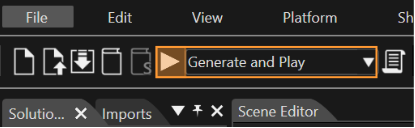
Save the solution configured in the steps above and start the player hitting the Play button of the "Generate and Play" option from the Toolbar.

<div drawio-diagram="6318"><img src="https://doc316en.candera.eu/uploads/images/drawio/2024-06/drawing-5-1718963685.png" alt="drawing-5-1718963685.png"/></div>

This will open the player and the Display will be in landscape mode.

![grafik.png](https://doc316en.candera.eu/uploads/images/gallery/2023-06/scaled-1680-/M5ggrafik.png)

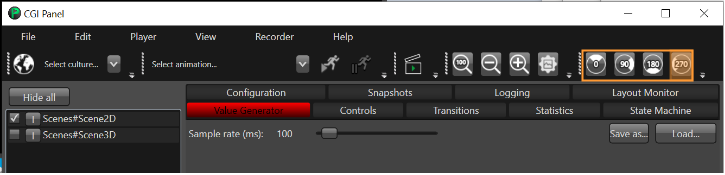
The display of the Player can be rotated as well using the corresponding icons in the CGI Panel's toolbar.

<div drawio-diagram="3662"><img src="https://doc316en.candera.eu/uploads/images/drawio/2023-06/drawing-5-1685725667.png" alt="drawing-5-1685725667.png"/></div>

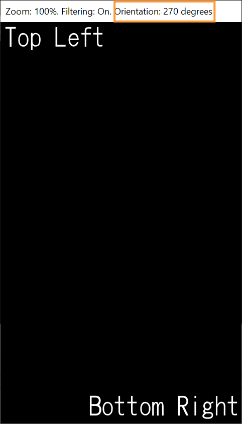
When configuring a display rotation of 270° clockwise for the Player (same as we did for the display in Scene Composer), the Display will be oriented correctly again. The current configuration of the display's rotation will be displayed in the Player's title bar.

<div drawio-diagram="3663"><img src="https://doc316en.candera.eu/uploads/images/drawio/2023-06/drawing-5-1685725854.png" alt="drawing-5-1685725854.png"/></div>