# Courier Editor

#### Overview

This page describes how to use CourierEditor.  
CourierEditor is an editor for editing XML files required for Courier. This page mainly explains how to create a data binding source. A data binding source can have multiple data binding items. The created data binding source is saved as an .xcdl file. Additionally, Scene Composer allows you to bind arbitrary properties and data binding items.

<p class="callout info">Please refer to data binding basics <span style="color: rgb(230, 126, 35);">[here](https://doc316en.candera.eu/books/courier/page/data-binding)</span>.  
Please refer to data binding with Scene Composer <span style="color: rgb(230, 126, 35);">[here](https://doc316en.candera.eu/books/scene-design/page/databinding-ui)</span>.  
For details about the data binding items that you set in the data binding source, please refer to the Xml Courier Definition Language (XCDL) schema documentation. (On the menu bar, click \[Help &gt; View Schema Help\])  
</p>

---

#### Starting Courier Editor

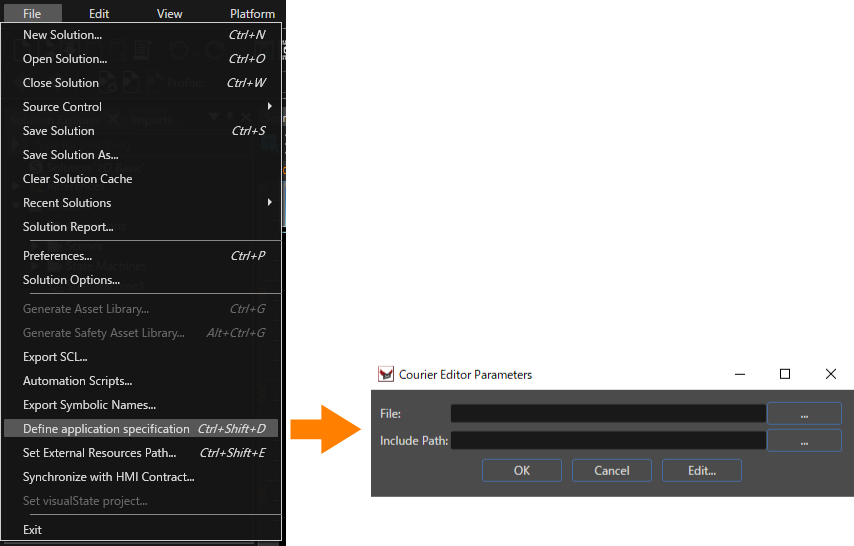
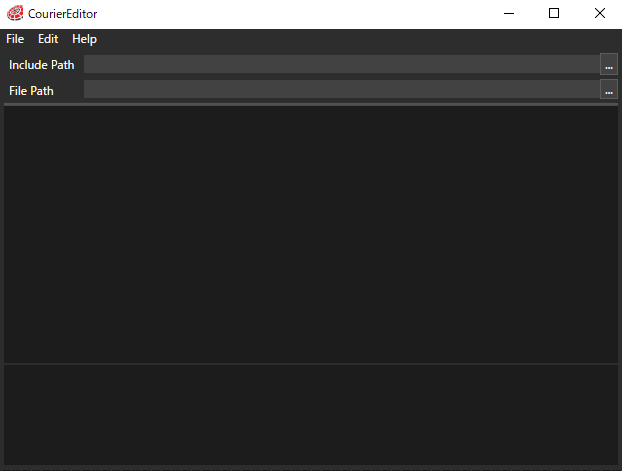
From the Scene Composer menu bar, select \[ File &gt; Define application specifications\], open the "Courier Editor Parameters" dialog, and select \[ Edit... \] to launch CourierEditor.
<div drawio-diagram="5957"><img src="https://doc316en.candera.eu/uploads/images/drawio/2024-06/drawing-7-1717648140.png" alt=""/></div>

<div drawio-diagram="5958"><img src="https://doc316en.candera.eu/uploads/images/drawio/2024-06/drawing-7-1717648178.png" alt=""/></div>

*<span style="text-decoration: underline;">**Courier Editor main window**</span>*

---

#### CourierEditor user interface

##### Menu bar

Please see the table below for details on CourierEditor menu bar.

<table border="1" id="bkmrk-%E3%83%A1%E3%83%8B%E3%83%A5%E3%83%BC%E5%90%8D-%E8%AA%AC%E6%98%8E-file-new-%E6%96%B0%E8%A6%8F" style="border-collapse: collapse; width: 97.7778%; height: 436.75px; border-width: 1px;"><tbody><tr style="height: 29.7969px;"><td class="align-center" colspan="2" style="width: 36.9153%; height: 29.7969px; background-color: rgb(230, 126, 35); border-width: 1px;"><span style="color: rgb(236, 240, 241);">**Menu name**</span>  
</td><td class="align-center" style="width: 63.2111%; height: 29.7969px; background-color: rgb(230, 126, 35); border-width: 1px;"><span style="color: rgb(236, 240, 241);">**Description**</span></td></tr><tr style="height: 29.7969px;"><td rowspan="5" style="width: 18.4576%; height: 148.984px; border-width: 1px;">File  
</td><td style="width: 18.4576%; height: 29.7969px; border-width: 1px;">New</td><td style="width: 63.2111%; height: 29.7969px; border-width: 1px;">Create a new data binding source.</td></tr><tr style="height: 29.7969px;"><td style="width: 18.4576%; height: 29.7969px; border-width: 1px;">Open</td><td style="width: 63.2111%; height: 29.7969px; border-width: 1px;">Open an existing data binding source.</td></tr><tr style="height: 29.7969px;"><td style="width: 18.4576%; height: 29.7969px; border-width: 1px;">Close</td><td style="width: 63.2111%; height: 29.7969px; border-width: 1px;">Closes the currently open data binding source.</td></tr><tr style="height: 29.7969px;"><td style="width: 18.4576%; height: 29.7969px; border-width: 1px;">Save</td><td style="width: 63.2111%; height: 29.7969px; border-width: 1px;">Overwrites the currently open data binding source.

</td></tr><tr style="height: 29.7969px;"><td style="width: 18.4576%; height: 29.7969px; border-width: 1px;">Save As</td><td style="width: 63.2111%; height: 29.7969px; border-width: 1px;">Save the currently open data binding source as.

</td></tr><tr style="height: 29.7969px;"><td rowspan="8" style="width: 18.4576%; height: 228.172px; border-width: 1px;">Edit  
</td><td style="width: 18.4576%; height: 29.7969px; border-width: 1px;">Undo</td><td style="width: 63.2111%; height: 29.7969px; border-width: 1px;">Undo the previous operation.</td></tr><tr style="height: 29.7969px;"><td style="width: 18.4576%; height: 29.7969px; border-width: 1px;">Redo</td><td style="width: 63.2111%; height: 29.7969px; border-width: 1px;">Redo the previous operation.</td></tr><tr style="height: 29.7969px;"><td style="width: 18.4576%; height: 29.7969px; border-width: 1px;">Validate</td><td style="width: 63.2111%; height: 29.7969px; border-width: 1px;">Validate the currently open data binding source.</td></tr><tr style="height: 29.7969px;"><td style="width: 18.4576%; height: 29.7969px; border-width: 1px;">Add Include</td><td style="width: 63.2111%; height: 29.7969px; border-width: 1px;">Add another data binding source to "include".</td></tr><tr style="height: 19.5938px;"><td style="width: 18.4576%; height: 19.5938px; border-width: 1px;">Add Message</td><td style="width: 63.2111%; height: 19.5938px; border-width: 1px;">Add a message item to "messages".</td></tr><tr style="height: 29.7969px;"><td style="width: 18.4576%; height: 29.7969px; border-width: 1px;">Add Message Group</td><td style="width: 63.2111%; height: 29.7969px; border-width: 1px;">Add a group item to "messages".</td></tr><tr style="height: 29.7969px;"><td style="width: 18.4576%; height: 29.7969px; border-width: 1px;">Add Compound</td><td style="width: 63.2111%; height: 29.7969px; border-width: 1px;">Add the compound item to "types".</td></tr><tr style="height: 29.7969px;"><td style="width: 18.4576%; height: 29.7969px; border-width: 1px;">Add Binding Source</td><td style="width: 63.2111%; height: 29.7969px; border-width: 1px;">Add a bindingSource item to "bindingSources".</td></tr><tr style="height: 29.7969px;"><td style="width: 18.4576%; height: 29.7969px; border-width: 1px;">Help</td><td style="width: 18.4576%; height: 29.7969px; border-width: 1px;">View Schema Help</td><td style="width: 63.2111%; height: 29.7969px; border-width: 1px;">Open an "Xml Courier Definition Language (XCDL) schema documentation".</td></tr></tbody></table>

##### UI item

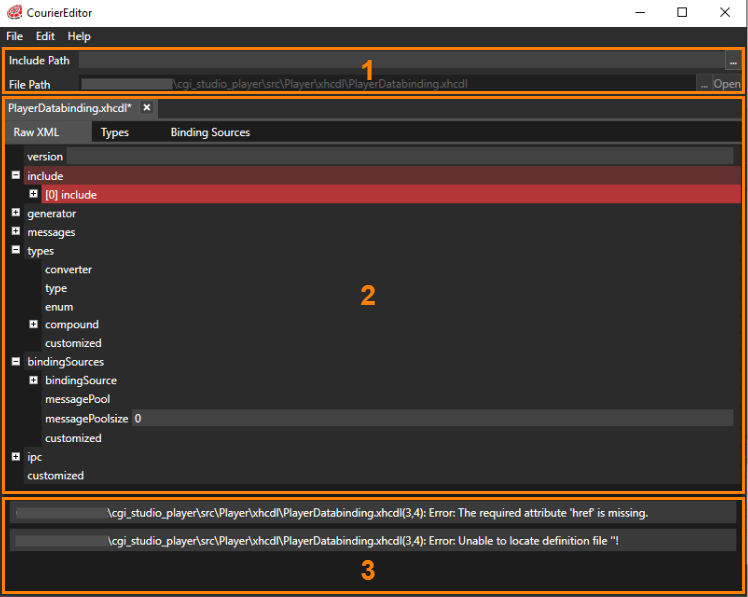
Details of the UI items on CourierEditor main window. The numbers in the diagram match the numbers in the explanations for each item below.

<div drawio-diagram="6964"><img src="https://doc316en.candera.eu/uploads/images/drawio/2024-10/drawing-7-1728614240.png" alt=""/></div>

<table border="1" id="bkmrk-ui%E9%A0%85%E7%9B%AE-%E8%AA%AC%E6%98%8E-1.-%E3%83%91%E3%82%B9-includ" style="border-collapse: collapse; width: 100%; height: 372.938px;"><colgroup><col style="width: 22.1261%;"></col><col style="width: 77.8739%;"></col></colgroup><tbody><tr style="height: 20.7969px;"><td class="align-center" style="background-color: rgb(230, 126, 35); height: 20.7969px;">**<span style="color: rgb(255, 255, 255);">UI item</span>**  
</td><td class="align-center" style="background-color: rgb(230, 126, 35); height: 20.7969px;">**<span style="color: rgb(255, 255, 255);">Description</span>**</td></tr><tr style="height: 29.7969px;"><td colspan="2" style="background-color: rgb(251, 238, 184); height: 29.7969px;">**1. Data binding source path information**  
</td></tr><tr style="height: 29.7969px;"><td style="height: 29.7969px;">Include Path</td><td style="height: 29.7969px;">Set the save destination of the referenced Data binding source.</td></tr><tr style="height: 29.7969px;"><td style="height: 29.7969px;">File path</td><td style="height: 29.7969px;">Set the save destination of the Data binding source.</td></tr><tr style="height: 52.1875px;"><td colspan="2" style="height: 52.1875px; background-color: rgb(251, 238, 184);">**2. Data binding item editing area**  
The top row of tabs is for selecting the data binding source. (When setting Include path)

</td></tr><tr style="height: 57.7812px;"><td style="height: 57.7812px;">Raw XML tab</td><td style="height: 57.7812px;">Information on all items included in the Data binding source is displayed.  
You can add/edit/delete items.

</td></tr><tr style="height: 46.5938px;"><td style="height: 46.5938px;">Types tab</td><td style="height: 46.5938px;">Only items included in "types" in Raw XML are displayed in list format.  
You can add/edit/delete items.  
</td></tr><tr style="height: 46.5938px;"><td style="height: 46.5938px;">Binding Sources tab</td><td style="height: 46.5938px;">Only items included in "bindingSources" in Raw XML are displayed in list format.  
You can add/edit/delete items.  
</td></tr><tr style="height: 29.7969px;"><td colspan="2" style="height: 29.7969px; background-color: rgb(251, 238, 184);">**3. Verification result view**  
</td></tr><tr style="height: 29.7969px;"><td style="height: 29.7969px;">ー</td><td style="height: 29.7969px;">The data binding source validation results are displayed.</td></tr></tbody></table>

---

#### Create new definition

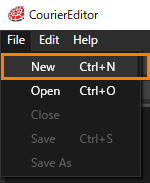
Create a Data binding source from \[ File &gt; New \] on the CourierEditor menu bar.

<div drawio-diagram="5961"><img src="https://doc316en.candera.eu/uploads/images/drawio/2024-06/drawing-7-1717648401.png" alt=""/></div>

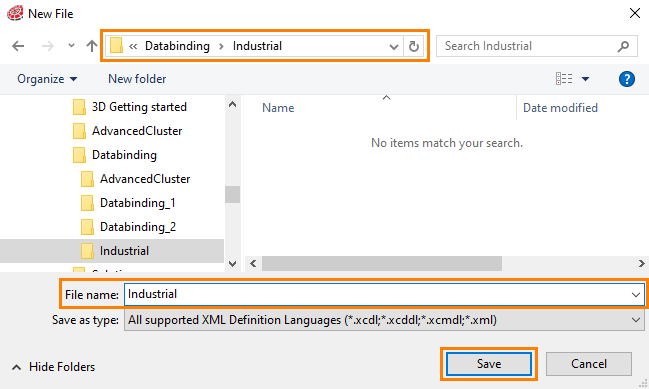
In the "New File" dialog, set the destination and name for the new data binding source, then click \[ Save \].

<div drawio-diagram="5976"><img src="https://doc316en.candera.eu/uploads/images/drawio/2024-06/drawing-7-1717653084.png" alt=""/></div>

---

#### Open existing definition

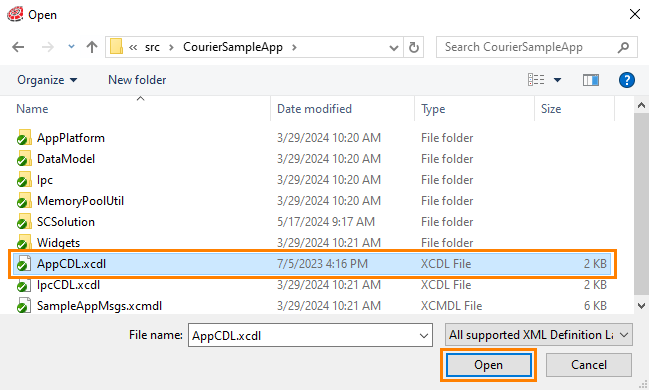
Open an existing Data binding source from \[ File &gt; Open \] in CourierEditor menu bar.

In the Open dialog, select an existing data binding source, then click \[ Open \]..

<div drawio-diagram="5977"><img src="https://doc316en.candera.eu/uploads/images/drawio/2024-06/drawing-7-1717653208.png" alt=""/></div>

In addition to the steps above, you can also open an existing data binding source from the CourierEditor main window. Click the \[...\] button at the right end of File Path to set the path required to open an existing data binding source. The \[Open\] button will appear at the right end of File Path, so click it.

<div drawio-diagram="6970"><img src="https://doc316en.candera.eu/uploads/images/drawio/2024-10/drawing-7-1728614713.png" alt=""/></div>

---

#### Setting the Include Path

You can set an Include Path for a Data binding source. Include path allows you to pre-include the contents of a specific Data binding source in the Data binding source you are editing by setting the path of the specific Data binding source. For example, by setting a Data binding source that is used for general purposes to a Include Path, there are advantages such as eliminating the need to create a similar Data binding source for each solution.

##### How to set Include Path

To set the Include Path, click the \[ ... \] button at the right end of the Include Path in the CourierEditor dialog to open the "Include path" dialog.

<div drawio-diagram="6966"><img src="https://doc316en.candera.eu/uploads/images/drawio/2024-10/drawing-7-1728614326.png" alt=""/></div>

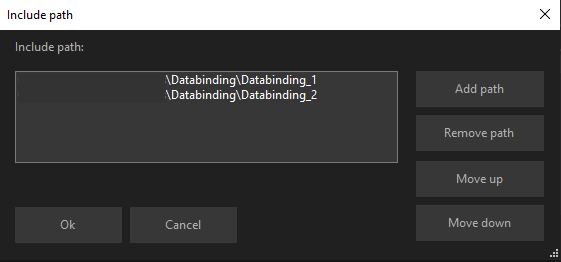
The details of the Include path dialog are as follows. Use \[ Add path \] to set the destination for any Data binding source.

<div drawio-diagram="6967"><img src="https://doc316en.candera.eu/uploads/images/drawio/2024-10/drawing-7-1728614354.png" alt=""/></div>

<table border="1" id="bkmrk-ui%E9%A0%85%E7%9B%AE-%E8%AA%AC%E6%98%8E-add-path-%E3%83%87%E3%83%BC%E3%82%BF" style="border-collapse: collapse; width: 100.053%; height: 159.578px;"><colgroup><col style="width: 15.5692%;"></col><col style="width: 84.4839%;"></col></colgroup><tbody><tr style="height: 29.7969px;"><td class="align-center" style="background-color: rgb(230, 126, 35); height: 29.7969px;"><span style="color: rgb(255, 255, 255);">**UI item**</span></td><td class="align-center" style="background-color: rgb(230, 126, 35); height: 29.7969px;"><span style="color: rgb(255, 255, 255);">**Description**</span></td></tr><tr style="height: 29.7969px;"><td style="height: 29.7969px;">Add path</td><td style="height: 29.7969px;">Sets the path for a specific Data binding source.</td></tr><tr style="height: 29.7969px;"><td style="height: 29.7969px;">Remove path</td><td style="height: 29.7969px;">Removes the path selected in the Include path dialog.</td></tr><tr style="height: 29.7969px;"><td style="height: 29.7969px;">Move up</td><td style="height: 29.7969px;">Moves the display order of the paths selected in the Include path dialog in ascending order.</td></tr><tr style="height: 10.5938px;"><td style="height: 10.5938px;">Move down</td><td style="height: 10.5938px;">Moves the display order of paths set in the Include path dialog in descending order.</td></tr><tr style="height: 29.7969px;"><td style="height: 29.7969px;">OK</td><td style="height: 29.7969px;">Finish setting Include path and proceed to the next step.</td></tr></tbody></table>

After setting the Include Path in the Include path dialog, perform the following operations in the editing area of the Data binding item.

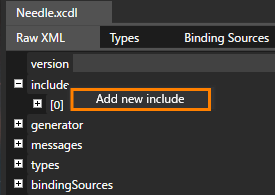
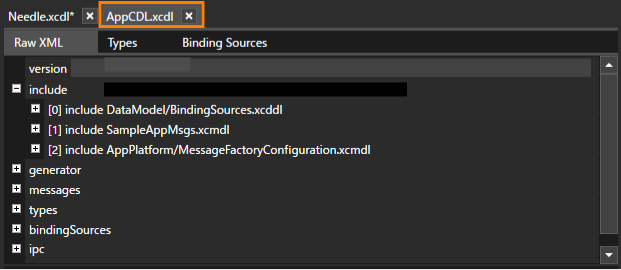
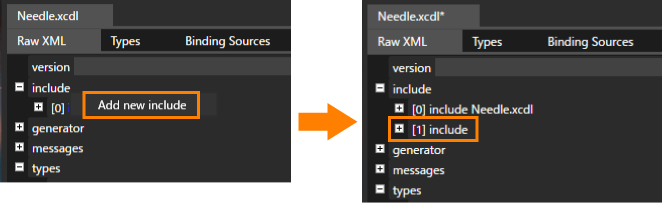
1. Add an include element by selecting \[ Add new include \] from the context menu of include in the Raw XML tab.
    
    <div drawio-diagram="5801"><img src="https://doc316en.candera.eu/uploads/images/drawio/2024-05/drawing-7-1716523486.png" alt=""/></div>
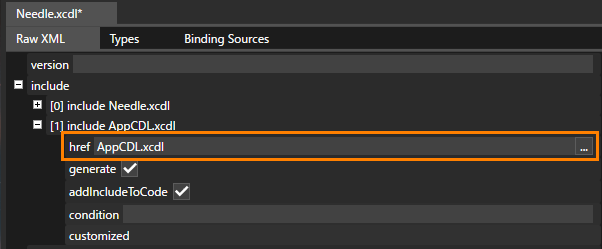
2. Enter the file name of specific Data binding source in \[ href \] of the added include element.  
    <div drawio-diagram="5802"><img src="https://doc316en.candera.eu/uploads/images/drawio/2024-05/drawing-7-1716523515.png" alt=""/></div>
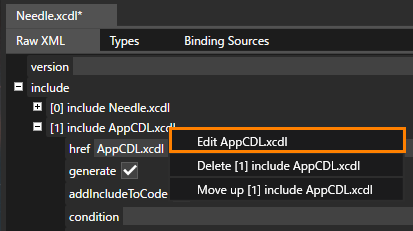
3. From the context menu of the added include element, choose \[ Edit (filename of specific Data binding source) \].  
    <div drawio-diagram="5803"><img src="https://doc316en.candera.eu/uploads/images/drawio/2024-05/drawing-7-1716523543.png" alt=""/></div>
4. The "(specific Data binding source name).xcdl" tab is displayed at the top of the Data binding item editing area.  
    <div drawio-diagram="6440"><img src="https://doc316en.candera.eu/uploads/images/drawio/2024-07/drawing-7-1721107898.png" alt=""/></div>

By performing the above operations, specific Data binding source can be included in the Data binding source being edited.

---

#### Edit definition

##### Adding new item

Add a new item by selecting \[ Add new (addable item name) \] from each item context menu.

<div drawio-diagram="5963"><img src="https://doc316en.candera.eu/uploads/images/drawio/2024-06/drawing-7-1717648728.png" alt=""/></div>


##### Deleting the item

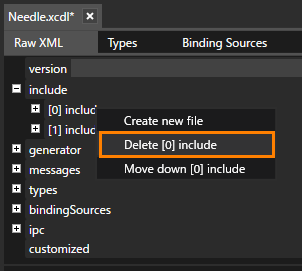
Select \[ Delete (item name you want to delete) \] from the context menu of the item you want to delete.

<div drawio-diagram="5964"><img src="https://doc316en.candera.eu/uploads/images/drawio/2024-06/drawing-7-1717648759.png" alt=""/></div>


##### Types / Binding Sources tabs

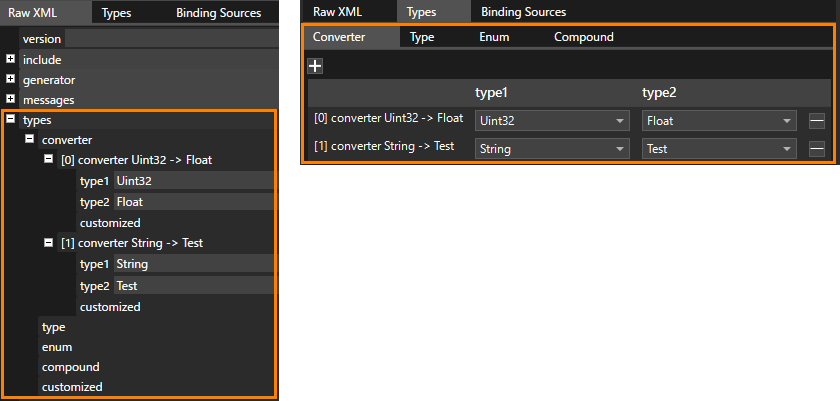
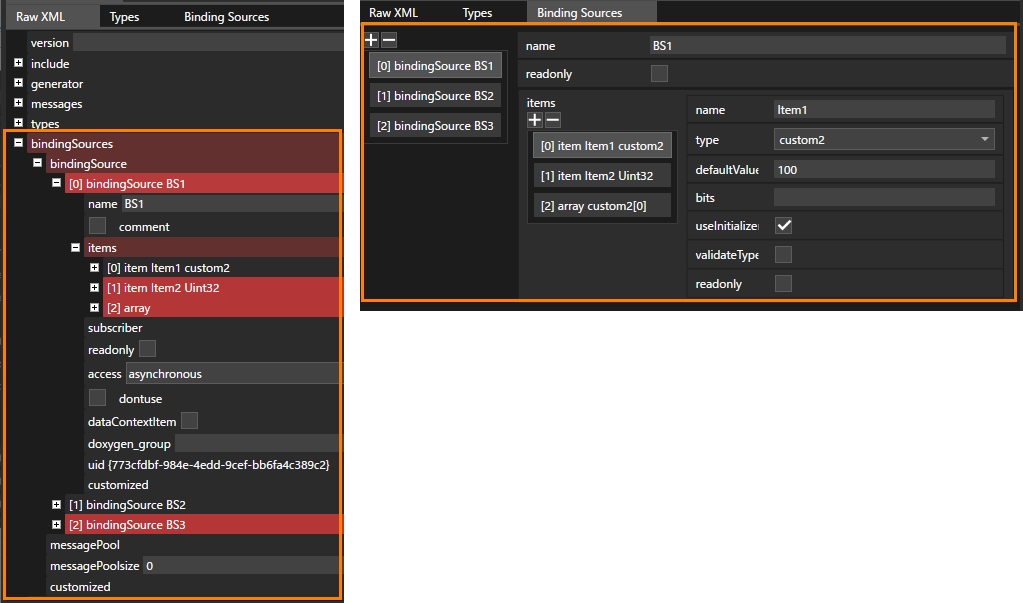
The Types and Binding Sources tabs are duplicates of the Raw XML tab's types and bindingSources. By using the Types tab and Binding Sources tab, you can edit the types and bindingSources items in the Raw XML tab, and display them in a list. Edits in the Raw XML tab and the Types/Binding Sources tab are synchronized with each other.

<div drawio-diagram="5806"><img src="https://doc316en.candera.eu/uploads/images/drawio/2024-05/drawing-7-1716526149.png" alt=""/></div>

*<span style="text-decoration: underline;">**Raw XML tab and Type tab**</span>*

<div drawio-diagram="5807"><img src="https://doc316en.candera.eu/uploads/images/drawio/2024-05/drawing-7-1716526190.png" alt=""/></div>

<span style="text-decoration: underline;">***Raw XML tab and Binding Sources tab***</span>

##### Defining the data type of a data binding item

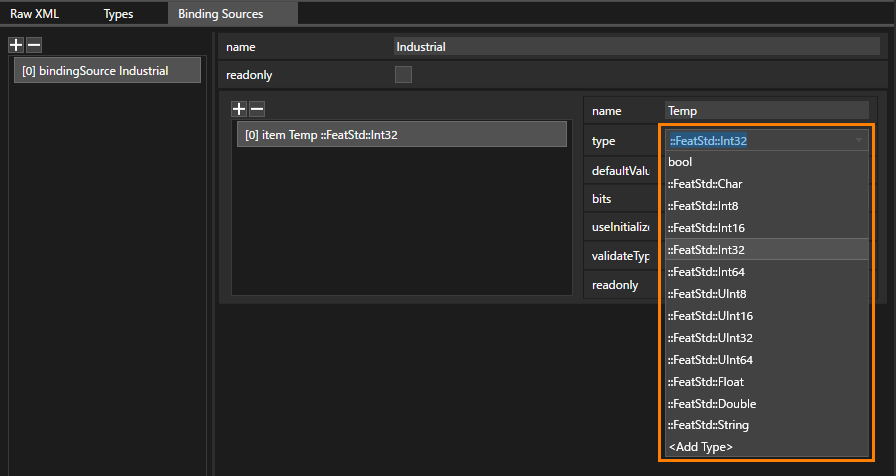
In the Binding Sources tab, you can define the data type of a data binding item. You can select a pre-defined data type from the item &gt; type pull-down menu.

<div drawio-diagram="6000"><img src="https://doc316en.candera.eu/uploads/images/drawio/2024-06/drawing-7-1717746646.png" alt=""/></div>

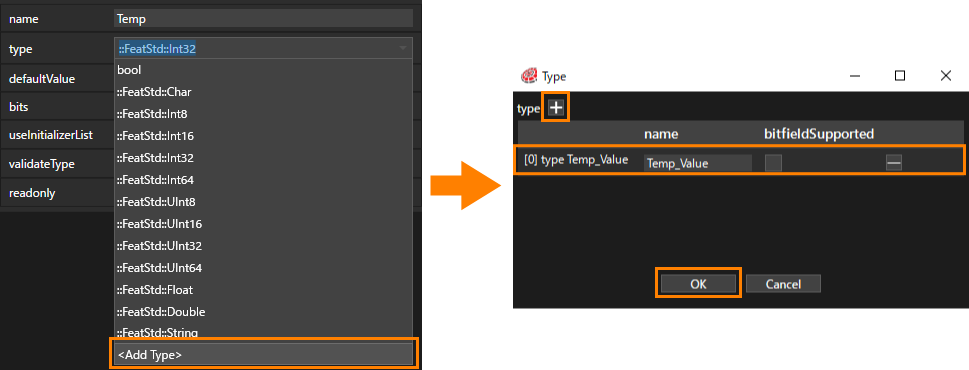
You can define a custom data type by selecting &lt;Add Type&gt; from the type pull-down menu. When you select &lt;Add Type&gt;, the "Type" dialog opens, so click the \[ + \] icon in the upper left. A new data type will be added, so enter the data type information and click \[ OK \].

<div drawio-diagram="6001"><img src="https://doc316en.candera.eu/uploads/images/drawio/2024-06/drawing-7-1717746676.png" alt=""/></div>

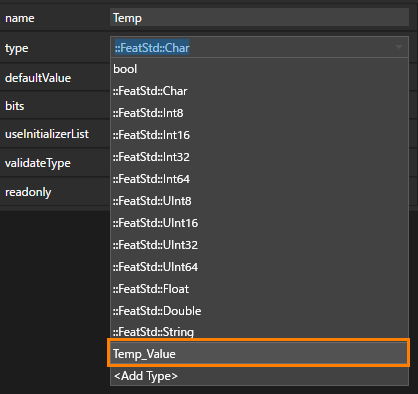
The added custom data type will be selectable from the pull-down menu of type.

<div drawio-diagram="6002"><img src="https://doc316en.candera.eu/uploads/images/drawio/2024-06/drawing-7-1717746708.png" alt=""/></div>

<div drawio-diagram="6638"></div>

<p class="callout info">To make the information easier to understand, the Types and Binding Sources tabs display only the important properties of the Raw XML tab.</p>

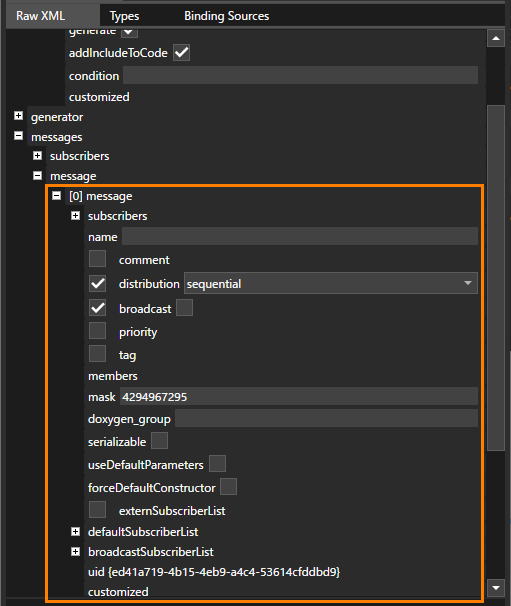
##### Specify optional artifacts like the message distribution

- Check the checkbox to the left of each artifact to set the value.
- Note: 
    - If not specified the inherited distribution is used
    - The broadcast value is edited by the checkbox on the right side
    - Uid will be automatically created by the editor
<div drawio-diagram="5678"><img src="https://doc316en.candera.eu/uploads/images/drawio/2024-04/drawing-7-1714457821.png" alt=""/></div>

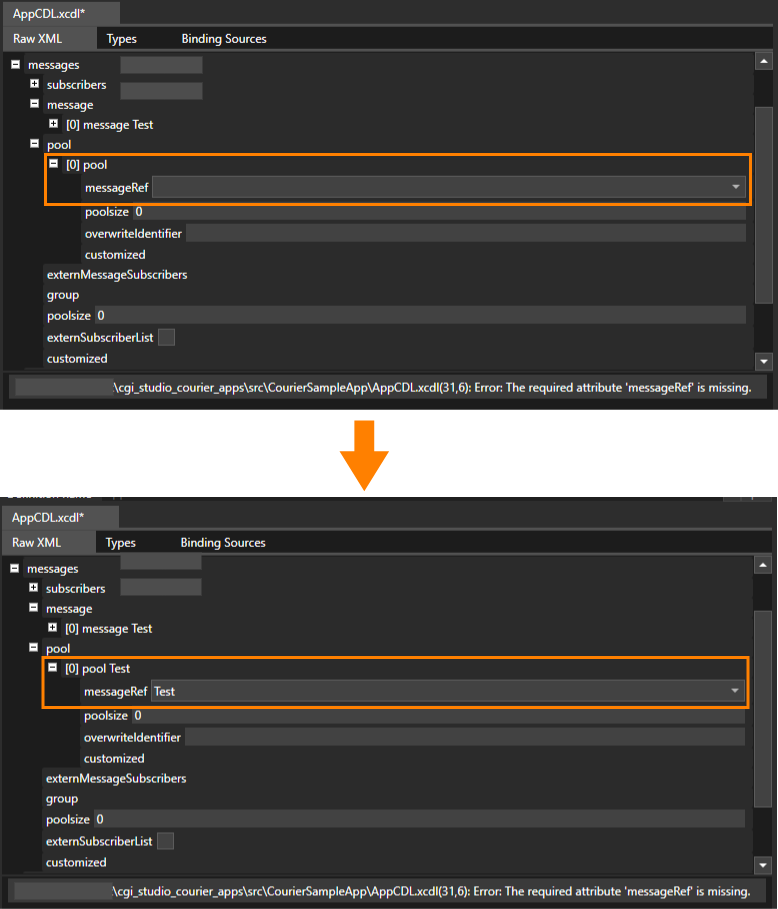
##### Choose references from the dropdown list e. g.

- The data binding source contains a message called "Test".
- In that case, a validation error will occur if the pool's messageRef is not set.
- From the pool's messageRef pull-down menu, select the message "Test".
- messageRef will be set to the uid of the message "Test".

<div drawio-diagram="6968"><img src="https://doc316en.candera.eu/uploads/images/drawio/2024-10/drawing-7-1728614448.png" alt=""/></div>

#### Validation

Validation can be performed in two ways.

- Execute \[ Edit &gt; Validate \] from the menu bar.
- Using the shortcut "Alt+V"

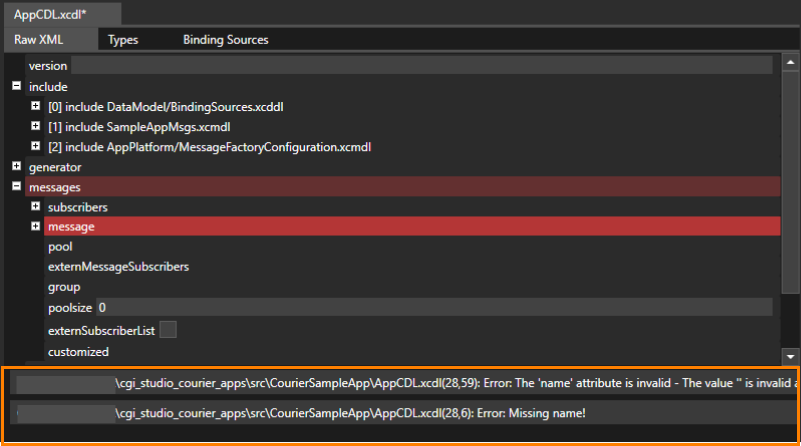
Validation output is shown on the lower part.

<div drawio-diagram="6969"><img src="https://doc316en.candera.eu/uploads/images/drawio/2024-10/drawing-7-1728614493.png" alt=""/></div>

---