# Examples Using Predefined Behaviors

<div class="contents" id="bkmrk-thermometer-example-"></div>#### Thermometer Example

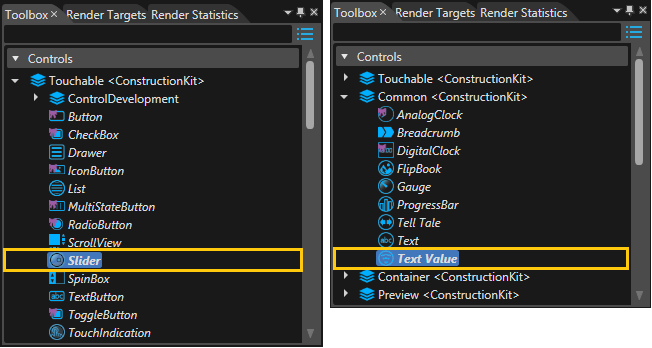
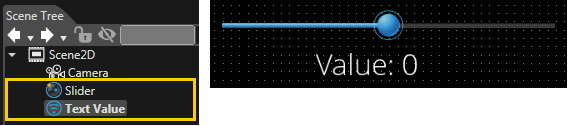
1\. Drag&amp;drop a Slider Control and a Text Value Control from the Controls Panel of the Toolbox to the Scene Editor or the Scene Tree.

<div class="contents" id="bkmrk-"><div class="contents"><div class="textblock"><div drawio-diagram="2375"><img src="https://doc316en.candera.eu/uploads/images/drawio/2023-02/drawing-7-1677217038.png" alt=""/></div>

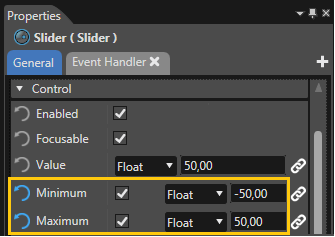
</div></div></div>2\. Set the Slider's Minimum to "-50,00" and the maximum to "+50,00".

<div class="contents" id="bkmrk--0"><div class="contents"><div class="textblock"><div drawio-diagram="2376"><img src="https://doc316en.candera.eu/uploads/images/drawio/2023-02/drawing-7-1677217059.png" alt=""/></div>

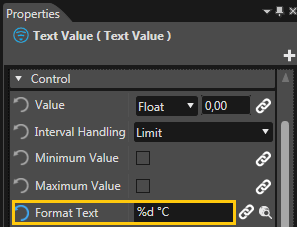
</div></div></div>3\. Change the Text Value Control's "Format Text" Property to "%d °C".

<div class="contents" id="bkmrk--1"><div class="contents"><div class="textblock"><div drawio-diagram="2377"><img src="https://doc316en.candera.eu/uploads/images/drawio/2023-02/drawing-7-1677217081.png" alt=""/></div>

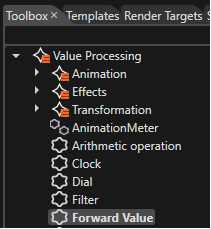
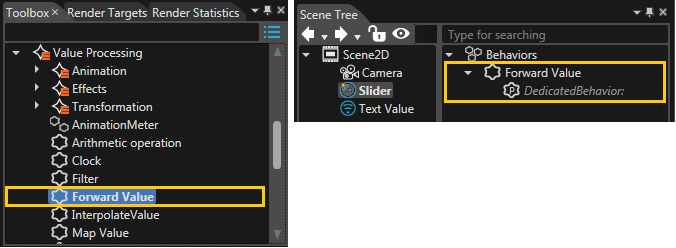
</div></div></div>4\. Drag&amp;drop a <span style="color: rgb(230, 126, 35);">[Forward Value](https://doc316en.candera.eu/link/647#bkmrk-forward-value)</span> Behavior (which is a <span style="color: rgb(230, 126, 35);">[Value Processing Behavior](https://doc316en.candera.eu/link/647#bkmrk-page-title)</span>) from the Behaviors Panel of the Toolbox onto the Slider in the Scene Tree.

<div class="contents" id="bkmrk--2"><div class="contents"><div class="textblock"><div drawio-diagram="2378"><img src="https://doc316en.candera.eu/uploads/images/drawio/2023-02/drawing-7-1677217098.png" alt=""/></div>

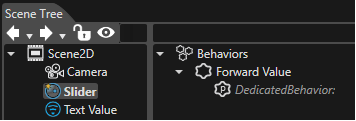
</div></div></div>This is what the Scene Tree should look like now:

<div class="contents" id="bkmrk--3"><div class="contents"><div class="textblock"><div drawio-diagram="2379"><img src="https://doc316en.candera.eu/uploads/images/drawio/2023-02/drawing-7-1677217109.png" alt=""/></div>

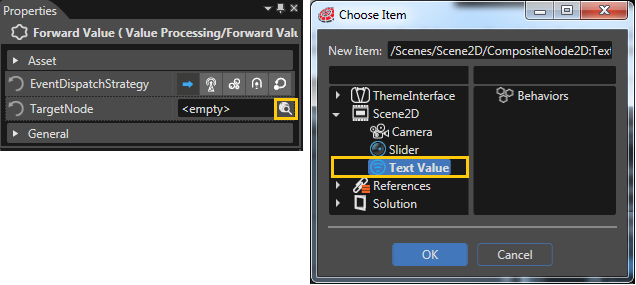
</div></div></div>5\. Select the <span style="color: rgb(230, 126, 35);">[Forward Value](https://doc316en.candera.eu/link/647#bkmrk-forward-value)</span> Behavior in the right side of the Scene Tree view. Set the <span style="color: rgb(230, 126, 35);">[Forward Value](https://doc316en.candera.eu/link/647#bkmrk-forward-value)</span> Behavior's Target Node to the Text Value Control you have added to the scene in step 1 by clicking on the magnifying glass on the right of the input field and selecting the Text Value Control in the "Choose Item" dialog.

<div class="contents" id="bkmrk--4"><div class="contents"><div class="textblock"><div drawio-diagram="2380"><img src="https://doc316en.candera.eu/uploads/images/drawio/2023-02/drawing-7-1677217134.png" alt=""/></div>

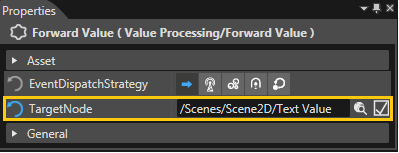
</div></div></div>After that, the <span style="color: rgb(230, 126, 35);">[Forward Value](https://doc316en.candera.eu/link/647#bkmrk-forward-value)</span> Behavior's Properties will look as follows.

<div class="contents" id="bkmrk--5"><div class="contents"><div class="textblock"><div drawio-diagram="2381"><img src="https://doc316en.candera.eu/uploads/images/drawio/2023-02/drawing-7-1677217146.png" alt=""/></div>

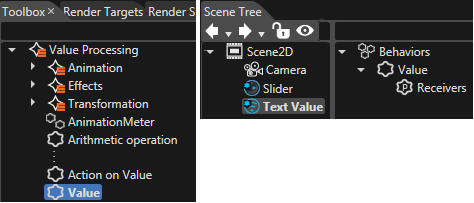
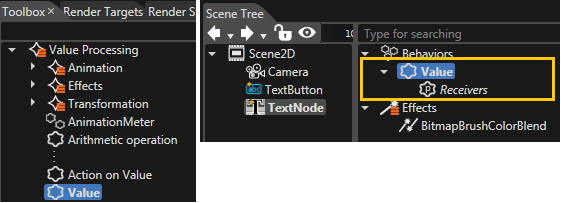
</div></div></div>6\. Drag&amp;drop a <span style="color: rgb(230, 126, 35);">[Value Behavior](https://doc316en.candera.eu/link/647#bkmrk-value)</span> (which is a <span style="color: rgb(230, 126, 35);">[Value Processing Behavior](https://doc316en.candera.eu/link/647#bkmrk-page-title)</span>) from the Behaviors Panel of the Toolbox onto the Text Value Control in the Scene Tree.

<div class="contents" id="bkmrk--6"><div class="contents"><div class="textblock"><div drawio-diagram="2382"><img src="https://doc316en.candera.eu/uploads/images/drawio/2023-02/drawing-7-1677217166.png" alt=""/></div>

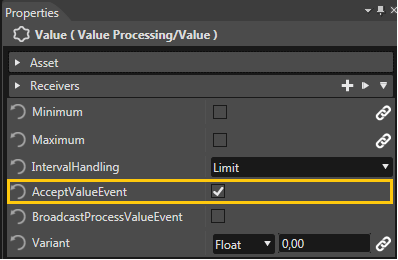
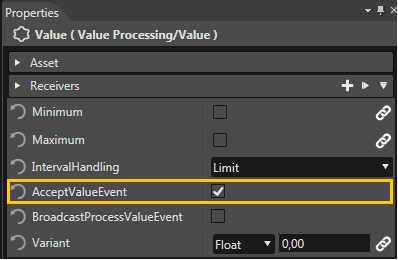
</div></div></div>7\. Select the [<span style="color: rgb(230, 126, 35);">Value Behavior</span>](https://doc316en.candera.eu/link/647#bkmrk-value) on the right side of the Scene Tree View. Set the <span style="color: rgb(230, 126, 35);">[Value Behavior](https://doc316en.candera.eu/link/647#bkmrk-value)</span>'s AcceptValueEvent Property to "true" by checking the checkbox.

<div class="contents" id="bkmrk--7"><div class="contents"><div class="textblock"><div drawio-diagram="2383"><img src="https://doc316en.candera.eu/uploads/images/drawio/2023-02/drawing-7-1677217184.png" alt=""/></div>

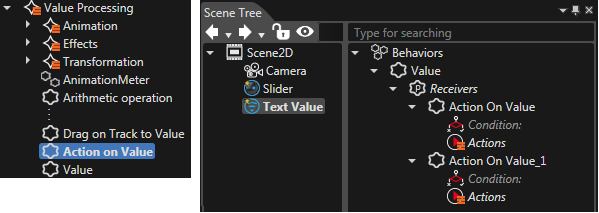
</div></div></div>8\. Select the "Text Value" Control in the Scene Tree Panel and drag&amp;drop two <span style="color: rgb(230, 126, 35);">[Action on Value](https://doc316en.candera.eu/link/647#bkmrk-action-on-value)</span> Behaviors (which are <span style="color: rgb(230, 126, 35);">[Value Processing Behaviors](https://doc316en.candera.eu/link/647#bkmrk-page-title)</span>) from the Behaviors Panel of the Toolbox onto the "Receivers" of the "Value Behavior" in right side of the SceneTree Panel.

<div class="contents" id="bkmrk--8"><div class="contents"><div class="textblock"><div drawio-diagram="2384"><img src="https://doc316en.candera.eu/uploads/images/drawio/2023-02/drawing-7-1677217211.png" alt=""/></div>

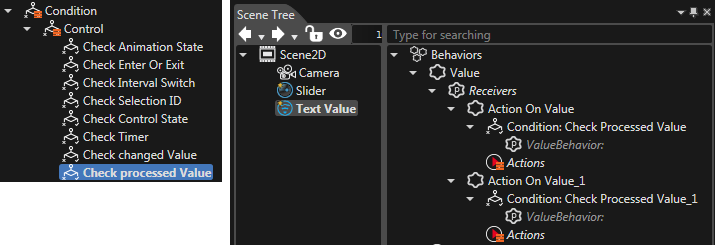
</div></div></div>9\. Add a condition to the <span style="color: rgb(230, 126, 35);">[Action on Value](https://doc316en.candera.eu/link/647#bkmrk-action-on-value)</span> Behaviors you have just added by dragging&amp;dropping a <span style="color: rgb(230, 126, 35);">[Check processed Value](https://doc316en.candera.eu/link/597#bkmrk-check-processed-valu)</span> Behavior (which is a <span style="color: rgb(230, 126, 35);">[Condition - Control Behavior](https://doc316en.candera.eu/link/597#bkmrk-control-condition-be-0)</span>) onto each of the <span style="color: rgb(230, 126, 35);">[Action on Value](https://doc316en.candera.eu/link/647#bkmrk-action-on-value)</span> Behaviors you have just added.

<div class="contents" id="bkmrk--9"><div class="contents"><div class="textblock"><div drawio-diagram="2385"><img src="https://doc316en.candera.eu/uploads/images/drawio/2023-02/drawing-7-1677217229.png" alt=""/></div>

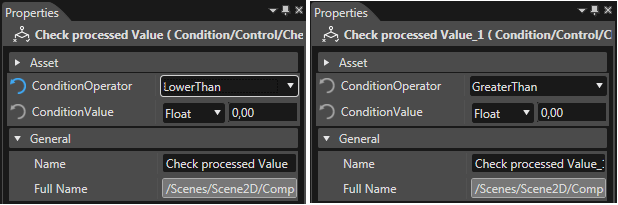
</div></div></div>10\. Configure one of the Conditions to "LowerThan 0,00" and the other one to "GreaterThan 0,00".

<div class="contents" id="bkmrk--10"><div class="contents"><div class="textblock"><div drawio-diagram="2386"><img src="https://doc316en.candera.eu/uploads/images/drawio/2023-02/drawing-7-1677217255.png" alt=""/></div>

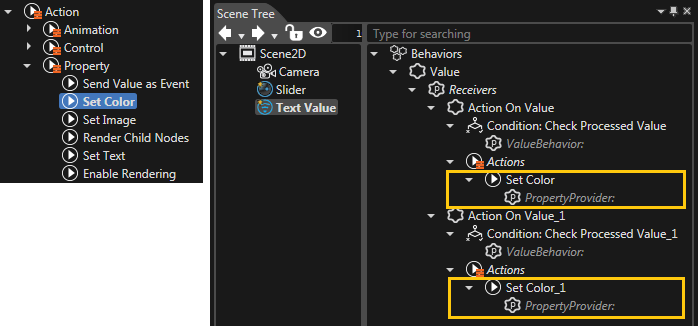
</div></div></div>11\. Drag&amp;drop a <span style="color: rgb(230, 126, 35);">[Set Color](https://doc316en.candera.eu/link/582#bkmrk-set-color)</span> SetColor Action (which is a <span style="color: rgb(230, 126, 35);">[Action - Property Behavior](https://doc316en.candera.eu/link/582#bkmrk-property-action-beha)</span>) from the Toolbox view onto the Actions of each of the <span style="color: rgb(230, 126, 35);">[Action on Value](https://doc316en.candera.eu/link/647#bkmrk-action-on-value)</span> Behaviors in the SceneTree.

<div class="contents" id="bkmrk--11"><div class="contents"><div class="textblock"><div drawio-diagram="2387"><img src="https://doc316en.candera.eu/uploads/images/drawio/2023-02/drawing-7-1677217282.png" alt=""/></div>

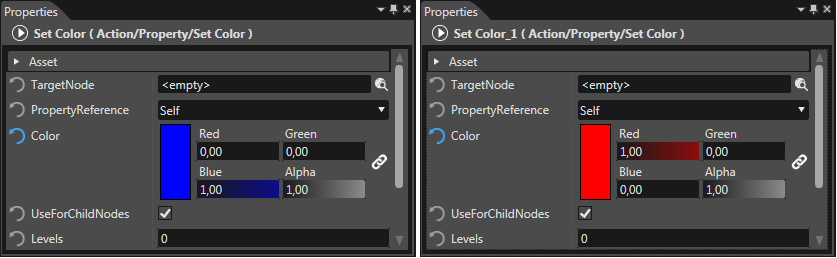
</div></div></div>12\. Set the color to Blue on the <span style="color: rgb(230, 126, 35);">[Action on Value](https://doc316en.candera.eu/link/647#bkmrk-action-on-value)</span> Behavior with the Condition `Lower Than 0,00` and set the Color to Red on the <span style="color: rgb(230, 126, 35);">[Action on Value](https://doc316en.candera.eu/link/647#bkmrk-action-on-value)</span> Behavior with the Condition `Greater Than 0,00`.

<div class="contents" id="bkmrk--12"><div class="contents"><div class="textblock"><div drawio-diagram="2388"><img src="https://doc316en.candera.eu/uploads/images/drawio/2023-02/drawing-7-1677217306.png" alt=""/></div>

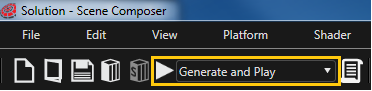
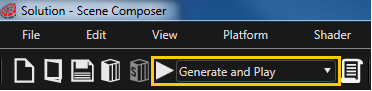
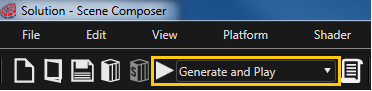
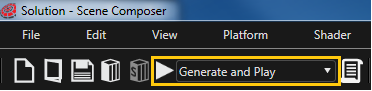
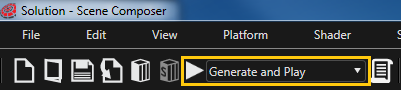
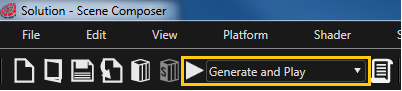
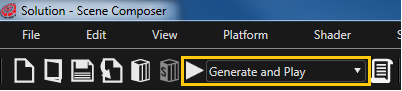
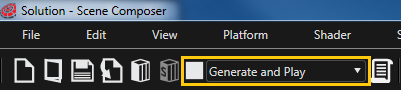
</div></div></div>13\. Save your solution and start the Player through the Play button (with the option "Generate and Play") in the Toolbar on the top to see the result.

<div class="contents" id="bkmrk--13"><div class="contents"><div class="textblock"><div drawio-diagram="2389"><img src="https://doc316en.candera.eu/uploads/images/drawio/2023-02/drawing-7-1677217319.png" alt=""/></div>

</div></div></div>14\. The text color of the Text Value Control displaying the temperature in degrees celcius will turn blue once the value of the slider gets lower than zero and it will turn red once the value becomes greater than zero.

<div class="contents" id="bkmrk--14"><div class="contents"><div class="contents"><div class="textblock"><div drawio-diagram="2391"><img src="https://doc316en.candera.eu/uploads/images/drawio/2023-02/drawing-7-1677217397.png" alt=""/></div>

</div></div></div></div>
#### Align Pivot Example

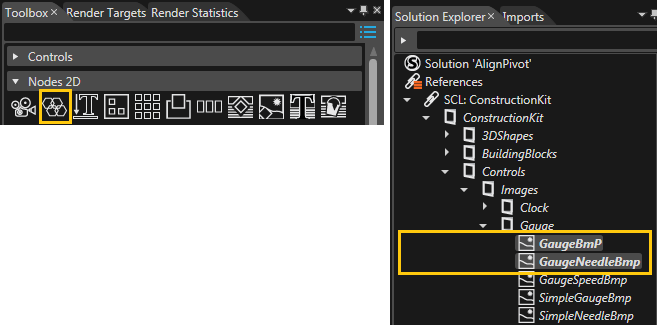
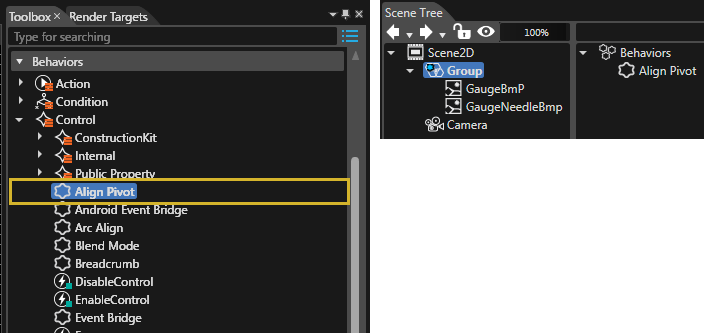
1\. Drag&amp;drop a Group from the "Nodes 2D" Panel of the Toolbox to the SceneEditor or the Scene Tree. Choose the follwing two Images from the Construction Kit (in the Solution Explorer) and drag&amp;drop them onto the Group node in the SceneTree: GaugeBmP and GaugeNeedleBmp

<div class="contents" id="bkmrk--15"><div class="contents"><div class="contents" id="bkmrk--16"><div class="contents"><div class="textblock"><div drawio-diagram="2395"><img src="https://doc316en.candera.eu/uploads/images/drawio/2023-02/drawing-7-1677217510.png" alt=""/></div>

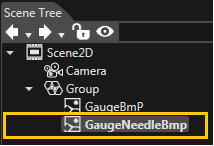
</div></div></div></div></div>2\. Arrange the Controls in the SceneEditor so that "GaugeNeedleBmp" is the last entry of the Group Node in the Scene Tree.

<div class="contents" id="bkmrk--17"><div class="contents"><div class="contents" id="bkmrk--18"><div class="contents"><div class="textblock"><div drawio-diagram="2396"><img src="https://doc316en.candera.eu/uploads/images/drawio/2023-02/drawing-7-1677217525.png" alt=""/></div>

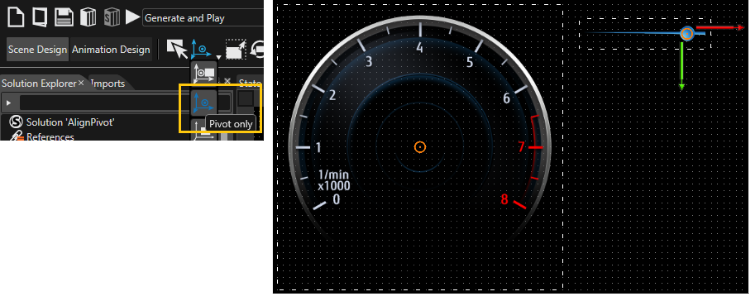
</div></div></div></div></div>3\. Select the "Pivot only" Translation tool in the toolbar and move the pivot of "GaugeBmP" to the center of the image and the pivot of "GaugeNeedleBmp" to the usual center of rotation of a gauge needle.

<div class="contents" id="bkmrk--19"><div class="contents"><div class="contents" id="bkmrk--20"><div class="contents"><div class="textblock"><div drawio-diagram="2400"><img src="https://doc316en.candera.eu/uploads/images/drawio/2023-02/drawing-7-1677217601.png" alt=""/></div>

</div></div></div></div></div>4\. Drag&amp;drop the <span style="color: rgb(230, 126, 35);">[Align Pivot](https://doc316en.candera.eu/link/598#bkmrk-align-pivot)</span> Behavior (which is a <span style="color: rgb(230, 126, 35);">[Control Behavior](https://doc316en.candera.eu/link/598#bkmrk-page-title)</span>) from the Toolbox view onto the Group node in the SceneTree.

<div class="contents" id="bkmrk--21"><div class="contents"><div class="contents" id="bkmrk--22"><div class="contents"><div class="textblock"><div drawio-diagram="2402"><img src="https://doc316en.candera.eu/uploads/images/drawio/2023-02/drawing-7-1677217632.png" alt=""/></div>

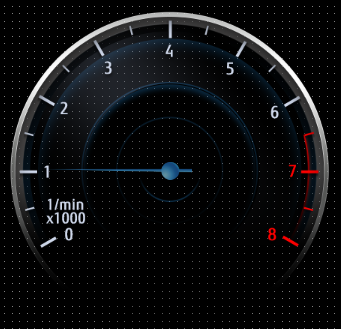
</div></div></div></div></div>5\. The <span style="color: rgb(230, 126, 35);">[Align Pivot](https://doc316en.candera.eu/link/598#bkmrk-align-pivot)</span> Behavior does not have any properties to set. The pivots of the Bitmap Nodes are aligned and the result can be seen in the SceneEditor: The Needle image is positioned correctly in the Gauge image.

<div class="contents" id="bkmrk-don%27t-forget-to-rese"><div class="contents"><div class="contents"><div class="textblock"><div drawio-diagram="2403"><img src="https://doc316en.candera.eu/uploads/images/drawio/2023-02/drawing-7-1677217647.png" alt=""/></div>

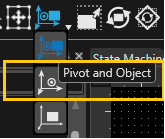
</div><div class="textblock"><dl class="note"><dt><p class="callout info">Don't forget to reset the Translation tool to "Pivot and Object".  
</p>

<div drawio-diagram="2405"><img src="https://doc316en.candera.eu/uploads/images/drawio/2023-02/drawing-7-1677217718.png" alt=""/></div>

</dt></dl></div></div></div></div>
#### <span style="vertical-align: inherit;"><span style="vertical-align: inherit;">Arc Align Example  
</span></span>

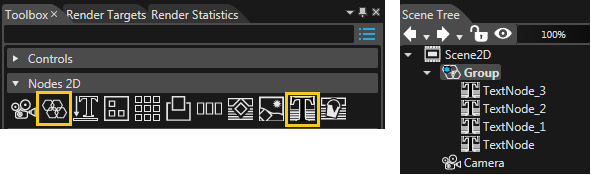
1\. Drag&amp;drop a Group from the "Nodes 2D" Panel of the Toolbox to the SceneEditor or the Scene Tree. And add four Text Nodes to this group by dragging&amp;dropping them onto the Group node in the SceneTree.

<div class="contents" id="bkmrk--23"><div class="contents"><div class="textblock"><div drawio-diagram="2407"><img src="https://doc316en.candera.eu/uploads/images/drawio/2023-02/drawing-7-1677217869.png" alt=""/></div>

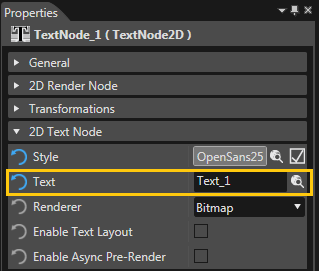
</div></div></div>2\. Change the texts of the Text Nodes to "Text", "Text\_1" etc. according to their names in the Scene Tree View.

<div class="contents" id="bkmrk--24"><div class="contents"><div class="textblock"><div drawio-diagram="2408"><img src="https://doc316en.candera.eu/uploads/images/drawio/2023-02/drawing-7-1677217884.png" alt=""/></div>

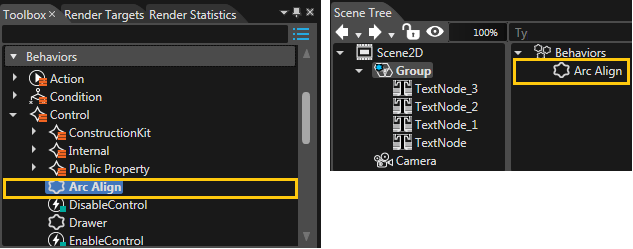
</div></div></div>3\. Drag&amp;drop the <span style="color: rgb(230, 126, 35);">[Arc Align](https://doc316en.candera.eu/link/598#bkmrk-arc-align)</span> Behavior (which is a <span style="color: rgb(230, 126, 35);">[Control Behavior](https://doc316en.candera.eu/link/598#bkmrk-page-title)</span>) from the Toolbox view onto the Group node in the SceneTree.

<div class="contents" id="bkmrk--25"><div class="contents"><div class="textblock"><div drawio-diagram="2410"><img src="https://doc316en.candera.eu/uploads/images/drawio/2023-02/drawing-7-1677217902.png" alt=""/></div>

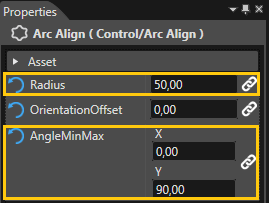
</div></div></div>4\. Configure the <span style="color: rgb(230, 126, 35);">[Arc Align](https://doc316en.candera.eu/link/598#bkmrk-arc-align)</span> Behavior with a radius of 50 and AngleMinMax values of 0 and 90.

<div class="contents" id="bkmrk--26"><div class="contents"><div class="textblock"><div drawio-diagram="2411"><img src="https://doc316en.candera.eu/uploads/images/drawio/2023-02/drawing-7-1677217920.png" alt=""/></div>

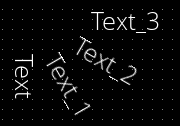
</div></div></div>5\. The result can be seen in the Scene Editor view: All nodes are aligned like an arc from 0 to 90 degrees.

<div class="contents" id="bkmrk--27"><div class="contents"><div class="contents"><div class="textblock"><div drawio-diagram="2412"><img src="https://doc316en.candera.eu/uploads/images/drawio/2023-02/drawing-7-1677217929.png" alt=""/></div>

</div></div></div></div>
#### <span style="vertical-align: inherit;"><span style="vertical-align: inherit;">Enable Rendering Example  
</span></span>

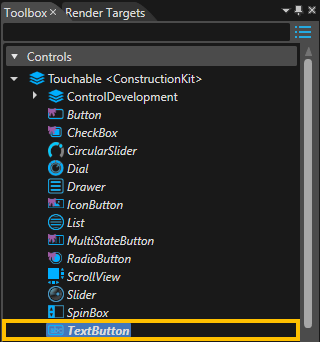
<div class="contents" id="bkmrk--28"></div>1\. Drag&amp;drop a TextButton Control from the Controls Panel of the Toolbox to the SceneEditor or the Scene Tree.

<div class="contents" id="bkmrk--29"><div class="contents"><div class="contents"><div class="contents" id="bkmrk--30"><div class="contents"><div class="textblock"><div drawio-diagram="2426"><img src="https://doc316en.candera.eu/uploads/images/drawio/2023-02/drawing-7-1677221451.png" alt=""/></div>

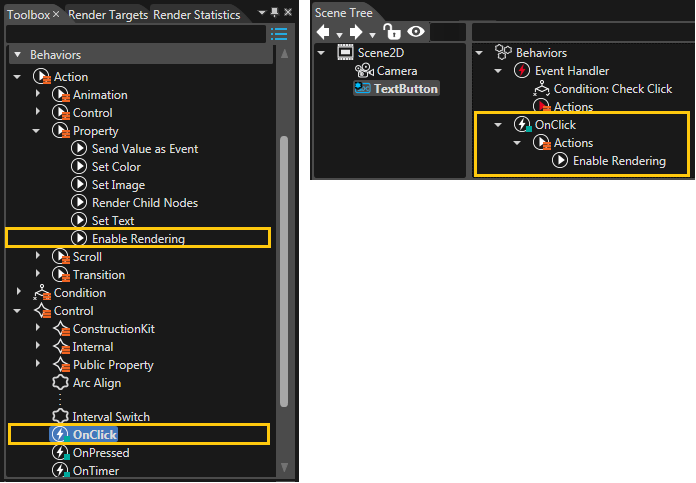
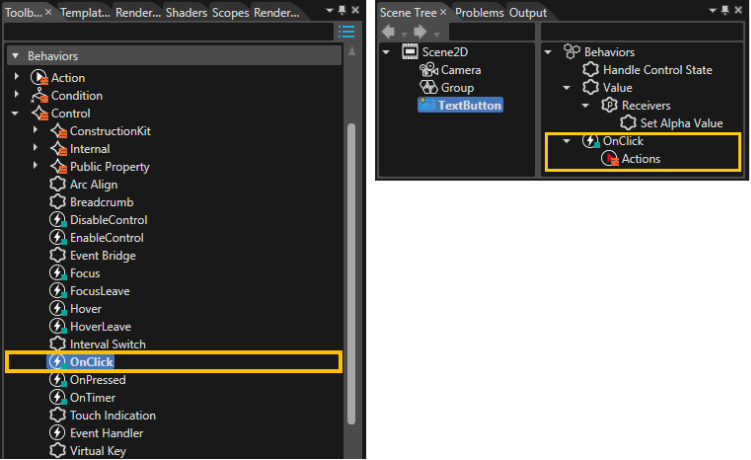
</div></div></div></div></div></div>2\. Drag&amp;drop the <span style="color: rgb(230, 126, 35);">[OnClick](https://doc316en.candera.eu/link/598#bkmrk-onclick)</span> Behavior (which is a <span style="color: rgb(230, 126, 35);">[Control Behavior](https://doc316en.candera.eu/link/598#bkmrk-page-title)</span>) from the Toolbox view onto the TextButton node in the SceneTree. Additionally, drag&amp;drop the <span style="color: rgb(230, 126, 35);">[Enable Rendering](https://doc316en.candera.eu/link/582#bkmrk-enable-rendering)</span> Behavior (which is a <span style="color: rgb(230, 126, 35);">[Action - Property Behavior](https://doc316en.candera.eu/link/582#bkmrk-property-action-beha)</span>) from the Toolbox view onto the "Actions" field of the OnClick Behavior on the right side of the Scene Tree.

<div class="contents" id="bkmrk--31"><div class="contents"><div class="contents"><div class="contents" id="bkmrk--32"><div class="contents"><div class="textblock"><div drawio-diagram="2427"><img src="https://doc316en.candera.eu/uploads/images/drawio/2023-02/drawing-7-1677221472.png" alt=""/></div>

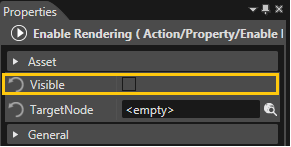
</div></div></div></div></div></div>3\. Check the properties of the <span style="color: rgb(230, 126, 35);">[Enable Rendering](https://doc316en.candera.eu/link/582#bkmrk-enable-rendering)</span> Behavior. We want to change the visibility of the TextButton to invisible when it has been clicked (onClick), so the checkbox "Visible" has to remain unchecked.

<div class="contents" id="bkmrk--33"><div class="contents"><div class="contents"><div class="contents" id="bkmrk--34"><div class="contents"><div class="textblock"><div drawio-diagram="2428"><img src="https://doc316en.candera.eu/uploads/images/drawio/2023-02/drawing-7-1677221485.png" alt=""/></div>

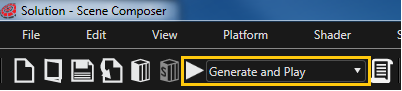
</div></div></div></div></div></div>4\. Save your solution and start the Player through the Play button (with the option "Generate and Play") in the Toolbar on the top to see the result.

<div class="contents" id="bkmrk--35"><div class="contents"><div class="contents"><div class="contents"><div class="contents"><div class="textblock"><div drawio-diagram="2429"><img src="https://doc316en.candera.eu/uploads/images/drawio/2023-02/drawing-7-1677221499.png" alt=""/></div>

</div></div></div></div></div></div>
#### <span style="color: rgb(0, 0, 0);">Format </span>String Example

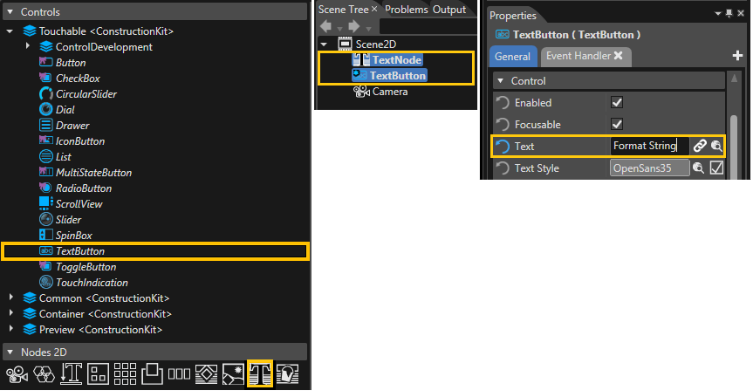
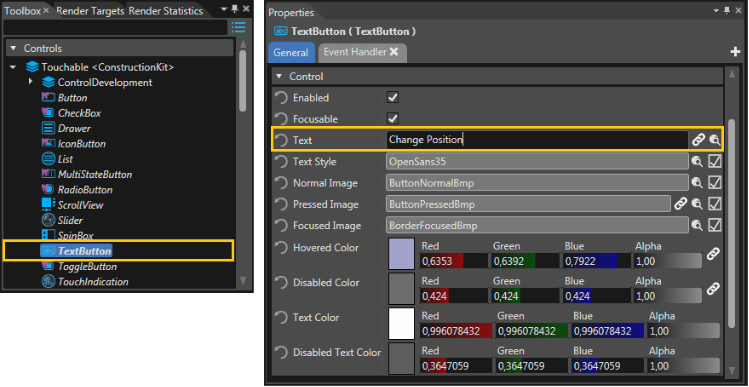
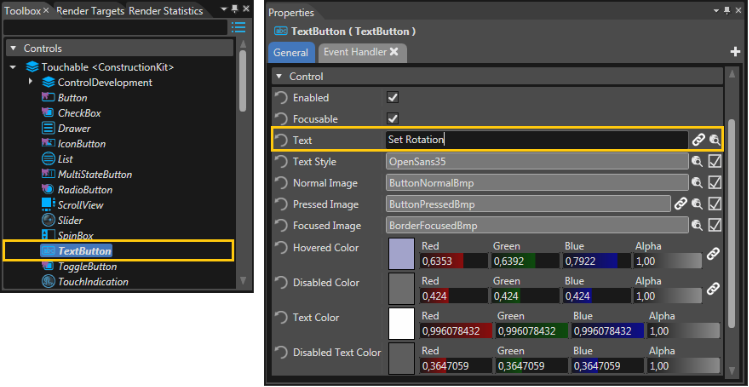
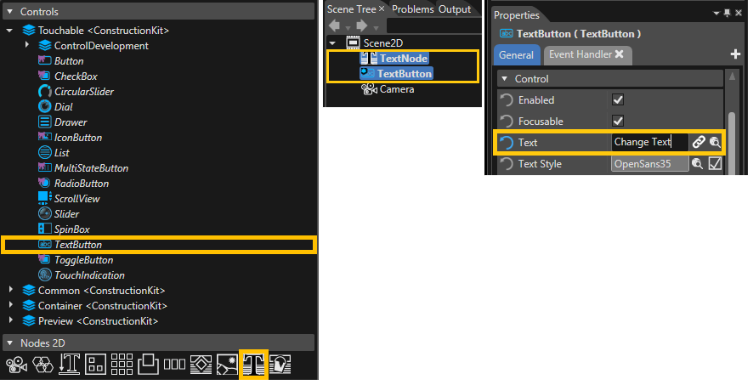
1\. Drag&amp;drop a TextButton Control from the Controls panel and a TextNode from the "Nodes 2D" Panel of the Toolbox to the SceneEditor or the Scene Tree. Set the TextButton's Text to "Format String".

<div class="contents" id="bkmrk--36"><div class="contents"><div class="contents"><div class="contents"><div class="contents"><div class="contents" id="bkmrk--37"><div class="contents"><div class="textblock"><div drawio-diagram="2430"><img src="https://doc316en.candera.eu/uploads/images/drawio/2023-02/drawing-7-1677221666.png" alt=""/></div>

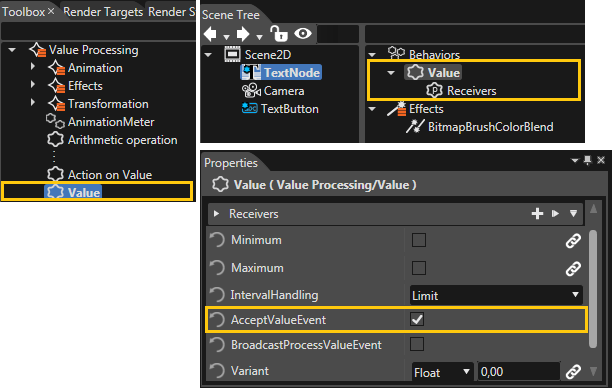
</div></div></div></div></div></div></div></div>2\. Drag&amp;drop a <span style="color: rgb(230, 126, 35);">[Value](https://doc316en.candera.eu/link/647#bkmrk-value)</span> Behavior (which is a <span style="color: rgb(230, 126, 35);">[Value Processing Behavior](https://doc316en.candera.eu/link/647#bkmrk-page-title)</span>) from the Toolbox view onto the TextNode in the SceneTree. Set the <span style="color: rgb(230, 126, 35);">[Value](https://doc316en.candera.eu/link/647#bkmrk-value)</span> Behavior's "AcceptValueEvent" property to true.

<div class="contents" id="bkmrk--38"><div class="contents"><div class="contents"><div class="contents"><div class="contents"><div class="contents" id="bkmrk--39"><div class="contents"><div class="textblock"><div drawio-diagram="2431"><img src="https://doc316en.candera.eu/uploads/images/drawio/2023-02/drawing-7-1677221695.png" alt=""/></div>

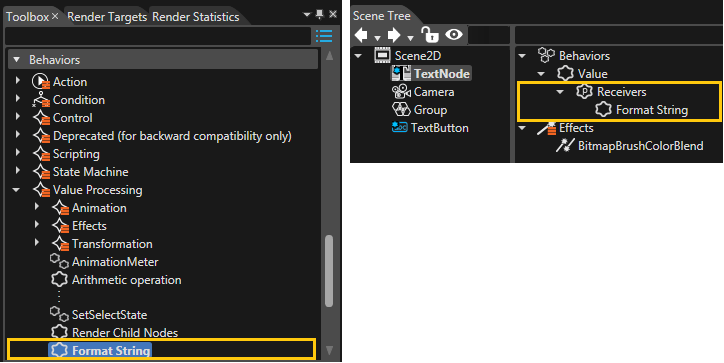
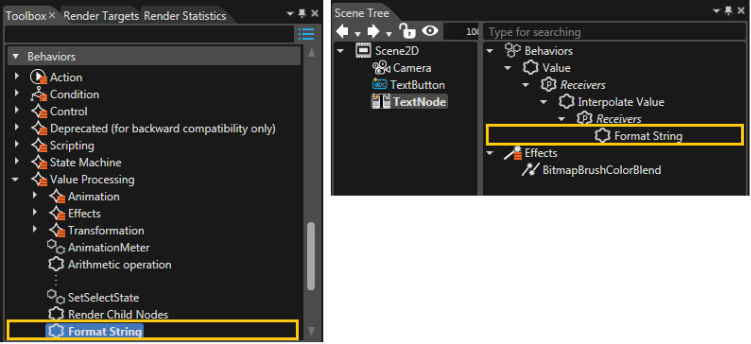
</div></div></div></div></div></div></div></div>3\. Drag&amp;drop a <span style="color: rgb(230, 126, 35);">[Format String](https://doc316en.candera.eu/link/647#bkmrk-format-string)</span> Behavior (which is a <span style="color: rgb(230, 126, 35);">[Value Processing Behavior](https://doc316en.candera.eu/link/647#bkmrk-value)</span>) from the Toolbox view onto the <span style="color: rgb(230, 126, 35);">[Value](https://doc316en.candera.eu/link/647#bkmrk-value)</span> Behavior's Receivers.

<div class="contents" id="bkmrk--40"><div class="contents"><div class="contents"><div class="contents"><div class="contents"><div class="contents" id="bkmrk--41"><div class="contents"><div class="textblock"><div drawio-diagram="2432"><img src="https://doc316en.candera.eu/uploads/images/drawio/2023-02/drawing-7-1677221725.png" alt=""/></div>

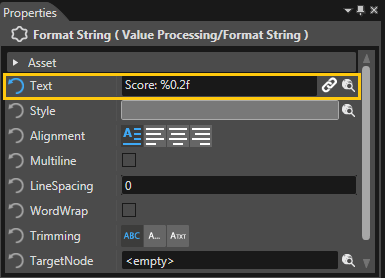
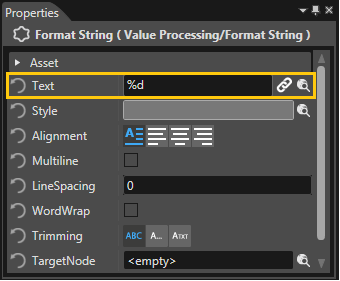
</div></div></div></div></div></div></div></div>4\. Set the <span style="color: rgb(230, 126, 35);">[Format String](https://doc316en.candera.eu/link/647#bkmrk-format-string)</span> Behavior's "Text" property to "Score: %0.2f", in order to represent the value as formatted string.

<div class="contents" id="bkmrk--42"><div class="contents"><div class="contents"><div class="contents"><div class="contents"><div class="contents" id="bkmrk--43"><div class="contents"><div class="textblock"><div drawio-diagram="2433"><img src="https://doc316en.candera.eu/uploads/images/drawio/2023-02/drawing-7-1677221738.png" alt=""/></div>

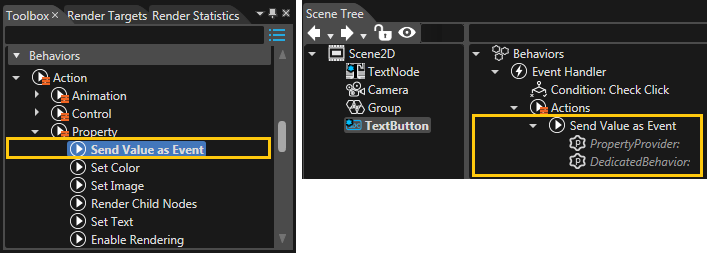
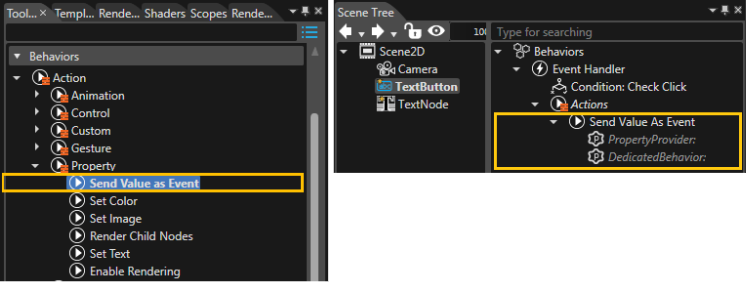
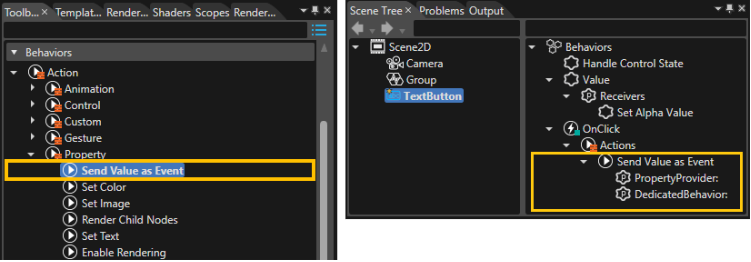
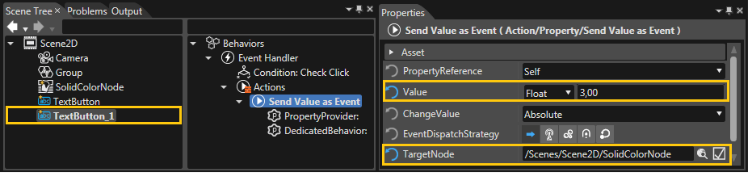
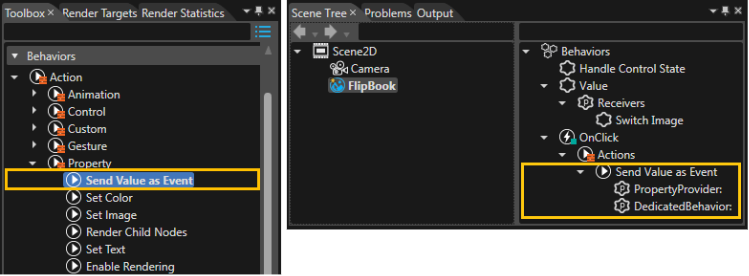
</div></div></div></div></div></div></div></div>5\. Drag&amp;drop a <span style="color: rgb(230, 126, 35);">[Send Value as Event](https://doc316en.candera.eu/link/582#bkmrk-send-value-as-event)</span> Behavior (which is a <span style="color: rgb(230, 126, 35);">[Action - Property Behavior](https://doc316en.candera.eu/link/582#bkmrk-property-action-beha)</span>) from the Toolbox view onto the TextButton's Actions on the right side of the SceneTree view.

<div class="contents" id="bkmrk--44"><div class="contents"><div class="contents"><div class="contents"><div class="contents"><div class="contents" id="bkmrk--45"><div class="contents"><div class="textblock"><div drawio-diagram="2434"><img src="https://doc316en.candera.eu/uploads/images/drawio/2023-02/drawing-7-1677221762.png" alt=""/></div>

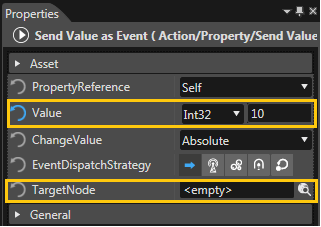
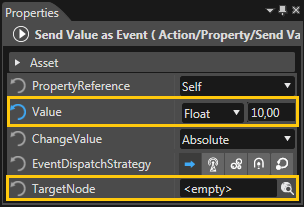
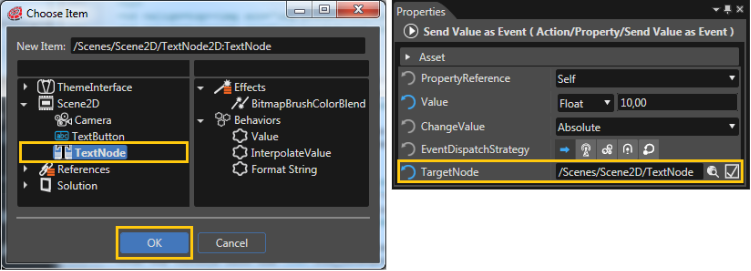
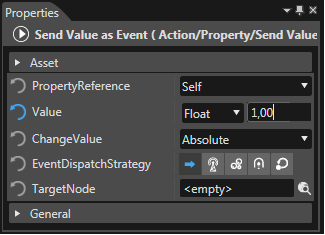
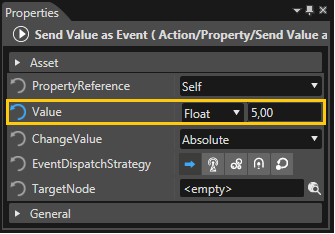
</div></div></div></div></div></div></div></div>6\. Configure the <span style="color: rgb(230, 126, 35);">[Send Value as Event](https://doc316en.candera.eu/link/582#bkmrk-send-value-as-event)</span> Behavior's Value property to datatype Int32 and value 10. Adjust the behavior's TargetNode by clicking on the magnifying glass on the right of the property.

<div class="contents" id="bkmrk--46"><div class="contents"><div class="contents"><div class="contents"><div class="contents"><div class="contents" id="bkmrk--47"><div class="contents"><div class="textblock"><div drawio-diagram="2435"><img src="https://doc316en.candera.eu/uploads/images/drawio/2023-02/drawing-7-1677221773.png" alt=""/></div>

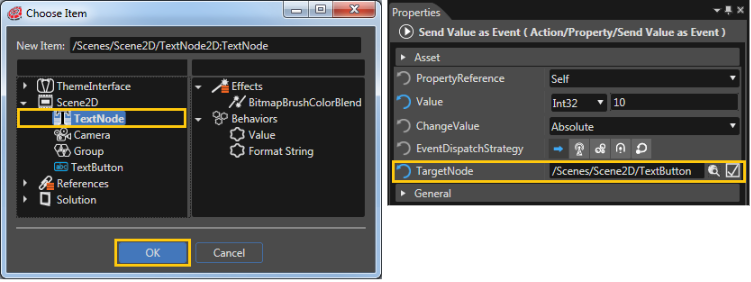
</div></div></div></div></div></div></div></div>7\. Set the scene's TextNode as TargetNode for the <span style="color: rgb(230, 126, 35);">[Send Value as Event](https://doc316en.candera.eu/link/582#bkmrk-send-value-as-event)</span> Behavior: After clicking the magnifying glass in the properties panel, the "Select Item" Dialog is opened. Select the scene's TextNode and press OK.

<div class="contents" id="bkmrk--48"><div class="contents"><div class="contents"><div class="contents"><div class="contents"><div class="contents" id="bkmrk--49"><div class="contents"><div class="textblock"><div drawio-diagram="2436"><img src="https://doc316en.candera.eu/uploads/images/drawio/2023-02/drawing-7-1677221811.png" alt=""/></div>

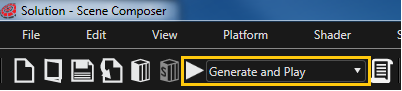
</div></div></div></div></div></div></div></div>8\. Save your solution and start the Player through the Play button (with the option "Generate and Play") in the Toolbar on the top to see the result.

<div class="contents" id="bkmrk--50"><div class="contents"><div class="contents"><div class="contents"><div class="contents"><div class="contents" id="bkmrk--51"><div class="contents"><div class="textblock"><div drawio-diagram="2437"><img src="https://doc316en.candera.eu/uploads/images/drawio/2023-02/drawing-7-1677221826.png" alt=""/></div>

</div></div></div></div></div></div></div></div>9\. When the TextButton is pressed, the Int32 value of 10 will be sent to the TextNode. This value is accepted by the TextNode and the behavior FormatString formats it to "Score: 10.00".

<div class="contents" id="bkmrk--52"><div class="contents"><div class="contents"><div class="contents"><div class="contents"><div class="contents"><div class="textblock"><div drawio-diagram="2438"><img src="https://doc316en.candera.eu/uploads/images/drawio/2023-02/drawing-7-1677221861.png" alt=""/></div>

</div></div></div></div></div></div></div>
#### <span style="vertical-align: inherit;"><span style="vertical-align: inherit;">Forward Value Example  
</span></span>

<div class="contents" id="bkmrk-1.-drag%26drop-a-slide-1"><div class="contents"><div class="contents"><div class="contents"><div class="contents"><div class="contents" id="bkmrk--53"></div></div><div class="header" id="bkmrk-1.-drag%26drop-a-slide-2"><div class="header"><div class="headertitle"><div class="title">1. Drag&amp;drop a Slider Control and a Text Value Control the Controls panel and a TextNode from the Controls Panel of the Toolbox to the Scene Editor or the Scene Tree.  
</div></div></div></div><div class="header" id="bkmrk--54"><div class="header"><div class="headertitle"><div class="title"><div class="contents"><div class="contents"><div class="textblock"><div drawio-diagram="2443"><img src="https://doc316en.candera.eu/uploads/images/drawio/2023-02/drawing-7-1677222589.png" alt=""/></div>

</div></div></div></div></div></div></div></div></div></div></div>2\. Position the Slider Control and Text Value Control in the Scene Editor View.

<div class="contents" id="bkmrk--55"><div class="contents"><div class="contents"><div class="contents"><div class="header" id="bkmrk--56"><div class="header"><div class="headertitle"><div class="title"><div class="contents"><div class="contents"><div class="textblock"><div drawio-diagram="2444"><img src="https://doc316en.candera.eu/uploads/images/drawio/2023-02/drawing-7-1677222616.png" alt=""/></div>

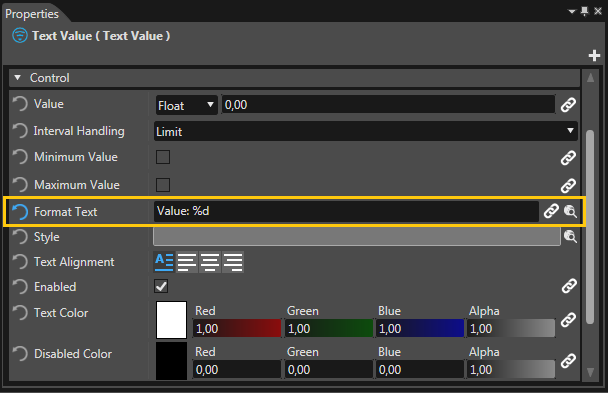
</div></div></div></div></div></div></div></div></div></div></div>3\. Change the Text Value Control's "Format Text" Property to "Value: %d".

<div class="contents" id="bkmrk--57"><div class="contents"><div class="contents"><div class="contents"><div class="header" id="bkmrk--58"><div class="header"><div class="headertitle"><div class="title"><div class="contents"><div class="contents"><div class="textblock"><div drawio-diagram="2445"><img src="https://doc316en.candera.eu/uploads/images/drawio/2023-02/drawing-7-1677222688.png" alt=""/></div>

</div></div></div></div></div></div></div></div></div></div></div>4\. Drag&amp;drop a <span style="color: rgb(230, 126, 35);">[Forward Value](https://doc316en.candera.eu/link/647#bkmrk-forward-value)</span> Behavior (which is a <span style="color: rgb(230, 126, 35);">[Value Processing Behavior](https://doc316en.candera.eu/link/647#bkmrk-page-title)</span>) from the Behaviors Panel of the Toolbox onto the Slider in the Scene Tree.

<div class="contents" id="bkmrk--59"><div class="contents"><div class="contents"><div class="contents"><div class="header" id="bkmrk--60"><div class="header"><div class="headertitle"><div class="title"><div class="contents"><div class="contents"><div class="textblock"><div drawio-diagram="2446"><img src="https://doc316en.candera.eu/uploads/images/drawio/2023-02/drawing-7-1677222705.png" alt=""/></div>

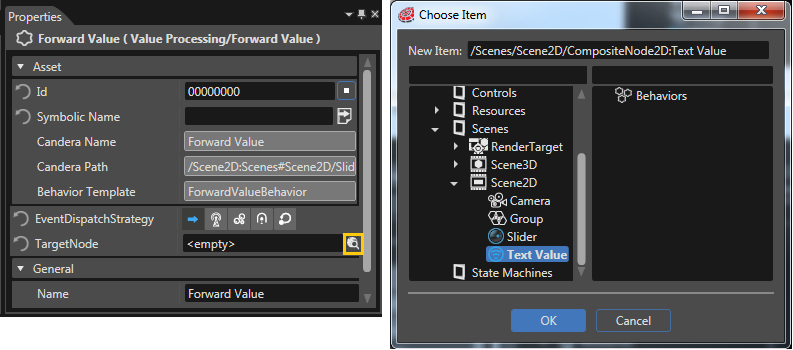
</div></div></div></div></div></div></div></div></div></div></div>5\. Select the <span style="color: rgb(230, 126, 35);">[Forward Value](https://doc316en.candera.eu/link/647#bkmrk-forward-value)</span> Behavior in the right side of the Scene Tree view. Set the <span style="color: rgb(230, 126, 35);">[Forward Value](https://doc316en.candera.eu/link/647#bkmrk-forward-value)</span> Behavior's Target Node to the Text Value Control you have added to the scene in step 1 by clicking on the magnifying glass on the right of the input field and selecting the Text Value Control in the Choose Item dialog.

<div class="contents" id="bkmrk--61"><div class="contents"><div class="contents"><div class="contents"><div class="header" id="bkmrk--62"><div class="header"><div class="headertitle"><div class="title"><div class="contents"><div class="contents"><div class="textblock"><div drawio-diagram="2447"><img src="https://doc316en.candera.eu/uploads/images/drawio/2023-02/drawing-7-1677222726.png" alt=""/></div>

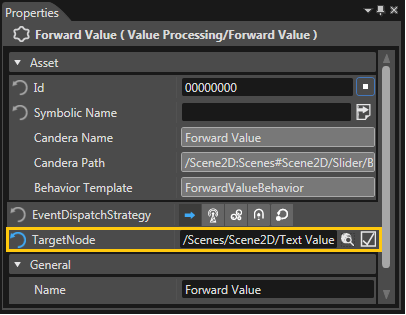
</div></div></div></div></div></div></div></div></div></div></div>After that, the [Forward Value](https://doc316en.candera.eu/link/647#bkmrk-forward-value) Behavior's Properties will look as follows.

<div class="contents" id="bkmrk--63"><div class="contents"><div class="contents"><div class="contents"><div class="header" id="bkmrk--64"><div class="header"><div class="headertitle"><div class="title"><div class="contents"><div class="contents"><div class="textblock"><div drawio-diagram="2448"><img src="https://doc316en.candera.eu/uploads/images/drawio/2023-02/drawing-7-1677222739.png" alt=""/></div>

</div></div></div></div></div></div></div></div></div></div></div>6\. Save your solution and start the Player through the Play button (with the option "Generate and Play") in the Toolbar on the top to see the result.

<div class="contents" id="bkmrk--65"><div class="contents"><div class="contents"><div class="contents"><div class="header" id="bkmrk--66"><div class="header"><div class="headertitle"><div class="title"><div class="contents"><div class="contents"><div class="textblock"><div drawio-diagram="2449"><img src="https://doc316en.candera.eu/uploads/images/drawio/2023-02/drawing-7-1677222755.png" alt=""/></div>

</div></div></div></div></div></div></div></div></div></div></div>7\. When manipulating the slider, the Value of the Text Value Control changes according to the alteration on the slider.

<div class="contents" id="bkmrk--67"><div class="contents"><div class="contents"><div class="contents"><div class="header"><div class="header"><div class="headertitle"><div class="title"><div class="contents"><div class="textblock"><div drawio-diagram="2450"><img src="https://doc316en.candera.eu/uploads/images/drawio/2023-02/drawing-7-1677222799.png" alt=""/></div>

</div></div></div></div></div></div></div></div></div></div>
#### <span style="vertical-align: inherit;"><span style="vertical-align: inherit;">Hover - Hover Leave Example  
</span></span>

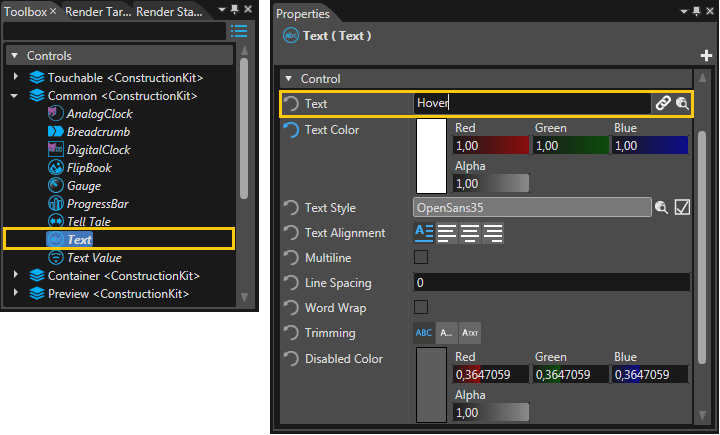
1\. Drag&amp;drop a Text Control from the Controls Panel of the Toolbox to the Scene Editor or the Scene Tree and change its text to "Hover".

<div class="contents" id="bkmrk--68"><div class="contents"><div class="contents"><div class="contents"><div class="contents" id="bkmrk--69"><div class="contents"><div class="textblock"><div drawio-diagram="2451"><img src="https://doc316en.candera.eu/uploads/images/drawio/2023-02/drawing-7-1677223245.png" alt=""/></div>

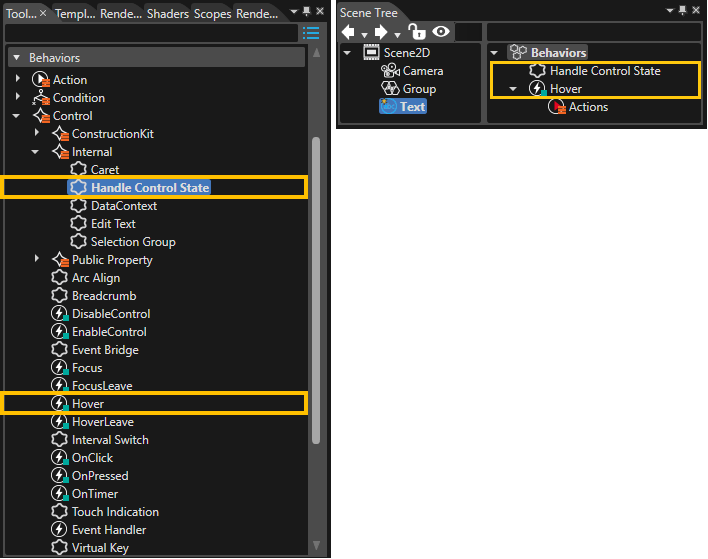
</div></div></div></div></div></div></div>2\. Drag&amp;drop a <span style="color: rgb(230, 126, 35);">[Hover](https://doc316en.candera.eu/link/598#bkmrk-hover)</span> Behavior (which is a <span style="color: rgb(230, 126, 35);">[Control Behavior](https://doc316en.candera.eu/link/598#bkmrk-page-title)</span>) and a <span style="color: rgb(230, 126, 35);">[Handle Control State](https://doc316en.candera.eu/link/598#bkmrk-handle-control-state)</span> Behavior (which is a <span style="color: rgb(230, 126, 35);">[Control - Internal Behavior](https://doc316en.candera.eu/link/598#bkmrk-internal-control-beh)</span>) from the Behaviors Panel of the ToolBox onto the Text Control in the SceneTree. The <span style="color: rgb(230, 126, 35);">[Handle Control State](https://doc316en.candera.eu/link/598#bkmrk-handle-control-state)</span> Behavior is needed in order for the Text Control to receive Input Events.

<div class="contents" id="bkmrk--70"><div class="contents"><div class="contents"><div class="contents"><div class="contents" id="bkmrk--71"><div class="contents"><div class="textblock"><div drawio-diagram="2452"><img src="https://doc316en.candera.eu/uploads/images/drawio/2023-02/drawing-7-1677223271.png" alt=""/></div>

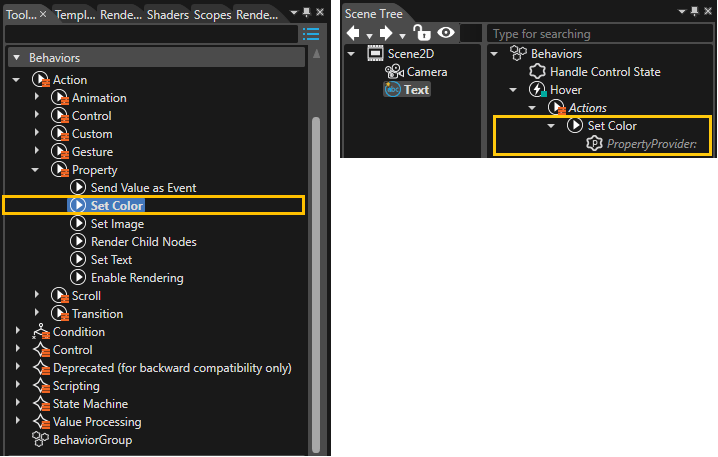
</div></div></div></div></div></div></div>3\. Drag&amp;drop a <span style="color: rgb(230, 126, 35);">[SetColor](https://doc316en.candera.eu/link/582#bkmrk-set-color)</span> Behavior (which is an <span style="color: rgb(230, 126, 35);">[Action - Property Behavior](https://doc316en.candera.eu/link/582#bkmrk-property-action-beha)</span>) onto the Actions of the <span style="color: rgb(230, 126, 35);">[Hover](https://doc316en.candera.eu/link/598#bkmrk-hover)</span> Behavior on the right side of the SceneTree view.

<div class="contents" id="bkmrk--72"><div class="contents"><div class="contents"><div class="contents"><div class="contents" id="bkmrk--73"><div class="contents"><div class="textblock"><div drawio-diagram="2453"><img src="https://doc316en.candera.eu/uploads/images/drawio/2023-02/drawing-7-1677223296.png" alt=""/></div>

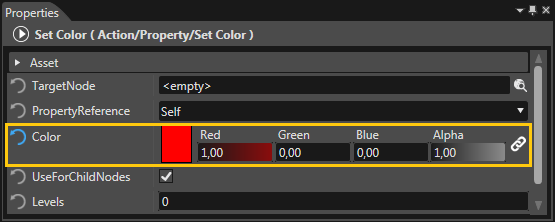
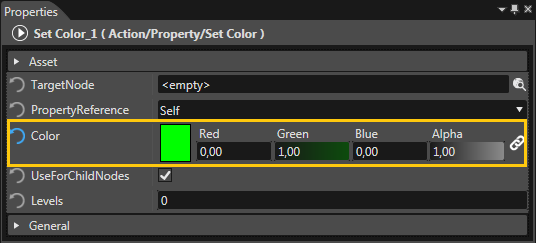
</div></div></div></div></div></div></div>4\. Select the <span style="color: rgb(230, 126, 35);">[Set Color](https://doc316en.candera.eu/link/582#bkmrk-set-color)</span> Behavior and change the Color to red.

<div class="contents" id="bkmrk--74"><div class="contents"><div class="contents"><div class="contents"><div class="contents" id="bkmrk--75"><div class="contents"><div class="textblock"><div drawio-diagram="2454"><img src="https://doc316en.candera.eu/uploads/images/drawio/2023-02/drawing-7-1677223305.png" alt=""/></div>

</div></div></div></div></div></div></div>5\. Save your solution and start the Player through the Play button (with the option "Generate and Play") in the Toolbar on the top to see the result.

<div class="contents" id="bkmrk--76"><div class="contents"><div class="contents"><div class="contents"><div class="contents" id="bkmrk--77"><div class="contents"><div class="textblock"><div drawio-diagram="2455"><img src="https://doc316en.candera.eu/uploads/images/drawio/2023-02/drawing-7-1677223315.png" alt=""/></div>

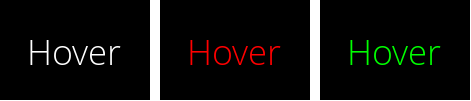
</div></div></div></div></div></div></div>6\. When moving the mouse over the Text Control, the text color changes to red.

<div class="contents" id="bkmrk--78"><div class="contents"><div class="contents"><div class="contents"><div class="contents" id="bkmrk--79"><div class="contents"><div class="textblock"><div drawio-diagram="2456"><img src="https://doc316en.candera.eu/uploads/images/drawio/2023-02/drawing-7-1677223338.png" alt=""/></div>

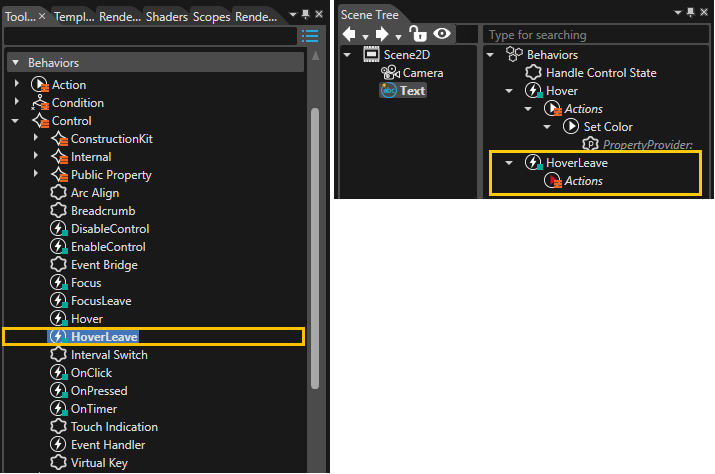
</div></div></div></div></div></div></div>7\. Drag&amp;drop a <span style="color: rgb(230, 126, 35);">[Hover Leave](https://doc316en.candera.eu/link/598#bkmrk-hoverleave-0)</span> Behavior (which is a <span style="color: rgb(230, 126, 35);">[Control Behavior](https://doc316en.candera.eu/link/598#bkmrk-page-title)</span>) onto the TextNode.

<div class="contents" id="bkmrk--80"><div class="contents"><div class="contents"><div class="contents"><div class="contents" id="bkmrk--81"><div class="contents"><div class="textblock"><div drawio-diagram="2457"><img src="https://doc316en.candera.eu/uploads/images/drawio/2023-02/drawing-7-1677223364.png" alt=""/></div>

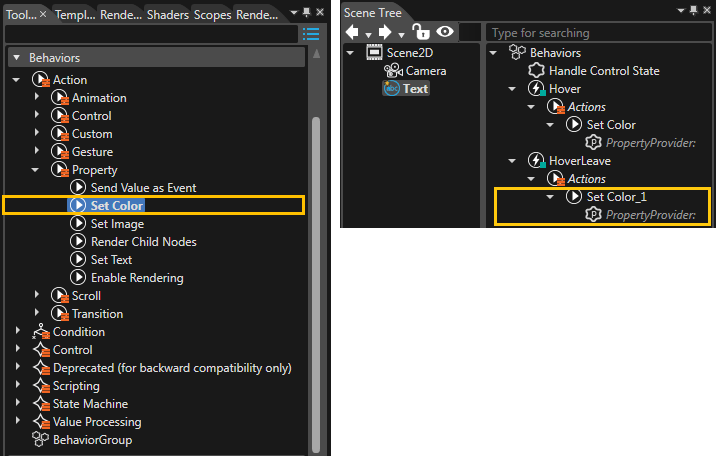
</div></div></div></div></div></div></div>8\. Drag&amp;drop a <span style="color: rgb(230, 126, 35);">[Set Color](https://doc316en.candera.eu/link/582#bkmrk-set-color)</span> Behavior (which is an <span style="color: rgb(230, 126, 35);">[Action - Property Behavior](https://doc316en.candera.eu/link/582#bkmrk-property-action-beha)</span>) onto the Actions of the <span style="color: rgb(230, 126, 35);">[HoverLeave](https://doc316en.candera.eu/link/598#bkmrk-hoverleave-0)</span> Behavior on the right side of the SceneTree view.

<div class="contents" id="bkmrk--82"><div class="contents"><div class="contents"><div class="contents"><div class="contents" id="bkmrk--83"><div class="contents"><div class="textblock"><div drawio-diagram="2458"><img src="https://doc316en.candera.eu/uploads/images/drawio/2023-02/drawing-7-1677223385.png" alt=""/></div>

</div></div></div></div></div></div></div>9\. Select the <span style="color: rgb(230, 126, 35);">[Set Color](https://doc316en.candera.eu/link/582#bkmrk-set-color)</span> Behavior and change the Color to green.

<div class="contents" id="bkmrk--84"><div class="contents"><div class="contents"><div class="contents"><div class="contents" id="bkmrk--85"><div class="contents"><div class="textblock"><div drawio-diagram="2459"><img src="https://doc316en.candera.eu/uploads/images/drawio/2023-02/drawing-7-1677223403.png" alt=""/></div>

</div></div></div></div></div></div></div>10\. Save your solution and start the Player through the Play button (with the option "Generate and Play") in the Toolbar on the top to see the result.

<div class="contents" id="bkmrk--86"><div class="contents"><div class="contents"><div class="contents"><div class="contents" id="bkmrk--87"><div class="contents"><div class="textblock"><div drawio-diagram="2460"><img src="https://doc316en.candera.eu/uploads/images/drawio/2023-02/drawing-7-1677223416.png" alt=""/></div>

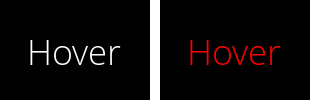
</div></div></div></div></div></div></div>11\. When moving the mouse over the Text Control, the text color changes to red (as it did before). When moving the mouse away again, the Text Control's color changes to green. Whenever you hover, it's getting red, when leaving, it's turning green.

<div class="contents" id="bkmrk--88"><div class="contents"><div class="contents"><div class="contents"><div class="contents" id="bkmrk--89"><div class="contents"><div class="textblock"><div drawio-diagram="2461"><img src="https://doc316en.candera.eu/uploads/images/drawio/2023-02/drawing-7-1677223532.png" alt=""/></div>

</div></div></div></div></div></div></div>
#### <span style="vertical-align: inherit;"><span style="vertical-align: inherit;">Interpolate Value Example  
</span></span>

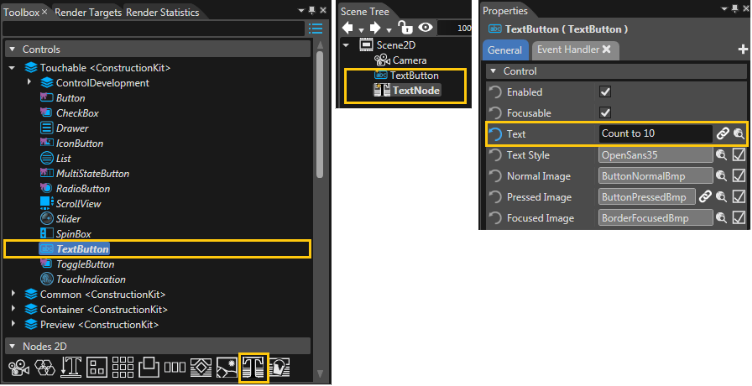
<div class="contents" id="bkmrk--90"><div class="contents" id="bkmrk--91"><div class="contents" id="bkmrk--92"></div></div></div>1\. Drag&amp;drop a TextButton Control from the Controls panel and a TextNode from the "Nodes 2D" Panel of the Toolbox to the SceneEditor or the Scene Tree. Set the TextButton's Text to "Count to 10".

<div class="contents" id="bkmrk--93"><div class="contents"><div class="textblock"><div drawio-diagram="2472"><img src="https://doc316en.candera.eu/uploads/images/drawio/2023-02/drawing-7-1677224131.png" alt=""/></div>

</div></div></div>2\. Drag&amp;drop a <span style="color: rgb(230, 126, 35);">[Value Behavior](https://doc316en.candera.eu/link/647#bkmrk-value)</span> (which is a <span style="color: rgb(230, 126, 35);">[Value Processing Behavior](https://doc316en.candera.eu/link/647#bkmrk-page-title)</span>) from the Behaviors Panel of the Toolbox onto the TextNode in the Scene Tree.

<div class="contents" id="bkmrk--94"><div class="contents"><div class="textblock"><div drawio-diagram="2473"><img src="https://doc316en.candera.eu/uploads/images/drawio/2023-02/drawing-7-1677224160.png" alt=""/></div>

</div></div></div>3\. Select the <span style="color: rgb(230, 126, 35);">[Value](https://doc316en.candera.eu/link/647#bkmrk-value)</span> Behavior in the right side of the Scene Tree view. Set the <span style="color: rgb(230, 126, 35);">[Value](https://doc316en.candera.eu/link/647#bkmrk-value)</span> Behavior's AcceptValueEvent Property to "true" by checking the checkbox.

<div class="contents" id="bkmrk--95"><div class="contents"><div class="textblock"><div drawio-diagram="2474"><img src="https://doc316en.candera.eu/uploads/images/drawio/2023-02/drawing-7-1677224173.png" alt=""/></div>

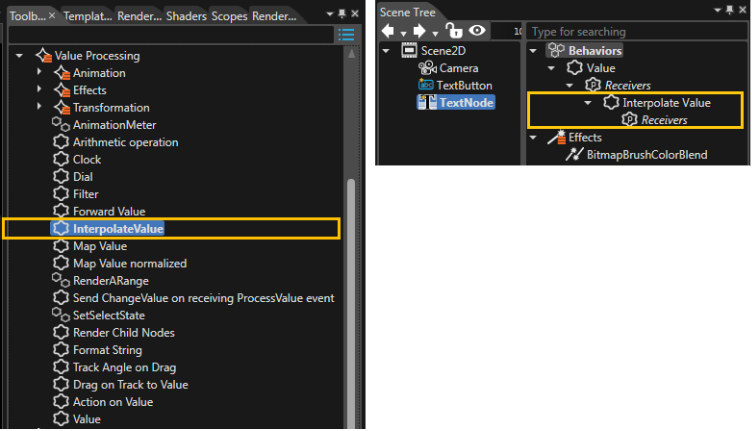
</div></div></div>4\. Drag&amp;drop an <span style="color: rgb(230, 126, 35);">[Interpolate Value](https://doc316en.candera.eu/link/647#bkmrk-interpolate-value)</span> Behavior (which is a <span style="color: rgb(230, 126, 35);">[Value Processing Behavior](https://doc316en.candera.eu/link/647#bkmrk-page-title)</span>) onto the <span style="color: rgb(230, 126, 35);">[Value](https://doc316en.candera.eu/link/647#bkmrk-value)</span> Behavior's Receivers in the right side of the Scene Tree Panel.

<div class="contents" id="bkmrk--96"><div class="contents"><div class="textblock"><div drawio-diagram="2475"><img src="https://doc316en.candera.eu/uploads/images/drawio/2023-02/drawing-7-1677224204.png" alt=""/></div>

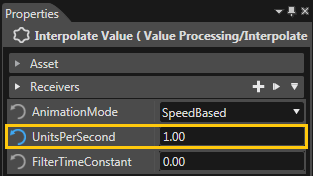
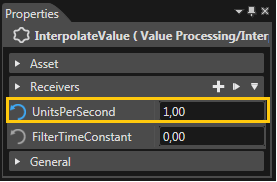
</div></div></div>5\. Select the <span style="color: rgb(230, 126, 35);">[Interpolate Value](https://doc316en.candera.eu/link/647#bkmrk-interpolate-value)</span> Behavior on the right side of the Scene Tree View and set the UnitsPerSecond to 1,00 in the Properties view on the bottom right.

<div class="contents" id="bkmrk--97"><div class="contents"><div class="textblock"><div drawio-diagram="2476"><img src="https://doc316en.candera.eu/uploads/images/drawio/2023-02/drawing-7-1677224216.png" alt=""/></div>

</div></div></div>6\. Drag&amp;drop a <span style="color: rgb(230, 126, 35);">[Format String](https://doc316en.candera.eu/link/647#bkmrk-format-string)</span> Behavior (which is a <span style="color: rgb(230, 126, 35);">[Value Processing Behavior](https://doc316en.candera.eu/link/647#bkmrk-page-title)</span>) from the Toolbox onto the <span style="color: rgb(230, 126, 35);">[Interpolate Value](https://doc316en.candera.eu/link/647#bkmrk-interpolate-value)</span> Behavior's Receivers on the right side of the Scene Tree Panel.

<div class="contents" id="bkmrk--98"><div class="contents"><div class="textblock"><div drawio-diagram="2477"><img src="https://doc316en.candera.eu/uploads/images/drawio/2023-02/drawing-7-1677224250.png" alt=""/></div>

</div></div></div>7\. Select the <span style="color: rgb(230, 126, 35);">[Format String](https://doc316en.candera.eu/link/647#bkmrk-format-string)</span> Behavior on the right side of the Scene Tree view and set the Text property to "%d" in the Properties view.

<div class="contents" id="bkmrk--99"><div class="contents"><div class="textblock"><div drawio-diagram="2478"><img src="https://doc316en.candera.eu/uploads/images/drawio/2023-02/drawing-7-1677224267.png" alt=""/></div>

</div></div></div>8\. Drag&amp;drop a <span style="color: rgb(230, 126, 35);">[Send Value as Event](https://doc316en.candera.eu/link/582#bkmrk-send-value-as-event)</span> Behavior (which is a <span style="color: rgb(230, 126, 35);">[Action - Property Behavior](https://doc316en.candera.eu/link/582#bkmrk-property-action-beha)</span>) from the Toolbox view onto the TextButton's Actions on the right side of the SceneTree view.

<div class="contents" id="bkmrk--100"><div class="contents"><div class="textblock"><div drawio-diagram="2479"><img src="https://doc316en.candera.eu/uploads/images/drawio/2023-02/drawing-7-1677224298.png" alt=""/></div>

</div></div></div>9\. Select the <span style="color: rgb(230, 126, 35);">[Send Value as Event](https://doc316en.candera.eu/link/582#bkmrk-send-value-as-event)</span> Behavior on the right side of the Scene Tree Panel. Set the Value property to datatype "Float" and value "10" in the Properties view. Adjust the behavior's TargetNode by clicking on the magnifying glass on the right of the property.

<div class="contents" id="bkmrk--101"><div class="contents"><div class="textblock"><div drawio-diagram="2480"><img src="https://doc316en.candera.eu/uploads/images/drawio/2023-02/drawing-7-1677224312.png" alt=""/></div>

</div></div></div>10\. Set the scene's TextNode as TargetNode for the <span style="color: rgb(230, 126, 35);">[Send Value as Event](https://doc316en.candera.eu/link/582#bkmrk-send-value-as-event)</span> Behavior: After clicking the magnifying glass in the properties panel, the "Select Item" Dialog is opened. Select the scene's TextNode and press OK.

<div class="contents" id="bkmrk--102"><div class="contents"><div class="textblock"><div drawio-diagram="2481"><img src="https://doc316en.candera.eu/uploads/images/drawio/2023-02/drawing-7-1677224346.png" alt=""/></div>

</div></div></div>11\. Save your solution and start the Player through the Play button (with the option "Generate and Play") in the Toolbar on the top to see the result.

<div class="contents" id="bkmrk--103"><div class="contents"><div class="textblock"><div drawio-diagram="2482"><img src="https://doc316en.candera.eu/uploads/images/drawio/2023-02/drawing-7-1677224359.png" alt=""/></div>

</div></div></div>12\. When clicking on the TextButton, the value 10 gets sent to the TextNode, but the TextNode doesn't change to 10 immediately. The [Interpolate Value](https://doc316en.candera.eu/link/647#bkmrk-interpolate-value) Behavior makes the TextNode count up from 0 to 10 in one step per second.

<div class="contents" id="bkmrk--104"><div class="contents"><div class="textblock"><div drawio-diagram="2485"><img src="https://doc316en.candera.eu/uploads/images/drawio/2023-02/drawing-7-1677224502.png" alt=""/></div>

</div></div></div>
#### <span style="vertical-align: inherit;"><span style="vertical-align: inherit;">Move Node Example  
</span></span>

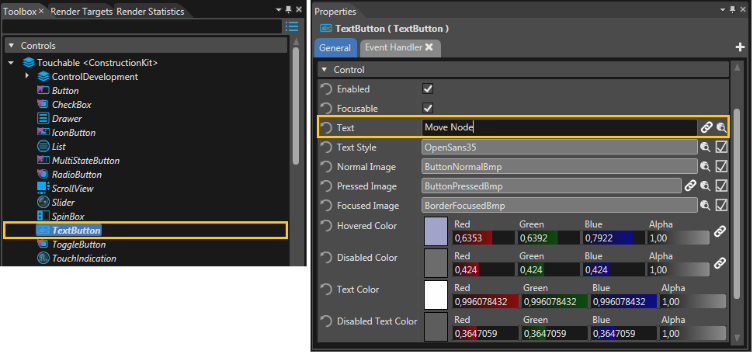
 1. Drag&amp;drop a TextButton Control from the Controls Panel of the Toolbox to the SceneEditor or the Scene Tree and change the Text to "Move Node"

<div class="contents" id="bkmrk--105"><div class="contents"><div class="textblock"><div drawio-diagram="2462"><img src="https://doc316en.candera.eu/uploads/images/drawio/2023-02/drawing-7-1677223703.png" alt=""/></div>

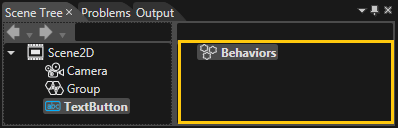
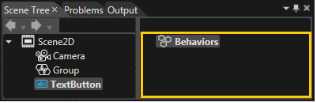
</div></div></div>2\. Select the TextButton in the Scene Tree View and delete all Behaviors that are automatically attached to the TextButton from the right side of the Scene Tree View.

<div class="contents" id="bkmrk--106"><div class="contents"><div class="textblock"><div drawio-diagram="2463"><img src="https://doc316en.candera.eu/uploads/images/drawio/2023-02/drawing-7-1677223735.png" alt=""/></div>

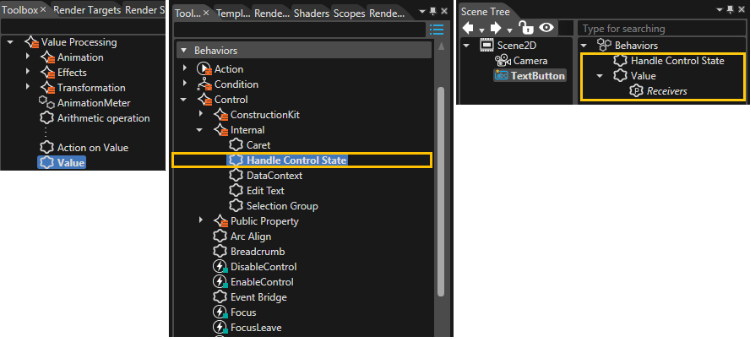
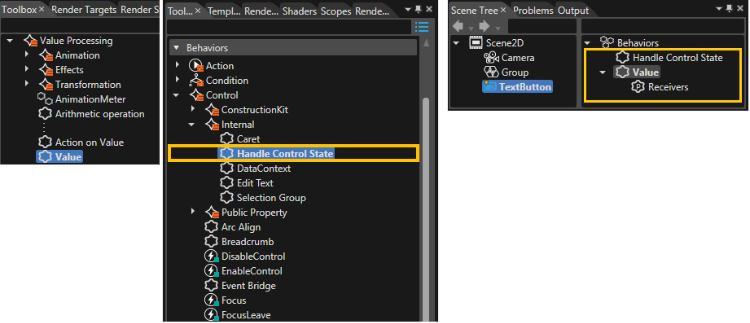
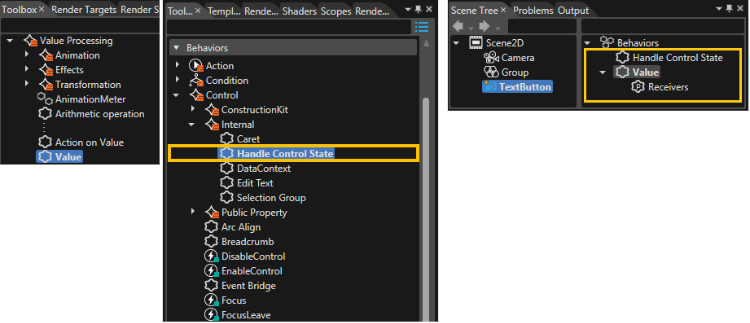
</div></div></div>3\. Drag&amp;drop a <span style="color: rgb(230, 126, 35);">[Value](https://doc316en.candera.eu/link/647#bkmrk-value)</span> Behavior (which is a <span style="color: rgb(230, 126, 35);">[Value Processing Behavior](https://doc316en.candera.eu/link/647#bkmrk-page-title)</span>) and a <span style="color: rgb(230, 126, 35);">[Handle Control State](https://doc316en.candera.eu/link/598#bkmrk-handle-control-state)</span> Behavior (which is a <span style="color: rgb(230, 126, 35);">[Control - Internal Behavior](https://doc316en.candera.eu/link/598#bkmrk-internal-control-beh)</span>) from the Behaviors Panel of the ToolBox onto the TextButton Control in the SceneTree. The <span style="color: rgb(230, 126, 35);">[Handle Control State](https://doc316en.candera.eu/link/598#bkmrk-handle-control-state)</span> Behavior is needed in order for the TextButton Control to receive Input Events.

<div class="contents" id="bkmrk--107"><div class="contents"><div class="textblock"><div drawio-diagram="2464"><img src="https://doc316en.candera.eu/uploads/images/drawio/2023-02/drawing-7-1677223783.png" alt=""/></div>

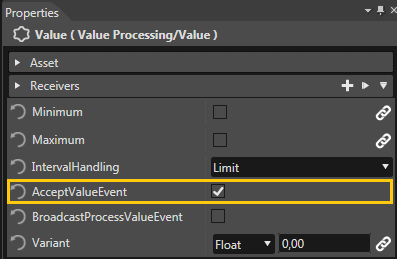
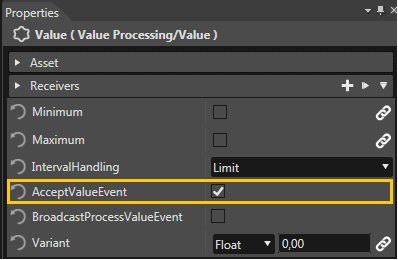
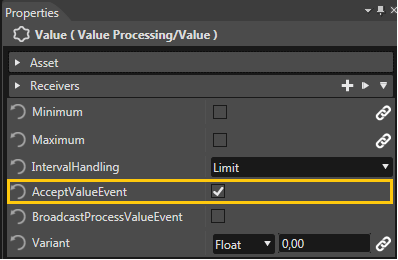
</div></div></div>4\. Select the <span style="color: rgb(230, 126, 35);">[Value](https://doc316en.candera.eu/link/647#bkmrk-value)</span> Behavior on the right of the Scene Tree View and set the <span style="color: rgb(230, 126, 35);">[Value](https://doc316en.candera.eu/link/647#bkmrk-value)</span> Behavior's AcceptValueEvent Property to "true" by checking the checkbox.

<div class="contents" id="bkmrk--108"><div class="contents"><div class="textblock"><div drawio-diagram="2465"><img src="https://doc316en.candera.eu/uploads/images/drawio/2023-02/drawing-7-1677223801.png" alt=""/></div>

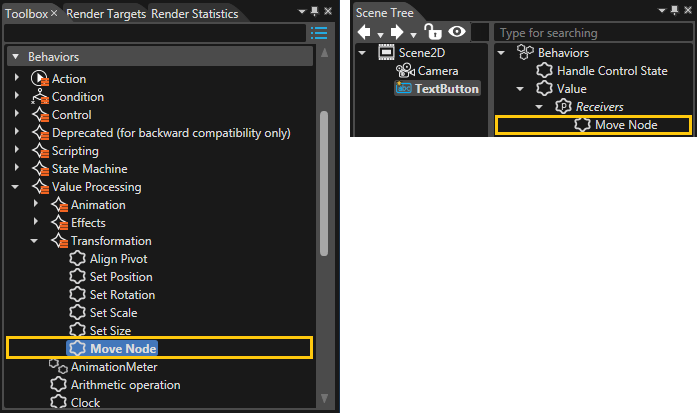
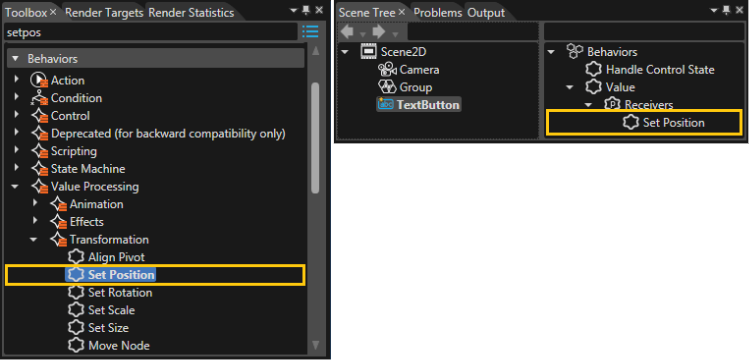
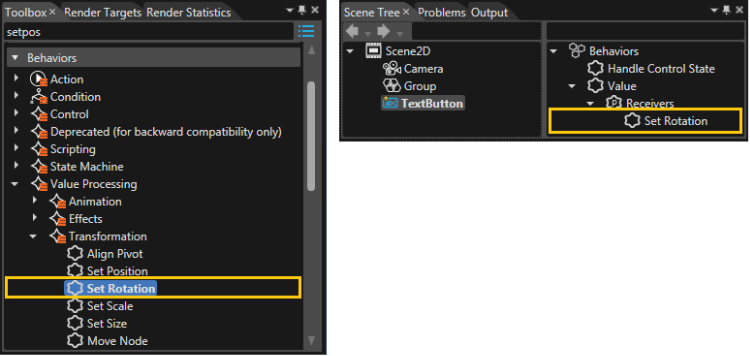
</div></div></div>5\. Drag&amp;drop the <span style="color: rgb(230, 126, 35);">[Move Node](https://doc316en.candera.eu/link/647#bkmrk-move-node)</span> Behavior (which is a <span style="color: rgb(230, 126, 35);">[Value Processing - Transformation Behavior](https://doc316en.candera.eu/link/647#bkmrk-transformation-value)</span>) from the Behaviors Panel of the ToolBox onto the <span style="color: rgb(230, 126, 35);">[Value](https://doc316en.candera.eu/link/647#bkmrk-value)</span> Behavior's Receivers.

<div class="contents" id="bkmrk--109"><div class="contents"><div class="textblock"><div drawio-diagram="2466"><img src="https://doc316en.candera.eu/uploads/images/drawio/2023-02/drawing-7-1677223828.png" alt=""/></div>

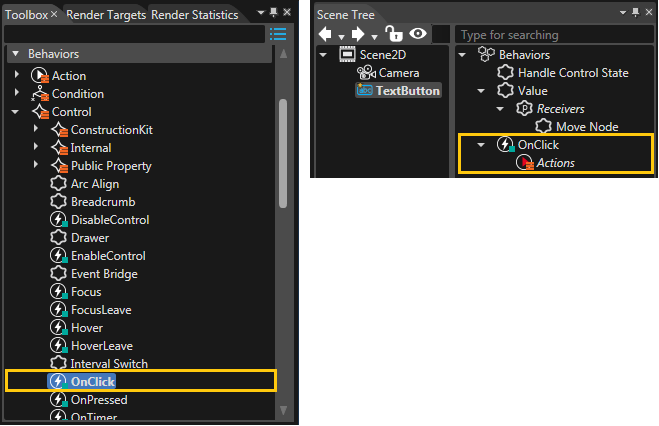
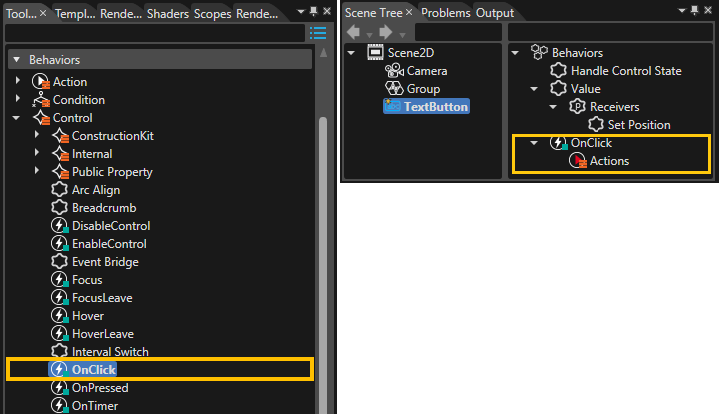
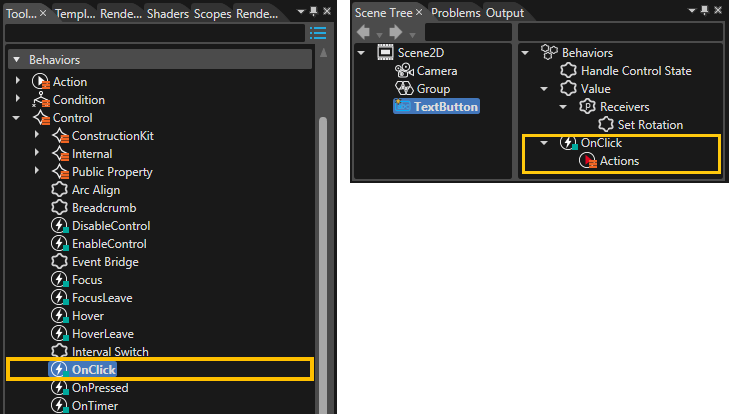
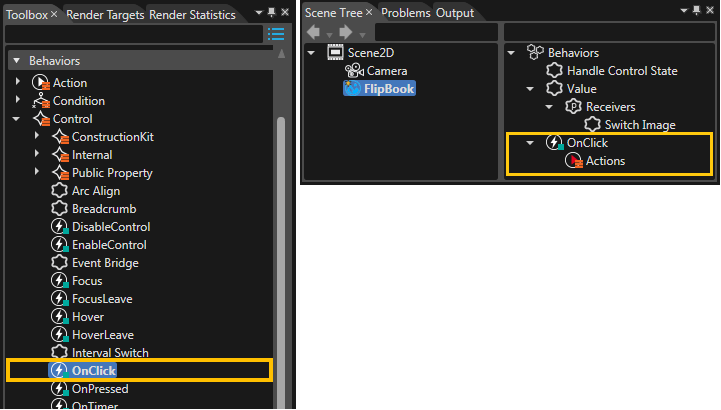
</div></div></div>6\. Drag&amp;drop an <span style="color: rgb(230, 126, 35);">[OnClick](https://doc316en.candera.eu/link/598#bkmrk-onclick)</span> Behavior (which is a <span style="color: rgb(230, 126, 35);">[Control Behavior](https://doc316en.candera.eu/link/598#bkmrk-page-title)</span>) from the Behaviors Panel of the ToolBox onto the TextButton Control.

<div class="contents" id="bkmrk--110"><div class="contents"><div class="textblock"><div drawio-diagram="2467"><img src="https://doc316en.candera.eu/uploads/images/drawio/2023-02/drawing-7-1677223850.png" alt=""/></div>

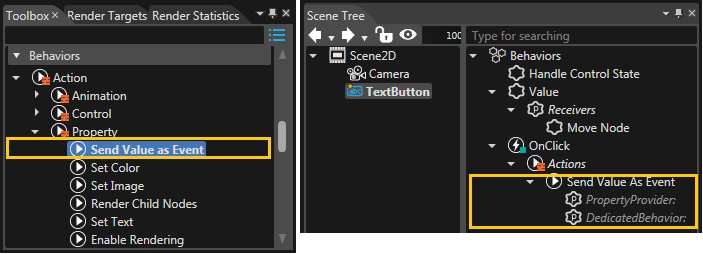
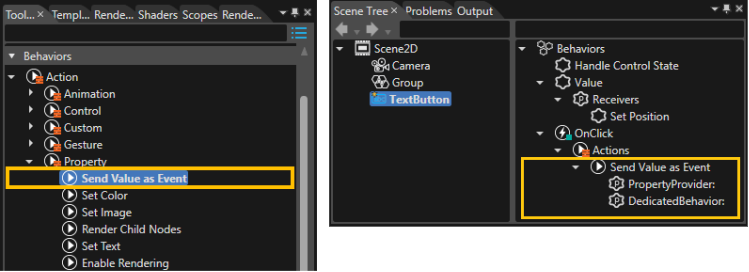
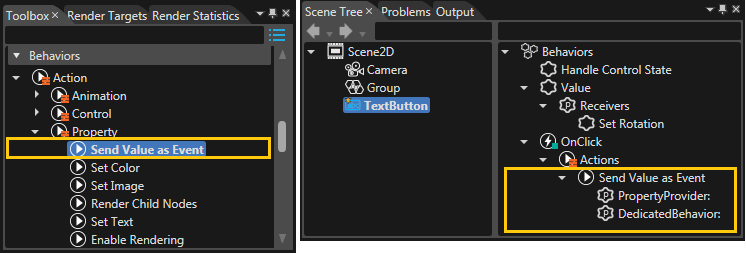
</div></div></div>7\. Drag&amp;drop a <span style="color: rgb(230, 126, 35);">[Send Value as Event](https://doc316en.candera.eu/link/582#bkmrk-send-value-as-event)</span> Behavior (which is a <span style="color: rgb(230, 126, 35);">[Action - Property Behavior](https://doc316en.candera.eu/link/582#bkmrk-property-action-beha)</span>) from the Behaviors Panel of the ToolBox onto the <span style="color: rgb(230, 126, 35);">[OnClick](https://doc316en.candera.eu/link/598#bkmrk-onclick)</span> Behavior's Actions Property.

<div class="contents" id="bkmrk--111"><div class="contents"><div class="textblock"><div drawio-diagram="2468"><img src="https://doc316en.candera.eu/uploads/images/drawio/2023-02/drawing-7-1677223875.png" alt=""/></div>

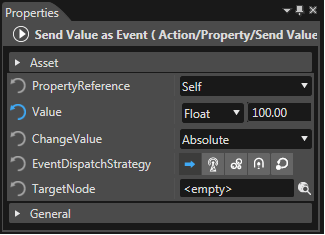
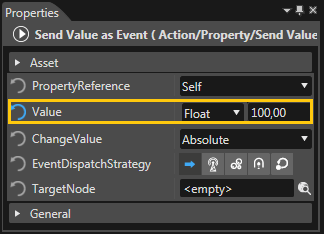
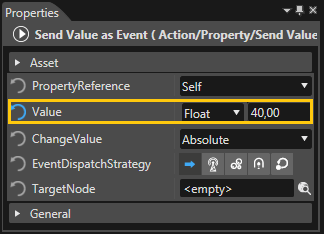
</div></div></div>8\. Select the <span style="color: rgb(230, 126, 35);">[Send Value as Event](https://doc316en.candera.eu/link/582#bkmrk-send-value-as-event)</span> Behavior on the right side of the Scene Tree View and set the value to datatype "Float" value "100,00" in the Properties view.

<div class="contents" id="bkmrk--112"><div class="contents"><div class="textblock"><div drawio-diagram="2469"><img src="https://doc316en.candera.eu/uploads/images/drawio/2023-02/drawing-7-1677223899.png" alt=""/></div>

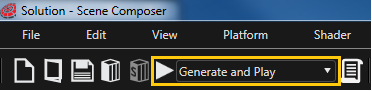
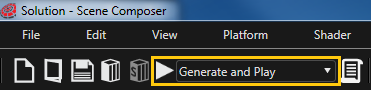
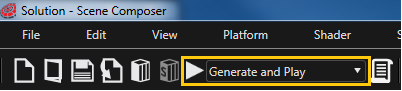
</div></div></div>9\. Save your solution and start the Player through the Play button (with the option "Generate and Play") in the Toolbar on the top to see the result.

<div class="contents" id="bkmrk--113"><div class="contents"><div class="textblock"><div drawio-diagram="2470"><img src="https://doc316en.candera.eu/uploads/images/drawio/2023-02/drawing-7-1677223911.png" alt=""/></div>

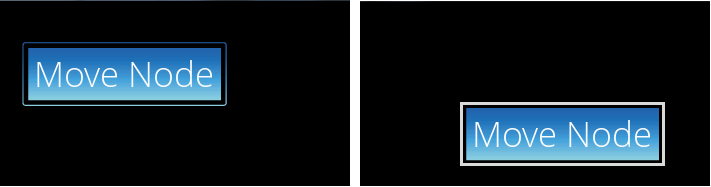
</div></div></div>10\. When Clicking on the TextButton in the Player, the Button moves to position 50, 50.

<div class="contents" id="bkmrk--114"><div class="contents"><div class="textblock"><div drawio-diagram="2471"><img src="https://doc316en.candera.eu/uploads/images/drawio/2023-02/drawing-7-1677223936.png" alt=""/></div>

</div>---

</div></div>#### OnClick Example

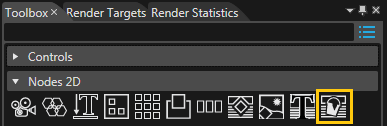
1\. Drag&amp;drop a SolidColorNode from the "Nodes 2D" Panel of the Toolbox to the SceneEditor or the Scene Tree.

<div class="contents" id="bkmrk--116"><div class="contents"><div class="contents" id="bkmrk--117"><div class="contents"><div class="textblock"><div drawio-diagram="2507"><img src="https://doc316en.candera.eu/uploads/images/drawio/2023-02/drawing-7-1677228014.png" alt=""/></div>

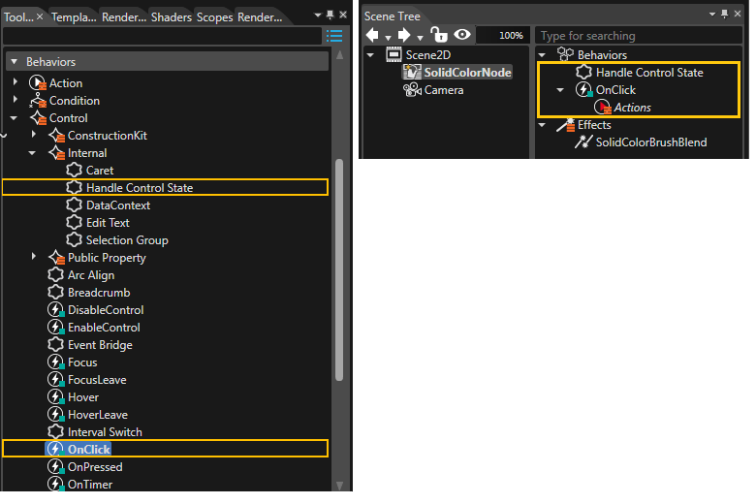
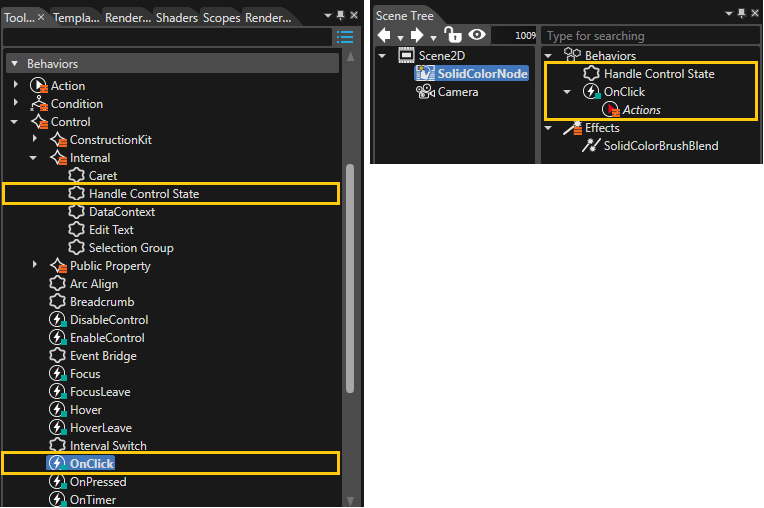
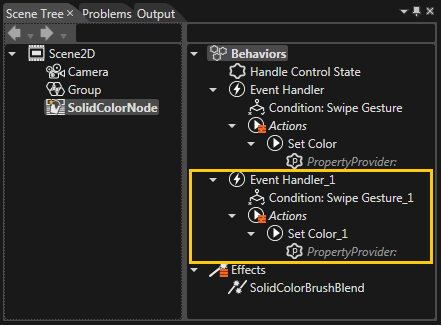
</div></div></div></div></div>2\. Drag&amp;drop a <span style="color: rgb(230, 126, 35);">[OnClick](https://doc316en.candera.eu/link/598#bkmrk-onclick)</span> Behavior (which is a <span style="color: rgb(230, 126, 35);">[Control Behavior](https://doc316en.candera.eu/link/598#bkmrk-page-title)</span>) and a <span style="color: rgb(230, 126, 35);">[Handle Control State](https://doc316en.candera.eu/link/598#bkmrk-handle-control-state)</span> Behavior (which is a <span style="color: rgb(230, 126, 35);">[Control - Internal Behavior](https://doc316en.candera.eu/link/598#bkmrk-internal-control-beh)</span>) from the Behaviors Panel of the ToolBox onto the SolidColorNode in the SceneTree. The <span style="color: rgb(230, 126, 35);">[Handle Control State](https://doc316en.candera.eu/link/598#bkmrk-handle-control-state)</span> Behavior is needed in order for the TextButton Control to receive Input Events.

<div class="contents" id="bkmrk--118"><div class="contents"><div class="contents" id="bkmrk--119"><div class="contents"><div class="textblock"><div drawio-diagram="2510"><img src="https://doc316en.candera.eu/uploads/images/drawio/2023-02/drawing-7-1677228098.png" alt=""/></div>

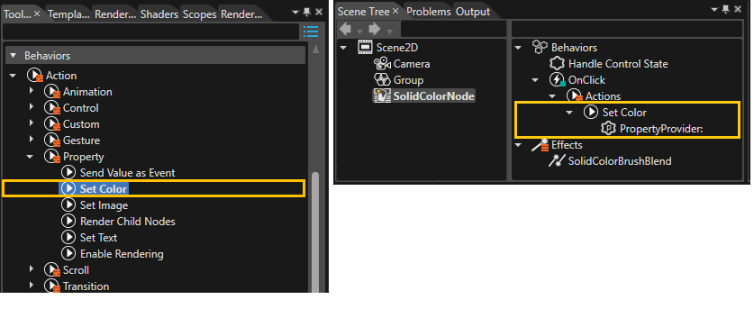
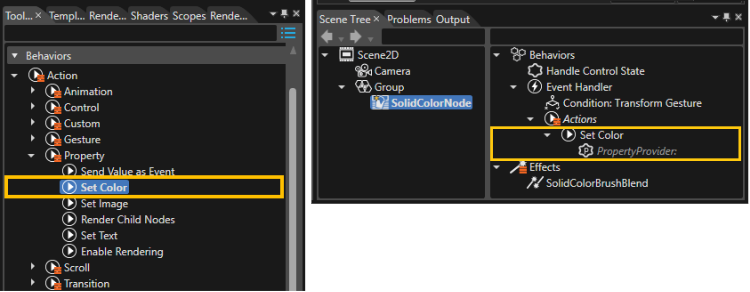
</div></div></div></div></div>3\. Drag&amp;drop a <span style="color: rgb(230, 126, 35);">[Set Color](https://doc316en.candera.eu/link/582#bkmrk-set-color)</span> SetColor Behavior (which is a <span style="color: rgb(230, 126, 35);">[Action - Property Behavior](https://doc316en.candera.eu/link/582#bkmrk-property-action-beha)</span>) from the Toolbox view onto the Actions of the <span style="color: rgb(230, 126, 35);">[OnClick](https://doc316en.candera.eu/link/598#bkmrk-onclick)</span> Behaviors in the SceneTree.

<div class="contents" id="bkmrk--120"><div class="contents"><div class="contents" id="bkmrk--121"><div class="contents"><div class="textblock"><div drawio-diagram="2509"><img src="https://doc316en.candera.eu/uploads/images/drawio/2023-02/drawing-7-1677228070.png" alt=""/></div>

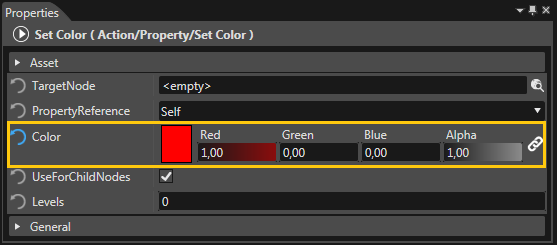
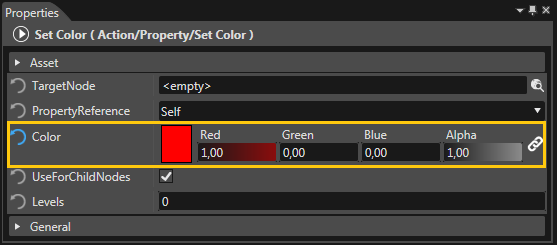
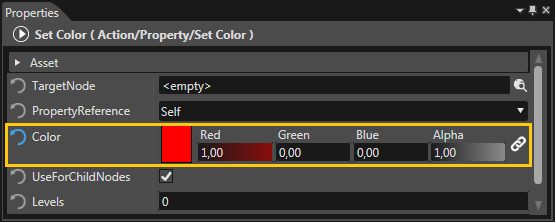
</div></div></div></div></div>4\. Select the <span style="color: rgb(230, 126, 35);">[Set Color](https://doc316en.candera.eu/link/582#bkmrk-set-color)</span> Behavior and change the Color to red.

<div class="contents" id="bkmrk--122"><div class="contents"><div class="contents" id="bkmrk--123"><div class="contents"><div class="textblock"><div drawio-diagram="2511"><img src="https://doc316en.candera.eu/uploads/images/drawio/2023-02/drawing-7-1677228106.png" alt=""/></div>

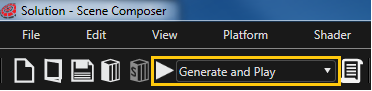
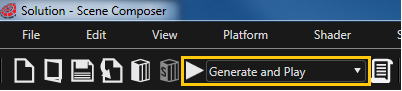
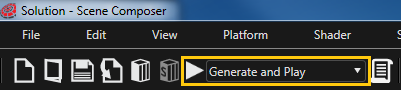
</div></div></div></div></div>5\. Save your solution and start the Player through the Play button (with the option "Generate and Play") in the Toolbar on the top to see the result.

<div class="contents" id="bkmrk--124"><div class="contents"><div class="contents" id="bkmrk--125"><div class="contents"><div class="textblock"><div drawio-diagram="2512"><img src="https://doc316en.candera.eu/uploads/images/drawio/2023-02/drawing-7-1677228115.png" alt=""/></div>

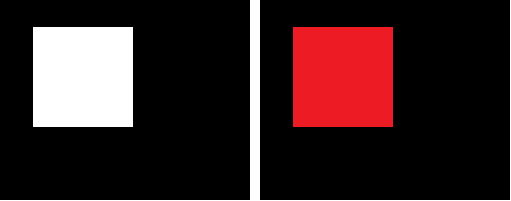
</div></div></div></div></div>6\. When clicking on the SolidColorNode, the SolidColorNode's color changes to red.

<div class="contents" id="bkmrk--126"><div class="contents"><div class="contents" id="bkmrk--127"><div class="contents"><div class="textblock"><div drawio-diagram="2513"><img src="https://doc316en.candera.eu/uploads/images/drawio/2023-02/drawing-7-1677228134.png" alt=""/></div>

</div></div></div></div></div>
#### <span style="vertical-align: inherit;"><span style="vertical-align: inherit;">OnPressed Example</span></span>

1\. Drag&amp;drop a SolidColorNode from the "Nodes 2D" Panel of the Toolbox to the SceneEditor or the Scene Tree.

<div class="contents" id="bkmrk--128"><div class="contents"><div class="textblock"><div drawio-diagram="2515"><img src="https://doc316en.candera.eu/uploads/images/drawio/2023-02/drawing-7-1677228338.png" alt=""/></div>

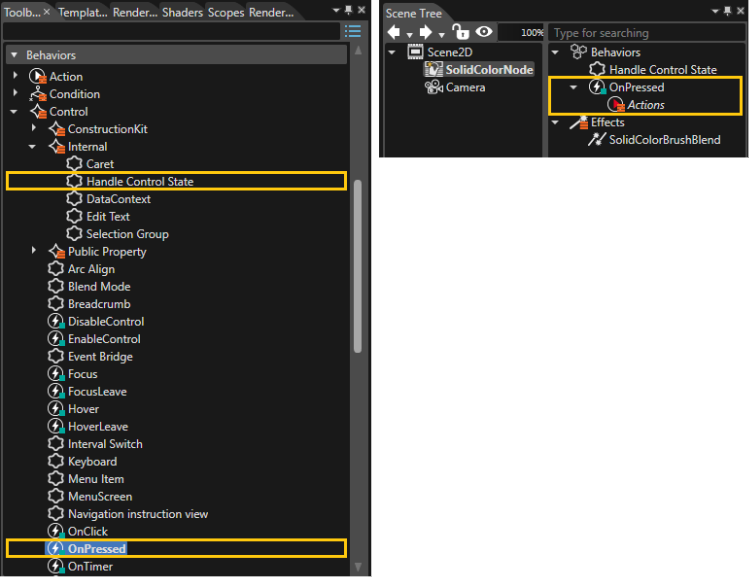
</div></div></div>2\. Drag&amp;drop a <span style="color: rgb(230, 126, 35);">[OnPressed](https://doc316en.candera.eu/link/598#bkmrk-onpressed)</span> Behavior (which is a <span style="color: rgb(230, 126, 35);">[Control Behavior](https://doc316en.candera.eu/link/598#bkmrk-page-title)</span>) and a <span style="color: rgb(230, 126, 35);">[Handle Control State](https://doc316en.candera.eu/link/598#bkmrk-handle-control-state)</span> Behavior (which is a <span style="color: rgb(230, 126, 35);">[Control - Internal Behavior](https://doc316en.candera.eu/link/598#bkmrk-internal-control-beh)</span>) from the Behaviors Panel of the ToolBox onto the SolidColorNode in the SceneTree. The <span style="color: rgb(230, 126, 35);">[Handle Control State](https://doc316en.candera.eu/link/598#bkmrk-handle-control-state)</span> Behavior is needed in order for the TextButton Control to receive Input Events.

<div class="contents" id="bkmrk--129"><div class="contents"><div class="textblock"><div drawio-diagram="2516"><img src="https://doc316en.candera.eu/uploads/images/drawio/2023-02/drawing-7-1677228366.png" alt=""/></div>

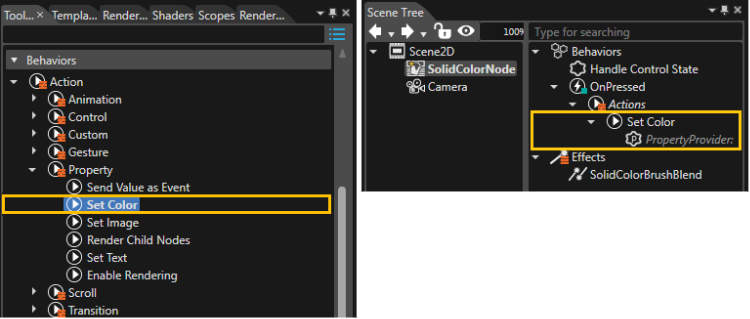
</div></div></div>3\. Drag&amp;drop a <span style="color: rgb(230, 126, 35);">[Set Color](https://doc316en.candera.eu/link/582#bkmrk-set-color)</span> SetColor Behavior (which is a <span style="color: rgb(230, 126, 35);">[Action - Property Behavior](https://doc316en.candera.eu/link/582#bkmrk-property-action-beha)</span>) from the Toolbox view onto the Actions of the <span style="color: rgb(230, 126, 35);">[OnPressed](https://doc316en.candera.eu/link/598#bkmrk-onpressed)</span> Behaviors in the SceneTree.

<div class="contents" id="bkmrk--130"><div class="contents"><div class="textblock"><div drawio-diagram="2518"><img src="https://doc316en.candera.eu/uploads/images/drawio/2023-02/drawing-7-1677228409.png" alt=""/></div>

</div></div></div>4\. Select the <span style="color: rgb(230, 126, 35);">[Set Color](https://doc316en.candera.eu/link/582#bkmrk-set-color)</span> Behavior and change the Color to red.

<div class="contents" id="bkmrk--131"><div class="contents"><div class="textblock"><div drawio-diagram="2519"><img src="https://doc316en.candera.eu/uploads/images/drawio/2023-02/drawing-7-1677228439.png" alt=""/></div>

</div></div></div>5\. Save your solution and start the CGIPlayer through the Play button (with the option "Generate and Play") in the Toolbar on the top to see the result.

<div class="contents" id="bkmrk--132"><div class="contents"><div class="textblock"><div drawio-diagram="2520"><img src="https://doc316en.candera.eu/uploads/images/drawio/2023-02/drawing-7-1677228460.png" alt=""/></div>

</div></div></div>6\. When pressing the mouse left button on the SolidColorNode, the SolidColorNode's color changes to red.

<div class="contents" id="bkmrk--133"><div class="contents"><div class="textblock"><div drawio-diagram="2522"><img src="https://doc316en.candera.eu/uploads/images/drawio/2023-02/drawing-7-1677228477.png" alt=""/></div>

</div></div></div>
#### Perform Transition Requests Example

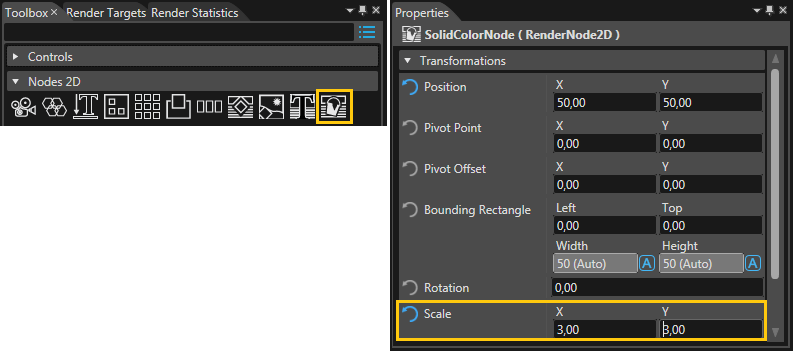
1\. Drag&amp;drop a SolidColorNode from the "Nodes 2D" Panel of the Toolbox to the 2D scene "Scene2D" in the SceneEditor or the Scene Tree view. Change the Scale X and Scale Y propertes to 3,0 each in the Properties view.

<div class="contents" id="bkmrk--134"><div class="contents"><div class="textblock"><div drawio-diagram="2530"><img src="https://doc316en.candera.eu/uploads/images/drawio/2023-02/drawing-7-1677460607.png" alt=""/></div>

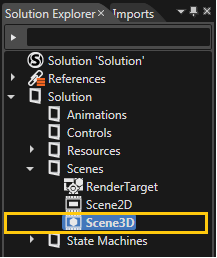
</div></div></div>2\. Open the already existing 3D scene "Scene3D" by double-clicking it in the Solution Explorer on the left.

<div class="contents" id="bkmrk--135"><div class="contents"><div class="textblock"><div drawio-diagram="2531"><img src="https://doc316en.candera.eu/uploads/images/drawio/2023-02/drawing-7-1677460624.png" alt=""/></div>

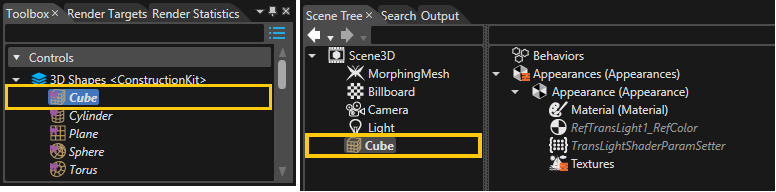
</div></div></div>3\. Drag&amp;drop a Cube Control from the Controls Panel of the Toolbox to the 3D Scene "Scene3D" in SceneEditor or the Scene Tree view.

<div class="contents" id="bkmrk--136"><div class="contents"><div class="textblock"><div drawio-diagram="2532"><img src="https://doc316en.candera.eu/uploads/images/drawio/2023-02/drawing-7-1677460648.png" alt=""/></div>

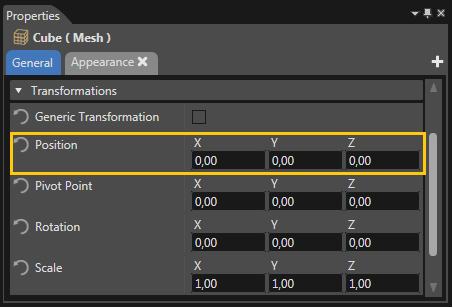
</div></div></div>4\. Select the Cube Control in the Scene Tree view and set the Position properties to (0, 0, 0).

<div class="contents" id="bkmrk--137"><div class="contents"><div class="textblock"><div drawio-diagram="2533"><img src="https://doc316en.candera.eu/uploads/images/drawio/2023-02/drawing-7-1677460668.png" alt=""/></div>

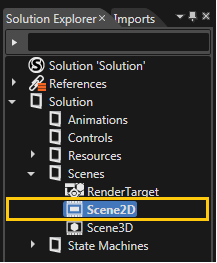
</div></div></div>5\. Switch back to the 2D scene "Scene2D" by double-clicking it in the Solution Explorer on the left.

<div class="contents" id="bkmrk--138"><div class="contents"><div class="textblock"><div drawio-diagram="2534"><img src="https://doc316en.candera.eu/uploads/images/drawio/2023-02/drawing-7-1677460682.png" alt=""/></div>

</div></div></div>6\. Drag&amp;drop a <span style="color: rgb(230, 126, 35);">[OnClick](https://doc316en.candera.eu/link/598#bkmrk-onclick)</span> Behavior (which is a <span style="color: rgb(230, 126, 35);">[Control Behavior](https://doc316en.candera.eu/link/598#bkmrk-page-title)</span>) and a <span style="color: rgb(230, 126, 35);">[Handle Control State](https://doc316en.candera.eu/link/598#bkmrk-handle-control-state)</span> Behavior (which is a <span style="color: rgb(230, 126, 35);">[Control - Internal Behavior](https://doc316en.candera.eu/link/598#bkmrk-internal-control-beh)</span>) from the Behaviors Panel of the ToolBox onto the SolidColorNode in the SceneTree. The <span style="color: rgb(230, 126, 35);">[Handle Control State](https://doc316en.candera.eu/link/598#bkmrk-handle-control-state)</span> Behavior is needed in order for the TextButton Control to receive Input Events.

<div class="contents" id="bkmrk--139"><div class="contents"><div class="textblock"><div drawio-diagram="2535"><img src="https://doc316en.candera.eu/uploads/images/drawio/2023-02/drawing-7-1677460707.png" alt=""/></div>

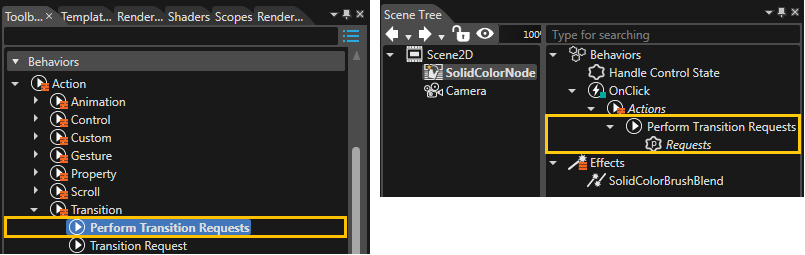
</div></div></div>7\. Drag&amp;drop a <span style="color: rgb(230, 126, 35);">[Perform Transition Requests](https://doc316en.candera.eu/link/582#bkmrk-perform-transition-r-0)</span> Perform Transition Requests Behavior (which is a <span style="color: rgb(230, 126, 35);">[Action - Transition Behavior](https://doc316en.candera.eu/link/582#bkmrk-transition-action-be)</span>) from the Toolbox view onto the Actions of the <span style="color: rgb(230, 126, 35);">[OnClick](https://doc316en.candera.eu/link/598#bkmrk-onclick)</span> Behaviors in right side of the SceneTree view.

<div class="contents" id="bkmrk--140"><div class="contents"><div class="textblock"><div drawio-diagram="2536"><img src="https://doc316en.candera.eu/uploads/images/drawio/2023-02/drawing-7-1677460734.png" alt=""/></div>

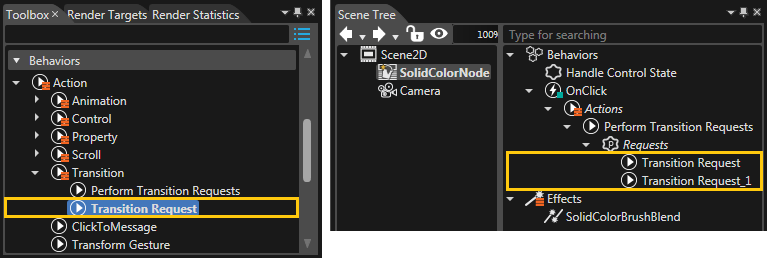
</div></div></div>8\. Drag&amp;drop two <span style="color: rgb(230, 126, 35);">[Transition Request](https://doc316en.candera.eu/link/582#bkmrk-transition-request-0)</span> Transition Request Behaviors (which are <span style="color: rgb(230, 126, 35);">[Action - Transition Behaviors](https://doc316en.candera.eu/link/582#bkmrk-transition-action-be)</span>) from the Toolbox view onto the Requests of the <span style="color: rgb(230, 126, 35);">[Perform Transition Requests](https://doc316en.candera.eu/link/582#bkmrk-perform-transition-r-0)</span> Perform Transition Requests Behavior in the right side of the SceneTree view.

<div class="contents" id="bkmrk--141"><div class="contents"><div class="textblock"><div drawio-diagram="2537"><img src="https://doc316en.candera.eu/uploads/images/drawio/2023-02/drawing-7-1677460756.png" alt=""/></div>

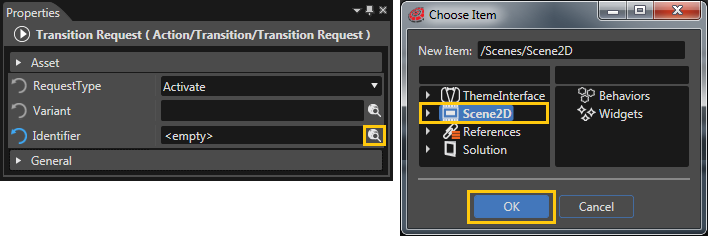
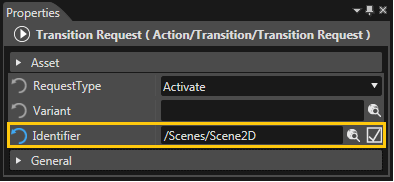
</div></div></div>9\. Select the first one of the two <span style="color: rgb(230, 126, 35);">[Transition Request](https://doc316en.candera.eu/link/582#bkmrk-transition-request-0)</span> Transition Request Behaviors. Set the <span style="color: rgb(230, 126, 35);">[Transition Request](https://doc316en.candera.eu/link/582#bkmrk-transition-request-0)</span> Transition Request Behavior's Identifier to the current scene (Scene2D) by clicking on the magnifying glass on the right of the input field and selecting the current 2D Scene (Scene2D) in the "Choose Item" dialog.

<div class="contents" id="bkmrk--142"><div class="contents"><div class="textblock"><div drawio-diagram="2538"><img src="https://doc316en.candera.eu/uploads/images/drawio/2023-02/drawing-7-1677460782.png" alt=""/></div>

</div></div></div>After that, the <span style="color: rgb(230, 126, 35);">[Transition Request](https://doc316en.candera.eu/link/582#bkmrk-transition-request-0)</span> Transition Request Behavior's Properties will look as follows.

<div class="contents" id="bkmrk--143"><div class="contents"><div class="textblock"><div drawio-diagram="2539"><img src="https://doc316en.candera.eu/uploads/images/drawio/2023-02/drawing-7-1677460805.png" alt=""/></div>

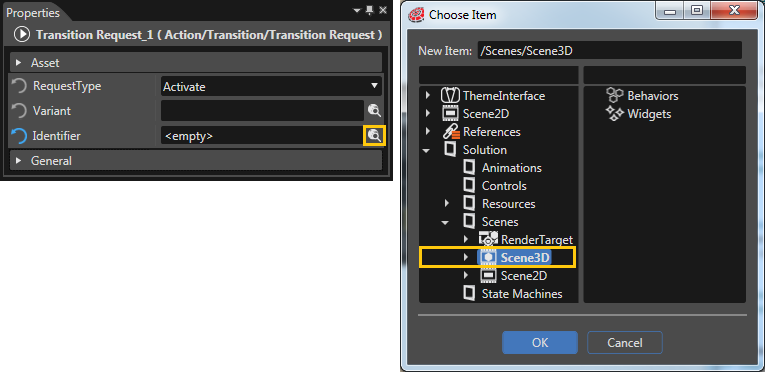
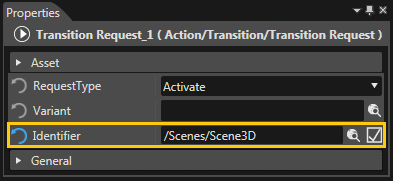
</div></div></div>10\. Now, select the second <span style="color: rgb(230, 126, 35);">[Transition Request](https://doc316en.candera.eu/link/582#bkmrk-transition-request-0)</span> Transition Request Behaviors. Set the <span style="color: rgb(230, 126, 35);">[Transition Request](https://doc316en.candera.eu/link/582#bkmrk-transition-request-0)</span> Transition Request Behavior's Identifier to the 3D scene (Scene3D) by clicking on the magnifying glass on the right of the input field and selecting the 3D Scene (Scene3D) in the "Choose Item" dialog.

<div class="contents" id="bkmrk--144"><div class="contents"><div class="textblock"><div drawio-diagram="2540"><img src="https://doc316en.candera.eu/uploads/images/drawio/2023-02/drawing-7-1677460836.png" alt=""/></div>

</div></div></div>After that, the <span style="color: rgb(230, 126, 35);">[Transition Request](https://doc316en.candera.eu/link/582#bkmrk-transition-request-0)</span> Transition Request Behavior's Properties will look as follows.

<div class="contents" id="bkmrk--145"><div class="contents"><div class="textblock"><div drawio-diagram="2541"><img src="https://doc316en.candera.eu/uploads/images/drawio/2023-02/drawing-7-1677460854.png" alt=""/></div>

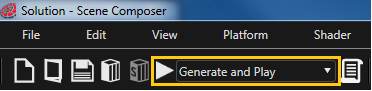
</div></div></div>11\. Save your solution and start the Player through the Play button (with the option "Generate and Play") in the Toolbar on the top to see the result.

<div class="contents" id="bkmrk--146"><div class="contents"><div class="textblock"><div drawio-diagram="2542"><img src="https://doc316en.candera.eu/uploads/images/drawio/2023-02/drawing-7-1677460867.png" alt=""/></div>

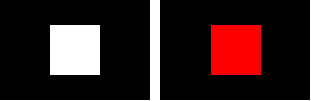
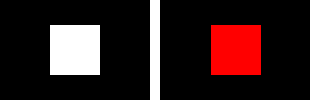
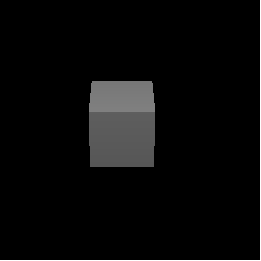
</div></div></div>12\. You can see your 2D scene with the white SolidColorNode. When clicking on the SolidColorNode, a transition to the 3D scene is performed.

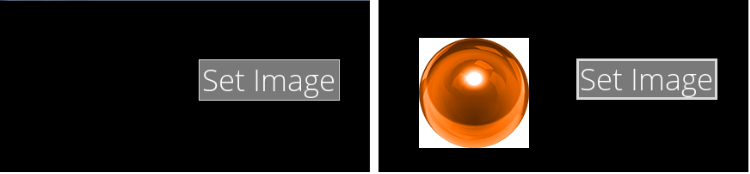
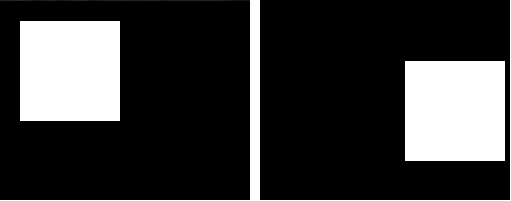
<div class="contents" id="bkmrk-initially-displaying"><div class="contents"><div class="contents"><div class="textblock"><table border="0"><tbody><tr><td valign="top"><div class="image"><div drawio-diagram="2543"><img src="https://doc316en.candera.eu/uploads/images/drawio/2023-02/drawing-7-1677460901.png" alt=""/></div>

</div></td><td valign="top"><div class="image"><div drawio-diagram="2544"><img src="https://doc316en.candera.eu/uploads/images/drawio/2023-02/drawing-7-1677460916.png" alt=""/></div>

</div></td></tr><tr><td align="center">*Initially displaying Scene2D*</td><td align="center">*After Clicking, displaying Scene3D*</td></tr></tbody></table>

</div></div></div></div>
#### Render Child Nodes Example

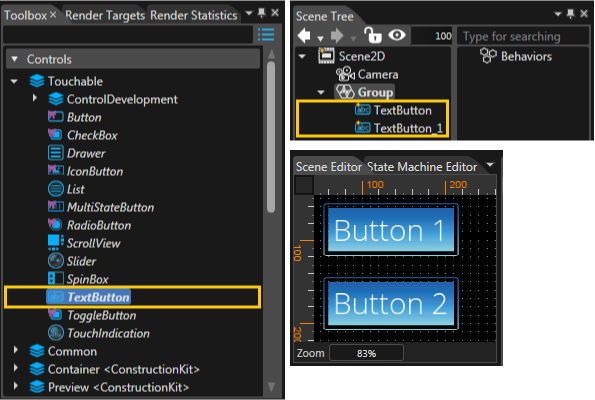
1\. Drag&amp;drop two TextButton Controls from the Controls Panel of the Toolbox to the already existing Group Node of the Scene Tree and change their texts to "Button 1" and "Button 2".

<div class="contents" id="bkmrk--147"><div class="contents"><div class="contents"><div class="contents" id="bkmrk--148"><div class="contents"><div class="textblock"><div drawio-diagram="2545"><img src="https://doc316en.candera.eu/uploads/images/drawio/2023-02/drawing-7-1677461065.png" alt=""/></div>

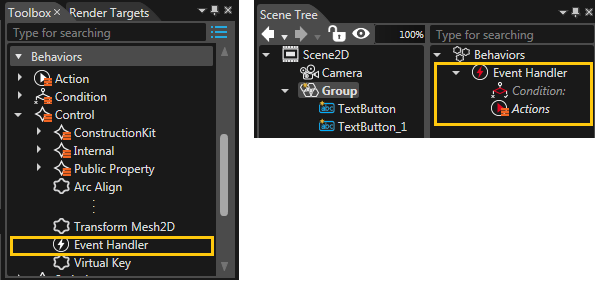
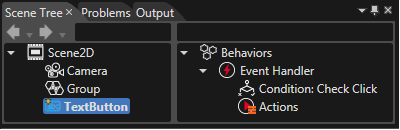
</div></div></div></div></div></div>2\. Drag&amp;drop an <span style="color: rgb(230, 126, 35);">[Event Handler](https://doc316en.candera.eu/link/598#bkmrk-event-handler)</span> Behavior (which is a <span style="color: rgb(230, 126, 35);">[Control Behavior](https://doc316en.candera.eu/link/598#bkmrk-page-title)</span>) from the Toolbox view onto the Group Node in the Scene Tree view.

<div class="contents" id="bkmrk--149"><div class="contents"><div class="contents"><div class="contents" id="bkmrk--150"><div class="contents"><div class="textblock"><div drawio-diagram="2546"><img src="https://doc316en.candera.eu/uploads/images/drawio/2023-02/drawing-7-1677461099.png" alt=""/></div>

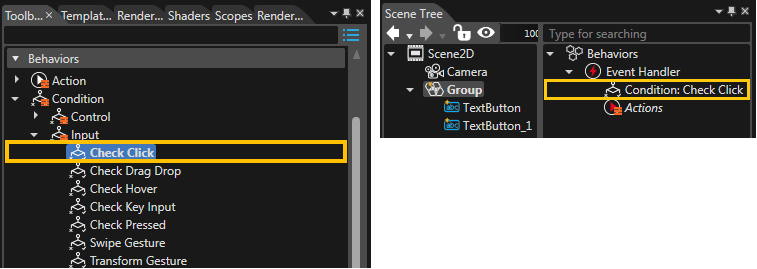
</div></div></div></div></div></div>3\. Select the Group Node in the Scene Tree view and drag&amp;drop a <span style="color: rgb(230, 126, 35);">[Check Click](https://doc316en.candera.eu/link/597#bkmrk-check-click)</span> Behavior (which is a <span style="color: rgb(230, 126, 35);">[Condition - Input Behavior](https://doc316en.candera.eu/link/597#bkmrk-%C2%A0-1)</span>) from the Toolbox view onto the Condition of the Group Node's EventHandler in the right side of the Scene Tree view.

<div class="contents" id="bkmrk--151"><div class="contents"><div class="contents"><div class="contents" id="bkmrk--152"><div class="contents"><div class="textblock"><div drawio-diagram="2547"><img src="https://doc316en.candera.eu/uploads/images/drawio/2023-02/drawing-7-1677461124.png" alt=""/></div>

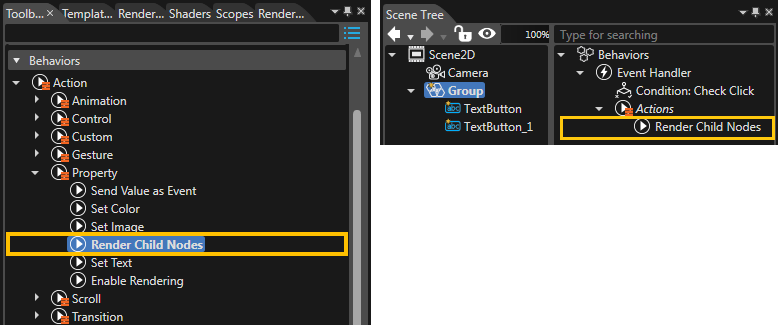
</div></div></div></div></div></div>4\. Keep the Group Node selected in the Scene Tree view and drag&amp;drop a <span style="color: rgb(230, 126, 35);">[Render Child Nodes](https://doc316en.candera.eu/link/647#bkmrk-render-child-nodes)</span> Behavior (which is a <span style="color: rgb(230, 126, 35);">[Action - Property](https://doc316en.candera.eu/link/582#bkmrk-property-action-beha)</span> Behavior) from the Toolbox view onto the "Actions" of the Group Node's EventHandler on the right side of the Scene Tree view.

<div class="contents" id="bkmrk--153"><div class="contents"><div class="contents"><div class="contents" id="bkmrk--154"><div class="contents"><div class="textblock"><div drawio-diagram="2548"><img src="https://doc316en.candera.eu/uploads/images/drawio/2023-02/drawing-7-1677461147.png" alt=""/></div>

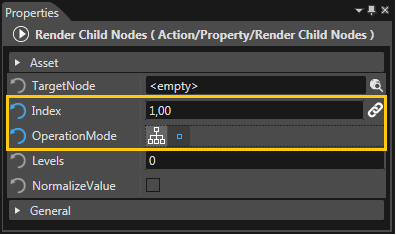
</div></div></div></div></div></div>5\. Select the "Render Child Nodes" Behavior in the right side of the Scene Tree view. In the Properties view set Index to "1,0" and OperationMode to to "SingleNode".

<div class="contents" id="bkmrk--155"><div class="contents"><div class="contents"><div class="contents" id="bkmrk--156"><div class="contents"><div class="textblock"><div drawio-diagram="2549"><img src="https://doc316en.candera.eu/uploads/images/drawio/2023-02/drawing-7-1677461167.png" alt=""/></div>

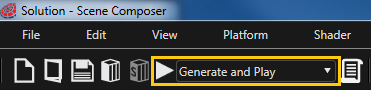
</div></div></div></div></div></div>6\. Save your solution and start the Player through the Play button (with the option "Generate and Play") in the Toolbar on the top to see the result.

<div class="contents" id="bkmrk--157"><div class="contents"><div class="contents"><div class="contents" id="bkmrk--158"><div class="contents"><div class="textblock"><div drawio-diagram="2550"><img src="https://doc316en.candera.eu/uploads/images/drawio/2023-02/drawing-7-1677461178.png" alt=""/></div>

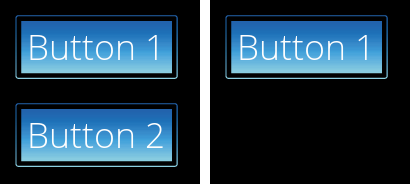
</div></div></div></div></div></div>7\. After clicking on one of the two buttons (no matter which one), "Button 2" will disappear and "Button 1" will get rendered.

<div class="contents" id="bkmrk--159"><div class="contents"><div class="contents"><div class="contents" id="bkmrk--160"><div class="contents"><div class="textblock"><div drawio-diagram="2551"><img src="https://doc316en.candera.eu/uploads/images/drawio/2023-02/drawing-7-1677461200.png" alt=""/></div>

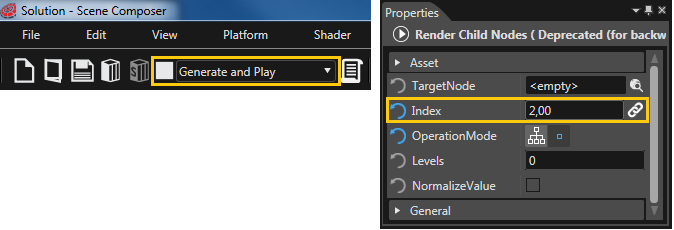
</div></div></div></div></div></div>8\. Stop the Player by pressing on the Stop Button (next to the option "Generate and Play") and change the "Render Child Nodes" Behavior's Property: Set Index to "2,0".

<div class="contents" id="bkmrk--161"><div class="contents"><div class="contents"><div class="contents" id="bkmrk--162"><div class="contents"><div class="textblock"><div drawio-diagram="2552"><img src="https://doc316en.candera.eu/uploads/images/drawio/2023-02/drawing-7-1677461219.png" alt=""/></div>

</div></div></div></div></div></div>9\. Save your solution and start the Player through the Play button (with the option "Generate and Play") in the Toolbar on the top to see the result.

<div class="contents" id="bkmrk--163"><div class="contents"><div class="contents"><div class="contents" id="bkmrk--164"><div class="contents"><div class="textblock"><div drawio-diagram="2553"><img src="https://doc316en.candera.eu/uploads/images/drawio/2023-02/drawing-7-1677461245.png" alt=""/></div>

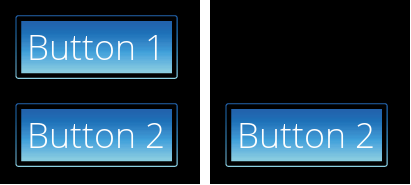
</div></div></div></div></div></div>10\. After clicking on one of the two buttons (no matter which one), "Button 1" will disappear and "Button 2" will get rendered.

<div class="contents" id="bkmrk--165"><div class="contents"><div class="contents"><div class="contents" id="bkmrk--166"><div class="contents"><div class="textblock"><div drawio-diagram="2555"><img src="https://doc316en.candera.eu/uploads/images/drawio/2023-02/drawing-7-1677461271.png" alt=""/></div>

</div></div></div></div></div></div>#### <span style="vertical-align: inherit;"><span style="vertical-align: inherit;">Send Value As Event Example</span>  
</span>

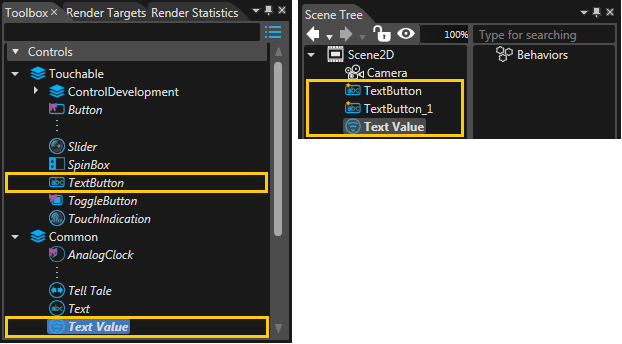
<div class="contents" id="bkmrk-1.-drag%26drop-two-tex-1"><div class="contents"><div class="contents"><div class="header" id="bkmrk-1.-drag%26drop-two-tex-2"><div class="header"><div class="headertitle"><div class="title">1. Drag&amp;drop two TextButton Controls and a TextValue Control from the Controls Panel of the Toolbox to the Scene Editor or Scene Tree.  
</div></div></div></div><div class="header" id="bkmrk--167"><div class="header"><div class="headertitle"><div class="title"><div class="contents"><div class="contents"><div class="textblock"><div drawio-diagram="2559"><img src="https://doc316en.candera.eu/uploads/images/drawio/2023-02/drawing-7-1677461437.png" alt=""/></div>

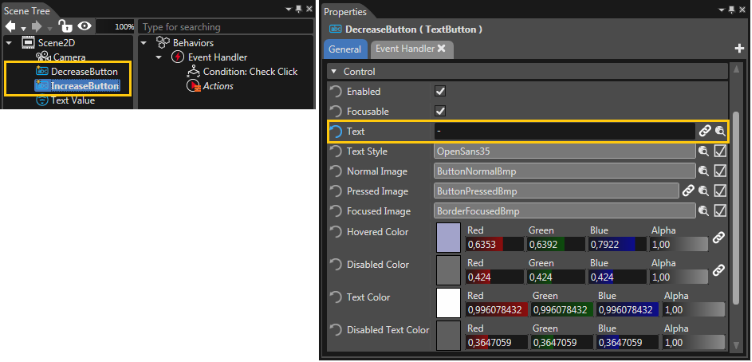
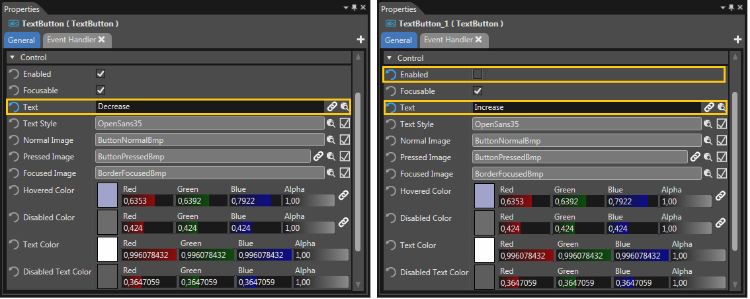
</div></div></div></div></div></div></div></div></div></div>2\. Rename the TextButton Controls to "DecreaseButton" and "IncreaseButton". Change the text of the DecreaseButton to "-" and the text of the IncreaseButton to "+".

<div class="contents" id="bkmrk--168"><div class="contents"><div class="contents"><div class="header" id="bkmrk--169"><div class="header"><div class="headertitle"><div class="title"><div class="contents"><div class="contents"><div class="textblock"><div drawio-diagram="2564"><img src="https://doc316en.candera.eu/uploads/images/drawio/2023-02/drawing-7-1677461590.png" alt=""/></div>

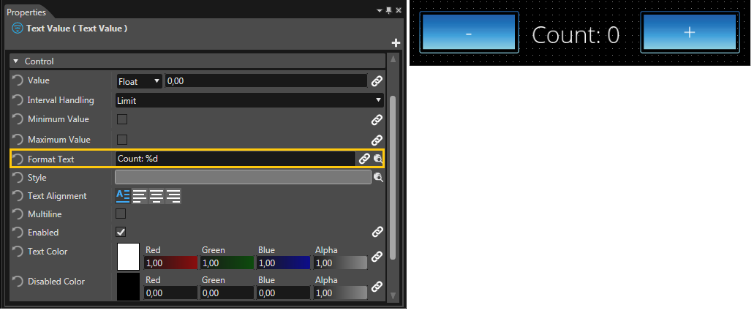
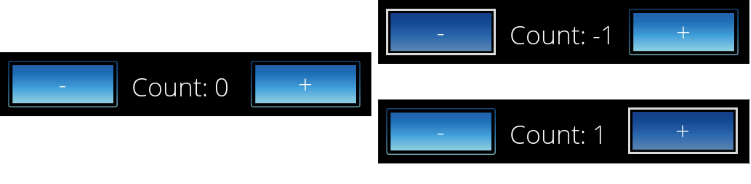
</div></div></div></div></div></div></div></div></div></div>3\. Change the Text of the TextValue Control to "Count: %d" and arrange the three Controls as in the right picture below.

<div class="contents" id="bkmrk--170"><div class="contents"><div class="contents"><div class="header" id="bkmrk--171"><div class="header"><div class="headertitle"><div class="title"><div class="contents"><div class="contents"><div class="textblock"><div drawio-diagram="2565"><img src="https://doc316en.candera.eu/uploads/images/drawio/2023-02/drawing-7-1677461636.png" alt=""/></div>

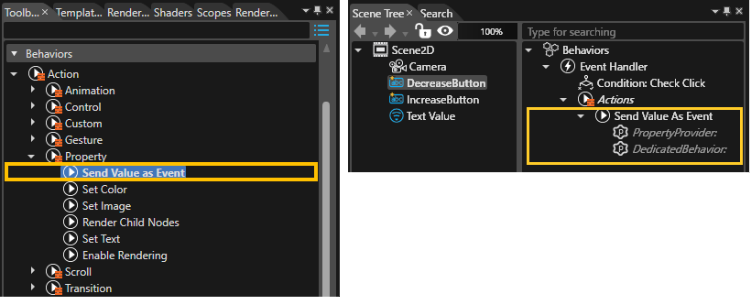
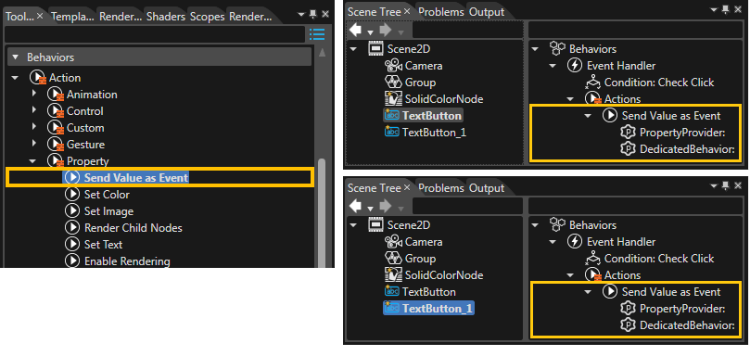
</div></div></div></div></div></div></div></div></div></div>4\. The value of the TextValue Control should be increased or decreased according to the pressed Button. To connect the TextButton Controls with the TextValue Control select one of the TextButtons. Drag&amp;drop a <span style="color: rgb(230, 126, 35);">[Send Value as Event](https://doc316en.candera.eu/link/582#bkmrk-send-value-as-event)</span> Behavior (which is a <span style="color: rgb(230, 126, 35);">[Action - Property Behavior](https://doc316en.candera.eu/link/582#bkmrk-property-action-beha)</span>) onto the Actions sections of both of the TextButton Controls' EventHandler.

<div class="contents" id="bkmrk--172"><div class="contents"><div class="contents"><div class="header" id="bkmrk--173"><div class="header"><div class="headertitle"><div class="title"><div class="contents"><div class="contents"><div class="textblock"><div drawio-diagram="2566"><img src="https://doc316en.candera.eu/uploads/images/drawio/2023-02/drawing-7-1677461678.png" alt=""/></div>

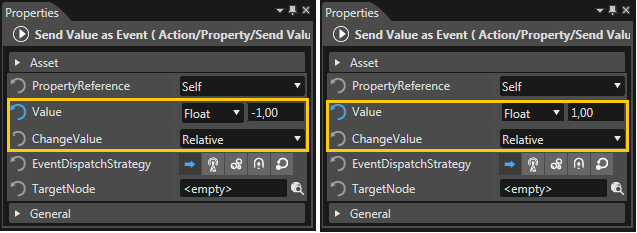
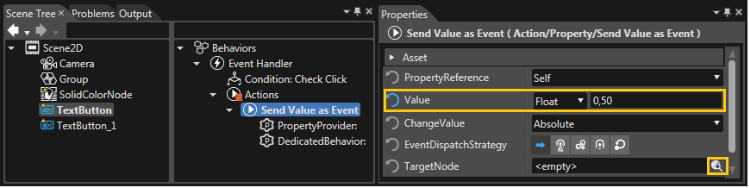
</div></div></div></div></div></div></div></div></div></div>5\. Select the "SendValueAsEvent" Behavior of the "DecreaseButton" and change the Value to "-1,00" in the Properties view. As the value should change relative to the current value, the "ChangeValue" property has to be set to "Relative". Select the "SendValueAsEvent" Behavior of the "IncreaseButton" and change the Value to "1,00" in the Properties view. Again, the "ChangeValue" property has to be set to "Relative"

<div class="contents" id="bkmrk--174"><div class="contents"><div class="contents"><div class="header" id="bkmrk--175"><div class="header"><div class="headertitle"><div class="title"><div class="contents"><div class="contents"><div class="textblock"><div drawio-diagram="2567"><img src="https://doc316en.candera.eu/uploads/images/drawio/2023-02/drawing-7-1677461711.png" alt=""/></div>

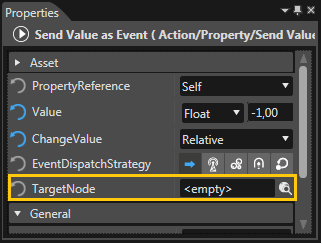
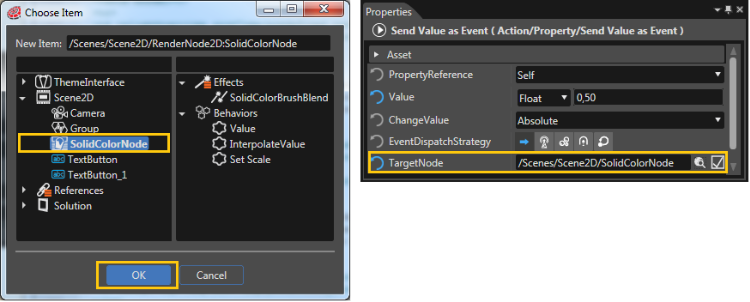
</div></div></div></div></div></div></div></div></div></div>6\. Both "SendValueAsEvent" Behaviors need to be configured with the "Text Value" Control as TargetNode by clicking on the magnifying glass on the right of the property.

<div class="contents" id="bkmrk--176"><div class="contents"><div class="contents"><div class="header" id="bkmrk--177"><div class="header"><div class="headertitle"><div class="title"><div class="contents"><div class="contents"><div class="textblock"><div drawio-diagram="2568"><img src="https://doc316en.candera.eu/uploads/images/drawio/2023-02/drawing-7-1677461727.png" alt=""/></div>

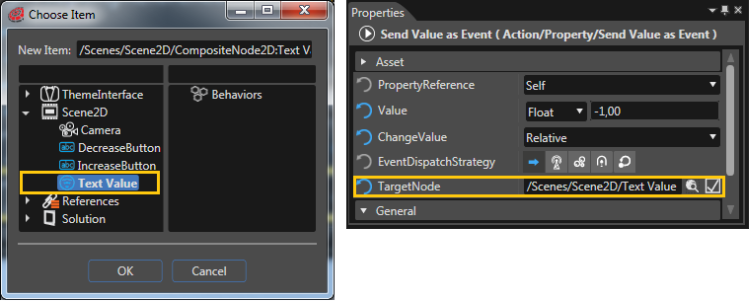
</div></div></div></div></div></div></div></div></div></div>7\. Set the scene's TextValue Node as TargetNode for the <span style="color: rgb(230, 126, 35);">[Send Value as Event](https://doc316en.candera.eu/link/582#bkmrk-send-value-as-event)</span> Behavior: After clicking the magnifying glass in the properties panel, the "Select Item" Dialog is opened. Select the scene's TextValue Node and press OK. Repeat this for the second "SendValueAsEvent" Behavior.

<div class="contents" id="bkmrk--178"><div class="contents"><div class="contents"><div class="header" id="bkmrk--179"><div class="header"><div class="headertitle"><div class="title"><div class="contents"><div class="contents"><div class="textblock"><div drawio-diagram="2569"><img src="https://doc316en.candera.eu/uploads/images/drawio/2023-02/drawing-7-1677461761.png" alt=""/></div>

</div></div></div></div></div></div></div></div></div></div>8\. Save your solution and start the Player through the Play button (with the option "Generate and Play") in the Toolbar on the top to see the result.

<div class="contents" id="bkmrk--180"><div class="contents"><div class="contents"><div class="header" id="bkmrk--181"><div class="header"><div class="headertitle"><div class="title"><div class="contents"><div class="contents"><div class="textblock"><div drawio-diagram="2570"><img src="https://doc316en.candera.eu/uploads/images/drawio/2023-02/drawing-7-1677461780.png" alt=""/></div>

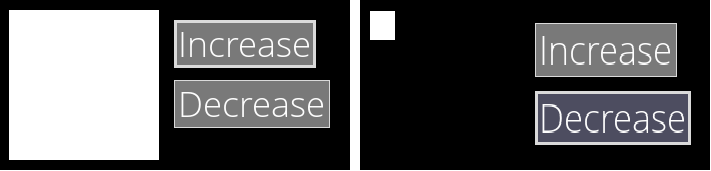
</div></div></div></div></div></div></div></div></div></div>9\. When pressing the "-" Button, the Count value is decreased by one. When pressing the "+" Button, the Count value is increased by one.

<div class="contents" id="bkmrk--182"><div class="contents"><div class="contents"><div class="header"><div class="header"><div class="headertitle"><div class="title"><div class="contents"><div class="textblock"><div drawio-diagram="2571"><img src="https://doc316en.candera.eu/uploads/images/drawio/2023-02/drawing-7-1677461844.png" alt=""/></div>

</div></div></div></div></div></div></div></div></div>
#### <span style="vertical-align: inherit;"><span style="vertical-align: inherit;">Set Alpha Value Example</span></span>

1\. Drag&amp;drop a TextButton Control from the Controls Panel of the Toolbox to the SceneEditor or the Scene Tree and change the Text to "Set Alpha Value"

<div class="contents" id="bkmrk--183"><div class="contents"><div class="contents"><div class="header"><div class="header"><div class="contents" id="bkmrk--184"><div class="contents"><div class="textblock"><div drawio-diagram="2577"><img src="https://doc316en.candera.eu/uploads/images/drawio/2023-02/drawing-7-1677462561.png" alt=""/></div>

</div></div></div></div></div></div></div></div>2\. Select the TextButton in the Scene Tree View and delete all Behaviors that are automatically attached to the TextButton from the right side of the Scene Tree View.

<div class="contents" id="bkmrk-before-deleting-all-"><div class="contents"><div class="contents"><div class="header"><div class="header"><div class="contents" id="bkmrk-before-deleting-all--1"><div class="contents"><div class="textblock"><table border="0"><tbody><tr><td valign="top"><div class="image"><div drawio-diagram="2578"><img src="https://doc316en.candera.eu/uploads/images/drawio/2023-02/drawing-7-1677462609.png" alt=""/></div>

</div></td><td valign="top"><div class="image"><div drawio-diagram="2579"><img src="https://doc316en.candera.eu/uploads/images/drawio/2023-02/drawing-7-1677462633.png" alt=""/></div>

</div></td></tr><tr><td align="center">*before deleting all behaviors*</td><td align="center">*after deleting behaviors*</td></tr></tbody></table>

</div></div></div></div></div></div></div></div>3\. Select the TextButton Control in the SceneTree View and decrease its Alpha Value e.g. to 0,5 in the Item Tab of the Properties Panel.

<div class="contents" id="bkmrk--185"><div class="contents"><div class="contents"><div class="header"><div class="header"><div class="contents" id="bkmrk--186"><div class="contents"><div class="textblock"><div drawio-diagram="2580"><img src="https://doc316en.candera.eu/uploads/images/drawio/2023-02/drawing-7-1677462646.png" alt=""/></div>

</div></div></div></div></div></div></div></div>4\. Drag&amp;drop a <span style="color: rgb(230, 126, 35);">[Value](https://doc316en.candera.eu/link/647#bkmrk-value)</span> Behavior (which is a <span style="color: rgb(230, 126, 35);">[Value Processing Behavior](https://doc316en.candera.eu/link/647#bkmrk-page-title)</span>) and a <span style="color: rgb(230, 126, 35);">[Handle Control State](https://doc316en.candera.eu/link/598#bkmrk-handle-control-state)</span> Behavior (which is a <span style="color: rgb(230, 126, 35);">[Control - Internal Behavior](https://doc316en.candera.eu/link/598#bkmrk-internal-control-beh)</span>) from the Behaviors Panel of the ToolBox onto the TextButton Control in the SceneTree. The [<span style="color: rgb(230, 126, 35);">Handle Control State</span>](https://doc316en.candera.eu/link/598#bkmrk-handle-control-state) Behavior is needed in order for the TextButton Control to receive Input Events.

<div class="contents" id="bkmrk--187"><div class="contents"><div class="contents"><div class="header"><div class="header"><div class="contents" id="bkmrk--188"><div class="contents"><div class="textblock"><div drawio-diagram="2582"><img src="https://doc316en.candera.eu/uploads/images/drawio/2023-02/drawing-7-1677462713.png" alt=""/></div>

</div></div></div></div></div></div></div></div>5\. Select the <span style="color: rgb(230, 126, 35);">[Value](https://doc316en.candera.eu/link/647#bkmrk-value)</span> Behavior on the right of the Scene Tree View and set the <span style="color: rgb(230, 126, 35);">[Value](https://doc316en.candera.eu/link/647#bkmrk-value)</span> Behavior's AcceptValueEvent Property to "true" by checking the checkbox.

<div class="contents" id="bkmrk--189"><div class="contents"><div class="contents"><div class="header"><div class="header"><div class="contents" id="bkmrk--190"><div class="contents"><div class="textblock"><div drawio-diagram="2583"><img src="https://doc316en.candera.eu/uploads/images/drawio/2023-02/drawing-7-1677462728.png" alt=""/></div>

</div></div></div></div></div></div></div></div>6\. Drag&amp;drop the <span style="color: rgb(230, 126, 35);">[Set Alpha Value](https://doc316en.candera.eu/link/647#bkmrk-set-alpha-value)</span> Behavior (which is a <span style="color: rgb(230, 126, 35);">[Value Processing - Effects Behavior](https://doc316en.candera.eu/link/647#bkmrk-effects-value-proces)</span>) from the Behaviors Panel of the ToolBox onto the <span style="color: rgb(230, 126, 35);">[Value](https://doc316en.candera.eu/link/647#bkmrk-value)</span> Behavior's Receivers.

<div class="contents" id="bkmrk--191"><div class="contents"><div class="contents"><div class="header"><div class="header"><div class="contents" id="bkmrk--192"><div class="contents"><div class="textblock"><div drawio-diagram="2584"><img src="https://doc316en.candera.eu/uploads/images/drawio/2023-02/drawing-7-1677462757.png" alt=""/></div>

</div></div></div></div></div></div></div></div>7\. Drag&amp;drop an <span style="color: rgb(230, 126, 35);">[OnClick](https://doc316en.candera.eu/link/598#bkmrk-onclick)</span> Behavior (which is a <span style="color: rgb(230, 126, 35);">[Control Behavior](https://doc316en.candera.eu/link/598#bkmrk-page-title)</span>) from the Behaviors Panel of the ToolBox onto the TextButton Control.

<div class="contents" id="bkmrk--193"><div class="contents"><div class="contents"><div class="header"><div class="header"><div class="contents" id="bkmrk--194"><div class="contents"><div class="textblock"><div drawio-diagram="2586"><img src="https://doc316en.candera.eu/uploads/images/drawio/2023-02/drawing-7-1677462788.png" alt=""/></div>

</div></div></div></div></div></div></div></div>8\. Drag&amp;drop a <span style="color: rgb(230, 126, 35);">[Send Value as Event](https://doc316en.candera.eu/link/582#bkmrk-send-value-as-event)</span> Behavior (which is a <span style="color: rgb(230, 126, 35);">[Action - Property Behavior](https://doc316en.candera.eu/link/582#bkmrk-property-action-beha)</span>) from the Behaviors Panel of the ToolBox onto the [OnClick](https://doc316en.candera.eu/link/598#bkmrk-onclick) Behavior's Actions Property.

<div class="contents" id="bkmrk--195"><div class="contents"><div class="contents"><div class="header"><div class="header"><div class="contents" id="bkmrk--196"><div class="contents"><div class="textblock"><div drawio-diagram="2590"><img src="https://doc316en.candera.eu/uploads/images/drawio/2023-02/drawing-7-1677462835.png" alt=""/></div>

</div></div></div></div></div></div></div></div>9\. Select the <span style="color: rgb(230, 126, 35);">[Send Value as Event](https://doc316en.candera.eu/link/582#bkmrk-send-value-as-event)</span> Behavior on the right side of the Scene Tree View and set the value to datatype "Float" value "1,00" in the Properties view.

<div class="contents" id="bkmrk--197"><div class="contents"><div class="contents"><div class="header"><div class="header"><div class="contents" id="bkmrk--198"><div class="contents"><div class="textblock"><div drawio-diagram="2591"><img src="https://doc316en.candera.eu/uploads/images/drawio/2023-02/drawing-7-1677462851.png" alt=""/></div>

</div></div></div></div></div></div></div></div>10\. Save your solution and start the Player through the Play button (with the option "Generate and Play") in the Toolbar on the top to see the result.

<div class="contents" id="bkmrk--199"><div class="contents"><div class="contents"><div class="header"><div class="header"><div class="contents" id="bkmrk--200"><div class="contents"><div class="textblock"><div drawio-diagram="2592"><img src="https://doc316en.candera.eu/uploads/images/drawio/2023-02/drawing-7-1677462862.png" alt=""/></div>

</div></div></div></div></div></div></div></div>11\. When Clicking on the TextButton in the Player, the Button moves to position 50, 50.

<div class="contents" id="bkmrk--201"><div class="contents"><div class="contents"><div class="header"><div class="header"><div class="contents" id="bkmrk--202"><div class="contents"><div class="textblock"><div drawio-diagram="2593"><img src="https://doc316en.candera.eu/uploads/images/drawio/2023-02/drawing-7-1677462890.png" alt=""/></div>

</div></div></div></div></div></div></div></div>
#### Set Image Example

1\. Drag&amp;drop a TextButton Control from the Controls Panel and a BitmapNode from the "Nodes 2D" Panel of the Toolbox to the SceneEditor or the Scene Tree.

<div class="contents" id="bkmrk--203"><div class="contents"><div class="contents"><div class="header"><div class="header"><div class="contents" id="bkmrk--204"><div class="contents"><div class="textblock"><div drawio-diagram="2594"><img src="https://doc316en.candera.eu/uploads/images/drawio/2023-02/drawing-7-1677463007.png" alt=""/></div>

</div></div></div></div></div></div></div></div>2\. Position the TextButton Control and the BitmapNode next to each other in the Scene Editor.

<div class="contents" id="bkmrk--205"><div class="contents"><div class="contents"><div class="header"><div class="header"><div class="contents" id="bkmrk--206"><div class="contents"><div class="textblock"><div drawio-diagram="2595"><img src="https://doc316en.candera.eu/uploads/images/drawio/2023-02/drawing-7-1677463025.png" alt=""/></div>

</div></div></div></div></div></div></div></div>3\. Drag&amp;Drop a <span style="color: rgb(230, 126, 35);">[Provide Image](https://doc316en.candera.eu/link/598#bkmrk-provide-image)</span> Behavior (which is a <span style="color: rgb(230, 126, 35);">[Control - Public Property Behavior](https://doc316en.candera.eu/link/598#bkmrk-public-property-cont)</span>) from the Behaviors Panel of the ToolBox onto the BitmapNode in the Scene Tree view.

<div class="contents" id="bkmrk--207"><div class="contents"><div class="contents"><div class="header"><div class="header"><div class="contents" id="bkmrk--208"><div class="contents"><div class="textblock"><div drawio-diagram="2596"><img src="https://doc316en.candera.eu/uploads/images/drawio/2023-02/drawing-7-1677463058.png" alt=""/></div>

</div></div></div></div></div></div></div></div>4\. Select the TextButton Control in the Scene Tree view and change its Text to "Set Image" in the Properties view.

<div class="contents" id="bkmrk--209"><div class="contents"><div class="contents"><div class="header"><div class="header"><div class="contents" id="bkmrk--210"><div class="contents"><div class="textblock"><div drawio-diagram="2597"><img src="https://doc316en.candera.eu/uploads/images/drawio/2023-02/drawing-7-1677463073.png" alt=""/></div>

</div></div></div></div></div></div></div></div>5\. Drag&amp;Drop a <span style="color: rgb(230, 126, 35);">[Set Image](https://doc316en.candera.eu/link/582#bkmrk-set-image)</span> Behavior (which is a <span style="color: rgb(230, 126, 35);">[Action - Property Behavior](https://doc316en.candera.eu/link/582#bkmrk-property-action-beha)</span>) from the Behaviors Panel of the ToolBox onto the "Actions" field of the TextButton Control's EventHandler on the right side of the Scene Tree.

<div class="contents" id="bkmrk--211"><div class="contents"><div class="contents"><div class="header"><div class="header"><div class="contents" id="bkmrk--212"><div class="contents"><div class="textblock"><div drawio-diagram="2598"><img src="https://doc316en.candera.eu/uploads/images/drawio/2023-02/drawing-7-1677463107.png" alt=""/></div>

</div></div></div></div></div></div></div></div>6\. Select the newly added <span style="color: rgb(230, 126, 35);">[Set Image](https://doc316en.candera.eu/link/582#bkmrk-set-image)</span> Behavior in right side of the Scene Tree view. Adjust the "Set Image" Behavior's Image Property by clicking the magnifying glass on the right of the input field.

<div class="contents" id="bkmrk--213"><div class="contents"><div class="contents"><div class="header"><div class="header"><div class="contents" id="bkmrk--214"><div class="contents"><div class="textblock"><div drawio-diagram="2599"><img src="https://doc316en.candera.eu/uploads/images/drawio/2023-02/drawing-7-1677463121.png" alt=""/></div>

</div></div></div></div></div></div></div></div>7\. Set the "Set Image" Behavior's image property: After clicking the magnifying glass in the properties panel, the "Select Item" Dialog is opened. Select an image from the construction kit (a preview of the image is shown when moving the mouse over the image) and press OK.

<div class="contents" id="bkmrk--215"><div class="contents"><div class="contents"><div class="header"><div class="header"><div class="contents" id="bkmrk--216"><div class="contents"><div class="textblock"><div drawio-diagram="2600"><img src="https://doc316en.candera.eu/uploads/images/drawio/2023-02/drawing-7-1677463153.png" alt=""/></div>

</div></div></div></div></div></div></div></div>8\. Select the <span style="color: rgb(230, 126, 35);">[Set Image](https://doc316en.candera.eu/link/582#bkmrk-set-image)</span> Behavior on the right side of the Scene Tree view and drag&amp;drop it onto the BitmapNode on the left side of the Scene Tree view (you can see a little arrow and "Set Image").

<div class="contents" id="bkmrk--217"><div class="contents"><div class="contents"><div class="header"><div class="header"><div class="contents" id="bkmrk--218"><div class="contents"><div class="textblock"><div drawio-diagram="2601"><img src="https://doc316en.candera.eu/uploads/images/drawio/2023-02/drawing-7-1677463173.png" alt=""/></div>

</div></div></div></div></div></div></div></div>9\. Save your solution and start the Player through the Play button (with the option "Generate and Play") in the Toolbar on the top to see the result.

<div class="contents" id="bkmrk--219"><div class="contents"><div class="contents"><div class="header"><div class="header"><div class="contents" id="bkmrk--220"><div class="contents"><div class="textblock"><div drawio-diagram="2602"><img src="https://doc316en.candera.eu/uploads/images/drawio/2023-02/drawing-7-1677463182.png" alt=""/></div>

</div></div></div></div></div></div></div></div>10\. When the TextButton is pressed, the configured image will be set to the BitmapNode and the image will appear.

<div class="contents" id="bkmrk--221"><div class="contents"><div class="contents"><div class="header"><div class="header"><div class="contents"><div class="contents"><div class="textblock"><div drawio-diagram="2603"><img src="https://doc316en.candera.eu/uploads/images/drawio/2023-02/drawing-7-1677463219.png" alt=""/></div>

</div></div></div></div></div></div></div></div>
#### Set Position Example

1\. Drag&amp;drop a TextButton Control from the Controls Panel of the Toolbox to the SceneEditor or the Scene Tree and change the Text to "Change Position".

<div class="contents" id="bkmrk--222"><div class="contents"><div class="contents"><div class="header"><div class="header"><div class="contents"><div class="contents" id="bkmrk--223"><div class="contents"><div class="textblock"><div drawio-diagram="2604"><img src="https://doc316en.candera.eu/uploads/images/drawio/2023-02/drawing-7-1677463851.png" alt=""/></div>

</div></div></div></div></div></div></div></div></div>2\. Select the TextButton in the Scene Tree View and delete all Behaviors that are automatically attached to the TextButton from the right side of the Scene Tree View.

<div class="contents" id="bkmrk-before-deleting-all--2"><div class="contents"><div class="contents"><div class="header"><div class="header"><div class="contents"><div class="contents" id="bkmrk-before-deleting-all--0"><div class="contents"><div class="textblock"><table border="0"><tbody><tr><td valign="top"><div class="image"><div drawio-diagram="2605"><img src="https://doc316en.candera.eu/uploads/images/drawio/2023-02/drawing-7-1677463866.png" alt=""/></div>

</div></td><td valign="top"><div class="image"><div drawio-diagram="2606"><img src="https://doc316en.candera.eu/uploads/images/drawio/2023-02/drawing-7-1677463877.png" alt=""/></div>

</div></td></tr><tr><td align="center">*before deleting all behaviors*</td><td align="center">*after deleting behaviors*</td></tr></tbody></table>

</div></div></div></div></div></div></div></div></div>3\. Drag&amp;drop a <span style="color: rgb(230, 126, 35);">[Value](https://doc316en.candera.eu/link/647#bkmrk-value)</span> Behavior (which is a <span style="color: rgb(230, 126, 35);">[Value Processing Behavior](https://doc316en.candera.eu/link/647#bkmrk-page-title)</span>) and a <span style="color: rgb(230, 126, 35);">[Handle Control State](https://doc316en.candera.eu/link/598#bkmrk-handle-control-state)</span> Behavior (which is a <span style="color: rgb(230, 126, 35);">[Control - Internal Behavior](https://doc316en.candera.eu/link/598#bkmrk-internal-control-beh)</span>) from the Behaviors Panel of the ToolBox onto the TextButton Control in the SceneTree. The <span style="color: rgb(230, 126, 35);">[Handle Control State](https://doc316en.candera.eu/link/598#bkmrk-handle-control-state)</span> Behavior is needed in order for the TextButton Control to receive Input Events.

<div class="contents" id="bkmrk--224"><div class="contents"><div class="contents"><div class="header"><div class="header"><div class="contents"><div class="contents" id="bkmrk--225"><div class="contents"><div class="textblock"><div drawio-diagram="2607"><img src="https://doc316en.candera.eu/uploads/images/drawio/2023-02/drawing-7-1677463921.png" alt=""/></div>

</div></div></div></div></div></div></div></div></div>4\. Select the <span style="color: rgb(230, 126, 35);">[Value](https://doc316en.candera.eu/link/647#bkmrk-value)</span> Behavior on the right side of the Scene Tree View and set the <span style="color: rgb(230, 126, 35);">[Value](https://doc316en.candera.eu/link/647#bkmrk-value)</span> Behavior's AcceptValueEvent Property to "true" by checking the checkbox.

<div class="contents" id="bkmrk--226"><div class="contents"><div class="contents"><div class="header"><div class="header"><div class="contents"><div class="contents" id="bkmrk--227"><div class="contents"><div class="textblock"><div drawio-diagram="2608"><img src="https://doc316en.candera.eu/uploads/images/drawio/2023-02/drawing-7-1677463936.png" alt=""/></div>

</div></div></div></div></div></div></div></div></div>5\. Drag&amp;drop a <span style="color: rgb(230, 126, 35);">[Set Position](https://doc316en.candera.eu/link/647#bkmrk-set-position)</span> Behavior (which is a <span style="color: rgb(230, 126, 35);">[Value Processing - Transformation Behavior](https://doc316en.candera.eu/link/647#bkmrk-transformation-value)</span>) from the Behaviors Panel of the ToolBox onto the <span style="color: rgb(230, 126, 35);">[Value](https://doc316en.candera.eu/link/647#bkmrk-value)</span> Behavior's Receivers.

<div class="contents" id="bkmrk--228"><div class="contents"><div class="contents"><div class="header"><div class="header"><div class="contents"><div class="contents" id="bkmrk--229"><div class="contents"><div class="textblock"><div drawio-diagram="2609"><img src="https://doc316en.candera.eu/uploads/images/drawio/2023-02/drawing-7-1677463971.png" alt=""/></div>

</div></div></div></div></div></div></div></div></div>6\. Select the <span style="color: rgb(0, 0, 0);">Set Position</span> Behavior on the right side of the Scene Tree view and set its TranslationAxis Property to "AxisX"

<div class="contents" id="bkmrk--230"><div class="contents"><div class="contents"><div class="header"><div class="header"><div class="contents"><div class="contents" id="bkmrk--231"><div class="contents"><div class="textblock"><div drawio-diagram="2610"><img src="https://doc316en.candera.eu/uploads/images/drawio/2023-02/drawing-7-1677463982.png" alt=""/></div>

</div></div></div></div></div></div></div></div></div>7\. Drag&amp;drop an <span style="color: rgb(230, 126, 35);">[OnClick](https://doc316en.candera.eu/link/598#bkmrk-onclick)</span> Behavior (which is a <span style="color: rgb(230, 126, 35);">[Control Behavior](https://doc316en.candera.eu/link/598#bkmrk-page-title)</span>) from the Behaviors Panel of the ToolBox onto the TextButton Control.

<div class="contents" id="bkmrk--232"><div class="contents"><div class="contents"><div class="header"><div class="header"><div class="contents"><div class="contents" id="bkmrk--233"><div class="contents"><div class="textblock"><div drawio-diagram="2611"><img src="https://doc316en.candera.eu/uploads/images/drawio/2023-02/drawing-7-1677464010.png" alt=""/></div>

</div></div></div></div></div></div></div></div></div>8\. Drag&amp;drop a <span style="color: rgb(230, 126, 35);">[Send Value as Event](https://doc316en.candera.eu/link/582#bkmrk-send-value-as-event)</span> Behavior (which is a <span style="color: rgb(230, 126, 35);">[Action - Property Behavior](https://doc316en.candera.eu/link/582#bkmrk-property-action-beha)</span>) from the Behaviors Panel of the ToolBox onto the <span style="color: rgb(230, 126, 35);">[OnClick](https://doc316en.candera.eu/link/598#bkmrk-onclick)</span> Behavior's Actions Property.

<div class="contents" id="bkmrk--234"><div class="contents"><div class="contents"><div class="header"><div class="header"><div class="contents"><div class="contents" id="bkmrk--235"><div class="contents"><div class="textblock"><div drawio-diagram="2612"><img src="https://doc316en.candera.eu/uploads/images/drawio/2023-02/drawing-7-1677464048.png" alt=""/></div>

</div></div></div></div></div></div></div></div></div>9\. Select the <span style="color: rgb(230, 126, 35);">[Send Value as Event](https://doc316en.candera.eu/link/582#bkmrk-send-value-as-event)</span> Behavior on the right side of the Scene Tree View and set the value to datatype "Float" value "100,00" in the Properties view.

<div class="contents" id="bkmrk--236"><div class="contents"><div class="contents"><div class="header"><div class="header"><div class="contents"><div class="contents" id="bkmrk--237"><div class="contents"><div class="textblock"><div drawio-diagram="2613"><img src="https://doc316en.candera.eu/uploads/images/drawio/2023-02/drawing-7-1677464062.png" alt=""/></div>

</div></div></div></div></div></div></div></div></div>10\. Save your solution and start the Player through the Play button (with the option "Generate and Play") in the Toolbar on the top to see the result.

<div class="contents" id="bkmrk--238"><div class="contents"><div class="contents"><div class="header"><div class="header"><div class="contents"><div class="contents" id="bkmrk--239"><div class="contents"><div class="textblock"><div drawio-diagram="2614"><img src="https://doc316en.candera.eu/uploads/images/drawio/2023-02/drawing-7-1677464071.png" alt=""/></div>

</div></div></div></div></div></div></div></div></div>11\. When Clicking on the TextButton in the Player, the Button's horizontal position (x coordinate) is set to 100, so it moves to the right.

<div class="contents" id="bkmrk--240"><div class="contents"><div class="contents"><div class="header"><div class="header"><div class="contents"><div class="contents" id="bkmrk--241"><div class="contents"><div class="textblock"><div drawio-diagram="2615"><img src="https://doc316en.candera.eu/uploads/images/drawio/2023-02/drawing-7-1677464100.png" alt=""/></div>

</div></div></div></div></div></div></div></div></div>
#### Set Rotation Example  


1\. Drag&amp;drop a TextButton Control from the Controls Panel of the Toolbox to the SceneEditor or the Scene Tree and change the Text to "Set Rotation".

<div class="contents" id="bkmrk--242"><div class="contents"><div class="contents"><div class="header"><div class="header"><div class="contents"><div class="contents" id="bkmrk--243"><div class="contents"><div class="textblock"><div drawio-diagram="2616"><img src="https://doc316en.candera.eu/uploads/images/drawio/2023-02/drawing-7-1677464616.png" alt=""/></div>

</div></div></div></div></div></div></div></div></div>2\. Select the TextButton in the Scene Tree View and delete all Behaviors that are automatically attached to the TextButton from the right side of the Scene Tree View.

<div class="contents" id="bkmrk-before-deleting-all--3"><div class="contents"><div class="contents"><div class="header"><div class="header"><div class="contents"><div class="contents" id="bkmrk-before-deleting-all--4"><div class="contents"><div class="textblock"><table border="0"><tbody><tr><td valign="top"><div class="image"><div drawio-diagram="2617"><img src="https://doc316en.candera.eu/uploads/images/drawio/2023-02/drawing-7-1677464644.png" alt=""/></div>

</div></td><td valign="top"><div class="image"><div drawio-diagram="2618"><img src="https://doc316en.candera.eu/uploads/images/drawio/2023-02/drawing-7-1677464661.png" alt=""/></div>

</div></td></tr><tr><td align="center">*before deleting all behaviors*</td><td align="center">*after deleting behaviors*</td></tr></tbody></table>

</div></div></div></div></div></div></div></div></div>3\. Drag&amp;drop a <span style="color: rgb(230, 126, 35);">[Value](https://doc316en.candera.eu/link/647#bkmrk-value)</span> Behavior (which is a <span style="color: rgb(230, 126, 35);">[Value Processing Behavior](https://doc316en.candera.eu/link/647#bkmrk-page-title)</span>) and a <span style="color: rgb(230, 126, 35);">[Handle Control State](https://doc316en.candera.eu/link/598#bkmrk-handle-control-state)</span> Behavior (which is a <span style="color: rgb(230, 126, 35);">[Control - Internal Behavior](https://doc316en.candera.eu/link/598#bkmrk-internal-control-beh)</span>) from the Behaviors Panel of the ToolBox onto the TextButton Control in the SceneTree. The <span style="color: rgb(230, 126, 35);">[Handle Control State](https://doc316en.candera.eu/link/598#bkmrk-handle-control-state)</span> Behavior is needed in order for the TextButton Control to receive Input Events.

<div class="contents" id="bkmrk--244"><div class="contents"><div class="contents"><div class="header"><div class="header"><div class="contents"><div class="contents" id="bkmrk--245"><div class="contents"><div class="textblock"><div drawio-diagram="2619"><img src="https://doc316en.candera.eu/uploads/images/drawio/2023-02/drawing-7-1677464698.png" alt=""/></div>

</div></div></div></div></div></div></div></div></div>4\. Select the <span style="color: rgb(230, 126, 35);">[Value](https://doc316en.candera.eu/link/647#bkmrk-value)</span> Behavior on the right side of the Scene Tree View and set the <span style="color: rgb(230, 126, 35);">[Value](https://doc316en.candera.eu/link/647#bkmrk-value)</span> Behavior's AcceptValueEvent Property to "true" by checking the checkbox.

<div class="contents" id="bkmrk--246"><div class="contents"><div class="contents"><div class="header"><div class="header"><div class="contents"><div class="contents" id="bkmrk--247"><div class="contents"><div class="textblock"><div drawio-diagram="2620"><img src="https://doc316en.candera.eu/uploads/images/drawio/2023-02/drawing-7-1677464712.png" alt=""/></div>

</div></div></div></div></div></div></div></div></div>5\. Drag&amp;drop a <span style="color: rgb(230, 126, 35);">[Set Rotation](https://doc316en.candera.eu/link/647#bkmrk-set-rotation)</span> Behavior (which is a <span style="color: rgb(230, 126, 35);">[Value Processing - Transformation Behavior](https://doc316en.candera.eu/link/647#bkmrk-transformation-value)</span>) from the Behaviors Panel of the ToolBox onto the <span style="color: rgb(230, 126, 35);">[Value](https://doc316en.candera.eu/link/647#bkmrk-value)</span> Behavior's Receivers.

<div class="contents" id="bkmrk--248"><div class="contents"><div class="contents"><div class="header"><div class="header"><div class="contents"><div class="contents" id="bkmrk--249"><div class="contents"><div class="textblock"><div drawio-diagram="2621"><img src="https://doc316en.candera.eu/uploads/images/drawio/2023-02/drawing-7-1677464744.png" alt=""/></div>

</div></div></div></div></div></div></div></div></div>6\. Drag&amp;drop an <span style="color: rgb(230, 126, 35);">[OnClick](https://doc316en.candera.eu/link/598#bkmrk-onclick)</span> Behavior (which is a <span style="color: rgb(230, 126, 35);">[Control Behavior](https://doc316en.candera.eu/link/598#bkmrk-page-title)</span>) from the Behaviors Panel of the ToolBox onto the TextButton Control.

<div class="contents" id="bkmrk--250"><div class="contents"><div class="contents"><div class="header"><div class="header"><div class="contents"><div class="contents" id="bkmrk--251"><div class="contents"><div class="textblock"><div drawio-diagram="2622"><img src="https://doc316en.candera.eu/uploads/images/drawio/2023-02/drawing-7-1677464772.png" alt=""/></div>

</div></div></div></div></div></div></div></div></div>7\. Drag&amp;drop a <span style="color: rgb(230, 126, 35);">[Send Value as Event](https://doc316en.candera.eu/link/582#bkmrk-send-value-as-event)</span> Behavior (which is a <span style="color: rgb(230, 126, 35);">[Action - Property Behavior](https://doc316en.candera.eu/link/582#bkmrk-property-action-beha)</span>) from the Behaviors Panel of the ToolBox onto the <span style="color: rgb(230, 126, 35);">[OnClick](https://doc316en.candera.eu/link/598#bkmrk-onclick)</span> Behavior's Actions Property.

<div class="contents" id="bkmrk--252"><div class="contents"><div class="contents"><div class="header"><div class="header"><div class="contents"><div class="contents" id="bkmrk--253"><div class="contents"><div class="textblock"><div drawio-diagram="2623"><img src="https://doc316en.candera.eu/uploads/images/drawio/2023-02/drawing-7-1677464807.png" alt=""/></div>

</div></div></div></div></div></div></div></div></div>8\. Select the <span style="color: rgb(230, 126, 35);">[Send Value as Event](https://doc316en.candera.eu/link/582#bkmrk-send-value-as-event)</span> Behavior on the right side of the Scene Tree View and set the value to datatype "Float" value "40,00" in the Properties view.

<div class="contents" id="bkmrk--254"><div class="contents"><div class="contents"><div class="header"><div class="header"><div class="contents"><div class="contents" id="bkmrk--255"><div class="contents"><div class="textblock"><div drawio-diagram="2624"><img src="https://doc316en.candera.eu/uploads/images/drawio/2023-02/drawing-7-1677464829.png" alt=""/></div>

</div></div></div></div></div></div></div></div></div>9\. Save your solution and start the Player through the Play button (with the option "Generate and Play") in the Toolbar on the top to see the result.

<div class="contents" id="bkmrk--256"><div class="contents"><div class="contents"><div class="header"><div class="header"><div class="contents"><div class="contents" id="bkmrk--257"><div class="contents"><div class="textblock"><div drawio-diagram="2625"><img src="https://doc316en.candera.eu/uploads/images/drawio/2023-02/drawing-7-1677464839.png" alt=""/></div>

</div></div></div></div></div></div></div></div></div>10\. When Clicking on the TextButton in the Player, the Button is rotated 40° clockwise.

<div class="contents" id="bkmrk--258"><div class="contents"><div class="contents"><div class="header"><div class="header"><div class="contents"><div class="contents" id="bkmrk--259"><div class="contents"><div class="textblock"><div drawio-diagram="2626"><img src="https://doc316en.candera.eu/uploads/images/drawio/2023-02/drawing-7-1677464862.png" alt=""/></div>

</div></div></div></div></div></div></div></div></div>
#### Set Scale Example  


1\. Drag&amp;drop a SolidColorNode from the "Nodes 2D" Panel of the Toolbox to the SceneEditor or the Scene Tree.

<div class="contents" id="bkmrk--260"><div class="contents"><div class="contents"><div class="header"><div class="header"><div class="contents"><div class="contents" id="bkmrk--261"><div class="contents"><div class="textblock"><div drawio-diagram="2627"><img src="https://doc316en.candera.eu/uploads/images/drawio/2023-02/drawing-7-1677464965.png" alt=""/></div>

</div></div></div></div></div></div></div></div></div>2\. Drag&amp;drop a <span style="color: rgb(230, 126, 35);">[Value Behavior](https://doc316en.candera.eu/link/647#bkmrk-value)</span> (which is a <span style="color: rgb(230, 126, 35);">[Value Processing Behavior](https://doc316en.candera.eu/link/647#bkmrk-page-title)</span>) from the Behaviors Panel of the Toolbox onto the Text Value Control in the Scene Tree.

<div class="contents" id="bkmrk--262"><div class="contents"><div class="contents"><div class="header"><div class="header"><div class="contents"><div class="contents" id="bkmrk--263"><div class="contents"><div class="textblock"><div drawio-diagram="2628"><img src="https://doc316en.candera.eu/uploads/images/drawio/2023-02/drawing-7-1677464995.png" alt=""/></div>

</div></div></div></div></div></div></div></div></div>3\. Select the <span style="color: rgb(230, 126, 35);">[Value](https://doc316en.candera.eu/link/647#bkmrk-value)</span> Behavior on the right side of the Scene Tree View. Set the <span style="color: rgb(230, 126, 35);">[Value](https://doc316en.candera.eu/link/647#bkmrk-value)</span> Behavior's AcceptValueEvent Property to "true" by checking the checkbox in the Properties view. Check the Minimum Checkbox and set the Minimum Value to 0,50. Check the Maximum Checkbox and set the Maximum Value to 3,00. Also, set the Variant Value to 1,00.

<div class="contents" id="bkmrk--264"><div class="contents"><div class="contents"><div class="header"><div class="header"><div class="contents"><div class="contents" id="bkmrk--265"><div class="contents"><div class="textblock"><div drawio-diagram="2629"><img src="https://doc316en.candera.eu/uploads/images/drawio/2023-02/drawing-7-1677465013.png" alt=""/></div>

</div></div></div></div></div></div></div></div></div>4\. Select the SolidColorNode in the Scene Tree view and drag&amp;drop an <span style="color: rgb(230, 126, 35);">[Interpolate Value](https://doc316en.candera.eu/link/647#bkmrk-interpolate-value)</span> Behavior (which is a <span style="color: rgb(230, 126, 35);">[Value Processing Behavior](https://doc316en.candera.eu/link/647#bkmrk-page-title)</span>) onto the <span style="color: rgb(230, 126, 35);">[Value](https://doc316en.candera.eu/link/647#bkmrk-value)</span> Behavior's Receivers in the right side of the Scene Tree Panel.

<div class="contents" id="bkmrk--266"><div class="contents"><div class="contents"><div class="header"><div class="header"><div class="contents"><div class="contents" id="bkmrk--267"><div class="contents"><div class="textblock"><div drawio-diagram="2631"><img src="https://doc316en.candera.eu/uploads/images/drawio/2023-02/drawing-7-1677465082.png" alt=""/></div>

</div></div></div></div></div></div></div></div></div>5\. Select the <span style="color: rgb(230, 126, 35);">[Interpolate Value](https://doc316en.candera.eu/link/647#bkmrk-interpolate-value)</span> Behavior on the right side of the Scene Tree view and set the property "Units Per Second" to 1,00 in the Properties view.

<div class="contents" id="bkmrk--268"><div class="contents"><div class="contents"><div class="header"><div class="header"><div class="contents"><div class="contents" id="bkmrk--269"><div class="contents"><div class="textblock"><div drawio-diagram="2632"><img src="https://doc316en.candera.eu/uploads/images/drawio/2023-02/drawing-7-1677465101.png" alt=""/></div>

</div></div></div></div></div></div></div></div></div>6\. Drag&amp;Drop a <span style="color: rgb(230, 126, 35);">[Set Scale](https://doc316en.candera.eu/link/647#bkmrk-set-scale)</span> Behavior (which is a <span style="color: rgb(230, 126, 35);">[Value Processing - Transformation Behavior](https://doc316en.candera.eu/link/647#bkmrk-transformation-value)</span>) onto the <span style="color: rgb(230, 126, 35);">[Interpolate Value](https://doc316en.candera.eu/link/647#bkmrk-interpolate-value)</span> Behavior's Receivers in the right side of the Scene Tree Panel.

<div class="contents" id="bkmrk--270"><div class="contents"><div class="contents"><div class="header"><div class="header"><div class="contents"><div class="contents" id="bkmrk--271"><div class="contents"><div class="textblock"><div drawio-diagram="2633"><img src="https://doc316en.candera.eu/uploads/images/drawio/2023-02/drawing-7-1677465130.png" alt=""/></div>

</div></div></div></div></div></div></div></div></div>7\. Select the <span style="color: rgb(230, 126, 35);">[Set Scale](https://doc316en.candera.eu/link/647#bkmrk-set-scale)</span> Behavior and check the ScaleAlongY checkbox in the Properties view. Set the ScaleVextor2D Property to (1, 1).

<div class="contents" id="bkmrk--272"><div class="contents"><div class="contents"><div class="header"><div class="header"><div class="contents"><div class="contents" id="bkmrk--451"><div class="contents"><div class="textblock"><div drawio-diagram="2634"><img src="https://doc316en.candera.eu/uploads/images/drawio/2023-02/drawing-7-1677465144.png" alt=""/></div>

</div></div></div></div></div></div></div></div></div>8\. Drag&amp;drop two TextButton Controls from the Controls Panel of the Toolbox to the SceneEditor or the Scene Tree.

<div class="contents" id="bkmrk--453"><div class="contents"><div class="contents"><div class="header"><div class="header"><div class="contents"><div class="contents" id="bkmrk--454"><div class="contents"><div class="textblock"><div drawio-diagram="2635"><img src="https://doc316en.candera.eu/uploads/images/drawio/2023-02/drawing-7-1677465180.png" alt=""/></div>

</div></div></div></div></div></div></div></div></div>9\. Configure the first TextButton Control to have the Text "Decrease". Configure the second TextButton Control to have the Text "Increase" and set it's Enabled Property to "false" by unchecking the Checkbox.

<div class="contents" id="bkmrk--456"><div class="contents"><div class="contents"><div class="header"><div class="header"><div class="contents"><div class="contents" id="bkmrk--457"><div class="contents"><div class="textblock"><div drawio-diagram="2636"><img src="https://doc316en.candera.eu/uploads/images/drawio/2023-02/drawing-7-1677465215.png" alt=""/></div>

</div></div></div></div></div></div></div></div></div>10\. Drag&amp;drop a <span style="color: rgb(230, 126, 35);">[Send Value as Event](https://doc316en.candera.eu/link/582#bkmrk-send-value-as-event)</span> Behavior (which is a <span style="color: rgb(230, 126, 35);">[Action - Property Behavior](https://doc316en.candera.eu/link/582#bkmrk-property-action-beha)</span>) from the Toolbox view onto the TextButton's Actions on the right side of the SceneTree view. Do this for both of the TextButton Controls.

<div class="contents" id="bkmrk--459"><div class="contents"><div class="contents"><div class="header"><div class="header"><div class="contents"><div class="contents" id="bkmrk--460"><div class="contents"><div class="textblock"><div drawio-diagram="2638"><img src="https://doc316en.candera.eu/uploads/images/drawio/2023-02/drawing-7-1677465306.png" alt=""/></div>

</div></div></div></div></div></div></div></div></div>11\. Select the first TextButton Control (the one with text "Decrease") and then select its <span style="color: rgb(230, 126, 35);">[Send Value as Event](https://doc316en.candera.eu/link/582#bkmrk-send-value-as-event)</span> Behavior on the right side of the Scene Tree view. Set the Value Property to 0,50. Adjust the behavior's TargetNode by clicking on the magnifying glass on the right of the property.

<div class="contents" id="bkmrk--462"><div class="contents"><div class="contents"><div class="header"><div class="header"><div class="contents"><div class="contents" id="bkmrk--463"><div class="contents"><div class="textblock"><div drawio-diagram="2639"><img src="https://doc316en.candera.eu/uploads/images/drawio/2023-02/drawing-7-1677465327.png" alt=""/></div>

</div></div></div></div></div></div></div></div></div>12\. Set the scene's TextNode as SolidColorNode for the <span style="color: rgb(230, 126, 35);">[Send Value as Event](https://doc316en.candera.eu/link/582#bkmrk-send-value-as-event)</span> Behavior: After clicking the magnifying glass in the properties panel, the "Select Item" Dialog is opened. Select the scene's SolidColorNode and press OK.

<div class="contents" id="bkmrk--465"><div class="contents"><div class="contents"><div class="header"><div class="header"><div class="contents"><div class="contents" id="bkmrk--466"><div class="contents"><div class="textblock"><div drawio-diagram="2640"><img src="https://doc316en.candera.eu/uploads/images/drawio/2023-02/drawing-7-1677465358.png" alt=""/></div>

</div></div></div></div></div></div></div></div></div>13\. Select the second TextButton Control (the one with text "Increase") and then select its <span style="color: rgb(230, 126, 35);">[Send Value as Event](https://doc316en.candera.eu/link/582#bkmrk-send-value-as-event)</span> Behavior on the right side of the Scene Tree view. Set the Value Property to 3,00. Set the behavior's TargetNode to the scene's SolidColorNode as you just did for the first TextButton Control.

<div class="contents" id="bkmrk--468"><div class="contents"><div class="contents"><div class="header"><div class="header"><div class="contents"><div class="contents" id="bkmrk--469"><div class="contents"><div class="textblock"><div drawio-diagram="2641"><img src="https://doc316en.candera.eu/uploads/images/drawio/2023-02/drawing-7-1677465376.png" alt=""/></div>

</div></div></div></div></div></div></div></div></div>14\. Save your solution and start the Player through the Play button (with the option "Generate and Play") in the Toolbar on the top to see the result.

<div class="contents" id="bkmrk--471"><div class="contents"><div class="contents"><div class="header"><div class="header"><div class="contents"><div class="contents" id="bkmrk--472"><div class="contents"><div class="textblock"><div drawio-diagram="2642"><img src="https://doc316en.candera.eu/uploads/images/drawio/2023-02/drawing-7-1677465391.png" alt=""/></div>

</div></div></div></div></div></div></div></div></div>15\. When clicking on the TextButton "Increase" in the Player, the size of the SolidColorNode is slowly increased. When clicking on the TextButton "Decrease", the size of the SolidColorNode is slowly decreased.

<div class="contents" id="bkmrk--474"><div class="contents"><div class="contents"><div class="header"><div class="header"><div class="contents"><div class="contents" id="bkmrk--475"><div class="contents"><div class="textblock"><div drawio-diagram="2643"><img src="https://doc316en.candera.eu/uploads/images/drawio/2023-02/drawing-7-1677465415.png" alt=""/></div>

</div></div></div></div></div></div></div></div></div>
#### Set Text Example  


1\. Drag&amp;drop a TextButton Control from the Controls panel and a TextNode from the "Nodes 2D" Panel of the Toolbox to the SceneEditor or the Scene Tree. Set the TextButton's Text to "Change Text".

<div class="contents" id="bkmrk--477"><div class="contents"><div class="contents"><div class="header"><div class="header"><div class="contents"><div class="contents" id="bkmrk--478"><div class="contents"><div class="textblock"><div drawio-diagram="2644"><img src="https://doc316en.candera.eu/uploads/images/drawio/2023-02/drawing-7-1677465523.png" alt=""/></div>

</div></div></div></div></div></div></div></div></div>2\. Position the TextButton Control and the TextNode nicely in the Scene Editor.

<div class="contents" id="bkmrk--480"><div class="contents"><div class="contents"><div class="header"><div class="header"><div class="contents"><div class="contents" id="bkmrk--481"><div class="contents"><div class="textblock"><div drawio-diagram="2645"><img src="https://doc316en.candera.eu/uploads/images/drawio/2023-02/drawing-7-1677465539.png" alt=""/></div>

</div></div></div></div></div></div></div></div></div>3\. Drag&amp;Drop a <span style="color: rgb(230, 126, 35);">[Provide Text](https://doc316en.candera.eu/link/598#bkmrk-provide-text)</span> Behavior (which is a <span style="color: rgb(230, 126, 35);">[Control - Public Property Behavior](https://doc316en.candera.eu/link/598#bkmrk-public-property-cont)</span>) from the Behaviors Panel of the ToolBox onto the TextNode in the Scene Tree view.

<div class="contents" id="bkmrk--483"><div class="contents"><div class="contents"><div class="header"><div class="header"><div class="contents"><div class="contents" id="bkmrk--484"><div class="contents"><div class="textblock"><div drawio-diagram="2646"><img src="https://doc316en.candera.eu/uploads/images/drawio/2023-02/drawing-7-1677465570.png" alt=""/></div>

</div></div></div></div></div></div></div></div></div>4\. Select the TextButton Control and drag&amp;drop a <span style="color: rgb(230, 126, 35);">[Set Text](https://doc316en.candera.eu/link/582#bkmrk-set-text)</span> Behavior (which is a <span style="color: rgb(230, 126, 35);">[Action - Property Behavior](https://doc316en.candera.eu/link/582#bkmrk-property-action-beha)</span>) from the Behaviors Panel of the ToolBox onto the "Actions" field of the TextButton Control's EventHandler on the right side of the Scene Tree.

<div class="contents" id="bkmrk--486"><div class="contents"><div class="contents"><div class="header"><div class="header"><div class="contents"><div class="contents" id="bkmrk--487"><div class="contents"><div class="textblock"><div drawio-diagram="2647"><img src="https://doc316en.candera.eu/uploads/images/drawio/2023-02/drawing-7-1677465604.png" alt=""/></div>

</div></div></div></div></div></div></div></div></div>5\. Select the newly added [Set Text](https://doc316en.candera.eu/link/582#bkmrk-set-text) Behavior in right side of the Scene Tree view and change the Text property to "Hallo" in the Properties view.

<div class="contents" id="bkmrk--489"><div class="contents"><div class="contents"><div class="header"><div class="header"><div class="contents"><div class="contents" id="bkmrk--490"><div class="contents"><div class="textblock"><div drawio-diagram="2648"><img src="https://doc316en.candera.eu/uploads/images/drawio/2023-02/drawing-7-1677465618.png" alt=""/></div>

</div></div></div></div></div></div></div></div></div>6\. Select the <span style="color: rgb(230, 126, 35);">[Set Text](https://doc316en.candera.eu/link/582#bkmrk-set-text)</span> Behavior on the right side of the Scene Tree view and drag&amp;drop it onto the TextNode on the left side of the Scene Tree view (you can see a little arrow and "Set Text").

<div class="contents" id="bkmrk--492"><div class="contents"><div class="contents"><div class="header"><div class="header"><div class="contents"><div class="contents" id="bkmrk--493"><div class="contents"><div class="textblock"><div drawio-diagram="2649"><img src="https://doc316en.candera.eu/uploads/images/drawio/2023-02/drawing-7-1677465630.png" alt=""/></div>

</div></div></div></div></div></div></div></div></div>7\. Save your solution and start the Player through the Play button (with the option "Generate and Play") in the Toolbar on the top to see the result.

<div class="contents" id="bkmrk--495"><div class="contents"><div class="contents"><div class="header"><div class="header"><div class="contents"><div class="contents" id="bkmrk--496"><div class="contents"><div class="textblock"><div drawio-diagram="2650"><img src="https://doc316en.candera.eu/uploads/images/drawio/2023-02/drawing-7-1677465645.png" alt=""/></div>

</div></div></div></div></div></div></div></div></div>8\. When the TextButton is pressed, the text of the TextNode will be changed to "Hallo".

<div class="contents" id="bkmrk--498"><div class="contents"><div class="contents"><div class="header"><div class="header"><div class="contents"><div class="contents" id="bkmrk--499"><div class="contents"><div class="textblock"><div drawio-diagram="2651"><img src="https://doc316en.candera.eu/uploads/images/drawio/2023-02/drawing-7-1677465664.png" alt=""/></div>

</div></div></div></div></div></div></div></div></div>
#### Start Timer Example  


1\. Drag&amp;drop a TextButton Control and a Text Control from the Controls panel of the Toolbox to the SceneEditor or the Scene Tree.

<div class="contents" id="bkmrk--501"><div class="contents"><div class="contents"><div class="header"><div class="header"><div class="contents"><div class="contents" id="bkmrk--502"><div class="contents"><div class="textblock"><div drawio-diagram="2652"><img src="https://doc316en.candera.eu/uploads/images/drawio/2023-02/drawing-7-1677466176.png" alt=""/></div>

</div></div></div></div></div></div></div></div></div>2\. Select the TextButton in the Scene Tree View and delete all Behaviors that are automatically attached to the TextButton from the right side of the Scene Tree View.

<div class="contents" id="bkmrk-before-deleting-all--5"><div class="contents"><div class="contents"><div class="header"><div class="header"><div class="contents"><div class="contents" id="bkmrk-before-deleting-all--6"><div class="contents"><div class="textblock"><table border="0"><tbody><tr><td valign="top"><div class="image"><div drawio-diagram="2653"><img src="https://doc316en.candera.eu/uploads/images/drawio/2023-02/drawing-7-1677466205.png" alt=""/></div>

</div></td><td valign="top"><div class="image"><div drawio-diagram="2654"><img src="https://doc316en.candera.eu/uploads/images/drawio/2023-02/drawing-7-1677466222.png" alt=""/></div>

</div></td></tr><tr><td align="center">*before deleting all behaviors*</td><td align="center">*after deleting behaviors*</td></tr></tbody></table>

</div></div></div></div></div></div></div></div></div>3\. Set the TextButton Control's text to "Start Timer" and the Text Control's text to "Wait for Timer".

<div class="contents" id="bkmrk--506"><div class="contents"><div class="contents"><div class="header"><div class="header"><div class="contents"><div class="contents" id="bkmrk--507"><div class="contents"><div class="textblock"><div drawio-diagram="2655"><img src="https://doc316en.candera.eu/uploads/images/drawio/2023-02/drawing-7-1677466255.png" alt=""/></div>

</div></div></div></div></div></div></div></div></div>4\. Drag&amp;drop an <span style="color: rgb(230, 126, 35);">[OnClick](https://doc316en.candera.eu/link/598#bkmrk-onclick)</span> Behavior (which is a <span style="color: rgb(230, 126, 35);">[Control Behavior](https://doc316en.candera.eu/link/598#bkmrk-page-title)</span>) and a <span style="color: rgb(230, 126, 35);">[Handle Control State](https://doc316en.candera.eu/link/598#bkmrk-handle-control-state)</span> Behavior (which is a <span style="color: rgb(230, 126, 35);">[Control - Internal Behavior](https://doc316en.candera.eu/link/598#bkmrk-internal-control-beh)</span>) from the Behaviors Panel of the ToolBox onto the TextButton Control in the SceneTree. The <span style="color: rgb(230, 126, 35);">[Handle Control State](https://doc316en.candera.eu/link/598#bkmrk-handle-control-state)</span> Behavior is needed in order for the Text Control to receive Input Events.

<div class="contents" id="bkmrk--509"><div class="contents"><div class="contents"><div class="header"><div class="header"><div class="contents"><div class="contents" id="bkmrk--510"><div class="contents"><div class="textblock"><div drawio-diagram="2656"><img src="https://doc316en.candera.eu/uploads/images/drawio/2023-02/drawing-7-1677466286.png" alt=""/></div>

</div></div></div></div></div></div></div></div></div>5\. Select the TextButton Control in the Scene Tree view and drag&amp;drop a <span style="color: rgb(230, 126, 35);">[Start Timer](https://doc316en.candera.eu/link/582#bkmrk-start-timer)</span> Behavior (which is a <span style="color: rgb(230, 126, 35);">[Action - Control Behavior](https://doc316en.candera.eu/link/582#bkmrk-control-action-behav)</span>) from the Toolbox view onto the Actions of the TextButton Control's OnClick Behavior in the right side of the Scene Tree view.

<div class="contents" id="bkmrk--512"><div class="contents"><div class="contents"><div class="header"><div class="header"><div class="contents"><div class="contents" id="bkmrk--513"><div class="contents"><div class="textblock"><div drawio-diagram="2658"><img src="https://doc316en.candera.eu/uploads/images/drawio/2023-02/drawing-7-1677466318.png" alt=""/></div>

</div></div></div></div></div></div></div></div></div>6\. Select the <span style="color: rgb(230, 126, 35);">[Start Timer](https://doc316en.candera.eu/link/582#bkmrk-start-timer)</span> Behavior in the right side of the Scene Tree view and set the Delay property to "1000" in the properties view. Set the <span style="color: rgb(230, 126, 35);">[Start Timer](https://doc316en.candera.eu/link/582#bkmrk-start-timer)</span> Behavior's Target Node to the Text Control you have added to the scene in step 1 by clicking the magnifying glass on the right side of the input filed and selecting the Text Value Control in "Choose Item" dialog.

<div class="contents" id="bkmrk--515"><div class="contents"><div class="contents"><div class="header"><div class="header"><div class="contents"><div class="contents" id="bkmrk--516"><div class="contents"><div class="textblock"><div drawio-diagram="2659"><img src="https://doc316en.candera.eu/uploads/images/drawio/2023-02/drawing-7-1677466347.png" alt=""/></div>

</div></div></div></div></div></div></div></div></div>After that, the <span style="color: rgb(230, 126, 35);">[Start Timer](https://doc316en.candera.eu/link/582#bkmrk-start-timer)</span> Behavior's Properties will look as follows.

<div class="contents" id="bkmrk--518"><div class="contents"><div class="contents"><div class="header"><div class="header"><div class="contents"><div class="contents" id="bkmrk--519"><div class="contents"><div class="textblock"><div drawio-diagram="2660"><img src="https://doc316en.candera.eu/uploads/images/drawio/2023-02/drawing-7-1677466362.png" alt=""/></div>

</div></div></div></div></div></div></div></div></div>7\. Drag&amp;drop an <span style="color: rgb(230, 126, 35);">[On Timer](https://doc316en.candera.eu/link/598#bkmrk-ontimer)</span> Behavior (which is a <span style="color: rgb(230, 126, 35);">[Control Behavior](https://doc316en.candera.eu/link/598#bkmrk-page-title)</span>) and a <span style="color: rgb(230, 126, 35);">[Handle Control State](https://doc316en.candera.eu/link/598#bkmrk-handle-control-state)</span> Behavior (which is a <span style="color: rgb(230, 126, 35);">[Control - Internal Behavior](https://doc316en.candera.eu/link/598#bkmrk-internal-control-beh)</span>) from the Behaviors Panel of the ToolBox onto the TextButton Control in the SceneTree. The <span style="color: rgb(230, 126, 35);">[Handle Control State](https://doc316en.candera.eu/link/598#bkmrk-handle-control-state)</span> Behavior is needed in order for the Text Control to receive Input Events.

<div class="contents" id="bkmrk--521"><div class="contents"><div class="contents"><div class="header"><div class="header"><div class="contents"><div class="contents" id="bkmrk--522"><div class="contents"><div class="textblock"><div drawio-diagram="2662"><img src="https://doc316en.candera.eu/uploads/images/drawio/2023-02/drawing-7-1677466421.png" alt=""/></div>

</div></div></div></div></div></div></div></div></div>8\. Select the Text Control in the Scene Tree view and drag&amp;drop a <span style="color: rgb(230, 126, 35);">[Set Color](https://doc316en.candera.eu/link/582#bkmrk-set-color)</span> Behavior (which is a <span style="color: rgb(230, 126, 35);">[Action - Property Behavior](https://doc316en.candera.eu/link/582#bkmrk-property-action-beha)</span>) from the Toolbox view onto the Actions of the Text Control's <span style="color: rgb(230, 126, 35);">[On Timer](https://doc316en.candera.eu/link/598#bkmrk-ontimer)</span> Behavior in the right side of the Scene Tree view.

<div class="contents" id="bkmrk--524"><div class="contents"><div class="contents"><div class="header"><div class="header"><div class="contents"><div class="contents" id="bkmrk--525"><div class="contents"><div class="textblock"><div drawio-diagram="2663"><img src="https://doc316en.candera.eu/uploads/images/drawio/2023-02/drawing-7-1677466472.png" alt=""/></div>

</div></div></div></div></div></div></div></div></div>9\. Select the <span style="color: rgb(230, 126, 35);">[Set Color](https://doc316en.candera.eu/link/582#bkmrk-set-color)</span> Behavior and change the Color to red.

<div class="contents" id="bkmrk--527"><div class="contents"><div class="contents"><div class="header"><div class="header"><div class="contents"><div class="contents" id="bkmrk--528"><div class="contents"><div class="textblock"><div drawio-diagram="2664"><img src="https://doc316en.candera.eu/uploads/images/drawio/2023-02/drawing-7-1677466483.png" alt=""/></div>

</div></div></div></div></div></div></div></div></div>10\. Save your solution and start the Player through the Play button (with the option "Generate and Play") in the Toolbar on the top to see the result.

<div class="contents" id="bkmrk--530"><div class="contents"><div class="contents"><div class="header"><div class="header"><div class="contents"><div class="contents" id="bkmrk--531"><div class="contents"><div class="textblock"><div drawio-diagram="2665"><img src="https://doc316en.candera.eu/uploads/images/drawio/2023-02/drawing-7-1677466498.png" alt=""/></div>

</div></div></div></div></div></div></div></div></div>11\. When the TextButton "Start Timer" is pressed, a timer is started and after some time the Text Control's text changes its color.

<div class="contents" id="bkmrk--533"><div class="contents"><div class="contents"><div class="header"><div class="header"><div class="contents"><div class="contents" id="bkmrk--534"><div class="contents"><div class="textblock"><div drawio-diagram="2666"><img src="https://doc316en.candera.eu/uploads/images/drawio/2023-02/drawing-7-1677466517.png" alt=""/></div>

</div></div></div></div></div></div></div></div></div>
#### Switch Image Example  


1\. Drag&amp;drop a FlipBook Control from the Controls panel of the Toolbox to the SceneEditor or the Scene Tree.

<div class="contents" id="bkmrk--536"><div class="contents"><div class="contents"><div class="header"><div class="header"><div class="contents"><div class="contents" id="bkmrk--537"><div class="contents"><div class="textblock"><div drawio-diagram="2669"><img src="https://doc316en.candera.eu/uploads/images/drawio/2023-02/drawing-7-1677466622.png" alt=""/></div>

</div></div></div></div></div></div></div></div></div>2\. Drag&amp;drop a <span style="color: rgb(230, 126, 35);">[Value](https://doc316en.candera.eu/link/647#bkmrk-value)</span> Behavior (which is a <span style="color: rgb(230, 126, 35);">[Value Processing Behavior](https://doc316en.candera.eu/link/647#bkmrk-page-title)</span>) and a <span style="color: rgb(230, 126, 35);">[Handle Control State](https://doc316en.candera.eu/link/598#bkmrk-handle-control-state)</span> Behavior (which is a <span style="color: rgb(230, 126, 35);">[Control - Internal Behavior](https://doc316en.candera.eu/link/598#bkmrk-internal-control-beh)</span>) from the Behaviors Panel of the ToolBox onto the TextButton Control in the SceneTree. The <span style="color: rgb(230, 126, 35);">[Handle Control State](https://doc316en.candera.eu/link/598#bkmrk-handle-control-state)</span> Behavior is needed in order for the Text Control to receive Input Events.

<div class="contents" id="bkmrk--539"><div class="contents"><div class="contents"><div class="header"><div class="header"><div class="contents"><div class="contents" id="bkmrk--540"><div class="contents"><div class="textblock"><div drawio-diagram="2670"><img src="https://doc316en.candera.eu/uploads/images/drawio/2023-02/drawing-7-1677466649.png" alt=""/></div>

</div></div></div></div></div></div></div></div></div>3\. Select the [Value](https://doc316en.candera.eu/link/647#bkmrk-value) Behavior in the right side of the Scene Tree view and set the "AcceptValueEvent" property to "True" in the Properties view.

<div class="contents" id="bkmrk--542"><div class="contents"><div class="contents"><div class="header"><div class="header"><div class="contents"><div class="contents" id="bkmrk--543"><div class="contents"><div class="textblock"><div drawio-diagram="2671"><img src="https://doc316en.candera.eu/uploads/images/drawio/2023-02/drawing-7-1677466660.png" alt=""/></div>

</div></div></div></div></div></div></div></div></div>4\. Select the FlipBook Control in the Scene Tree view and drag&amp;drop a <span style="color: rgb(230, 126, 35);">[Switch Image](https://doc316en.candera.eu/link/647#bkmrk-switch-image)</span> Behavior (which is a <span style="color: rgb(230, 126, 35);">[Value Processing - Effects Behavior](https://doc316en.candera.eu/link/647#bkmrk-effects-value-proces)</span>) from the Toolbox view onto the Receivers of the FlipBook Control's <span style="color: rgb(230, 126, 35);">[Value](https://doc316en.candera.eu/link/647#bkmrk-value)</span> Behavior in the right side of the Scene Tree view.

<div class="contents" id="bkmrk--545"><div class="contents"><div class="contents"><div class="header"><div class="header"><div class="contents"><div class="contents" id="bkmrk--546"><div class="contents"><div class="textblock"><div drawio-diagram="2672"><img src="https://doc316en.candera.eu/uploads/images/drawio/2023-02/drawing-7-1677466696.png" alt=""/></div>

</div></div></div></div></div></div></div></div></div>5\. Drag&amp;drop an <span style="color: rgb(230, 126, 35);">[OnClick](https://doc316en.candera.eu/link/598#bkmrk-onclick)</span> Behavior (which is a <span style="color: rgb(230, 126, 35);">[Control Behavior](https://doc316en.candera.eu/link/598#bkmrk-page-title)</span>) from the Behaviors Panel of the ToolBox onto the FlipBook Control in the SceneTree.

<div class="contents" id="bkmrk--548"><div class="contents"><div class="contents"><div class="header"><div class="header"><div class="contents"><div class="contents" id="bkmrk--549"><div class="contents"><div class="textblock"><div drawio-diagram="2673"><img src="https://doc316en.candera.eu/uploads/images/drawio/2023-02/drawing-7-1677466717.png" alt=""/></div>

</div></div></div></div></div></div></div></div></div>6\. Select the FlipBook Control in the Scene Tree view and drag&amp;drop a <span style="color: rgb(230, 126, 35);">[Send Value as Event](https://doc316en.candera.eu/link/582#bkmrk-send-value-as-event)</span> Behavior (which is a <span style="color: rgb(230, 126, 35);">[Action - Property Behavior](https://doc316en.candera.eu/link/582#bkmrk-property-action-beha)</span>) from the Toolbox view onto the Actions of the FlipBook Control's <span style="color: rgb(230, 126, 35);">[OnClick](https://doc316en.candera.eu/link/598#bkmrk-onclick)</span> Behavior in the right side of the Scene Tree view.

<div class="contents" id="bkmrk--551"><div class="contents"><div class="contents"><div class="header"><div class="header"><div class="contents"><div class="contents" id="bkmrk--552"><div class="contents"><div class="textblock"><div drawio-diagram="2675"><img src="https://doc316en.candera.eu/uploads/images/drawio/2023-02/drawing-7-1677466750.png" alt=""/></div>

</div></div></div></div></div></div></div></div></div>7\. Select the <span style="color: rgb(230, 126, 35);">[Send Value as Event](https://doc316en.candera.eu/link/582#bkmrk-send-value-as-event)</span> Behavior in the right side of the Scene Tree view and set the "Value" propert to "5,00".

<div class="contents" id="bkmrk--554"><div class="contents"><div class="contents"><div class="header"><div class="header"><div class="contents"><div class="contents" id="bkmrk--555"><div class="contents"><div class="textblock"><div drawio-diagram="2676"><img src="https://doc316en.candera.eu/uploads/images/drawio/2023-02/drawing-7-1677466761.png" alt=""/></div>

</div></div></div></div></div></div></div></div></div>8\. Save your solution and start the Player through the Play button (with the option "Generate and Play") in the Toolbar on the top to see the result.

<div class="contents" id="bkmrk--557"><div class="contents"><div class="contents"><div class="header"><div class="header"><div class="contents"><div class="contents" id="bkmrk--558"><div class="contents"><div class="textblock"><div drawio-diagram="2677"><img src="https://doc316en.candera.eu/uploads/images/drawio/2023-02/drawing-7-1677466774.png" alt=""/></div>

</div></div></div></div></div></div></div></div></div>9\. When the FlipBook Control is clicked in the Player, the image of the FlipBook is switched.

<div class="contents" id="bkmrk--560"><div class="contents"><div class="contents"><div class="header"><div class="header"><div class="contents"><div class="contents"><div class="contents"><div class="textblock"><div drawio-diagram="2678"><img src="https://doc316en.candera.eu/uploads/images/drawio/2023-02/drawing-7-1677466812.png" alt=""/></div>

</div></div></div></div></div></div></div></div></div>
#### Transform Gesture Action Example  


1\. Drag&amp;drop a SolidColorNode from the "Nodes 2D" Panel of the Toolbox to the SceneEditor or the Scene Tree.

<div class="contents" id="bkmrk--562"><div class="contents"><div class="contents"><div class="header"><div class="header"><div class="contents"><div class="contents"><div class="contents" id="bkmrk--563"><div class="contents"><div class="textblock"><div drawio-diagram="2685"><img src="https://doc316en.candera.eu/uploads/images/drawio/2023-02/drawing-7-1677471881.png" alt=""/></div>

</div></div></div></div></div></div></div></div></div></div>2\. Select the SolidColorNode's SolodColorBushBlend effect and change the Size properties to 100,00 and 100,0 in the Properties view.   
The SolidColorNode is going to be our touchable content, which should be large enough to touch it with two fingers. This could also be achieved by extending the touchable area of the RenderNode (defining the Bounding Rectangle). But please beware that this will have consequences on the laid out size.

<div class="contents" id="bkmrk--565"><div class="contents"><div class="contents"><div class="header"><div class="header"><div class="contents"><div class="contents"><div class="contents" id="bkmrk--566"><div class="contents"><div class="textblock"><div drawio-diagram="2686"><img src="https://doc316en.candera.eu/uploads/images/drawio/2023-02/drawing-7-1677471909.png" alt=""/></div>

</div></div></div></div></div></div></div></div></div></div>3\. Drag&amp;drop a <span style="color: rgb(230, 126, 35);">[Transform Gesture](https://doc316en.candera.eu/link/582#bkmrk-transform-gesture-ac)</span> Action Behavior (which is a <span style="color: rgb(230, 126, 35);">[Action - Gesture Behavior](https://doc316en.candera.eu/link/582#bkmrk--8)</span>) and a <span style="color: rgb(230, 126, 35);">[Handle Control State](https://doc316en.candera.eu/link/598#bkmrk-handle-control-state)</span> Behavior (which is a <span style="color: rgb(230, 126, 35);">[Control - Internal Behavior](https://doc316en.candera.eu/link/598#bkmrk-internal-control-beh)</span>) from the Behaviors Panel of the ToolBox onto the SolidColorNode in the SceneTree. The <span style="color: rgb(230, 126, 35);">[Handle Control State](https://doc316en.candera.eu/link/598#bkmrk-handle-control-state)</span> Behavior is needed in order for the TextButton Control to receive Input Events.

<div class="contents" id="bkmrk--568"><div class="contents"><div class="contents"><div class="header"><div class="header"><div class="contents"><div class="contents"><div class="contents" id="bkmrk--569"><div class="contents"><div class="textblock"><div drawio-diagram="2687"><img src="https://doc316en.candera.eu/uploads/images/drawio/2023-02/drawing-7-1677471949.png" alt=""/></div>

</div></div></div></div></div></div></div></div></div></div>4\. Select the <span style="color: rgb(230, 126, 35);">[Transform Gesture](https://doc316en.candera.eu/link/582#bkmrk-transform-gesture-ac)</span> Action Behavior and configure Panning Minimum and Maximum values for x and y coordinate.

<div class="contents" id="bkmrk--571"><div class="contents"><div class="contents"><div class="header"><div class="header"><div class="contents"><div class="contents"><div class="contents" id="bkmrk--572"><div class="contents"><div class="textblock"><div drawio-diagram="2688"><img src="https://doc316en.candera.eu/uploads/images/drawio/2023-02/drawing-7-1677471964.png" alt=""/></div>

</div></div></div></div></div></div></div></div></div></div>5\. Save your solution and start the Player through the Play button (with the option "Generate and Play") in the Toolbar on the top to see the result.

<div class="contents" id="bkmrk--574"><div class="contents"><div class="contents"><div class="header"><div class="header"><div class="contents"><div class="contents"><div class="contents" id="bkmrk--575"><div class="contents"><div class="textblock"><div drawio-diagram="2689"><img src="https://doc316en.candera.eu/uploads/images/drawio/2023-02/drawing-7-1677471979.png" alt=""/></div>

</div></div></div></div></div></div></div></div></div></div>6\. When panning the SolidColorNode you can drag it around in the area that has been defined in the <span style="color: rgb(230, 126, 35);">[Transform Gesture](https://doc316en.candera.eu/link/582#bkmrk-transform-gesture-ac)</span> Action Behavior's Panning Properties. If you do have a touch screen available, you can also try pinching and rotating the SolidColorNode.

<div class="contents" id="bkmrk--577"><div class="contents"><div class="contents"><div class="header"><div class="header"><div class="contents"><div class="contents"><div class="contents" id="bkmrk--578"><div class="contents"><div class="textblock"><div drawio-diagram="2690"><img src="https://doc316en.candera.eu/uploads/images/drawio/2023-02/drawing-7-1677471997.png" alt=""/></div>

</div></div></div></div></div></div></div></div></div></div>
#### Transform Gesture Condition Example  


1\. Drag&amp;drop a SolidColorNode from the "Nodes 2D" Panel of the Toolbox to the SceneEditor or the Scene Tree.

<div class="contents" id="bkmrk--580"><div class="contents"><div class="contents"><div class="header"><div class="header"><div class="contents"><div class="contents"><div class="contents" id="bkmrk--581"><div class="contents"><div class="textblock"><div drawio-diagram="2691"><img src="https://doc316en.candera.eu/uploads/images/drawio/2023-02/drawing-7-1677472095.png" alt=""/></div>

</div></div></div></div></div></div></div></div></div></div>2\. Select the SolidColorNode's SolidColorBushBlend effect and change the Size properties to 100,00 and 100,0 in the Properties view.   
The SolidColorNode is going to be our touchable content, which should be large enough to touch it with two fingers. This could also be achieved by extending the touchable area of the RenderNode (defining the Bounding Rectangle). But please beware that this will have consequences on the laid out size.

<div class="contents" id="bkmrk--583"><div class="contents"><div class="contents"><div class="header"><div class="header"><div class="contents"><div class="contents"><div class="contents" id="bkmrk--584"><div class="contents"><div class="textblock"><div drawio-diagram="2692"><img src="https://doc316en.candera.eu/uploads/images/drawio/2023-02/drawing-7-1677472127.png" alt=""/></div>

</div></div></div></div></div></div></div></div></div></div>3\. Drag&amp;drop a <span style="color: rgb(230, 126, 35);">[Event Handler](https://doc316en.candera.eu/link/598#bkmrk-event-handler)</span> Behavior (which is a <span style="color: rgb(230, 126, 35);">[Control Behavior](https://doc316en.candera.eu/link/598#bkmrk-page-title)</span>) and a <span style="color: rgb(230, 126, 35);">[Handle Control State](https://doc316en.candera.eu/link/598#bkmrk-handle-control-state)</span> Behavior (which is a <span style="color: rgb(230, 126, 35);">[Control - Internal Behavior](https://doc316en.candera.eu/link/598#bkmrk-internal-control-beh)</span>) from the Behaviors Panel of the ToolBox onto the SolidColorNode in the SceneTree. The <span style="color: rgb(230, 126, 35);">[Handle Control State](https://doc316en.candera.eu/link/598#bkmrk-handle-control-state)</span> Behavior is needed in order for the TextButton Control to receive Input Events.

<div class="contents" id="bkmrk--586"><div class="contents"><div class="contents"><div class="header"><div class="header"><div class="contents"><div class="contents"><div class="contents" id="bkmrk--587"><div class="contents"><div class="textblock"><div drawio-diagram="2694"><img src="https://doc316en.candera.eu/uploads/images/drawio/2023-02/drawing-7-1677472255.png" alt=""/></div>

</div></div></div></div></div></div></div></div></div></div>4\. Drag&amp;drop an <span style="color: rgb(230, 126, 35);">[Event Handler](https://doc316en.candera.eu/link/598#bkmrk-event-handler)</span> Behavior (which is a <span style="color: rgb(230, 126, 35);">[Control Behavior](https://doc316en.candera.eu/link/598#bkmrk-page-title)</span>) from the Toolbox view onto the SolidColorNode or its parent node in the Scene Tree view.

<div class="contents" id="bkmrk--589"><div class="contents"><div class="contents"><div class="header"><div class="header"><div class="contents"><div class="contents"><div class="contents" id="bkmrk--590"><div class="contents"><div class="textblock"><div drawio-diagram="2695"><img src="https://doc316en.candera.eu/uploads/images/drawio/2023-02/drawing-7-1677472287.png" alt=""/></div>

</div></div></div></div></div></div></div></div></div></div>5\. Select the SolidColorNode and drag&amp;drop a <span style="color: rgb(230, 126, 35);">[Transform Gesture](https://doc316en.candera.eu/link/597#bkmrk-transform-gesture)</span> Condition Behavior (which is a <span style="color: rgb(230, 126, 35);">[Condition - Input Behavior](https://doc316en.candera.eu/link/597#bkmrk-%C2%A0-1)</span>) onto the <span style="color: rgb(230, 126, 35);">[Event Handler](https://doc316en.candera.eu/link/598#bkmrk-event-handler)</span> EventHandler's Condition on the right side of the Scene Tree View.

<div class="contents" id="bkmrk--592"><div class="contents"><div class="contents"><div class="header"><div class="header"><div class="contents"><div class="contents"><div class="contents" id="bkmrk--593"><div class="contents"><div class="textblock"><div drawio-diagram="2696"><img src="https://doc316en.candera.eu/uploads/images/drawio/2023-02/drawing-7-1677472332.png" alt=""/></div>

</div></div></div></div></div></div></div></div></div></div>6\. Select the SolidColorNode and drag&amp;drop a <span style="color: rgb(230, 126, 35);">[Set Color](https://doc316en.candera.eu/link/582#bkmrk-set-color)</span> Behavior (which is a <span style="color: rgb(230, 126, 35);">[Action - Property Behavior](https://doc316en.candera.eu/link/582#bkmrk-property-action-beha)</span>) onto the <span style="color: rgb(230, 126, 35);">[Event Handler](https://doc316en.candera.eu/link/598#bkmrk-event-handler)</span> EventHandler's Actions on the right side of the Scene Tree View.

<div class="contents" id="bkmrk--595"><div class="contents"><div class="contents"><div class="header"><div class="header"><div class="contents"><div class="contents"><div class="contents" id="bkmrk--596"><div class="contents"><div class="textblock"><div drawio-diagram="2697"><img src="https://doc316en.candera.eu/uploads/images/drawio/2023-02/drawing-7-1677472363.png" alt=""/></div>

</div></div></div></div></div></div></div></div></div></div>7\. Select the <span style="color: rgb(230, 126, 35);">[Set Color](https://doc316en.candera.eu/link/582#bkmrk-set-color)</span> Behavior and change the Color to red.

<div class="contents" id="bkmrk--598"><div class="contents"><div class="contents"><div class="header"><div class="header"><div class="contents"><div class="contents"><div class="contents" id="bkmrk--599"><div class="contents"><div class="textblock"><div drawio-diagram="2698"><img src="https://doc316en.candera.eu/uploads/images/drawio/2023-02/drawing-7-1677472383.png" alt=""/></div>

</div></div></div></div></div></div></div></div></div></div>8\. Save your solution and start the Player through the Play button (with the option "Generate and Play") in the Toolbar on the top to see the result.

<div class="contents" id="bkmrk--601"><div class="contents"><div class="contents"><div class="header"><div class="header"><div class="contents"><div class="contents"><div class="contents" id="bkmrk--602"><div class="contents"><div class="textblock"><div drawio-diagram="2699"><img src="https://doc316en.candera.eu/uploads/images/drawio/2023-02/drawing-7-1677472394.png" alt=""/></div>

</div></div></div></div></div></div></div></div></div></div>9\. When a transform gesture is detected, a TransformEvent is sent to the touched node. If the event matches the condition, the configured action will be performed. In our case, when a transform gesture is detected, the SetColor Action will be performed and the SolidColorNode changes its color.

<div class="contents" id="bkmrk--604"><div class="contents"><div class="contents"><div class="header"><div class="header"><div class="contents"><div class="contents"><div class="contents" id="bkmrk--605"><div class="contents"><div class="textblock"><div drawio-diagram="2700"><img src="https://doc316en.candera.eu/uploads/images/drawio/2023-02/drawing-7-1677472413.png" alt=""/></div>

</div></div></div></div></div></div></div></div></div></div>
#### Swipe Gesture Example  


1\. Drag&amp;drop a SolidColorNode from the "Nodes 2D" Panel of the Toolbox to the SceneEditor or the Scene Tree.

<div class="contents" id="bkmrk--607"><div class="contents"><div class="contents"><div class="header"><div class="header"><div class="contents"><div class="contents"><div class="contents" id="bkmrk--608"><div class="contents"><div class="textblock"><div drawio-diagram="2701"><img src="https://doc316en.candera.eu/uploads/images/drawio/2023-02/drawing-7-1677472523.png" alt=""/></div>

</div></div></div></div></div></div></div></div></div></div>2\. Select the SolidColorNode's SolidColorBushBlend effect and change the Size properties to 100,00 and 100,0 in the Properties view.   
The SolidColorNode is going to be our touchable content, which should be large enough to touch it with two fingers. This could also be achieved by extending the touchable area of the RenderNode (defining the Bounding Rectangle). But please beware that this will have consequences on the laid out size.

<div class="contents" id="bkmrk--610"><div class="contents"><div class="contents"><div class="header"><div class="header"><div class="contents"><div class="contents"><div class="contents" id="bkmrk--611"><div class="contents"><div class="textblock"><div drawio-diagram="2702"><img src="https://doc316en.candera.eu/uploads/images/drawio/2023-02/drawing-7-1677472556.png" alt=""/></div>

</div></div></div></div></div></div></div></div></div></div>3\. Drag&amp;drop a <span style="color: rgb(230, 126, 35);">[Event Handler](https://doc316en.candera.eu/link/598#bkmrk-event-handler)</span> Behavior (which is a <span style="color: rgb(230, 126, 35);">[Control Behavior](https://doc316en.candera.eu/link/598#bkmrk-page-title)</span>) and a [<span style="color: rgb(230, 126, 35);">Handle Control State</span>](https://doc316en.candera.eu/link/598#bkmrk-handle-control-state) Behavior (which is a <span style="color: rgb(230, 126, 35);">[Control - Internal Behavior](https://doc316en.candera.eu/link/598#bkmrk-internal-control-beh)</span>) from the Behaviors Panel of the ToolBox onto the SolidColorNode in the SceneTree. The <span style="color: rgb(230, 126, 35);">[Handle Control State](https://doc316en.candera.eu/link/598#bkmrk-handle-control-state)</span> Behavior is needed in order for the TextButton Control to receive Input Events.

<div class="contents" id="bkmrk--613"><div class="contents"><div class="contents"><div class="header"><div class="header"><div class="contents"><div class="contents"><div class="contents" id="bkmrk--614"><div class="contents"><div class="textblock"><div drawio-diagram="2703"><img src="https://doc316en.candera.eu/uploads/images/drawio/2023-02/drawing-7-1677472578.png" alt=""/></div>

</div></div></div></div></div></div></div></div></div></div>4\. Select the SolidColorNode and drag&amp;drop a <span style="color: rgb(230, 126, 35);">[Swipe Gesture](https://doc316en.candera.eu/link/597#bkmrk-swipe-gesture-condit)</span> Condition Behavior (which is a <span style="color: rgb(230, 126, 35);">[Condition - Input Behavior](https://doc316en.candera.eu/link/597#bkmrk-%C2%A0-1)</span>) onto the <span style="color: rgb(230, 126, 35);">[Event Handler](https://doc316en.candera.eu/link/598#bkmrk-event-handler)</span> EventHandler's Condition on the right side of the Scene Tree View.

<div class="contents" id="bkmrk--616"><div class="contents"><div class="contents"><div class="header"><div class="header"><div class="contents"><div class="contents"><div class="contents" id="bkmrk--617"><div class="contents"><div class="textblock"><div drawio-diagram="2704"><img src="https://doc316en.candera.eu/uploads/images/drawio/2023-02/drawing-7-1677472613.png" alt=""/></div>

</div></div></div></div></div></div></div></div></div></div>5\. Select the <span style="color: rgb(230, 126, 35);">[Swipe Gesture](https://doc316en.candera.eu/link/597#bkmrk-swipe-gesture-condit)</span> Condition Behavior and configure its direction to "Right".

<div class="contents" id="bkmrk--619"><div class="contents"><div class="contents"><div class="header"><div class="header"><div class="contents"><div class="contents"><div class="contents" id="bkmrk--620"><div class="contents"><div class="textblock"><div drawio-diagram="2705"><img src="https://doc316en.candera.eu/uploads/images/drawio/2023-02/drawing-7-1677472642.png" alt=""/></div>

</div></div></div></div></div></div></div></div></div></div>6\. Select the SolidColorNode and drag&amp;drop a <span style="color: rgb(230, 126, 35);">[Set Color](https://doc316en.candera.eu/link/582#bkmrk-set-color)</span> Behavior (which is a <span style="color: rgb(230, 126, 35);">[Action - Property Behavior](https://doc316en.candera.eu/link/582#bkmrk-property-action-beha)</span>) onto the <span style="color: rgb(230, 126, 35);">[Event Handler](https://doc316en.candera.eu/link/598#bkmrk-event-handler)</span> EventHandler's Actions on the right side of the Scene Tree View.

<div class="contents" id="bkmrk--622"><div class="contents"><div class="contents"><div class="header"><div class="header"><div class="contents"><div class="contents"><div class="contents" id="bkmrk--623"><div class="contents"><div class="textblock"><div drawio-diagram="2706"><img src="https://doc316en.candera.eu/uploads/images/drawio/2023-02/drawing-7-1677472735.png" alt=""/></div>

</div></div></div></div></div></div></div></div></div></div>7\. Select the <span style="color: rgb(230, 126, 35);">[Set Color](https://doc316en.candera.eu/link/582#bkmrk-set-color)</span> Behavior and change the Color to red.

<div class="contents" id="bkmrk--625"><div class="contents"><div class="contents"><div class="header"><div class="header"><div class="contents"><div class="contents"><div class="contents" id="bkmrk--626"><div class="contents"><div class="textblock"><div drawio-diagram="2707"><img src="https://doc316en.candera.eu/uploads/images/drawio/2023-02/drawing-7-1677472750.png" alt=""/></div>

</div></div></div></div></div></div></div></div></div></div>8\. Copy the EventHandler (with both its Condition and its Action you configured in steps 3 - 6 of this example) by right-clicking on the EventHandler in the right side of the Scene Tree View and choosing "Copy" (or via keyboard shortcut use Ctrl+C). Paste the EventHandler by right-clicking on the Behaviors (the topmost entry, where it says "Behaviors") in the right side of the Scene Scene Tree view and choosing "Paste" (or via keyboard shortcut select the topmost entry where it says "Behaviors" and press Ctrl+V).

<div class="contents" id="bkmrk--628"><div class="contents"><div class="contents"><div class="header"><div class="header"><div class="contents"><div class="contents"><div class="contents" id="bkmrk--629"><div class="contents"><div class="textblock"><div drawio-diagram="2709"><img src="https://doc316en.candera.eu/uploads/images/drawio/2023-02/drawing-7-1677472811.png" alt=""/></div>

</div></div></div></div></div></div></div></div></div></div>9\. By duplicating the EventHandler you have created "Event Handler\_1" with Condition "Swipe Gesture\_1" and Action "Set Color\_1".

<div class="contents" id="bkmrk--631"><div class="contents"><div class="contents"><div class="header"><div class="header"><div class="contents"><div class="contents"><div class="contents" id="bkmrk--632"><div class="contents"><div class="textblock"><div drawio-diagram="2710"><img src="https://doc316en.candera.eu/uploads/images/drawio/2023-02/drawing-7-1677472824.png" alt=""/></div>

</div></div></div></div></div></div></div></div></div></div>10\. Select the "Swipe Gesture\_1" Condition and set its Direction to "Left". Select the "Set Color\_1" Action and configure its color to Green.

<div class="contents" id="bkmrk--634"><div class="contents"><div class="contents"><div class="header"><div class="header"><div class="contents"><div class="contents"><div class="contents" id="bkmrk--635"><div class="contents"><div class="textblock"><div drawio-diagram="2711"><img src="https://doc316en.candera.eu/uploads/images/drawio/2023-02/drawing-7-1677472857.png" alt=""/></div>

</div></div></div></div></div></div></div></div></div></div>11\. Save your solution and start the Player through the Play button (with the option "Generate and Play") in the Toolbar on the top to see the result.

<div class="contents" id="bkmrk--637"><div class="contents"><div class="contents"><div class="header"><div class="header"><div class="contents"><div class="contents"><div class="contents" id="bkmrk--638"><div class="contents"><div class="textblock"><div drawio-diagram="2712"><img src="https://doc316en.candera.eu/uploads/images/drawio/2023-02/drawing-7-1677472871.png" alt=""/></div>

</div></div></div></div></div></div></div></div></div></div>12\. In the beginning the SolidColorNode is white. But after a swipe to the right, the SolidColorNode is gets red. If you swipe to the left, the SolidColorNode gets green.

<div class="contents" id="bkmrk-initial-color-after-"><div class="contents"><div class="contents"><div class="header"><div class="header"><div class="contents"><div class="contents"><div class="contents"><div class="contents"><div class="textblock"><table border="0"><tbody><tr><td valign="top"><div class="image"><div drawio-diagram="2713"><img src="https://doc316en.candera.eu/uploads/images/drawio/2023-02/drawing-7-1677472911.png" alt=""/></div>

</div></td><td valign="top"><div class="image"><div drawio-diagram="2715"><img src="https://doc316en.candera.eu/uploads/images/drawio/2023-02/drawing-7-1677472931.png" alt=""/></div>

</div></td><td valign="top"><div class="image"><div drawio-diagram="2716"><img src="https://doc316en.candera.eu/uploads/images/drawio/2023-02/drawing-7-1677472948.png" alt=""/></div>

</div></td></tr><tr><td align="center">*Initial color*</td><td align="center">*After swipe right*</td><td align="center">*After swipe left*</td></tr></tbody></table>

</div></div></div></div></div></div></div></div></div></div>
#### Scroll View Example  


1\. Drag&amp;drop a ScrollView Control from the Controls Panel of the Toolbox to the Scene Editor or the Scene Tree.

<div class="contents" id="bkmrk--643"><div class="contents"><div class="contents"><div class="header"><div class="header"><div class="contents"><div class="contents"><div class="contents"><div class="contents" id="bkmrk--644"><div class="contents"><div class="textblock"><div drawio-diagram="2717"><img src="https://doc316en.candera.eu/uploads/images/drawio/2023-02/drawing-7-1677473077.png" alt=""/></div>

</div></div></div></div></div></div></div></div></div></div></div>2\. Drag&amp;drop a StackLayout from the "Nodes2D" Panel of the ToolBox onto the ContentAnchor of the ScrollView Control in the Scene Tree.

<div class="contents" id="bkmrk--646"><div class="contents"><div class="contents"><div class="header"><div class="header"><div class="contents"><div class="contents"><div class="contents"><div class="contents" id="bkmrk--647"><div class="contents"><div class="textblock"><div drawio-diagram="2718"><img src="https://doc316en.candera.eu/uploads/images/drawio/2023-02/drawing-7-1677473134.png" alt=""/></div>

</div></div></div></div></div></div></div></div></div></div></div>3\. Change the Layouter Arrangement of the StackLayout to "vertical".

<div class="contents" id="bkmrk--649"><div class="contents"><div class="contents"><div class="header"><div class="header"><div class="contents"><div class="contents"><div class="contents"><div class="contents" id="bkmrk--650"><div class="contents"><div class="textblock"><div drawio-diagram="2719"><img src="https://doc316en.candera.eu/uploads/images/drawio/2023-02/drawing-7-1677473146.png" alt=""/></div>

</div></div></div></div></div></div></div></div></div></div></div>4\. Drag&amp;drop a Text Control from the Controls Panel, a BitmapNode from the "Nodes2D" Panel of the ToolBox and another Text Control from the Control Panel onto the StackLayout in the Scene Tree.

<div class="contents" id="bkmrk--652"><div class="contents"><div class="contents"><div class="header"><div class="header"><div class="contents"><div class="contents"><div class="contents"><div class="contents" id="bkmrk--653"><div class="contents"><div class="textblock"><div drawio-diagram="2720"><img src="https://doc316en.candera.eu/uploads/images/drawio/2023-02/drawing-7-1677473184.png" alt=""/></div>

</div></div></div></div></div></div></div></div></div></div></div>5\. Select a Text Control in the Scene Tree View and set its width to "500" in the Layout Size Properties.

<div class="contents" id="bkmrk--655"><div class="contents"><div class="contents"><div class="header"><div class="header"><div class="contents"><div class="contents"><div class="contents"><div class="contents" id="bkmrk--656"><div class="contents"><div class="textblock"><div drawio-diagram="2721"><img src="https://doc316en.candera.eu/uploads/images/drawio/2023-02/drawing-7-1677473201.png" alt=""/></div>

</div></div></div></div></div></div></div></div></div></div></div>6\. In the Control Properties change the Text Property to a longer, several lines long text (newlines can be achieved via *Ctrl+Enter*). Also set the Text Control to be Multiline and enable Word Wrap.

<div class="contents" id="bkmrk--658"><div class="contents"><div class="contents"><div class="header"><div class="header"><div class="contents"><div class="contents"><div class="contents"><div class="contents" id="bkmrk--659"><div class="contents"><div class="textblock"><div drawio-diagram="2722"><img src="https://doc316en.candera.eu/uploads/images/drawio/2023-02/drawing-7-1677473212.png" alt=""/></div>

</div></div></div></div></div></div></div></div></div></div></div>7\. Repeat the previous two steps for the second Text Control.

<div class="contents" id="bkmrk--661"><div class="contents"><div class="contents"><div class="header"><div class="header"><div class="contents"><div class="contents"><div class="contents"><div class="contents" id="bkmrk--662"><div class="contents"><div class="textblock"><div drawio-diagram="2723"><img src="https://doc316en.candera.eu/uploads/images/drawio/2023-02/drawing-7-1677473240.png" alt=""/></div>

</div></div></div></div></div></div></div></div></div></div></div>8\. Select the BitmapNode in the Scene Tree View before selecting the BitmapBrushBlend Effect on the right side of the Scene Tree View. Adjust the BitmapBrushBlend Effect's image by clicking on the magnifying glass on the right of the input field.

<div class="contents" id="bkmrk--664"><div class="contents"><div class="contents"><div class="header"><div class="header"><div class="contents"><div class="contents"><div class="contents"><div class="contents" id="bkmrk--665"><div class="contents"><div class="textblock"><div drawio-diagram="2724"><img src="https://doc316en.candera.eu/uploads/images/drawio/2023-02/drawing-7-1677473273.png" alt=""/></div>

</div></div></div></div></div></div></div></div></div></div></div>9\. Set the BitmapBrushBlend Effect's image property: After clicking the magnifying glass in the properties panel, the "Select Item" Dialog is opened. Select an image from the construction kit (a preview of the image is shown when moving the mouse over the image) and press OK.

<div class="contents" id="bkmrk--667"><div class="contents"><div class="contents"><div class="header"><div class="header"><div class="contents"><div class="contents"><div class="contents"><div class="contents" id="bkmrk--668"><div class="contents"><div class="textblock"><div drawio-diagram="2725"><img src="https://doc316en.candera.eu/uploads/images/drawio/2023-02/drawing-7-1677473307.png" alt=""/></div>

</div></div></div></div></div></div></div></div></div></div></div>10\. The SceneEditor now displays the ScrollView and its contents without the possibility to scroll.

<div class="contents" id="bkmrk--670"><div class="contents"><div class="contents"><div class="header"><div class="header"><div class="contents"><div class="contents"><div class="contents"><div class="contents" id="bkmrk--671"><div class="contents"><div class="textblock"><div drawio-diagram="2726"><img src="https://doc316en.candera.eu/uploads/images/drawio/2023-02/drawing-7-1677473323.png" alt=""/></div>

</div></div></div></div></div></div></div></div></div></div></div>11\. Select the ScrollView Control in the Scene Tree View and set its Layout Size to a height of "400". After that, a vertical scrollbar is displayed in the SceneEditor.

<div class="contents" id="bkmrk--673"><div class="contents"><div class="contents"><div class="header"><div class="header"><div class="contents"><div class="contents"><div class="contents"><div class="contents" id="bkmrk--674"><div class="contents"><div class="textblock"><div drawio-diagram="2727"><img src="https://doc316en.candera.eu/uploads/images/drawio/2023-02/drawing-7-1677473358.png" alt=""/></div>

</div></div></div></div></div></div></div></div></div></div></div>12\. Save your solution and start the Player through the Play button (with the option "Generate and Play") in the Toolbar on the top to see the result.

<div class="contents" id="bkmrk--676"><div class="contents"><div class="contents"><div class="header"><div class="header"><div class="contents"><div class="contents"><div class="contents"><div class="contents" id="bkmrk--677"><div class="contents"><div class="textblock"><div drawio-diagram="2728"><img src="https://doc316en.candera.eu/uploads/images/drawio/2023-02/drawing-7-1677473378.png" alt=""/></div>

</div></div></div></div></div></div></div></div></div></div></div>13\. The ScrollView is displayed with a full functional scrollbar. When scrolling, you can check that all configured content is available: both Text Controls and one BitmapNode.

<div class="contents" id="bkmrk--679"><div class="contents"><div class="contents"><div class="header"><div class="header"><div class="contents"><div class="contents"><div class="contents"><div class="contents"><div class="contents"><div class="textblock"><div drawio-diagram="2729"><img src="https://doc316en.candera.eu/uploads/images/drawio/2023-02/drawing-7-1677473392.png" alt=""/></div>

</div></div></div></div></div></div></div></div></div></div></div>
#### Process Value Changed Event - Slider Example  


<div class="contents" id="bkmrk-drag%26drop-a-slider-a"><div class="contents"><div class="contents"><div class="header"><div class="header"><div class="contents"><div class="contents"><div class="contents"><div class="contents">1. Drag&amp;drop a Slider and a TextNode2D from the Toolbox into the Scene Editor or the Scene Tree and arrange them in a way that both are clearly visible.  
    [![grafik.png](https://doc316en.candera.eu/uploads/images/gallery/2023-04/scaled-1680-/YCOgrafik.png)](https://doc316en.candera.eu/uploads/images/gallery/2023-04/YCOgrafik.png)
2. Drag&amp;drop a Process Value Changed Event from the Toolbox onto the Slider in the Scene Tree.
3. Select the Slider in the Scene Tree and drag&amp;drop a Format String Behavior into the right side of the Scene Tree onto the Receivers part of the Process Value Changed Event.  
    [![grafik.png](https://doc316en.candera.eu/uploads/images/gallery/2023-04/scaled-1680-/Wzngrafik.png)](https://doc316en.candera.eu/uploads/images/gallery/2023-04/Wzngrafik.png)
4. Drag the Format String Behavior from the Slider's Process Value Changed Event's Receivers and drop it onto the TextNode in the Scene tree.
    
    [![grafik.png](https://doc316en.candera.eu/uploads/images/gallery/2023-04/scaled-1680-/Gx8grafik.png)](https://doc316en.candera.eu/uploads/images/gallery/2023-04/Gx8grafik.png)
5. Select the TextNode2D in the Scene Tree, so that its behaviors get visible on the right side of the Scene Tree and select the Format String Behavior. In the Properties panel configure the Text to "%d" so that the TextNode2D can correctly display the value given by the Slider  
    [![grafik.png](https://doc316en.candera.eu/uploads/images/gallery/2023-04/scaled-1680-/mzografik.png)](https://doc316en.candera.eu/uploads/images/gallery/2023-04/mzografik.png)
6. You can test the functionality already without starting the Player: Select the Slider and change its Value in the Properties panel (confirm the value by hitting the &lt;Enter&gt; key). The TextNode2D will always display the current value of the Slider.
    
    [![grafik.png](https://doc316en.candera.eu/uploads/images/gallery/2023-04/scaled-1680-/orOgrafik.png)](https://doc316en.candera.eu/uploads/images/gallery/2023-04/orOgrafik.png)
7. You can also start the Player. Manipulating the Slider knob will change the Slider's value. The TextNode2D will get updated whenever the Slider's value is changed, it will always display the Slider's value.[![grafik.png](https://doc316en.candera.eu/uploads/images/gallery/2023-04/scaled-1680-/grafik.png)](https://doc316en.candera.eu/uploads/images/gallery/2023-04/grafik.png)

</div></div></div></div></div></div></div></div></div>
#### Process Value Changed Event - State Machine Example

<div class="contents" id="bkmrk--681"><div class="contents"><div class="contents"><div class="header"><div class="header"><div class="contents"><div class="contents"><div class="contents"><div class="contents"><div id="bkmrk--682"></div><div class="header" id="bkmrk--683"></div></div></div></div></div></div></div></div></div></div>1\. Drag&amp;drop a Button and a TextNode2D from the Toolbox into the Scene Editor or Scene Tree and arrange them in a way that both are clearly visible.

[![grafik.png](https://doc316en.candera.eu/uploads/images/gallery/2023-04/scaled-1680-/2lVgrafik.png)](https://doc316en.candera.eu/uploads/images/gallery/2023-04/2lVgrafik.png)

<div class="contents" id="bkmrk--685"><div class="contents"><div class="contents"><div class="header"><div class="header"><div class="contents"><div class="contents"><div class="contents"><div class="contents"><div class="contents" id="bkmrk--686"><div class="contents"><div class="textblock">  
</div></div></div></div></div></div></div></div></div></div></div></div>2\. Create a new State Machine through the menu "State Machine" - "New State Machine...", which will open the "Add New State Machine" dialog. Adapt the State Machine's name to your needs and press "OK".

[![grafik.png](https://doc316en.candera.eu/uploads/images/gallery/2023-04/scaled-1680-/OJEgrafik.png)](https://doc316en.candera.eu/uploads/images/gallery/2023-04/OJEgrafik.png)

<div class="contents" id="bkmrk--688"><div class="contents"><div class="contents"><div class="header"><div class="header"><div class="contents"><div class="contents"><div class="contents"><div class="contents"><div class="contents" id="bkmrk--689"><div class="contents"><div class="textblock">  
</div></div></div></div></div></div></div></div></div></div></div></div>3\. Select the created State Machine and make it a global State Machine by checking the "Is Global" property in the Properties panel.

[![grafik.png](https://doc316en.candera.eu/uploads/images/gallery/2023-04/scaled-1680-/IGqgrafik.png)](https://doc316en.candera.eu/uploads/images/gallery/2023-04/IGqgrafik.png)

<div class="contents" id="bkmrk--691"><div class="contents"><div class="contents"><div class="header"><div class="header"><div class="contents"><div class="contents"><div class="contents"><div class="contents"><div class="contents" id="bkmrk--692"><div class="contents"><div class="textblock">  
</div></div></div></div></div></div></div></div></div></div></div></div>4\. Double-click your Global State Machine to open it in the State Machine Editor. Drag&amp;drop a State from the tools in the top right corner of the State Machine Editor into the State Machine diagram.

[![grafik.png](https://doc316en.candera.eu/uploads/images/gallery/2023-04/scaled-1680-/IARgrafik.png)](https://doc316en.candera.eu/uploads/images/gallery/2023-04/IARgrafik.png)

<div class="contents" id="bkmrk--694"><div class="contents"><div class="contents"><div class="header"><div class="header"><div class="contents"><div class="contents"><div class="contents"><div class="contents"><div class="contents" id="bkmrk--695"><div class="contents"><div class="textblock">  
</div></div></div></div></div></div></div></div></div></div></div></div>5\. Drag&amp;drop a Transition from the tools in the top right corner onto one of the States in the diagram, then move the mouse and click the second state of the diagram, which will draw a Transition from one State to the other.

[![grafik.png](https://doc316en.candera.eu/uploads/images/gallery/2023-04/scaled-1680-/ybGgrafik.png)](https://doc316en.candera.eu/uploads/images/gallery/2023-04/ybGgrafik.png)

<div class="contents" id="bkmrk--697"><div class="contents"><div class="contents"><div class="header"><div class="header"><div class="contents"><div class="contents"><div class="contents"><div class="contents"><div class="contents" id="bkmrk--698"><div class="contents"><div class="textblock">  
</div></div></div></div></div></div></div></div></div></div></div></div>6\. Perform the same action again, drawing a Transition in the other direction.

[![grafik.png](https://doc316en.candera.eu/uploads/images/gallery/2023-04/scaled-1680-/p5xgrafik.png)](https://doc316en.candera.eu/uploads/images/gallery/2023-04/p5xgrafik.png)

<div class="contents" id="bkmrk--700"><div class="contents"><div class="contents"><div class="header"><div class="header"><div class="contents"><div class="contents"><div class="contents"><div class="contents"><div class="contents" id="bkmrk--701"><div class="contents"><div class="textblock">  
</div></div></div></div></div></div></div></div></div></div></div></div>7\. Select a State and add an OnEntry Action. To do this, press the "+" sign. Choose the "Send Value Changed As Event" from the drop-down list and configure a Float value of "1.00".

[![grafik.png](https://doc316en.candera.eu/uploads/images/gallery/2023-04/scaled-1680-/hSNgrafik.png)](https://doc316en.candera.eu/uploads/images/gallery/2023-04/hSNgrafik.png)

<div class="contents" id="bkmrk--703"><div class="contents"><div class="contents"><div class="header"><div class="header"><div class="contents"><div class="contents"><div class="contents"><div class="contents"><div class="contents" id="bkmrk--704"><div class="contents"><div class="textblock">  
</div></div></div></div></div></div></div></div></div></div></div></div>8\. Click the magnifying glass next to the Target Node property to open the "Choose Item" dialog, where you can select the Scene's TextNode2D.

[![grafik.png](https://doc316en.candera.eu/uploads/images/gallery/2023-04/scaled-1680-/37cgrafik.png)](https://doc316en.candera.eu/uploads/images/gallery/2023-04/37cgrafik.png)

<div class="contents" id="bkmrk--706"><div class="contents"><div class="contents"><div class="header"><div class="header"><div class="contents"><div class="contents"><div class="contents"><div class="contents"><div class="contents" id="bkmrk--707"><div class="contents"><div class="textblock">  
</div></div></div></div></div></div></div></div></div></div></div></div>9\. Now, select the other State and perform the same action again, but configure a different value in the "Send Value Changed As Event", e.g. a Float value of "2.00".

10\. Drag&amp;drop a "Process Value Changed Event" from the Toolbox onto the TextNode2D in the Scene Tree and drag&amp;drop a "Format String" behavior onto the Receiver's part of the "Process Value Changed Event".

[![grafik.png](https://doc316en.candera.eu/uploads/images/gallery/2023-04/scaled-1680-/Yglgrafik.png)](https://doc316en.candera.eu/uploads/images/gallery/2023-04/Yglgrafik.png)

<div class="contents" id="bkmrk--709"><div class="contents"><div class="contents"><div class="header"><div class="header"><div class="contents"><div class="contents"><div class="contents"><div class="contents"><div class="contents" id="bkmrk--710"><div class="contents"><div class="textblock">  
</div></div></div></div></div></div></div></div></div></div></div></div>11\. Select the Format String Behavior and enter "%d" in the Text Property.

[![grafik.png](https://doc316en.candera.eu/uploads/images/gallery/2023-04/scaled-1680-/3jEgrafik.png)](https://doc316en.candera.eu/uploads/images/gallery/2023-04/3jEgrafik.png)

<div class="contents" id="bkmrk--712"><div class="contents"><div class="contents"><div class="header"><div class="header"><div class="contents"><div class="contents"><div class="contents"><div class="contents"><div class="contents" id="bkmrk--713"><div class="contents"><div class="textblock">  
</div></div></div></div></div></div></div></div></div></div></div></div>12\. Save your solution and start the Player. Whenever you press the button, a state transition will be performed. Each of the two states is configured with a different value (1.00 or 2.00), which will be sent as event. The TextNode2D will receive this value and display it. So, repeatedly pressing the button will change the displayed value from 1 to 2 and back to 1 etc.

[![grafik.png](https://doc316en.candera.eu/uploads/images/gallery/2023-04/scaled-1680-/3RBgrafik.png)](https://doc316en.candera.eu/uploads/images/gallery/2023-04/3RBgrafik.png)


#### Usecase for Send Value Changed as Event and reception in state machine(s)   


**Triggering State Transitions using Buttons**

This example demonstrates the usage of "Send Value Changed as Event" in combination with a local as well as a global state machine.

**Setting up the Scene**

For this example, two groups are used each with two buttons and a color node. The buttons are used to send events with values "0" and "1". The color node is used to display the corresponding state of the associated state machine.

1\. Drag&amp;Drop a StackLayout onto the scene and rename to "Group"

2\. Drag&amp;Drop a StackLayout onto the root group and rename to "GlobalGroup". Set the property "Layouter &gt; Arrangement" to "Vertical"

3\. Drag&amp;Drop a TextNode into the GlobalGroup and change name and text to "Global". Add two TextButtons rename to "GlobalButton\_Send\_0" and "GlobalButton\_Send\_1" and change the text to "0" and "1". Add a SolidColorNode and rename to "GlobalTarget". Set property "StretchBehavior" to "Fill".

4\. Repeat Step 2. and 3. using "Local" for the names (as displayed in the screenshot).

<div class="contents" id="bkmrk--715"><div class="contents"><div class="contents"><div class="header"><div class="header"><div class="contents"><div class="contents"><div class="contents"><div class="contents"><div drawio-diagram="4110"><img src="https://doc316en.candera.eu/uploads/images/drawio/2023-09/drawing-7-1693531116.png" alt=""/></div>

</div></div></div></div></div></div></div></div></div>**Setting up the State Machines**

1\. In Solution Explorer in "Solution &gt; State Machines" from the context menu use "Add &gt; New Item…". In the dialog select "StateMachine" and change name to "GlobalChangeColorOnEvent"

2\. Open State Machine Editor by double clicking on the created state machine. It shows an initial state and a state with a transition.

3\. Drag&amp;Drop a new State onto StateMachine canvas. Rename the two states to "Value\_Is\_0" and "Value\_Is\_1".

4\. Drag&amp;Drop a Transition starting from State "Value\_Is\_0" to "Value\_Is\_1". Rename it to "If\_Value\_1". In the property panel in the "Transition" section set the property "Event" to "Value Changed" and property "Condition" to "Check Changed Value". In the "Condition parameters" section set "ConditionOperator" to "Equal" and "ConditionValue" to "Int32" and value "1".

5\. Repeat Step 4. for the transition in opposite direction. Use "If\_Value\_0" as a name, and for the "ConditionValue" property use value "0".

6\. In the "Solution Explorer" clone the state machine "GlobalChangeColorOnEvent" naming it "LocalChangeColorOnEvent".

7\. Set the property settings of the cloned state machine (set "Transition &gt; Event" to "Value Changed", "Transition &gt; Condition" to "Check Changed Value", "Condition parameters &gt; ConditionOperator" to "Equal" and "Condition parameters &gt; ConditionValue" to "Int32" and value "0" and "1", respectively).

**Connecting Scene and StateMachines**

1\. In Scene Tree open "GlobalButton\_Send\_1". From "Behaviors &gt; Action &gt; Property" drag&amp;drop a "Send Value Changed As Event" action onto the buttons "Actions" section in the "Behaviors" tree. In the property panel of the added action, change "Value" to "Int32" and value "1" and "EventDispatchStrategy" to "Bubble".

2\. Repeat Step 1 for the other buttons "GlobalButton\_Send\_0", "LocalButton\_Send\_1", and "LocalButton\_Send\_1", with values set accordingly.

3\. In Solution Explorer open state machine "GlobalChangeColorOnEvent". Select Transition "If\_Value\_1". In the properties panel set "Condition Parameters &gt; Sender" to "Scene2D &gt; Group &gt; GlobalGroup &gt; GlobalButton\_Send\_1".

4\. Repeat Step 3 for Transition "If\_Value\_0" using "GlobalButton\_Send\_0".

5\. In the State Machine Editor, select state "Value\_Is\_0". From "Behaviors &gt; Action &gt; Property" drag&amp;Drop a "Set Color" action onto the "On Entry Actions" section in the transition’s actions editor.

6\. Select the new action and in the properties panel set "TargetNode" to "Scene2D &gt; Group &gt; GlobalGroup &gt; GlobalTarget" and "Color" to a color that is associated with the global value "0" (for example #FFD900FF)

7\. Repeat step 5 and 6 for state "Value\_Is\_1" (using a different color, such as #0E00FFFF)

8\. Repeat Step 3 – 7 for state machine "LocalChangeColorOnEvent" referring to the nodes in "LocalGroup" instead and using different colors (for example #00FF00FF for value "0" and #FF0000FF for value "1").

9\. Select the state machine "GlobalChangeColorOnEvent" and change its property "Is Global" to "true".

10\. In Scene Tree select "Scene2D &gt; Group" and drag&amp;drop a StateMachine behavior onto its behavior tree. In the properties panel set "StateMachine" to "Solution &gt; State Machines &gt; LocalChangeColorOnEvent".

**Result and Conclusion**

Generate and play the solution to see the following result:

<div class="contents" id="bkmrk--718"><div class="contents"><div class="contents"><div class="header"><div class="header"><div class="contents"><div class="contents"><div class="contents"><div class="contents"><div drawio-diagram="4109"><img src="https://doc316en.candera.eu/uploads/images/drawio/2023-09/drawing-7-1693531086.png" alt=""/></div>

</div></div></div></div></div></div></div></div></div>The following aspects have been considered in this example:

<div class="contents" id="bkmrk-a-combination-of-%22se"><div class="contents"><div class="header"><div class="header"><div class="contents"><div class="contents"><div class="contents"><div class="contents"><div class="contents"><div class="contents"><div class="textblock">- A combination of "Send Value Changed as Event" action and "Check Changed Value" behavior are used to trigger state transitions in a global and a local state machine.
- The "Send Value Changed as Event" action provides variants for the "EventDispatchStrategy" property. Please refer to <span style="color: rgb(230, 126, 35);">[Behaviors and Events](https://doc316en.candera.eu/link/565#bkmrk-page-title)</span>. In this example, the "Bubble" strategy was applied as it is very simple to understand.
- The global state machine receives all bubbling events that have not been consumed already.
- To avoid that the two state machines react on the same events, the "Sender" property in the condition parameters of the state transitions should be used.

</div></div></div></div></div></div></div></div></div></div></div>#### Set MVG Fill Colour

<div id="bkmrk--721">  
</div><div id="bkmrk-%E3%83%84%E3%83%BC%E3%83%AB%E3%83%9C%E3%83%83%E3%82%AF%E3%82%B9%E3%81%AE%E3%82%B3%E3%83%B3%E3%83%88%E3%83%AD%E3%83%BC%E3%83%AB%EF%BC%9Etouch">1. Drag and drop TextButton (Controls &gt; Touchable) and MVG Rect Node (Nodes 2D) from the Toolbox onto the Scene Editor or Scene Tree.  
    <div drawio-diagram="9447"><img src="http://cgi316jp.candera.eu/uploads/images/drawio/2026-01/drawing-4-1767591704.png" alt=""/></div>
2. Select the TextButton node in the Scene Tree.  
    In the Properties panel, under Control &gt; Text, set the value to “Change Color.”  
    <div drawio-diagram="8877"><img src="https://doc316en.candera.eu/uploads/images/drawio/2026-01/drawing-4-1767685309.png" alt=""/></div>
3. Select the TextButton node again in the Scene Tree.  
    In the Extra Scene Tree, add a **Set MVG Fill Color** (Behavior: Action &gt; Property) to Event Handler &gt; Actions by dragging and dropping it from the Toolbox.  
    <div drawio-diagram="8878"><img src="https://doc316en.candera.eu/uploads/images/drawio/2026-01/drawing-4-1767685330.png" alt=""/></div>
4. Select the newly added **Set MVG Fill Color**.  
    In the Properties panel, change Color to any desired color.
5. In the **Set MVG Fill Color** properties, for TargetNode, click the item-selection icon. 
    - The **Choose Item** dialog opens.
6. In Scenes, choose Scene2D &gt; MVG Rect. 
    - The MVG Rect node is now set as the target node.
7. Next, in the Extra Scene Tree, select Condition: Check Click. 
    - Its properties appear in the Properties panel.
8. For the Sender property, click the item-selection icon. 
    - The **Choose Item** dialog opens.
9. In Scenes, choose Scene2D &gt; TextButton.
10. Click the Player button on the top toolbar to launch the Player and verify the result. 
    - When you press the TextButton, the MVG node’s fill color changes.

</div><div id="bkmrk--728">  
</div><div id="bkmrk--729">  
</div>#### Set MVG Stroke Color

<div id="bkmrk-drag-and-drop-textbu">1. Drag and drop TextButton (Controls &gt; Touchable) and MVG Rect Node (Nodes 2D) from the Toolbox onto the Scene Editor or Scene Tree.  
    <div drawio-diagram="9447"><img src="http://cgi316jp.candera.eu/uploads/images/drawio/2026-01/drawing-4-1767591704.png" alt=""/></div>
2. Select the TextButton node in the Scene Tree.  
    In the Properties panel, under Control &gt; Text, set the value to “Change Stroke Color.”  
    <div drawio-diagram="8875"><img src="https://doc316en.candera.eu/uploads/images/drawio/2026-01/drawing-4-1767685244.png" alt=""/></div>
3. Select the TextButton node again in the Scene Tree.  
    In the Extra Scene Tree, add a **Set MVG Stroke Color** (Behavior: Action &gt; Property) to Event Handler &gt; Actions by dragging and dropping it from the Toolbox.  
    <div drawio-diagram="8879"><img src="https://doc316en.candera.eu/uploads/images/drawio/2026-01/drawing-4-1767685379.png" alt=""/></div>
4. Select the newly added **Set MVG Stroke Color**.  
    In the Properties panel, change Color to any desired color.
5. In the **Set MVG Stroke Color properties, for TargetNode, click the item-selection icon. 
    - The **Choose Item** dialog opens.
6. In Scenes, choose Scene2D &gt; MVG Rect. 
    - The MVG Rect node is now set as the target node.
7. Next, in the Extra Scene Tree, select Condition: Check Click. 
    - Its properties appear in the Properties panel.
8. For the Sender property, click the item-selection icon. 
    - The **Choose Item** dialog opens.
9. In Scenes, choose Scene2D &gt; TextButton.
10. Click the Player button on the top toolbar to launch the Player and verify the result. 
    - When you press the TextButton, the MVG Rect node’s stroke color changes.
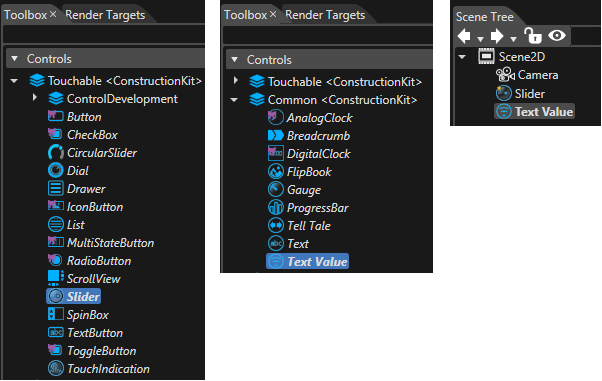
</div><div class="contents" id="bkmrk--737"></div>