# Behaviors

This chapter gives an overview of what Behaviors are and shows how to use them.

# Overview

This chapter gives an overview of Behaviors.

#### What are Behaviors?

The purpose of Behaviors is to perform modifications to the content presented to the user.

While it would be possible for the application to directly perform any required change directly to the nodes of the scene tree this would require quite complex application code. The application would need to be specifically tailored to a single solution and every change to the scene tree might require a change in the application code. To avoid this strong dependency, Behaviors are used to perform the actual modification on the content.

<p class="callout info">The following impact has to be considered: Cross-references (nodes or behaviors) to different scenes may occur. For details see [<span style="color: rgb(230, 126, 35);">Cross-Reference Implications </span>](https://doc316en.candera.eu/books/controls-and-behaviors/page/overview#bkmrk-cross-reference-impl)below.  
</p>

Their advantage is that they after they are created they can be easily used in Scene-Composer by people without any coding knowledge. By adding configurable properties they can be adapted to apply in multiple different scenarios without the need to create new ones. Further the application code can be simplified as it only needs to provide an "input" for the Behaviors. It is no longer responsible to decide how the content needs to be modified based on the input.
<div class="contents" id="bkmrk-"><div class="contents"><div class="textblock"><div drawio-diagram="2318"><img src="https://doc316en.candera.eu/uploads/images/drawio/2023-02/drawing-7-1677056275.png" alt=""/></div>

</div></div></div>Since the introduction of Behaviors in CGI-Studio 3.4.2 they are a replacement for Widgets, which are now being considered deprecated. Therefore instead of Widgets, Behaviors should be used to add functionality.

Behaviors can be considered Widgets 2.0. They can perform any task that widgets can perform but have some added features which greatly enhances their usability. While it is in most cases easy to convert an existing Widget into a Behavior a simple conversion might not make usage of the new functionality introduced negating the actual benefit from using them.

#### Comparison to Widgets

As mentioned behaviors are essentially an enhanced version of widgets. Compared to widgets they have 2 major new features to help with implementing complex functionality.

#### OWNERSHIP

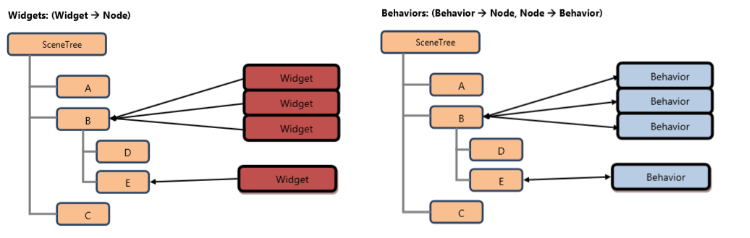
While (most) widgets are attached to a node they are considered part of the scene itself. A widget does know about the node it is attached to but the node does not know about the widget.

This can cause problems if multiple widgets should collaborate as by default they can not know which other widgets they should interact with. To overcome this problem it was required to either specify "other" widgets a property (type is [Candera::WidgetBase](http://dev.doc.cgistudio.at/APILINK/class_candera_1_1_widget_base.html "Abstract base class for Candera Widgets.")\*) directly in the widget or store custom information on the node about other widgets that are also attached.

Behaviors have simplified this by now longer considering them as part of the Scene but rather part of the node. Each node has a Behavior-Container which hold all attached behaviors for this node. Via this container it is now easily possible to communicate and collaborate between different behaviors.

<div class="contents" id="bkmrk--0"><div class="contents"><div class="textblock"><div drawio-diagram="2319"><img src="https://doc316en.candera.eu/uploads/images/drawio/2023-02/drawing-7-1677056333.png" alt=""/></div>

</div></div></div>#### EVENTS

The second major addition is the usage of events. Events allow to send "information" from one behavior to another behavior without them knowing any details about each other.

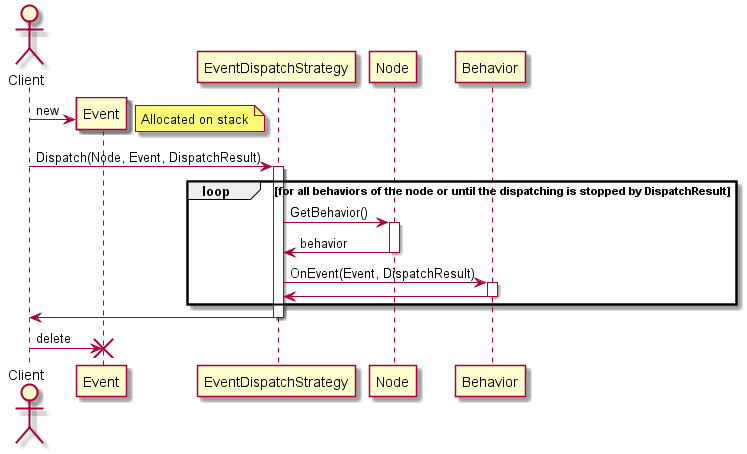
Events will be routed thought the scene tree. This is made possible by the change in ownership mentioned before. Once an event is dispatched to a node, all attached behaviors will receive the event unless the event routing is stopped.

For more information about Events see chapter <span style="color: rgb(230, 126, 35);">[Behaviors and Events](https://doc316en.candera.eu/link/565#bkmrk-page-title)</span> .

#### Cross-Reference Implications

Behaviors can have properties of type Node or Behavior. If those properties refer to parts of other scenes, those scenes will be automatically loaded by the AssetProvider.

If unloading is required, it is necessary to unload the entire cross-referencing network. Partially unloading cross-referenced scenes of such a cross-referenced network will result in dangling pointers and a will **end up in unpredictable and incorrect behavior!**

Unloading the complete cross-reference network is safe.

The same also has to be considered for Controls and State Machines.

Since the Global State Machine cannot be unloaded, it is not allowed to unload any referenced Nodes or Behaviors.

---

# Behaviors and Events

This chapter explains how the Event-System in Behaviors work.

#### General

Behaviors communicate via Events with each other and with other components of the application. For each action a specific event is implemented. An Event can carry any data or none at all. For a custom Event simply derive from [FeatStd::Event](http://dev.doc.cgistudio.at/APILINK/class_feat_std_1_1_event.html "Event serves as a base class for user derived events."). Each Behavior can return an event-result after handling an Event in the "OnEvent"-method. Behaviors are using unique identifiers (FeatStd::Internal::Identifier) to identify the sender of an event.

```
        void OnPressedEvent(const PressedEvent& event, Candera::EventDispatchResult& /*dispatchResult*/)
        {
            if (event.GetSender() == m_behavior.GetIdentifier()) {
                static_cast<void>(m_behavior.SetState(<a class="code" href="http://dev.doc.cgistudio.at/APILINK/group___behaviors_control.html#gga37959d0c8bd2f2c4ec4427a697be1365aeb7226ee20e9f17095571a522c5ff48e">ControlStateEnum::Pressed</a>, event.GetType() == <a class="code" href="http://dev.doc.cgistudio.at/APILINK/group___behaviors_control.html#gga37959d0c8bd2f2c4ec4427a697be1365aeb7226ee20e9f17095571a522c5ff48e">PressedEventType::Pressed</a>));
            }
        }
```

For a list with all Events which are used by Behaviors also check chapter <span style="color: rgb(230, 126, 35);">[Control Behaviors Events](https://doc316en.candera.eu/link/565#bkmrk-control-behaviors-ev)</span> . There you can also find their readable names (names in SC).

#### Event-dispatching

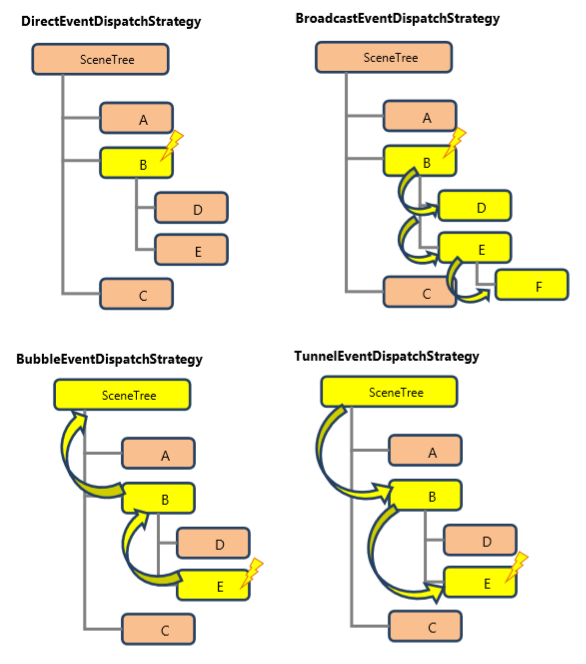
The Behavior base-class implements *DispatchEvent*-functions. Events are dispatched on a Node using one of the available *EventDispatchStrategy* objects. An Event is passed to all OnEvent function of all Behaviors. The following dispatch strategies are available:

<div class="contents" id="bkmrk-directeventdispatchs"><div class="contents"><div class="contents"><div class="textblock">- **DirectEventDispatchStrategy:** Only the behaviors of the node will receive the event.
- **BroadcastEventDispatchStrategy:** The event will be first dispatched to the current node then to all child nodes.
- **BubbleEventDispatchStrategy:** The event will be dispatched from the current node to the parent and so on until the root node is reached.
- **TunnelEventDispatchStrategy:** The event will be dispatched from the root node to the current node.

</div></div></div></div><div drawio-diagram="2320"><img src="https://doc316en.candera.eu/uploads/images/drawio/2023-02/drawing-7-1677058038.png" alt=""/></div>

<div class="contents" id="bkmrk--0"><div class="contents"><div class="textblock">  
</div></div></div>#### Event Dispatching Diagram

<div class="contents" id="bkmrk--1"><div class="contents"><div class="textblock"><div drawio-diagram="2321"><img src="https://doc316en.candera.eu/uploads/images/drawio/2023-02/drawing-7-1677058061.png" alt=""/></div>

---

</div></div></div>#### **Control Behaviors Events**

This chapter gives an overview of the most important control behaviors events. Furthermore they are listed with their readable names (names in SC). For further information of how to use them in SC see chapter <span style="color: rgb(230, 126, 35);">[EventHandler Tab](https://doc316en.candera.eu/link/569#bkmrk-page-title)</span> .

##### Events

<div class="contents" id="bkmrk-class-candera%3A%3Aproce"><div class="textblock"><dl class="reflist"><dt><table border="1" style="border-collapse: collapse; width: 100%;"><tbody><tr><td style="background-color: rgb(194, 224, 244);"><dl class="reflist"><dt>Class [Candera::ProcessValueEvent](http://dev.doc.cgistudio.at/APILINK/class_candera_1_1_process_value_event.html)</dt></dl></td></tr><tr><td><dl class="reflist"><dd>ProcessValueEvent - Value Processed</dd></dl></td></tr></tbody></table>

<div class="contents"><table border="1" style="border-collapse: collapse; width: 100%;"><tbody><tr><td style="background-color: rgb(194, 224, 244);"><dl class="reflist"><dt>Class [CgiStudioControl::AnimationEvent](http://dev.doc.cgistudio.at/APILINK/class_cgi_studio_control_1_1_animation_event.html)</dt></dl></td></tr><tr><td><dl class="reflist"><dd>AnimationEvent - Animation State Changed</dd></dl></td></tr></tbody></table>

</div></dt></dl></div></div><table border="1" id="bkmrk-class-cgistudiocontr" style="border-collapse: collapse; width: 100%; height: 59.5938px;"><colgroup><col style="width: 99.8765%;"></col></colgroup><tbody><tr style="height: 29.7969px;"><td style="background-color: rgb(194, 224, 244); height: 29.7969px;"><dl class="reflist"><dt>Class [CgiStudioControl::ArTargetEvent](http://dev.doc.cgistudio.at/APILINK/class_cgi_studio_control_1_1_ar_target_event.html)</dt></dl></td></tr><tr style="height: 29.7969px;"><td style="height: 29.7969px;">ArTargetEvent - ArTargetEvent event</td></tr></tbody></table>

<table border="1" id="bkmrk-class-cgistudiocontr-0" style="border-collapse: collapse; width: 100%; height: 59.5938px;"><colgroup><col style="width: 99.8765%;"></col></colgroup><tbody><tr style="height: 29.7969px;"><td style="background-color: rgb(194, 224, 244); height: 29.7969px;"><dl class="reflist"><dt>Class [CgiStudioControl::CaretPositionChangedEvent](http://dev.doc.cgistudio.at/APILINK/class_cgi_studio_control_1_1_caret_position_changed_event.html)</dt></dl></td></tr><tr style="height: 29.7969px;"><td style="height: 29.7969px;">CaretPositionChangedEvent - Caret Position Changed</td></tr></tbody></table>

<table border="1" id="bkmrk-class-cgistudiocontr-1" style="border-collapse: collapse; width: 100%; height: 59.5938px;"><colgroup><col style="width: 99.8765%;"></col></colgroup><tbody><tr style="height: 29.7969px;"><td style="background-color: rgb(194, 224, 244); height: 29.7969px;"><dl class="reflist"><dt>Class [CgiStudioControl::ChangePropertyEvent](http://dev.doc.cgistudio.at/APILINK/class_cgi_studio_control_1_1_change_property_event.html)</dt></dl></td></tr><tr style="height: 29.7969px;"><td style="height: 29.7969px;">ChangePropertyEvent - Property Changed</td></tr></tbody></table>

<div class="contents" id="bkmrk-class-cgistudiocontr-2"><table border="1" style="border-collapse: collapse; width: 100%; height: 59.5938px;"><colgroup><col style="width: 99.8765%;"></col></colgroup><tbody><tr style="height: 29.7969px;"><td style="background-color: rgb(194, 224, 244); height: 29.7969px;"><dl class="reflist"><dt>Class [CgiStudioControl::ChangeSelectionEvent](http://dev.doc.cgistudio.at/APILINK/class_cgi_studio_control_1_1_change_selection_event.html)</dt></dl></td></tr><tr style="height: 29.7969px;"><td style="height: 29.7969px;">ChangeSelectionEvent - Selection Changed</td></tr></tbody></table>

</div><div class="contents" id="bkmrk-class-cgistudiocontr-3"><div class="textblock"><dl class="reflist"><dt><div class="contents"><div class="textblock"><dl class="reflist"><dt><table border="1" style="border-collapse: collapse; width: 100%; height: 59.5938px;"><tbody><tr style="height: 29.7969px;"><td style="background-color: rgb(194, 224, 244); height: 29.7969px;"><dl class="reflist"><dt>Class [CgiStudioControl::ChangeStateEvent](http://dev.doc.cgistudio.at/APILINK/class_cgi_studio_control_1_1_change_state_event.html)</dt></dl></td></tr><tr style="height: 29.7969px;"><td style="height: 29.7969px;">ChangeStateEvent - State Change Triggered</td></tr></tbody></table>

</dt><dt><table border="1" style="border-collapse: collapse; width: 100%; height: 59.5938px;"><tbody><tr style="height: 29.7969px;"><td style="background-color: rgb(194, 224, 244); height: 29.7969px;"><dl class="reflist"><dt>Class [CgiStudioControl::ChangeValueEvent](http://dev.doc.cgistudio.at/APILINK/class_cgi_studio_control_1_1_change_value_event.html)</dt></dl></td></tr><tr style="height: 29.7969px;"><td style="height: 29.7969px;">ChangeValueEvent - Value Change Triggered</td></tr></tbody></table>

</dt><dt><table border="1" style="border-collapse: collapse; width: 100%; height: 59.5938px;"><tbody><tr style="height: 29.7969px;"><td style="background-color: rgb(194, 224, 244); height: 29.7969px;"><dl class="reflist"><dt>Class [CgiStudioControl::ClickEvent](http://dev.doc.cgistudio.at/APILINK/class_cgi_studio_control_1_1_click_event.html)</dt></dl></td></tr><tr style="height: 29.7969px;"><td style="height: 29.7969px;">ClickEvent - Clicked</td></tr></tbody></table>

</dt><dt><table border="1" style="border-collapse: collapse; width: 100%; height: 59.5938px;"><tbody><tr style="height: 29.7969px;"><td style="background-color: rgb(194, 224, 244); height: 29.7969px;"><dl class="reflist"><dt>Class [CgiStudioControl::ControlTimer::Event](http://dev.doc.cgistudio.at/APILINK/class_cgi_studio_control_1_1_control_timer_1_1_event.html)</dt></dl></td></tr><tr style="height: 29.7969px;"><td style="height: 29.7969px;">ControlTimer::Event - Timer Expired</td></tr></tbody></table>

</dt></dl></div></div></dt></dl></div></div><table border="1" id="bkmrk-class-cgistudiocontr-4" style="border-collapse: collapse; width: 100%; height: 59.5938px;"><colgroup><col style="width: 99.8765%;"></col></colgroup><tbody><tr style="height: 29.7969px;"><td style="background-color: rgb(194, 224, 244); height: 29.7969px;"><dl class="reflist"><dt>Class [CgiStudioControl::DragDropEvent](http://dev.doc.cgistudio.at/APILINK/class_cgi_studio_control_1_1_drag_drop_event.html)</dt></dl></td></tr><tr style="height: 29.7969px;"><td style="height: 29.7969px;">DragDropEvent - Drag and Drop</td></tr></tbody></table>

<table border="1" id="bkmrk-class-cgistudiocontr-5" style="border-collapse: collapse; width: 100%; height: 59.5938px;"><colgroup><col style="width: 99.8765%;"></col></colgroup><tbody><tr style="height: 29.7969px;"><td style="background-color: rgb(194, 224, 244); height: 29.7969px;"><dl class="reflist"><dt>Class [CgiStudioControl::EnterExitEvent](http://dev.doc.cgistudio.at/APILINK/class_cgi_studio_control_1_1_enter_exit_event.html)</dt></dl></td></tr><tr style="height: 29.7969px;"><td style="height: 29.7969px;">OnEnterExitEvent- On Enter Exit Edit</td></tr></tbody></table>

<table border="1" id="bkmrk-class-cgistudiocontr-6" style="border-collapse: collapse; width: 100%; height: 59.5938px;"><colgroup><col style="width: 99.8765%;"></col></colgroup><tbody><tr style="height: 29.7969px;"><td style="background-color: rgb(194, 224, 244); height: 29.7969px;"><dl class="reflist"><dt>Class [CgiStudioControl::HoverEvent](http://dev.doc.cgistudio.at/APILINK/class_cgi_studio_control_1_1_hover_event.html)</dt></dl></td></tr><tr style="height: 29.7969px;"><td style="height: 29.7969px;">HoverEvent - Hovered</td></tr></tbody></table>

<table border="1" id="bkmrk-member-cgistudiocont" style="border-collapse: collapse; width: 100%; height: 59.5938px;"><colgroup><col style="width: 99.8765%;"></col></colgroup><tbody><tr style="height: 29.7969px;"><td style="background-color: rgb(194, 224, 244); height: 29.7969px;"><dl class="reflist"><dt>Member [CgiStudioControl::IntervalSwitchBehavior::OnEvent](http://dev.doc.cgistudio.at/APILINK/class_cgi_studio_control_1_1_interval_switch_behavior.html#add5a525a0cc648e4588bda1c1158205d) (const [FeatStd::Event](http://dev.doc.cgistudio.at/APILINK/class_feat_std_1_1_event.html "Event serves as a base class for user derived events.") &amp;event, Candera::EventDispatchResult &amp;dispatchResult)</dt></dl></td></tr><tr style="height: 29.7969px;"><td style="height: 29.7969px;">to handle.</td></tr></tbody></table>

<table border="1" id="bkmrk-class-cgistudiocontr-7" style="border-collapse: collapse; width: 100%; height: 59.5938px;"><colgroup><col style="width: 99.8765%;"></col></colgroup><tbody><tr style="height: 29.7969px;"><td style="background-color: rgb(194, 224, 244); height: 29.7969px;"><dl class="reflist"><dt>Class [CgiStudioControl::IntervalVisualizationEvent](http://dev.doc.cgistudio.at/APILINK/class_cgi_studio_control_1_1_interval_visualization_event.html)</dt></dl></td></tr><tr style="height: 29.7969px;"><td style="height: 29.7969px;">IntervalVisualizationEvent - Interval State Changed</td></tr></tbody></table>

<table border="1" id="bkmrk-class-cgistudiocontr-8" style="border-collapse: collapse; width: 100%; height: 59.5938px;"><colgroup><col style="width: 99.8765%;"></col></colgroup><tbody><tr style="height: 29.7969px;"><td style="background-color: rgb(194, 224, 244); height: 29.7969px;"><dl class="reflist"><dt>Class [CgiStudioControl::PoiUpdateEvent](http://dev.doc.cgistudio.at/APILINK/class_cgi_studio_control_1_1_poi_update_event.html)</dt></dl></td></tr><tr style="height: 29.7969px;"><td style="height: 29.7969px;">PoiUpdateEvent - Poi update</td></tr></tbody></table>

<table border="1" id="bkmrk-class-cgistudiocontr-9" style="border-collapse: collapse; width: 100%; height: 59.5938px;"><colgroup><col style="width: 99.8765%;"></col></colgroup><tbody><tr style="height: 29.7969px;"><td style="background-color: rgb(194, 224, 244); height: 29.7969px;"><dl class="reflist"><dt>Class [CgiStudioControl::PressedEvent](http://dev.doc.cgistudio.at/APILINK/class_cgi_studio_control_1_1_pressed_event.html)</dt></dl></td></tr><tr style="height: 29.7969px;"><td style="height: 29.7969px;">PressedEvent - Pressed</td></tr></tbody></table>

<table border="1" id="bkmrk-class-cgistudiocontr-10" style="border-collapse: collapse; width: 100%; height: 59.5938px;"><colgroup><col style="width: 99.8765%;"></col></colgroup><tbody><tr style="height: 29.7969px;"><td style="background-color: rgb(194, 224, 244); height: 29.7969px;"><dl class="reflist"><dt>Class [CgiStudioControl::RegisterSelectionEvent](http://dev.doc.cgistudio.at/APILINK/class_cgi_studio_control_1_1_register_selection_event.html)</dt></dl></td></tr><tr style="height: 29.7969px;"><td style="height: 29.7969px;">RegisterSelectionEvent - Register Selection</td></tr></tbody></table>

<table border="1" id="bkmrk-class-cgistudiocontr-11" style="border-collapse: collapse; width: 100%; height: 59.5938px;"><colgroup><col style="width: 99.8765%;"></col></colgroup><tbody><tr style="height: 29.7969px;"><td style="background-color: rgb(194, 224, 244); height: 29.7969px;"><dl class="reflist"><dt>Class [CgiStudioControl::ScrollableDirectionChangedEvent](http://dev.doc.cgistudio.at/APILINK/class_cgi_studio_control_1_1_scrollable_direction_changed_event.html)</dt></dl></td></tr><tr style="height: 29.7969px;"><td style="height: 29.7969px;">ScrollableDirectionChangedEvent - Scroll Direction Changed</td></tr></tbody></table>

<table border="1" id="bkmrk-class-cgistudiocontr-12" style="border-collapse: collapse; width: 100%; height: 59.5938px;"><colgroup><col style="width: 99.8765%;"></col></colgroup><tbody><tr style="height: 29.7969px;"><td style="background-color: rgb(194, 224, 244); height: 29.7969px;"><dl class="reflist"><dt>Class [CgiStudioControl::StateEvent](http://dev.doc.cgistudio.at/APILINK/class_cgi_studio_control_1_1_state_event.html)</dt></dl></td></tr><tr style="height: 29.7969px;"><td style="height: 29.7969px;">StateEvent - State Changed</td></tr></tbody></table>

<table border="1" id="bkmrk-class-cgistudiocontr-13" style="border-collapse: collapse; width: 100%; height: 59.5938px;"><colgroup><col style="width: 99.8765%;"></col></colgroup><tbody><tr style="height: 29.7969px;"><td style="background-color: rgb(194, 224, 244); height: 29.7969px;"><dl class="reflist"><dt>Class [CgiStudioControl::TrackingEvent](http://dev.doc.cgistudio.at/APILINK/class_cgi_studio_control_1_1_tracking_event.html)</dt></dl></td></tr><tr style="height: 29.7969px;"><td style="height: 29.7969px;">TrackingEvent - Tracking event</td></tr></tbody></table>

<table border="1" id="bkmrk-class-cgistudiocontr-14" style="border-collapse: collapse; width: 100%; height: 59.5938px;"><colgroup><col style="width: 99.8765%;"></col></colgroup><tbody><tr style="height: 29.7969px;"><td style="background-color: rgb(194, 224, 244); height: 29.7969px;"><dl class="reflist"><dt>Class [CgiStudioControl::ValueChangedEvent](http://dev.doc.cgistudio.at/APILINK/class_cgi_studio_control_1_1_value_changed_event.html)</dt></dl></td></tr><tr style="height: 29.7969px;"><td style="height: 29.7969px;">ValueChangedEvent - Value Changed</td></tr></tbody></table>

<table border="1" id="bkmrk-class-cgistudiocontr-15" style="border-collapse: collapse; width: 100%; height: 59.5938px;"><colgroup><col style="width: 99.8765%;"></col></colgroup><tbody><tr style="height: 29.7969px;"><td style="background-color: rgb(194, 224, 244); height: 29.7969px;"><dl class="reflist"><dt>Class [CgiStudioControl::VideoControlEvent](http://dev.doc.cgistudio.at/APILINK/class_cgi_studio_control_1_1_video_control_event.html)</dt></dl></td></tr><tr style="height: 29.7969px;"><td style="height: 29.7969px;">VideoControlEvent - Video Control Event</td></tr></tbody></table>

<table border="1" id="bkmrk-class-cgistudiocontr-16" style="border-collapse: collapse; width: 100%; height: 59.5938px;"><colgroup><col style="width: 99.8765%;"></col></colgroup><tbody><tr style="height: 29.7969px;"><td style="background-color: rgb(194, 224, 244); height: 29.7969px;"><dl class="reflist"><dt>Class [CgiStudioControl::VideoStateEvent](http://dev.doc.cgistudio.at/APILINK/class_cgi_studio_control_1_1_video_state_event.html)</dt></dl></td></tr><tr style="height: 29.7969px;"><td style="height: 29.7969px;"><dl class="reflist"><dt><div class="contents"><div class="textblock"><dl class="reflist"><dd>VideoStateEvent - Video changed</dd></dl></div></div></dt><dd></dd></dl></td></tr></tbody></table>

<div class="contents" id="bkmrk--3"><div class="textblock"><dl class="reflist"><dt><div class="contents"><div class="textblock">---

<dl class="reflist"><dt>  
</dt></dl></div></div></dt></dl></div></div>

# Predefined Behaviors

This chapter gives an explanation of the Behaviors that come with CGI Studio.

#### Different types of Behaviors

Behaviors are sorted into different categories, which are:

<div class="contents" id="bkmrk-actions%3A-example-beh"><div class="contents"><div class="textblock">- **Actions:** Example Behaviors are: Play Animation, Start Timer, Set Color, Set Image, Enable Rendering, ...
- **Conditions:** Example Behaviors are: Check Control State, Check Animation State, Check Timer, ...
- **Control:** Example Behaviors are: Control State Handler, Event Handler, ...
- **Value Processing:** Example Behaviors are: Map, Filter, Interpolate, Jump to Keyframe, Set Alpha, Set Rotation, ...
- **Scripting** and **State Machine** related

</div></div></div>#### Visualization of Behaviors as Tree

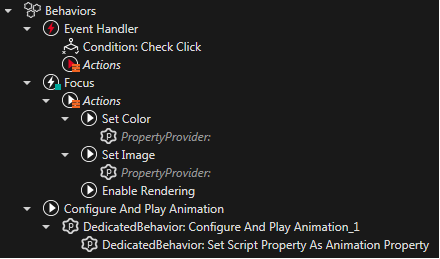
When many behaviors are nested, the hierarchy of the behaviours is shown thorugh the visualization of the behaviours integral map ( = "tree") structure.

For example, if a conditional behavior is used together with another connected behavior, the later is displayed as a child of the conditional behavior. In this way, all behavior properties on behaviors are displayed as a tree view with item children of the owner behavior.

<div class="contents" id="bkmrk-"><div class="contents"><div class="textblock"><div drawio-diagram="2322"><img src="https://doc316en.candera.eu/uploads/images/drawio/2023-02/drawing-7-1677201998.png" alt=""/></div>

</div></div></div>The drag and drop operations only allow behavior of the baseclass specified in the property to be assigned to the main (i.e. "parent") behavior. Any behavior that appears as a child of another behavior will not appears as a standalone behavior in the treeview. If a behavior is removed from all properties, that behavior will be shown again as a stand alone behavior in the tree.

#### Behaviors: Deep Copy/Paste Operation

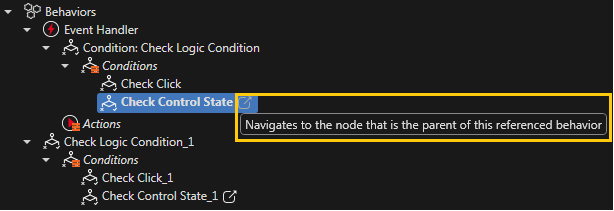
If a behavior is just the reference of another (parent) behavior, the referenced behavior will be marked by a specific sign and a tooltip will become visible on it:

<div class="contents" id="bkmrk--0"><div class="contents"><div class="textblock"><div drawio-diagram="2323"><img src="https://doc316en.candera.eu/uploads/images/drawio/2023-02/drawing-7-1677202029.png" alt=""/></div>

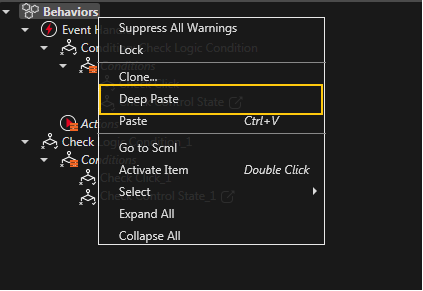
</div></div></div>If a behavior which contains referenced behavior is copied, a new option will become available in the context menu: "Deep Paste".

<div class="contents" id="bkmrk--1"><div class="contents"><div class="textblock"><div drawio-diagram="2324"><img src="https://doc316en.candera.eu/uploads/images/drawio/2023-02/drawing-7-1677202053.png" alt=""/></div>

</div></div></div>By using this option, referenced behaviors from other nodes will be duplicated, in the location of the original referenced behavior, and the reference will be updated to the duplicated behavior.

When copied, all behaviors will have the following behavior in the Scene extra-Tree:

A) Behavior that are referenced from the copied behaviors will now also get copied to the new location if they are from the same node as the copied behaviors. Behaviors from other nodes will remain as a reference to the same behavior.

<div class="contents" id="bkmrk-group%2Fb1-ref%3A-group%2F"><div class="contents"><div class="textblock">- Group/B1 
    - ref: Group/B2
    - ref: Camera/B3

</div></div></div>When copying and pasting behavior B1 on Group, we will get the following structure:

<div class="contents" id="bkmrk-group%2Fb1_1-ref%3A-grou"><div class="contents"><div class="textblock">- Group/B1\_1 
    - ref: Group/B2\_1
    - ref: Camera/B3

</div></div></div>When copying and pasting behavior B1 on Button, we will get the following structure:

<div class="contents" id="bkmrk-button%2Fb1-ref%3A-butto"><div class="contents"><div class="textblock">- Button/B1 
    - ref: Button/B2
    - ref: Camera/B3

</div></div></div>B) When using the Deep Paste context menu option, referenced behaviors from other nodes will also be duplicated, in the location of the original referenced behavior, and the reference will be updated to the duplicated behavior.

<div class="contents" id="bkmrk-group%2Fb1-ref%3A-group%2F-0"><div class="contents"><div class="textblock">- Group/B1 
    - ref: Group/B2
    - ref: Camera/B3

</div></div></div>When copying and pasting behavior B1 on Group, we will get the following structure:

<div class="contents" id="bkmrk-group%2Fb1_1-ref%3A-grou-0"><div class="contents"><div class="textblock">- Group/B1\_1 
    - ref: Group/B2\_1
    - ref: Camera/B3\_1

</div></div></div>When copying and pasting behavior B1 on Button, we will get the following structure:

<div class="contents" id="bkmrk-button%2Fb1-ref%3A-butto-0"><div class="contents"><div class="textblock">- Button/B1 
    - ref: Button/B2
    - ref: Camera/B3\_1

</div></div></div>#### Functional Categories of Behaviors

To differentiate the functionality of behaviors in the context of controls, there are two categories available: event handling and value processing.

#### Event Handling with Behaviors

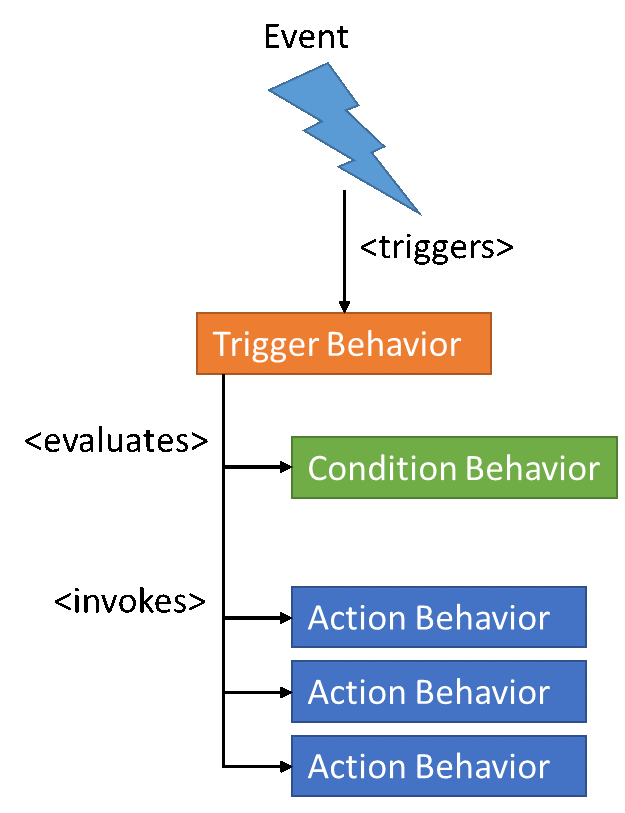
The Behaviors for Event-Handling work like the following pattern:

```
Upon <event> When <condition> Do <action>;
```

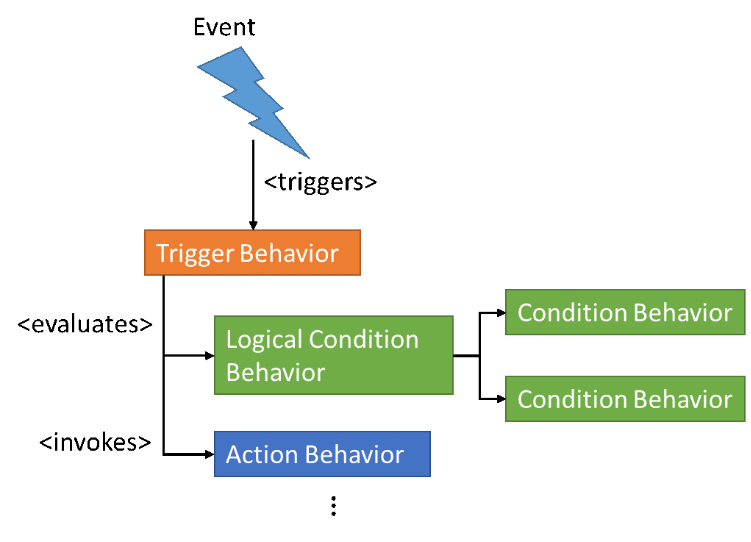
An input event is processed by a Trigger Behavior, which evaluates a condition (Condition Behavior). If the condition evaluates to true, then it invokes one or more Action Behaviors. The Trigger Behavior reacts on any input event. A filter on event type is achieved by specialized Condition Behaviors for these events. Event parameters are evaluated against Condition Behavior property values.

<div class="contents" id="bkmrk--2"><div class="contents"><div class="textblock"><div drawio-diagram="2326"><img src="https://doc316en.candera.eu/uploads/images/drawio/2023-02/drawing-7-1677202118.png" alt=""/></div>

</div></div></div>Specialized Logical Condition Behaviors enable complex conditions by combining Condition Behaviors.

Additionally there is a ConditionalActionBehavior which can be attached as an action. This can be used as a trigger with further conditions for other actions.

<div class="contents" id="bkmrk--3"><div class="contents"><div class="textblock"><div drawio-diagram="2327"><img src="https://doc316en.candera.eu/uploads/images/drawio/2023-02/drawing-7-1677202153.png" alt=""/></div>

</div></div></div>### Value Processing with Behaviors

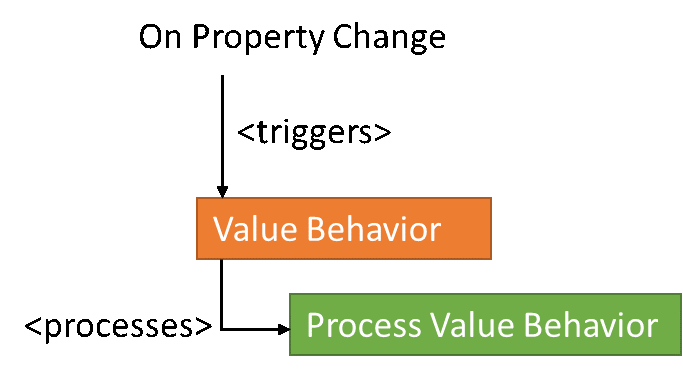
The second category is value processing. The Value Behavior provides a Variant data type which is bindable. A value change results in a processing of that value.

<div class="contents" id="bkmrk--4"><div class="contents"><div class="textblock"><div drawio-diagram="2328"><img src="https://doc316en.candera.eu/uploads/images/drawio/2023-02/drawing-7-1677202186.png" alt=""/></div>

</div></div></div>The value processing is realized in a data flow chain (including mapping to a limited value range and parallel data flow processing). As a result of this chain properties like position, scale … will be affected.

To trigger an ActionBehavior corresponding to a value the "Action on Value"-Behavior can be used. To check the value a "Value Condition" can be attached as a ConditionBehavior.

#### Bridges between Event Handling and Value Processing

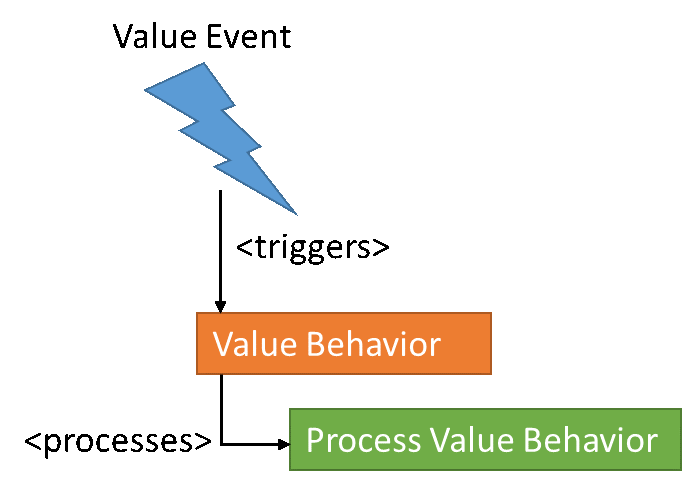
An option is provided to bridge the Event Handling and Value Processing flows. The first bridge is from an event to Value Processing. A dedicated Value Event carrying the value is sent to the Value Behavior. The Value Behavior receives the Value Event and proceeds the Value Processing.

<div class="contents" id="bkmrk--5"><div class="contents"><div class="textblock"><div drawio-diagram="2329"><img src="https://doc316en.candera.eu/uploads/images/drawio/2023-02/drawing-7-1677202206.png" alt=""/></div>

</div></div></div>The second bridge is from a value change to Event Handling. A specialized Process Value Behavior – Send Value Process Value Behavior - dispatches directly a Process Value Event. Optionally a condition can be applied (Condition Behavior) to determine whether the Value Event shall be sent. The Process Value Event is handled by a Trigger Behavior.

---

# Behavior Definition

#### Behavior Definition

While SceneComposer can be used to compose the static structure and properties of a scene, with Behaviors it is possible to add dynamics to a static scene structure.

<div class="contents" id="bkmrk-a-behavior-is-define"><div class="contents"><div class="textblock">- A Behavior is defined by behavior attributes: Name, Type, Properties
- Behavior attributes are expressed in the <span style="color: rgb(230, 126, 35);">[Behavior Meta Information](https://doc316en.candera.eu/link/568#bkmrk-behavior-meta-inform)</span>
- Behaviors are assembled together in a widget set
- Behaviors and the widget set can be assembled in several Behavior libraries (lib), to be linked to the application

</div></div></div>#### Behavior Generation

If *cgi\_studio\_cit* is within the package, the base classes for Behaviors can be generated. Therefore an .xhcdl-file has to be written. The base class can include properties that can be defined in the .xhcdl-file too. The xhcdl-files can be found for each behavior in the same folder where the source-code lies. The following example shows an .xhcdl-file for a behavior.

```
<?xml version="1.0" encoding="utf-8"?>
<definition
    xmlns:xsi="http://www.w3.org/2001/XMLSchema-instance"
    xsi:noNamespaceSchemaLocation="../../../../cgi_studio_cit/schema/HmiContract.xsd">
    <include href="Behaviors/Behavior.xhcdl" addIncludeToCode="false" />
    <generator location="Behaviors/Transition/generated">
        <namespace namespace="Candera" />
        <header>
            <include file="Behaviors/ActionBehavior/ActionBehavior.h" />
            <include file="CanderaWidget/WidgetBase/StringDataTypes.h" />
        </header>
    </generator>
    <widgets setPolicy="onChange" notifierPolicy="onUpdate" viewInvalidationPolicy="wakeup">
        <group baseClassRef="ActionBehavior">
            <widget name="SimpleTransitionActionBehavior" readableName="" uid="{889EF594-E702-4846-930D-BA377121BBA0}">
                <property name="ActivatedSceneAssetID" description="The scene to activate." type="FeatStd::UInt32" uid="{7DB722C4-5543-43D8-BEB0-DF38729C8F5C}" />
                <property name="IsActivatedScene3D" description="If the activated scene is 3D or not." type="bool" uid="{ED8607D7-1F37-49FD-B689-CBF444DFF708}" />
                <property name="DeactivatedSceneAssetID" description="The scene to deactivate." type="FeatStd::UInt32" uid="{9A0E2E92-AAF6-4460-A2D9-7F40FED3210E}" />
                <property name="IsDeactivatedScene3D" description="If the deactivated scene is 3D or not." type="bool" uid="{31F35C65-6E87-4EAF-A660-709C8FB67F1A}" />
                <property name="Variant" description="The transition variant." type="FeatStd::String" uid="{E3A46266-73DE-4F1D-BD5F-224E3ABB91E3}" />
            </widget>
        </group>
    </widgets>
</definition>
```

Some important tags and attributes:

<div class="contents" id="bkmrk-generator-location%3A-"><div class="contents"><div class="textblock">- Generator location: Defines in which folder the base class should be generated.
- Group baseClassRef: The base class of the generated base class.
- Widget name: The name of the generated base class. The suffix "Base" will be added to the class-name.
- Property: The properties of the Behavior. For the String-type the include file *CanderaWidget/WidgetBase/StringDataTypes.h* has to be added for instance. If the property can't be generated it can still be added in the source code.

</div></div></div>After the .xhcdl-file is written the behavior can be generated by calling *GenerateBehaviors.bat* which can be found in *cgi\_studio\_controls/src/Behaviors*. The files are a base class with a header- and cpp-file. It is meant to derive from that class. All the properties and its getter- and setter-methods are already in the class.

#### Behavior Meta Information

**Behavior Name and Type**

To publish a behavior to SceneComposer, it must register for the widget with its name and type:

<div class="contents" id="bkmrk-cdabehaviordef-behav"><div class="contents"><div class="textblock"><table class="doxtable"><tbody><tr><td>CdaBehaviorDef</td><td>Behavior class name and its base class</td></tr><tr><td>CdaDescription</td><td>Behavior description for the SceneComposer tooltip</td></tr><tr><td>CdaReadableName</td><td>Behavior name</td></tr></tbody></table>

</div></div></div><p class="callout info">Note that the example above explains how to publish a behavior for a 3D-scene. For 2D-scenes the macro *CdaBehavior2DDef* must be used instead of *CdaBehaviorDef*.</p>

**Behavior Properties**

For linking a behavior with scene content in SceneComposer, behavior properties are used. Usually the properties should be defined in the .xhcdl-file of a behavior. Anyway, the properties can be defined directly in the behavior-class by using the appropriate macros in the header-file. The behavior implements a property by providing a getter and a setter method.

<div class="contents" id="bkmrk-cdaproperty-specifie"><div class="contents"><div class="textblock"><table class="doxtable" style="width: 100%;"><tbody><tr><td style="width: 14.5822%;">CdaProperty</td><td style="width: 85.4178%;">Specifies \[property\_name\], \[property\_type\], \[property\_getter\], \[property\_setter\]</td></tr><tr><td style="width: 14.5822%;">CdaDescription</td><td style="width: 85.4178%;">Behavior property description for the SceneComposer tooltip</td></tr><tr><td style="width: 14.5822%;">CdaCategory</td><td style="width: 85.4178%;">Defines a category for the property. SceneComposer displays all properties of one category in a related Category section in the property grid.</td></tr></tbody></table>

</div></div></div><p class="callout info">The Behavior property must be initialized correctly, e.g. in the widget constructor!  
Take care that the getter and setter methods are safe (prevent null pointer accesses)!</p>

#### Usage of the introduced macro CGI\_BEHAVIOR\_FORWARD\_AssetLoaderDataTypeDef

This macro is used to be able to set a certain behavior as property of another behavior.

Therefore following code has to be added to the xhcdl file to generate the macro in the base class of the behavior:

```
<postNamespace text="CGI_BEHAVIOR_FORWARD_AssetLoaderDataTypeDef(::CgiStudioControl::ValueBehavior)" />
```

This is an example code to be able to use a ValueBehavior as property. The generated code in the base class of your behavior will look like this:

```
<a class="code" href="http://dev.doc.cgistudio.at/APILINK/group___behavior_base.html#ga16abcb418e53e14ab4e909538ffb4c57">CGI_BEHAVIOR_FORWARD_AssetLoaderDataTypeDef</a>(::<a class="code" href="http://dev.doc.cgistudio.at/APILINK/class_cgi_studio_control_1_1_value_behavior.html" title="Receives a ChangeValueEvent and passes its changed value to the receivers (Value Processing Behaviors...">CgiStudioControl::ValueBehavior</a>)
```

<div class="contents" id="bkmrk-"><div class="contents"><div class="textblock"><div class="fragment">---

</div></div></div></div>

# Behavior Building Blocks - Behavior Blocks

#### Description

This chapter describes how to work with behavior building blocks - in short: behavior blocks.   
Behaviors can be nested and this way combined to a reusable behavior building block. These behavior blocks offer the possibility to configure, which of the properties of this behavior block will be published and are therefore editable at the time the behavior block is instantiated and used in the SceneComposer scene.

In this tutorial a 2D scene is created with a simple SolidColorNode and an OnClick Behavior Building Block. When single-clicking on the SolidColorNode, its color will be changed to red, when double-clicking on it, its color will be changed to green.  
The OnClick Behavior Building Block is built out of an *EventHandler Control Behavior* and a *CheckClick Condition Behavior*. The two instances of the Behavior Building Blocks are configured with an additional *SetColor Action Behavior* to change the color.

#### Create a Behavior Building Block

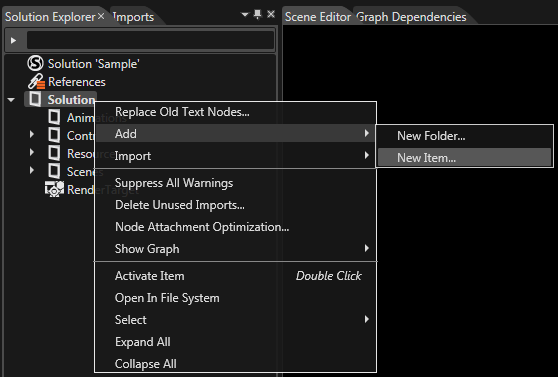
To create a behavior building block, right click on a folder in the Solution Explorer (e.g. Solution) to open the context menu and select "Add" - "New Item...".

<div class="contents" id="bkmrk-"><div class="contents"><div class="textblock"><div drawio-diagram="2330"><img src="https://doc316en.candera.eu/uploads/images/drawio/2023-02/drawing-7-1677202321.png" alt=""/></div>

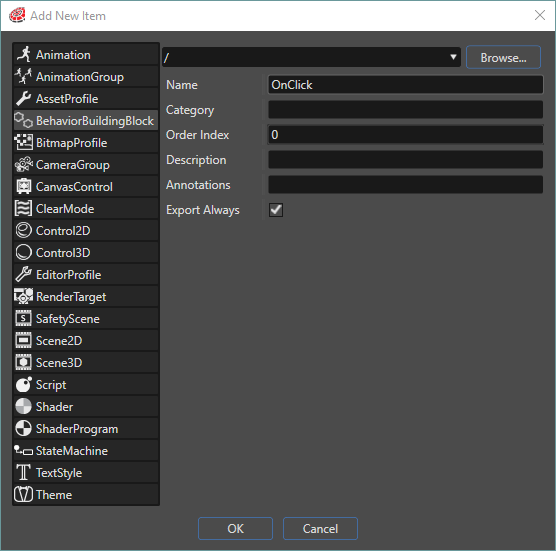
</div></div></div>In the opening "Add Item Dialog" select "BehaviorBlock" on the left. You can then define a location in your solution using the "Browse" button, a name (e.g. "OnClick") and a category for your behavior building block. You can also specify an order index and if you want the behavior building block to be always exported.

<div class="contents" id="bkmrk--0"><div class="contents"><div class="textblock"><div drawio-diagram="2331"><img src="https://doc316en.candera.eu/uploads/images/drawio/2023-02/drawing-7-1677202337.png" alt=""/></div>

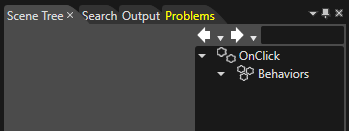
</div></div></div>After Clicking "OK", the new Behavior Building Block called "OnClick" is created and visible in the Solution Explorer. Double-click on the newly created Behavior Building Block to edit it in the Scene Tree View.

<div class="contents" id="bkmrk--1"><div class="contents"><div class="textblock"><div drawio-diagram="2332"><img src="https://doc316en.candera.eu/uploads/images/drawio/2023-02/drawing-7-1677202352.png" alt=""/></div>

</div></div></div>#### Construct a Behavior Building Block

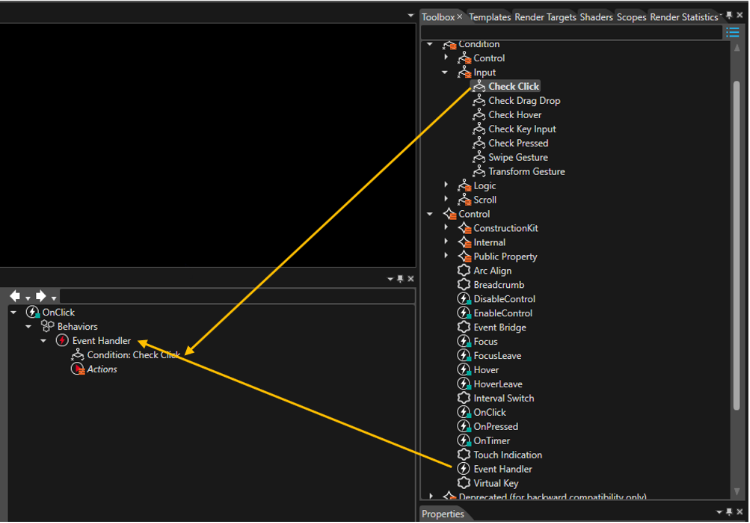
To construct the Behavior Building Block you can drag Behaviors from the Toolbox Tab of the Libraries View and drop them onto the Behavior Building Block in the Scene Tree View.

For this tutorial we first add an EventHandler Control Behavior to the Building Block that requires a condition. We add a CheckClick Conditon Input Behavior to the EventHandler Behavior by dragging and dropping it onto the EventHandler Behavior.  
Our Building Block now consists of the following Behaviors:

<div class="contents" id="bkmrk-eventhandler-control"><div class="contents"><div class="textblock">- *EventHandler Control Behavior* passes a value to a Condition Behavior and if the response is positive, invokes an Action Behavior
- *CheckClick Conditon Input Behavior* evaluates the click event condition and is to be used with a Trigger Behavior to trigger a certain action.

<div drawio-diagram="2333"><img src="https://doc316en.candera.eu/uploads/images/drawio/2023-02/drawing-7-1677202409.png" alt=""/></div>

<dl class="note"><dt></dt><dt><p class="callout info">You can also build up nested behaviors while working on your scene in the Scene Tree View. Whenever you decide that you want to reuse your built-up behavior construct, you can press the right mouse button on the parent behavior. The context menu of the behavior offers you the possibility to "Save as BehaviorBlock"</p>

</dt></dl></div></div></div>#### Configure Properties of the Behavior Building Block

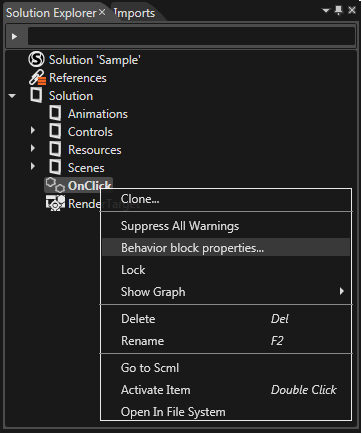
The Properties of the Behavior Building Blocks can be edited in the Configure Properties Dialog that is opened by right-clicking on the Behavior Block in the Solution Explorer and selecting "Behavior block properties...".

<div class="contents" id="bkmrk--2"><div class="contents"><div class="textblock"><div drawio-diagram="2334"><img src="https://doc316en.candera.eu/uploads/images/drawio/2023-02/drawing-7-1677202448.png" alt=""/></div>

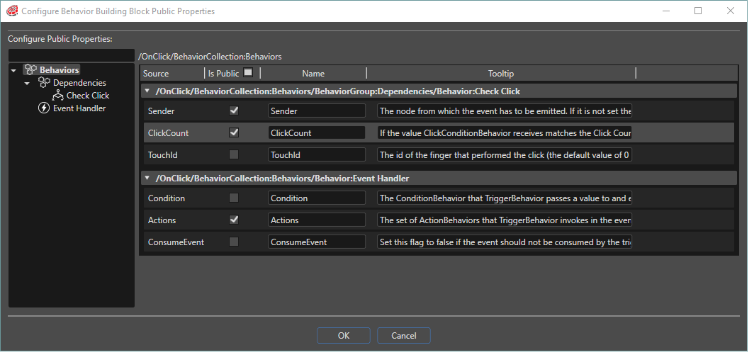
</div></div></div>In the "Configure Properties" dialog you can define which properties you want to publish, that means, which properties you want to be able to edit when creating an instance of this Behavior Building Block.  
For our tutorial we want to publish the following properties:

<div class="contents" id="bkmrk-the-clickcount-of-th"><div class="contents"><div class="textblock">- the *ClickCount* of the CheckClick Behavior
- the *Emitter* of the CheckClick Behavior
- the *Actions* of the EventHandler

<div drawio-diagram="2335"><img src="https://doc316en.candera.eu/uploads/images/drawio/2023-02/drawing-7-1677202481.png" alt=""/></div>

</div></div></div>#### Instantiate the created Behavior Building Blocks

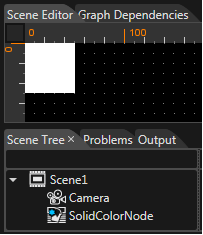
Now that we have created the "OnClick" Behavior Building Block, we can use it in our scene. For this, we create a simple 2D scene with one single white SolidColorNode.

<div class="contents" id="bkmrk--3"><div class="contents"><div class="textblock"><div drawio-diagram="2336"><img src="https://doc316en.candera.eu/uploads/images/drawio/2023-02/drawing-7-1677202502.png" alt=""/></div>

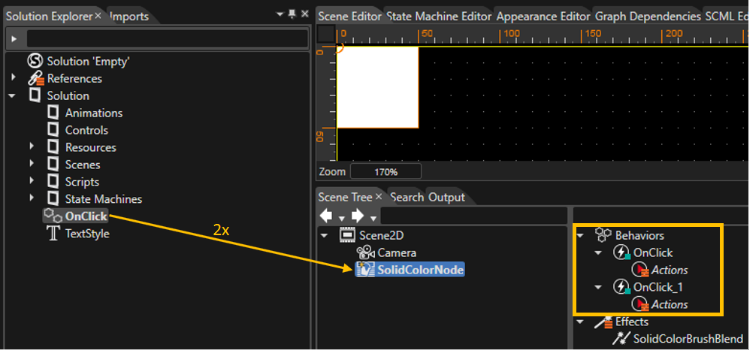
</div></div></div>We want to have 2 OnClick Behaviors: one for a single-click and one for a double-click. To instantiate the "OnClick" Behavior Building Block, simply drag and drop it from the Solution Explorer onto the SolidColorNode in the Scene Tree View twice. You should now see the created instances of the Behavior Blocks on the right side in the Scene Tree View.

<div class="contents" id="bkmrk--4"><div class="contents"><div class="textblock"><div drawio-diagram="2337"><img src="https://doc316en.candera.eu/uploads/images/drawio/2023-02/drawing-7-1677202533.png" alt=""/></div>

</div></div></div>#### Configure Behavior Building Block Instances

These 2 instances can now be configured. One instance should be configured to change the color of the SolidColorNode to red when someone single-clicks on it and the second one should be configured to change the color of the SolidColorNode to green when someone double-clicks on it. You can configure the Click Count for one Behavior to 1 (single-click) and the Click Count for the other Behavior to 2 (double-click).   
  
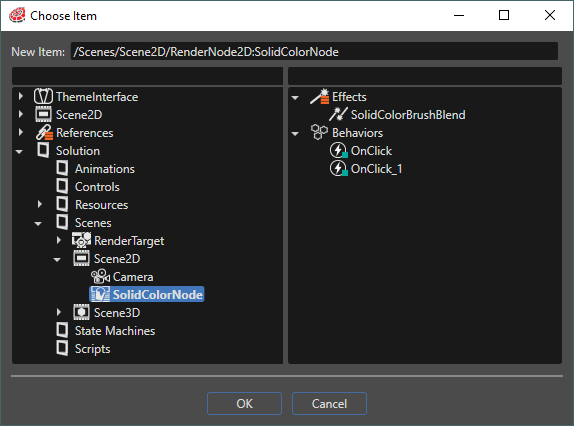
We also have to configure the Emitter, that means the node from which the click event has to be emitted. If no emitter is configured, all click events are handled. Therefore we configure the single SolidColorNode fom our 2D Scene as Emitter by clicking on the icon to the right of the Emitter property input field. In the opened "Choose Item" dialog the SolidColorNode can be selected.

<div class="contents" id="bkmrk--5"><div class="contents"><div class="textblock"><div drawio-diagram="2338"><img src="https://doc316en.candera.eu/uploads/images/drawio/2023-02/drawing-7-1677202557.png" alt=""/></div>

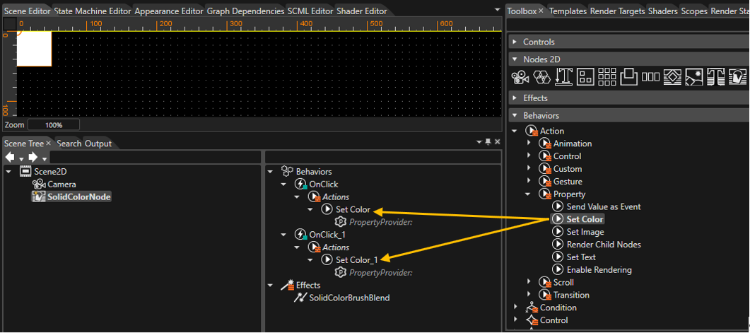
</div></div></div>To change the color of the SolidColorNode, an action is required. This means, we need another Behavior: The action Behavior "SetColor". It can be applied by dragging it from the Behavior ToolBox and dropping it onto our "OnClick" Behavior Building Blocks in the Scene Tree View.

<div class="contents" id="bkmrk--6"><div class="contents"><div class="textblock"><div drawio-diagram="2339"><img src="https://doc316en.candera.eu/uploads/images/drawio/2023-02/drawing-7-1677202593.png" alt=""/></div>

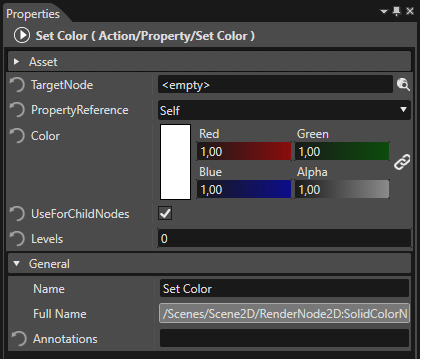
</div></div></div>The last step of this tutorial is to configure these SetColor Action Behaviors: one SetColor Action should set the color of the SolidColorNode to red (see picture below) and the other one should set it to green.

<div class="contents" id="bkmrk--7"><div class="contents"><div class="textblock"><div drawio-diagram="2340"><img src="https://doc316en.candera.eu/uploads/images/drawio/2023-02/drawing-7-1677202608.png" alt=""/></div>

---

</div></div></div>

# EventHandler Tab

Every control needs an EventHandler in order to handle user events and take appropriate actions.  
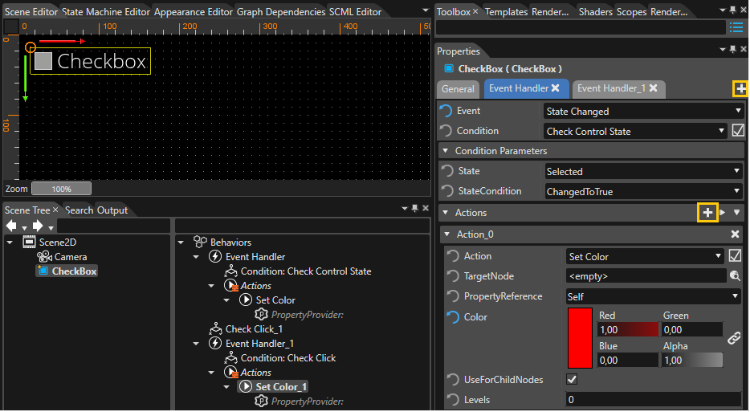
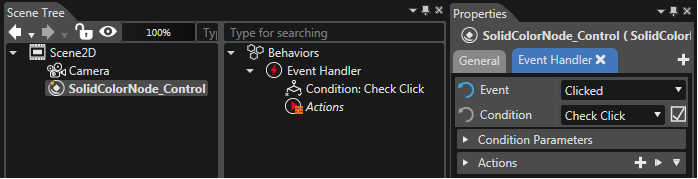
Events, Conditions and Actions for a node can conveniently be edited in SceneComposer in the EventHandler Tab, which is located in the properties view. Using the EventHandler Tab the user can choose the event he wants to react on from a drop-down menu. Furthermore, conditions and actions can also be configured with drop-down menus in this tab. Once an Event is selected, only conditions that are suitable for the selected event are offered in the drop-down menu. For a list of all selectable Events see chapter <span style="color: rgb(230, 126, 35);">[Control Behaviors Events](https://doc316en.candera.eu/link/565#bkmrk-control-behaviors-ev)</span> .

<div class="contents" id="bkmrk-"><div class="contents"><div class="textblock"><div drawio-diagram="2341"><img src="https://doc316en.candera.eu/uploads/images/drawio/2023-02/drawing-7-1677203278.png" alt=""/></div>

</div></div></div>Additional EventHandlers can be added by clicking the '+' sign next to the EventHandler Tabs, more Actions can be added by clicking the '+' sign next to the Actions (marked in orange in the image above).

#### Filtering Conditions according to the selected Event

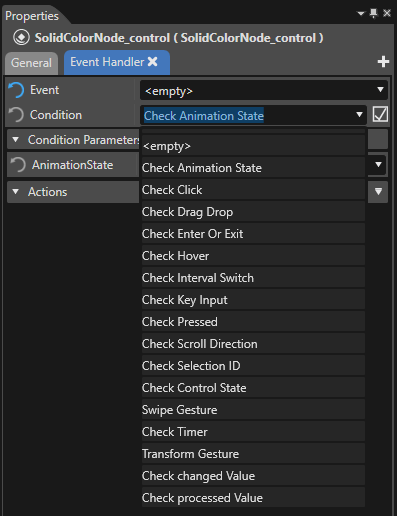
Before selecting an Event, the Conditions drop-down menu contains quite a lot of entries:

<div class="contents" id="bkmrk--0"><div class="contents"><div class="textblock"><div drawio-diagram="2342"><img src="https://doc316en.candera.eu/uploads/images/drawio/2023-02/drawing-7-1677203302.png" alt=""/></div>

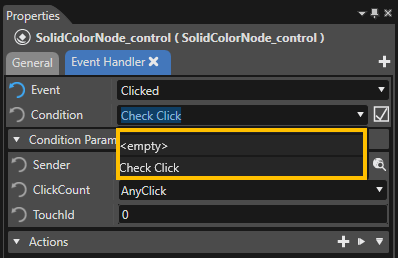
</div></div></div>After selecting an Event, the Conditions drop-down menu only contains Conditions that are applicable for the selected Event:

<div class="contents" id="bkmrk--1"><div class="contents"><div class="textblock"><div drawio-diagram="2343"><img src="https://doc316en.candera.eu/uploads/images/drawio/2023-02/drawing-7-1677203312.png" alt=""/></div>

</div></div></div>When implementing a ConditionBehavior, filtering for a specific Event can easily be configured using the CdaProperty "CdaEvents" as seen in the code example below, where the StateConditionBehavior is the configured to be visible for the StateEvent:

```
private:
    <a class="code" href="http://dev.doc.cgistudio.at/APILINK/group___behavior_base.html#gaa6c7bb84ac98320b27829f415f095ed9">CdaBehaviorMixedDef</a>(StateConditionBehavior, StateConditionBehaviorBase)
        CdaDescription("Expects a State Event (generated by Control State Behavior) and returns either a positive or negative response.")
        CdaReadableName("Check Control State")
        CdaCategory("Condition/Control")
        CdaProperties()
        <a class="code" href="http://dev.doc.cgistudio.at/APILINK/group___widget_base.html#gaadabeed44f0653634b664191cd875742">CdaPropertiesEnd</a>()
        <a class="code" href="http://dev.doc.cgistudio.at/APILINK/group___behavior_base.html#gacffa930ff589666f40b4cfe1101e82fe">CdaEvents</a>()
            <a class="code" href="http://dev.doc.cgistudio.at/APILINK/group___behavior_base.html#gaf18af8294463f4c87092b0dd719ce807">CdaEvent</a>(<a class="code" href="http://dev.doc.cgistudio.at/APILINK/group___behavior_base.html#ga2d424f469df77c82e14a26f142f08733">CdaInputEvent</a>, StateEvent, "")
        <a class="code" href="http://dev.doc.cgistudio.at/APILINK/group___behavior_base.html#gaca0f18f1742e7e52edc48d782d902a7b">CdaEventsEnd</a>()
    <a class="code" href="http://dev.doc.cgistudio.at/APILINK/group___behavior_base.html#ga1d66b72219f10490bc1faf9e1c2445bf">CdaBehaviorDefEnd</a>()
```

#### Adding an EventHandler to a Control

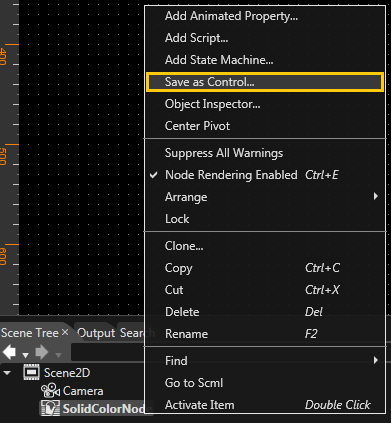
A Control can be created from a simple RenderNode using "Save as Control..." from the RenderNode's context menu in the Scene Tree View:

<div class="contents" id="bkmrk--2"><div class="contents"><div class="textblock"><div drawio-diagram="2344"><img src="https://doc316en.candera.eu/uploads/images/drawio/2023-02/drawing-7-1677203338.png" alt=""/></div>

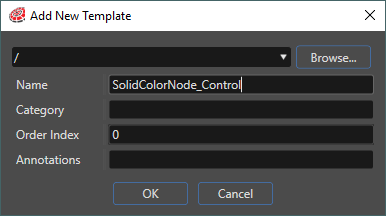
</div></div></div>For creating a Control, a name can be specified:

<div class="contents" id="bkmrk--3"><div class="contents"><div class="textblock"><div drawio-diagram="2345"><img src="https://doc316en.candera.eu/uploads/images/drawio/2023-02/drawing-7-1677203350.png" alt=""/></div>

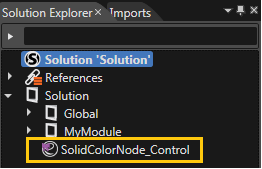
</div></div></div>After clicking "OK", the new Control is visible in the Solution Explorer

<div class="contents" id="bkmrk--4"><div class="contents"><div class="textblock"><div drawio-diagram="2346"><img src="https://doc316en.candera.eu/uploads/images/drawio/2023-02/drawing-7-1677203366.png" alt=""/></div>

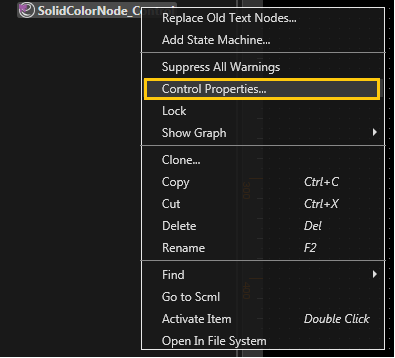
</div></div></div>When right-clicking on the context menu of the new Control, the Control's properties can be edited choosing "Control Properties...":

<div class="contents" id="bkmrk--5"><div class="contents"><div class="textblock"><div drawio-diagram="2347"><img src="https://doc316en.candera.eu/uploads/images/drawio/2023-02/drawing-7-1677203382.png" alt=""/></div>

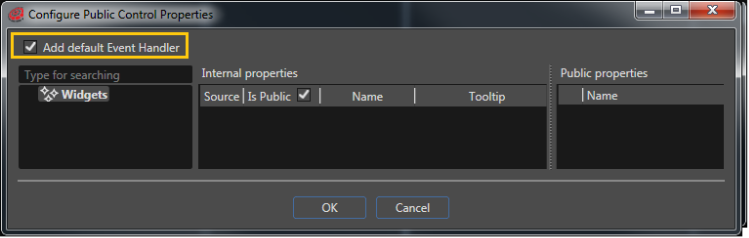
</div></div></div>The "Configure Properties" window offers a checkbox to choose if an EventHandler shall be added to every instance of this kind of Control that is created.

<div class="contents" id="bkmrk--6"><div class="contents"><div class="textblock"><div drawio-diagram="2348"><img src="https://doc316en.candera.eu/uploads/images/drawio/2023-02/drawing-7-1677203406.png" alt=""/></div>

</div></div></div>Now, whenever such a control is dragged-and-dropped to the SceneComposer scene, an EventHandler is added and the EventHandler Tab is visible in the Properties view.

<div class="contents" id="bkmrk--7"><div class="contents"><div class="textblock"><div drawio-diagram="2349"><img src="https://doc316en.candera.eu/uploads/images/drawio/2023-02/drawing-7-1677203421.png" alt=""/></div>

---

</div></div></div>

# Implementation

This page gives an overview of how Behaviors can be implemented.

#### **How to implement a Behavior**

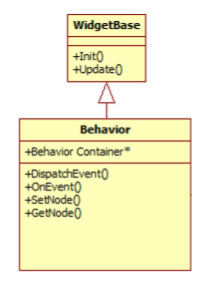
There is very little difference between implementing a Widget and implementing a Behavior. Though there are some difference which will be explained below.

##### Base Class

The major difference is that Behaviors need to be derived from the [Candera::Behavior](http://dev.doc.cgistudio.at/APILINK/class_candera_1_1_behavior.html "Behaviors are small re-usable functional blocks that communicate via events. Behaviors are based on W...") base class instead of the [Candera::WidgetBase](http://dev.doc.cgistudio.at/APILINK/class_candera_1_1_widget_base.html "Abstract base class for Candera Widgets.") class. Incidentally the [Candera::Behavior](http://dev.doc.cgistudio.at/APILINK/class_candera_1_1_behavior.html "Behaviors are small re-usable functional blocks that communicate via events. Behaviors are based on W...") base class is internally derived from [Candera::WidgetBase](http://dev.doc.cgistudio.at/APILINK/class_candera_1_1_widget_base.html "Abstract base class for Candera Widgets.") further demonstrating the similarities between both.

<div class="contents" id="bkmrk-"><div class="contents"><div class="textblock">  
</div></div></div>##### Methods

<div drawio-diagram="2350"><img src="https://doc316en.candera.eu/uploads/images/drawio/2023-02/drawing-7-1677203692.png" alt=""/></div>

From the [Candera::WidgetBase](http://dev.doc.cgistudio.at/APILINK/class_candera_1_1_widget_base.html "Abstract base class for Candera Widgets.") the already known Init() and Update() methods are inherited.

<div class="contents" id="bkmrk-init%3A-called-once-wh"><div class="contents"><div class="textblock">- **Init:** Called once when the Widget/Behavior is created, after all Widget/Behavior properties have been set. This is used to initialize the Widget/Behavior.
- **Update:** Called once per iteration (frame). Here normally the Widget/Behavior performs its actual functionality.

</div></div></div>Newly added are the methods from [Candera::Behavior](http://dev.doc.cgistudio.at/APILINK/class_candera_1_1_behavior.html "Behaviors are small re-usable functional blocks that communicate via events. Behaviors are based on W...") which are related to event handling and the attached node:

<div class="contents" id="bkmrk-dispatchevent%3A-start"><div class="contents"><div class="textblock">- **DispatchEvent:** Starts dispatching an event with a specified strategy
- **OnEvent:** Called when an event is received by a Behavior
- **SetNode/GetNode:** Allows access to the node this behavior is attached to. Note that this uses a new data type called [Candera::AbstractNodePointer](http://dev.doc.cgistudio.at/APILINK/class_candera_1_1_abstract_node_pointer.html "The class AbstractCameraPointer is an wrapper class to abstract 2D and 3D camera nodes.") which abstracts between 2D and 3D nodes. This allows creating behaviors that work und 2D and 3D without duplicating code.

</div></div></div>##### META INFO

The Meta-Info is essential to provide generic access to all properties of the widget/behavior as well as special information for Scene-Composer about the available properties, their types and functionality. The available macros to define the Meta-Info are very similar to those used by widgets.

The first set of Macros defines a Behavior either for 3D, 2D or both (mixed):

```
    ...
    <a class="code" href="http://dev.doc.cgistudio.at/APILINK/group___behavior_base.html#gac11e42b36cc6ee1a4814d07df4abff9b">CdaBehaviorDef</a>(<<ClassName>>, <<BaseClassName>>)
        [Information][Properties][Events] 
    <a class="code" href="http://dev.doc.cgistudio.at/APILINK/group___behavior_base.html#ga1d66b72219f10490bc1faf9e1c2445bf">CdaBehaviorDefEnd</a>() 
    ... 
```

```
    ...  
    <a class="code" href="http://dev.doc.cgistudio.at/APILINK/group___behavior_base.html#ga0df74c6a17b4313fffc1084d9fb4e60d">CdaBehavior2DDef</a>(<<ClassName>>, <<BaseClassName>>)
        [Information][Properties][Events] 
    <a class="code" href="http://dev.doc.cgistudio.at/APILINK/group___behavior_base.html#ga1d66b72219f10490bc1faf9e1c2445bf">CdaBehaviorDefEnd</a>() 
    ...
```

```
    ...  
    <a class="code" href="http://dev.doc.cgistudio.at/APILINK/group___behavior_base.html#gaa6c7bb84ac98320b27829f415f095ed9">CdaBehaviorMixedDef</a>(<<ClassName>>, <<BaseClassName>>)
        [Information][Properties][Events] 
    <a class="code" href="http://dev.doc.cgistudio.at/APILINK/group___behavior_base.html#ga1d66b72219f10490bc1faf9e1c2445bf">CdaBehaviorDefEnd</a>()
    ...  
```

All other macros are the same as where used by Widgets. This includes the macros to add additional information:

```
    ...  
    CdaReadableName("Name")
    CdaCategory("Category")  
    CdaDescription("Description")
    ...  
```

As well as the macros to define properties:

```
... 
CdaProperties() 
...     [Property List] 
<a class="code" href="http://dev.doc.cgistudio.at/APILINK/group___widget_base.html#gaadabeed44f0653634b664191cd875742">CdaPropertiesEnd</a>() 
...
```

```
... 
CdaProperty(<<Name>>, <<Type>>, <<Setter>>, <<Getter>>) 
CdaDescription("Column used by this Item inside the Area") 
CdaCategory("Area") 
<a class="code" href="http://dev.doc.cgistudio.at/APILINK/group___meta_info.html#ga119bef57449bd05d8b3c40d7d514e375">CdaPropertyEnd</a>() 
... 
```

The new macros for events will be described in the <span style="color: rgb(230, 126, 35);">[Event Handling](https://doc316en.candera.eu/link/570#bkmrk-event-handling)</span> chapter.   
For further information about the Meta Info please also see chapter <span style="color: rgb(230, 126, 35);">[Behavior Definition](https://doc316en.candera.eu/link/568#bkmrk-page-title)</span>.

##### RUNTIME TYPE INFORMATION

CGI-Studio uses its own RTTI system for major parts instead of relying on the RTTI of the compiler. For this a set of macros is added to each class that uses this system. In case of Behaviors only a single macro is required to be added to the code:

```
... 
<a class="code" href="http://dev.doc.cgistudio.at/APILINK/group___behavior_base.html#gade83d69bfb6ff6767119bbc71d3b76de">CGI_BEHAVIOR_RTTI_DEFINITION</a>(<<ClassName>>) 
... 
```

<div class="contents" id="bkmrk--1"><div class="contents"><div class="textblock"><div class="fragment">---

</div></div></div></div>#### **Event Handling**

Events are one of the major new features introduced via Behaviors. This chapter shows how they can be utilized from within the Behavior code.

##### Meta Info

The first requirement is to add all events that should are either received or sent to the Meta-Info via the following macros:

```
... 
<a class="code" href="http://dev.doc.cgistudio.at/APILINK/group___behavior_base.html#gacffa930ff589666f40b4cfe1101e82fe">CdaEvents</a>()    
   <a class="code" href="http://dev.doc.cgistudio.at/APILINK/group___behavior_base.html#gaf18af8294463f4c87092b0dd719ce807">CdaEvent</a>(<a class="code" href="http://dev.doc.cgistudio.at/APILINK/group___behavior_base.html#ga1f87d4147378125fc817898dd84e98eb">CdaOutputEvent</a>, <<EventType>>, "Description")    
   <a class="code" href="http://dev.doc.cgistudio.at/APILINK/group___behavior_base.html#gaf18af8294463f4c87092b0dd719ce807">CdaEvent</a>(CdaInputEvent, <<EventType>>, "Description") 
<a class="code" href="http://dev.doc.cgistudio.at/APILINK/group___behavior_base.html#gaca0f18f1742e7e52edc48d782d902a7b">CdaEventsEnd</a>() 
...
```

##### Sending Events

An Event can be sent by multiple different approaches.

The first is achieved by calling the DispatchEvent() method of the Behavior or any of the other available alternatives. It requires providing the dispatch strategy and event itself. When using this method the dispatching will start from the current node of the Behavior.

```
... 
    CgiStudioControl::Event event;     
    EventDispatchResult dispatchResult;     
    EventDispatchStrategy dispatchStrategy; 
 
    DispatchEvent(dispatchStrategy, event, dispatchResult); 
... 
```

<div class="header" id="bkmrk-note-that-the-event-"><div class="header"><div class="headertitle"><div class="title"><div class="contents"><div class="contents"><div class="textblock"><div class="fragment">  
</div><dl class="note"><dd></dd><dd><p class="callout info">Note that the Event and EventDispatchStrategy need to be replaced with the concrete implementations.</p>

</dd><dd></dd><dd>The second options is to directly call the DispatchEvent() method of the Event-Dispatch-Strategy. This allows to define the node from which the dispatching should start:</dd><dd></dd></dl></div></div></div></div></div></div></div>```
... 
    Candera::EventDispatchResult eventDispatchResult; 
    <a class="code" href="http://dev.doc.cgistudio.at/APILINK/class_candera_1_1_broadcast_event_dispatch_strategy.html" title="Broadcast strategy: the event will be dispatched first for the node with a Direct strategy and then f...">Candera::BroadcastEventDispatchStrategy</a> dispatchStrategy; 
    <a class="code" href="http://dev.doc.cgistudio.at/APILINK/class_cgi_studio_control_1_1_change_value_event.html" title="Received by a ValueBehavior to change the value. Value can be absolute or relative (will be added)...">CgiStudioControl::ChangeValueEvent</a> valueChangedEvent(<a class="code" href="http://dev.doc.cgistudio.at/APILINK/class_feat_std_1_1_variant.html">FeatStd::Variant</a>(listDataEvent->GetData()),                                                            
                                                         CgiStudioControl::ChangeValue::Absolute); 
    dispatchStrategy.<a class="code" href="http://dev.doc.cgistudio.at/APILINK/class_candera_1_1_broadcast_event_dispatch_strategy.html#a2147a1a0a6eb0d4f93cd32dcd9404698">DispatchEvent</a>(GetNode(), valueChangedEvent, eventDispatchResult); 
... 
```

##### Receiving Events

Receiving of events is done via the OnEvent-Method. Here normally the incoming events are type-cast to check the Event-Type and processed if applicable. Further it is possible to stop further dispatching of the event via the Dispatch-Result. In case a custom Dispatch-Result is used (again type-casting can be used) then additional information can be returned to the sender.

```
... 
void ListItemEventBehavior::OnEvent(const <a class="code" href="http://dev.doc.cgistudio.at/APILINK/class_feat_std_1_1_event.html" title="Event serves as a base class for user derived events.">FeatStd::Event</a>& event, Candera::EventDispatchResult& dispatchResult) 
{     
    const ListDataEvent* listDataEvent = Candera::Dynamic_Cast<const ListDataEvent*>(&event); 
 
    if (0 != listDataEvent) {         
        if (m_index == listDataEvent->GetIndex()) {             
            dispatchResult.StopDispatchingImmediately(); 
 
            // Do something with the data of the event         
        }     
    } 
} 
... 
```

If derived from Behaviors that also do event processing also the Base-Class OnEvent method should be called.

```
... 
Base::OnEvent(event, dispatchResult); 
... 
```

##### Custom Events

It is possible to define custom events by simply deriving from [FeatStd::Event](http://dev.doc.cgistudio.at/APILINK/class_feat_std_1_1_event.html "Event serves as a base class for user derived events.") class. An Event can contain any number custom data.

```
... 
class ListDataEvent : public FeatStd::Event 
{     
    public:         
        FEATSTD_RTTI_DECLARATION(); 
 
        ListDataEvent(FeatStd::Int32 index, FeatStd::Int32 value) :             
            m_index(index),            
            m_value(value)         
        {         
        } 
 
        FeatStd::Int32 GetIndex() const         
        {             
            return m_index;         
        } 
 
        FeatStd::Int32 GetData() const         
        {             
            return m_value;         
        } 
 
    private:         
        FeatStd::Int32 m_index;         
        FeatStd::Int32 m_value; 
}; 
...
```

```
... 
FEATSTD_RTTI_DEFINITION(ListDataEvent, <a class="code" href="http://dev.doc.cgistudio.at/APILINK/class_feat_std_1_1_event.html" title="Event serves as a base class for user derived events.">FeatStd::Event</a>) 
... 
```

##### FINDING BEHAVIORS

The second major advantage compared to widgets is that it is now possible to determine if any and which Behaviors are attached to a node. This can be done by iterating over all behaviors of a node via the code snipped shown below.

```
... 
<a class="code" href="http://dev.doc.cgistudio.at/APILINK/class_candera_1_1_behavior.html" title="Behaviors are small re-usable functional blocks that communicate via events. Behaviors are based on W...">Candera::Behavior</a>* behavior = <a class="code" href="http://dev.doc.cgistudio.at/APILINK/group___behavior_base.html#ga69a5dc63c0630e3ee64ada60854041bb">Candera::Behavior::GetFirstBehavior</a>(node); 
 
while (0 != behavior) {     
    // do something 
 
    behavior = behavior-><a class="code" href="http://dev.doc.cgistudio.at/APILINK/group___behavior_base.html#gaeb8b1c6d391f8a18e57bf8b3a570239c">GetNextBehavior</a>(); 
} 
...
```

For a better understanding of how events work, please see chapter <span style="color: rgb(230, 126, 35);">[Predefined Behaviors](https://doc316en.candera.eu/link/566#bkmrk-page-title)</span>.

---

#### **How to integrate a Behavior into an Application**

Behaviors are integrated into the Application similar to Widgets by adding them to the Widget-Set. How this is exactly done depends on the application.

##### Adding Behaviors manually

If the application doesn't generate a Widget-Set automatically (e.g. MLC-Templates) the Behavior needs first to be added to the Build-System by modifying the existing CMake-files

<div class="contents" id="bkmrk-widgets.cmake-%28of-ml"><div class="contents"><div class="textblock"><table border="0"><tbody><tr><td>**Widgets.cmake (of MLC-Template App)**</td></tr><tr><td>```
... 
CourierAddProjectFiles(     
    OnOffWidget.cpp     
    OnOffWidget.h     
    WidgetSet.cpp 
 
    CustomBehavior.cpp     
    CustomBehavior.h 
)
```

</td></tr></tbody></table>

</div></div></div>And then added to the Widget-Set manually via the CdaWidget-Macro:

<div class="contents" id="bkmrk-widgetset.cpp-%28of-ml"><div class="contents"><div class="textblock"><table border="0"><tbody><tr><td>**WidgetSet.cpp (of MLC-Template App)**</td></tr><tr><td>```
... 
#include "OnOffWidget.h" 
#include "CustomBehavior.h" 
... 
<a class="code" href="http://dev.doc.cgistudio.at/APILINK/group___widget_base.html#gaf22698a7899d856911f78b17f154dcb2">CdaWidgetSet</a>(MatlabConnectorApplicationWidgetSet)     
    CdaDescription("MatlabConnectorApplication <a class="code" href="http://dev.doc.cgistudio.at/APILINK/group___c_o_u_r_i_e_r___m_e_s_s_a_g_i_n_g.html#ggac4e3f0853af916ef773e65d02a15c95dac1224e2f0bf57d4eede7026521a13aa8">Widget</a> Set")     
    <a class="code" href="http://dev.doc.cgistudio.at/APILINK/group___widget_base.html#gada111508ebf4b6014fe2564083936d3e">CdaWidgets</a>()         
        <a class="code" href="http://dev.doc.cgistudio.at/APILINK/group___widget_base.html#ga311ed10f0878a04c24365fa67fd7e152">CdaWidget</a>(OnOffWidget)         
        <a class="code" href="http://dev.doc.cgistudio.at/APILINK/group___widget_base.html#ga311ed10f0878a04c24365fa67fd7e152">CdaWidget</a>(ListDataSimBehavior) 
... 
```

</td></tr></tbody></table>

</div></div></div>##### Adding Behaviors to Default Behavior Project

If the Widget-Set is generated (Player application) then under normal conditions it is sufficient to add the code files to the Build-System (CMake). Here they are added to the "Default Behavior Project" (ControlBehaviors\_1).

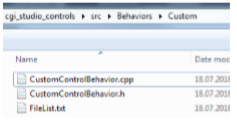
To do this, create a folder (e.g. "Custom") in "cgi\_studio\_controls\\src\\Behaviors" containing the Custom-Behavior's code and a FileList.txt file containing the related code files.

<div class="contents" id="bkmrk--3"><div class="contents"><div class="textblock"><div drawio-diagram="2351"><img src="https://doc316en.candera.eu/uploads/images/drawio/2023-02/drawing-7-1677204085.png" alt=""/></div>

</div></div></div><div class="contents" id="bkmrk-filelist.txt-set%28fil"><div class="contents"><div class="textblock"><table border="0"><tbody><tr><td>**FileList.txt**</td></tr><tr><td>```
set(FILE_LIST     
    CustomBehavior.cpp     
    CustomBehavior.h 
) 
```

</td></tr></tbody></table>

</div></div></div>Then add the folder to the CMakeLists.txt found in "cgi\_studio\_controls\\src\\Behaviors"

<div class="contents" id="bkmrk-cmakelists.txt-...-s"><div class="contents"><div class="textblock"><table border="0"><tbody><tr><td>**CMakeLists.txt**</td></tr><tr><td>```
... 
set(PRV_WIDGET_SUBDIRS     
    Animation 
...     
    Custom 
) 
... 
```

</td></tr></tbody></table>

</div></div></div>##### Adding Behavior to new Project

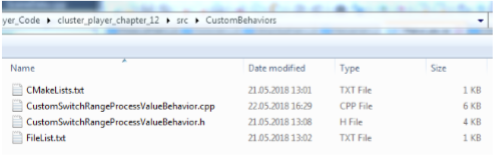
Another way to add the Behavior, if the Widget-Set is generated (Player application), is to create a new project containing the custom behaviors. This approach is preferred to changing the default behavior project as no code from CGI-Studio itself is modified. Also it is easy to include these custom behaviors into other projects as well.

To start create a folder with the custom behavior code, a FileList.txt file and a CMakeLists.txt file.

<div class="contents" id="bkmrk--5"><div class="contents"><div class="textblock"><div drawio-diagram="2352"><img src="https://doc316en.candera.eu/uploads/images/drawio/2023-02/drawing-7-1677204106.png" alt=""/></div>

</div></div></div>  
In the FileList.txt file add the required code files.

<div class="contents" id="bkmrk-filelist.txt-set%28fil-0"><div class="contents"><div class="textblock"><table border="0"><tbody><tr><td>**FileList.txt**</td></tr><tr><td>```
set(FILE_LIST      
    FileList.txt     
    CustomSwitchRangeProcessValueBehavior.h     
    CustomSwitchRangeProcessValueBehavior.cpp 
)
```

</td></tr></tbody></table>

</div></div></div>In the CMakeList.txt file specify the name of the new project (here "ControlBehaviors\_2") and optional all subfolders which should be searched.

<div class="contents" id="bkmrk-cmakelists.txt-%23-dec"><div class="contents"><div class="textblock"><table border="0"><tbody><tr><td>**CMakeLists.txt**</td></tr><tr><td>```
# declared directories to include these directories 
# must provide a "FileList.txt" which lists all files 
set(PRV_WIDGET_SUBDIRS     
    . 
) 
 
CgiGetCurrentDir(PRV_CUR_DIR) 
CgiAddIncludeDirs(${PRV_CUR_DIR}/..) 
 
set(PRV_APP_NAME "ControlBehaviors_2") 
source_group(PRV_ALL_SRCS FILES ${PRV_WIDGET_SUBDIRS}) 
CgiCollectListedFiles(PRV_ALL_SRCS ${PRV_APP_NAME} "" LIST ${PRV_WIDGET_SUBDIRS}) 
 
CgiAddStaticLibrary(PRV_APP_TARGET_NAME ${PRV_APP_NAME} ${PRV_ALL_SRCS}
```

</td></tr></tbody></table>

</div></div></div>Finally in the "AdditionalBehaviorsPaths.txt" of the application add the new folder.

<div class="contents" id="bkmrk-additionalbehaviorsp"><div class="textblock"><table border="0"><tbody><tr><td>**AdditionalBehaviorsPaths.txt**</td></tr><tr><td>```
# Additional Behaviors 
# declare all directories to include (one directory per line) 
# these directories must provide a "FileList.txt" file which lists all files 
# all subdirectories containing a "FileList.txt" file will also be included 
# path must be relative to Default widget directory 
# lines starting with # will be ignored 
# 
 
../../../cgi_studio_controls/src/Behaviors 
../CustomBehaviors 
```

</td></tr></tbody></table>

</div></div>

# CGI-Studio Default Behaviors

CGI-Studio already provides multiple Behaviors by default which can already be used in projects. While they are also just Behaviors the follow a new concept for development which has been made possible by the new features of Behaviors.

<div class="header" id="bkmrk-basic-concept"><div class="headertitle"><div class="title">**Basic Concept**  
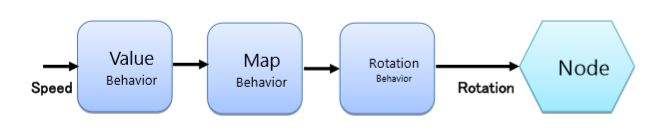
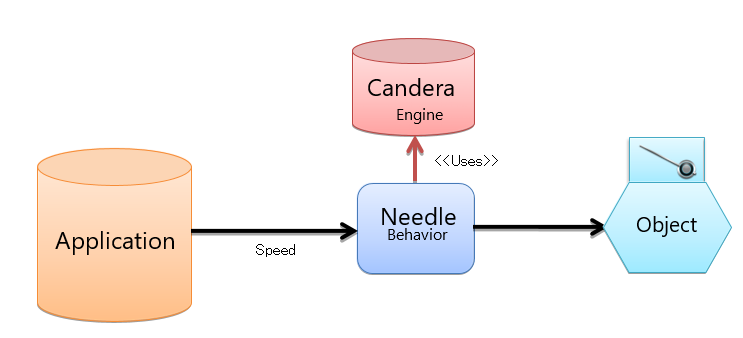
</div></div></div>Previously Widgets where rather self-contained blocks of functionality. For example a needle widget would receive an input value (e.g. Speed) map it to a rotation angle and apply this rotation to a node.

<div class="contents" id="bkmrk-"><div class="contents"><div class="textblock"><div drawio-diagram="2353"><img src="https://doc316en.candera.eu/uploads/images/drawio/2023-02/drawing-7-1677206395.png" alt=""/></div>

</div></div></div>It would be possible to recreate this exact functionality as a behavior though the decision at [Candera](http://dev.doc.cgistudio.at/APILINK/namespace_candera.html "[DataBinding_RefTypeSample]") GmbH was to have multiple smaller behaviors which each implement only a small bit of functionality. Then combine these to achieve the desired results.

In the above sample this would result in a Value-Behavior which receives the value, a Map-Behavior which maps it to an angle and a Rotation-Behavior which applies the angle as a rotation on the node.

<div class="contents" id="bkmrk--0"><div class="contents"><div class="textblock"><div drawio-diagram="2354"><img src="https://doc316en.candera.eu/uploads/images/drawio/2023-02/drawing-7-1677206415.png" alt=""/></div>

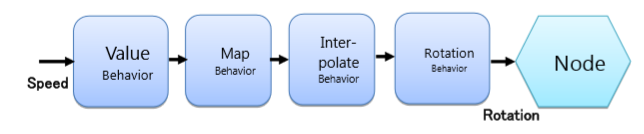
</div></div></div>This approach has the advantage that it drastically improves the flexibility due to the modular design. For example if the rotation shouldn't happen instantly but slowly over time an interpolation behavior can be added.

<div class="contents" id="bkmrk--1"><div class="contents"><div class="textblock"><div drawio-diagram="2355"><img src="https://doc316en.candera.eu/uploads/images/drawio/2023-02/drawing-7-1677206427.png" alt=""/></div>

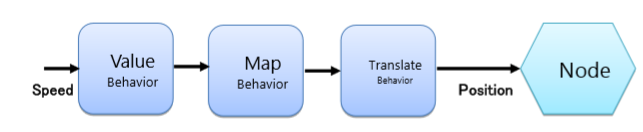
</div></div></div>If instead of rotating a needle, a pointer is just moved forward or back to indicate the value the Rotation-Behavior can be replaced with a Translation-Behavior.

<div class="contents" id="bkmrk--2"><div class="contents"><div class="textblock"><div drawio-diagram="2356"><img src="https://doc316en.candera.eu/uploads/images/drawio/2023-02/drawing-7-1677206442.png" alt=""/></div>

</div></div></div>All this can be achieved by simply recombining existing behaviors without the need to code new ones.

---

#### **Event Handler Behavior**

When an Event-Handler Behavior receives an event it will pass this event to a number of Condition-Behaviors. The Condition-Behaviors can then decide if this event is "accepted" or not. In case the event is accepted all attached Action-Behaviors will be executed.

##### How to create a new Condition-Behavior

To create a custom Condition-Behavior a new Behavior derived from Candera::ConditionBehavior must be created.

In the OnEvent() method an EvaluateConditionEvent will be received which allows to get the original event via the GetTriggerEvent() method. Further the dispatchResult will be of the type ConditionEvaluationResult. To accept the event the Match() method of the result must be called.

```
... 
void ClickConditionBehavior::OnEvent(const <a class="code" href="http://dev.doc.cgistudio.at/APILINK/class_feat_std_1_1_event.html" title="Event serves as a base class for user derived events.">FeatStd::Event</a>& event, Candera::EventDispatchResult& dispatchResult) 
{     
    const <a class="code" href="http://dev.doc.cgistudio.at/APILINK/class_candera_1_1_evaluate_condition_event.html" title="The ConditionBehavior is referenced by an TriggerBehavior. ConditionBehavior and ActionBehavior are b...">Candera::EvaluateConditionEvent</a>* conditionBehaviorEvaluationEvent = Candera::Dynamic_Cast<const Candera::EvaluateConditionEvent*>(&event); 
 
    if (0 != conditionBehaviorEvaluationEvent) {         
        const ClickEvent* clickEvent =                
              Candera::Dynamic_Cast<const ClickEvent*>(&(conditionBehaviorEvaluationEvent-><a class="code" href="http://dev.doc.cgistudio.at/APILINK/class_candera_1_1_evaluate_condition_event.html#a189ee80c106180afad63fad526cc456b">GetTriggerEvent</a>())); 
 
        if (0 != clickEvent) {             
            if (clickEvent->GetClickCount() == GetClickCount()) {                 
                Candera::ConditionEvaluationResult* conditionEvaluationResult = Candera::Dynamic_Cast<Candera::ConditionEvaluationResult*>(&dispatchResult); 
 
                if (0 != conditionEvaluationResult) {                     
                    conditionEvaluationResult->Match();                 
                }             
             }         
        }     
    } 
} 
...
```

##### How to create a new Action Behavior

To create a custom Action-Behavior a new Behavior derived from [Candera::ActionBehavior](http://dev.doc.cgistudio.at/APILINK/class_candera_1_1_action_behavior.html "The Action Behavior is part of the Event Handling with Behaviors pattern. It follows the ECA (Event-C...") must be created.

In the OnEvent() method an InvokeActionEvent will be received which indicates that the action should be executed.

```
... 
void ChangeValueActionBehavior::OnEvent(const <a class="code" href="http://dev.doc.cgistudio.at/APILINK/class_feat_std_1_1_event.html" title="Event serves as a base class for user derived events.">FeatStd::Event</a>& event, Candera::EventDispatchResult& dispatchResult) 
{     
    FEATSTD_UNUSED(dispatchResult);     
    const <a class="code" href="http://dev.doc.cgistudio.at/APILINK/class_candera_1_1_invoke_action_event.html" title="Event to invoke an action. An input event is processed by a TriggerBehavior, which evaluates a condit...">Candera::InvokeActionEvent</a>* invokeActionEvent = Candera::Dynamic_Cast<const Candera::InvokeActionEvent*>(&event); 
 
    if (0 != invokeActionEvent) {         
        // Do something     
    } 
} 
... 
```

<div class="header" id="bkmrk-back-to-the-menu-0"><div class="headertitle"><div class="title align-left">---

</div></div></div>#### **How to handle Touch-Events**

To create a Behavior which reacts on Touch interaction a new Behavior derived from CgiStudioControl:: TouchableBehavior must be created. This class registers to the TouchSession and processes the incoming TouchSession-Events to perform a hit detection. If a hit is detected it is possible to react to Touch-Event in the behavior.

From the event the Touch-Info can be retrieved which contains important information about the Touch-State (Down, Move, Up), Pointer-Id (Multi-Touch), Source-Id (Multi-Display) and Touch-Coordinates.

```
...         
    virtual void OnEvent(const <a class="code" href="http://dev.doc.cgistudio.at/APILINK/class_feat_std_1_1_event.html" title="Event serves as a base class for user derived events.">FeatStd::Event</a>& event, Candera::EventDispatchResult& dispatchResult)         
    {             
        const Candera::TouchEvent* touchEvent = Candera::Dynamic_Cast<const Candera::TouchEvent*>(&event); 
 
        if (touchEvent != 0) {                 
            switch (touchEvent->GetTouchInfo().m_state) {                     
                case <a class="code" href="http://dev.doc.cgistudio.at/APILINK/struct_candera_1_1_touch_info.html#a0115203900e842855ca9c7dd69107721a10cbf1c0a6ea47eaef08b88eadd88607">Candera::TouchInfo::Down</a>:                         
                    //OnBeginDrag(event.GetTouchInfo().m_x, event.GetTouchInfo().m_y);                         
                    break;                     
                case <a class="code" href="http://dev.doc.cgistudio.at/APILINK/struct_candera_1_1_touch_info.html#a0115203900e842855ca9c7dd69107721a08abf72a0e7c5d81cfaf58382e1df658">Candera::TouchInfo::Move</a>:                         
                    //OnDrag(event.GetTouchInfo().m_x, event.GetTouchInfo().m_y);                         
                    break;                     
                case <a class="code" href="http://dev.doc.cgistudio.at/APILINK/struct_candera_1_1_touch_info.html#a0115203900e842855ca9c7dd69107721a5584e1acc88c0a4386c327abf73cb4cd">Candera::TouchInfo::Up</a>:                         
                    //OnEndDrag(event.GetTouchInfo().m_x, event.GetTouchInfo().m_y);                         
                    break;                     
                default: break;                 
            }             
        } 
        else {                 
            Base::OnEvent(event, dispatchResult);             
        }         
    } 
...
```

##### Manual Touch handling

If a more customized processing of Touch-Events is required, instead of deriving from CgiStudioControl:: TouchableBehavior it is also possible to manually implement Touch-Handling. First the behavior must be marked as Touchable by implementing the "virtual bool IsTouchable() const" method or simply adding the following macro.

```
... 
CGI_BEHAVIOR_IS_TOUCHABLE() 
...
```

Next the Behavior must be registered/unregistered to the Touch-Session. This allows receiving TouchSession-Events.

```
...     
void TouchableBehavior::Register()     
{         
    Deregister();         
    Candera::TouchSession::GetInstance().Register(GetTouchable());         
    m_touchSession = &Candera::TouchSession::GetInstance();    
} 
 
void TouchableBehavior::Deregister()     
{         
    if (0 != m_touchSession) {             
        m_touchSession->Deregister(GetTouchable());             
        m_touchSession = 0;         
    }     
} 
...
```

The basic touch handling (object hit detection) must be manually implemented. This can be a bit more complicated but related code can be found in the TouchBehavior::OnEvent which can be used as basis for a custom implementation.

```
...     
    void TouchableBehavior::OnEvent(const <a class="code" href="http://dev.doc.cgistudio.at/APILINK/class_feat_std_1_1_event.html" title="Event serves as a base class for user derived events.">FeatStd::Event</a>& event, Candera::EventDispatchResult& dispatchResult)
    {         
        if (!TouchSessionEventHandler::Handle(*this, event, dispatchResult)) { 
...             
            Base::OnEvent(event, dispatchResult);         
        }     
    } 
...
```

And the TouchSessionEventHandlerImpl::OnTouchSessionEvent.

```
...         
    void OnTouchSessionEvent(const Candera::TouchSessionEvent& event, Candera::TouchSessionEventDispatchResult& dispatchResult)         
    {             
        if (m_intersectionTest) {                 
            if (m_behavior.GetNode().IsEffectiveRenderingEnabled()) {                     
                <a class="code" href="http://dev.doc.cgistudio.at/APILINK/class_courier_1_1_view.html">Courier::View</a>* view = m_behavior.<a class="code" href="http://dev.doc.cgistudio.at/APILINK/class_courier_1_1_view.html#a873e33496b823c37e043688906db66ae" title="Returns the parent view.">GetParentView</a>();                     
                if (0 != view) {                         
                    const <a class="code" href="http://dev.doc.cgistudio.at/APILINK/class_candera_1_1_abstract_node_pointer.html" title="The class AbstractCameraPointer is an wrapper class to abstract 2D and 3D camera nodes.">Candera::AbstractNodePointer</a>& abstractNode = m_alternativeNode.<a class="code" href="http://dev.doc.cgistudio.at/APILINK/class_candera_1_1_abstract_node_pointer_base.html#aa1bbbae49167cb862bdd4fbaadc3c18f">IsValid</a>() ? m_alternativeNode : m_behavior.GetNode();
                    const <a class="code" href="http://dev.doc.cgistudio.at/APILINK/struct_candera_1_1_touch_info.html" title="Description.">Candera::TouchInfo</a>& touchInfo = event.GetTouchInfo(); 
#ifdef CANDERA_2D_ENABLED
                    <a class="code" href="http://dev.doc.cgistudio.at/APILINK/class_courier_1_1_view_scene2_d.html">Courier::ViewScene2D</a>* viewScene2D = view->ToViewScene2D();                         
                    if (0 != viewScene2D) {                             
                        <a class="code" href="http://dev.doc.cgistudio.at/APILINK/class_candera_1_1_node2_d.html" title="The class Node2D is an abstract base class for all 2D scene graph nodes.">Candera::Node2D</a>* node2D = abstractNode.<a class="code" href="http://dev.doc.cgistudio.at/APILINK/class_candera_1_1_abstract_node_pointer_base.html#a332cbbcd777c748145418b8ff6911e4f">ToNode2D</a>();                             
                        if (0 != node2D) {                                 
                            Courier::ViewScene2D::CameraPtrVector& cameras = viewScene2D->GetCameraPtrVector(); 
                            for (FeatStd::SizeType i = 0; i < cameras.Size(); ++i) {
                                <a class="code" href="http://dev.doc.cgistudio.at/APILINK/class_candera_1_1_vector2.html" title="The default Vector2 class.">Candera::Vector2</a> touchPosition(FeatStd::Float(touchInfo.m_x), FeatStd::Float(touchInfo.m_y));
                                if ((0 != cameras[i]) && node2D-><a class="code" href="http://dev.doc.cgistudio.at/APILINK/class_candera_1_1_node2_d.html#a2bc3ebd04baf379858acd754f97b3354">IsPickIntersectingBoundingRectangle</a>(*cameras[i], touchPosition)) {
                                     dispatchResult.SetTouched(true);
                                     dispatchResult.SetTouchUsage(m_touchUsage);                                         
                                     return;                                     
                                }                                 
                            }                             
                        }                         
                 } 
#endif 
#ifdef CANDERA_3D_ENABLED                         
                      <a class="code" href="http://dev.doc.cgistudio.at/APILINK/class_courier_1_1_view_scene3_d.html">Courier::ViewScene3D</a>* viewScene3D = view->ToViewScene3D();                         
                      if (0 != viewScene3D) {                             
                          <a class="code" href="http://dev.doc.cgistudio.at/APILINK/class_candera_1_1_node.html" title="The class Node is an abstract base class for all scene graph nodes. Each Node defines a local coordin...">Candera::Node</a>* node = abstractNode.<a class="code" href="http://dev.doc.cgistudio.at/APILINK/class_candera_1_1_abstract_node_pointer_base.html#a2da309042e58ef8e12f580c6533050f9">ToNode</a>();                             
                          if (0 != node) {                                 
                              Courier::ViewScene3D::CameraPtrVector& cameras = viewScene3D->GetCameraPtrVector(); 
                              for (FeatStd::SizeType i = 0; i < cameras.Size(); ++i) { 
                                   <a class="code" href="http://dev.doc.cgistudio.at/APILINK/class_candera_1_1_camera.html" title="A Camera provides Modelview and Projection matrices. Camera is a Transformable.* The eye point is set...">Candera::Camera</a>* camera = cameras[i];                                     
                                   FeatStd::Float distance = Candera::Math::MaxFloat();
                                   if ((0 != camera) && camera-><a class="code" href="http://dev.doc.cgistudio.at/APILINK/class_candera_1_1_node.html#aedd4032a1ace92b9c2c7a97a9876ebf7">IsRenderingEnabled</a>() && node-><a class="code" href="http://dev.doc.cgistudio.at/APILINK/class_candera_1_1_node.html#a0e1a8d24555a67b3cddf6a2ceef94481">IsPickIntersectingGeometry</a>(*camera, static_cast<FeatStd::Int>(touchInfo.m_x), 
                                                                                        static_cast<FeatStd::Int>(touchInfo.m_y), distance)) { 
                                        dispatchResult.SetTouched(true);                                         
                                        dispatchResult.SetTouchUsage(m_touchUsage);                                         
                                        return;
                                   }                                 
                              }                             
                          }                         
                      } 
#endif                     
                 }                 
             }             
         }             
         else {                 
             dispatchResult.SetTouched(true);                 
             dispatchResult.SetTouchUsage(m_touchUsage);             
         }         
     } 
... 
```

---

#### **How to handle View-Activation-Events**

View-Activation-Events are events send by the View to indicate if it has been activated or deactivated. To react to these events the Behavior must register at the View as an Event-Listener.

```
... 
EventListenerAdapter m_eventListenerAdapter; 
...
```

```
...     
    CustomBehavior::CustomBehavior()     
    {         
        m_eventListenerAdapter.SetBehavior(this);         
        <a class="code" href="http://dev.doc.cgistudio.at/APILINK/class_courier_1_1_view.html#a18dd6075cdc9de203f4b720595c58b8b">Courier::View::GetEventSource</a>().<a class="code" href="http://dev.doc.cgistudio.at/APILINK/class_feat_std_1_1_event_source.html#a82512678c455da0bfcc928d0f24b357b">AddEventListener</a>(&m_eventListenerAdapter);     
    } 
 
    CustomBehavior::~CustomBehavior ()     
    {         
        <a class="code" href="http://dev.doc.cgistudio.at/APILINK/class_courier_1_1_view.html#a18dd6075cdc9de203f4b720595c58b8b">Courier::View::GetEventSource</a>().<a class="code" href="http://dev.doc.cgistudio.at/APILINK/class_feat_std_1_1_event_source.html#a92a06e13517c1dc371fd13a0f0ba5739">RemoveEventListener</a>(&m_eventListenerAdapter);         
        m_eventListenerAdapter.SetBehavior(0);     
    } 
...
```

It is now possible to receive as [Courier::ViewActivationEvent](http://dev.doc.cgistudio.at/APILINK/class_courier_1_1_view_activation_event.html) via the OnEvent() method.

---

####   

# External Image Behaviour

### Behaviour Overview

#### Feature Description

<span lang="EN-IN">A new file resource manager called **<span style="background-image: initial; background-position: initial; background-size: initial; background-repeat: initial; background-attachment: initial; background-origin: initial; background-clip: initial;">FileSystemResourceManager</span>** has been introduced. With this new resource manager, **“FileSystem”**, users can now use it with the external resource behaviours **SetExternalBitmap** and **ExternalBitmapProvider**.</span>

<span lang="EN-IN">Previously, these behaviours only supported the **Android Resource Manager**, where users had to provide a unique resource ID (e.g., Bitmap name), and it was limited to Android.</span>

<span lang="EN-IN">With the introduction of the **FileSystemResourceManager**, the use cases of these behaviours have been extended. Now, users can provide a file path from the project file system (outside the binary</span><span lang="EN-IN" style="font-size: 10.0pt; line-height: 115%; font-family: 'Courier New';"> </span><span lang="EN-IN">ExternalResourceManagerId and ExternalResourceId are configurable properties of the External Resource behaviour.  
When the **ExternalResourceManagerId** is set to Filesystem, the behaviour enables dynamic image loading from the file system at runtime to Vram.  
Users can specify a relative image path in the ExternalResourceId property to load image files such as PNG and JPEG without embedding them directly into the binary file**.** These behaviours internally use the lodepng and IJG (libjpeg) libraries to decode, encode, and compress image data as needed.</span>

<span lang="EN-IN">A **relative path** refers to a path that is defined relative to the application’s working directory or a configured asset root.  
For example:</span>

- <span lang="EN-IN">Logos\\400x150\\CGI-Studio-Translator-final.png</span>
- <span lang="EN-IN">Logos\\400x150\\CGI-Studio-Translator-final.jpg</span>

<span lang="EN-IN">The **Filesystem resource manager** enables the management of image resources without the need to import them into the Scene Composer. Images can be accessed and loaded directly from the application’s file system at runtime.</span>

##### Supported Platforms

It supports all platforms.

##### Limitations:

1. These behaviours are used to set images on 2D bitmap nodes and cannot be used to set textures for **3D objects**.
2. There is no dropdown list available in the **ExternalResourceManagerID** property to select between **FileSystem** and **Android system** — the user must set it manually.
3. The FileSystemResourceManager supports loading and displaying only PNG and JPG images. It does not support file paths of other formats.

### Using External Resource Behaviours

#### External Bitmap Provider

1. Drag and drop the \[ Node 2D &gt; Bitmap Node \] from the toolbox onto the scene editor, or the scene tree.
2. Attach \[ Behavior &gt; External Resource &gt; Value Processing &gt; External Bitmap Provider \] in the Toolbox to the Behavior in the Extra Scene Tree of the placed bitmap node by drag-and-drop operation.
    
    <div drawio-diagram="8697"><img src="https://doc316en.candera.eu/uploads/images/drawio/2025-11/drawing-4-1762587299.png" alt=""/></div>
3. Click **External Bitmap Provider**, and in the properties panel that opens, change **ExternalResourceManagerId** from **Android** to **FileSystem** (default: **Android**).
    
    <div drawio-diagram="8696"><img src="https://doc316en.candera.eu/uploads/images/drawio/2025-11/drawing-4-1762587266.png" alt=""/></div>
4. Next, set the relative path to the external image in the **ExternalResourceId** property.  
    For example: *&lt;trunk&gt;\\cgi\_studio\_content\\Resources\\cgi\_studio\\Logos\\400x150\\CGI-Studio-Translator-final.png.*
    
    <div drawio-diagram="8695"><img src="https://doc316en.candera.eu/uploads/images/drawio/2025-11/drawing-4-1762587225.png" alt=""/></div>
5. The image will be loaded into the solution, and the image from the given relative path will be displayed on the screen.
    
    <div drawio-diagram="8694"><img src="https://doc316en.candera.eu/uploads/images/drawio/2025-11/drawing-4-1762587158.png" alt=""/></div>

#### Set External Bitmap

1. Drag and drop the \[ Node 2D &gt; Bitmap Node \] from the toolbox onto the scene editor, or the scene tree.
2. Drag and drop the \[ Controls &gt; Touchable &gt; TextButton \] from the toolbox onto the scene editor, or the scene tree. Take place this operation twice (add two button control nodes).
3. Attach \[ Behavior &gt; External Resource &gt; Action &gt; Set External Bitmap \] in the Toolbox to the Actions in the Extra Scene Tree of the placed Text Button control nodes by drag-and-drop operation.
    
    <div drawio-diagram="8698"><img src="https://doc316en.candera.eu/uploads/images/drawio/2025-11/drawing-4-1762587485.png" alt=""/></div>
4. Change the *ExternalResourceManager ID* to **FileSystem** to make the behavior support file system resources.
    
    <div drawio-diagram="8699"><img src="https://doc316en.candera.eu/uploads/images/drawio/2025-11/drawing-4-1762587544.png" alt=""/></div>
5. Click the select item button on the Image Provider in the properties panel that appears and select the External Bitmap Provider connected to the BitmapNode (this operation is performed for the two Text Button controls).
    
    <div drawio-diagram="8700"><img src="https://doc316en.candera.eu/uploads/images/drawio/2025-11/drawing-4-1762587668.png" alt=""/></div>
6. Set the relative image path to the *ExternalResourceID* property of the **Set External Bitmap** behavior in the button’s actions.(This operation is performed for both button controls that use the **Set External Bitmap** behavior.)
    
    <div drawio-diagram="8701"><img src="https://doc316en.candera.eu/uploads/images/drawio/2025-11/drawing-4-1762587741.png" alt=""/></div>
7. Run the player and press the text buttons. When each button is pressed, the image at the specified path will be loaded by the **Set External Bitmap** behaviors and displayed on the screen.
    
    <div drawio-diagram="8702"><img src="https://doc316en.candera.eu/uploads/images/drawio/2025-11/drawing-4-1762587751.png" alt=""/></div>

### External Resource Behaviour

#### Set External Bitmap Behavior

Sets **ExternalResourceId** and **ExternalResourceManagerId** properties of an associated **ExternalBitmapProvider** when its action is triggered. For details on the property items, please refer to the <span style="color: rgb(230, 126, 35);">[Action External Resource Resource](https://doc316en.candera.eu/link/1074#bkmrk-action-external-reso-1)</span>.

#### External Resource Provider Behavior

Sets an image on a render node based on the **ExternalResourceId**. For details on the property items, please refer to the <span style="color: rgb(230, 126, 35);">[Value Processing External Resource Behavior](https://doc316en.candera.eu/link/1074#bkmrk-value-processing-ext)</span>.

- If the ID is *Android*, it retrieves an external bitmap using the **ExternalResourceId** from the external resource provider specified by the **ExternalResourceManagerId**, and provides the bitmap to the associated bitmap node.
- If the ID is *FileSystem*, it retrieves the image from the specified file, converts it to a bitmap using the **FileSystemResourceManager**, and provides it to the associated bitmap node.

### Implementation Structure

1. **Included the IJG Library** in the project to decode JPEG images and convert them into pixel data.
    
    
    - The library source files are located in the cgi\_studio\_3psw\\ src\\ijg
    - Both **LodePNG** (for PNG) and **IJG** (for JPEG) are compiled as static libraries.
2. The **SetExternalBitmap** and **External** **Behaviour** functionalities already supported the **Android** **Resource Manager**.
    
    
    - Bitmaps are loaded at runtime based on the configured ExternalResourceManagerId, which determines whether to use the **File System** or **Android Resource System**.
3. **Added two new files:** FileSystemResourceManager.cpp and FileSystemResourceManager.h in the trunk.
    
    
    - Definedaclassnamed**FileSystemResourceManager**, derived from ExternalResourceManager.
4. The ExternalResourceManagerId determines which resource manager handles the request (e.g., FileResourceManager or FileSystemResourceManager).
5. The **FileSystemResourceManager** class allows loading PNG and JPEG images directly from file paths and interacts with the **IJG** and **lodepng** libraries.
    
    
    - An instance of this class is created when the user sets the **ExternalResourceManager Property ID** to **Filesystem**.
6. The **External Resource Manager** handles resources (such as images and bitmaps) that exist **outside** the project’s asset binary file.
7. Resource managers are registered by calling the **DefaultSetup**() function in . in the applications.
    
    
    - The definition of this function is located in **src\\CanderaPlatform\\Device\\Common\\Base\\DefaultSetupExternalResourceManagers.cpp**
8. When Default Setup() is executed, two static objects are created —
    
    
    - One in FileResourceManager for Android resources
    - Another in FileSystemResourceManager for file system resourcesBoth classes are derived from the common base class **ExternalResourceManager**.
9. The objects of these classes are registered using the Register() function of ExternalResourceManager, and are inserted into a **global map** for access during runtime.
10. A new class named **ImageLoader** has been defined in the newly introduced file **ImageLoader**, located in ***featstd\\src\\FeatStd\\Platform***.The **ImageLoader** class acts as a platform-independent interface for loading, decoding, and storing image files in various formats. It ensures consistent usage across different systems and simplifies image handling for the resource manager across multiple operating systems.
11. Each platform directory contains a file named **PlatformImageLoader**, which defines the platform-dependent implementation corresponding to the **ImageLoader** interface. The **PlatformImageLoader** implementation ensures that image handling is optimized and compatible with the target operating system (e.g., Windows, Linux, Android, RTOS, etc.).

#### Other Changes

1. Modification in **IdentifierHelper** Structure 
    - **File:** IdentifierHelper.cpp
    - **Why:** The resource ID (e.g., ExternalResourceId) is not a plain string but an object that can be converted to a string using IdentifierHelper::GetStringByIdentifier.
    - **Purpose:** This change allows the resource manager to handle hierarchical and structured resource paths efficiently and safely.

2. Replaced Name with Identifier Data Type 
    - The data type **Name** has been replaced with **Identifier** in all external resource management classes.
    - **Reason for Change:**
        - **Name** represents a single, non-hierarchical string label (e.g., "Logo" or "Scene1") and is suitable only for flat resources such as bitmap names or unique IDs obtained from ExternalResourceId.
        - **Identifier** supports hierarchical resource paths, improving the flexibility of resource management — mainly for the FileSystemResourceManager.
    - **Files Modified:**
        - ExternalBitmapProviderBehavior.cpp
        - ExternalBitmapProviderBehavior.h
        - ExternalResourceChangeConditionBehavior.cpp
        - ExternalResourceChangeConditionBehavior.h
        - SetExternalBitmapActionBehavior.cpp
        - SetExternalBitmapActionBehavior.h
        - ExternalBitmapProviderTest.cpp
        - ExternalResourceChangeConditionTest.cpp
        - SetExternalBitmapActionTest.cpp
3. Update in GetBitmapResource Member Function (ExternalResourceManager Class) 
    - The **GetBitmapResource** member function definition in **ExternalResourceManager** has been updated.
    - **Reason for Change:**   
        To retrieve a bitmap resource from a registered external resource manager using a **Manager ID** and a **Resource ID** (both as Name::SharedPointer).
    - The function converts the resource name to an **Identifier**, then delegates the actual bitmap retrieval to the selected resource manager.This design enables **flexible and modular access** to bitmap resources from different managers.

### Display Bitmap from File Path

1. **The Candera framework uses the LodePNG and IJG libraries to decode image files:** LodePNG handles PNG images.  
    IJG handles JPEG images.  
    During decoding, the compressed data is converted into raw bitmap data (e.g., RGBA for PNG or RGB for JPEG).

2. When the **ExternalBitmapProvider** **behavior** properties are configured with an External Resource Manager ID and a full file path,  
    The OnChanged() function of the behavior is triggered,  
    Which then calls updateImage() inside the function

3. ExternalResourceManager::GetBitmapResource (const FeatStd::Internal::Identifier::SharedPointer&amp; resourceId)
4. The GetBitmapResource() function retrieves the corresponding Resource Manager object based on the Resource Manager ID and reads the user-configured properties from ExternalBitmapProvider.
5. Depending on the ID, it invokes the LoadBitmapResource() function:
6. If the Resource ID is set to FileSystem,
7. the LoadBitmapResource() function defined inside the FileSystemResourceManager class is called.
8. LoadBitmapResource() takes the resource ID (image file path) as input and processes it based on the file extension (e.g., .png or .jpg).
9. It then calls the LoadImage() function with the file path and detected format.
10. This function is defined in ImageLoader.h and implemented in GenericImageLoader.cpp.
11. The GenericImageLoader class uses two specialized loaders:  
    GenericJpegLoader (GenericJpegLoader.cpp/h)  
    GenericPngLoader (GenericPngLoader.cpp/h)
12. When the Load() function of either loader is called:  
    The lodepng library loads PNG files.  
    The IJG (libjpeg) library loads JPEG files.
13. The image data is decoded and converted into raw pixel data, stored in a structure containing image properties (height, width, pixel info).
14. The decoded bitmap is then returned from LoadBitmapResource() to the updateImage() function of ExternalBitmapProviderBehavior, where:
15. The bitmap effect is applied.
16. The image properties are updated for display on the screen.
17. When the **SetExternalBitmapActionBehavior** is triggered (for example, by an event or property change), it sets the Resource Manager ID and Resource ID on the ExternalBitmapProviderBehavior,
18. after which the process continues as described above.

**For example: Call Stack (Reference):** Demonstrates how a relative image file path is converted into pixel data using the **lodepng** library during bitmap creation.

```
Courier::ViewScene::Update(renderHint)
CgiStudioControl::ExternalBitmapProviderBehavior::UpdateImage()
ExternalResourceManager::GetBitmapResource(resourceManagerId, resourceId)
FileSystemResourceManager::LoadBitmapResource(resourceId)   // when Manager ID = FileSystem
FeatStd::Internal::ImageLoader::LoadImage(filename, format, output)
FeatStd::Internal::Generic::GenericImageLoader::LoadImage(filename, format, output)
FeatStd::Internal::Generic::GenericPngLoader::Load(filename, output)
lodepng_decode32_file(out, w, h, filename)

```

### FileSystemResourceManager Overview:

The **FileSystemResourceManager** class, defined in *FileSystemResourceManager.h*/*cpp*, provides functionality to load bitmap images from external files. It handles image format detection, error reporting, and seamless integration with the existing resource management system.

This class is derived from the **ExternalResourceManager** base class and serves as a common parent for both the AndroidResourceManager and FileSystemResourceManager classes. It defines a shared interface and common functionality for managing and loading external resources, enabling consistent handling of bitmap images across different platforms and resource types.

#### Class Overview

The FileSystemResourceManager class includes the following member functions

<table border="1" id="bkmrk-filesystemresourcema-1" style="border-collapse: collapse; width: 800px; height: 662.094px;"><tbody><tr><td>*FileSystemResourceManager(**const** **FeatStd**::Internal::Name::**SharedPointer**&amp;resourceManagerId*</td><td>Initializes the resource manager with a unique identifier(FileSystem).  
Stores the provided resourceManagerId in the member variable m\_resourceManagerId.  
</td></tr><tr style="height: 29.7969px;"><td style="height: 29.7969px;">*~**FileSystemResourceManager(**)*</td><td style="height: 29.7969px;"> </td></tr><tr style="height: 281.75px;"><td style="height: 281.75px;">*Bitmap::**SharedPointer** **LoadBitmapResource**(**const** **FeatStd**::Internal::Identifier::**SharedPointer**&amp; **resourceId**)*</td><td style="height: 281.75px;">Loads a bitmap image from the file system using the provided resource identifier. This function is called from ExternalBitmapProvider when the ExternalResourceManagerID is set to FileSystem.

**Path Extraction:**

Converts the identifier to a file path string using IdentifierHelper::GetStringByIdentifier.

**Format Detection:**

Determines the image format (PNG, JPEG) by checking the file extension or reading the file header.  
**File Access:**

Opens the file using FileStream. If the format is unknown, reads the header to detect PNG/JPEG signatures.  
**Image Loading:**

Uses ImageLoader::LoadImage to read the image data into a RawImageData structure.  
**Bitmap Creation:**

Calls Bitmap::Create to construct a bitmap object from the raw image data, pixel format, and other properties.  
**Return:**

Returns the created bitmap as a shared pointer

</td></tr><tr style="height: 80.1875px;"><td style="height: 80.1875px;">*bool **RegisterFileSystemResourceManager**(const FeatStd::Internal::Name::SharedPointer&amp; name)*</td><td style="height: 80.1875px;">Registers a new instance of FileSystemResourceManager with the global ExternalResourceManager registry.

Creates a new manager and calls ExternalResourceManager::Register with the provided name and manager instance.

</td></tr><tr style="height: 63.3906px;"><td style="height: 63.3906px;">*bool UnregisterFileSystemResourceManager(const FeatStd::Internal::Name::SharedPointer&amp; name*</td><td style="height: 63.3906px;">: Unregisters an existing FileSystemResourceManager from the global registry. : Unregisters an existing FileSystemResourceManager from the global registry.

</td></tr><tr style="height: 63.3906px;"><td style="height: 63.3906px;">*GetPixelFormat*()</td><td style="height: 63.3906px;">Converts an internal image format (e.g., RGBA, RGB) to the corresponding Bitmap::PixelFormat used by the Candera engine.</td></tr><tr style="height: 63.3906px;"><td style="height: 63.3906px;">*GetFileExtension()*</td><td style="height: 63.3906px;">Extracts the file extension from a file path (e.g. image path) string. Iterates through the string to find the last dot (**.**) and returns the substring after it, which is the extension.</td></tr></tbody></table>

### Dependent Classes of FileResourceManager for Converting File Path to Bitmap.

New files have been introduced to serve as a common, platform-independent interface. The files listed below have been added to the project and act as a common interface for handling different image formats. Based on the file format (PNG or JPEG), the lodepng and IJG (libjpeg) libraries are used to convert the image from the file system into pixel data

The following C++ files have been introduced:

<table id="bkmrk-genericimageloader.c" style="width: 70%;"><tbody><tr><td style="width: 100%;">GenericImageLoader.cpp/h

GenericJpegLoader.cpp/h   
GenericPngLoader.cpp/h   
ImageLoader.h

</td></tr></tbody></table>


#### Details about the classes defined above these files.

<table border="1" id="bkmrk-imageloader-the-imag" style="border-collapse: collapse; width: 800px;"><tbody><tr><td style="width: 193.5px;">ImageLoader</td><td style="width: 605.5px;">1. The ImageLoader class provides a platform-independent interface for loading image files (such as PNG, JPEG, BMP) into raw image data structures that can be used by the application.
2. **Identifier** supports hierarchical resource paths, improving the flexibility of resource management — mainly for the FileSystemResourceManager.

</td></tr><tr><td style="width: 193.5px;">GenericImageLoader</td><td style="width: 605.5px;">1. The GenericImageLoader class provides a unified, platform-independent interface for loading and storing image files in various formats (such as PNG and JPEG).
2. **Supported Formats:** PNG (calls GenericPngLoader::Store), JPEG (calls GenericJpegLoader::Store).
3. This class has one main member function,*LoadImage*(**const** **FeatStd**::Charfilename, ImageInputFormat), which loads and decodes an image file (e.g., PNG or JPEG) from disk using the file pathprovidedby **FileSystemResourceManager**, and stores it into a raw image structure.

</td></tr><tr><td style="width: 193.5px;">GenericJpegLoader</td><td style="width: 605.5px;">1. The GenericJpegLoader class is designed to load and decode JPEG image files into a raw image data structure that can be used FileSystemResourceManager.
2. This class has one main member function,*GenericJpegLoader*::Load(**const** **FeatStd**::*Char* filename, RawImageData&amp; output),which is called form the **GenericImageLoader** class when the file format is JPEG. It loads and decodes the JPEG image file into a **RawImageData** structure that can be used by the application.This function uses the **IJG** (Independent JPEG Group) library, a widely used open-source JPEG decoder, to read the JPEG file specified by filename(e.g. .png/jpeg). It decodes the compressed JPEG data into uncompressed pixel data and fills the output structure with the image’s width, height, pixel format, and pixel buffer.

</td></tr><tr><td style="width: 193.5px;">GenericPngLoader</td><td style="width: 605.5px;">1. The GenericPngLoader class is responsible for loading and decoding PNG image files into a raw image.
2. Uses a standard PNG decoding library (such as lodepng) to parse and decompress PNG images.
3. GenericPngLoader::Load(const FeatStd::Char filename, RawImageData&amp; output) is to load and decode a PNG image file into a raw image data structure (RawImageData) for use in ExteranalResourceBehaviors.
4. This function uses a PNG decoding library (Lodepng) to read the PNG file specified by filename. It parses the PNG format, decompresses the image data, and fills the output structure with the image’s width, height, pixel format, and pixel buffer.

</td></tr></tbody></table>

### Filesystem vs. Android Resource Manager ID

Resource managers in CGI Studio abstract the way external resources (such as images) are loaded and managed. Two commonly used managers are the FileSystem Resource Manager and the Android System Resource Manager. Each is designed for different platforms and use cases.

#### FileSystem Resource Manager

**Purpose:**

The FileSystem Resource Manager (FileSystemResourceManager) is designed to load resources directly from the device’s filesystem. It is platform-agnostic and works on desktop, embedded, and other systems where resources are stored as files.

Uses file paths or hierarchical identifiers to locate resources (e.g., images) on disk.

Supports common image formats like PNG and JPEG, with automatic format detection.

Reads files using standard file I/O operations and Convert to bitmap with help of Loadepng and ijg Opensource libraries.

#### Android System Resource Manager

**Purpose:**

The Android System Resource Manager is tailored for Android platforms, leveraging the Android resource system to access images and other assets packaged within the APK or available via Android’s resource APIs.

**How It Works:**

Uses Android resource IDs (not file paths) to locate resources.

Resources are typically bundled with the application and managed by the Android OS.

The resources read from the

- May have limitations on dynamic resource updates, as resources are often static once packaged.

#### Benefits of FileSystem Resource Manager :

1. Platform Flexibility:  
    Works across multiple platforms, not limited to Android.

2. Dynamic Resource Updates:  
    Resources can be updated, replaced, or added at runtime without rebuilding the application.