CGI Studio Community Edition
This books provides an overview of the Community Edition and highlights the differences between the CGI Studio Editions.
- Overview
- Target Setup Guide
- How to obtain your License?
- Python-based Data Binding
- Predefined Data Bindings
- Blood Pressure Sample
Overview
The Community Edition is our newly introduced and freely available Candera CGI Studio version for makers, enthusiasts and curious developers. The package includes the same set of features as our Professional Edition (see here), but does not require a licence for Scene Composer.
This edition is for private usage only and cannot be used for commercial purposes. Via registration at our Community Forum, each user has access to three free target licences, enabling the usage of up to three target devices without restrictions (no watermark, no runtime limitation).
The Community Edition was introduced with CGI Studio Version 3.16 and will be maintained along with our other CGI Studio versions.
For details about the CGI Studio versions, go to this page: CGI Studio Editions
This edition initially supports Raspberry Pi 4 and 5 only. Further hardware support will be added in later releases.
Notes:
Some of the bundled samples are designed for the Enterprise Edition of CGI Studio and contain a not compatible data binding definition. In that case the sample would not run on the target. Please have a look at the Pollen Infoscreen sample, as it is specifically designed for the Community Edition.
Target Setup Guide
Please refer to below for setup guides for each target device supported by CGI Studio Community Edition.
How to obtain your License?
To run your solutions as assets on hardware, a valid hardware license is required. Without this license, system limitations such as watermarks and runtime restrictions will apply.
Before activating your hardware, ensure that the system is correctly set up according to the Target Setup Guide, up to the section “Activate License”.
Steps to Obtain Your License File:
- Visit the Candera Community Forum.
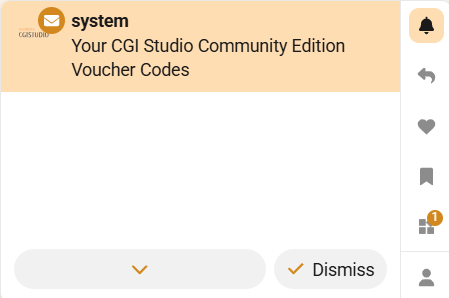
- Sign up to the Candera Community Forum. You will receive a system notification granting access to three license vouchers.

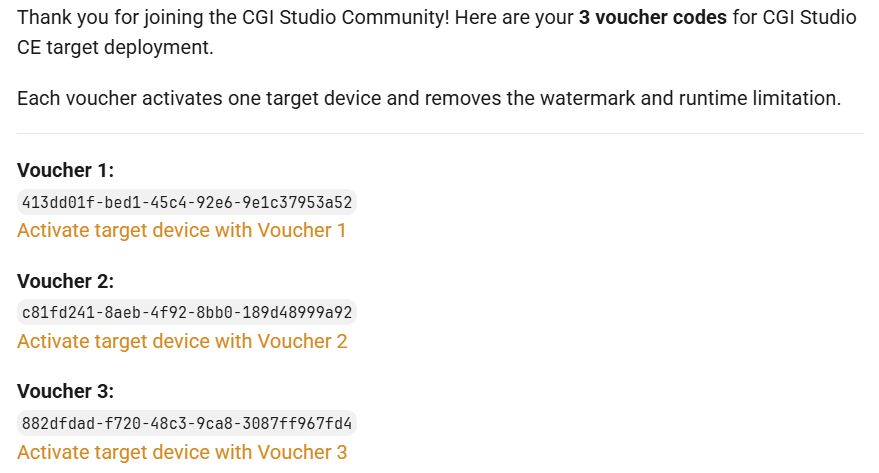
- Open the notification. It will contain the following message:

-
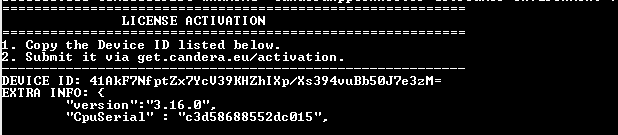
Before obtaining your license, you must retrieve the Device ID of your RaspberryPi device. Ensure that the Candera Debian package is installed on the device before performing this step.
/opt/candera/bin/PlayerYou should see the the Device ID in the console log:

- For a voucher, select the corresponding activation link (e.g., “Activate target device with Voucher 1”).
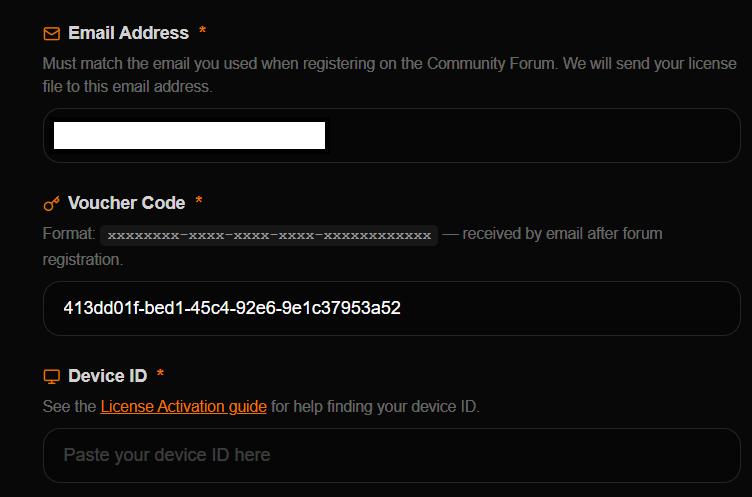
You will be redirected to the activation page.

- After submitting the Device ID and completing the voucher activation process, you will receive an email containing your hardware license file (.lic).
-
Copy the license file to the same directory as the Player on the target device.
/opt/candera/bin/License.licMoving the license file to a different location prevents the license from being activated on the target.
If the license file is not named License.lic, please rename it. CGI Studio is now activated on your target device.If you don't have permission to copy the license file, grant it by running sudo chmod 777 /opt/candera/bin on the device.
Please continue with our Target Setup Guide to run your first assets on the target and familiarize yourself with CGI Studio.
Python-based Data Binding
The Player Connector Library is a simple library written in Python and c++ that provides functionality to start and load scene composer binary assets and interact with a predefined set of data binding items (Variant) through Python scripting.
Player Connector Library Package
The main functionality of the library is contained in two files, CanderaAppConnector.py [1] and BindingSourceEnum.py [2]. These files contain three classes.
CanderaAppConnector: This is the main class to be used to play assets and interact with them using data bindingBindingSourceEnum: A Python enum generated by the build pipeline that contains the enum keys to be used when setting and getting data binding items. The keys underlay the nomenclature "SOURCE<sourceIndex>ITEM<itemIndex>". Source - and item index start at one and go to ten, as we currently have ten predefined binding sources and ten items per source.Logger: Logger class that my be used to generate logs with compliant format and logging levels
The sources and types listed above are contained in a file system Python package that can be installed with pip.
pip install path/to/python/library/root/folder
It is suggested to install the library to a virtual environment and not to the global Python installation. For an exemplary usage refer to the Blood Pressure Sample documentation and source code.
[1]: /bin/CommunityEdition/Python/CanderaAppConnector/CanderaAppConnector.py
[2]: /bin/CommunityEdition/Python/Generated/BindingSourceEnum.py
Workflow
The general workflow using the Player Connector Library package consists of:
- Constructing the library with the Player Connector Library binary contained in the delivered package (PlayerConnectorLibrary)
- Initializing the library with the asset binary
- Optionally register data binding callbacks
- Continuously calling step to invoke the render loop and internal message delivery
- Interact with data bindings. Note that internally, changes to the data bindings are reflected on the view when step is called
- Shutdown library and gracefully exit program
Documentation
Constructor
Creates and instance of this class. Expects and absolute or relative path to the Player Connector Library binary as parameter.
| Parameters |
|
Init
Initializes the player with the provided asset path. Expects an absolute or relative path to the asset binary as parameter. Must be called before every other method. Returns a bool value whether the operation was successful.
| Parameters |
|
| Returns | The bool value |
Step
Invokes the internal message processing and render loop execution. Needs to be called continuously. Databinding updates are reflected internally during the invocation of this method. Returns a bool value whether the operation was successful.
| Parameters | None |
| Returns | The bool value |
SetIntValue
Sets an integer value to a predefined databinding source item.
| Parameters |
|
| Returns | The bool value |
SetBoolValue
Sets a bool value to a predefined databinding source item.
| Parameters |
|
| Returns | The bool value |
SetStringValue
Sets a string to a predefined databinding source item.
| Parameters |
|
| Returns | The bool value |
SetFloatValue
Sets a float value to a predefined databinding source item.
| Parameters |
|
| Returns | The bool value |
GetIntValue
Gets an int value from a predefined databinding source item.
| Parameters |
|
| Returns | The integer value |
GetBoolValue
Gets a bool value from a predefined databinding source item.
| Parameters |
|
| Returns | The bool value |
GetStringValue
Gets a string from a predefined databinding source item.
| Parameters |
|
| Returns | The string |
GetFloatValue
Gets a float value from a predefined databinding source item.
| Parameters |
|
| Returns | The float value |
RegisterCallback
Registers a callback method. Multiple methods can be registered. Passed method must have two parameters. First param is BindingSourceItem and second parameter is value.
| Parameters |
|
| Returns | The bool value |
ShutDown
Shuts down the asset player and frees up allocated resources.
| Parameters | None |
| Returns | The bool value |
Predefined Data Bindings
The CGI Studio Community Edition comes with a predefined set of data bindings. This set consists of ten data binding sources with ten data binding items each. They are all of type FeatStd::Variant and can be bound to any bindable property in the scene composer with standard data binding. The data binding sources are prefixed with PredefinedBindingSource[n] and the items of each source is prefixed with Item[n].
To select and use the predefined set of data bindings follow the steps in the image below
- Click on the chain icon near a bindable property in the properties panel.
- Select a predefined binding item from the list in the modal window that follows the nomenclature described above.

There are two methods how to set values to the binding items and observe changes in the player.
- During solution development in the Scene Composer, values can be set and simulated through the player panel, as described here.
- By exporting the solution as asset and setting the values with the Player Connector Library, as described here.
Blood Pressure Sample
The blood pressure device sample is a Scene Composer sample that demonstrates a blood pressure measurement device with exemplary scenes and animations. For the Community Edition, the sample was extended with a voice activation feature and a data binding sample programmed in Python. The Python part of the sample relies on the Python-Based Player Data Binding Library to interact with the data bindings of the scene.
General information on this sample can be found in the Blood Pressure Solution documentation. This book goes over the sample Python extension, namely the voice activation feature and the integrated data binding.
The Python code for the blood pressure device sample can be found under:
\bin\CommunityEdition\Python\Samples\BloodPressureDevice.
The voice activation feature only works if the sample is started from Python using the Player Connector Library with the provided Python sample program. The feature doesn't work if the sample is started from the scene composer or directly with the player. Also, for enterprise edition users, if the Player Connector Library binary is built from source, it must be built with CMake flag CGIAPP_SAMPLE_SOUNDHOUND_ENABLED set to ON.
Python Environment Setup
To play the sample, a minimal Python setup is required. Verify that Python 3.x is installed on the system and either the py or the python command is on the path. Afterwards, create a virtual environment like below.
The CanderaAppConnector and other required types are an installable Python package under \bin\Player\PlayerConnector. Although, the package is listed in requirements.txt and installed by default. For more information refer to the Python-based Data Binding documentation.
Soundhound API Setup
The voice to text/command transcription is realized with Soundhound. To use the Soundhound Api in the blood pressure sample, a free account must be created under https://www.houndify.com/login. Afterwards, a new client must created in the dashboard. In this client, all domains may be deactivated, apart from the "Stored Page Match" domain.
As custom commands on Soundhound are only available in English language, the voice activation feature only support English language.

Now, a new custom can be created by navigating to the section "Custom Commands" in the menu on the left side. Enable the custom commands and click "New Page". After entering an arbitrary name for the command like "BloodPressureDevice", a modal window for configuring the command, opens. In der "Expression" input field enter the string
("Start") . [["blood pressure"] . ("device" | "measurement")]
and in the "Result JSON" input field the JSON
{
  "action": "START_BPD"
}
like in the image below

In the header/tab "Configure", select the "Imperative Phrase" radio button

The Soundhound service is now configured and the client credentials must be copied to the Python source files. Navigate to "Overview & API Key" and copy the credentials to the corresponding fields in the Python source file under:
\bin\Player\PlayerConnector\Samples\BloodPressureDevice\SoundhoundCommandClient.py

Note: The field __SOUNDHOUND_REQUEST_USER may be an arbitrary string value
Creating and running the asset
The binary asset can be created by opening the scene composer and opening the blood pressure device sample from the sample list. Save the solution on your file system and generate the asset by clicking on the "Generate Asset" button in the toolbar of the Scene Composer. Afterwards save the asset to the file system.
The sample can be started by executing the python blood pressure device sample program (\bin\CommunityEdition\Python\Samples\BloodPressureDevice\BloodPressureDevice.py) with the Python interpreter of the virtual environment. Note that the Python interpreter of the virtual environment is automatically used when the environment is activated. If the environment is activated, the terminal should have "(BloodPressureDevice)" written near the command input area.
py BloodPressureDevice.py -lbp "path/to/the/connector/library/binary" -abp "path/to/the/asset/binary"
- "-lbp" is the path to the Player Connector Library binary. Either under \bin\CommunityEdition\<device>_Simulation\PlayerConnector\PlayerConnectorLibrary*.dll or where it was built
- "-abp" is the path to the asset binary
Blood Pressure Device Sample
When the sample starts, it plays an intro animation and activates the menu scene. The menu scene is active until an according voice command like "Start", "Start measurement", "Start blood pressure device", ... was recorded. A live transcription of the voice input is displayed in the menu scene.

When the according voice command was received or the start button was pressed, the sample transitions to the blood pressure measurement scene. The measurement scene animates measurement values like oxygen saturation or heart rate gradually. An exemplary MEM button demonstrates a potential saving function of last measurements.

The values that can be seen in the above picture are set via Python by using the data binding library. A timer defined in the global state machine transitions back to the menu scene after 20 seconds.