# SceneComposer Translator Plugin

#### <a class="anchor" id="bkmrk--17"></a>Overview

*CGI Studio SceneComposer Translator Plugin* provides the following features:

<div class="contents" id="bkmrk-create%2C-edit-and-del"><div class="contents"><div class="textblock">- Create, edit and delete translatable texts in the *Language Table* dialog
- Set and manage translatable texts in the *Text property editor* of text nodes or controls and behaviors that expose Text properties.
- Alternatively import translatable texts from an existing CGI Language Pack Source or Excel file.
- Export translatable texts to a CGI Language Pack Source or Excel file.
- Append a compiled CGI Language Pack file to an asset after asset export.

</div></div></div>#### **Globalization License**

If the Translator Plugin files are present but no translation features are accessible in Scene Composer, please ensure that the *Globalization* license is acquired. Refer to the menu *Help &gt; Licenses*.

####   
**Create and Manage Cultures and Translatable Texts**

##### <a class="anchor" id="bkmrk--19"></a>Accessing Translator Plugin in SceneComposer

The translator plugin is fully integrated into SceneComposer. The SceneComposer toolbar provides an icon for opening the *Solution Options: Cultures* dialog as well as a drop-down menu for selecting an already created culture.

<div drawio-diagram="2208"><img src="https://doc316en.candera.eu/uploads/images/drawio/2023-02/drawing-4-1677043273.png" alt=""/></div>

<div class="contents" id="bkmrk--0"><div class="contents"><div class="textblock">  
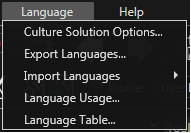
</div></div></div>There are five additional menu entries under *Language*:

<div class="contents" id="bkmrk-culture-solution-opt"><div class="contents"><div class="contents"><div class="textblock">- Culture Solution Option: Open the Culture Solution Option Dialog, where the user can add, edit or remove Culture as the multiple languages setting. By selecting a Culture in SceneComposer, you can switch between the displayed language of the solution. The translated texts displayed when selecting a Culture are configured in the Language Table.
- Export Languages: Opens the *Select Cultures* dialog where you can select the languages you want to export and - after browsing to an export file path - you can export your selected languages in the format you prefer to the location you selected by pressing *Export*.
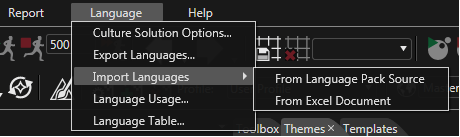
- Import Languages: Opens the Import Languages Dialog where Languages can be imported into a solution either as Language Pack Source or as Excel file, by going to *Language &gt; Import Languages* and selecting the desired flavor.
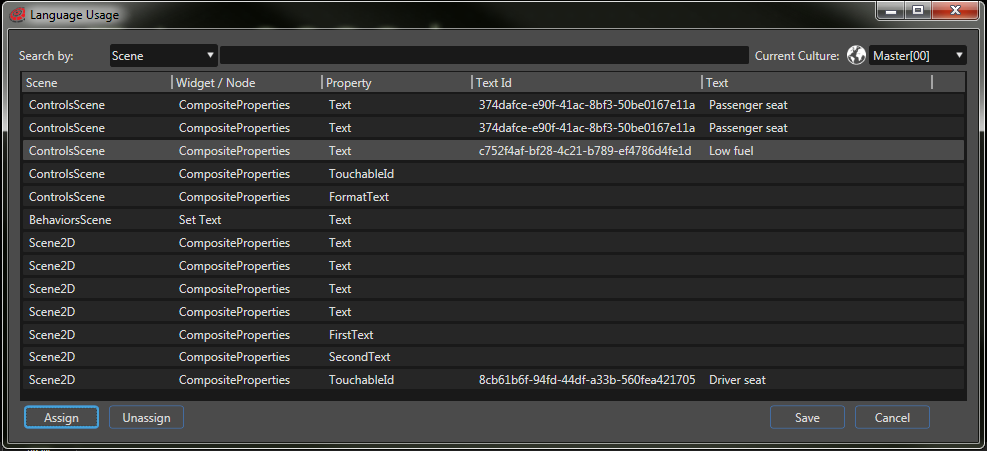
- Language Usage: Opens the Language Usage Dialog, where all Text Properties of the solution are listed. For those Text Properties that have a translatable text assigned, the *Text Id* and the *Text* value for the current culture are displayed. It is also possible to assign or unassign a translatable text for a Text Property.
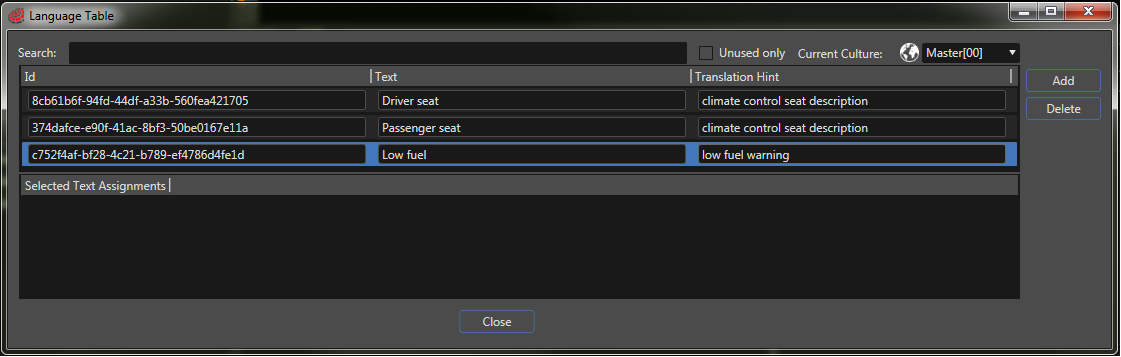
- Language Table: Opens the Language Table Dialog, where the user can add, edit or remove translatable texts. The Id of each translatable text is unique. The Text value for a certain culture can be accessed by selecting the respective culture in the Current Culture drop-down.

</div></div></div></div><div drawio-diagram="2209"><img src="https://doc316en.candera.eu/uploads/images/drawio/2023-02/drawing-4-1677043286.png" alt=""/></div>

<div class="contents" id="bkmrk--2"><div class="contents"><div class="textblock">  
</div></div></div>##### <a class="anchor" id="bkmrk--22"></a>Creating Cultures

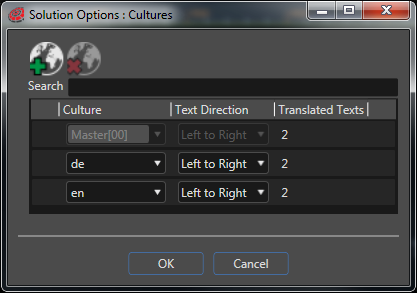
In order to have texts in different languages, cultures have to be created. This is done by clicking on the button *Culture Solution Options* in the toolbar.

<div drawio-diagram="2210"><img src="https://doc316en.candera.eu/uploads/images/drawio/2023-02/drawing-4-1677043314.png" alt=""/></div>

<div class="contents" id="bkmrk--4"><div class="contents"><div class="textblock">  
</div></div></div>With the icons on top, cultures can be added (using the green plus sign) and deleted (with the red "x"):

<div class="contents" id="bkmrk-to-add-a-new-culture"><div class="contents"><div class="textblock">- to add a new culture: use the button with the green plus sign
- to delete a culture: use the button with the red "x" For each entry the culture name can be selected from the drop-down and the text direction can be set. Once there are translated texts available for a certain culture, the number of available text for this culture is displayed in the Translated Texts column. In the above example there are two translatable texts for culture *de* and two translatable texts for *en*.

</div></div></div>##### <a class="anchor" id="bkmrk--24"></a>Translate Texts

Texts can be translated in the Language Table Dialog, which is opened via the menu *Language &gt; Language Table...*.

<div drawio-diagram="2211"><img src="https://doc316en.candera.eu/uploads/images/drawio/2023-02/drawing-4-1677043341.png" alt=""/></div>

<div class="contents" id="bkmrk--6"><div class="contents"><div class="textblock">  
</div></div></div>The drop-down on the top right allows the Current Culture selection. The texts of the Master culture or another culture in the solution can be accessed by changing the Current Culture. If the Master culture is selected, the Add and Delete buttons are enabled, otherwise they are disabled.

A search field on top helps to easily find specific texts once the number of texts increases. With the checkbox *Unused only* it is possible to identify texts that have not yet been assigned to any Text Property of the solution.

Clicking on the globe icon on the top right opens the *Solution Options: Cultures* dialog.

##### <a class="anchor" id="bkmrk--26"></a>Translatable Text

A translatable text is a text which supports translation into other languages and which provides information that facilitates its translation to other languages. The translatable text has the following properties:

<div class="contents" id="bkmrk-id%3A-unique-identifie"><div class="contents"><div class="textblock"><table border="0" cellpadding="2"><tbody><tr valign="top"><td>**Id:**</td><td>Unique identifier of the translatable text: - *Computed TextId*: An alphanumerical string, which will be exported into a computed hash value as TextId.
- *Direct Id*: When the format HEX\_VALUE is used, the hex value is directly exported into the asset without computing a hash value.

</td></tr><tr><td>**Text:**</td><td>Text in the master language</td></tr><tr><td>**Translation hint:**</td><td>Hint for the process of translation</td></tr></tbody></table>

</div></div></div>##### <a class="anchor" id="bkmrk--27"></a>Editing Text Properties

For editing the texts' properties, Scene Composer provides the Text Properties Dialog, which can be opened via the menu *Language &gt; Language Usage...*.

<div drawio-diagram="2212"><img src="https://doc316en.candera.eu/uploads/images/drawio/2023-02/drawing-4-1677043361.png" alt=""/></div>

<div class="contents" id="bkmrk--8"><div class="contents"><div class="textblock">  
</div></div></div>This dialog lists all Text Properties of the solution. For those Text Properties that have a translatable text assigned, the *Text Id* and the *Text* value for the current culture are displayed. The current culture can be changed in the drop-down menu on the right. If necessary, the *Solution Options: Cultures* dialog can be opened with the globe icon on the left of the drop-down menu.

When pressing *Save*, the changes made to the Text Properties will be applied to the solution.

##### <a class="anchor" id="bkmrk--29"></a>Assigning Texts to TextNodes

Assigning texts to Text Properties can either be done in the *Language Usage Dialog* or in the *Text Properties Panel*.

##### <a class="anchor" id="bkmrk--30"></a>Assigning Texts using the Language Usage Dialog

In the Language Usage Dialog a Text property can be selected. When pressing the *Assign* button on the bottom of the dialog, the *Language Table Selection* dialog is opened where a text can be chosen from the list.

##### <a class="anchor" id="bkmrk--31"></a>Assigning Texts using the Text Properties Panel

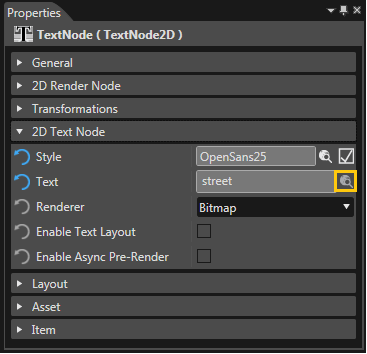
The *Language Table Selection* dialog can also be opened when editing a Text property by clicking on the icon *Select template for item*.

<div drawio-diagram="2213"><img src="https://doc316en.candera.eu/uploads/images/drawio/2023-02/drawing-4-1677043388.png" alt=""/></div>

<div class="contents" id="bkmrk--10"><div class="contents"><div class="textblock">  
</div></div></div>##### <a class="anchor" id="bkmrk--33"></a>Switching Cultures

If cultures and texts have been created and the texts are assigned to Text properties, the culture can be switched using the drop-down in the toolbar. As soon as another culture is chosen, the solution will be displayed in the other language.

<div class="contents" id="bkmrk-if-there-is-no-text-"><div class="textblock"><dl class="note"><dt></dt><dd><p class="callout info">If there is no text configured for a certain language, the *Text Id* will be displayed instead. Using this id, the missing text can easily be identified and found in the Language Table using the search function.  

</p>

<div drawio-diagram="2215"><img src="https://doc316en.candera.eu/uploads/images/drawio/2023-02/drawing-4-1677043434.png" alt=""/></div>

</dd></dl></div></div>####   
**Import and Export of Language Packs**

##### <a class="anchor" id="bkmrk--35"></a>Import of Language Pack Sources

Languages can be imported into a solution either as CGI Language Pack Source or as Excel file, by going to *Language &gt; Import Languages* and selecting the desired flavor.

<div drawio-diagram="2216"><img src="https://doc316en.candera.eu/uploads/images/drawio/2023-02/drawing-4-1677043472.png" alt=""/></div>

<div class="contents" id="bkmrk--12"><div class="contents"><div class="textblock">  
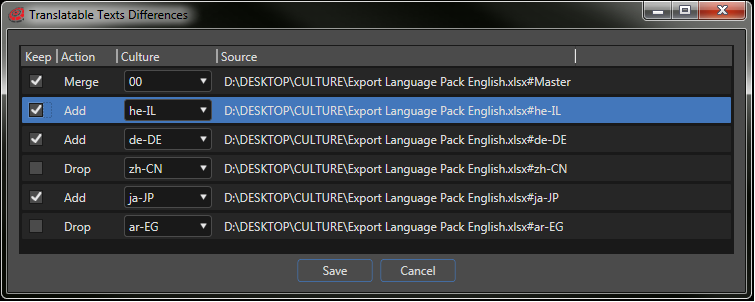
</div></div></div>The final step of the language import process is to show the differences between the texts in the import file and the texts in solution. There are three possible actions:

<div class="contents" id="bkmrk-add-%3A-indicates-that"><div class="contents"><div class="textblock">- **Add** : Indicates that the language does not already exist in the solution and will be imported from the file.
- **Merge**: Means that the language already exists in the solution and only the content differs. New texts will be added and already existing texts will be updated.
- **Drop** : When unchecking a language entry in the Translatable Text Differences dialogue, the Action changes automatically from Add/Merge to Drop. If the initial action was *Add*, this means that the language will not be added to the solution. If the initial action was *Merge*, this means its texts will not be updated and new texts from the import files will not be added to this language in the solution.

</div></div></div><div class="contents" id="bkmrk-the-drop-action-does"><div class="contents"><div class="contents"><div class="textblock"><dl class="note"><dd><p class="callout info">The *Drop* action does not mean that the language will be removed from the solution. The removal of a language can be done from *File &gt; Solution Options* in the *Cultures* tab.</p>

</dd><dd></dd></dl></div></div></div></div><div drawio-diagram="2217"><img src="https://doc316en.candera.eu/uploads/images/drawio/2023-02/drawing-4-1677043519.png" alt=""/></div>

##### <a class="anchor" id="bkmrk--38"></a>Export of Language Pack Sources

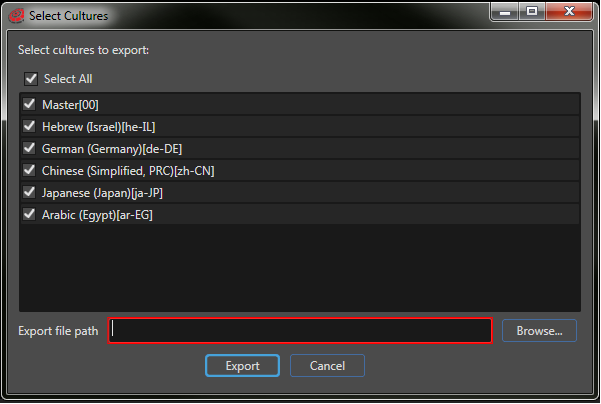
The translatable texts of the current solution can be exported by going to *Language &gt; Export Languages...*, which opens the *Select Cultures* dialog.

<div drawio-diagram="2218"><img src="https://doc316en.candera.eu/uploads/images/drawio/2023-02/drawing-4-1677043537.png" alt=""/></div>

<div class="contents" id="bkmrk--15"><div class="contents"><div class="textblock">  
</div></div></div>The *Select Cultures* dialog allows the choice of which cultures to be exported or not. Languages can be exported in Excel or CGI Language Pack Source (.LPS). Click the *Browse* button to select the *Export file path*, choose the format in the *Save as type* drop down and click *Save*. Click the *Export* button to finalize the languages export.

Please note that only the texts that have a correspondent in the master language texts, considering their Id, are included in the export, all the others being ignored. In this case warnings will be added to the Output tab in Scene Composer.

<div class="contents" id="bkmrk-exporting-languages-"><div class="contents"><div class="textblock">- Exporting languages as Language Pack Source file creates a .LPS file that contains the master language and all the other languages available in the solution. The exported .LPS file can be compiled and appended using the CGI Studio Language Appender.
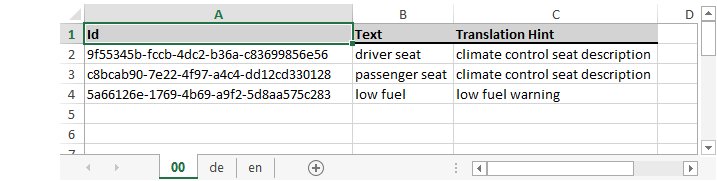
- Exporting languages as Excel document creates an Excel file that contains one sheet for the master language (named Master) and a sheet for each of the other languages in the solution having an identical name with the respective culture (e.g. de-DE, en-US, fr-FR). Each sheet has a header on the first row, with 3 columns: *Id*, *Text*, and *Translation Hint*. The following rows contain the translatable texts.

</div></div></div><div drawio-diagram="2220"><img src="https://doc316en.candera.eu/uploads/images/drawio/2023-02/drawing-4-1677043571.png" alt=""/></div>