# Tutorial for Special 2D Render Techniques

# 2D Shadow Effect

#### <a class="anchor" id="bkmrk--5"></a>Description

This chapter briefly describes how to use the 2D shadow effect.

<div class="contents" id="bkmrk-ensure-that-this-eff"><div class="contents"><div class="textblock"><dl class="note"><dt></dt><dd><p class="callout info">Ensure that this effect is supported by the device platform in use.</p>

</dd></dl></div></div></div>#### **2D Configure a Shadow Effect** 

##### <a class="anchor" id="bkmrk--7"></a>Shadow Effect

By using [Candera::ShadowBitmapBrushBlend](http://dev.doc.cgistudio.at/APILINK/class_candera_1_1_shadow_bitmap_brush_blend.html "Output a shadowed or glowing bitmap image, both shadow/glow and image alpha blended."), a colored shadow can be applied to a bitmap.

Following properties of the shadow can be configured:

<div class="contents" id="bkmrk-color-%28including-alp"><div class="contents"><div class="textblock">- Color (including alpha value)
- Scale (the shadow size related to the bitmap)
- Position Offset (related to the bitmap)

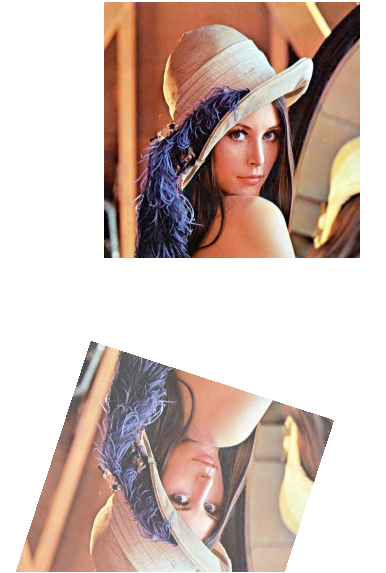
</div></div></div>Following is an example of a grey colored shadow, with a scale of 70% and an offset of 80/80 related to the bitmap:

<div drawio-diagram="2657"><img src="https://doc316en.candera.eu/uploads/images/drawio/2023-02/drawing-4-1677466312.png" alt=""/></div>

<div class="contents" id="bkmrk--1"><div class="contents"><div class="textblock"><div class="image">  
</div></div></div></div>Refer to <span style="color: rgb(230, 126, 35);">[SceneComposer User Manual](https://doc316en.candera.eu/books/scene-design/page/effects)</span> about how to configure a ShadowBitmapBrushBlend effect in a 2D scene.

#### **Modify 2D Shadow Effect Properties** 

##### <a class="anchor" id="bkmrk--9"></a>Access Shadow Effect

To modify the shadow effect properties, first the shadow effect needs to be retrieved from its render node:

```
    // Get and cast first effect of render node
    Effect2D* effect2D = renderNode->GetEffect(0);
    ShadowBitmapBrushBlend* shadow = 0;
    if (effect2D != 0){
        shadow = (ShadowBitmapBrushBlend*) effect2D;
    }
    // End Get and cast first effect of render node
```

##### <a class="anchor" id="bkmrk--10"></a>Set Shadow Color

Specify a color with a red, a blue, a green and an alpha component and apply the color to the Shadow Effect.

Example:

```
Color::Data c;
c.alpha = 0.5f;
c.blue = 0.0f;
c.green = 0.0f;
c.red = 1.0f;
shadow->ShadowColor().Set(c);
```

##### <a class="anchor" id="bkmrk--11"></a>Set Shadow Scale

For the shadow's scale you need the scale X and Y value. Add the two values to a Vector2 and set the shadow's scale.

Example:

```
Float shadowScaleX = 0.7f;
Float shadowScaleY = 0.7f;
shadow->ShadowScale().Set(Vector2(shadowScaleX, shadowScaleY));
```

##### <a class="anchor" id="bkmrk--12"></a>Set Shadow Position Offset

It is possible to change the position of the shadow by changing its offset to the node. Therefore you need a Vector2 with the X and Y offset values again.

Example:

```
Float shadowPosOffX = 5.0f;
Float shadowPosOffY = 7.0f;
shadow->ShadowPositionOffset().Set(Vector2(shadowPosOffX, shadowPosOffY));
```

# 2D Mirror Effect

#### <a class="anchor" id="bkmrk--2"></a>Description

This chapter briefly describes how to use the 2D mirror effect.

<div class="contents" id="bkmrk-ensure-that-this-eff"><div class="contents"><div class="textblock"><dl class="note"><dt></dt><dd><p class="callout info">Ensure that this effect is supported by the device platform in use.</p>

</dd></dl></div></div></div>#### **Configure a 2D Mirror Effect** 

##### <a class="anchor" id="bkmrk--4"></a>Mirror Effect

By using [Candera::MirrorBitmapBrushBlend](http://dev.doc.cgistudio.at/APILINK/class_candera_1_1_mirror_bitmap_brush_blend.html "Output includes the bitmap image and it's reflection."), a mirror reflection can be applied to a bitmap node.

Following properties of a mirror effect can be configured:

<div class="contents" id="bkmrk-mirror-axis-modifica"><div class="contents"><div class="textblock">- Mirror Axis Modifications
- Alpha Value

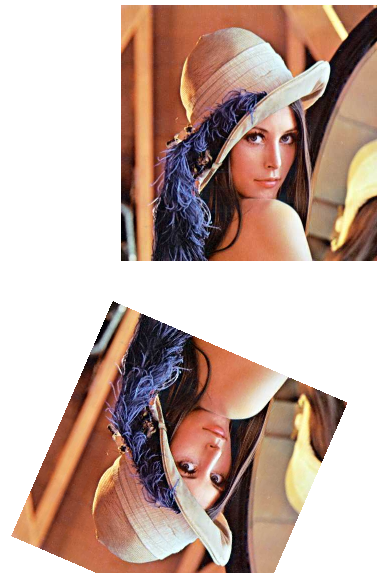
</div></div></div>Following is an example of a mirror effect with a diagonal mirror axis and an alpha value of 1.0f:

<div drawio-diagram="2667"><img src="https://doc316en.candera.eu/uploads/images/drawio/2023-02/drawing-4-1677466536.png" alt=""/></div>

<div class="contents" id="bkmrk--0"><div class="contents"><div class="textblock"><div class="image">  
</div></div></div></div>Refer to <span style="color: rgb(230, 126, 35);">[SceneComposer User Manual](https://doc316en.candera.eu/books/scene-design/page/effects)</span> about how to configure a MirrorBitmapBrushBlend effect in a 2D scene.

#### **Modify 2D Mirror Effect Properties** 

##### <a class="anchor" id="bkmrk--6"></a>Set Mirror Axis

To set the Mirror Axis you need to set two vectors.

<div class="contents" id="bkmrk-the-first-vector-def"><div class="contents"><div class="textblock">- The first vector defines the start point of the mirror axis (the startpoint's X and Y value),
- and the second vector defines the end of the axis.

</div></div></div>The following example shows how to implement a mirror axis from the startpoint (0, 400) to the endpoint (700, 400).

```
Float fromX = 0.0f;
Float fromY = 400.0f;
Float toX = 700.0f;
Float toY = 400.0f;

mirror->MirrorAxisFrom().Set(Vector2(fromX, fromY));
mirror->MirrorAxisTo().Set(Vector2(toX, toY));
```

##### <a class="anchor" id="bkmrk--7"></a>Set Mirror Alpha Value

It is possible to set the mirrors alpha value, so that the mirror looks more or less intensive.

```
Float mirrorAlpha = 0.7f;
mirror->Alpha()= mirrorAlpha;
```

<div drawio-diagram="2668"><img src="https://doc316en.candera.eu/uploads/images/drawio/2023-02/drawing-4-1677466579.png" alt=""/></div>

# 2D Blur Effect

#### <a class="anchor" id="bkmrk--1"></a>Description

This chapter briefly describes how to use the 2D blur effect.

<div class="contents" id="bkmrk-ensure-that-this-eff"><div class="contents"><div class="textblock"><dl class="note"><dt></dt><dd><p class="callout info">Ensure that this effect is supported by the device platform in use.</p>

</dd></dl></div></div></div>#### <a class="anchor" id="bkmrk--2"></a>**Configure a 2D Blur Effect** 

##### <a class="anchor" id="bkmrk--3"></a>Blur Effect

By using [Candera::BlurBitmapBrushBlend](http://dev.doc.cgistudio.at/APILINK/class_candera_1_1_blur_bitmap_brush_blend.html "Output a blurred and alpha blended bitmap image. The blur effect is created by applying a gaussean fi..."), a bitmap node can be blurred, applying a gaussean filter convolution.

Blur Effect supports the following property:

<div class="contents" id="bkmrk-filtersize-%28number-o"><div class="contents"><div class="textblock">- Filtersize (Number of neighbour pixels)

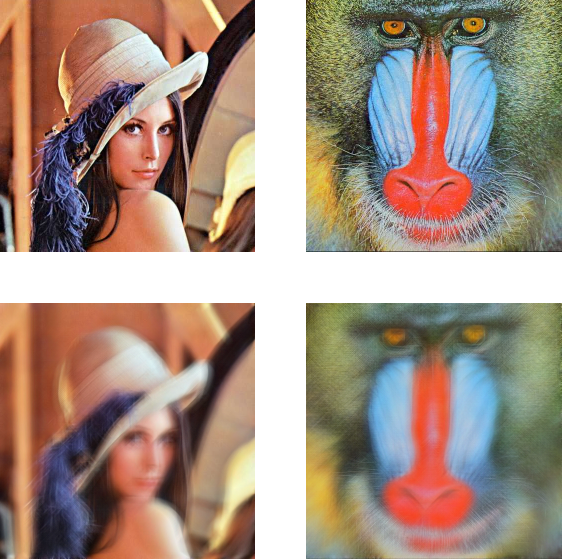
</div></div></div>In this example, the upper two pictures are the original ones, the lower two are blurred with a filter size of 15.

<div drawio-diagram="2674"><img src="https://doc316en.candera.eu/uploads/images/drawio/2023-02/drawing-4-1677466738.png" alt=""/></div>

<div class="contents" id="bkmrk--0"><div class="contents"><div class="textblock"><div class="image">  
</div></div></div></div>Refer to <span style="color: rgb(230, 126, 35);">[SceneComposer User Manual](https://doc316en.candera.eu/books/scene-design/page/effects)</span> about how to configure a BlurBitmapBrushBlend effect in a 2D scene.

#### **Modify 2D Blur Effect Property** 

##### <a class="anchor" id="bkmrk--5"></a>Set Blur Filtersize

When using this effect you only have to set the filtersize. This value defines the blur factor of, for example, an image. The bigger the value, the more the image is blurred. The following example shows how to set the filtersize.

```
UInt8 factor = 5;
blur->FilterSize() = factor;
```

# 2D Shear Effect

#### <a class="anchor" id="bkmrk--1"></a>Description

This chapter briefly describes how to use the 2D shear effect.

<div class="contents" id="bkmrk-ensure-that-this-eff"><div class="contents"><div class="textblock"><dl class="note"><dt></dt><dd><p class="callout info">Ensure that this effect is supported by the device platform in use.</p>

</dd></dl></div></div></div>#### <a class="anchor" id="bkmrk--2"></a>**2D Configure a Shear Effect** 

##### <a class="anchor" id="bkmrk--3"></a>Shear Effect

By using [Candera::ShearBitmapBrushBlend](http://dev.doc.cgistudio.at/APILINK/class_candera_1_1_shear_bitmap_brush_blend.html "Draws a sheared image. The ShearAngleX and the ShearAngleY can be modified."), the effect shears the incoming surface horizontally and vertically using the given angles.

Following properties for shearing can be configured:

<div class="contents" id="bkmrk-shear-angle-x-shear-"><div class="contents"><div class="textblock">- Shear Angle X
- Shear Angle Y

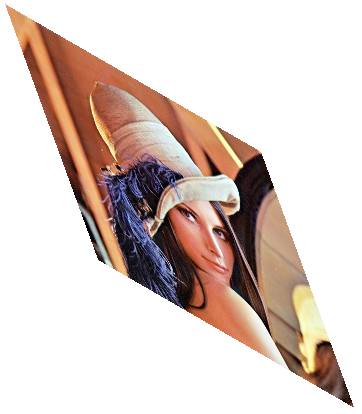
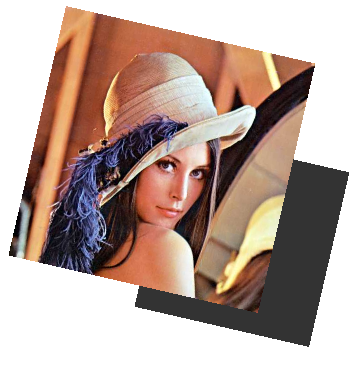
</div></div></div>Following is an example of a skewed bitmap, with the angles (in degree): X = 20 and Y = 30.

<div drawio-diagram="2679"><img src="https://doc316en.candera.eu/uploads/images/drawio/2023-02/drawing-4-1677466983.png" alt=""/></div>

<div class="contents" id="bkmrk--0"><div class="contents"><div class="textblock">  
</div></div></div>Refer to <span style="color: rgb(230, 126, 35);">[SceneComposer User Manual](https://doc316en.candera.eu/books/scene-design/page/effects)</span> about how to configure a ShearBitmapBrushBlend effect in a 2D scene.

#### **Modify 2D Shear Effect Properties** 

##### <a class="anchor" id="bkmrk--5"></a>Set Shear Angles

Horizontal and a vertical skew can be modified by setting the ShearAngle to proper values. You can set both, horizontal and vertical skew, to values from -180 to 180.

Example:

```
    // Set Shear Angles X and Y
    shear.ShearAngleX().Set(30.0f);
    shear.ShearAngleY().Set(20.0f);
    // End Set Shear Angles X and Y
```

# 2D HSL Effect

#### <a class="anchor" id="bkmrk--6"></a>Description

This chapter briefly describes how to use the 2D HSL effect.

<div class="contents" id="bkmrk-ensure-that-this-eff"><div class="contents"><div class="textblock"><dl class="note"><dt></dt><dd><p class="callout info">Ensure that this effect is supported by the device platform in use.</p>

</dd></dl></div></div></div>#### **Configure a 2D HSL Effect** 

##### <a class="anchor" id="bkmrk--8"></a>HSL Effect

The [BitmapBrushHslBlend](http://dev.doc.cgistudio.at/APILINK/class_candera_1_1_bitmap_brush_hsl_blend.html "Output a bitmap image, apply a HSL transformation, and blend it with the store buffer. Same as chaining (BitmapBrush + HslCorrectionEffect + BlendEffect)") effect outputs an bitmap image having applied hue, saturation and lightness correction and blended with the store buffer.

Following properties of a HSL effect can be configured:

##### <a class="anchor" id="bkmrk--9"></a>Hue

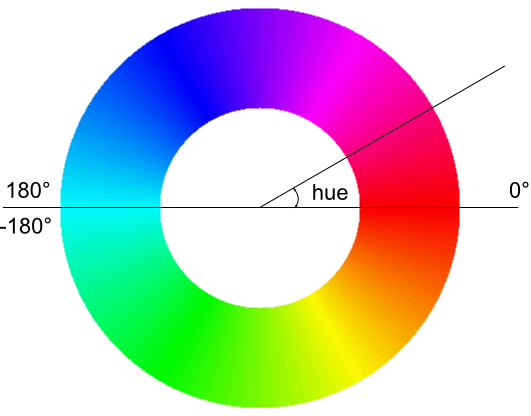
Hue is one of the main properties of a color, defined, technically, as the degree to which a stimulus can be described as similar to or different from stimuli that are described as red, green, blue, yellow, orange and violet. The image below shows the circle of hues for the color red (R=255, G=0, B=0).

<div drawio-diagram="2680"><img src="https://doc316en.candera.eu/uploads/images/drawio/2023-02/drawing-4-1677467179.png" alt=""/></div>

 On the HSL effect, the hue is expressed as degrees in the interval \[-180 .. 180\]; the original color is at a hue value of 0.

##### <a class="anchor" id="bkmrk--11"></a>Saturation

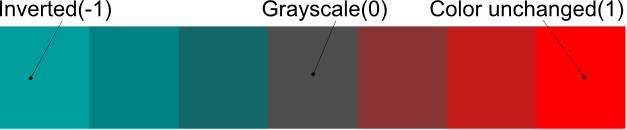
Saturation describes the intensity of a color, defined as a range from pure color to gray.

<div drawio-diagram="2681"><img src="https://doc316en.candera.eu/uploads/images/drawio/2023-02/drawing-4-1677467197.png" alt=""/></div>

<div class="contents" id="bkmrk--1"><div class="contents"><div class="textblock">  
</div></div></div>On the HSL effect, "0" means grayscale, "1" means color unchanged and "-1" means color inverted.

##### <a class="anchor" id="bkmrk--13"></a>Lightness

Lightness measures the relative degree of black or white that's been mixed with a given hue.

<div drawio-diagram="2682"><img src="https://doc316en.candera.eu/uploads/images/drawio/2023-02/drawing-4-1677467220.png" alt=""/></div>

<div class="contents" id="bkmrk--3"><div class="contents"><div class="textblock">  
</div></div></div>On the HSL effect "0" means black, "1" means the color unchanged.

##### <a class="anchor" id="bkmrk--15"></a>Example

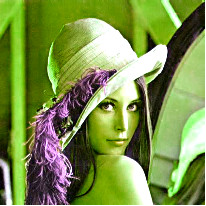
Following is an example of a HSL effect configured with hue = 120, saturation = -1 and lightness = 1.3:

<div drawio-diagram="2683"><img src="https://doc316en.candera.eu/uploads/images/drawio/2023-02/drawing-4-1677467235.png" alt=""/></div>

<div class="contents" id="bkmrk--5"><div class="contents"><div class="textblock">  
</div></div></div>Refer to <span style="color: rgb(230, 126, 35);">[SceneComposer User Manual](https://doc316en.candera.eu/books/scene-design/page/effects)</span> about how to configure a [BitmapBrushHslBlend](http://dev.doc.cgistudio.at/APILINK/class_candera_1_1_bitmap_brush_hsl_blend.html "Output a bitmap image, apply a HSL transformation, and blend it with the store buffer. Same as chaining (BitmapBrush + HslCorrectionEffect + BlendEffect)") effect in a 2D scene.

#### **Modify 2D HSL Effect Properties**

##### <a class="anchor" id="bkmrk--17"></a>Set Hue, Saturation and Lightness

In order to change the BitmapBrushHslBlend effect properties, call the corresponding method on the HslCorrectionEffect as shown bellow:

```
            m_bitmap_hslBlend = <a class="code" href="http://dev.doc.cgistudio.at/APILINK/group___c_o_u_r_i_e_r___v_i_s_u_a_l_i_z_a_t_i_o_n.html#ggaf0e93dc4242f607c3c8d13dafd036af9aaabfa5309af24986d3111a092449f857">BitmapBrushHslBlend::Create</a>();
            m_bitmap_hslBlend->GetBitmapBrush().Image().Set(m_image.GetPointerToSharedInstance());

            HslCorrectionEffect& hslCorrection = m_bitmap_hslBlend->GetHslCorrectionEffect();
            hslCorrection.Hue() = 17.0F;
            hslCorrection.Saturation() = -0.5F;
            hslCorrection.Lightness() = 1.2F;
```

# 2D Alpha Mask Effect

#### <a class="anchor" id="bkmrk--2"></a>Description

This chapter briefly describes how to use the 2D alpha mask effect.

<div class="contents" id="bkmrk-ensure-that-this-eff"><div class="contents"><div class="textblock"><dl class="note"><dt></dt><dd><p class="callout info">Ensure that this effect is supported by the device platform in use.</p>

</dd></dl></div></div></div>#### **Configure a 2D Alpha Mask Effect** 

##### <a class="anchor" id="bkmrk--4"></a>Alpha Mask Effect

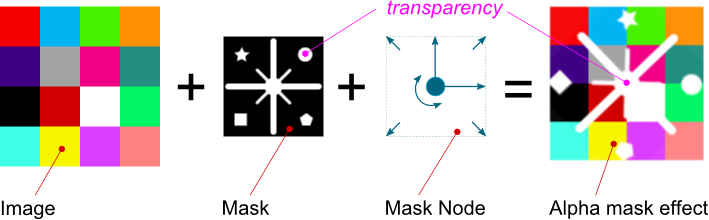
The alpha mask effect creates the appearance of partial or full transparency of an image by using the information from the alpha channel of a mask.

This appearance can be applied to a node by using one of the following effects:

<div class="contents" id="bkmrk-glbitmapbrushmaskble"><div class="contents"><div class="textblock">- [GlBitmapBrushMaskBlend](http://dev.doc.cgistudio.at/APILINK/class_candera_1_1_gl_bitmap_brush_mask_blend.html "Output a bitmap image, apply an alpha mask, and blend it with the store buffer. Same as chaining (Bit...")
- [GlBitmapBrushColorMaskBlend](http://dev.doc.cgistudio.at/APILINK/class_candera_1_1_gl_bitmap_brush_color_mask_blend.html "Output a bitmap image, apply an alpha mask, and blend it with the store buffer. Same as chaining (Bit...")

</div></div></div>##### <a class="anchor" id="bkmrk--5"></a>Configuration

Following properties can be configured:

##### <a class="anchor" id="bkmrk--6"></a>Image

Represents the image attached to the effect.

##### <a class="anchor" id="bkmrk--7"></a>Mask

It's the image used as mask. Only the alpha channel of the mask is used.

##### <a class="anchor" id="bkmrk--8"></a>Mask Node

It's the node used to control the transformation of the mask (position, rotation and scaling). If set to 0 the transformation of the current node is used.

##### <a class="anchor" id="bkmrk--9"></a>Effect Example

The image below presents an alpha mask effect example. The mask node is rotated 45 degrees, the pivot offset is set to (-50;-50) and scaled to (1.5;1.5).

<div drawio-diagram="2684"><img src="https://doc316en.candera.eu/uploads/images/drawio/2023-02/drawing-4-1677467438.png" alt=""/></div>

<div class="contents" id="bkmrk--0"><div class="contents"><div class="textblock">  
</div></div></div>Refer to <span style="color: rgb(230, 126, 35);">[SceneComposer User Manual](https://doc316en.candera.eu/books/scene-design/page/effects)</span> about how to configure an alpha mask effect in a 2D scene.

#### **Modify 2D Alpha Mask Effect Properties** 

##### <a class="anchor" id="bkmrk--11"></a>Set Effect Properties

```
//create effect
bitmap_maskBlend = <a class="code" href="http://dev.doc.cgistudio.at/APILINK/group___c_o_u_r_i_e_r___v_i_s_u_a_l_i_z_a_t_i_o_n.html#ggaf0e93dc4242f607c3c8d13dafd036af9aaabfa5309af24986d3111a092449f857">GlBitmapBrushMaskBlend::Create</a>();

//set image property
bitmap_maskBlend->GetBitmapBrush().Image().Set(m_image.GetPointerToSharedInstance());

//set mask property
SharedPointer<BitmapImage2D> maskBitImage = <a class="code" href="http://dev.doc.cgistudio.at/APILINK/class_candera_1_1_bitmap_image2_d.html#af16cef9df35df365f94fe89a810197c6">BitmapImage2D::Create</a>();
maskBitImage->SetBitmap(mask_bitmap);
maskBitImage->Upload();
GlMaskEffect& maskEffect = bitmap_maskBlend->GetMaskEffect();
maskEffect.Mask() = maskBitImage.GetPointerToSharedInstance();

//set mask node
RenderNode* maskNode = <a class="code" href="http://dev.doc.cgistudio.at/APILINK/class_candera_1_1_render_node.html#a86b21db92fab0635be7bdfcaf423ca4b">RenderNode::Create</a>();
maskNode->SetPosition(400.f, 30.f);
maskNode->SetScale(0.2f, 0.2f);
maskNode->SetPosition(m_bitmapNode5->GetPosition() + Vector2(8, 8));
maskEffect.MaskNode() = maskNode;

bitmap_maskBlend->Update();

//attach effect to the node
node = <a class="code" href="http://dev.doc.cgistudio.at/APILINK/class_candera_1_1_render_node.html#a86b21db92fab0635be7bdfcaf423ca4b">RenderNode::Create</a>();
node->AddEffect(bitmap_maskBlend.GetPointerToSharedInstance());
```