# Tutorial for 3D Scene Graph and Nodes

# 3D Scenes and Nodes

#### <a class="anchor" id="bkmrk--95"></a>Scenes and Nodes

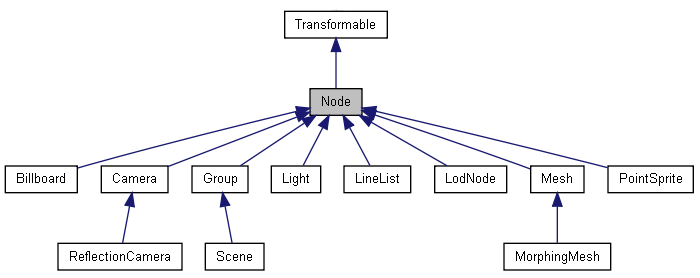
[Candera::Node](http://dev.doc.cgistudio.at/APILINK/class_candera_1_1_node.html "The class Node is an abstract base class for all scene graph nodes. Each Node defines a local coordin...") is an abstract base class for all scene graph nodes.

<div drawio-diagram="1966"><img src="https://doc316en.candera.eu/uploads/images/drawio/2023-02/drawing-4-1676880912.png" alt=""/></div>

<div class="contents" id="bkmrk--1"><div class="contents"><div class="textblock">  
</div></div></div>Each node defines a local coordinate system relative to the coordinate system of the parent node. The functionality to define the local coordinate system is derived from [Candera::Transformable](http://dev.doc.cgistudio.at/APILINK/class_candera_1_1_transformable.html "Defines common methods for manipulating node and texture transformations in local coordinate space (o...") and consists of following components:

<div class="contents" id="bkmrk-position%2C-rotation%2C-"><div class="contents"><div class="textblock">- position,
- rotation,
- scale,
- and a generic matrix called transform matrix.

</div></div></div>If the node is transformed from the local coordinate system to the world's coordinate system, then the node's local transformation is multiplied with all its parent's transformations. A node can also store a set of nodes as its children but a node can only have one parent at a time. Cycles are prohibited. The nodes alpha value is multiplied with the alpha value of its descendent nodes.

[Candera::Scene](http://dev.doc.cgistudio.at/APILINK/class_candera_1_1_scene.html "The class Scene represents a top level scene graph node. Multiple Scenes are allowed. A Scene can not be part of any other Scene. To render a Scene, at least one Camera must be part of this Scene and the Camera must have rendering enabled. A Scene can have more than one Camera. Note: Lights added to a Scene apply for that Scene only and do not affect 3D objects in any other Scene.") is the top level scene node which cannot be part of any other node.

# 3D Node Transformations

#### <a class="anchor" id="bkmrk--97"></a>3D Node Manipulation Example

To illustrate basic node transformation operations, the *NodeManipulationWidget\_3D* and the *DisplayPositionWidget3D* part of the Tutorial Widgets can be used. An usage example for *NodeManipulationWidget\_3D* widget is presented in **NodeManipulationSolution\_3D** solution provided in the content folder of *cgi\_studio\_player*.

**Please consider:**

<div class="contents" id="bkmrk-the-widget-property-"><div class="contents"><div class="textblock">- The widget property *Node* is derived from a base class and provides the node associated to the widget (e.g. the root node for content managed by the widget).
- Only if the widget is *enabled* (this property is also derived from a base class), the setter methods of the widget properties will take effect.
- If a widget property setter changes a node property of the associated node, the visual effect can be seen, but note that the static node properties maintained by SceneComposer are not changed accordingly!
- Widget dynamics are never reflected to static scene structure. It is recommended to use SceneComposer only for property configuration and dynamics only in the Player.

</div></div></div>#### <a class="anchor" id="bkmrk--98"></a>Translations

Once the NodeManipulationWidget\_3D is linked to a node from the static scene tree and enabled, the position coordinates can be set in the Player for this property to change the position.

```
        // Set node position
        node->SetPosition(m_position);
        // end Set node position
```

Use TranslateX property to move the node on the x axis with a delta value only. [Candera::Transformable::Translate](http://dev.doc.cgistudio.at/APILINK/class_candera_1_1_transformable.html#a34a94f1d107b2b9e163065ca26682853) adds the given Vector to the actual position .

```
       // Translate node on x axis
        node->Translate(Vector3(m_translateX, 0.0F, 0.0F));
        // end Translate node on x axis
```

#### <a class="anchor" id="bkmrk--99"></a>Rotations

Similar to translation, rotation can also be applied via [Candera::Transformable::SetRotation()](http://dev.doc.cgistudio.at/APILINK/class_candera_1_1_transformable.html#af76f9a446587115fa5cc19b0b37a64f3) or [Candera::Transformable::Rotate()](http://dev.doc.cgistudio.at/APILINK/class_candera_1_1_transformable.html#a55429982ad46b745fb37b306475e4b6d).

```
        // Set node rotation
        node->SetRotation(m_rotation);
        // end Set node rotation
```

#### <a class="anchor" id="bkmrk--100"></a>Scaling

Again there is also a [Candera::Transformable::SetScale](http://dev.doc.cgistudio.at/APILINK/class_candera_1_1_transformable.html#a750dce59a7a54ab4f28dd3763b879dde) and [Candera::Transformable::Scale](http://dev.doc.cgistudio.at/APILINK/class_candera_1_1_transformable.html#a5eaf72124658e7d27ecce86ad6576029) method.

```
        // set node scale
        node->SetScale(m_scale);
        // end node scale
```

#### <a class="anchor" id="bkmrk--101"></a>Pivot Point

It is possible to change your pivot point with the [Candera::Transformable::TranslatePivotPoint](http://dev.doc.cgistudio.at/APILINK/class_candera_1_1_transformable.html#a8de05c00892520953c933888152b0e5c) (or [Candera::Transformable::SetPivotPoint](http://dev.doc.cgistudio.at/APILINK/class_candera_1_1_transformable.html#a7a885bce1ab6cff4e26882759d1377ae)) method. The pivot point can be used to define e.g. the rotation point that the node should rotate around. It affects the scaling too.

#### <a class="anchor" id="bkmrk--102"></a>How to get the screen space coordinates of a node

With the DisplayPositionWidget3D you can retrieve the screen coordinates of an associated node. Please consider that a node and a camera have to be selected in the widget. In the solution the widget is disabled by default. To see the output of the node's display position, enabling the widget and log filter (via CgiAppLog -&gt; Info) in SceneComposer is mandatory. To get the screen space coordinates of an associated node you need the function [Candera::Math3D::TransformPointToScreen](http://dev.doc.cgistudio.at/APILINK/class_candera_1_1_math3_d.html#afb885f2eb69160b3d58ce74afb50d1b3), which transforms a point in world space into a point in screen space.

<div class="contents" id="bkmrk-first-you-need-the-w"><div class="textblock">- First you need the world position of your node. With Node::GetWorldPosition you get the screen coordinates as output. ```
            Vector3 worldPosition = node->GetWorldPosition();
    ```
- With the world position of your node and with your camera you can transform the point to screen space and you retrieve the display position as a [Candera::Vector2](http://dev.doc.cgistudio.at/APILINK/class_candera_1_1_vector2.html "The default Vector2 class."). ```
            Vector2 displayPos;
            static_cast<void>(Math3D::TransformPointToScreen(worldPosition, camera, displayPos));
    ```
- displayPos now contains the X and Y screen space coordinates of the selected node.

</div></div>

# 3D Node Appearance

#### <a class="anchor" id="bkmrk--103"></a>Description

[Candera::Appearance](http://dev.doc.cgistudio.at/APILINK/class_candera_1_1_appearance.html "The class Appearance groups following render attributes: Material, Textures, RenderMode, and Shader. Render attributes define the distinctive visualization of a geometry like Mesh, Billboard, and PointSprite. Further, render attributes can be shared across multiple objects, which conserves memory and enables sharing of appearance characteristics. An Appearance object is mandatory for any object in order to get rendered. Per default all render attributes are initialized to null, which is a valid setting. If the Appearance is activated, all render attributes that are set become activated. If no RenderMode is defined (null), then the default RenderMode is used instead;.") groups following render attributes:

<div class="contents" id="bkmrk-candera%3A%3Amaterial%2C-c"><div class="contents"><div class="textblock">- [Candera::Material](http://dev.doc.cgistudio.at/APILINK/class_candera_1_1_material.html "The class Material describes the color attributes of an object's surface and is primarily used for li..."),
- [Candera::Texture](http://dev.doc.cgistudio.at/APILINK/class_candera_1_1_texture.html "Texture encapsulates a TextureImage and a set of attributes specifying how it is applied to a vertex'..."),
- [Candera::RenderMode](http://dev.doc.cgistudio.at/APILINK/class_candera_1_1_render_mode.html "The class RenderMode is an Appearance component that encapsulates polygon-level and per-fragment comp...")
- [Candera::Shader](http://dev.doc.cgistudio.at/APILINK/class_candera_1_1_shader.html "The class Shader is an Appearance component representing a graphical processing unit (GPU) program...") and
- [Candera::ShaderParamSetter](http://dev.doc.cgistudio.at/APILINK/class_candera_1_1_shader_param_setter.html "ShaderParamSetter maintains a list of uniform parameters that are passed to a Shader.").

</div></div></div>Render attributes define the distinctive visualization of a geometry like [Candera::Mesh](http://dev.doc.cgistudio.at/APILINK/class_candera_1_1_mesh.html "The class Mesh represents a three-dimensional rigid body object defined by polygons. The Mesh's polygonal surface is defined by its VertexBuffer. Each Mesh must have exactly one Appearance set, in order to specify how the Mesh geometry is rendered."), [Candera::Billboard](http://dev.doc.cgistudio.at/APILINK/class_candera_1_1_billboard.html "The class Billboard represents a Plane that can align towards camera automatically, according to the alignment type set. Thus, Billboards are quite often used as "imposters" pretending to be a 3D geometry by showing a 2D image that is always facing the camera. In order to relief distinction between Billboard and PointSprite see following comparison: + Billboards support rectangular dimension and non-uniform scale, + Billboards support different rotation techniques (see Alignment), whereas PointSprites are aligned according to CenterEyeAlignment, exclusively. + Billboards take local rotation and scale into account (see class Transformable), whereas PointSprites ignore Transformable parameters others than position. + PointSprites have a performance advantage due to less geometry (one instead of 4 vertices). Overall recommendation: Use PointSprites for spherical shapes like particles, lens flares, sparkles, dust which are screen aligned (see Billboard::CameraUpAlignment). Further, use Billboards for world up oriented clouds, text, or yaw axis aligned trees, and signs, etc. Note: The Billboard - because of absent normals - does not support lighting. Belows sketch depicts the layout of a Billboard. W U:0,V:1 +-----+ U:1,V:1 H | X | Legend: texture coordinates: U,V; Width: W, Height: H, Local Center: X U:0,V:0 +-----+ U:1,V:0."), and [Candera::PointSprite](http://dev.doc.cgistudio.at/APILINK/class_candera_1_1_point_sprite.html "PointSprite represents a GL point primitive. The size (glPointSize) of the point is calculated by def..."). Further, render attributes can be shared across multiple objects, which conserve memory and enable sharing of appearance characteristics.

A [Candera::Appearance](http://dev.doc.cgistudio.at/APILINK/class_candera_1_1_appearance.html "The class Appearance groups following render attributes: Material, Textures, RenderMode, and Shader. Render attributes define the distinctive visualization of a geometry like Mesh, Billboard, and PointSprite. Further, render attributes can be shared across multiple objects, which conserves memory and enables sharing of appearance characteristics. An Appearance object is mandatory for any object in order to get rendered. Per default all render attributes are initialized to null, which is a valid setting. If the Appearance is activated, all render attributes that are set become activated. If no RenderMode is defined (null), then the default RenderMode is used instead;.") object is mandatory for any object in order to get rendered. Per default no Appearance attributes are attached.

If the Appearance is activated, all render attributes that are set become activated. If no RenderMode is defined (null), then the default RenderMode is used instead.

#### <a class="anchor" id="bkmrk--104"></a>**Appearance: Material**

##### <a class="anchor" id="bkmrk--105"></a>Material Attributes

[Candera::Material](http://dev.doc.cgistudio.at/APILINK/class_candera_1_1_material.html "The class Material describes the color attributes of an object's surface and is primarily used for li...") describes the color attributes of an object's surface and is primarily used for lighting computations. If no material is set, lighting calculations in associated shaders can not be applied.

The color attributes are defined as follows:

<div class="contents" id="bkmrk-ambient-rgb-color-th"><div class="contents"><div class="textblock"><table class="doxtable"><tbody><tr><td valign="top">Ambient</td><td valign="top">RGB color that interacts with the ambient attribute of light.</td></tr><tr><td valign="top">Emissive</td><td valign="top">RGB color that defines the self-lighting of the material. This color is visible, even when Material is unlighted.  
The emissive color attribute does neither interact with any type of light source nor with other 3D objects.</td></tr><tr><td valign="top">Diffuse</td><td valign="top">RGBA color that interacts with the diffuse attribute of light. The alpha value of the diffuse color, defines  
the alpha factor of the entire Material, supposed that alpha blending is enabled (For details see [Candera::RenderMode](http://dev.doc.cgistudio.at/APILINK/class_candera_1_1_render_mode.html "The class RenderMode is an Appearance component that encapsulates polygon-level and per-fragment comp...")).</td></tr><tr><td valign="top">Specular</td><td valign="top">RGB color that interacts with the specular attribute of light.</td></tr></tbody></table>

</div></div></div>Furthermore with Specular Power the sharpness of a specular highlight, if lit by specular light, can be defined.

##### <a class="anchor" id="bkmrk--106"></a>Create a new Material

```
    m_material = <a class="code" href="http://dev.doc.cgistudio.at/APILINK/group___c_o_u_r_i_e_r___v_i_s_u_a_l_i_z_a_t_i_o_n.html#ggaf0e93dc4242f607c3c8d13dafd036af9aaabfa5309af24986d3111a092449f857">Material::Create</a>();
```

##### <a class="anchor" id="bkmrk--107"></a>Set Colors

This sample code shows how to change the ambient color, the code for changing the diffuse color, the emissive color or the specular color looks similarly.

```
    // Set ambient color
    if (node->GetAppearance() != 0 && node->GetAppearance()->GetMaterial() != 0){
        node->GetAppearance()->GetMaterial()->SetAmbient(m_color);
    }
    // end Set ambient color
```

#### **Appearance: Texture** 

##### <a class="anchor" id="bkmrk--108"></a>Description

[Candera::Texture](http://dev.doc.cgistudio.at/APILINK/class_candera_1_1_texture.html "Texture encapsulates a TextureImage and a set of attributes specifying how it is applied to a vertex'...") encapsulates a [Candera::TextureImage](http://dev.doc.cgistudio.at/APILINK/class_candera_1_1_texture_image.html "Abstract base class for Texture images.A texture image mainly encapsulates a texture handle in VRAM a...") and a set of attributes specifying how it is applied to a vertex's texture coordinate. [Candera](http://dev.doc.cgistudio.at/APILINK/namespace_candera.html "[DataBinding_RefTypeSample]") implements a sharing mechanism based on TextureImages. These hold the actual VRAM handle. Multiple textures can share one TextureImage object. The TextureImage manages its upload to the VRAM.

**Attention:**

<div class="contents" id="bkmrk-the-texture-is-only-"><div class="contents"><div class="textblock">- The Texture is only useable with an associated TextureImage.
- Do not share TextureImages, if TextureImage modification shall not be shared across Textures.
- In order to support MipMapping or repeated wrapping, the bitmap's width and height must be a power of 2 (n^2), like e.g. 2, 4, 8, 16 ,32, etc. However, height and width can be different, e.g.: 256x128.

</div></div></div>##### <a class="anchor" id="bkmrk--109"></a>Texture Filtering

<div class="contents" id="bkmrk-minification-and-mag"><div class="contents"><div class="textblock">- **Minification and magnification:**

</div></div></div>Following texture filters can be used to improve visual quality of Textures: Magnification to upscale, Minification to downscale.

<div class="contents" id="bkmrk-nearest-value-of-the"><div class="contents"><div class="textblock"><table class="doxtable"><tbody><tr><td valign="top">Nearest</td><td valign="top">Value of the texel that is nearest to the center of the pixel being textured.</td></tr><tr><td valign="top">Linear</td><td valign="top">The weighted average of the four texels that are closest to the center of the pixel being textured.</td></tr></tbody></table>

</div></div></div><div class="contents" id="bkmrk-mipmapping%3A-mipmappi"><div class="contents"><div class="textblock">- **Mipmapping:** MipMapping can be used to avoid texture aliasing effects.

<table class="doxtable"><tbody><tr><td valign="top">None</td><td valign="top">MipMapping disabled</td></tr><tr><td valign="top">Nearest</td><td valign="top">MipMapping uses nearest mip map level</td></tr><tr><td valign="top">Linear</td><td valign="top">MipMapping uses bilinear mipmap interpolation of the two nearest mip map levels</td></tr></tbody></table>

</div></div></div><div class="contents" id="bkmrk-wrapmode%3A"><div class="contents"><div class="textblock">- **WrapMode:**

</div></div></div>It specifies how the texture is wrapped:

<div class="contents" id="bkmrk-repeat-repeat-the-te"><div class="contents"><div class="textblock"><table class="doxtable"><tbody><tr><td valign="top">Repeat</td><td valign="top">Repeat the texture</td></tr><tr><td valign="top">ClampToEdge</td><td valign="top">Clamp fetches to the edge of the texture</td></tr><tr><td valign="top">Linear</td><td valign="top">MipMapping uses bilinear mipmap interpolation of the two nearest mip map levels</td></tr></tbody></table>

</div></div></div><div class="contents" id="bkmrk-maxanisotropy%3A"><div class="contents"><div class="textblock">- **MaxAnisotropy:**

</div></div></div>It specifies the maximum degree of anisotropy to account for in texture filtering for the Texture object. Anisotropic filtering improves the quality of the textures when they are not uniformly scaled because, for example, the textured triangle is not exactly facing the camera. The value of maxAnisotropy must be greater or equal to 1.0f (isotropy) and is limited by the max detail of anisotropy supported by hardware, which can be retrieved with the function Candera::RenderDevice::GetMaxAnisotropySupportedByDevice.

##### <a class="anchor" id="bkmrk--110"></a>Changing Texture Image And Setting Filters

```
    m_textureImage = <a class="code" href="http://dev.doc.cgistudio.at/APILINK/group___c_o_u_r_i_e_r___v_i_s_u_a_l_i_z_a_t_i_o_n.html#ggaf0e93dc4242f607c3c8d13dafd036af9aaabfa5309af24986d3111a092449f857">BitmapTextureImage::Create</a>();
    m_textureImage->SetName("LabelTextureImage");
    static_cast<void>(m_textureImage->SetBitmap(m_bitmap));
    if (m_textureImage == 0) {
        FEATSTD_DEBUG_ASSERT(false);
        return; // memory is freed in destructor/UpdateBitmap()
    }


    m_texture = <a class="code" href="http://dev.doc.cgistudio.at/APILINK/group___c_o_u_r_i_e_r___v_i_s_u_a_l_i_z_a_t_i_o_n.html#ggaf0e93dc4242f607c3c8d13dafd036af9aaabfa5309af24986d3111a092449f857">Texture::Create</a>();
    m_texture->SetName("LabelTexture");
    m_texture->SetTextureImage(m_textureImage);
    m_texture->SetWrapModeU(Texture::ClampToEdge);
    m_texture->SetWrapModeV(Texture::ClampToEdge);
    m_texture->SetMinificationFilter(Texture::MinMagLinear);
    m_texture->SetMagnificationFilter(Texture::MinMagLinear);
```

#### **Appearance: Render Mode** 

##### <a class="anchor" id="bkmrk--111"></a>Description

[Candera::RenderMode](http://dev.doc.cgistudio.at/APILINK/class_candera_1_1_render_mode.html "The class RenderMode is an Appearance component that encapsulates polygon-level and per-fragment comp...") is an Appearance component that encapsulates polygon-level and per-fragment compositing render attributes. If an object's Appearance has set RenderMode to null, then the default RenderMode is used instead. For details how to set the default render mode, see [Candera::Renderer::SetDefaultRenderMode](http://dev.doc.cgistudio.at/APILINK/class_candera_1_1_renderer.html#a1fb82af52c979cf80cb24102cdf8bc1a).

If a Camera has a RenderMode attached \[camera-&gt;GetApperance()-&gt;SetRenderMode(...)\], then the Camera's RenderMode overrules the DefaultRenderMode during its render pass. Thus, all Nodes rendered by the Camera that do not have their own RenderMode set, use the RenderMode applied to the Camera.

If a RenderMode has set an inheritance bit for a certain render attribute, then the property of the base render mode is used, this is either the Camera's RenderMode if set or the DefaultRenderMode otherwise.

```
        bool m_isColorWriteRedEnabled;       // Default value: true
        bool m_isColorWriteGreenEnabled;     // Default value: true
        bool m_isColorWriteBlueEnabled;      // Default value: true
        bool m_isColorWriteAlphaEnabled;     // Default value: true
        bool m_isDepthWriteEnabled;          // Default value: true
        bool m_isDepthTestEnabled;           // Default value: true
        bool m_isStencilTestEnabled;         // Default value: false
        bool m_isBlendingEnabled;            // Default value: false
```

Set a rendermode:

```
    SharedPointer<RenderMode> rm = <a class="code" href="http://dev.doc.cgistudio.at/APILINK/group___c_o_u_r_i_e_r___v_i_s_u_a_l_i_z_a_t_i_o_n.html#ggaf0e93dc4242f607c3c8d13dafd036af9aaabfa5309af24986d3111a092449f857">RenderMode::Create</a>();
    rm->SetBlendingEnabled(true);
    rm->SetBlendMode(RenderMode::SourceAlpha, RenderMode::InverseSourceAlpha, RenderMode::Add);
    rm->SetDepthTestEnabled(false);
    rm->SetDepthWriteEnabled(false);
    appearance->SetRenderMode(rm);

```

##### <a class="anchor" id="bkmrk--112"></a>Render Mode Attributes

<div class="contents" id="bkmrk-blending"><div class="contents"><div class="textblock">- **blending**

</div></div></div>The next chapter <span style="color: rgb(230, 126, 35);">[Color Blending](#bkmrk-appearance%3A-render-m-0)</span> describes possible blending operations in detail.

<div class="contents" id="bkmrk-culling"><div class="contents"><div class="textblock">- **culling**

</div></div></div>Culling determines which side of a polygon is removed before rasterisation.

<div class="contents" id="bkmrk-frontfaceculling-fro"><div class="contents"><div class="textblock"><table class="doxtable"><tbody><tr><td valign="top">FrontFaceCulling</td><td valign="top">Front of the polygon is removed</td></tr><tr><td valign="top">BackFaceCulling</td><td valign="top">Back of the polygon is removed</td></tr><tr><td valign="top">NoCulling</td><td valign="top">Front and back of the polygon are rendered</td></tr></tbody></table>

</div></div></div><div class="contents" id="bkmrk-winding"><div class="contents"><div class="textblock">- **winding**

</div></div></div>Winding defines the front face of a polygon. A polygon side is the front-face if its screen-space vertices are in the same order as the winding specifies.

<div class="contents" id="bkmrk-clockwise-clockwise-"><div class="contents"><div class="textblock"><table class="doxtable"><tbody><tr><td valign="top">ClockWise</td><td valign="top">Clockwise ordered vertices define the front of the polygon.</td></tr><tr><td valign="top">CounterClockWise</td><td valign="top">Counterclockwise ordered vertices define the front of the polygon.</td></tr></tbody></table>

</div></div></div>[Candera::RenderMode::ComparisonFunction](http://dev.doc.cgistudio.at/APILINK/class_candera_1_1_render_mode.html#a698f416c261d527fd8a4558ab9b45e55) can be used with depth-, stencil-, or sampler state operations. It specifies how the source (new) data is compared against the destination (existing) data before passing the comparison operations (storing the data).

<div class="contents" id="bkmrk-comparenever-never-p"><div class="contents"><div class="textblock"><table class="doxtable"><tbody><tr><td valign="top">CompareNever</td><td valign="top">Never pass the comparison.</td></tr><tr><td valign="top">CompareLess</td><td valign="top">If source data is less than destination data, the comparison passes.</td></tr><tr><td valign="top">CompareEqual</td><td valign="top">If source data is equal than destination data, the comparison passes.</td></tr><tr><td valign="top">CompareLessEqual</td><td valign="top">If source data is less than or equal to destination data, the comparison passes.</td></tr><tr><td valign="top">CompareGreater</td><td valign="top">If source data is greater than destination data, the comparison passes.</td></tr><tr><td valign="top">CompareNotEqual</td><td valign="top">If source data is not equal to destination data, the comparison passes.</td></tr><tr><td valign="top">CompareGreaterEqual</td><td valign="top">If source data is greater than or equal to destination data, the comparison passes.</td></tr><tr><td valign="top">CompareAlways</td><td valign="top">Always pass the comparison.</td></tr></tbody></table>

</div></div></div><div class="contents" id="bkmrk-depth-bias"><div class="contents"><div class="textblock">- **depth bias**

</div></div></div>Depth bias that can be applied to co-planar primitives to reduce z-fighting, according to following function: *Depth bias = (max \* scaleFactor) + (r \* units)*; where *max* is the maximum depth slope of the triangle being rendered and *r* is an implementation-defined constant that is guaranteed to produce the smallest resolvable offset.

<div class="contents" id="bkmrk-olygons-that-are-cop"><div class="contents"><div class="contents"><div class="textblock"><dl class="note"><dt><p class="callout info">olygons that are coplanar can be made to appear not coplanar by adding a z-bias to each one. This is a technique commonly used to ensure that shadows, decals, or hidden-line images on coplanar surfaces are displayed properly. The depth bias is added before the depth test is performed but does not influence the original depth value written into depth buffer.</p>

</dt></dl></div></div></div></div>Via [Candera::RenderMode::SetDepthBias](http://dev.doc.cgistudio.at/APILINK/class_candera_1_1_render_mode.html#ae5e30756f98f874d6f05a8ba1b618b62) the depth bias can be set and [Candera::RenderMode::SetDepthTestEnabled](http://dev.doc.cgistudio.at/APILINK/class_candera_1_1_render_mode.html#a3983a4d136f976d1208a3bf0fc0832ee) and [Candera::RenderMode::SetDepthWriteEnabled](http://dev.doc.cgistudio.at/APILINK/class_candera_1_1_render_mode.html#a5417961fbefced86d218df5a62bb0935) enables it.

<div class="contents" id="bkmrk-stencil-buffer"><div class="contents"><div class="textblock">- **stencil buffer**

</div></div></div>StencilPlane specifies the face associated with the provided stencil function, which are *FrontFace*, *BackFace* and *FrontAndBackFace*. Front face stencil affects non-polygons and front-facing polygons whereas back face stencil affects back-facing polygons only.   
StencilOperation defines the stencil-buffer operation.

<div class="contents" id="bkmrk-settozero-set-the-st"><div class="textblock"><table class="doxtable"><tbody><tr><td style="background-color: rgb(206, 212, 217);" valign="top">**SetToZero**</td><td style="background-color: rgb(206, 212, 217);" valign="top">**Set the stencil-buffer entry to zero.**</td></tr><tr><td valign="top">Keep</td><td valign="top">Do not update the entry in the stencil buffer.</td></tr><tr><td valign="top">Replace</td><td valign="top">Replace the stencil-buffer entry with the reference value.</td></tr><tr><td valign="top">Increment</td><td valign="top">Increment the stencil-buffer entry, clamping to 2^n where n is the number of bits in the stencil buffer.</td></tr><tr><td valign="top">Decrement</td><td valign="top">Decrement the stencil-buffer entry, clamping to zero.</td></tr><tr><td valign="top">Invert</td><td valign="top">Invert the bits in the stencil-buffer entry.</td></tr><tr><td valign="top">IncrementWrap</td><td valign="top">Increment the stencil-buffer entry, wrapping to zero if the new value exceeds the maximum value</td></tr><tr><td valign="top">DecrementWrap</td><td valign="top">Decrement the stencil-buffer entry, wrapping to the maximum value if the new value is less than zero.</td></tr></tbody></table>

</div></div>#### **Appearance: Render Mode - Color Blending** 

##### <a class="anchor" id="bkmrk--113"></a>Description

When Blending is enabled, the output from the fragment shader is blended with the current contents of the frame buffer, rather than merely overwriting it. Blending is mostly used to make objects appear transparent, but can also produce various other effects. (eg. anti-aliasing, DOF, or multi-pass rendering.) There are multiple ways of using blending, but generally, the procedure is as follows:

<div class="contents" id="bkmrk-set-alpha-value-of-a"><div class="contents"><div class="textblock">- Set alpha value of a node
- Set alpha value of a material color
- Set alpha value of the material (this changes the alpha value of the materials diffuse color)
- Enable blending via RenderMode and use the alpha value of the texture in combination with [Candera::RenderMode::BlendMode](http://dev.doc.cgistudio.at/APILINK/struct_candera_1_1_render_mode_1_1_blend_mode.html)

</div></div></div>##### <a class="anchor" id="bkmrk--114"></a>Blend Operations

```
        enum BlendOperation
        {
            Add = 0,               
            Subtract = 1,          
            ReverseSubtract = 2,   
            Min = 3,               
            Max = 4                
        };
```

##### <a class="anchor" id="bkmrk--115"></a>Blend Factor

```
        enum BlendFactor
        {
            Zero = 0,                   
            One  = 1,                   
            SourceColor = 2,            
            InverseSourceColor = 3,     
            SourceAlpha = 4,            
            InverseSourceAlpha = 5,     
            DestColor = 6,              
            InverseDestColor = 7,       
            DestAlpha = 8,              
            InverseDestAlpha = 9,       
            ConstantColor = 10,         
            InverseConstantColor = 11,  
            ConstantAlpha = 12,         
            InverseConstantAlpha = 13,  
            SourceAlphaSaturate = 14    
        };
```

BlendMode combines the source and destination blend factors with the operation used in blending equation.

<div class="contents" id="bkmrk-rgb-blending-equatio"><div class="contents"><div class="textblock">- RGB blending equation: *final\_RGB = source\_RGB \* sourceRGBFactor (+operationRGB+) destination\_RGB \* destRGBFactor*.
- Alpha blending equation: *final\_alpha = source\_alpha \* sourceAlphaFactor (+operationAlpha+) destination\_alpha \* destAlphaFactor*.

</div></div></div>For the Blending Options ConstantColor, InverseConstantColor, ConstantAlpha, or InverseConstantAlpha a blending color can be set.

Set blending:

```
    SharedPointer<RenderMode> rm = <a class="code" href="http://dev.doc.cgistudio.at/APILINK/group___c_o_u_r_i_e_r___v_i_s_u_a_l_i_z_a_t_i_o_n.html#ggaf0e93dc4242f607c3c8d13dafd036af9aaabfa5309af24986d3111a092449f857">RenderMode::Create</a>();
    rm->SetBlendingEnabled(true);
    rm->SetBlendMode(RenderMode::SourceAlpha, RenderMode::InverseSourceAlpha, RenderMode::Add);
    rm->SetDepthTestEnabled(false);
    rm->SetDepthWriteEnabled(false);
    appearance->SetRenderMode(rm);
```

#### **Appearance: Shader** 

##### <a class="anchor" id="bkmrk--116"></a>Description

[Candera::Shader](http://dev.doc.cgistudio.at/APILINK/class_candera_1_1_shader.html "The class Shader is an Appearance component representing a graphical processing unit (GPU) program...") is an Appearance component representing a graphical processing unit (GPU) program, thus a vertex and fragment shader pair.

<div class="contents" id="bkmrk-the-shader-program-c"><div class="contents"><div class="textblock">- The Shader program can be parametrized with uniforms and attributes. It's guaranteed by the shader that the program is only created once in VRAM.
- Shader is a device object that counts its uploads to VRAM automatically. Thus, a shader is only uploaded if it has not been uploaded before.
- Further, a shader is unloaded from VRAM, if the upload count is decreased to zero. Take care, that upload is invoked as many times as unload.

</div></div></div>[Candera](http://dev.doc.cgistudio.at/APILINK/namespace_candera.html "[DataBinding_RefTypeSample]") and SceneComposer offer reference shaders of both vertex and fragment shaders.   
For details refer to section <span style="color: rgb(230, 126, 35);">[Shader Usage](https://doc316en.candera.eu/books/candera/chapter/tutorial-for-shader-usage)</span>.

In SceneComposer via the appearance of a node its ShaderProgram can be chanced easily. Further it is possible to change shaders, the default shader configuration, to create new shaders and combine two of them to a new ShaderProgram.

##### <a class="anchor" id="bkmrk--117"></a>The Default Shader Configuration in SceneComposer

<div class="contents" id="bkmrk-node-vertex-shader-f"><div class="contents"><div class="textblock"><table border="1" cellpadding="5" cellspacing="0"><tbody><tr bgcolor="#d4d4d4"><th>**Node**</th><th>**Vertex Shader**</th><th>**Fragment Shader**</th></tr><tr><td valign="top">Billboard</td><td valign="top">RefTrans</td><td valign="top">RefTex</td></tr><tr><td valign="top">Mesh without texture</td><td valign="top">RefTransLight1</td><td valign="top">RefColor</td></tr><tr><td valign="top">Mesh with texture</td><td valign="top">RefTransLight1</td><td valign="top">RefColorTex</td></tr><tr><td valign="top">MorphingMesh without texture</td><td valign="top">RefTransLight1Morph</td><td valign="top">RefColor</td></tr><tr><td valign="top">MorphingMesh with texture</td><td valign="top">RefTransLight1Morph</td><td valign="top">RefColorTex</td></tr><tr><td valign="top">PointSprite</td><td valign="top">RefTransPointSprite</td><td valign="top">RefPointSprite</td></tr><tr><td valign="top">SkyBox</td><td valign="top">RefTransCubeMap</td><td valign="top">RefCubeMapTex</td></tr></tbody></table>

</div></div></div>#### **Appearance: Shader Parameter Setters** 

##### <a class="anchor" id="bkmrk--118"></a>Description

The [Candera::ShaderParamSetter](http://dev.doc.cgistudio.at/APILINK/class_candera_1_1_shader_param_setter.html "ShaderParamSetter maintains a list of uniform parameters that are passed to a Shader.") class is used to pass uniform parameters to a Shader program. The most relevant methods for this class are [Candera::ShaderParamSetter::SetUniform](http://dev.doc.cgistudio.at/APILINK/class_candera_1_1_shader_param_setter.html#a2e95acd899a8578d4c2e62425a257b0c) which creates a new uniform (see example below):

```
    shaderParamSetter->SetUniform(m_uniformName, Shader::Float, &m_uniformValue);
```

and the [Candera::ShaderParamSetter::Activate](http://dev.doc.cgistudio.at/APILINK/class_candera_1_1_shader_param_setter.html#a40f13a2080caf433d894e4f40b9e9468) which activates all the uniforms previously set by the SetUniform method in the Shader.

<div class="contents" id="bkmrk-in-a-class-derived-f"><div class="contents"><div class="textblock"><dl class="note"><dt></dt><dd><p class="callout info">In a class derived from ShaderParamSetter, the methods which calculates the auto-uniforms (e.g. ModelViewProjectionMatrix4), should be invoked in the Activate method.</p>

</dd></dl></div></div></div>##### <a class="anchor" id="bkmrk--119"></a>Generic Shader Param Setters

[Candera::GenericShaderParamSetter](http://dev.doc.cgistudio.at/APILINK/class_candera_1_1_generic_shader_param_setter.html "GenericShaderParamSetter bundles uniform shader parameters that are calculated by Candera...") is a class derived from [Candera::ShaderParamSetter](http://dev.doc.cgistudio.at/APILINK/class_candera_1_1_shader_param_setter.html "ShaderParamSetter maintains a list of uniform parameters that are passed to a Shader.") which bundles uniform shader parameters that are calculated by [Candera](http://dev.doc.cgistudio.at/APILINK/namespace_candera.html "[DataBinding_RefTypeSample]"). The class interface offers, for each of these parameters, a specialized method which enables / disables the parameter.

```
    shaderParamSetter->SetModelMatrix4Enabled(true);
    shaderParamSetter->SetModelMatrix3Enabled(true);
    shaderParamSetter->SetNormalModelMatrix3Enabled(true);
    shaderParamSetter->SetModelViewMatrix4Enabled(true);
    shaderParamSetter->SetModelViewMatrix3Enabled(true);
    shaderParamSetter->SetNormalModelViewMatrix3Enabled(true);
    shaderParamSetter->SetModelViewProjectionMatrix4Enabled(true);
    shaderParamSetter->SetCameraLookAtVectorEnabled(true);
    shaderParamSetter->SetCameraPositionEnabled(true);
    shaderParamSetter->SetLightActivationEnabled(true);
    shaderParamSetter->SetMaterialActivationEnabled(true);
    shaderParamSetter->SetTextureActivationEnabled(true);
    shaderParamSetter->SetLightsCoordinateSpace(Light::World);
```

If a parameter is enabled then it will be calculated and passed to the shader, if disabled the parameter is neither calculated nor passed.

##### <a class="anchor" id="bkmrk--120"></a>Default Parameters

Some often needed shader parameters are enabled by default:

<div class="contents" id="bkmrk-modelviewprojectionm"><div class="contents"><div class="textblock">- ModelViewProjectionMatrix4
- LightActivation
- MaterialActivation
- TextureActivation

</div></div></div>If needed, for performance reasons, those parameters might be disabled.

##### <a class="anchor" id="bkmrk--121"></a>Generic Param Setters in SceneComposer

In SceneComposer the generic parameter setters are accessible through the graphic interface in two ways:

<div class="contents" id="bkmrk-as-customizable-unif"><div class="contents"><div class="textblock">- as customizable uniform setter, from the Toolbox panel in the Attachments bar. Once added in the Appearance node list this uniform setter should be configured in the Properties panel by enabling the desired uniforms.
- as a predefined uniform setter, from the Templates panel in the UniformSetters list.

</div></div></div>SceneComposer provides the following predefined uniform setters:

<div class="contents" id="bkmrk-transanisotropicligh"><div class="contents"><div class="textblock">- TransAnisotropicLightShaderParamSetter
- TransLightBumpMapShaderParamSetter
- TransLightShaderParamSetter
- TransLightSphereMapShaderParamSetter
- TransShaderParamSetter

</div></div></div>The table below shows some examples of shaders that can be set by each of the predefined shader parameter setters:

<div class="contents" id="bkmrk-shader-param-setter-"><div class="contents"><div class="textblock"><table border="1" cellpadding="5" cellspacing="0"><tbody><tr bgcolor="#d4d4d4"><th>**Shader Param Setter**</th><th>**Shader Program**</th></tr><tr><td>TransAnisotropicLightShaderParamSetter</td><td>RefTransAnisotropicLight1\_RefAnisotropicLight1SpecularTex</td></tr><tr><td>TransLightBumpMapShaderParamSetter</td><td>RefTransLight1BumpMap\_RefLight1BumpMap</td></tr><tr><td>TransShaderParamSetter</td><td>RefTransLight1\_RefColor</td></tr><tr><td>TransLightSphereMapShaderParamSetter</td><td>RefTransLight1SphereMap\_RefColorTex</td></tr><tr><td>TransLightShaderParamSetter</td><td>RefTransWorldLight1\_RefColor</td></tr></tbody></table>

</div></div></div>Shader parameter setters can be applied to a 3D node by selecting it in the panel and then drag-and-drop it in the Appearance list of the node.

#### **Customized Shader Parameter Setter** 

##### <a class="anchor" id="bkmrk--122"></a>Customized Shader Parameter Setter - Example

If for any reason the standard shader parameter setters are not sufficient, it is possible to create a customized shader parameter setter. However, a custom shader parameter setter cannot be configured in SceneComposer, it must be associated to the desired node by coding.

The following example explains how to create and use a customized shader parameter setter in a widget. Refer to the

<div class="contents" id="bkmrk-shaderparamsetterwid"><div class="contents"><div class="textblock">- *ShaderParamSetterWidget* in combination with the
- *ShaderParamSetterSolution*,   
    both present in the *cgi\_studio\_player* folder.

</div></div></div>The widget *ShaderParamSetterWidget* allows to set the u\_Material.emissive and the u\_MVPMatrix uniform parameters for any node using an appropriate shader program (for example, the nodes in the ShaderParamSetterSolution are using the **RefTransLight1\_RefColor** shader program).

##### <a class="anchor" id="bkmrk--123"></a>Simple Shader Parameter Setter for u\_Material.emissive &amp; u\_MVPMatrix Uniforms

In order to pass the u\_Material.emissive and u\_MVPMatrix uniforms to a shader program, the widget uses an instance of the class *SimpleShaderParameterSetter*:

```
    // Create uniform setter instance
    // m_shaderParamSetter is of type SharedPointer<SimpleShaderParamSetter> ;
    m_shaderParamSetter = <a class="code" href="http://dev.doc.cgistudio.at/APILINK/group___c_o_u_r_i_e_r___v_i_s_u_a_l_i_z_a_t_i_o_n.html#ggaf0e93dc4242f607c3c8d13dafd036af9aaabfa5309af24986d3111a092449f857">SimpleShaderParamSetter::Create</a>();
    // end Create uniform setter instance
```

The only method that needs to be overridden in the SimpleShaderParameterSetter is [Candera::ShaderParamSetter::Activate](http://dev.doc.cgistudio.at/APILINK/class_candera_1_1_shader_param_setter.html#a40f13a2080caf433d894e4f40b9e9468).

The example *ShaderParamSetterWidget* uses this SimpleShaderParameterSetter by attaching the created instance to the node, which is associated to the widget:

```
    // Attach uniform setter
    if ( (GetNode() != 0) && (GetNode()->GetAppearance() != 0) ) {
        GetNode()->GetAppearance()->SetShaderParamSetter(m_shaderParamSetter);
    }
    // end Attach uniform setter
```

Whenever the widget property "Uniform Color" is modified, the widget sets the given color value (m\_color) as u\_Material.emissive uniform to the SimpleShaderParameterSetter:

```
    // Set u_Material.emissive uniform
    FEATSTD_UNUSED(m_shaderParamSetter->SetUniform(ShaderParamNames::GetUniformName(ShaderParamNames::MaterialEmissive), Shader::FloatVec4, reinterpret_cast<Float*>(&m_shaderColor[0]), 1));
    // end Set u_Material.emissive uniform
```

The node vertices are mapped from the model space to the screen space using the Model-View-Projection Matrix (u\_MVPMatrix). SimpleShaderParameterSetter calculates the u\_MVPMatrix using the node and camera attributes and then passes it to the shader:

```
    // Set u_MVPMatrix uniform
    const Matrix4 mvpMatrix = node.GetWorldTransform() * RenderDevice::GetActiveCamera()->GetViewProjectionMatrix();
    return shader.SetUniform( mvpMatrix.GetData(), ShaderParamNames::GetUniformName(ShaderParamNames::ModelViewProjectionMatrix4), Shader::FloatMat4 );
    // end Set u_MVPMatrix uniform
```

Modifications made using the SetUniform method become effective each time the camera renders the scene because the method Activate is invoked internally by the node.

#### **Multipass Appearance** 

##### <a class="anchor" id="bkmrk--124"></a>Description

A [Candera::MultiPassAppearance](http://dev.doc.cgistudio.at/APILINK/class_candera_1_1_multi_pass_appearance.html "A MultiPassAppearance enables a node to be rendered multiple times with different appearance settings...") is a dedicated Appearance which enables a node to be rendered multiple times with different appearance settings which are blended in order to achieve a certain visual result like e.g. fur or blurred rendering.

The sequence of render passes is created by chaining instances of MultiPassAppearance using the SetNextPass method:

```
    multiPassAppearance1->SetNextPass(multiPassAppearance2);
    multiPassAppearance2->SetNextPass(multiPassAppearance3);
```

# 3D Scene Graph Dynamics

#### <a class="anchor" id="bkmrk--125"></a>Description

Usually all required nodes are already specified and preconfigured via SceneComposer, so in most cases it won't be necessary to make any adaptations within the scene graph loaded from an asset at runtime.

However, some use cases might require such adaptations. This tutorial covers the most common means to manipulate the scene graph structure dynamically.

#### <a class="anchor" id="bkmrk--127"></a>Example Solution

<div class="contents" id="bkmrk-scenegraphdynamicsso"><div class="textblock">- SceneGraphDynamicsSolution\_3D in folder *cgi\_studio\_player/content/Tutorials/03\_SceneGraphAndNodes*

</div></div>#### **Adding and Removing 3D Nodes** 

##### <a class="anchor" id="bkmrk--128"></a>3D Scene Graph Dynamics Example

For creating and adding a new node, the following can be used:

<div class="contents" id="bkmrk-scenegraphdynamicsso-0"><div class="contents"><div class="textblock">- **SceneGraphDynamicsSolution\_3D** from folder *cgi\_studio\_player/content/Tutorials/03\_SceneGraphAndNodes*
- **SceneGraphDynamicsWidget\_3D** (this is used in the example solution - refer to SceneGraphDynamicsWidget\_3D)

</div></div></div>As an example use case, a [Candera::Billboard](http://dev.doc.cgistudio.at/APILINK/class_candera_1_1_billboard.html "The class Billboard represents a Plane that can align towards camera automatically, according to the alignment type set. Thus, Billboards are quite often used as "imposters" pretending to be a 3D geometry by showing a 2D image that is always facing the camera. In order to relief distinction between Billboard and PointSprite see following comparison: + Billboards support rectangular dimension and non-uniform scale, + Billboards support different rotation techniques (see Alignment), whereas PointSprites are aligned according to CenterEyeAlignment, exclusively. + Billboards take local rotation and scale into account (see class Transformable), whereas PointSprites ignore Transformable parameters others than position. + PointSprites have a performance advantage due to less geometry (one instead of 4 vertices). Overall recommendation: Use PointSprites for spherical shapes like particles, lens flares, sparkles, dust which are screen aligned (see Billboard::CameraUpAlignment). Further, use Billboards for world up oriented clouds, text, or yaw axis aligned trees, and signs, etc. Note: The Billboard - because of absent normals - does not support lighting. Belows sketch depicts the layout of a Billboard. W U:0,V:1 +-----+ U:1,V:1 H | X | Legend: texture coordinates: U,V; Width: W, Height: H, Local Center: X U:0,V:0 +-----+ U:1,V:0.") can be created, added and removed. Use the SceneGraphDynamicsWidget\_3D properties described below:

<div class="contents" id="bkmrk-addbillboard%3A-if-add"><div class="contents"><div class="contents"><div class="textblock">- **AddBillboard**: If AddBillboard is enabled a new Billboard is created and added to the widget node. If disabled, the Billboard will be removed.

<div class="fragment">  
</div></div></div></div></div>```
        // Definition of WidgetProperty "AddBillboard"
        CdaProperty(AddBillboard, bool, GetAddBillboard, SetAddBillboard)
            CdaDescription("If AddBillboard is enabled a new Billboard is created and added to the widget Candera::Node. If disabled, the Billboard will be removed.")
        <a class="code" href="http://dev.doc.cgistudio.at/APILINK/group___meta_info.html#ga119bef57449bd05d8b3c40d7d514e375">CdaPropertyEnd</a>()
        // End Definition of WidgetProperty "AddBillboard"
```

##### <a class="anchor" id="bkmrk--129"></a>Creating a new Billboard

The following code snippet generates a basic [Candera::Billboard](http://dev.doc.cgistudio.at/APILINK/class_candera_1_1_billboard.html "The class Billboard represents a Plane that can align towards camera automatically, according to the alignment type set. Thus, Billboards are quite often used as "imposters" pretending to be a 3D geometry by showing a 2D image that is always facing the camera. In order to relief distinction between Billboard and PointSprite see following comparison: + Billboards support rectangular dimension and non-uniform scale, + Billboards support different rotation techniques (see Alignment), whereas PointSprites are aligned according to CenterEyeAlignment, exclusively. + Billboards take local rotation and scale into account (see class Transformable), whereas PointSprites ignore Transformable parameters others than position. + PointSprites have a performance advantage due to less geometry (one instead of 4 vertices). Overall recommendation: Use PointSprites for spherical shapes like particles, lens flares, sparkles, dust which are screen aligned (see Billboard::CameraUpAlignment). Further, use Billboards for world up oriented clouds, text, or yaw axis aligned trees, and signs, etc. Note: The Billboard - because of absent normals - does not support lighting. Belows sketch depicts the layout of a Billboard. W U:0,V:1 +-----+ U:1,V:1 H | X | Legend: texture coordinates: U,V; Width: W, Height: H, Local Center: X U:0,V:0 +-----+ U:1,V:0.") (size 30 x 30) with a [Candera::Material](http://dev.doc.cgistudio.at/APILINK/class_candera_1_1_material.html "The class Material describes the color attributes of an object's surface and is primarily used for li...") and a matching [Candera::Shader](http://dev.doc.cgistudio.at/APILINK/class_candera_1_1_shader.html "The class Shader is an Appearance component representing a graphical processing unit (GPU) program..."). The Shader has to be provided in the asset and is delivered through the AssetProvider by its name. Further, some translation is applied to the new Billboard.

```
        // Create and init a new Billboard

        SharedPointer<Appearance> myAppearance = <a class="code" href="http://dev.doc.cgistudio.at/APILINK/group___c_o_u_r_i_e_r___v_i_s_u_a_l_i_z_a_t_i_o_n.html#ggaf0e93dc4242f607c3c8d13dafd036af9aaabfa5309af24986d3111a092449f857">Appearance::Create</a>();
        SharedPointer<Material> myMaterial = <a class="code" href="http://dev.doc.cgistudio.at/APILINK/group___c_o_u_r_i_e_r___v_i_s_u_a_l_i_z_a_t_i_o_n.html#ggaf0e93dc4242f607c3c8d13dafd036af9aaabfa5309af24986d3111a092449f857">Material::Create</a>();
        myMaterial->SetEmissive(<a class="code" href="http://dev.doc.cgistudio.at/APILINK/group___behaviors_control.html#ggae7abc816df647d0ecbc280480fefb788a6d1d4da086e381cb2c5a5ce6a2513ebd">Color</a>(0.5F, 0.0F, 0.0F, 1.0F));
        myAppearance->SetMaterial(myMaterial);
        myAppearance->SetShader(Base::GetAssetProvider()->GetShader(CgiAssetNames::RefTransLight1_RefColor));
        myAppearance->SetName("Generated Appearance");

        m_billboard = <a class="code" href="http://dev.doc.cgistudio.at/APILINK/group___c_o_u_r_i_e_r___v_i_s_u_a_l_i_z_a_t_i_o_n.html#ggaf0e93dc4242f607c3c8d13dafd036af9aaabfa5309af24986d3111a092449f857">Billboard::Create</a>(30.0F, 30.0F);
        m_billboard->SetAppearance(myAppearance);
        m_billboard->Translate(Vector3(30.0F, 0.0F, 0.0F));

        // end Create and init a new Billboard
```

##### <a class="anchor" id="bkmrk--130"></a>Adding the new Billboard to the scene graph

Next the Billboard is uploaded to VRAM and appended to the node associated with the widget.

```
        // Add Billboard

        static_cast<void>(m_billboard->Upload());
        static_cast<void>(node->AddChild(m_billboard));

        // end Add Billboard
```

##### <a class="anchor" id="bkmrk--131"></a>Removing and destructing the Billboard

To remove the Billboard simply from the scene graph, use [Candera::Node::RemoveChild](http://dev.doc.cgistudio.at/APILINK/class_candera_1_1_node.html#a7748ed9b2f0e87acebf7de84b78b4095). If the Billboard will be used for further operations e.g. attaching it to an other node removing would be enough. Since in this example the Billboard isn't used further it should not only be removed but also be destructed completely (freeing the resources).

The following code snippet removes the previously generated billboard from its parents, unloads the Billboard from VRAM and frees with [Candera::Node::Dispose](http://dev.doc.cgistudio.at/APILINK/class_candera_1_1_node.html#a4dd4cc45a36bfb6b461d6a8af096e650) the resources.

```
        // Remove previously generated billboard and destruct it

        Node* parent = m_billboard->GetParent();
        if (parent != 0){
            static_cast<void>(parent->RemoveChild(m_billboard));
            FEATSTD_LOG_ERROR("- Node %s removed from parent %s ...\n", m_billboard->GetName(), parent->GetName());
        }
        // Destruct node

        static_cast<void>(m_billboard->Unload());
        m_billboard->Dispose();
        m_billboard = 0;

        // end Destruct node

        // end Remove previously generated billboard and destruct it
```

As [Candera::Node::Dispose](http://dev.doc.cgistudio.at/APILINK/class_candera_1_1_node.html#a4dd4cc45a36bfb6b461d6a8af096e650) internally calls the [Candera::Node::RemoveChild](http://dev.doc.cgistudio.at/APILINK/class_candera_1_1_node.html#a7748ed9b2f0e87acebf7de84b78b4095) on parent node following code would be enough for removing and destructing a node.

```
        // Destruct node

        static_cast<void>(m_billboard->Unload());
        m_billboard->Dispose();
        m_billboard = 0;

        // end Destruct node
```

<p class="callout info">In SceneComposer the newly added Node does not appear in the Scene Tree view because it is only added dynamically by the widget.  
- The used Shader for the generated Billboard in the widget has to be included when generating an asset from the solution - ensure that "Always include in asset" flag is marked at the Shaders properties.  
- The widget must control memory and VRAM management of its internal dynamic subtree autonomously.</p>

##### <a class="anchor" id="bkmrk--132"></a>Widget Interaction in the Player

First, the asset must be exported and loaded in the Player. Then, one of the two existing *SceneGraphDynamicsWidget\_3D* widgets must be selected for the 3D scene. After, **ChangeAppearance**, **CloneOperation** and **AddBillboard** properties can be enabled/disabled (1/0) to obtain different results.

#### **Changing Appearance and other 3D Node Attachments** 

For changing the appearance of a node, the following property of the SceneGraphDynamicsWidget\_3D can be used:

<div class="contents" id="bkmrk-changeappearance%3A-if"><div class="contents"><div class="contents"><div class="textblock">- **ChangeAppearance**: If ChangeAppearance is enabled, the appearance of the widgets associated node will be changed to a new generated appearance. If disabled, the previous appearance will be restored.

<div class="fragment">  
</div></div></div></div></div>```
        // Definition of WidgetProperty "ChangeAppearance"
        CdaProperty(ChangeAppearance, bool, GetChangeAppearance, SetChangeAppearance)
            CdaDescription("If ChangeAppearance is enabled, the appearance will be exchanged to a new generated appearance. If disabled, the previus appearance will be restored.")
        <a class="code" href="http://dev.doc.cgistudio.at/APILINK/group___meta_info.html#ga119bef57449bd05d8b3c40d7d514e375">CdaPropertyEnd</a>()
        // End Definition of WidgetProperty "ChangeAppearance"
```

Try the ChangeAppearance property at the SceneGraphDynamics\_3D\_Billboard widget in the example solution to change the Billboards appearance from a texture appearance to a material appearance.

##### <a class="anchor" id="bkmrk--133"></a>Creating and changing an Appearance

The following code snippet generates a basic [Candera::Appearance](http://dev.doc.cgistudio.at/APILINK/class_candera_1_1_appearance.html "The class Appearance groups following render attributes: Material, Textures, RenderMode, and Shader. Render attributes define the distinctive visualization of a geometry like Mesh, Billboard, and PointSprite. Further, render attributes can be shared across multiple objects, which conserves memory and enables sharing of appearance characteristics. An Appearance object is mandatory for any object in order to get rendered. Per default all render attributes are initialized to null, which is a valid setting. If the Appearance is activated, all render attributes that are set become activated. If no RenderMode is defined (null), then the default RenderMode is used instead;."). A [Candera::Material](http://dev.doc.cgistudio.at/APILINK/class_candera_1_1_material.html "The class Material describes the color attributes of an object's surface and is primarily used for li...") is created and its emissive color is set to a light green. The material and a proper shader is set to the Appearance. The shader has to be provided in the asset and is delivered through the AssetProvider by its name.

```
    // Create and set a new Appearance

    SharedPointer<Appearance> myAppearance = <a class="code" href="http://dev.doc.cgistudio.at/APILINK/group___c_o_u_r_i_e_r___v_i_s_u_a_l_i_z_a_t_i_o_n.html#ggaf0e93dc4242f607c3c8d13dafd036af9aaabfa5309af24986d3111a092449f857">Appearance::Create</a>();
    myAppearance->SetMaterial(<a class="code" href="http://dev.doc.cgistudio.at/APILINK/group___c_o_u_r_i_e_r___v_i_s_u_a_l_i_z_a_t_i_o_n.html#ggaf0e93dc4242f607c3c8d13dafd036af9aaabfa5309af24986d3111a092449f857">Material::Create</a>());
    myAppearance->GetMaterial()->SetEmissive(<a class="code" href="http://dev.doc.cgistudio.at/APILINK/group___behaviors_control.html#ggae7abc816df647d0ecbc280480fefb788a6d1d4da086e381cb2c5a5ce6a2513ebd">Color</a>(0.0F, 0.5F, 0.0F, 1.0F));
    myAppearance->SetShader(Base::GetAssetProvider()->GetShader(CgiAssetNames::RefTransLight1_RefColor));
    myAppearance->SetName("Generated Appearance");

    // end Create and set new Appearance
```

In the next step the node's previous Appearance is saved (for restoring purpose) and the new generated appearance is set to the node associated with the widget.

```
    // Change Appearance

    m_previousAppearance = node->GetAppearance();
    node->SetAppearance(myAppearance);
    static_cast<void>(myAppearance->Upload());

    // end Change Appearance
```

##### <a class="anchor" id="bkmrk--134"></a>Restoring / releasing an Appearance

Restore the previous Appearance and destruct the dynamically generated appearance.

```
        // Restoring appearance and destructing

        SharedPointer<Appearance> currentAppearance = node->GetAppearance();
        static_cast<void>(currentAppearance->Unload());
        currentAppearance.Release();
        node->SetAppearance(m_previousAppearance);

        // end Restoring appearance and destructing
```

<p class="callout info">In SceneComposer the changed Appearance does not appear in the Appearance panel because it is only changed dynamically by the widget.  
- The used shader for the generated Billboard in the widget has to be included when generating an asset from the solution - ensure that "Always include in asset" flag is marked at the Shaders properties.  
- The widget must control memory and VRAM management of dynamically created node attachments autonomously.</p>

#### **Cloning 3D Nodes** 

For cloning a node, the following property of the SceneGraphDynamicsWidget\_3D can be used:

<div class="contents" id="bkmrk-nodetoclone%3A-select-"><div class="contents"><div class="contents"><div class="textblock">- **NodeToClone**: Select an arbitrary node in the scene graph, which shall be cloned and added to the widget node

<div class="fragment">  
</div></div></div></div></div>```
        // Definition of WidgetProperty "NodeToClone"
        CdaProperty(NodeToClone, <a class="code" href="http://dev.doc.cgistudio.at/APILINK/class_candera_1_1_node.html" title="The class Node is an abstract base class for all scene graph nodes. Each Node defines a local coordin...">Candera::Node</a>*, GetNodeToClone, SetNodeToClone)
            CdaDescription("Select a Candera::Node which shall be cloned and added to the widget Candera::Node. The Candera::Node must be a child of this widget's scene.")
        <a class="code" href="http://dev.doc.cgistudio.at/APILINK/group___meta_info.html#ga119bef57449bd05d8b3c40d7d514e375">CdaPropertyEnd</a>()
        // End Definition of WidgetProperty "NodeToClone"
```

<div class="contents" id="bkmrk-cloneoperation%3A-if-e"><div class="contents"><div class="contents"><div class="textblock">- **CloneOperation**: If enabled, the clone operation will be executed and the cloned node will be added to the widget node.

<div class="fragment">  
</div></div></div></div></div>```
        // Definition of WidgetProperty "CloneOperation"
        CdaProperty(CloneOperation, bool, GetCloneOperation, SetCloneOperation)
            CdaDescription("If CloneOperation is enabled, the Candera::Node to clone will be cloned and added to the widget Candera::Node. If disabled, the clone will be removed.")
        <a class="code" href="http://dev.doc.cgistudio.at/APILINK/group___meta_info.html#ga119bef57449bd05d8b3c40d7d514e375">CdaPropertyEnd</a>()
        // End Definition of WidgetProperty "CloneOperation"
```

For the cloning operation, refer to [Candera::Node::Clone](http://dev.doc.cgistudio.at/APILINK/class_candera_1_1_node.html#a0c1909b131003514664878e065f7802b). The following code snippets illustrate, what the SceneGraphDynamicsWidget\_3D is actually doing for cloning a node and destructing it again.

##### <a class="anchor" id="bkmrk--135"></a>Validating Node to Clone

This example should allow to clone nodes, which are part of the scene graph the widget is linked to. The scene graph can be traversed from a given node up to its actual top level scene node to check whether it is part of the scene graph.

```
    // Search the parent scene of a given node

    Node* currentNode = node;

    while (currentNode != 0) {
        if (currentNode->IsTypeOf(Scene::GetTypeId())) {
            return static_cast<Scene*>(currentNode);
        }
        currentNode = currentNode->GetParent();
    }
    return 0;

    // end Search the parent scene of a given node
```

##### <a class="anchor" id="bkmrk--136"></a>Creating and Adding Clone

If the widget node and the node to clone have same top level scene, the node can be cloned and added to the widget node according to the following code snippet.

```
        // Clone the node and add it to the widgets associated node

        m_clonedNode = <a class="code" href="http://dev.doc.cgistudio.at/APILINK/group___cloning3_d.html#gaf1781cbf2a3e09d5d24d63bdf3685145" title="Specialization of TreeClonerBase for use with Node.">TreeCloner</a>().CreateClone(*m_nodeToClone);
        static_cast<void>(node->AddChild(m_clonedNode));
        static_cast<void>(m_clonedNode->UploadAll());
        m_clonedNode->SetName("Clone");

        // end Clone the node and add it to the widgets associated node
```

<div class="contents" id="bkmrk-nodes-can-be-attache"><div class="contents"><div class="textblock"><dl class="note"><dd><p class="callout info">Nodes can be attached to any 3D node.</p>

</dd></dl></div></div></div>##### <a class="anchor" id="bkmrk--137"></a>TreeCloner and Cloning Strategies

For more complex cloning see [Candera::TreeCloner](http://dev.doc.cgistudio.at/APILINK/group___cloning3_d.html#gaf1781cbf2a3e09d5d24d63bdf3685145 "Specialization of TreeClonerBase for use with Node.") and [Candera::TreeCloneStrategy](http://dev.doc.cgistudio.at/APILINK/class_candera_1_1_tree_clone_strategy.html "This is an interface for strategies used during cloning by TreeCloner."). [Candera::TreeClonerBase](http://dev.doc.cgistudio.at/APILINK/class_candera_1_1_tree_cloner_base.html "This class clones scene subtrees.") is provided for cloning trees.

<div class="contents" id="bkmrk-the-default-clone-st"><div class="contents"><div class="textblock">- The default clone strategy is to call the Clone interface on each node, and build the clone tree with the same node pattern as the original tree.
- For deeper cloning, TreeClonerBase supports attaching a [Candera::TreeCloneStrategy](http://dev.doc.cgistudio.at/APILINK/class_candera_1_1_tree_clone_strategy.html "This is an interface for strategies used during cloning by TreeCloner."). This TreeCloneStrategy is typically aware of different types of nodes, and delegates to other strategies.

</div></div></div>##### <a class="anchor" id="bkmrk--138"></a>Removing and Destructing Clone

Analogous to <span style="color: rgb(230, 126, 35);">[Removing and destructing the Billboard](https://doc316en.candera.eu/link/449#bkmrk-removing-and-destruc)</span> (removing/destructing a 3D node) the cloned node is destructed.

```
        // Remove a previously cloned node

        static_cast<void>(m_clonedNode->UnloadAll());
        m_clonedNode->Dispose();
        m_clonedNode = 0;

        // end Remove a previously cloned node
```

<div class="contents" id="bkmrk--17"><div class="textblock"><dl class="note"></dl>  
</div></div><p class="callout info">In SceneComposer the newly added node clone does not appear in the Scene Tree view because it is only added dynamically by the widget.  
- It is not allowed to modify the scene graph maintained by SceneComposer outside of the subtree owned by the widget!  
- The widget must control memory and VRAM management of its internal dynamic subtree autonomously.</p>

# 3D Render Order

#### <a class="anchor" id="bkmrk--139"></a>Description

There are various reasons why sorting of objects to render is required:

<div class="contents" id="bkmrk-transparency%3A-transp"><div class="contents"><div class="textblock">- **Transparency**: Transparent objects must be rendered from back to front, while opaque objects must be rendered from front to back.
- **Performance**: Front to back order or advanced techniques like state sorting provide the best performance
- **Other**: Custom rank, Skybox, other background geometry, dialogs, pop-ups, etc.

</div></div></div>#### **Render Order: Involved Classes** 

##### <a class="anchor" id="bkmrk--141"></a>Involved Render Order Classes

<div class="contents" id="bkmrk-candera%3A%3Arenderorder"><div class="textblock"><table class="doxtable" style="width: 100%;"><tbody><tr><td style="width: 24.4582%;" valign="top">[Candera::RenderOrder](http://dev.doc.cgistudio.at/APILINK/class_candera_1_1_render_order.html "Defines the order(sequence) in which nodes are rendered. Collaborates with Renderer. Must cover functional correctness (translucent/transparent objects after opaque/solid objects) as well as optimization-related orderings (sorting by state, defining a background bin for rendering without depth checks). Nodes are assigned to bins; all nodes in an "earlier" bin are rendered before all nodes in a "later" bin. Two default bins are defined and must not be deleted. The opaque bin, which is sorted from front to back (DistanceToCameraOrderCriterion), and the transparent bin, which is sorted from back to front (ReverseDistanceToCameraOrderCriterion). If a Node has no specific assignment to a render order bin, it will be automatically assigned by Candera either to opaque or transparent bin, according to its RenderMode::IsAlphaBlendingEnabled setting.")</td><td style="width: 75.5006%;" valign="top">Defines the sequence of nodes to render per scene and camera.  
Sorting is done according to following criteria:

1. Rank of render order bins: [Candera::RenderOrder::SetBinRank](http://dev.doc.cgistudio.at/APILINK/class_candera_1_1_render_order.html#ac5eef4f1c2868e99327595988dade0c9).
2. Sorting of Nodes within bin (see below).

Default bins are 'opaque' and 'transparent'. If no assignment is set, nodes are automatically assigned to opaque or transparent, according to the Node's transparency settings (RenderMode state).

</td></tr><tr><td style="width: 24.4582%;" valign="top">Candera::RenderOrderBin</td><td style="width: 75.5006%;" valign="top">RenderOrder maintains a set of RenderOrderBins. A bin - Contains nodes that have rendering enabled
- Candera::RenderOrderBin::SetOrderCriterion: Sorts nodes according to applied [Candera::OrderCriterion](http://dev.doc.cgistudio.at/APILINK/class_candera_1_1_order_criterion.html "Abstract class OrderCriterion defines an interface that compares two Nodes according to a specific so...")
- Candera::RenderOrderBin::SetRank: defines sequence of bin within render order
- Distinction between camera dependent and camera independent bins

</td></tr><tr><td style="width: 24.4582%;" valign="top">[Candera::OrderCriterion](http://dev.doc.cgistudio.at/APILINK/class_candera_1_1_order_criterion.html "Abstract class OrderCriterion defines an interface that compares two Nodes according to a specific so...")</td><td style="width: 75.5006%;" valign="top">Nodes within a bin are sorted according to an OrderCriterion.   
Predefined for **camera dependent bins:**

- [Candera::DistanceToCameraOrderCriterion](http://dev.doc.cgistudio.at/APILINK/class_candera_1_1_distance_to_camera_order_criterion.html "class DistanceToCameraOrderCriterion compares two Node's distances to the camera. A render order bin ...") (sorting from front to back for opaque bin)
- [Candera::ReverseDistanceToCameraOrderCriterion](http://dev.doc.cgistudio.at/APILINK/class_candera_1_1_reverse_distance_to_camera_order_criterion.html "class ReverseDistanceToCameraOrderCriterion compares two Node's distances to the camera. A render order bin using ReverseDistanceToCameraOrderCriterion can sort its Nodes from "Back to Front" according to selected distance function. (") (sorting from back to front for transparent bin)

Predefined for **camera independent bins, sorted by explicit rank values:**

- [Candera::RankOrderCriterion](http://dev.doc.cgistudio.at/APILINK/class_candera_1_1_rank_order_criterion.html "class RankOrderCriterion compares two Node's render order ranks, whereas lower render order rank is b...") (lower render order rank is before higher render order rank.)
- [Candera::ReverseRankOrderCriterion](http://dev.doc.cgistudio.at/APILINK/class_candera_1_1_reverse_rank_order_criterion.html "class ReverseRankOrderCriterion compares two Node's render order ranks, whereas higher render order r...") (higher render order rank is before lower render order rank)
- [Candera::RenderStateOrderCriterion](http://dev.doc.cgistudio.at/APILINK/class_candera_1_1_render_state_order_criterion.html) (takes in consideration the Node's Shader, Texture and RenderMode, whose changes are considered the most expensive)

</td></tr><tr><td style="width: 24.4582%;" valign="top">[Candera::Node](http://dev.doc.cgistudio.at/APILINK/class_candera_1_1_node.html "The class Node is an abstract base class for all scene graph nodes. Each Node defines a local coordin...")</td><td style="width: 75.5006%;" valign="top">A node must be assigned to a bin, and if this bin is sorted by rank, the node must also specify it's rank inside the bin. - [Candera::Node::SetRenderOrderBinAssignment](http://dev.doc.cgistudio.at/APILINK/class_candera_1_1_node.html#a1b5049fe6c069246a3d6632217600025): Defines bin assignment. If not set, then auto assignment is processed: Opaque or transparent, according to Node's RenderMode state
- [Candera::Node::SetRenderOrderRank](http://dev.doc.cgistudio.at/APILINK/class_candera_1_1_node.html#ac5a79fc4766b96fc638cef6ee0073794): Defines render order rank that is utilized if the bin assigned to is sorted by rank

</td></tr><tr><td style="width: 24.4582%;" valign="top">[Candera::Scene](http://dev.doc.cgistudio.at/APILINK/class_candera_1_1_scene.html "The class Scene represents a top level scene graph node. Multiple Scenes are allowed. A Scene can not be part of any other Scene. To render a Scene, at least one Camera must be part of this Scene and the Camera must have rendering enabled. A Scene can have more than one Camera. Note: Lights added to a Scene apply for that Scene only and do not affect 3D objects in any other Scene.")</td><td style="width: 75.5006%;" valign="top">Candera::Scene::SetRenderOrder: One RenderOrder is exactly assigned to one Scene.</td></tr><tr><td style="width: 24.4582%;" valign="top">[Candera::Renderer](http://dev.doc.cgistudio.at/APILINK/class_candera_1_1_renderer.html "The class Renderer represents the unique Candera render interface to the application. Each render call an base of Candera shall be triggered via the Renderer interface.")</td><td style="width: 75.5006%;" valign="top">Uses RenderOrder to render Nodes according to its defined sequence.</td></tr></tbody></table>

</div></div>#### **Default Render Order: Sorting by Distance to Camera** 

##### <a class="anchor" id="bkmrk--142"></a>Default Render Order

By default, all objects part of a scene are automatically sorted by [Candera](http://dev.doc.cgistudio.at/APILINK/namespace_candera.html "[DataBinding_RefTypeSample]") according to their render attributes into two predefined render order bins:

<div class="contents" id="bkmrk-opaque-bin%3A-opaque-o"><div class="contents"><div class="textblock">- **Opaque bin**: Opaque objects are rendered using [Candera::DistanceToCameraOrderCriterion](http://dev.doc.cgistudio.at/APILINK/class_candera_1_1_distance_to_camera_order_criterion.html "class DistanceToCameraOrderCriterion compares two Node's distances to the camera. A render order bin ...")
- **Transparent bin**: Transparent objects are rendered using [Candera::ReverseDistanceToCameraOrderCriterion](http://dev.doc.cgistudio.at/APILINK/class_candera_1_1_reverse_distance_to_camera_order_criterion.html "class ReverseDistanceToCameraOrderCriterion compares two Node's distances to the camera. A render order bin using ReverseDistanceToCameraOrderCriterion can sort its Nodes from "Back to Front" according to selected distance function. (")

</div></div></div>Both default bins are protected, which means that they are under control of [Candera](http://dev.doc.cgistudio.at/APILINK/namespace_candera.html "[DataBinding_RefTypeSample]") and cannot be deleted.

##### <a class="anchor" id="bkmrk--143"></a>Predefined Render Order in SceneComposer

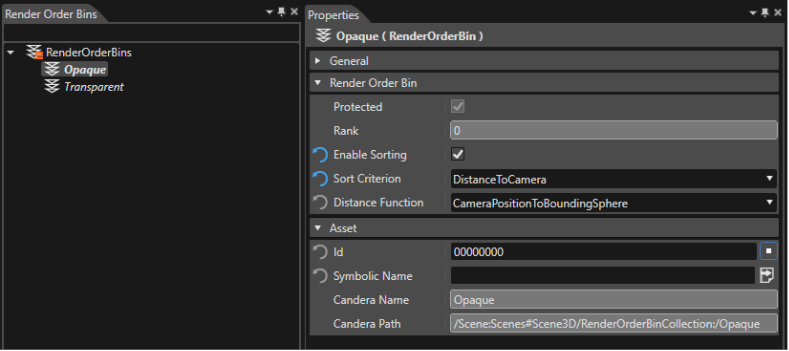
In SceneComposer, each 3D scene gets the predefined render order bins assigned by default:

<div drawio-diagram="1967"><img src="https://doc316en.candera.eu/uploads/images/drawio/2023-02/drawing-4-1676882062.png" alt=""/></div>

<div class="contents" id="bkmrk--19"><div class="contents"><div class="textblock">  
</div></div></div>##### <a class="anchor" id="bkmrk--145"></a>Predefined Render Order in Candera

To apply the default behaviour with auto-assignment of transparent and opaque objects via [Candera](http://dev.doc.cgistudio.at/APILINK/namespace_candera.html "[DataBinding_RefTypeSample]") API, refer to following example:

```
// Create default render order with 2 default bins and max. number of 10 nodes each (opaque and transparent bin).
// Default rank for opaque bin is 10 and transparent bin is 20
static RenderOrder* renderOrder = <a class="code" href="http://dev.doc.cgistudio.at/APILINK/group___c_o_u_r_i_e_r___v_i_s_u_a_l_i_z_a_t_i_o_n.html#ggaf0e93dc4242f607c3c8d13dafd036af9aaabfa5309af24986d3111a092449f857">RenderOrder::Create</a>(10, 10);
// Assign render order to scene.
m_scene->SetRenderOrder(&renderOrder);
```

#### **Fixed Render Order** 

To customize the default render order with a fixed render order, scene nodes must be assigned to custom render order bins sorted by explicit rank values.

<div class="contents" id="bkmrk-using-candera%3A%3Aranko"><div class="contents"><div class="textblock">- Using [Candera::RankOrderCriterion](http://dev.doc.cgistudio.at/APILINK/class_candera_1_1_rank_order_criterion.html "class RankOrderCriterion compares two Node's render order ranks, whereas lower render order rank is b..."), the scene will be rendered so that lower render order rank is before higher render order rank.
- When using [Candera::ReverseRankOrderCriterion](http://dev.doc.cgistudio.at/APILINK/class_candera_1_1_reverse_rank_order_criterion.html "class ReverseRankOrderCriterion compares two Node's render order ranks, whereas higher render order r..."), higher render order rank is before lower render order rank.

</div></div></div>##### <a class="anchor" id="bkmrk--146"></a>Code Example: Fixed Render Order

As an example, create a render order with 3 bins and max. number of 10 nodes for O&amp;T bin:

```
static RenderOrder renderOrder(3, 10, 10);
m_scene->SetRenderOrder(&renderOrder);
```

Create new render order bin with name "UserBin", rank "30", max. Number of 10 nodes:

```
renderOrder.CreateBin("UserBin", 30, 10);
```

Create dedicated order criterion which sorts nodes by its render order rank:

```
static RankOrderCriterion userCriterion;
```

Assign order criterion to UserBin:

```
renderOrder.SetBinOrderCriterion("UserBin", &userCriterion);
```

Assign nodes to dedicated bins:

```
m_mesh1->SetRenderOrderBinAssignment("UserBin");
m_mesh2->SetRenderOrderBinAssignment("UserBin");
```

Set dedicated render order rank for nodes:

```
m_mesh1->SetRenderOrderRank(2);
m_mesh2->SetRenderOrderRank(1);
```

#### **Performance Optimized Render Order**   


[Candera::RenderStateOrderCriterion](http://dev.doc.cgistudio.at/APILINK/class_candera_1_1_render_state_order_criterion.html) implements a proof of concept OrderCriterion used for batching nodes to minimize render state changes. It takes into consideration the nodes shader, texture and render mode, whose changes are considered the most expensive.

<div class="contents" id="bkmrk-after-sorting-all-th"><div class="contents"><div class="textblock">- After sorting all the nodes using the [Candera::OrderCriterionValue](http://dev.doc.cgistudio.at/APILINK/class_candera_1_1_order_criterion_value.html "OrderCriterionValue class encapsulates a 32bit Float or Int value."), rendering is done in batches of nodes with the same shader.
- Inside a batch of nodes with the same shader, the rendering will be done in batches of nodes with the same texture.
- Inside a batch of nodes with the same shader and texture, the rendering will be done in batches of nodes with the same blending enabled value.

</div></div></div>The batching continues until the least expensive state change (CullingMode).

<p class="callout info">- Usage of Candera::RenderStateOrderCriterion does not guarantee best batching algorithm, which should be implemented after benchmarking the target render device's state change costs.  
- RenderStateOrderCriterion groups the nodes only by their first appearance and texture. Nodes with multi-pass rendering (MultiPassAppearance), or with multiple texture units, most probably will break the batches and cancel some performance gains.  
- CANDERA\_RENDER\_STATE\_CACHING\_ENABLED should be defined to use Candera's render state caching mechanism.</p>

# Searching for Nodes with SearchTreeTraverser

#### <a class="anchor" id="bkmrk--147"></a>Searching for Nodes

With [Candera::SearchTreeTraverser](http://dev.doc.cgistudio.at/APILINK/APILINK/class_candera_1_1_search_tree_traverser.html "Search nodes that meet a search criterion within a node tree.") it is possible to find nodes within a given scene tree by certain criteria. The search scene graph traverser is a [Candera::TreeTraverserBase](http://dev.doc.cgistudio.at/APILINK/APILINK/class_candera_1_1_tree_traverser_base.html "Traverses a Node tree depth-first. What is done at each node is customized in the ProcessNode virtual...") implementation that evaluates each node with a given [Candera::SearchCriterion](http://dev.doc.cgistudio.at/APILINK/APILINK/class_candera_1_1_search_criterion.html).

Following code snippets illustrate how to use the traverser.

#### <a class="anchor" id="bkmrk--148"></a>Creating a plugin that registers a configuration and uses the default configuration editor.

First create a [Candera::SearchTreeTraverser](http://dev.doc.cgistudio.at/APILINK/APILINK/class_candera_1_1_search_tree_traverser.html "Search nodes that meet a search criterion within a node tree.") and then set its [Candera::SearchCriterion](http://dev.doc.cgistudio.at/APILINK/APILINK/class_candera_1_1_search_criterion.html). The search criterion validates nodes based on the implemented criterion.

In the example below the criterion is a [Candera::ScopeMaskSearchCriterion](http://dev.doc.cgistudio.at/APILINK/APILINK/class_candera_1_1_scope_mask_search_criterion.html).

```
    // Create criterion
    ScopeMaskSearchCriterion<Node> scopeMaskCriterion;
    scopeMaskCriterion.SetScopeMask(scopeA);
    
    // Create SearchTreeTraverser
    SearchTreeTraverser<Node> scopeSearchTraverser;
    scopeSearchTraverser.SetSearchCriterion(&scopeMaskCriterion);
```

#### <a class="anchor" id="bkmrk--149"></a>Tree Traversing

To start a search within a node tree, call [Candera::SearchTreeTraverser::Traverse()](http://dev.doc.cgistudio.at/APILINK/APILINK/group___common_base.html#gab35eff4b3c78073dd03ea13e1f8234d6). With the [Candera::SearchTreeTraverser::SetOnFoundAction](http://dev.doc.cgistudio.at/APILINK/APILINK/class_candera_1_1_search_tree_traverser.html#a8f8ca3881df5b6559f4fcbc70787311b) you can define if the search should stop after the first node that fulfills the search criterion is found, or if it should continue to gather all valid nodes.

Possible TraverserActions are:

<div class="contents" id="bkmrk-proceedtraversing%3A-f"><div class="contents"><div class="textblock">- *ProceedTraversing*: Find all nodes matching the given search criterion (traversing is stopped at the end of the tree)
- *StopTraversingForDescendants*: Find only nodes on the top level of the tree (traversing stops at child nodes and proceeds at siblings, until the end of the tree)
- *StopTraversing*: Find only the first node matching the search criterion (traversing is stopped immediately).

</div></div></div>The nodes fulfilling the search criterion are retained and are available to be later retrieved. Get the nodes one by one with [Candera::SearchTreeTraverser::GetSearchResult](http://dev.doc.cgistudio.at/APILINK/APILINK/group___common_base.html#gac868b9574bbdc6bea6f3c9afdd3a6796). The order of the nodes is not defined and each node can be retrieved only once. When no more nodes are available, the method returns 0.

Following are examples for the different TraverserActions.

#### <a class="anchor" id="bkmrk--150"></a>ProceedTraversing

This action is used if the traversing should continue with the next child (if the current node has any) or with the next sibling.

First define the action and then call the Traverse() method. All nodes that fulfill the search criterion are found and stored internally in a list.

```
    // Set on found action and traverse
    scopeSearchTraverser.SetOnFoundAction(<a class="code" href="http://dev.doc.cgistudio.at/APILINK/APILINK/class_candera_1_1_tree_traverser_base.html" title="Traverses a Node tree depth-first. What is done at each node is customized in the ProcessNode virtual...">Candera::TreeTraverserBase<Node>::ProceedTraversing</a>);
    scopeSearchTraverser.Traverse(*groupRoot);
    
    // Get results
    UInt32 nodeCount = 0;
    for (Node* node = scopeSearchTraverser.GetSearchResult(); node != 0; node = scopeSearchTraverser.GetSearchResult()) {
        nodeCount++;
    }
```

#### <a class="anchor" id="bkmrk--151"></a>StopTraversingForDescendants

Used if the traversing should stop for all child nodes and continue with the next sibling.

```
    // Set on found action and traverse
    scopeSearchTraverser.SetOnFoundAction(<a class="code" href="http://dev.doc.cgistudio.at/APILINK/APILINK/class_candera_1_1_tree_traverser_base.html" title="Traverses a Node tree depth-first. What is done at each node is customized in the ProcessNode virtual...">Candera::TreeTraverserBase<Node>::StopTraversingForDescendants</a>);
    scopeSearchTraverser.Traverse(*groupRoot);
```

#### <a class="anchor" id="bkmrk--152"></a>StopTraversing

If you search for only one node which fulfills your criteria, you can use StopTraversing. The traversing will stop immediately after the first node is found.

```
    // Set on found action and traverse
    scopeSearchTraverser.SetOnFoundAction(<a class="code" href="http://dev.doc.cgistudio.at/APILINK/APILINK/class_candera_1_1_tree_traverser_base.html" title="Traverses a Node tree depth-first. What is done at each node is customized in the ProcessNode virtual...">Candera::TreeTraverserBase<Node>::StopTraversing</a>);
    scopeSearchTraverser.Traverse(*groupRoot);
    Node* resultNode = scopeSearchTraverser.GetSearchResult();
```

<div class="contents" id="bkmrk-another-call-of-cand"><div class="textblock"><div class="fragment">  
</div><dl class="note"><dd><p class="callout info">Another call of [Candera::SearchTreeTraverser::GetSearchResult](http://dev.doc.cgistudio.at/APILINK/group___common_base.html#gac868b9574bbdc6bea6f3c9afdd3a6796) would return 0, because we use StopTraversing here. This leads to one result only.</p>

</dd></dl></div></div>

# Vertex Geometry Builder

#### <a class="anchor" id="bkmrk--153"></a>Description

The [Candera::VertexGeometryBuilder](http://dev.doc.cgistudio.atcgistudio.at/APILINK/class_candera_1_1_vertex_geometry_builder.html "The VertexGeometryBuilder helps effectively build VertexGeometry objects.") class helps effectively build [Candera::VertexGeometry](http://dev.doc.cgistudio.atcgistudio.at/APILINK/class_candera_1_1_vertex_geometry.html "The VertexGeometry holds all vertex data of a mesh. VertexGeometry may be used also for multiple Vert...") objects.

<div class="contents" id="bkmrk-vertexgeometrybuilde"></div>#### **Procedural Geometry** 

##### <a class="anchor" id="bkmrk--156"></a>Example: Wireframe Cube with LineList

First example shows how to generate a wireframe cube using a [Candera::LineList](http://dev.doc.cgistudio.atcgistudio.at/APILINK/class_candera_1_1_line_list.html "The LineList represents a list of lines (segments). It can be used to store a wireframe, a list of connected vertices, or just a list of isolated segments. A generic LineList instance can be created by the static method LineList::Create. A wireframe LineList can be created out of a Mesh by the static helper function Math3D::CreateLineListFromMesh.") object.

The vertex geometry will be generated procedurally using a [Candera::VertexGeometryBuilder](http://dev.doc.cgistudio.atcgistudio.at/APILINK/class_candera_1_1_vertex_geometry_builder.html "The VertexGeometryBuilder helps effectively build VertexGeometry objects.") object (e.g. *m\_builder*).

##### <a class="anchor" id="bkmrk--157"></a>Vertex Element Format: Position and Color

At the beginning we have to specify what kind of information will be set in the vertices. Of course we need information about the position and, optionally, for an improved visual effect, we could also add color information.

```
    // Set the data type to be used: position & color
    m_builder.SetVertexElementFormat(VertexGeometry::Position, 0, VertexGeometry::Float32_3);
    m_builder.SetVertexElementFormat(<a class="code" href="http://dev.doc.cgistudio.atcgistudio.at/APILINK/group___behaviors_control.html#ggae7abc816df647d0ecbc280480fefb788a6d1d4da086e381cb2c5a5ce6a2513ebd">VertexGeometry::Color</a>, 0, VertexGeometry::Float32_4);
```

##### <a class="anchor" id="bkmrk--158"></a>Vertex Data: Position

The position information for the vertices is obtained from the array *c\_cubeData* which, in fact, stores the coordinates of the points A and G. The coordinates for the rest of the vertices are obtained relatively to this points (e.g. F(X<sub>A</sub>, Y<sub>G</sub>, Z<sub>G</sub>) or D(X<sub>G</sub>, Y<sub>A</sub>, Z<sub>A</sub>)

<div drawio-diagram="1968"><img src="https://doc316en.candera.eu/uploads/images/drawio/2023-02/drawing-4-1676882299.png" alt=""/></div>

```
// Coordinates for the points A & G
static const Float c_cubeData[2][3] = {
    {-1.0F, -1.0F, -1.0F },
    {1.0F, 1.0F, 1.0F }
};
```

##### <a class="anchor" id="bkmrk--160"></a>VertexGeometryBuilder: Set Vertex Elements

Because the LineType property of the LineList object will be set to LineType::Lines, the vertex buffer will have to contain a pair of vertices for each line of the cube: 2 vertices/line \* 12 lines = 24 vertices.

```
    // Set the position & color information for each vertex
    // Line segment AD
    m_builder.SetVertexElement(VertexGeometry::Position, 0, c_cubeData[0][0], c_cubeData[0][1], c_cubeData[0][2]); // A
    m_builder.SetVertexElement(<a class="code" href="http://dev.doc.cgistudio.atcgistudio.at/APILINK/group___behaviors_control.html#ggae7abc816df647d0ecbc280480fefb788a6d1d4da086e381cb2c5a5ce6a2513ebd">VertexGeometry::Color</a>, 0, 1.F, 0.F, 1.F, 1.F); // magenta
    // Increment the vertex cursor
    m_builder.IncrementVertexCursor();
    m_builder.SetVertexElement(VertexGeometry::Position, 0, c_cubeData[1][0], c_cubeData[0][1], c_cubeData[0][2]); // D
    m_builder.SetVertexElement(<a class="code" href="http://dev.doc.cgistudio.atcgistudio.at/APILINK/group___behaviors_control.html#ggae7abc816df647d0ecbc280480fefb788a6d1d4da086e381cb2c5a5ce6a2513ebd">VertexGeometry::Color</a>, 0, 1.F, 1.F, 1.F, 1.F); // white
    m_builder.IncrementVertexCursor();
    // Line segment AB
    m_builder.SetVertexElement(VertexGeometry::Position, 0, c_cubeData[0][0], c_cubeData[0][1], c_cubeData[0][2]); // A
    m_builder.SetVertexElement(<a class="code" href="http://dev.doc.cgistudio.atcgistudio.at/APILINK/group___behaviors_control.html#ggae7abc816df647d0ecbc280480fefb788a6d1d4da086e381cb2c5a5ce6a2513ebd">VertexGeometry::Color</a>, 0, 1.F, 0.F, 1.F, 1.F); // magenta
    m_builder.IncrementVertexCursor();
    m_builder.SetVertexElement(VertexGeometry::Position, 0, c_cubeData[0][0], c_cubeData[0][1], c_cubeData[1][2]); // B
    m_builder.SetVertexElement(<a class="code" href="http://dev.doc.cgistudio.atcgistudio.at/APILINK/group___behaviors_control.html#ggae7abc816df647d0ecbc280480fefb788a6d1d4da086e381cb2c5a5ce6a2513ebd">VertexGeometry::Color</a>, 0, 1.F, 1.F, 0.F, 1.F); // yellow
    // ...
```

##### <a class="anchor" id="bkmrk--161"></a>Create Vertex Buffer

Create a [Candera::VertexBuffer](http://dev.doc.cgistudio.atcgistudio.at/APILINK/class_candera_1_1_vertex_buffer.html "The VertexBuffer encapsulates the attributes of an uploaded VertexGeometry. It holds the actual handl...") object and attach to it the vertex geometry obtained from the [Candera::VertexGeometryBuilder](http://dev.doc.cgistudio.atcgistudio.at/APILINK/class_candera_1_1_vertex_geometry_builder.html "The VertexGeometryBuilder helps effectively build VertexGeometry objects."):

```
    VertexGeometry* vertexGeom = m_builder.GetVertexGeometry();
    SharedPointer<VertexBuffer> vertexBuffer = <a class="code" href="http://dev.doc.cgistudio.atcgistudio.at/APILINK/group___c_o_u_r_i_e_r___v_i_s_u_a_l_i_z_a_t_i_o_n.html#ggaf0e93dc4242f607c3c8d13dafd036af9aaabfa5309af24986d3111a092449f857">VertexBuffer::Create</a>();
    static_cast<void>(vertexBuffer->SetVertexGeometry(vertexGeom, VertexBuffer::VertexGeometryDisposer::Dispose));
    vertexBuffer->SetPrimitiveType(VertexBuffer::Lines);
```

##### <a class="anchor" id="bkmrk--162"></a>Create LineList using the Vertex Buffer

Attach the vertex buffer to LineList object:

```
    // Create and configure the line list object
    m_lineList = <a class="code" href="http://dev.doc.cgistudio.atcgistudio.at/APILINK/group___c_o_u_r_i_e_r___v_i_s_u_a_l_i_z_a_t_i_o_n.html#ggaf0e93dc4242f607c3c8d13dafd036af9aaabfa5309af24986d3111a092449f857">LineList::Create</a>();
    m_lineList->SetAppearance(<a class="code" href="http://dev.doc.cgistudio.atcgistudio.at/APILINK/group___c_o_u_r_i_e_r___v_i_s_u_a_l_i_z_a_t_i_o_n.html#ggaf0e93dc4242f607c3c8d13dafd036af9aaabfa5309af24986d3111a092449f857">Appearance::Create</a>());
    m_lineList->GetAppearance()->SetMaterial(<a class="code" href="http://dev.doc.cgistudio.atcgistudio.at/APILINK/group___c_o_u_r_i_e_r___v_i_s_u_a_l_i_z_a_t_i_o_n.html#ggaf0e93dc4242f607c3c8d13dafd036af9aaabfa5309af24986d3111a092449f857">Material::Create</a>());
    m_lineList->GetAppearance()->GetMaterial()->SetEmissive(<a class="code" href="http://dev.doc.cgistudio.atcgistudio.at/APILINK/group___behaviors_control.html#ggae7abc816df647d0ecbc280480fefb788a6d1d4da086e381cb2c5a5ce6a2513ebd">Color</a>(1.0F, 1.0F, 0.0F));
    m_lineList->GetAppearance()->SetShader(m_shaderLightMaterial);
    m_lineList->SetLineType(LineList::Lines);
    m_lineList->SetWidth(1.0);
    m_lineList->SetIntersectionTestEnabled(false);
    m_lineList->SetVertexBuffer(vertexBuffer);
    m_lineList->SetScopeMask(ScopeMask(false));
    static_cast<void>(m_lineList->SetScopeEnabled(1, true));
    m_lineList->SetRenderingEnabled(true);
    m_lineList->SetName("Wireframe");
    static_cast<void>(m_lineList->Upload());
```

##### <a class="anchor" id="bkmrk--163"></a>Wireframe Cube Result

The image below shows the resulting wireframe cube:

<div drawio-diagram="1970"><img src="https://doc316en.candera.eu/uploads/images/drawio/2023-02/drawing-4-1676882342.png" alt=""/></div>

<div class="contents" id="bkmrk--22"><div class="contents"><div class="textblock">  
</div></div></div><div class="contents" id="bkmrk-for-an-easier-manipu"><div class="textblock"><dl class="note"><dd><p class="callout info">For an easier manipulation of the widget in SceneComposer all the shaders are hardcoded in the source file and then created by the widget at the initialization time.</p>

<p class="callout info">Alternatively obtain shaders from [Candera::AssetProvider](http://dev.doc.cgistudio.atcgistudio.at/APILINK/class_candera_1_1_asset_provider.html "Abstract class providing methods for retrieving objects.") (e.g. GetAssetProvider()-&gt;GetShader("...")) in case the application uses an asset library.</p>

</dd></dl></div></div>####   
**Indexed Geometry**   


##### <a class="anchor" id="bkmrk--165"></a>Example: Solid Cube from one Triangle Strip

The next example will show how to create a solid cube from one triangle strip using a [Candera::Mesh](http://dev.doc.cgistudio.atcgistudio.at/APILINK/class_candera_1_1_mesh.html "The class Mesh represents a three-dimensional rigid body object defined by polygons. The Mesh's polygonal surface is defined by its VertexBuffer. Each Mesh must have exactly one Appearance set, in order to specify how the Mesh geometry is rendered.") object. In this case the cube is determined by only 14 vertices which have to be ordered in a special way.

The figure below presents a cube unfolded and a possible solution of ordering the vertices:

<div drawio-diagram="1971"><img src="https://doc316en.candera.eu/uploads/images/drawio/2023-02/drawing-4-1676882414.png" alt=""/></div>

<div class="contents" id="bkmrk--24"><div class="contents"><div class="textblock">  
</div></div></div>##### <a class="anchor" id="bkmrk--167"></a>Indexed Vertex Sequence

The vertex sequence is stored in the *c\_index\_order* array, encoding the order:

<div class="contents" id="bkmrk-g-%3Ec-%3Ef-%3Eb-%3Ea-%3Ec-%3Ed-"><div class="contents"><div class="textblock">- **G-&gt;C-&gt;F-&gt;B-&gt;A-&gt;C-&gt;D-&gt;H-&gt;A-&gt;E-&gt;F-&gt;H-&gt;G-&gt;C**.

</div></div></div>Each array element represents an offset it the vertex buffer.

```
// The vertex sequence - triangle strip
static const UInt16 c_index_order[] = { 12, 11, 7, 3, 0, 11, 1, 17, 0, 5, 7, 17, 12, 11 };
```

The vertex geometry builder object used in the previous example has already 24 vertices set with position and color information. Because only 14 vertices out of 24 are needed in this case and, also, because their sequence has to be different, an index buffer is added:

```
    // Change the order of the vertices using indexes
    for (Int index = 0; index < 14; index++) {
        // Define the value of the index
        m_builder.SetIndexElement(c_index_order[index]);
        // Increment the index cursor
        m_builder.IncrementIndexCursor();
    }
```

##### <a class="anchor" id="bkmrk--168"></a>Create TriangleStrip Vertex Buffer

<a class="anchor" id="bkmrk--169"></a>Create the vertex buffer using the geometry from the builder:

```
    VertexGeometry* vertexGeom = m_builder.GetVertexGeometry();
    SharedPointer<VertexBuffer> vertexBuffer = <a class="code" href="http://dev.doc.cgistudio.atcgistudio.at/APILINK/group___c_o_u_r_i_e_r___v_i_s_u_a_l_i_z_a_t_i_o_n.html#ggaf0e93dc4242f607c3c8d13dafd036af9aaabfa5309af24986d3111a092449f857">VertexBuffer::Create</a>();
    static_cast<void>(vertexBuffer->SetVertexGeometry(vertexGeom, VertexBuffer::VertexGeometryDisposer::Dispose));
    vertexBuffer->SetPrimitiveType(VertexBuffer::TriangleStrip);
```

##### <a class="anchor" id="bkmrk--170"></a>Create Mesh using the Vertex Buffer

<a class="anchor" id="bkmrk--171"></a>Configure mesh and attach the vertex buffer:

```
    m_mesh = <a class="code" href="http://dev.doc.cgistudio.atcgistudio.at/APILINK/group___c_o_u_r_i_e_r___v_i_s_u_a_l_i_z_a_t_i_o_n.html#ggaf0e93dc4242f607c3c8d13dafd036af9aaabfa5309af24986d3111a092449f857">Mesh::Create</a>();
    m_mesh->SetVertexBuffer(vertexBuffer);
    m_mesh->SetAppearance(appearance);
    m_mesh->SetRenderingEnabled(false);
    m_mesh->SetName("SolidNonTextured");
    static_cast<void>(m_mesh->Upload());
```

##### <a class="anchor" id="bkmrk--172"></a>Solid Cube Result

The image below shows the resulting solid cube:

<div drawio-diagram="1972"><img src="https://doc316en.candera.eu/uploads/images/drawio/2023-02/drawing-4-1676882451.png" alt=""/></div>

<div class="contents" id="bkmrk--26"></div>#### **Remove &amp; Add Vertex Elements**   


##### <a class="anchor" id="bkmrk--174"></a>Example: Textured Cube

In this example the vertex geometry builder object will be used to generate the vertex geometry for a textured cube.

Adding texture to a mesh requires that its vertices should contain specific information like *normal* and *texture coordinate*. Also, the *color* information is no longer needed so it can be removed:

```
    // Vertex Elements Manipulation
    // Remove color data associated to the vertices
    m_builder.RemoveVertexElement(<a class="code" href="http://dev.doc.cgistudio.atcgistudio.at/APILINK/group___behaviors_control.html#ggae7abc816df647d0ecbc280480fefb788a6d1d4da086e381cb2c5a5ce6a2513ebd">VertexGeometry::Color</a>,0);
    // Add data type to be used: texture coordinate & normal
    m_builder.SetVertexElementFormat(VertexGeometry::TextureCoordinate, 0, VertexGeometry::Float32_2);
    m_builder.SetVertexElementFormat(<a class="code" href="http://dev.doc.cgistudio.atcgistudio.at/APILINK/group___c_o_u_r_i_e_r___m_e_s_s_a_g_i_n_g.html#gga12eb807cc34f92845cb1483cd7e7fb07a35ab3707105aae81f65484ffd603264b">VertexGeometry::Normal</a>, 0, VertexGeometry::Float32_3);
```

##### <a class="anchor" id="bkmrk--175"></a>Vertex Data: Normals and Texture Coordinates

After adding the new data types for the vertices it is time to add the corresponding information. First, add normals for vertices:

```
    // Move the cursor to the first vertex
    m_builder.SetVertexCursor();
    for (UInt32 i = 0; i < m_builder.GetVertexCount(); i++ )
    {
        m_builder.SetVertexElement(<a class="code" href="http://dev.doc.cgistudio.atcgistudio.at/APILINK/group___c_o_u_r_i_e_r___m_e_s_s_a_g_i_n_g.html#gga12eb807cc34f92845cb1483cd7e7fb07a35ab3707105aae81f65484ffd603264b">VertexGeometry::Normal</a>, 0, 0.0F, 0.0F, 1.0F);
        m_builder.IncrementVertexCursor();
    }
```

In order to map the UV texture coordinate values correctly, the cube faces should be drawn using 4 vertices per face, so, in this case, all 24 vertices will be used. Of course, the vertex order has to be adjusted.

The new vertex order is stored in the *c\_indexDataTexturedCube* array.

```
// Vertex order - textured cube
static const UInt16 c_indexDataTexturedCube[24] = {
    1,17,0,5,
    2,6,3,7,
    9,8,11,12,
    13,14,19,21,
    15,23,16,22,
    4,10,20,18
};
```

Now, reorder the vertices:

```
    // Overwrite the index buffer
    // Move the cursor to the first index
    m_builder.SetIndexCursor();
    for (UInt32 i = 0; i < m_builder.GetVertexCount(); i++ )
    {
        // Define the value of the index
        m_builder.SetIndexElement(c_indexDataTexturedCube[i]);
        m_builder.IncrementIndexCursor();
    }
```

The vertices of each face of the cube should be set with texture coordinate information as shown below:

<div drawio-diagram="1973"><img src="https://doc316en.candera.eu/uploads/images/drawio/2023-02/drawing-4-1676882513.png" alt=""/></div>

<div class="contents" id="bkmrk--28"><div class="contents"><div class="textblock">  
</div></div></div>Set the texture coordinates for vertices:

```
    Int idx = 0;
    for (Int nb_of_faces = 0; nb_of_faces<6; nb_of_faces++) {
        for (Int u=0; u<=1; u++) {
            for (Int v=0; v<=1; v++) {
                //Set the position of the vertex cursor
                m_builder.SetVertexCursor(c_indexDataTexturedCube[idx]);
                m_builder.SetVertexElement(VertexGeometry::TextureCoordinate, 0, static_cast<Float>(u), static_cast<Float>(v));
                idx++;
            }
        }
    }
```

The vertex buffer is created and configured in the same way as in the <span style="color: rgb(230, 126, 35);">[previous example](#bkmrk-indexed-geometry%C2%A0)</span>.

The mesh setup is also similar but, unlike the <span style="color: rgb(230, 126, 35);">[solid cube](#bkmrk-solid-cube-result)</span>, the textured cube appearance has to be set with a texture and a texture shader.

##### <a class="anchor" id="bkmrk--177"></a>Textured Cube Result

Here is the final result:

<div drawio-diagram="1974"><img src="https://doc316en.candera.eu/uploads/images/drawio/2023-02/drawing-4-1676882532.png" alt=""/></div>

#### **Range Data Usage**   


##### <a class="anchor" id="bkmrk--179"></a>Example: Solid Cube using Range Data

This example will show how to create a solid cube as in the <span style="color: rgb(230, 126, 35);">[second example](#bkmrk-indexed-geometry%C2%A0)</span> but using range data.

First, all existing data from the vertex geometry builder is removed.

```
    // Clear all data stored by the builder
    m_builder.Clear();
```

The vertex data is taken from the two buffers *c\_positionData* and *c\_colorData*.

```
static const Float c_positionData[8][3] = {
    { -1.0F, 1.0F, 1.0F},
    { 1.0F, 1.0F, 1.0F},
    { -1.0F, -1.0F, 1.0F},
    { 1.0F, -1.0F, 1.0F},
    { -1.0F, 1.0F, -1.0F},
    { 1.0F, 1.0F, -1.0F},
    { -1.0F, -1.0F, -1.0F},
    { 1.0F, -1.0F, -1.0F}
};

static const Float c_colorData[8][4] = {
    { 0.0F, 0.0F, 1.0F, 1.0F},
    { 0.0F, 1.0F, 0.0F, 1.0F},
    { 0.0F, 1.0F, 1.0F, 1.0F},
    { 1.0F, 0.0F, 0.0F, 1.0F},
    { 1.0F, 0.0F, 1.0F, 1.0F},
    { 1.0F, 1.0F, 0.0F, 1.0F},
    { 1.0F, 1.0F, 1.0F, 1.0F},
    { 1.0F, 0.5F, 1.0F, 1.0F}
};
```

The vertex sequence is taken from the array *c\_indexData*.

```
// Range data index
static const UInt16 c_indexData[] = {3, 2, 1, 0, 4, 2, 6, 3, 7, 1, 5, 4, 7, 6 };
```

Use the methods [Candera::VertexGeometryBuilder::SetVertexElementRange](http://dev.doc.cgistudio.atcgistudio.at/APILINK/class_candera_1_1_vertex_geometry_builder.html#a262ac223bfe93c8e42571f0771cfd3fb) and [Candera::VertexGeometryBuilder::SetIndexElementRange](http://dev.doc.cgistudio.atcgistudio.at/APILINK/class_candera_1_1_vertex_geometry_builder.html#a37e18ba1d6f49c484d4dc172e123b136) to add the required information.

```
    // Add position, color and an index from range data
    // Splice values to the position buffer starting with the first vertex
    static_cast<void>(m_builder.SetVertexElementRange(VertexGeometry::Position, 0, 0, VertexGeometry::Float32_3,
        8, 3*sizeof(Float), c_positionData ));
    // Splice values to the color buffer starting with the first vertex
    static_cast<void>(m_builder.SetVertexElementRange(<a class="code" href="http://dev.doc.cgistudio.atcgistudio.at/APILINK/group___behaviors_control.html#ggae7abc816df647d0ecbc280480fefb788a6d1d4da086e381cb2c5a5ce6a2513ebd">VertexGeometry::Color</a>, 0, 0, VertexGeometry::Float32_4,
        8, 4*sizeof(Float), c_colorData ));

    // Splice values to the index buffer starting with the first index
    static_cast<void>(m_builder.SetIndexElementRange(0, sizeof(c_indexData)/sizeof(UInt16),c_indexData));
```

<span style="color: rgb(0, 0, 0);">The vertex buffer configuration and the mesh setup</span> are identical with the ones from the [second example](#bkmrk-create-mesh-using-th).

Here is the final result:

<div drawio-diagram="1975"><img src="https://doc316en.candera.eu/uploads/images/drawio/2023-02/drawing-4-1676882596.png" alt=""/></div>

<div class="contents" id="bkmrk--32"><div class="textblock">  
</div></div>#### **Concatenate Geometries**   


##### <a class="anchor" id="bkmrk--181"></a>VertexGeometryBuilder::SpliceGeometry

In some cases it might be useful to concatenate two vertex geometries. This can be done by using the [Candera::VertexGeometryBuilder::SpliceGeometry](http://dev.doc.cgistudio.atcgistudio.at/APILINK/class_candera_1_1_vertex_geometry_builder.html#ad0ce8d747bc1d48d32622282ab0731c8) method as shown below:

```
    m_builder.SpliceGeometry(0, 0, vertexGeometry1);
    m_builder.SpliceGeometry(vertexGeometry1->GetVertexCount(), vertexGeometry1->GetIndexCount(), vertexGeometry2);
    vertexGeometry1cat2 = builder.GetGeometry();
```

# Vertex Geometry Modifier

#### <a class="anchor" id="bkmrk--182"></a>Overview

The [VertexGeometryModifier](http://dev.doc.cgistudio.at/APILINK/class_candera_1_1_vertex_geometry_modifier.html "In conjunction with a VertexAccessor, the VertexGeometryModifier helps to effectively modify VertexGe..."), in conjunction with a [VertexAccessor](http://dev.doc.cgistudio.at/APILINK/class_candera_1_1_vertex_accessor.html), helps to modify [VertexGeometry](http://dev.doc.cgistudio.at/APILINK/class_candera_1_1_vertex_geometry.html "The VertexGeometry holds all vertex data of a mesh. VertexGeometry may be used also for multiple Vert...") objects by the means of the setters offered by the class interface. The interface offers also getters which are helpful to retrieve the values of the vertex elements from a given vertex buffer.

#### <a class="anchor" id="bkmrk--183"></a>Example

The example below shows how to change the position values for the vertices from a vertex buffer of a given mesh.

```
            VertexGeometry* vertexGeom;
            bool isMutable = m_mesh3->GetVertexBuffer()->GetVertexGeometry()->GetVertexArrayResourceHandle().m_isMutable;
            // Get the vertex geometry of the mesh
            if (isMutable) {
                vertexGeom = m_mesh3->GetVertexBuffer()->GetVertexGeometry();
            }
            else {
                DiagnosticPlatform::ConsoleOut("VertexGeometryData not mutable");
                break;
            }
             // The vertex accessor will be used by the vertex geometry modifier to access the vertices
            VertexAccessor accessor(*vertexGeom);

            // Create a vertex geometry modifier specifying as usage the type of vertex attribute
            // which will be changed
            VertexGeometryModifier modifier(*vertexGeom, <a class="code" href="http://dev.doc.cgistudio.at/APILINK/class_candera_1_1_vertex_geometry.html#af7691f69f328ccb7417ebdf28c39bb9ea952812830012c7d152a2513c8e14ed44" title="The position of a vertex in local space.">VertexGeometry::Position</a>, 0);
            Float vertexData[3];
            for(Int i = 0; i<8; i++) {
                if(s_inflate) {
                // Retrieve the position data of the vertex "i" in the vertexData array
                modifier.GetVertexElement(accessor.GetVertex(i), vertexData, 3);

                // Alter the data and set it back
                modifier.SetVertexElement(accessor.GetMutableVertex(i), vertexData[0]*1.3F, vertexData[1]*1.3F, vertexData[2]*1.3F);
                } 
                else {
                    // Set the position of the vertex with data get from an array (Float c_positionData[8][3])
                    modifier.SetVertexElement(accessor.GetMutableVertex(i), c_positionData[i], 3);
                }
            }

            // Update the vertex buffer on the mesh
            m_mesh3->GetVertexBuffer()->Update(0, m_mesh3->GetVertexBuffer()->GetVertexGeometry()->GetVertexCount());
```

# Candera 3D Listeners

Applications can receive notifications on scene graph events. Therefore implement and use a listener, which defines hooks to receive those notifications.

Following listener interfaces are provided in [Candera](http://dev.doc.cgistudio.at/APILINK/namespace_candera.html "[DataBinding_RefTypeSample]") 3D:

<div class="contents" id="bkmrk-candera%3A%3Arendererlis"><div class="contents"><div class="textblock">- [Candera::RendererListener](http://dev.doc.cgistudio.at/APILINK/class_candera_1_1_renderer_listener.html "A RendererListener defines hooks that are called before or after a Node is rendered.") defines hooks that are called before or after a node is rendered. It supports events for OnNodePreRender and OnNodePostRender, so you are informed before and after a node is rendered.
- [Candera::NodeListener](http://dev.doc.cgistudio.at/APILINK/class_candera_1_1_node_listener.html "A NodeListener defines hooks that are called when certain Node functions are triggered, e.g. when a Node's transformation changes. In order to register a NodeListener to a Node simply derive from NodeListener and override pure virtual functions with custom code.") defines hooks that are called when certain node functions are triggered, e.g. when a node's transformation changes.
- [Candera::SceneListener](http://dev.doc.cgistudio.at/APILINK/class_candera_1_1_scene_listener.html "The abstract class SceneListener defines an interface utilized by class Scene to notify listeners on ...") defines hooks that are called on certain scene actions. The listener informs when a scene is activated.
- Candera::AnimationPlayerListener defines several hooks for the AnimationPlayer. It informs about changes of the animation, like when an animation has started, stopped, finished, resumed, paused and when the direction has changed.
- [Candera::CameraListener](http://dev.doc.cgistudio.at/APILINK/class_candera_1_1_camera_listener.html "A CameraListener defines hooks that are called before or after a Camera is rendered. In order to register a CameraListener to a Camera simply derive from CameraListener and override pure virtual functions with custom code.") defines hooks that are called before or after a camera is rendered. It supports events for OnPreRender, OnPostRender, OnProjectionChanged and OnViewChanged.
- [Candera::ProjectionListener](http://dev.doc.cgistudio.at/APILINK/class_candera_1_1_projection_listener.html "A ProjectionListener defines hooks that are called when a projection's parameters are changed...") defines hooks that are called when projection parameters are changed. It supports OnProjectionChanged, which means the camera reacts to changes of the projection matrix associated and updates frustums accordingly.

</div></div></div>In order to register a listener simply derive from the listener class and override pure virtual functions with custom code.

#### <a class="anchor" id="bkmrk--184"></a>Example Listener Implementation

Refer to <span style="color: rgb(230, 126, 35);">[Using Animation Callback Functions](https://doc316en.candera.eu/books/candera/page/using-animation-callback-functions)</span> for an example how to implement and use an Animation listener.