# Build System Setup

This document describes how to create and set up the CGI Studio build environment in order to build following components:  
  
\- Candera including device packages   
\- SCHost.dll to provide SceneComposer with a device-specific dynamic link library   
\- Player demo application including how to add application-specific widgets to SceneComposer.   
\- FeatStd basic functionality library   
\- Courier framework   


Note:  
Host development only, please refer to the device specific documentation for target setup instructions

# Prerequisites

#### <a class="anchor" id="bkmrk-"></a>CMake

In order to build CGI-Studio Applications, the Meta build system CMake needs to be installed with at least version 3.19.0

CMake is able to create the build system for the development IDE of choice, e.g.:

<div class="contents" id="bkmrk-visual-studio-%28multi"><div class="contents"><div class="textblock">- Visual Studio (multiple versions)
- GCC build using GNU make
- Others, like Eclipse
- Custom cross compile tool chain using GNU make
- ...

</div></div></div>#### <a class="anchor" id="bkmrk--0"></a>Build Tool Chain

The build tool chain is not part of CGI-Studio Packages. Specific target compilers, be it for Windows, Linux or any device, need to be properly installed before being able to build applications.   
Before generating output CMake automatically verifies build capabilities by compiling and linking a small sample program with the configured tool chain.

For specific system requirements regarding build tool chain, see also <span style="color:rgb(230,126,35);">[System Requirements and Preparation](https://doc316en.candera.eu/books/getting-started/page/system-requirements-and-preparation)</span> .

#### <a class="anchor" id="bkmrk--1"></a>CMake Usage

<div class="contents" id="bkmrk-point-to-source-dire"><div class="textblock">1. Point to source directory 
    - Folder containing top-level "CMakeLists.txt"
2. Point to binary directory 
    - May not exist, CMake creates folder if necessary
    - Root directory for generated makefiles / solutions
    - Root directory for build artifacts
3. Configure 
    - CMake asks for, sets-up, and validates compilation tool-chain / IDE by compiling and executing a standard program (no execution for X-compilation)
    - CMake processes CMake-files and provides user options
    - Changes are shown in red on CMake GUI
    - Configure again to apply user options or changes
4. Generate 
    - Generates makefiles / solution / projects to binary directory
5. CMake-flags 
    - Check <span style="color:rgb(230,126,35);">[CMake\_Flags](https://doc316en.candera.eu/books/appendix-WCP/chapter/cmake-flags)</span> for a detailed description of the flags

</div></div>

# New CMake environment

The new CMake environment was introduced with CGI Studio 3.14. It has some advantages:

- <span style="font-size:10pt;line-height:1.5;"> it is based on newer CMake versions (CMake 3.19.0 or higher is required): some newer CMake features allow for a much simpler configuration </span>
- <span style="font-size:10pt;line-height:1.5;">cleaner and idiomatic overall implementation: everything is implemented in a way following guide-lines from CMake.org. This makes it also easier to use it, as there is a lot of community documentation available.</span>
- <span style="font-size:10pt;line-height:1.5;">better structure and order of the configuration: with the old system it is often quite difficult to find the correct place where all necessary information is available (such as target or OS information)</span>

<span style="font-size:10pt;line-height:1.5;">The starting point for the applications are new files in the top-level "cmake" folder, you can see a mapping to the old locations in the table below. Please be aware that not all applications and target platform combinations maybe be fully functional yet. The old approach is deprecated but will be still maintained for the next two releases.   
</span>

<table id="bkmrk-old-location-new-loc" style="border-collapse:collapse;width:100%;height:127.6px;"><colgroup><col style="width:50%;"></col><col style="width:50%;"></col></colgroup><tbody><tr style="height:38.2px;"><td style="height:38.2px;">**old location**  
</td><td style="height:38.2px;">**new location**

</td></tr><tr style="height:29.8px;"><td style="height:29.8px;">cgi\_studio\_player/src  
</td><td style="height:29.8px;">cmake/Candera/Player  
</td></tr><tr style="height:29.8px;"><td style="height:29.8px;">cgi\_studio\_player/LightPlayer/src</td><td style="height:29.8px;">cmake/Apps/LightPlayer</td></tr><tr style="height:29.8px;"><td style="height:29.8px;">cgi\_studio\_courier\_apps/src/CourierSampleApp</td><td style="height:29.8px;">cmake/Apps/Courier/CourierSampleApp</td></tr><tr><td>cgi\_studio\_courier\_apps/src/CourierSampleAppLight</td><td>cmake/Apps/Courier/CourierSampleAppLight</td></tr></tbody></table>

<p class="callout info">Features are still named the same and backward compatible.</p>

# Build System Overview

# Features

The build system facilitates CMake capabilities to enable easy creation of customer application builds and to provide centralized build configuration and user settings.

<div class="contents" id="bkmrk-makefile-%2F-solution-"><div class="textblock">- Makefile / solution compilation incl. 3rd party components
- Makefile / solution generation considering dependencies
- Central module naming
- Overridable project and user options (features)
- Overridable build rules (compiler and tool-chain settings)
- System detection (OS, CPU, GPU, Compiler, ...) considering cross compilation
- Collection of available OS and GPU device packs
- Code generation for build-dependent sources (e.g. configuration files)
- Version validation
- CMake Logging and Tracing

</div></div>

# Build System Structure

#### <a class="anchor" id="bkmrk-"></a>CGI-Studio Build System Structure

The build system is a modular environment for CGI-Studio components, automatically detecting [Candera](http://dev.doc.cgistudio.at/APILINK/namespace_candera.html "[DataBinding_RefTypeSample]"), [Courier](http://dev.doc.cgistudio.at/APILINK/namespace_courier.html) and FeatStd libraries to provide easy application inclusion.

<p class="callout warning">This information is outdated with the new cmake environment from CGIStudio 3.14 on</p>

<div class="contents" id="bkmrk-filename%28foldername%29"><div class="textblock"><table border="1" cellpadding="5" cellspacing="0" width="800"><tbody><tr bgcolor="#d4d4d4"><th>**Filename(Foldername)**</th><th>**Description**</th></tr><tr><td>cgistudio\_cmake\_main.cmake</td><td>Entry point, provides common information and constants  
Defines CGI-Studio component "projects"</td></tr><tr><td>cgistudio\_detection\_inc.cmake</td><td>Provides detection facilities for various components</td></tr><tr><td>cgistudio\_cmake\_variables.cmake</td><td>CMake switch management, enables deprecating and overriding of CMake GUI variables</td></tr><tr><td>cgistudio\_build\_rules\_cxx.cmake</td><td>Provides build settings and compiler options</td></tr><tr><td>cgistudio\_version\_check\_inc.cmake</td><td>Provides version check facilities, used by e.g. CgiStudioCanderaConfigVersion</td></tr><tr><td>cgistudio\_pclint\_inc.cmake</td><td>Provides PC-Lint related facilities, incl. PC-Lint related user settings</td></tr></tbody></table>

</div></div>

# Building Candera

# Select Features

<div class="contents" id="bkmrk-cmake-feature-switch"><div class="contents"><div class="textblock"><dl class="warning"><dd><p class="callout warning">CMake feature switches have been renamed for V3.x releases, see <span style="color: rgb(230, 126, 35);">[Change Log](https://doc316en.candera.eu/shelves/6-change-log)</span></p>

</dd></dl></div></div></div>#### <a class="anchor" id="bkmrk-"></a>Select Candera Features

Build settings for the [Candera](http://dev.doc.cgistudio.at/APILINK/namespace_candera.html "[DataBinding_RefTypeSample]") Engine are specified by the following CMake variables:

<div class="contents" id="bkmrk-name-description-pos"><div class="contents"><div class="textblock"><table border="1" cellpadding="5" cellspacing="0" style="border-collapse: collapse; width: 800px; border-width: 1px; border-spacing: 0px;" width="1150"><tbody><tr bgcolor="#d4d4d4"><th style="border-width: 1px; padding: 5px;">**Name**</th><th style="border-width: 1px; padding: 5px;">**Description**</th><th style="border-width: 1px; padding: 5px;">**Possible values**</th></tr><tr><td style="border-width: 1px; padding: 5px;">CANDERA\_2D\_ENABLED</td><td style="border-width: 1px; padding: 5px;">Enables [Candera](http://dev.doc.cgistudio.at/APILINK/namespace_candera.html "[DataBinding_RefTypeSample]") engine's 2D elements.  
If both 2D and 3D are enabled, the solution will contain both CanderaEngine2D and CanderaEngine3D subprojects.</td><td style="border-width: 1px; padding: 5px;">ON/OFF</td></tr><tr><td style="border-width: 1px; padding: 5px;">CANDERA\_LAYOUT\_ENABLED</td><td style="border-width: 1px; padding: 5px;">Enables [Candera](http://dev.doc.cgistudio.at/APILINK/namespace_candera.html "[DataBinding_RefTypeSample]") 2D dynamic layout.  
If disabled, the whole code for dynamic layout is removed.</td><td style="border-width: 1px; padding: 5px;">ON/OFF</td></tr><tr><td style="border-width: 1px; padding: 5px;">CANDERA\_LAYOUT\_CLIPPING\_ENABLED</td><td style="border-width: 1px; padding: 5px;">Enables clipping of [Candera](http://dev.doc.cgistudio.at/APILINK/namespace_candera.html "[DataBinding_RefTypeSample]") 2D dynamic layout.  
If enabled, the render area of a render node is clipped to the layout area.</td><td style="border-width: 1px; padding: 5px;">ON/OFF</td></tr><tr><td style="border-width: 1px; padding: 5px;">CANDERA\_3D\_ENABLED</td><td style="border-width: 1px; padding: 5px;">Enables Cander engine's 3D elements.</td><td style="border-width: 1px; padding: 5px;">ON/OFF</td></tr><tr><td style="border-width: 1px; padding: 5px;">CANDERA\_VRAM\_ALLOCATOR\_CHECK\_ENABLED</td><td style="border-width: 1px; padding: 5px;">  
</td><td style="border-width: 1px; padding: 5px;">ON/OFF</td></tr><tr><td style="border-width: 1px; padding: 5px;">CANDERA\_VRAM\_ALLOCATOR\_STATISTICS\_ENABLED</td><td style="border-width: 1px; padding: 5px;">  
</td><td style="border-width: 1px; padding: 5px;">ON/OFF</td></tr><tr><td style="border-width: 1px; padding: 5px;">CANDERA\_RENDER\_STATE\_CACHING\_ENABLED</td><td style="border-width: 1px; padding: 5px;">Whether or not [Candera](http://dev.doc.cgistudio.at/APILINK/namespace_candera.html "[DataBinding_RefTypeSample]") shall cache render states.   
<dl class="note"><dt></dt><dd><p class="callout info">For SceneComposer builds (on host), render state caching must be disabled.</p>

<p class="callout info">For target builds, take care to enable this feature!</p>

</dd></dl></td><td style="border-width: 1px; padding: 5px;">ON/OFF

</td></tr><tr><td style="border-width: 1px; padding: 5px;">CANDERA\_DETAIL\_STATISTICS\_ENABLED</td><td style="border-width: 1px; padding: 5px;">Whether or not [Candera](http://dev.doc.cgistudio.at/APILINK/namespace_candera.html "[DataBinding_RefTypeSample]") shall keep statistics about render state cache hits and misses.   
<dl class="note"><dt></dt><dd><p class="callout info">This works only if CANDERA\_RENDER\_STATE\_CACHING\_ENABLED is enabled.</p>

<p class="callout info">For target builds, disable because of the added overhead!</p>

</dd></dl></td><td style="border-width: 1px; padding: 5px;">ON/OFF

</td></tr><tr><td style="border-width: 1px; padding: 5px;">CANDERA\_GLOBALIZATION\_ENABLED</td><td style="border-width: 1px; padding: 5px;">Whether or not [Candera](http://dev.doc.cgistudio.at/APILINK/namespace_candera.html "[DataBinding_RefTypeSample]") Globalization library shall be built.

<dl class="note"><dt></dt><dd><p class="callout info">[Candera](http://dev.doc.cgistudio.at/APILINK/namespace_candera.html "[DataBinding_RefTypeSample]") Globalization is an optional module only available upon special request.</p>

</dd></dl></td><td style="border-width: 1px; padding: 5px;">ON/OFF</td></tr><tr><td style="border-width: 1px; padding: 5px;">CANDERA\_ASSET\_DECOMPRESSION\_ENABLED</td><td style="border-width: 1px; padding: 5px;">This option is required to decompress asset data if it was compressed with CGI Studio Asset Library Shaper previously. <dl class="note"><dt>  
</dt><dd><p class="callout info">Enabling this feature will automatically add ZLib to the project.</p>

</dd></dl></td><td style="border-width: 1px; padding: 5px;">ON/OFF</td></tr><tr><td style="border-width: 1px; padding: 5px;">CANDERA\_TEXT\_SHAPER</td><td style="border-width: 1px; padding: 5px;">Allows the selection of a text shaper.   
A text shaper resolves certain text features like text direction, context specific substitutions and ligatures.  
Options:

- **HarfBuzz (Default)(Optional)**: Unidirectional text. Unicode defined substitutions. Unicode defined ligature, GSUB and GPOS lookup. <dl class="note"><dt></dt><dd><p class="callout info">HarfBuzz shaping is an optional module only available upon special request. Upon failure to detect the HarfBuzz source location, CMake will display "ComplexScripLib" as default textshaping option.</p>
    
    </dd></dl>
- **ComplexScriptLib**: Bidirectional text. Arabic context substitutions. Forced Unicode defined ligatures.
- **NoShaping**: Disables shaping. Text will be displayed left to right. No substitutions or ligatures are resolved.

</td><td style="border-width: 1px; padding: 5px;">NoShaping  
ComplexScriptLib  
Harfbuzz - *Default*  
  
</td></tr><tr><td style="border-width: 1px; padding: 5px;">CANDERA\_BIDIRECTIONAL\_TEXT\_ENABLED</td><td style="border-width: 1px; padding: 5px;">Allows enabling of bidirectional text parsing.   
This is needed when combining text written left to right with text written right to left.   
If the text shaper supports bidirectional text this option is required when using multi-font text styles.</td><td style="border-width: 1px; padding: 5px;">ON/OFF

</td></tr><tr><td style="border-width: 1px; padding: 5px;">CANDERA\_TEXTENGINE\_NATIVE\_LINEHEIGHT\_ENABLED</td><td style="border-width: 1px; padding: 5px;">Whether or not the native line height metrics of the font engine is used.   
If disabled then 120% of EM size is applied as line height which is compatible with Adobe.</td><td style="border-width: 1px; padding: 5px;">ON/OFF</td></tr><tr><td style="border-width: 1px; padding: 5px;">CANDERA\_ASSETLOADER\_MEMORYPOOL\_ENABLED</td><td style="border-width: 1px; padding: 5px;">Enables the use of the Memory Pool feature in [Candera](http://dev.doc.cgistudio.at/APILINK/namespace_candera.html "[DataBinding_RefTypeSample]") AssetLoader.  
<dl class="note"><dt></dt><dd>Requires the MemoryPool feature. <p class="callout info">Only available if FEATSTD\_MEMORYPOOL\_ENABLED is ON.</p>

</dd></dl></td><td style="border-width: 1px; padding: 5px;">ON/OFF</td></tr><tr><td style="border-width: 1px; padding: 5px;">CANDERA\_TEXTENGINE\_MEMORYPOOL\_ENABLED</td><td style="border-width: 1px; padding: 5px;">Enables the use of the Memory Pool feature in [Candera](http://dev.doc.cgistudio.at/APILINK/namespace_candera.html "[DataBinding_RefTypeSample]") TextEngine.  
<dl class="note"><dt></dt><dd>Requires the MemoryPool feature.</dd><dd><p class="callout info">Only available if FEATSTD\_MEMORYPOOL\_ENABLED is ON.</p>

</dd></dl></td><td style="border-width: 1px; padding: 5px;">ON/OFF</td></tr><tr><td style="border-width: 1px; padding: 5px;">CANDERA\_ASSET\_LIBRARYHEADER\_CACHE\_ENABLED</td><td style="border-width: 1px; padding: 5px;">Optional feature which will cache all Asset-Library-Header that have been loaded and cached upon Asset initialization.  
<dl class="note"><dt></dt><dd>If dynamic Asset-Partitions are being used, caching will occur when a partition is added, and will continue until it is removed. <p class="callout info">The cache will use the standard Asset Cache memory.</p>

</dd></dl></td><td style="border-width: 1px; padding: 5px;">ON/OFF</td></tr></tbody></table>

</div></div></div>#### <a class="anchor" id="bkmrk--0"></a>Select FeatStd Features

For information about FeastStd features, please refer to <span style="color: rgb(230, 126, 35);">[FeatStd &gt; FeatStd Features](https://doc316en.candera.eu/books/featstd/page/featstd-features "FeatStd Features")</span>.

# 3rd Party Software: FreeType2 Configuration

3<sup>rd</sup> party software FreeType2 is used by the [Candera](http://dev.doc.cgistudio.at/APILINK/namespace_candera.html "[DataBinding_RefTypeSample]") Engine and can be configured in CMake like this:

<div class="contents" id="bkmrk-name-description-pos"><div class="textblock"><table border="1" cellpadding="5" cellspacing="0" width="800"><tbody><tr bgcolor="#d4d4d4"><th>**Name**</th><th>**Description**</th><th>**Possible values**</th></tr><tr><td>FREETYPE2\_CUSTOMIZE</td><td>Enable or disable FreeType2 customization.</td><td>ON/OFF</td></tr><tr><td>FREETYPE2\_FORCE\_DEFAULT\_CONFIG</td><td>Set all Freetype2 configuration flags such that the outcome is equivalent to using the "freetype/include/config/" files.</td><td>ON/OFF</td></tr><tr><td>FREETYPE2\_FORCE\_CANDERA\_CONFIG</td><td>Set all Freetype2 configuration flags such that the outcome is equivalent to using "Candera/TextEngine/FreeType/FtCda\*.h" files.</td><td>ON/OFF</td></tr><tr><td>FREETYPE2\_FORCE\_EMPTY\_CONFIG</td><td>Clears all Freetype2 configuration flags.</td><td>ON/OFF</td></tr><tr><td>FREETYPE2\_FORCE\_LIGHT\_CONFIG</td><td>Set all Freetype2 configuration flags to a minimal setting that provides support for using TrueType fonts and anti-aliased rendering with a minimal code size.</td><td>ON/OFF</td></tr></tbody></table>

  
</div></div><div class="contents" id="bkmrk-the-%22light%22-configur"><div class="textblock"><dl class="note"><dd></dd><dd><p class="callout info">The "light" configuration (FREETYPE2\_FORCE\_LIGHT\_CONFIG) does not support rendering of Opentype fonts. However, a rather minimal configuration with Opentype support is possible by enabling the following flags on top of the "light" configuration:  
 FREETYPE2\_MODLOAD\_DRIVER\_CFF  
 FREETYPE2\_MODLOAD\_MODULE\_PSAUX  
 FREETYPE2\_MODLOAD\_MODULE\_PSHINTER  
 FREETYPE2\_MODLOAD\_MODULE\_PSNAMES  
 FREETYPE2\_OPT\_FT\_CONFIG\_OPTION\_POSTSCRIPT\_NAMES  
 FREETYPE2\_OPT\_TT\_CONFIG\_OPTION\_POSTSCRIPT\_NAMES The exact features are font specific. The fastest way to evaluate the minimal module set requirements for a font is to get in contact with the font designer.</p>

</dd></dl></div></div>

# Candera Device Packages

#### <a class="anchor" id="bkmrk--1"></a>Supported Device Packages

[Candera](http://dev.doc.cgistudio.at/APILINK/namespace_candera.html "[DataBinding_RefTypeSample]") provides device implementations for following device types:

<div class="contents" id="bkmrk-name-description-pos"><div class="contents"><div class="textblock"><table border="1" cellpadding="5" cellspacing="0" style="border-collapse: collapse; width: 800px; height: 59.5938px; border-width: 1px; border-spacing: 0px;" width="900"><tbody><tr bgcolor="#d4d4d4" style="height: 29.7969px;"><th style="height: 29.7969px; border-width: 1px; padding: 5px;">**Name**</th><th style="height: 29.7969px; border-width: 1px; padding: 5px;">**Description**</th><th style="height: 29.7969px; border-width: 1px; padding: 5px;">**Possible values**</th></tr><tr style="height: 29.7969px;"><td style="height: 29.7969px; border-width: 1px; padding: 5px;">Other proprietary devices</td><td style="height: 29.7969px; border-width: 1px; padding: 5px;">Can be provided upon special request</td><td style="height: 29.7969px; border-width: 1px; padding: 5px;">ON/OFF</td></tr></tbody></table>

</div></div></div><div class="contents" id="bkmrk--0"><div class="contents"><div class="textblock">---

</div></div></div>#### <a class="anchor" id="bkmrk--2"></a>Device-Specific CMake Settings

<div class="contents" id="bkmrk-name-description-pos-0"><div class="contents"><div class="textblock"><table border="1" cellpadding="5" cellspacing="0" style="border-collapse: collapse; width: 800px; height: 369.14px; border-width: 1px; border-spacing: 0px;" width="900"><tbody><tr bgcolor="#d4d4d4" style="height: 29.7969px;"><th style="height: 29.7969px; border-width: 1px; padding: 5px;">**Name**</th><th style="height: 29.7969px; border-width: 1px; padding: 5px;">**Description**</th><th style="height: 29.7969px; border-width: 1px; padding: 5px;">**Possible values**</th></tr><tr style="height: 102.578px;"><td style="height: 102.578px; border-width: 1px; padding: 5px;">CGIDEVICE\_NAME</td><td style="height: 102.578px; border-width: 1px; padding: 5px;">The name of the device package</td><td style="height: 102.578px; border-width: 1px; padding: 5px;">Each device package following the [Candera](http://dev.doc.cgistudio.at/APILINK/namespace_candera.html "[DataBinding_RefTypeSample]") device CMake rules provided in the folder &lt;CANDERA\_SRC&gt;/CanderaPlatform/Device</td></tr><tr style="height: 29.7969px;"><td style="height: 29.7969px; border-width: 1px; padding: 5px;">CGIDEVICE\_TARGET\_BUILD</td><td style="height: 29.7969px; border-width: 1px; padding: 5px;">Enable or disable building for target</td><td style="height: 29.7969px; border-width: 1px; padding: 5px;">ON/OFF</td></tr><tr style="height: 80.1875px;"><td style="height: 80.1875px; border-width: 1px; padding: 5px;">CGISTUDIO\_PATH\_3RD\_PARTY</td><td style="height: 80.1875px; border-width: 1px; padding: 5px;">Path to the 3rd party repository location</td><td style="height: 80.1875px; border-width: 1px; padding: 5px;">A string value containing the system file location of 3rd party software, auto-detected by finding possible locations of the name "\[ic01\_\]cgi\_studio\_3psw"</td></tr><tr style="height: 63.3906px;"><td style="height: 63.3906px; border-width: 1px; padding: 5px;">CGIDEVICE\_TARGET\_  
&lt;CGIDEVICE\_NAME&gt;  
\_DRIVER\_PATH\_INCLUDE</td><td style="height: 63.3906px; border-width: 1px; padding: 5px;">If you don't use the default driver path, the path to the driver include directory can be changed with this setting.</td><td style="height: 63.3906px; border-width: 1px; padding: 5px;">Path to driver include directory (by default set to include directory in 3rd party repository)</td></tr><tr style="height: 63.3906px;"><td style="height: 63.3906px; border-width: 1px; padding: 5px;">CGIDEVICE\_TARGET\_  
&lt;CGIDEVICE\_NAME&gt;  
\_DRIVER\_PATH\_LIB</td><td style="height: 63.3906px; border-width: 1px; padding: 5px;">If you don't use the default driver path, the path to the driver library directory can be changed with this setting.</td><td style="height: 63.3906px; border-width: 1px; padding: 5px;">Path to driver library directory (by default set to library directory in 3rd party repository)</td></tr></tbody></table>

</div></div></div>  
To build a certain device package selected it from the drop-down list of the CMake property **"CGIDEVICE\_NAME"**:

For each device package, either building OpenGL based host simulation or target binaries can be selected via the Boolean CMake property ***"CGIDEVICE\_TARGET\_BUILD"***.

The following table illustrates configurations available for the supported device package:

<div class="contents" id="bkmrk-cgidevice_name-cgide"><div class="contents"><div class="textblock"><table border="1" cellpadding="5" cellspacing="0" style="border-collapse: collapse; width: 800px; border-width: 1px; border-spacing: 0px;" width="900"><tbody><tr bgcolor="#d4d4d4"><th style="border-width: 1px; padding: 5px;">CGIDEVICE\_NAME</th><th style="border-width: 1px; padding: 5px;">CGIDEVICE\_TARGET\_BUILD</th><th style="border-width: 1px; padding: 5px;">PUB\_CGI\_CPU</th><th style="border-width: 1px; padding: 5px;">PUB\_CGI\_OS</th><th style="border-width: 1px; padding: 5px;">Default driver path following  
&lt;CGISTUDIO\_PATH\_3RD\_PARTY&gt;  
/\[src/lib\]/</th></tr></tbody></table>

</div></div></div>The CMake properties "PUB\_CGI\_CPU", "PUB\_CGI\_OS" usually cannot be configured via the CMake user interface, but are autonomously detected by  
the build system. The same applies for the variable "PUB\_CGI\_COMPILER".

If you don't use the CGI Studio 3rd party software folder structure, the driver paths can be specified in the variables

<div class="contents" id="bkmrk-cgidevice_target_%3Ccg"><div class="contents"><div class="textblock">- CGIDEVICE\_TARGET\_&lt;CGIDEVICE\_NAME&gt;\_DRIVER\_PATH\_INCLUDE and
- CGIDEVICE\_TARGET\_&lt;CGIDEVICE\_NAME &gt;\_DRIVER\_PATH\_LIB

</div></div></div>Depending on these properties, either MS Visual Studio solutions or Unix makefiles will be generated into the specified build  
directory.

# Integrate Candera into Custom Build Environments

#### <a class="anchor" id="bkmrk--1"></a>Integrate Candera into Custom Build Environments

For building [Candera](http://dev.doc.cgistudio.at/APILINK/namespace_candera.html "[DataBinding_RefTypeSample]") as part of the Player demo application, please refer to <span style="color: rgb(230, 126, 35);">[Building the Player](https://doc316en.candera.eu/books/build-system-setup/chapter/building-player-widgets-and-schost)</span>.

If a custom application should include [Candera](http://dev.doc.cgistudio.at/APILINK/namespace_candera.html "[DataBinding_RefTypeSample]") libraries, this chapter explains the CGI-Studio library build process. To simplify integration of [Candera](http://dev.doc.cgistudio.at/APILINK/namespace_candera.html "[DataBinding_RefTypeSample]") source code into a custom build environment references to [Candera](http://dev.doc.cgistudio.at/APILINK/namespace_candera.html "[DataBinding_RefTypeSample]") compile switches are given below.

<div class="contents" id="bkmrk-"><div class="contents"><div class="textblock">---

</div></div></div>#### <a class="anchor" id="bkmrk--2"></a>Build Cgi-Studio Candera libraries with CMake

Use CMake to create a Visual Studio solution for host or any other build environment (like make files for targets) and build [Candera](http://dev.doc.cgistudio.at/APILINK/namespace_candera.html "[DataBinding_RefTypeSample]") libraries.

<div class="contents" id="bkmrk-start-cmake-point-%22w"><div class="contents"><div class="textblock">1. Start CMake
2. Point "Where is the source code" to *&lt;cgi-studio-root&gt;/cgi\_studio\_candera/src*
3. Point "Where to build the binaries" to *&lt;cgi-studio-root&gt;/cgi\_studio\_candera/build*. Note that the name of the build directory can be freely chosen but it is required to create it on the same directory level as "src". Avoid blanks in the path
4. Click "Configure" and select the proper generator for the desired build environment.   
    &gt; As an example, for host builds using Visual Studio 2010, select "Visual Studio 10".   
    &gt; For target builds, please refer to the given target-specific setup documentation part of CGI Studio releases.
5. Confirm the dialog with OK. All [Candera](http://dev.doc.cgistudio.at/APILINK/namespace_candera.html "[DataBinding_RefTypeSample]") CMake settings which can be configured will appear in the main window, having red lines for all settings to be confirmed.
6. Check and modify the [Candera](http://dev.doc.cgistudio.at/APILINK/namespace_candera.html "[DataBinding_RefTypeSample]") CMake properties and click "Configure" again
7. As long as red lines are visible, those lines must be confirmed by clicking "Configure" again.
8. If no more red lines are visible, the "Generate" button is enabled. Click "Generate" to create the Visual Studio solution (or the make files for make-based build environments).

</div></div></div>Build [Candera](http://dev.doc.cgistudio.at/APILINK/namespace_candera.html "[DataBinding_RefTypeSample]") with the CMake-generated build environment (Visual Studio solution for host, e.g.).

<p class="callout info">Candera libraries will be available in the separate folders in the given build directory.  
To collect all of the libraries in a specific folder, an output path can be specified during CMake configuration:  
 - Tick the "Advanced" checkbox in the CMake GUI.  
 - After pressing "Configure", the CMake property "CANDERA\_ENABLE\_LIBRARY\_OUTPUT" will become visible. Tick this and press "Configure" again.  
 - Specify the library output directory in the "LIBRARY\_OUTPUT\_PATH" CMake variable.</p>

<div class="contents" id="bkmrk--0"><div class="contents"><div class="textblock"><dl class="note"><dd></dd></dl>---

</div></div></div>#### <a class="anchor" id="bkmrk--3"></a>Integrate Candera Source Code (Compile Switches)

When [Candera](http://dev.doc.cgistudio.at/APILINK/namespace_candera.html "[DataBinding_RefTypeSample]") source code is built using [Candera](http://dev.doc.cgistudio.at/APILINK/namespace_candera.html "[DataBinding_RefTypeSample]") CMake configuration, all relevant compile switches (defines) are already set by CMake. The template CanderaConfig.h.template (refer to *&lt;cgi\_studio\_root&gt;/cgi\_studio\_candera/cmake/templates*) is used by CMake to generate the file CanderaConfig.h in the build directory.

If [Candera](http://dev.doc.cgistudio.at/APILINK/namespace_candera.html "[DataBinding_RefTypeSample]") source code is built using a custom build environment, learn about all configuration defines available for [Candera](http://dev.doc.cgistudio.at/APILINK/namespace_candera.html "[DataBinding_RefTypeSample]") in the [Candera](http://dev.doc.cgistudio.at/APILINK/namespace_candera.html "[DataBinding_RefTypeSample]") API Documentation:

<div class="contents" id="bkmrk-candera_api_document"><div class="textblock">- [CANDERA\_API\_DOCUMENTATION/CANDERA GRAPHIC ENGINE/CANDERA CONFIGURATION](http://dev.doc.cgistudio.at/APILINK/group___config.html)

</div></div>

# Building Player, Widgets, and SCHost

# Introduction

CGI Studio provides an integrated development environment based on Visual Studio for widget and application layer development, located at:

<div class="contents" id="bkmrk-%3Ccgi-studio-root%3E%2Fcg"><div class="contents"><div class="textblock">- &lt;cgi-studio-root&gt;/cgi\_studio\_player

</div></div></div>In the cgi\_studio\_player directory, 4 different projects are defined:

<div class="contents" id="bkmrk-cgi-panel-a-graphica"><div class="contents"><div class="textblock">- **CGI Panel**
    - A graphical user interface which controls the flow of the Player
    - C# Application with predefined controlling interface towards the Player
- **Player**
    - The application layer (C++) links [Candera](http://dev.doc.cgistudio.at/APILINK/namespace_candera.html "[DataBinding_RefTypeSample]"), demo application and Widgets as an executable for host system
    - Player depends on CGI Panel, hence it refers to CGI Panel as "debug" application and stores its output near CgiPanel.exe in order to enable CgiPanel.exe to execute it.
- **Behaviors\_Examples**
    - The concrete behavior set implementation (C++)
    - Based on [Candera](http://dev.doc.cgistudio.at/APILINK/namespace_candera.html "[DataBinding_RefTypeSample]") and compiled as a static library
- **SCHost**
    - Makes SceneComposer aware of [Candera](http://dev.doc.cgistudio.at/APILINK/namespace_candera.html "[DataBinding_RefTypeSample]") including the [Candera](http://dev.doc.cgistudio.at/APILINK/namespace_candera.html "[DataBinding_RefTypeSample]") Device used in the solution, and widgets
    - Compiled as an dll and loaded by SceneComposer
    - Output dll is placed directly into SceneComposer installation directory to avoid manual copying.

</div></div></div>The following pages explain how to build these components.

# Building CGI Panel

The CGI Panel is a C# project which provides a graphical interface which supports the control of scenes and animations by managing the flow of the Player.

#### <a class="anchor" id="bkmrk--1"></a>Building CGI Panel

Usually there is no need to build the CGI Panel on your own, since the executable is already provided for the Player build environment - refer to either:

<div class="contents" id="bkmrk-%3Ccgi_studio_root%3E%2Fbi"><div class="contents"><div class="textblock">- *&lt;cgi\_studio\_root&gt;/bin/Player/CGIPanel.exe or*
- *&lt;cgi\_studio\_root&gt;/bin/LightPlayer/Win32/CGIPanel.exe.*

</div></div></div>#### <a class="anchor" id="bkmrk--2"></a>Building CGI Panel

For building a new CGI Panel, refer to the following steps:

<div class="contents" id="bkmrk-start-visual-studio-"><div class="contents"><div class="textblock">1. Start Visual Studio 2017 or higher and load solution *&lt;cgi-studio-root&gt;/cgi\_studio\_player/src/CGIPanel/CGIPlayer.sln*.
2. Build the project and then press F5 to start the CGI Panel in Debug Mode.

</div></div></div>This solution allows the customer to extend the windows UI control of the Player.

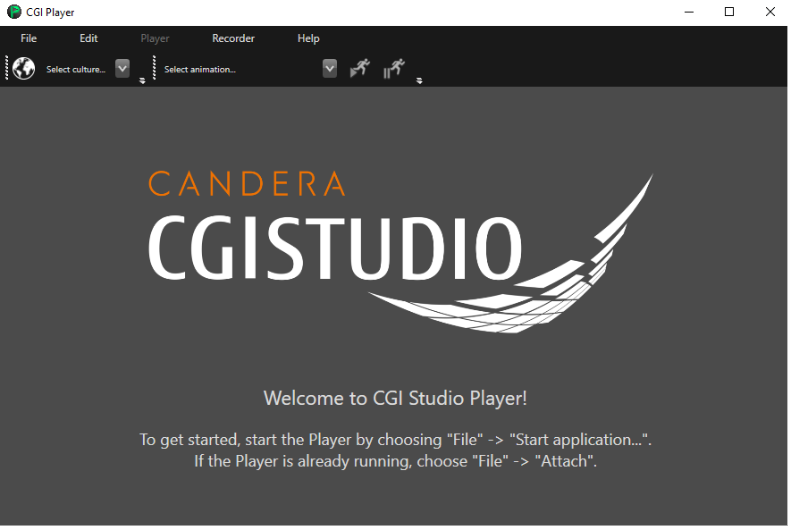
Actually, the C# Panel is responsible for providing the following Player control panel:

<div drawio-diagram="1959"><img src="https://doc316en.candera.eu/uploads/images/drawio/2023-02/drawing-4-1676872050.png" alt=""/></div>

<div class="contents" id="bkmrk--0"><div class="contents"><div class="textblock">  
</div></div></div>For additional information regarding CGI Panel User Interface please take a look at <span style="color: rgb(230, 126, 35);">[CGI Panel User Interface - Overview](https://doc316en.candera.eu/books/player/page/overview)</span>.

Upon opening a specific asset library, the CGI Panel will attach to a Player for asset loading and content display. The next section explains how to create the application.

# Building Player and Widgets

#### <a class="anchor" id="bkmrk--1"></a>Building Player and Widgets

The Player executable used by CGI Panel collects following components:

<div class="contents" id="bkmrk-candera-engine-inclu"><div class="contents"><div class="textblock">- [Candera](http://dev.doc.cgistudio.at/APILINK/namespace_candera.html "[DataBinding_RefTypeSample]") Engine including [Candera](http://dev.doc.cgistudio.at/APILINK/namespace_candera.html "[DataBinding_RefTypeSample]") Device Platform
- Player as a demo application for loading assets and displaying / manipulating content: *&lt;cgi\_studio\_root&gt;/cgi\_studio\_player/src/Player*.

</div></div></div>Build output will be named according to the [Candera](http://dev.doc.cgistudio.at/APILINK/namespace_candera.html "[DataBinding_RefTypeSample]") device platform configuration.

For example if you build for your device on host simulation, the following executable will be created:

<div class="contents" id="bkmrk-%3Ccgi_studio_root%3E%2Fbi"><div class="contents"><div class="contents"><div class="textblock">- *&lt;cgi\_studio\_root&gt;/bin/Player/device/\[your device\]/**Player.exe***.

</div></div></div></div><div class="contents" id="bkmrk-"><div class="contents"><div class="textblock">---

</div></div></div>#### <a class="anchor" id="bkmrk--2"></a>Load Assets in Player

After starting CGIPanel.exe from this location, you will be able to load assets generated for host simulation with the Player. For building the Player, refer to following steps:

<div class="contents" id="bkmrk-setup-visual-studio-"><div class="contents"><div class="textblock">1. Setup Visual Studio Solution "Player.sln" 
    - Start CMake
    - Point "Where is the source code" to *&lt;cgi-studio-root&gt;/cmake/Candera/Player.*
    - Point "Where to build the binaries" to *&lt;cgi-studio-root&gt;/cgi\_studio\_player/build*. Avoid blanks in the path.
    - Click "Configure", select "Visual Studio 15" and specify "x64" as optional platform for generator. Confirm the dialog with OK. Some lines in the main area appears
    - Set "COURIER\_PLATFORM" to the Device Package you want to use - e.g. "iMX6Platform"
    - Set "COURIER\_PLATFORM\_CONFIG" to build for host environment (default)
    - Set "CGIAPP\_PLAYER\_DEBUG\_PATH" to the location, where the debug version of CGIPanel.exe resides (per default initialized to the path *&lt;cgi-studio-root&gt;bin/Player/CGIPanel.exe*).
    - Set "CGIAPP\_PLAYER\_RELEASE\_PATH" to the location, where the release version of CGIPanel.exe resides (per default initialized to the path *&lt;cgi-studio-root&gt;bin/Player/CGIPanel.exe*).
    - Set "CGIAPP\_SCENE\_COMPOSER\_PATH" to *&lt;cgi-studio-root&gt;/bin/SceneComposer/*. This is the location where SCHost.dll will be copied after building.
    - Click "Configure" again
    - Click "Generate", the solution is generated
2. Start Visual Studio 2015 C++ and load generated solution from *&lt;cgi-studio-root&gt;/cgi\_studio\_player/build/Player.sln*.
3. Set Project "Player" as startup project in VS
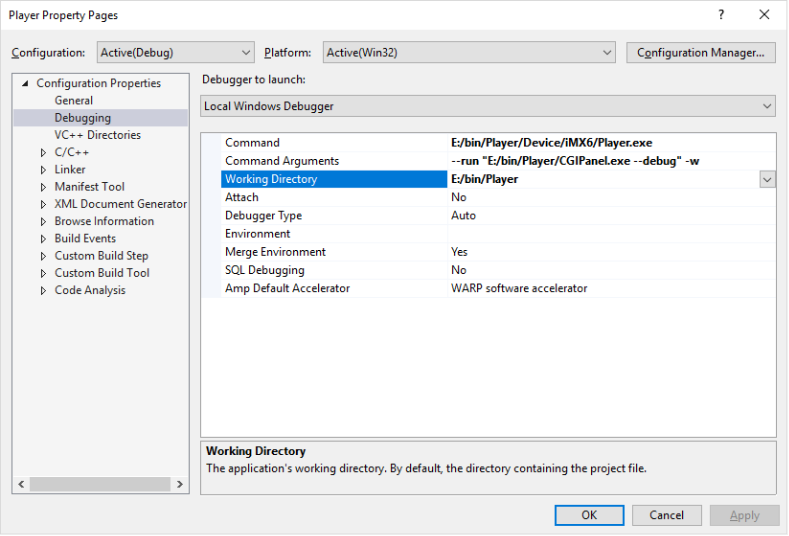
4. Following project properties of project "Player" will be preconfigured by CMake, hence usually there is no need to adjust this manually: 
    - Configuration Properties/Debugging/Command pointed to *&lt;cgi-studio-root&gt;/bin/Player/Device/&lt;DeviceName&gt;/Player.exe*
    - Configuration Properties/Debugging/Command Arguments pointed to *--run "&lt;cgi-studio-root&gt;/bin/Player/CGIPanel.exe --debug" -w*
    - Configuration Properties/Debugging/Working Directory pointed to *&lt;cgi-studio-root&gt;bin/Player*
5. In Player solution, press F5 to execute the application. After Player is started, load an asset generated by SceneComposer for the proper device platform to see if the build is working. <dl class="note"><dt></dt></dl>

</div></div></div><div class="contents" id="bkmrk--0"><div class="textblock">  
</div></div><p class="callout info">If CGIPanel pops up but the asset content is not shown use the File-&gt;Attach menu to connect the panel to the Player.   
</p>

# Activating Additional Behaviors for Player

To include the behaviors part of CGI Studio in the Player, simple enable the CMake option **CGIAPP\_ENABLE\_ADDITIONAL\_BEHAVIORS** before generating the CGI Application solution with CMake.

The CMake option **CGIAPP\_ADDITIONAL\_BEHAVIOR\_PATH** is already preconfigured to include widgets part of *&lt;cgi-studio-root&gt;/cgi\_studio\_player/src/Behaviors/AdditionalBehaviorsPaths.txt*.

<div drawio-diagram="1960"><img src="https://doc316en.candera.eu/uploads/images/drawio/2023-02/drawing-4-1676872260.png" alt=""/></div>

<div class="contents" id="bkmrk--0"><div class="contents"><div class="textblock">  
</div></div></div>Following projects will be created in the solution with above cmake configuration:

<div class="contents" id="bkmrk-behaviorset-for-comp"><div class="textblock">- **BehaviorSet** for compiling WidgetSet.cpp
- **Behaviors\_Example** for compiling example behaviors defined at *&lt;cgi\_studio\_root&gt;/cgi\_studio\_player/src/Behaviors*
- **ControlBehaviors\_1** for compiling behaviors defined at *&lt;cgi\_studio\_root&gt;/cgi\_studio\_controls/src/Behaviors*

</div></div>

# Building SCHost for SceneComposer

To make the same set of widgets available for SceneComposer, as they are for the Player, a new SCHost.dll needs to be created and deployed to SceneComposer.

<div class="contents" id="bkmrk-enable-courier_add_s"><div class="contents"><div class="contents"><div class="textblock"><dl class="note"><dd><p class="callout info">Enable COURIER\_ADD\_SCHOST\_PROJECT in the CMake project in order to add the SCHost project to the Player solution.</p>

</dd></dl></div></div></div></div>That's the reason why the **SCHostDll** project is part of the C++ Player.sln, because this way the widget set configuration for the Player is identical to the one for SCHost.dll .

However, in difference to the Player, SceneComposer requires a specific set of [Candera](http://dev.doc.cgistudio.at/APILINK/namespace_candera.html "[DataBinding_RefTypeSample]") static libraries to link together with the widgets part of the solution. These specific libraries are created as part of the compilation process and collected into a library names **SCHostLib.lib**. The corresponding Visual Studio project is named **SCHostLib**.  
When the SCHostDll project is built, **SCHostLib.lib** will be linked together with the widgets and the [Candera](http://dev.doc.cgistudio.at/APILINK/namespace_candera.html "[DataBinding_RefTypeSample]") Device lib part of the solution into the **SCHostDll.dll** library.

To automatically copy the generated **SCHostDll.dll** to your SceneComposer executable location as **SCHost.dll** after the build, take care to set the following CMake variable:

<div class="contents" id="bkmrk-%22cgiapp_scene_compos"><div class="contents"><div class="textblock">- Make sure to select "x64" as optional platform for generator during CMake configuration for Visual Studio versions lower than Visual Studio 2019 (version 16) in order to build with 64-bit compiler. Building SCHost.dll with 32-bit will result in an CMake error *"<span class="line ansi-color">SCHost.dll will not work in 32-bit mode, please use CMake with </span><span class="line ansi-color">a 64-bit platform"</span>*
- "CGIAPP\_SCENE\_COMPOSER\_PATH" to *&lt;SC-Install-Dir&gt;/SceneComposer/* .

- Close SceneComposer before building SCHost.dll, otherwise SCHost.dll cannot be copied to the SceneComposer location.
- SCHost.dll will contain exactly the [Candera](http://dev.doc.cgistudio.at/APILINK/namespace_candera.html "[DataBinding_RefTypeSample]") Device which is selected in CMake during Player solution generation.

</div></div></div><div class="contents" id="bkmrk-for-using-several-pl"><div class="contents"><div class="textblock"><dl class="note"><dd><p class="callout info">For using several platforms alternatively, it is also possible to specify the name of the SCHost dynamic link library as command line argument to SceneComposer. Example: "SceneComposer /schost device\\iMX6\\SCHost.dll"</p>

</dd></dl></div></div></div>#### <a class="anchor" id="bkmrk-"></a>SCHost and Memory Pools

As memory pools are introduced in FeatStd V1.2.0 resp. V1.1.0.3, and an SCHost build using this feature is not binary compatible to a build not using memory pools, a new restriction is added for building SCHost.dll:

<div class="contents" id="bkmrk-in-the-solution-for-"><div class="contents"><div class="textblock">- In the solution for building SCHost.dll, the feature FEATSTD\_MEMORYPOOL\_ENABLED must not be set!

</div></div></div>As a consequence, the build system for cgi\_studio\_dev will not add the SCHost project when Memory Pools are enabled.

<div class="contents" id="bkmrk-disable-featstd_memo"><div class="textblock">- Disable FEATSTD\_MEMORYPOOL\_ENABLED to integrate your widgets to SceneComposer
- Enabled FEATSTD\_MEMORYPOOL\_ENABLED to integrate and test memory pool configurations on host simulation as preparation for the target

</div></div>

# Customizing Widgetset Generation

#### <a class="anchor" id="bkmrk--1"></a>Customizing Widgetset Generation

For adding your own behaviors and widgets to the default widget set, it is required to specify them in the widget set definition (WidgetSet.cpp), which is finally accessed by SceneComposer to provide all exported behaviors and widgets in the user interface.

The [Candera](http://dev.doc.cgistudio.at/APILINK/namespace_candera.html "[DataBinding_RefTypeSample]") CMake build system automatically generates this widget set definition (WidgetSet.cpp), so it is only required to provide behavior and widget implementations at any location and to specify this additional behavior and widget location for CMake.

This chapter explains how the widget set generation works.

<div class="contents" id="bkmrk-"><div class="contents"><div class="textblock">---

</div></div></div>#### <a class="anchor" id="bkmrk--2"></a>Specifying Widget Set (WidgetSet.cpp)

The main widget set is a project to generate a library containing definitions for all behaviors and widgets to be used. Behavior and widget implementations can be part of other libraries which of course also need to be linked together with the widget set definition.

Refer to the CMake configuration of the Player demo widget set:

<div class="contents" id="bkmrk-%5Bcgi-studio-root%5D%2Fcg"><div class="contents"><div class="textblock">- *\[CGI-Studio-Root\]/cgi\_studio\_player/src/Behaviors/CMakeLists.txt* Following configurations are important:
- The WidgetSet project source path must point to "${PRV\_CGI\_GENERATED\_CANDERA\_DIR}/WidgetSet.cpp". This file will be generated by CMake including all widget implementations. No other files are required as they are added to a separate project.
- CMake macro CgiAddWidgetSet must be called to register the WidgetSet project. There is no need to call CgiCollectListedFiles as the project should only contain "WidgetSet.cpp".
- Take care to include the CMake file "${FeatStd\_DIR}/cmake/cgistudio/cgistudio\_widgetset\_generator.cmake". For the Player Widgets, this is already done in *&lt;cgi-studio-root&gt;/cgi\_studio\_player/src/Behaviors/CMakeLists.txt*.
- CgiFetchHeaderFiles must be called to register the default widgets project. It has two parameters, the project name and the variable containing the include paths.
- CgiCreateWidgetSet must be called to generated the WidgetSet.cpp file. It has one parameter containing the CdaDescription which is written to the file.

</div></div></div>Refer to the following example from the Player behaviors:

```
# Declare widget set class files
set(WidgetSet_SRC
    ${PRV_CGI_GENERATED_CANDERA_DIR}/WidgetSet.cpp
)
source_group("WidgetSet" FILES ${WidgetSet_SRC})

# Declare behavior set class files
set(BehaviorSet_SRC
    ${PRV_CGI_GENERATED_CANDERA_DIR}/WidgetSet.cpp
)
source_group("BehaviorSet" FILES ${BehaviorSet_SRC})


# Register widget set
CgiAddWidgetSet(PRV_WIDGET_TARGET_NAME_WIDGETSET WidgetsSet ${WidgetSet_SRC})

# Register behavior set
CgiAddWidgetSet(PRV_WIDGET_TARGET_NAME_WIDGETSET BehaviorSet ${BehaviorSet_SRC})


# Declare default widget directories (include here all your subdirectories 
# containing behavior and/or widget implementations
include(${CGISTUDIO_BEHAVIORSET_CMAKE_INCLUDE})
if (CGIAPP_ENABLE_ADDITIONAL_WIDGETS)
    if ((EXISTS "${CGIAPP_ADDITIONAL_WIDGET_PATH}"))
        CgiAddAdditionalWidgets(${CGIAPP_ADDITIONAL_WIDGET_PATH} "Widgets_CgiStudioWidgetsLib")
    endif()
endif()


if (CGIAPP_ENABLE_ADDITIONAL_BEHAVIORS)
    if ((EXISTS "${CGIAPP_ADDITIONAL_BEHAVIOR_PATH}"))
        CgiGetCurrentDir(PRV_CUR_DIR)
        CgiAddAdditionalBehaviors(${CGIAPP_ADDITIONAL_BEHAVIOR_PATH} "ControlBehaviors")
    endif()
endif()
#add to WidgetSet.cpp
    
if (CGIAPP_ENABLE_TUTORIAL)    
    source_group(PRV_ALL_SRCS FILES ${PRV_CGIAPP_TUTORIALWIDGET_SUBDIRS})
    CgiCollectListedFiles(PRV_ALL_SRCS "" "" LIST ${PRV_CGIAPP_TUTORIALWIDGET_SUBDIRS})
    CgiFetchHeaderFiles("Widgets_Tutorial" "${PRV_CGIAPP_TUTORIALWIDGET_SUBDIRS}")
endif(CGIAPP_ENABLE_TUTORIAL)


source_group(PRV_ALL_SRCS FILES ${PRV_CGIAPP_BEHAVIORS_SUBDIRS})
CgiCollectListedFiles(PRV_ALL_SRCS "" "" LIST ${PRV_CGIAPP_BEHAVIORS_SUBDIRS})
#CgiFetchHeaderFiles("Behaviors_Examples" "${PRV_CGIAPP_BEHAVIORS_SUBDIRS}")
CgiFetchBehaviorsHeaderFiles("Behaviors_Examples" "${PRV_CGIAPP_BEHAVIORS_SUBDIRS}
```

In this example, following projects will be created in the solution:

<div class="contents" id="bkmrk-behaviorset-for-comp"><div class="contents"><div class="contents"><div class="textblock">- **BehaviorSet** for compiling WidgetSet.cpp
- **ControlBehaviors\_1** for compiling behaviors defined at *&lt;cgi\_studio\_root&gt;/cgi\_studio\_controls/src/Behaviors*

</div></div></div></div><div class="contents" id="bkmrk--0"><div class="contents"><div class="textblock">---

</div></div></div>#### <a class="anchor" id="bkmrk--3"></a>Adding Widget Sets

If other locations than in the example above shall be included for widget set generation, following steps are required:

<div class="contents" id="bkmrk-specify-the-paths-to"><div class="contents"><div class="textblock">1. Specify the paths to additional widget locations in the file *&lt;cgi-studio-root&gt;/cgi\_studio\_player/src/Behaviors/AdditionalBehaviorsPaths.txt and/or AdditionalWidgetsPaths.txt.* These paths must be relative to the default widget folder.
2. Each directory must - as always - provide a "FileList.txt" which lists all files to include. All subdirectories of the given directories which contain a "FileList.txt" file will also be included.
3. Setup Visual Studio Solution "Player.sln" 
    - Start CMake again
    - Point "Where is the source code" to *&lt;cgi-studio-root&gt;/cmake/Candera/Player*
    - Point "Where to build the binaries" to *&lt;cgi-studio-root&gt;/cgi\_studio\_player/build*.
    - Enable option "CGIAPP\_ENABLE\_ADDITIONAL\_BEHAVIORS" and/or "CGIAPP\_ENABLE\_ADDITIONAL\_WIDGETS"
    - After pressing configure the new option "CGIAPP\_ADDITIONAL\_BEHAVIOR\_PATH" and/or "CGIAPP\_ADDITIONAL\_WIDGET\_PATH" is shown. Cmake should automatically detect "AdditionalBehaviorsPaths.txt" and/or "AdditionalWidgetsPaths.txt"
    - Click "Configure" again
    - Click "Generate", the solution is generated

</div></div></div>The project will contain a sub project for the generated widget set, a sub project for the main widget set, and further sub projects for each additional widget location specified in AdditionalBehaviorsPaths.txt and/or AdditionalWidgetsPaths.txt.

<div class="contents" id="bkmrk-%3A-attention%3A-the-las"><div class="textblock"><dl class="note"><dd><p class="callout info">: ATTENTION: The last part of a path in AdditionalBehaviorsPaths.txt and AdditionalBehaviorsWidgetsPaths.txt can not be the same.</p>

</dd></dl></div></div><div class="contents" id="bkmrk-fine-wrong-%28last-par"><div class="textblock"><dl class="note"><dd><table class="doxtable"><tbody><tr><td>**Fine**</td><td>**Wrong (last part is Behaviors for both paths)**</td></tr><tr><td>cgi\_studio\_controls/src/Behaviors</td><td>cgi\_studio\_controls/src/Behaviors</td></tr><tr><td>CustomBehaviors/src/CustomBehaviors</td><td>CustomBehaviors/src/Behaviors</td></tr></tbody></table>

</dd></dl></div></div>

# BehaviorSet Library with Behavior Set Parts

With the new CMake environment, a new CMake Flag **CANDERA\_DEPRECATED\_WIDGETSET\_ENABLED** is available (Default setting is **ON**). When this flag is turned **OFF**, then instead of a single file "WidgetSet.cpp", several files are generated for every Widget or Behavior library.

This might resolve known issues with too many symbols generated during compilation of single "WidgetSet.cpp" file.

# Candera Version Validation

To ensure, that an application like the Player always refers to the proper [Candera](http://dev.doc.cgistudio.at/APILINK/namespace_candera.html "[DataBinding_RefTypeSample]") version, following CMake configurations can be used:

*&lt;CANDERA\_DIR&gt;/CgiStudioCanderaConfig.cmake*: This file specifies the actual version of [Candera](http://dev.doc.cgistudio.at/APILINK/namespace_candera.html "[DataBinding_RefTypeSample]"), e.g.:

```
 set(CGI_CANDERA_VERSION "3.12.0.0") 
```

Accordingly, proper [Candera](http://dev.doc.cgistudio.at/APILINK/namespace_candera.html "[DataBinding_RefTypeSample]") build defines will be generated, accessible for applications via *&lt;CANDERA\_DIR&gt;/src/Candera/CanderaVersion.h*

*&lt;CGI-Player\_DIR&gt;/src/CgiStudioPrereqs.txt*: This file is an example how an application will request a specific [Candera](http://dev.doc.cgistudio.at/APILINK/namespace_candera.html "[DataBinding_RefTypeSample]") version:

```
 set(CGI_CANDERA_VERSION_REQUIRED "3.12.0.0") 
```

*&lt;CGI-Player\_DIR&gt;/cmake/cgiapp\_cmake\_common.cmake*: This cmake file contains an example how an application can detect a [Candera](http://dev.doc.cgistudio.at/APILINK/namespace_candera.html "[DataBinding_RefTypeSample]") folder matching a specific [Candera](http://dev.doc.cgistudio.at/APILINK/namespace_candera.html "[DataBinding_RefTypeSample]") version (via cmake find\_package command).

# Using Player on 64 bit Systems

For Player, the CMake project generator should be of type *Win64* (e.g. *Visual Studio 15 2017 Win64*) and it should be built with the "COURIER\_PLATFORM\_CONFIG" setting set to "x64". This is the only way to build a SCHost.dll that can be used in SceneComposer

# Debugging Hints

#### <a class="anchor" id="bkmrk--3"></a>Debugging Player

For debugging the Player set "Player" as startup project in the Player solution and start debugging.

With CMake, the required Debugging configurations are preconfigured as following:

<div drawio-diagram="1961"><img src="https://doc316en.candera.eu/uploads/images/drawio/2023-02/drawing-4-1676872549.png" alt=""/></div>

<div class="contents" id="bkmrk--0"><div class="contents"><div class="textblock">---

</div></div></div>#### <a class="anchor" id="bkmrk--5"></a>Debugging Widget Life Cycle in SceneComposer

For debugging widgets used in SceneComposer please execute the following steps:

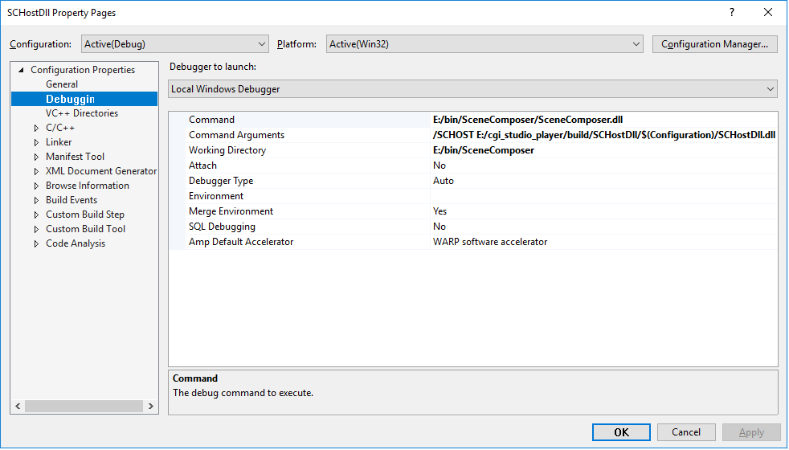
<div class="contents" id="bkmrk-set-schost-as-startu"><div class="contents"><div class="contents"><div class="textblock">- Set SCHost as startup project in the dev solution and edit the properties as shown below.

</div></div></div></div><div drawio-diagram="1962"><img src="https://doc316en.candera.eu/uploads/images/drawio/2023-02/drawing-4-1676872575.png" alt=""/></div>

<div class="contents" id="bkmrk--2"><div class="contents"><div class="textblock"></div></div></div>Set:

<div class="contents" id="bkmrk-debugger-type-to-nat"><div class="textblock">- Debugger Type to Native Only
- Command: The path to the file 'SceneComposer.dll' in your SceneComposer installation.

- After setting a breakpoint in a widget in the dev solution and pressing F5 (Debug), the breakpoint will get hit as soon as the widget is used by SceneComposer.

</div></div><div class="contents" id="bkmrk-debugging-with-scene"><div class="textblock"><dl class="note"><dd><p class="callout info">Debugging with SceneComposer only works while using a SCHost.dll including debug information! For this, take care that the CMake variable "CGIAPP\_SCENE\_COMPOSER\_PATH" is set to your SceneComposer executable, and compile in debug mode. All dll files required by SceneComposer will then be automatically deployed to your SceneComposer executable directory.</p>

</dd></dl></div></div>

# Used Behaviors Plugin

The "Used Behaviors Plugin" extracts the type names of all Behaviors referenced in a solution.  
At asset generation time, it generates a CMake file as given in the plugin configuration.

When configuring a build with CMake, there is a new option "CONTROLS\_PLUGIN\_CONFIGURATION\_ENABLED".

<p class="callout info">This option is hidden, when "COURIER\_ADD\_SCHOST\_PROJECT" flag is set to ON.</p>

When the option "CONTROLS\_PLUGIN\_CONFIGURATION\_ENABLED" is turned on, then another option "CONTROLS\_USED\_BEHAVIORS\_CONFIG\_PATH" is exposed, which must be set to the file as configured in the plugin.

Then the build is configured by CMake to only contain the Behaviors referenced in the solution, and some base behaviors and functionality, which is always required.

# Building Courier

# Build Process

#### <a class="anchor" id="bkmrk--0"></a>Description

The following chapters provide some information about build process aspects.

#### **Using CMake for Building Courier resp. Courier Applications**

##### <a class="anchor" id="bkmrk--2"></a>General Setup

[Courier](http://dev.doc.cgistudio.at/APILINK/namespace_courier.html) including it's sample applications provides a complete cmake environment for targeting multiple platform setups (compiler, OS, etc.). To start the CMake process either the command-line tool (cmake) or the CMake GUI (cmake-gui) can be used. As source code entry point the location of the application's source root folder has to be set. In case building [Courier](http://dev.doc.cgistudio.at/APILINK/namespace_courier.html) standalone this entry point is the root folder of [Courier](http://dev.doc.cgistudio.at/APILINK/namespace_courier.html) (more on this in the next section <span style="color: rgb(230, 126, 35);">[Building Courier Standalone](#bkmrk-building-courier-sta)</span>).

When using the CMake GUI you will encounter notifications (aka. CMake error) to

<div class="contents" id="bkmrk-define-the-courier_p"><div class="contents"><div class="textblock">1. Define the *COURIER\_PLATFORM* of choice , based on the platforms defined in the CourierPlatformDefs folder (see <span style="color: rgb(230, 126, 35);">[Platform Definition](https://doc316en.candera.eu/link/398#bkmrk-platform-definition)</span>).
2. Define the *COURIER\_PLATFORM\_CONFIG*, based on the platform configurations supported by the selected platform (e.g. Host, Target, etc.)

</div></div></div>When you encounter these notifications, interactively select the platform and the platform configuration of your choice and generate the build tool chain.

To avoid these notifications you may use the command line call for CMake instead, e.g.

##### <a class="anchor" id="bkmrk--3"></a>Use own Platform Definition

If you want to access your own platform definitions, which are not located in the pre-defined folder *CourierPlatformDefs*, add the CMake parameter *COURIER\_EXTENDED\_SEARCH\_PATHS*. Afterwards you can define your custom platform definition, e.g.

```
cmake -G "Visual Studio 15 2017 Win64" -DCOURIER_EXTENDED_SEARCH_PATHS="<MyOwnPlatformDefFolder>" -DCOURIER_PLATFORM=<MyCustomPlatform> -DCOURIER_PLATFORM_CONFIG=<AnyOfCustomPlatformConfigs> -DCMAKE_BUILD_TYPE=Debug "<MyWorkspaceFolder>\cgi_studio_courier\src\Courier"

```

<div class="contents" id="bkmrk-you-can-set-any-of-t"><div class="contents"><div class="textblock"><div class="fragment">  
</div><dl class="remark"><dt></dt><dd><p class="callout info">You can set any of the CMake parameter defined in [Courier](http://dev.doc.cgistudio.at/APILINK/namespace_courier.html) in the command-line call.</p>

</dd></dl></div></div></div>##### <a class="anchor" id="bkmrk--4"></a>Cross Compilation

CMake also supports cross compilation. The easiest way to handle this via CMake is to define a cross compilation toolchain file. CGI-Studio normally provides a basic set of toolchain files for the supported target cross compilations, which are located in *./cgi\_studio\_candera/cmake/toolchain-files*. In case there is none matching your setup, you can easily create your own toolchain file.

Here is an example:

```
include(CMakeForceCompiler)

# The name of the target operating system.
set(CMAKE_SYSTEM_NAME Linux)
set(CMAKE_SYSTEM_PROCESSOR ARM)

# Which C and C++ compiler to use.
set(CMAKE_C_COMPILER <location to the C cross compiler of choice>)
set(CMAKE_CXX_COMPILER <location to the C++ cross compiler of choice>)
```

<div class="contents" id="bkmrk-courier-only-needs-t"><div class="contents"><div class="contents"><div class="textblock"><div class="fragment">  
</div><dl class="note"><dt></dt><dd><p class="callout info">[Courier](http://dev.doc.cgistudio.at/APILINK/namespace_courier.html) only needs the basic set of cross compilation information in the toolchain file, which you can see in the example above. If you like to see more settings ([Candera](http://dev.doc.cgistudio.at/APILINK/namespace_candera.html "[DataBinding_RefTypeSample]") resp. CGI Application specific settings) in a CGI-Studio toolchain file, you have to know, that these are often prepared to configure target builds of a CGI Application without [Courier](http://dev.doc.cgistudio.at/APILINK/namespace_courier.html). [Courier](http://dev.doc.cgistudio.at/APILINK/namespace_courier.html) itself does this configuration already in the [Courier](http://dev.doc.cgistudio.at/APILINK/namespace_courier.html) platform definition files (see <span style="color: rgb(230, 126, 35);">[Platform Definition](https://doc316en.candera.eu/link/398#bkmrk-platform-definition)</span>).</p>

</dd></dl></div></div></div></div>Once the toolchain file is available, cmake can be started for cross compilation (if CMake variable CMAKE\_TOOLCHAIN\_FILE is set properly) in the output directory of choice.

See here as example a linux build script:

```
#!/bin/bash

ROOT_DIR="~/work/cgi_studio"
GENERATOR="Unix Makefiles"
TOOLCHAIN_FILE="${ROOT_DIR}/cgi_studio_candera/cmake/toolchain-files/<name of the toolchain file of choice>"
PLATFORM=<Courier platform name to use>
PLATFORM_CONFIG=<Courier platform configuration to use>
APPLICATION_PATH="${ROOT_DIR}/cgi_studio_courier_apps/src/CourierSampleApp"
BUILD_TYPE=Debug

cmake -G "$GENERATOR" -DCMAKE_TOOLCHAIN_FILE=$TOOLCHAIN_FILE -DCOURIER_PLATFORM=$PLATFORM -DCOURIER_PLATFORM_CONFIG=$PLATFORM_CONFIG -DCMAKE_BUILD_TYPE=$BUILD_TYPE $APPLICATION_PATH

make
```

If the build finishes successful, the target executable can be found in the output directory. In the above example the executable will have the name CourierSampleApp\_&lt;PLATFORM&gt;\_&lt;PLATFORM\_CONFIG&gt;. This executable then has to be loaded together with the target Asset to the device (e.g. via rootfs), for which the application was built.

<div class="contents" id="bkmrk-in-case-of-a-courier"><div class="textblock"><dl class="note"><dt></dt><dd><p class="callout info">In case of a [Courier](http://dev.doc.cgistudio.at/APILINK/namespace_courier.html) demo application *./cgi\_studio\_courier\_apps/src* the asset is copied to the binary root folder of the build (where the executable resides), named *AssetLibCff.bin*.</p>

</dd></dl></div></div>#### **Selecting Courier Features**

<div class="contents" id="bkmrk-cmake-feature-switch"><div class="contents"><div class="textblock"><dl class="warning"><dt></dt><dd><p class="callout warning">CMake feature switches have been renamed for V3.x releases, see <span style="color: rgb(230, 126, 35);">[Change Log](https://doc316en.candera.eu/shelves/6-change-log)</span></p>

</dd></dl></div></div></div>##### <a class="anchor" id="bkmrk--5"></a>CMAKE Features

Since Courier2 (V2.0.0) the interaction framework was enhanced with new substantial functionalities. Three new optional [Courier](http://dev.doc.cgistudio.at/APILINK/namespace_courier.html) software modules are now available, which are reflected by their pendants - the [Courier](http://dev.doc.cgistudio.at/APILINK/namespace_courier.html) CMake features:

##### <a class="anchor" id="bkmrk--6"></a>ENHANCED

While the [Courier](http://dev.doc.cgistudio.at/APILINK/namespace_courier.html) CMake feature `COURIER_ENHANCED_ENABLED` was inherent part of Courier1 (V1.x.x), it is now possible to disable it for using [Courier](http://dev.doc.cgistudio.at/APILINK/namespace_courier.html) without [Candera](http://dev.doc.cgistudio.at/APILINK/namespace_candera.html "[DataBinding_RefTypeSample]") graphics engine. The only additional library, which is needed in such a setup is libFeatStd (actually every CGI Studio software product relies on libFeatStd).

The enhanced mode enabled activates the link to CGI-Studio's graphics engine [Candera](http://dev.doc.cgistudio.at/APILINK/namespace_candera.html "[DataBinding_RefTypeSample]") and enables in [Courier](http://dev.doc.cgistudio.at/APILINK/namespace_courier.html) the modules Visualization and DataBinding. This enhanced mode reflects the feature-set provided with previous [Courier](http://dev.doc.cgistudio.at/APILINK/namespace_courier.html) (1.x) versions.

Turn on the [Courier](http://dev.doc.cgistudio.at/APILINK/namespace_courier.html) CMake feature `COURIER_ENHANCED_ENABLED` (either via CMake-gui or the CMakeLists.txt file of the respective application) to have this mode available.

##### <a class="anchor" id="bkmrk--7"></a>IPC

[Courier](http://dev.doc.cgistudio.at/APILINK/namespace_courier.html) also supports IPC with [Courier](http://dev.doc.cgistudio.at/APILINK/namespace_courier.html) messages, which is supported for Windows, Linux and Integrity environments. [Courier](http://dev.doc.cgistudio.at/APILINK/namespace_courier.html) IPC abstracts OS specific mechanisms to transport the serialized message over process borders. This IPC is (currently) limited to be used within one processor. To enable this functionality the CMake feature `FEATSTD_IPC_ENABLED` has to be set.

For this IPC mechanism the [Courier](http://dev.doc.cgistudio.at/APILINK/namespace_courier.html) generator was enhanced to generate the IPC infrastructure for the applications, which want to communicate via IPC.

##### <a class="anchor" id="bkmrk--8"></a>MONITOR

Courier2 introduces an additional CMake feature, which is about monitoring messaging and rendering performance. Both monitoring features can be enabled separately having their distinct [Courier](http://dev.doc.cgistudio.at/APILINK/namespace_courier.html) CMake feature, called:

```
- <a class="code" href="http://dev.doc.cgistudio.at/APILINK/group___c_o_u_r_i_e_r___c_o_n_f_i_g.html#ga1e6ad0bdc91811525f16ceefffb0891c">COURIER_MESSAGING_MONITOR_ENABLED</a>
- <a class="code" href="http://dev.doc.cgistudio.at/APILINK/group___c_o_u_r_i_e_r___c_o_n_f_i_g.html#ga3fe43a9497651e5cf08f0a7fe223fd16">COURIER_RENDERING_MONITOR_ENABLED</a>
```

These features are prepared to be connected to the CGI Studio Analyzer tool, if this optional CGI Studio module is available and activated via the respective [Courier](http://dev.doc.cgistudio.at/APILINK/namespace_courier.html) platform definition file using the CGI CMake flag `FEATSTD_MONITOR_ENABLED` (V2.x: `CGIFEATURE_ENABLE_MONITOR`).

Additionally if CGI Studio Analyzer option is not available, the [Courier](http://dev.doc.cgistudio.at/APILINK/namespace_courier.html) messaging monitor feature provides also a native support, while the rendering monitor is not available natively.

<div class="contents" id="bkmrk-using-cmake-gui-both"><div class="textblock"><dl class="note"><dt></dt><dd><p class="callout info">Using CMake-GUI both monitoring features are available only if `FEATSTD_MONITOR_ENABLED` is set to **ON** in the respective platform definition file. If `FEATSTD_MONITOR_ENABLED` is set to **OFF**, then only the `COURIER_MESSAGING_MONITOR_ENABLED` is visible.</p>

</dd></dl></div></div>#### **Building Courier Standalone**

For building [Courier](http://dev.doc.cgistudio.at/APILINK/namespace_courier.html) in standalone mode simply start CMake pointing to the folder

```
./cgi_studio_courier/src/Courier/ 
```

After generating the buildsystem via CMake and building the code using the according build tool chain, the [Courier](http://dev.doc.cgistudio.at/APILINK/namespace_courier.html) platform dependent library is available. Additionally this solution includes the complete [Candera](http://dev.doc.cgistudio.at/APILINK/namespace_candera.html "[DataBinding_RefTypeSample]"), so it is easy to provide also the [Candera](http://dev.doc.cgistudio.at/APILINK/namespace_candera.html "[DataBinding_RefTypeSample]") libraries within one build step.

**Remarks:**

<div class="contents" id="bkmrk-if-the-courier-libra"><div class="textblock"><dl class="remark"><dd>If the [Courier](http://dev.doc.cgistudio.at/APILINK/namespace_courier.html) library is build standalone and linked as external library to an customer application code, [Courier](http://dev.doc.cgistudio.at/APILINK/namespace_courier.html) has generated header files (e.g. Config.h and Version.h), which are created to the [Courier](http://dev.doc.cgistudio.at/APILINK/namespace_courier.html) build output directory ```
<CourierOutputDirectory>/gensrc/Courier
```

and have to be in the include path of the customer [Courier](http://dev.doc.cgistudio.at/APILINK/namespace_courier.html) application. To solve this issue the folder ```
<CourierOutputDirectory>/gensrc
```

has to be added to the customer application's include paths. (To copy the files to cgi\_studio\_courier/src/Courier may also be possible, but be aware that these generated files can be highly build configuration dependent!)</dd></dl></div></div>#### **Building Courier together with an Application Solution**

When using this option, there will be a dedicated CMakeLists.txt file for the [Courier](http://dev.doc.cgistudio.at/APILINK/namespace_courier.html) application available. [Courier](http://dev.doc.cgistudio.at/APILINK/namespace_courier.html) has defined a set of CMake macros which shall ease the CMake configuration in the application.

Take a look at the following template to see what this may look like. The comments in the section explain the various steps in detail.

```
cmake_minimum_required(VERSION 3.8)
cmake_policy(VERSION 3.8)

# Requested Courier version
set(APP_COURIER_VERSION 3.12.0.0)

# -----------------------------------------------------------------------------
# Enable optional Courier features
set(COURIER_ENHANCED_ENABLED ON)

# Required to resolve root paths of CGI Studio products
set(CGI_ROOT_PATH_HINT "../../.." "../.." "../") # Adapt to specific needs

# -----------------------------------------------------------------------------
# Checks for Couriesr package with given version in given paths
function(FindPackage pkg version path0)
    string(TOLOWER ${pkg} searchString)
    foreach(p ${path0} ${ARGN})
        file(GLOB tmp "${p}/*${searchString}*")
        list(APPEND paths ${tmp})
    endforeach()
    message(STATUS "Searching for ${pkg} ${version} in '${paths}' ...")
    find_package("${pkg}" ${version} REQUIRED PATHS ${paths})
endfunction()

# Search for Courier package
FindPackage(Courier ${APP_COURIER_VERSION} ${CGI_ROOT_PATH_HINT})

# -----------------------------------------------------------------------------
# Set customer specific search path for Courier platform definitions
set(CGI_ROOT_PATH "${CMAKE_CURRENT_LIST_DIR}/../../..") 
set(COURIER_PLATFORMDEFS_DIR "${CGI_ROOT_PATH}/cgi_studio_devices/src")

# If COURIER_PLATFORMDEF_FILE is not set, pre-select one of the available platforms
if (NOT COURIER_PLATFORM)
#    Preselection is disabled, as application can be used for different platforms
#    set(COURIER_PLATFORM "<anyPlatform>")
endif()

# Pre-select platform configuration
if (NOT COURIER_PLATFORM_CONFIG)
#    Preselection is disabled, as SampleApp can be used for different platforms
#    set(COURIER_PLATFORM_CONFIG "<anyPlatformConfig>")
    if (CMAKE_SYSTEM_NAME STREQUAL Windows)
        set(COURIER_PLATFORM_CONFIG "Simulation_Win32_x64")
    endif()
endif()

# -----------------------------------------------------------------------------
# Include Courier build system
include("${Courier_DIR}/cmake/Courier.cmake")

# -----------------------------------------------------------------------------
# Enable solution folder representation in Visual Studio
#CgiEnableSolutionFolderSupport(ON)

# -----------------------------------------------------------------------------
# Set asset locations
if (CGIDEVICE_TARGET_BUILD) 
    set(ASSET_POSTFIX Target)
else()
    set(ASSET_POSTFIX Simulation)
endif()
set(ASSET_SOURCE_LOCATION "${CMAKE_CURRENT_LIST_DIR}/Assets/AssetLibCff_${CGIDEVICE_NAME}_${ASSET_POSTFIX}.bin")
set(ASSET_TARGET_LOCATION ${CMAKE_BINARY_DIR}/AssetLibCff.bin)

# -----------------------------------------------------------------------------
# Courier application solution (incl. build of SCHost.dll)
CourierSolution("CourierSampleApp")

    # -------------------------------------------------------------------------
    # Generate application's widget library
    CourierAddProjectFiles(
        AppCDL.h
        AppCDL.cpp
        AppCDL.xcdl
        Constants.cpp
        Constants.h
        ComponentMessageReceiverThread.h
        CustomComponentId.h
        ExtCommOutputHandler.h
        ExtCommOutputHandler.cpp
        ListItemDataPresenter.h
        ListItemDataPresenter.cpp
        RenderStatisticsOverlayWrapper.h
        RenderStatisticsOverlayWrapper.cpp
        SampleApp.cpp
        SampleApp.h
        SampleAppControllerComponent.cpp
        SampleAppControllerComponent.h
        SampleExtCommOutputHandler.cpp
        SampleExtCommOutputHandler.h
        SampleAppLogRealm.cpp
        SampleAppLogRealm.h
        SampleAppMsgs.cpp
        SampleAppMsgs.h
        SampleAppMsgs.xcmdl
        SampleAppViewController.cpp
        SampleAppViewController.h
        SampleAppViewControllerFactory.cpp
        SampleAppViewControllerFactory.h
        SampleAppViewFactory.cpp
        SampleAppViewFactory.h
        SampleTypeConverter.cpp
    )

    # Add screen broker related files
    if(CGIDEVICE_ENABLE_SCREENBROKER)
        CourierAddProjectFiles(
            ScreenBrokerClient.cpp
            ScreenBrokerClient.h
        )
    endif()

    # Bind widgets
    CgiAddProject(Widgets)

    # Add subfolder sources
    CourierAddListFile("DataModel/DataModel.cmake")
    CourierAddListFile("AppPlatform/AppPlatform.cmake")

    # Add Memory Pool specific files
    if(FEATSTD_MEMORYPOOL_ENABLED)
        CourierAddProjectFiles(
            MemoryPoolConfig.cpp
        )
        CourierAddListFile("MemoryPoolUtil/MemoryPoolUtil.cmake")
    endif()

    # Add IPC resources
    if(FEATSTD_IPC_ENABLED)
        CourierAddProjectFiles(
            IpcCDL.cpp
            IpcCDL.h
            IpcCDL.xcdl
            IpcMsgs.cpp
            IpcMsgs.h
        )
        CourierAddListFile("Ipc/Shared/Shared.cmake")
    endif()

set(CGIAPP_TYPE_NATIVE_DLL "NativeDll")
set(CGIAPP_TYPE_NATIVE_EXE "NativeExe")
set(CGIAPP_TYPES ${CGIAPP_TYPE_NATIVE_EXE} ${CGIAPP_TYPE_NATIVE_DLL})
set(CGIAPP_BUILD_TYPE ${CGIAPP_TYPE_NATIVE_EXE} CACHE STRING "Binary type of the built application, one of: ${CGIAPP_TYPES}")
set_property(CACHE CGIAPP_BUILD_TYPE PROPERTY STRINGS ${CGIAPP_TYPES})

    if (${CGIAPP_BUILD_TYPE} STREQUAL ${CGIAPP_TYPE_NATIVE_DLL})
        CgiSetSolutionFolderName("CourierApplication")
        CourierAddDynamicLibrary(CourierSampleAppLib)
        CgiCreateOutputName(PRV_APP_TARGET_NAME CourierSampleAppLib)
    else()
        CgiSetSolutionFolderName("CourierApplication")
        CourierAddStaticLibrary(CourierSampleAppLib)
        # add application top level source files
        CourierAddProjectFiles(
            Main.cpp
        )
        CourierAddExecutable(CourierSampleApp TARGET_NAME COURIER_APPLICATION_TARGET)
        CgiCreateOutputName(PRV_APP_TARGET_NAME CourierSampleApp)
    endif()

    # -------------------------------------------------------------------------
    # Include target specific build targets
    # -----------------------------------------------------------------------------
    if (CMAKE_SYSTEM_NAME STREQUAL Integrity)
        set(COURIER_KERNEL_TARGET_DIR "${COURIER_PLATFORMDEFS_DIR}/${CGIDEVICE_NAME}/CourierPlatformDefs/${COURIER_PLATFORM_CONFIG}/KernelTargets")
        include("${COURIER_KERNEL_TARGET_DIR}/KernelTargets.cmake")
    endif()

    # -------------------------------------------------------------------------
    # Generate application's SCHost dynamic link library project for scene composer
    CourierAddSCHostLibrary()

    CgiClearSolutionFolderName()
CourierSolutionEnd()

#! [COURIER_XCDLGeneration]
# -----------------------------------------------------------------------------
# Generate h/cpp sources from XCDL files
#   Attention: As soon as the generation output dir (3rd parameter) is changed,
#              the courier messages cannot be generated any more!
#              SampleAppMsgs.xcmdl has to be adapted to that effect.
if (FEATSTD_IPC_ENABLED)
    CourierGenerateFromXcdl(CourierSampleAppLib ${CMAKE_SOURCE_DIR}/IpcCDL.xcdl ${CMAKE_SOURCE_DIR} -i ${COURIER_SRC_DIR} -gm -gi -gfa -v)
endif()

CourierGenerateFromXcdl(CourierSampleAppLib ${CMAKE_SOURCE_DIR}/AppCDL.xcdl ${CMAKE_SOURCE_DIR} -i ${COURIER_SRC_DIR} -gm -gd -gfa -v)
#! [COURIER_XCDLGeneration]

# -----------------------------------------------------------------------------
# Copy device specific asset to working dir (with target name AssetLibCff.bin) 
if (EXISTS "${ASSET_SOURCE_LOCATION}")
    if (${CGIAPP_BUILD_TYPE} STREQUAL ${CGIAPP_TYPE_NATIVE_DLL})
        CourierLog0("Asset file found at ${ASSET_SOURCE_LOCATION}. Copy to binary dir manually!")
    else()
        CourierLog0("Asset file found at ${ASSET_SOURCE_LOCATION}. Copying to binary dir")
        add_custom_command(TARGET ${COURIER_APPLICATION_TARGET}
                           PRE_LINK
                           COMMENT "Copy AssetLibCff.bin"
                           COMMAND ${CMAKE_COMMAND} -E copy_if_different ${ASSET_SOURCE_LOCATION} ${ASSET_TARGET_LOCATION}
                           VERBATIM)
    endif()
else()
    CourierLog0("No asset file found at ${ASSET_SOURCE_LOCATION}. Cannot copy to ${ASSET_TARGET_LOCATION}")
endif()


```

##### <a class="anchor" id="bkmrk--9"></a>Solution Folder

An interesting option (for Visual Studio only) is the solution folder support, which groups projects to logical groups (aka. solution folder). Though [Courier](http://dev.doc.cgistudio.at/APILINK/namespace_courier.html) implements the solution folders internally, the option itself is turned off by default (solution folders are not supported by Visual Studio Express edition installations and may cause problems using Express Editions). It can easily be enabled by calling the [Courier](http://dev.doc.cgistudio.at/APILINK/namespace_courier.html) CMake macro *CgiEnableSolutionFolderSupport()*.

Alternatively setting the environment variable *CGI\_STUDIO\_ENABLE\_SOLUTION\_FOLDERS* to value 1 enables the solution folder support without changing cmake files. With CGI\_STUDIO\_ENABLE\_SOLUTION\_FOLDERS variable solution folder support can be enabled per user / workstation.

<div class="contents" id="bkmrk-after-cgi_studio_ena"><div class="contents"><div class="textblock"><dl class="note"><dt></dt><dd><p class="callout info">After CGI\_STUDIO\_ENABLE\_SOLUTION\_FOLDERS has been defined, CMake needs to be restarted and the solution be re-generated.</p>

</dd></dl></div></div></div>If various application libraries shall be grouped, then the scoping macros *CgiSetSolutionFolderName()* and *CgiClearSolutionFolderName()* can be used. The example above already makes use of the options mentioned here.

#### **Building SCHost.dll**

How to build an SCHost.dll for the CGI SceneComposer is described in this chapter.

It is possible to build an additional SCHost.dll for SceneComposer (containing the widgets) by adding the following simple cmake macro to the of the application CMakeLists.txt:

```
    CourierAddSCHostLibrary()
```

right after the entry

```
    CourierAddExecutable(<solutionName>)
```

<div class="contents" id="bkmrk-it-is-important-to-s"><div class="contents"><div class="textblock"><div class="fragment">  
</div><dl class="note"><dd><p class="callout info">It is important to separate the application project in a widget library and an application executable. A simple guideline for the separation is to put only the main entry point (e.g. main.cpp) into the executable and the rest of the application code into the application (widget) library. You can also use a different separation if you so desire, but please make sure that all widget dependent code resides in the application widget library.</p>

</dd><dd></dd></dl></div></div></div>As mentioned above the application widget library must be self-contained as it shall be able it to the SCHost.lib without any link error. Just take the CMakeList.txt of the CourierSampleApp as a reference (see <span style="color: rgb(230, 126, 35);">[Platform Configuration &amp; Build Process](https://doc316en.candera.eu/books/courier/page/platform-configuration-build-process)</span>).

Having the macro *CourierAddSCHostLibrary()* applied in the applications CMakeLists.txt file you will find a new CMAKE option in the [Courier](http://dev.doc.cgistudio.at/APILINK/namespace_courier.html) section named **COURIER\_ADD\_SCHOST\_PROJECT**. Enable this option, configure until there is no configuration line marked red and generate the solution.

<div class="contents" id="bkmrk-schost-generation-is"><div class="contents"><div class="contents"><div class="textblock"><dl class="note"><dt></dt><dd><p class="callout info">SCHost generation is only applicable (at least tested) with the CMake generators for Visual Studio versions that are mentioned in the release notes.</p>

</dd></dl></div></div></div></div>When opening your Visual Studio project you see an additional **CourierSCHost** solution folder, which contains the project **CourierSCHostDll**. This DLL project links the applications widget project (e.g. CourierSampleAppLib inside CourierSampleApp) and the pre-built static [Courier](http://dev.doc.cgistudio.at/APILINK/namespace_courier.html) SCHost library (provided at **cgi\_studio\_courier/lib** folder).

If you also apply the correct SceneComposer binary path in the CMAKE configuration (before generating the project), see CMAKE option **CGIAPP\_SCENE\_COMPOSER\_PATH**, the built DLL is automatically renamed to SCHost.dll and copied into the SceneComposer binary folder. If this path is not set, the built DLL CourierSCHostDll\_&lt;COURIER\_PLATFORM&gt;\_&lt;COURIER\_PLATFORM\_CONFIG&gt;.dll has to be renamed to SCHost.dll and copied to the SceneComposer binary folder manually.

For details on developing widgets please also refer to [Candera](http://dev.doc.cgistudio.at/APILINK/namespace_candera.html "[DataBinding_RefTypeSample]") documentation.

##### <a class="anchor" id="bkmrk--10"></a>Building SCHost.dll when using Memory Pools

As a SCHost build using the Memory Pool feature is not binary compatible to a build not using memory pools, a new restriction is added for building SCHost.dll:

<div class="contents" id="bkmrk-in-the-solution-for-"><div class="contents"><div class="textblock">- In the solution for building SCHost.dll, the feature FEATSTD\_MEMORYPOOL\_ENABLED must not be set!

</div></div></div>As an example, the [Courier](http://dev.doc.cgistudio.at/APILINK/namespace_courier.html) SampleApp platform configuration has been extended to provide two different host simulation configurations:

<div class="contents" id="bkmrk-simulation_win32_x86"><div class="textblock">- ***Simulation\_Win32\_x64***: Disabled memory pool feature, option **COURIER\_ADD\_SCHOST\_PROJECT** available. Use this one to integrate your widgets to SceneComposer.
- ***Simulation\_Win32\_x86\_MP***: Enabled memory pool feature, but no option to add the [Courier](http://dev.doc.cgistudio.at/APILINK/namespace_courier.html) SCHost project available. Use this one to integrate and test memory pool configurations on host simulation as preparation for the target.

</div></div>#### **Adding External Widgets**  


##### <a class="anchor" id="bkmrk--11"></a>Adding External Widgets to SampleApp

In the last major update it is now possible to add additional external widgets (e.g. from a widget repository) to the application. For this reason the widgets of CourierSampleApp are collected in a separate sub-project enhancing the application with the possibility to add additional external defined widget libraries to be linked to the application.

The usage is basically the same like it is already available in CGIApplication (without [Courier](http://dev.doc.cgistudio.at/APILINK/namespace_courier.html)).

This means a CMake file variable (`CGIAPP_ADDITIONAL_WIDGET_PATH`) was added pointing to a file, which contains all the additional widget paths. If the paths in this file are valid and the second CMake flag `CGIAPP_ENABLE_ADDITIONAL_WIDGETS` is checked, than all widgets found in these folders resp. subfolders are added as separate projects to the solution. The format of defining these widgets follow the same structure as it is already used in CGIApplication resp. the sample widget repository cgi\_studio\_widgets.

The CourierSampleApp got a new folder named Widgets, which includes the basic CMake infrastructure for this new feature. Additionally the already used (and adapted) widgets (SampleWidget and SpeedWidget) and the base classes (CgiWidget2D &amp; CgiWidget3D) are moved to this new Widgets folder.

The WidgetSet itself was removed from the CourierSampleApp source code, and will be replaced with a generated one (based on all the widgets linked to the project), which is located in ${CMAKE\_BINARY\_DIR}/gensrc/CanderaGen/WidgetSet.cpp.

##### <a class="anchor" id="bkmrk--12"></a>Migration Info of "Binding of External Widget Libraries"

Migration info of the "Binding of external widget libraries" feature to any other (customer) Courier/CIT application (called in the following &lt;myProject&gt;):

<div class="contents" id="bkmrk-copy-folder-couriers"><div class="textblock">1. Copy Folder CourierSampleApp/Widgets to &lt;myProject&gt;/Widgets (optional: remove CourierSampleApp's widgets: SampleWidget and SpeedWidget).
2. Move project (local) owned widgets (if already available) to &lt;myProject&gt;//Widgets.
3. Remove project (local) owned widget base classes (CgiWidget2D &amp; CgiWidget3D) and WidgetSet.cpp.
4. Adapt the file AdditionalWidgetsPaths.txt to your needs or let the CMake variable `CGIAPP_ENABLE_ADDITIONAL_WIDGETS` point to a custom provided additional widgets file.
5. Optional: adapt &lt;myProject&gt;//Widgets/CMakeLists.txt, if the additional widgets project name shall be changed, resp. the local widgets search path shall be adapted.
6. To build the new SCHost.dll, don't forget to check the [Courier](http://dev.doc.cgistudio.at/APILINK/namespace_courier.html) CMake flag `COURIER_ADD_SCHOST_PROJECT`.
7. Compile and build the solution (or at least the project CourierSCHostDll\_&lt;myProject&gt;\_&lt;myProject&gt;).
8. If the CMake variable `CGISTUDIO_SCENE_COMPOSER_PATH` was set (or found correctly) the newly built CourierSCHostDll.dll is automatically copied to the previous mentioned SceneComposer path (with name SCHost.dll).
9. Start SceneComposer and enjoy the newly added widgets.

</div></div>

# Platform Configuration

#### <a class="anchor" id="bkmrk--20"></a>Description

Some platform specific topics are described here.

#### **Platform Definition**

A [Courier](http://dev.doc.cgistudio.at/APILINK/namespace_courier.html) platform definition describes the complete setup for a dedicated platform. This comprises the implementation of the various platform interfaces defined in Courier::Platform but also stores the [Candera](http://dev.doc.cgistudio.at/APILINK/namespace_candera.html "[DataBinding_RefTypeSample]") configuration and the characteristics of the target build environment (like OS, Compiler, CPU, etc.).

[Courier](http://dev.doc.cgistudio.at/APILINK/namespace_courier.html) pre-defines a few sets of platform definitions, which are located in the folder

```
./cgi_studio_courier/src/CourierPlatformDefs/<PlatformName>/
```

and [Courier](http://dev.doc.cgistudio.at/APILINK/namespace_courier.html) may use one of them, which is selected via CMake. See <span style="color: rgb(230, 126, 35);">[Platform Configuration &amp; Build Process](https://doc316en.candera.eu/books/courier/page/platform-configuration-build-process)</span>.

If there is a need to adapt a platform definition, like different [Candera](http://dev.doc.cgistudio.at/APILINK/namespace_candera.html "[DataBinding_RefTypeSample]") setup, additional platform configurations, compiler settings, etc. simply duplicate and modify or create a completely new platform definition folder, which has a cmake file with the name *&lt;AnyPlatformName&gt;Def.cmake*. If the new platform definition doesn't reside in the CourierPlatformDefs folder a simple [Courier](http://dev.doc.cgistudio.at/APILINK/namespace_courier.html) CMake commando (COURIER\_EXTENDED\_SEARCH\_PATHS), applied accordingly to your [Courier](http://dev.doc.cgistudio.at/APILINK/namespace_courier.html) application project, will help to find it.

<div class="contents" id="bkmrk-"><div class="contents"><div class="textblock">---

</div></div></div>##### <a class="anchor" id="bkmrk--23"></a>Platform Definition File

The platform definition file holds the complete setup for the platform, as the example Courier's Platform shows:

##### <a class="anchor" id="bkmrk--24"></a>Config macros

Config macros are used to source re-useable configuration out of any concrete platform definition. Currently they are used to define compiler specific sets for the platform definitions, e.g. for MSVC, gcc, etc. Generally these config macros are included at the beginning of the platform definition file.

Take a look at the config macros for MSVC setup:

```
CourierConfigMacro(MSVCBase "Base compiler flag set for Microsoft Visual Studio")

    CourierAddConfigMacroRequirement(COURIER_TOOLCHAIN_ID STREQUAL "MSVC")

    if(FEATSTD_64BIT_PLATFORM)
        SET(tmp_linker_flags "/STACK:10000000 /machine:X64 ")
    else()
        SET(tmp_linker_flags "/STACK:10000000 /machine:X86 ")
    endif()
    
    CourierSetConfigMacroProperties(
        # C++ compiler
        CMAKE_CXX_FLAGS                             "/D_VARIADIC_MAX=10 /DWIN32 /D_WINDOWS /DWINVER=0x0601 /D_WIN32_WINNT=0x0601 /Zm1000 /GR /MP"
        CMAKE_CXX_FLAGS_DEBUG                       "/D_DEBUG /MDd /Ob0 /Od /Z7 /RTC1 /DFEATSTD_BUILD_MODE=FEATSTD_BUILD_MODE_DEBUG"
        CMAKE_CXX_FLAGS_MINSIZEREL                  "/MD /O1 /Ob1 /DNDEBUG /DFEATSTD_BUILD_MODE=FEATSTD_BUILD_MODE_MINSIZEREL"
        CMAKE_CXX_FLAGS_RELEASE                     "/MD /O2 /Ob2 /DNDEBUG /DFEATSTD_BUILD_MODE=FEATSTD_BUILD_MODE_RELEASE"
        CMAKE_CXX_FLAGS_RELWITHDEBINFO              "/MD /O2 /Ob2 /Z7 /DNDEBUG /DFEATSTD_BUILD_MODE=FEATSTD_BUILD_MODE_RELWITHDEBINFO"
        CMAKE_CXX_STANDARD_LIBRARIES                "kernel32.lib user32.lib gdi32.lib winspool.lib shell32.lib ole32.lib oleaut32.lib uuid.lib comdlg32.lib advapi32.lib"

        #    C compiler
        CMAKE_C_FLAGS                               "/D_VARIADIC_MAX=10 /DWIN32 /D_WINDOWS /DWINVER=0x0601 /D_WIN32_WINNT=0x0601 /W4 /Zm1000 /MP"
        CMAKE_C_FLAGS_DEBUG                         "/D_DEBUG /MDd /Ob0 /Od /Z7 /RTC1 /DFEATSTD_BUILD_MODE=FEATSTD_BUILD_MODE_DEBUG"
        CMAKE_C_FLAGS_MINSIZEREL                    "/MD /O1 /Ob1 /DNDEBUG /DFEATSTD_BUILD_MODE=FEATSTD_BUILD_MODE_MINSIZEREL"
        CMAKE_C_FLAGS_RELEASE                       "/MD /O2 /Ob2 /DNDEBUG /DFEATSTD_BUILD_MODE=FEATSTD_BUILD_MODE_RELEASE"
        CMAKE_C_FLAGS_RELWITHDEBINFO                "/MD /O2 /Ob2 /Z7 /DNDEBUG /DFEATSTD_BUILD_MODE=FEATSTD_BUILD_MODE_RELWITHDEBINFO"
        CMAKE_C_STANDARD_LIBRARIES                  "kernel32.lib user32.lib gdi32.lib winspool.lib shell32.lib ole32.lib oleaut32.lib uuid.lib comdlg32.lib advapi32.lib "

        # linker EXE
        CMAKE_EXE_LINKER_FLAGS                      ${tmp_linker_flags}
        CMAKE_EXE_LINKER_FLAGS_DEBUG                "/INCREMENTAL /debug"
        CMAKE_EXE_LINKER_FLAGS_MINSIZEREL           "/INCREMENTAL:NO"
        CMAKE_EXE_LINKER_FLAGS_RELEASE              "/INCREMENTAL:NO"
        CMAKE_EXE_LINKER_FLAGS_RELWITHDEBINFO       "/INCREMENTAL /debug"

        # linker Modules
        CMAKE_MODULE_LINKER_FLAGS                   ${tmp_linker_flags}
        CMAKE_MODULE_LINKER_FLAGS_DEBUG             "/debug /INCREMENTAL"
        CMAKE_MODULE_LINKER_FLAGS_MINSIZEREL        "/INCREMENTAL:NO"
        CMAKE_MODULE_LINKER_FLAGS_RELEASE           "/INCREMENTAL:NO"
        CMAKE_MODULE_LINKER_FLAGS_RELWITHDEBINFO    "/INCREMENTAL:NO /debug"

        # linker DLLs
        CMAKE_SHARED_LINKER_FLAGS                   ${tmp_linker_flags}
        CMAKE_SHARED_LINKER_FLAGS_DEBUG             "/debug /INCREMENTAL"
        CMAKE_SHARED_LINKER_FLAGS_MINSIZEREL        "/INCREMENTAL:NO"
        CMAKE_SHARED_LINKER_FLAGS_RELEASE           "/INCREMENTAL:NO"
        CMAKE_SHARED_LINKER_FLAGS_RELWITHDEBINFO    "/INCREMENTAL:NO /debug"

        # resource compiler
        CMAKE_RC_FLAGS    " "

        # tool chain features
        COURIER_DEPRECATED                          "__declspec(deprecated)"
        COURIER_DEPRECATED_MSG                      "__declspec(deprecated(msg))"
    )
CourierConfigMacroEnd()

CourierConfigMacro(MSVC_Candera "MSVC flags with warning level 3 and enabled exception handling" PARENT MSVCBase)
    CourierSetConfigMacroProperty(CMAKE_CXX_FLAGS "/W4 /EHsc" ADD)
CourierConfigMacroEnd()

CourierConfigMacro(MSVC "Default compiler configuration for Microsoft Visual Studio" PARENT MSVC_Candera)
CourierConfigMacroEnd()

```

##### <a class="anchor" id="bkmrk--25"></a>General Platform setup

The basic platform setup begins with the macro *CourierPlatformDef* setting the platform name and a short description about this platform. Various settings are included in the platform definition block, like the choices of toolchains, various platform configurations (e.g. for Host, Target, etc.), and general properties (valid for all platform configurations).

##### <a class="anchor" id="bkmrk--26"></a>Platform configuration

A platform definition is additionally separated one or more sections of platform configurations. Usually a host (e.g. for simulation on Win32) and a target configuration are defined. Though they are typically named *Host* and *Target*, the names of these platform configurations are changeable.

<div class="contents" id="bkmrk--2"><div class="contents"><div class="textblock">---

</div></div></div>##### <a class="anchor" id="bkmrk--27"></a>Platform Implementation

Besides the platform definition file, also the implementation of the Courier::Platform interfaces is essential (see also <span style="color: rgb(230, 126, 35);">[OS Abstraction](#bkmrk-os-abstraction)</span>), which can be found in the subfolders of the various platform definition. For each platform configuration which is defined in the platform definition file, a subfolder with the name of the platform configuration has to exist.

E.g. if there are the several platform configurations, it has to look like this:

```
<AnyPlatformDefsFolder>/<PlatformName>/Integrity_ARM
<AnyPlatformDefsFolder>/<PlatformName>/Linux_ARM
<AnyPlatformDefsFolder>/<PlatformName>/Simulation_Win32_x64
<AnyPlatformDefsFolder>/<PlatformName>/Simulation_Win32_x86
<AnyPlatformDefsFolder>/<PlatformName>Def.cmake

```

In this platform configuration folders, the realizations of the Courier::Platform interfaces are located. There are at least two possibilities how this can be done:

<div class="contents" id="bkmrk-directly-code-in-the"><div class="contents"><div class="textblock">1. Directly code in the platform configuration folder the implementation of the Courier::Platform interface of choice and name the corresponding source and header file like Courier::Platform interface file.
2. Simply put forwards to a concrete implementation (located anywhere, e.g. in Courier/Platform/Impl) of the platform interface in a header file, named like the corresponding platform interface file. E.g.

</div></div></div>In order to get the (concrete or forwarded) platform implementation linked to the according Courier::Platform interface a namespace forward has to be done at the end of the header file of the real implementation as listed here:

```
namespace Courier { namespace Platform { namespace Impl {
    typedef Courier::Platform::Os::Generic::GenericMessageQueue MessageQueue;
}}}
```

<div class="contents" id="bkmrk-he-only-important-th"><div class="textblock"><div class="fragment">  
</div><dl class="note"><dt><p class="callout info">he only important thing with this namespace forward is the target namespace, which has to be Courier::Platform::Impl::&lt;PlatformInterface&gt;!</p>

</dt></dl></div></div>#### **External Communication**

##### <a class="anchor" id="bkmrk--28"></a>External Communication Component

The external communication component ([Courier::ExtCommComponent](http://dev.doc.cgistudio.at/APILINK/class_courier_1_1_ext_comm_component.html)) is served as interface to the "outside world". One of Courier's basic concept are the Components, which are active entities communicating via messages among each other. Besides the core components, which represent the model view controller pattern, the external communication component incorporates this concept.

External communication in other words means interfacing the [Courier](http://dev.doc.cgistudio.at/APILINK/namespace_courier.html) world with information sent from and to non [Courier](http://dev.doc.cgistudio.at/APILINK/namespace_courier.html) modules. An ExtCommComponent plays the role of a gateway in this matter.

Like all other components, the ExtCommComponent is identified by an ID, the Component ID, which itself has to be unique per instance. Other than the dedicated [Courier](http://dev.doc.cgistudio.at/APILINK/namespace_courier.html) components, like ModelComponent, ViewComponent, ControllerComponent, a.s.o. the ExtCommComponent can be instantiated multiple times by providing this unique ID in its constructor interface.

Additionally the ExtCommComponent has an interface to attach/detach multiple external input handler and an interface to set one external output handler. The reason to have only one output handler per ExtCommComponent is that [Courier](http://dev.doc.cgistudio.at/APILINK/namespace_courier.html) messaging internally has no additional routing information for routing outgoing messages than the message tag "external". So [Courier](http://dev.doc.cgistudio.at/APILINK/namespace_courier.html) cannot differentiate between different types of "external" messages and sends all "external" [Courier](http://dev.doc.cgistudio.at/APILINK/namespace_courier.html) messages to all external output handler in the system.

```
    public:
        ExtCommComponent(ComponentId cid);

        virtual ~ExtCommComponent();

        void <a class="code" href="http://dev.doc.cgistudio.at/APILINK/group___behaviors_mixed_reality.html#gga9cc8f4e76f63ae9535ba9e36b2c42beda3dac7c7669d534d6f83caf5a75b07a5a">Attach</a>(ExtCommInputHandler * extCommInputHandler);

        void Detach(ExtCommInputHandler * extCommInputHandler);

        IExtCommOutputHandler * SetExtCommOutputHandler(IExtCommOutputHandler * extCommOutputHandler);
```

<div class="contents" id="bkmrk-an-extcommcomponent-"><div class="contents"><div class="textblock"><div class="fragment">  
</div><dl class="note"><dt></dt><dd><p class="callout info">An ExtCommComponent may also be dedicated to external output handling respectively input handling only (just not attach an external input handler respectively set an external output handler).</p>

</dd><dd></dd></dl></div></div></div>A characteristic of [Courier](http://dev.doc.cgistudio.at/APILINK/namespace_courier.html) components is that they run in a (application defined) thread context defined by the component message receiver ([Courier::ComponentMessageReceiver](http://dev.doc.cgistudio.at/APILINK/class_courier_1_1_component_message_receiver.html)) they are attached to. In case of the ExtCommComponent this means, that all attached external input handler are running in this very same thread context. The external output handler assigned to an ExtCommComponent also runs in the same thread context receiving [Courier](http://dev.doc.cgistudio.at/APILINK/namespace_courier.html) messages marked with the message tag "external".

<div class="contents" id="bkmrk-in-case-an-external-"><div class="contents"><div class="textblock"><dl class="attention"><dt></dt><dd><p class="callout warning">In case an external input/output handler is blocking on its execution, the application designer is well advised to create a separate thread context (for listening from respectively distributing data to external modules), in order not to interfere any other external input/output handler or even component attached to the same ComponentMessageReceiver. An example for this can be found in the implementation of the Courier::Platform::ExtComm::PosixTerminalInputHandler.</p>

</dd></dl>---

</div></div></div>##### <a class="anchor" id="bkmrk--29"></a>External Input Handler

An external input handler is an object, which listens on an external communication channel. If an event on this channel is received, which shall be transported to the [Courier](http://dev.doc.cgistudio.at/APILINK/namespace_courier.html) system, the external input handler has to transform this message into an appropriate [Courier](http://dev.doc.cgistudio.at/APILINK/namespace_courier.html) message and post it into the [Courier](http://dev.doc.cgistudio.at/APILINK/namespace_courier.html) system. [Courier](http://dev.doc.cgistudio.at/APILINK/namespace_courier.html) provides a base (interface) class, which depicts the interface of an external input handler [Courier](http://dev.doc.cgistudio.at/APILINK/namespace_courier.html) is able to attach to an ExtCommComponent, this class is called Courier::ExtCommInputHandler.

An external input handler has to fulfil one simple interface, called Listen().

```
        static bool Post(Message * msg);

        virtual void Listen() = 0;
```

The static method Post() shall be used in the derived class of ExtCommInputHandler for posting [Courier](http://dev.doc.cgistudio.at/APILINK/namespace_courier.html) messages to the [Courier](http://dev.doc.cgistudio.at/APILINK/namespace_courier.html) system. It is also possible to simply use the method Post(), which is provided by the dedicated message itself. But using the Courier::ExtCommOutputHandler::Post() method, provides the possibility to monitor the events coming from external sources in a well-defined manner. The method Listen(), which has to be implemented in the respective external input handler, has to provide all the logic about extracting an event from an external source and transform it into a [Courier](http://dev.doc.cgistudio.at/APILINK/namespace_courier.html) message.

<div class="contents" id="bkmrk-the-method-listen%28%29-"><div class="contents"><div class="textblock"><dl class="note"><dt></dt><dd><p class="callout info">The method Listen() is, as already mentioned above, running in the thread context of the component message receiver, where its ExtCommComponent is attached to. This method is triggered every loop cycle of the underlying thread, so a "forever"-loop must not be used in the implementation of the method Listen(). Running in the context of the component message receiver is also the reason not to use any blocking calls in this method.</p>

</dd></dl>---

</div></div></div>##### <a class="anchor" id="bkmrk--30"></a>External Output Handler

External output handler are simply defined by an interface in [Courier](http://dev.doc.cgistudio.at/APILINK/namespace_courier.html), called Courier::IExtCommOutputHandler.

```
        virtual bool OnMessage(const Message & msg) = 0;
```

These output handler are application specific because they are simply used to transform a [Courier](http://dev.doc.cgistudio.at/APILINK/namespace_courier.html) message, which has to be tagged with "external", into a whatever corresponding external event.

```
        <message distribution="sequential" name="SpeedLimitViolationMsg" tag="external" uid="{8628147C-CC61-4366-BC86-D1DD2C550B78}">
            <subscribers>
                <subscriber id="External" />
            </subscribers>
        </message>

```

Once an external output handler is implemented, for whatever reasons, it can be attached to any available ExtCommComponent in the system. Simply be aware of the above mentioned restrictions on blocking external input handler attached to an ExtCommComponent.

<div class="contents" id="bkmrk-the-above-message-ex"><div class="contents"><div class="textblock"><dl class="note"><dd><p class="callout info">The above message example also defines a dedicated subscriber (component) for the external message, which makes definitely sense for using the optimized routing path. The subscriber named "External" reflects the pre-defined Courier::ComponentType::ExternalCommunicator. This pre-defined component ID is still available in [Courier](http://dev.doc.cgistudio.at/APILINK/namespace_courier.html), though it is not anymore assigned to an ExtCommComponent by [Courier](http://dev.doc.cgistudio.at/APILINK/namespace_courier.html) automatically. Reason is that the ExtCommComponent may be instantiated multiple times having now a [Courier::ComponentId](http://dev.doc.cgistudio.at/APILINK/namespace_courier.html#ade469915d5185e2f772f1890edbb6803 "Type for component ID.") in its constructor. But the application can still re-use this pre-defined component ID or simply create its own customer specific component ID. Using a custom component ID means also that this custom component ID has to be used in the subscriber list of the message definition, if needed.</p>

</dd></dl></div></div></div><div class="contents" id="bkmrk--4"><div class="contents"><div class="textblock"><dl class="note"><dd>```
#include <Courier/Foundation/Component.h>

namespace CustomComponentId {
    enum Enum {
        WindowEventExtComm = Courier::ComponentType::CustomerFirst,
        TerminalEventExtComm
    };
}

```

</dd></dl></div></div></div><div class="contents" id="bkmrk-the-blocking-call-li"><div class="contents"><div class="textblock"><dl class="attention"><dd><p class="callout warning">The blocking call limitations for external output handler are the same as for the external input handlers. Means if an external output handler uses blocking calls the corresponding ExtCommComponent resp. the underlying ComponentMessageReceiver are blocked too, which would result in not processing the messages in an appropriate manner. In this case a separate thread context is needed to resolve this issue.</p>

</dd></dl>---

</div></div></div>##### <a class="anchor" id="bkmrk--31"></a>How to Implement External Communication

External communication is in most cases dependent on the application requirements, as the application defines which events shall be received from and sent to the external modules. Additionally the external communication may differ on which platform configuration it is applied. E.g. on Win32 the window event handling will make use of the Win32 Messaging System, while on a Linux X11 environment the window events are represented by X11 event handling. Additionally it may be required, that besides window event handling another input source provides events, which shall be forwarded to the [Courier](http://dev.doc.cgistudio.at/APILINK/namespace_courier.html) application (e.g. CAN, SPI, TCP/IP, Serial, etc.). For this reason is shall be possible to setup different external input handler or even external communication components, running in separate message receiver (thread contexts). [Courier](http://dev.doc.cgistudio.at/APILINK/namespace_courier.html) itself doesn't has a hard link to these application specific needs, but provides a framework to easily adopt to these needs. The translation from external event to [Courier](http://dev.doc.cgistudio.at/APILINK/namespace_courier.html) message and vice versa will basically always be part of the application, though [Courier](http://dev.doc.cgistudio.at/APILINK/namespace_courier.html) provides building blocks, which at least can provide a default transformation.

These building blocks, which are currently available, focus on external input handling. [Courier](http://dev.doc.cgistudio.at/APILINK/namespace_courier.html) simply provides this implementation, which are not linked into the [Courier](http://dev.doc.cgistudio.at/APILINK/namespace_courier.html) library but can be added to any application, that wants to make use of them.

##### <a class="anchor" id="bkmrk--32"></a>Available pre-implemented External Input Handler

[Courier](http://dev.doc.cgistudio.at/APILINK/namespace_courier.html) already provides a small set of external input handler, which can be used either as building blocks in an applications platform specific code or as templates to implemented custom input handlers.

<div class="contents" id="bkmrk-these-building-block-0"><div class="contents"><div class="textblock"><dl class="note"><dt></dt><dd><p class="callout info">These building blocks are not linked to the [Courier](http://dev.doc.cgistudio.at/APILINK/namespace_courier.html) library but may be linked into any application library (or executable). This enables the possibility to completely exchange external input handler for any need.</p>

</dd></dl></div></div></div>Currently following external input handler building blocks/templates are available in [Courier](http://dev.doc.cgistudio.at/APILINK/namespace_courier.html) source folder (see cgi\_studio\_courier/src/Courier/Platform/Impl/ExtComm/):

<div class="contents" id="bkmrk-courier%3A%3Aplatform%3A%3Ae"><div class="contents"><div class="textblock">- Courier::Platform::ExtComm:Generic::GenericConsoleInputHander
- Courier::Platform::ExtComm:Posix::PosixTerminalInputHander
- Courier::Platform::ExtComm:Win32::Win32WindowInputHandler
- Courier::Platform::ExtComm:Wayland::WaylandInputHandler

</div></div></div>While external input handler can be implemented in many variations, fulfilling the base class interface from Courier::ExtCommInputHandler, the mentioned [Courier](http://dev.doc.cgistudio.at/APILINK/namespace_courier.html) external input handler building blocks follow basically the same pattern. Every external input handler has a method Init() and if needed a method Dispose(), called at startup respectively shutdown phase of the applications platform environment. For transformation of an incoming event, these external input handler use a hook interface providing the (platform) specific event object. This (platform) specific hook interface can be used to implement the application specific event to [Courier](http://dev.doc.cgistudio.at/APILINK/namespace_courier.html) message transformation and assigned to the very external input handler.

<div class="contents" id="bkmrk-currently-all-extern"><div class="contents"><div class="textblock"><dl class="note"><dd><p class="callout info">Currently all external input handlers provided by [Courier](http://dev.doc.cgistudio.at/APILINK/namespace_courier.html) (as application building blocks) are "non-blocking"! This has the benefit, that they will work in a single threaded application setup (e.g. all components running in the main thread).</p>

</dd></dl></div><div class="textblock"><dl class="attention"><dd><p class="callout warning">Using a non blocking external input handler has unfortunately a big drawback. When attached to an ExtCommComponent, which itself is running in a ComponentMessageReceiver together with other components, this ExtCommComponent will signal to be permanently executed (no wait). This may cause a boost in CPU usage respectively performance issues (e.g. for rendering)! To solve this problem the external input handler execution has to be throttled by either the Component throttling mechanism (available since [Courier](http://dev.doc.cgistudio.at/APILINK/namespace_courier.html) V2.1) or by simple add a wait state within the execution loop where the ComponentMessageReceiver of the respective ExtCommComponent is running.</p>

</dd></dl></div></div></div>Another solution to solve performance problems of "non-blocking" external input handler is to make them "blocking". Having a blocking external input handler implicates changes in the application's thread layout, which at least leads into having the external input handler run in its very own thread context. In [Courier](http://dev.doc.cgistudio.at/APILINK/namespace_courier.html) terms this means, maximum one external input handler is attached to an ExtCommComponent, which itself must be the only Component running in a ComponentMessageReveiver instance, that in turn is processed in a separate thread context. Though this seems a little restrictive it is the normal way how (external) input events are queried - by listen (and wait) on their respective input event queue in a separate thread. As this is the better approach for external input handling this topic is under review and most probably external input handler building blocks in blocking manner (wait and listen) will be supported.

An example for a Wayland input handler:

```
    class WaylandInputHandler : public ExtCommInputHandler {
        typedef ExtCommInputHandler Base;
    public:
        WaylandInputHandler();

        virtual ~WaylandInputHandler() {}

        bool <a class="code" href="http://dev.doc.cgistudio.at/APILINK/namespace_courier.html#a2e6f80d7ef7c7a120595f3d56e6f4246">Init</a>(void * display, void * data, WaylandEventHook * eventHook = 0);

        WaylandEventHook * SetEventHook(WaylandEventHook * eventHook);

        virtual void Listen();

        const WaylandContext & GetContext() const { return mContext; }

    private:
        WaylandContext mContext;
    };
```

or an example of a POSIX terminal input handler,

```
    class PosixTerminalInputHandler : public ExtCommInputHandler {
        typedef ExtCommInputHandler Base;
    public:
        class Hook {
        public:
            virtual Message * OnEvent(Int event) = 0;
        };

        PosixTerminalInputHandler();

        bool <a class="code" href="http://dev.doc.cgistudio.at/APILINK/namespace_courier.html#a2e6f80d7ef7c7a120595f3d56e6f4246">Init</a>(const Char * serialPortPath, bool mapStdIn, bool mapStdOut, bool mapStdErr, Hook * hook = 0);

        void Dispose();

        Hook * SetEventHook(Hook * hook);

        virtual void Listen();

        void OnEvent(Int event);

        void SetTerminalListenerName(const Char * name);

        const Char * GetTerminalListenerName() const;

    private:
        SerialPort mSerialPort;
        Hook * mHook;
        PosixTerminalListener mTerminalListener;
        CriticalSection mCs;
        bool mSerialPortOpened;
        bool mStdInMapped;
        bool mStdOutMapped;
        bool mStdErrMapped;
    };
```

which uses a separate thread for listening to terminal inputs:

```
    class PosixTerminalListener : public Thread {
    public:
        PosixTerminalListener();

        virtual ~PosixTerminalListener();

        bool <a class="code" href="http://dev.doc.cgistudio.at/APILINK/namespace_courier.html#a2e6f80d7ef7c7a120595f3d56e6f4246">Init</a>(PosixTerminalInputHandler * inputHandler);

        void Terminate();

    protected:
        virtual Int ThreadFn();

    private:
        PosixTerminalInputHandler * mInputHandler;
        bool mTerminate;
    };
```

In order to get a building block linked to an application, simply add the sources to the application's build path. If [Courier](http://dev.doc.cgistudio.at/APILINK/namespace_courier.html) CMake system is used it looks like this:

```
CourierAddProjectFiles(
    ABSOLUTE_FILE_PATHS "."
    SOURCE_GROUP AppPlatform/${<a class="code" href="http://dev.doc.cgistudio.at/APILINK/group___c_o_u_r_i_e_r___c_o_n_f_i_g.html#gad00275503cc208695e709ef2a0eea220">COURIER_PLATFORM_CONFIG</a>}
    ${COURIER_SRC_DIR}/Courier/Platform/Impl/ExtComm/Win32/Win32WindowInputHandler.cpp
    ${COURIER_SRC_DIR}/Courier/Platform/Impl/ExtComm/Win32/Win32WindowInputHandler.h
)
```

##### <a class="anchor" id="bkmrk--33"></a>Using Courier Provided External Input Handler

All external input handler building blocks rely basically on the same pattern: providing a hook interface which is used if available. If no hook object is applied to the respective external input handler, a default handling (if possible) may take place (e.g. sending key messages with keycode, when receiving a mappable key event). This means an application may re-use these building blocks without changing the code but simply applying a hook for events it wants to handle or overwrite (if the default handling is inappropriate).

See here an example of a hook implementation:

```
    class WindowInputEventHook : public Courier::InputHandling::Win32::Win32WindowInputHandler::Hook
    {
    public:
        WindowInputEventHook() :
            mTouchEventPreprocessor(0),
            mRenderer(0) {}

        ~WindowInputEventHook()
        {
            mTouchEventPreprocessor = 0;
            mRenderer = 0;
        }

        void SetTouchEventPreprocessor(Courier::TouchHandling::TouchEventPreprocessor * touchEventPreprocessor) {
            mTouchEventPreprocessor = touchEventPreprocessor;
        };

        virtual Courier::Message * OnEvent(const MSG & event);

        void SetRenderer(Courier::Renderer* renderer) { mRenderer = renderer; }

    private:
        Courier::TouchHandling::TouchEventPreprocessor * mTouchEventPreprocessor;
        Courier::Renderer* mRenderer;

    };

```

```
    Courier::Message * WindowInputEventHook::OnEvent(const MSG & event)
    {

        if (0 != mRenderer) {
            mRenderer->ForceKickDisplay();
        }

        Courier::Message * lMsg = Courier::InputHandling::InputHandler::cDoDefaultHandling;
        switch (event.message) {
        case WM_KEYDOWN:
            {
                COURIER_DEBUG_ASSERT(event.wParam <= 255);
                if (event.wParam == 'Q') {
                    lMsg = COURIER_MESSAGE_NEW(Courier::ShutdownMsg)();
                    // Post directly the message
                    Courier::InputHandling::InputHandler::Post(lMsg);
                }
                else if ((event.wParam >= '0') && (event.wParam <= '9')) {
                    const Courier::UInt32 lSpeed(static_cast<Courier::UInt32>((event.wParam - '0') * 25));
                    COURIER_DEBUG_ASSERT(lSpeed <= 270);
                    lMsg = COURIER_MESSAGE_NEW(SpeedMsg)(lSpeed);
                }
                else if (event.wParam == 'A') {
                    lMsg = COURIER_MESSAGE_NEW(ToggleAutoPilotMsg)();
                }
                else if ((event.wParam == 'S') || (event.wParam == 'P') ||
                         (event.wParam == 'R') || (event.wParam == 'B') ||
                         (event.wParam == 'E') || (event.wParam == 'F')) {
                            const Courier::UInt8 lKeyCode(static_cast<Courier::UInt8>(event.wParam));
                            lMsg = COURIER_MESSAGE_NEW(TriggerAnimationActionMsg)(lKeyCode);
                }
                else if (event.wParam == 'O') {
                    lMsg = COURIER_MESSAGE_NEW(RenderStatisticsOverlayMsg)();
                }
                break;
            }
        case WM_MOUSEMOVE:
            // Don't handle moves without left button pressed
            if ((event.wParam & MK_LBUTTON) == 0) {
                break;
            }
            if(mTouchEventPreprocessor!=0) {
                if(mTouchEventPreprocessor->Receive(COURIER_MESSAGE_NEW(TouchMsg)(TouchMsgState::Move, WINDOWS_GET_X_LPARAM(event.lParam), WINDOWS_GET_Y_LPARAM(event.lParam), FeatStd::Internal::PerfCounter::Now(),static_cast<PointerId>(0),0))) {
                    lMsg = Courier::InputHandling::InputHandler::cIgnoreDefaultHandling;
                }
            }
            break;

        case WM_LBUTTONDOWN:
            COURIER_DEBUG_ASSERT((event.wParam & MK_LBUTTON) == MK_LBUTTON);
            if(mTouchEventPreprocessor!=0) {
                if(mTouchEventPreprocessor->Receive(COURIER_MESSAGE_NEW(TouchMsg)(TouchMsgState::Down, WINDOWS_GET_X_LPARAM(event.lParam), WINDOWS_GET_Y_LPARAM(event.lParam), FeatStd::Internal::PerfCounter::Now(),static_cast<PointerId>(0),0))) {
                    lMsg = Courier::InputHandling::InputHandler::cIgnoreDefaultHandling;
                }
            }
            break;

        case WM_LBUTTONUP:
            COURIER_DEBUG_ASSERT((event.wParam & MK_LBUTTON) == 0);
            if(mTouchEventPreprocessor!=0) {
                if(mTouchEventPreprocessor->Receive(COURIER_MESSAGE_NEW(TouchMsg)(TouchMsgState::Up, WINDOWS_GET_X_LPARAM(event.lParam), WINDOWS_GET_Y_LPARAM(event.lParam), FeatStd::Internal::PerfCounter::Now(),static_cast<PointerId>(0),0))) {
                    lMsg = Courier::InputHandling::InputHandler::cIgnoreDefaultHandling;
                }
            }
            break;

        default:
            break;
        }

        return lMsg;
    }

```

This window event hook then has to be linked to an external input handler

```
// Configure external communication input handling
lRc = lRc && mWin32WindowInputHandler.Init(handle, &mWindowInputEventHook);
COURIER_DEBUG_ASSERT(lRc);
```

and the external input handler has to be attached to an external communication component.

```
// Attach external input handler to external communication component
mExtCommComponent.Attach(&mWin32WindowInputHandler);
```

##### <a class="anchor" id="bkmrk--34"></a>Using External Output Handler

As already mentioned more than one external input handler may be attached to one ExtCommComponent. Additionally to external input handlers an external output handler may be assigned to the ExtCommComponent. See here a sample of a very simple external output handler:

```
#include <Courier/Foundation/IExtCommOutputHandler.h>

class ExtCommOutputHandler : public Courier::IExtCommOutputHandler
{
public:
    ExtCommOutputHandler() {}

    virtual bool OnMessage(const Courier::Message & message);
};

```

```
bool ExtCommOutputHandler::OnMessage(const Courier::Message & message)
{
    printf("***** %s processed by external entity *****\n", message.GetName());
    return true;
}

```

This external output handler may also be assigned to the same ExtCommComponent (but can also be assigned to a different one).

```
    // Configure platform independent external communication component for output handling
    (void) mExtCommComponent.SetExtCommOutputHandler(&mExtCommOutputHandler);

```

<div class="contents" id="bkmrk-the-external-communi-0"><div class="contents"><div class="textblock"><div class="fragment">  
</div><dl class="note"><dt></dt><dd><p class="callout info">The external communication component which an external output handler is assigned to is the one which shall be assigned in an [Courier](http://dev.doc.cgistudio.at/APILINK/namespace_courier.html) "external" tagged message's subscriber list. If an "external" tagged message has no subscriber list it is assumed to be "broadcasted", that is this message is sent to all ExtCommComponents having an external output handler attached.</p>

</dd></dl></div></div></div>##### <a class="anchor" id="bkmrk--35"></a>Starting an External Communication Component

We already learned that the ExtCommComponent has to be instantiated with an unique component ID, which can either be the one available from Courier::ComponentType, called ExternalCommunicator or any custom defined component ID.

```
    mExtCommComponent(Courier::ComponentId(Courier::ComponentType::ExternalCommunicator))

```

Once an external communication component has its external input and/or output handler attached (<span style="color: rgb(230, 126, 35);">[Using Courier Provided External Input Handler](https://doc316en.candera.eu/link/578#bkmrk-using-courier-provid)</span> resp. <span style="color: rgb(230, 126, 35);">[Using External Output Handler](https://doc316en.candera.eu/link/578#bkmrk-using-external-outpu)</span>), it is ready to be linked to the [Courier](http://dev.doc.cgistudio.at/APILINK/namespace_courier.html) application.

Next step is to attach the ExtCommComponent to a ComponentMessageReceiver, which provides (beside other things like message queue, etc.) the thread context in which the ExtCommComponent is supposed to run. A few ExtCommComponents may have special requirements, like an ExtCommComponent for window event handling,

```
    // Attach platform dependent window event handler 
    mMsgReceiver.Attach(mAppEnvironment->GetWindowEventExtCommComponent());
```

others may run in a separate thread context.

```
    // Start external communicator in separate thread
    <a class="code" href="http://dev.doc.cgistudio.at/APILINK/class_component_message_receiver_thread.html" title="[ComponentMessageReceiverThread]">ComponentMessageReceiverThread</a> lExternalCommunicatorThread;
    lExternalCommunicatorThread.SetName("ExtComm");
    lExternalCommunicatorThread.Attach(mExtCommComponent);
    lExternalCommunicatorThread.Activate();
    rc = rc && lExternalCommunicatorThread.Run();
```

The above piece of code uses the class [ComponentMessageReceiverThread](http://dev.doc.cgistudio.at/APILINK/class_component_message_receiver_thread.html "[ComponentMessageReceiverThread]"). This class is not part of [Courier](http://dev.doc.cgistudio.at/APILINK/namespace_courier.html) but simply a helper class to let a ComponentMessageReceiver run in a separate thread. Here is the complete implementation of this basic helper:

```
class ComponentMessageReceiverThread : public Courier::Platform::Thread
{
    COURIER_LOG_SET_REALM(LogRealm::SampleApp);
public:
    class Hook {
        public:
            virtual ~Hook() {}
            virtual bool OnStartup(void * data) { FEATSTD_UNUSED(data); return true; }
            virtual bool OnExecute(void * data) { FEATSTD_UNUSED(data); return true; }
            virtual void OnShutdown(void * data, bool normalShutdown) { FEATSTD_UNUSED2(data, normalShutdown); }
    };

    ComponentMessageReceiverThread(Hook * hook = 0, void * data = 0) : mHook(hook), mData(data) {}

    Hook * SetHook(Hook * hook) {
        Hook * lPrevHook = mHook;
        mHook = hook;
        return lPrevHook;
    }

    void * SetData(void * data) {
        void * lPrevData = data;
        mData = data;
        return lPrevData;
    }

    // Make receiver active to start receiving messages
    void Activate() {
        mMsgReceiver.Activate();
    }

    void Attach(Courier::Component & component) {
        mMsgReceiver.Attach(&component);
    }

    void Detach(Courier::Component & component) {
        mMsgReceiver.Detach(&component);
    }

    void SetCycleTime(Courier::ComponentMessageReceiverTiming::Enum type, FeatStd::UInt32 timeMs) {
        mMsgReceiver.SetCycleTime(type, timeMs);
    }

    FeatStd::UInt32 GetCycleTime() const { return mMsgReceiver.GetCycleTime(); }


protected:
    virtual Courier::Int ThreadFn() {
        mMsgReceiver.SetName(this->GetName());

        bool lSuccess = true;
        if (0 != mHook) {
            lSuccess = lSuccess && mHook->OnStartup(mData);
        }

        // The message processing loop
        while (lSuccess && !mMsgReceiver.IsShutdownTriggered()) {
            if (0 != mHook) {
                lSuccess =  mHook->OnExecute(mData);
            }
            lSuccess = lSuccess && mMsgReceiver.Process();
        }

        if (0 != mHook) {
            mHook->OnShutdown(mData, lSuccess);
        }

        Courier::Int lRc;
        if (!lSuccess) {
            COURIER_LOG_FATAL("Thread (%s) processing failed!", GetName());
            lRc = -1;
        } else {
            COURIER_LOG_INFO("Thread (%s) processing ended normal.", GetName());
            lRc = 0;
        }

        return lRc;
    }

private:
    Courier::ComponentMessageReceiver mMsgReceiver;
    Hook * mHook;
    void * mData;
};

```

After attaching the components to its appropriate message receiver, all message receiver have to be activated, which basically means, that they are registered to the [Courier](http://dev.doc.cgistudio.at/APILINK/namespace_courier.html) internal message router. The message router now know all the message receivers (respectively their message queues) in the system and is able to forward the messages, based on their characteristics (distribution strategy, tags, etc.). Sending the [Courier::StartupMsg](http://dev.doc.cgistudio.at/APILINK/class_courier_1_1_startup_msg.html), which shall always be the very first message to be sent, informs all components about the system startup.

```
    // Before sending the start up (resp. the first) message be sure to activate all message receivers
    mMsgReceiver.Activate();

    // Startup the system by posting the startup message after all components are in place
    Courier::Message * msg = COURIER_MESSAGE_NEW(Courier::StartupMsg)();
    lRc = lRc && (msg!=0 && msg->Post());
    COURIER_DEBUG_ASSERT(lRc);

```

Afterwards let the message receiver being processed in the "main" thread context, if not already done via a [ComponentMessageReceiverThread](http://dev.doc.cgistudio.at/APILINK/class_component_message_receiver_thread.html "[ComponentMessageReceiverThread]") (see code sample above).

```
        bool lSuccess;
        do {
            // this is the main message processing loop.
            lSuccess = mMsgReceiver.Process();
/*
            FeatStd::UInt32 fps2D = mViewHandler.GetFramesPerSecond2D();
            FeatStd::UInt32 fps3D = mViewHandler.GetFramesPerSecond();
            printf("FPS 2D(%u) 3D(%u) \n",fps2D,fps3D);
            COURIER_UNUSED2(fps2D,fps3D);
*/
        } while (lSuccess && !mMsgReceiver.IsShutdownTriggered());

        if (!lSuccess) {
            COURIER_LOG_FATAL("Main loop processing failed!");
        } else {
            COURIER_LOG_INFO("Main loop processing ended normal.");
        }
        lRc = lSuccess;

```

##### <a class="anchor" id="bkmrk--36"></a>Graceful Termination of External Communication Component

Cleaning up has to be done to the external communication component to terminate a program gracefully. Maybe the most important is to call the external input handlers Dispose() method, if one exists, which may restore respectively free external resources.

For example in the implementation of the PosixTerminalInputHandler, the Dispose() method restores the terminal settings, which were changed in initialization phase.

```
        // Cleanup external communication input handling
        mExtCommComponent.Detach(&mTerminalInputHandler);
        mTerminalInputHandler.Dispose();

```

```
    // Cleanup external communication output handling
    (void) mExtCommComponent.SetExtCommOutputHandler(0);

```

The above code fragments perform detach of the external input handler applied on system shutdown and reset the assigned external output handler.

<div class="contents" id="bkmrk-the-application-shal"><div class="contents"><div class="textblock"><dl class="attention"><dt></dt><dd><p class="callout warning">The application shall always care to cleanup and restore all the resources (like threads, external resources) it has used during its execution to avoid a mess up of the platform.</p>

</dd><dd></dd></dl></div></div></div>E.g. gracefully shutdown of component message receiver threads after [Courier::ShutdownMsg](http://dev.doc.cgistudio.at/APILINK/class_courier_1_1_shutdown_msg.html) was issued:

```
        toggleThread.Stop();
        do {
            lTerminate = true;
#if (0 != ENABLE_VIEW_THREAD)
            lTerminate = lTerminate && (Courier::Platform::ThreadStatus::Terminated == lViewThread.GetStatus());
#endif
#if (0 != ENABLE_RENDER_THREAD)
            lTerminate = lTerminate && (Courier::Platform::ThreadStatus::Terminated == lRenderThread.GetStatus());
#endif
#if (0 != ENABLE_CONTROLLER_THREAD)
            lTerminate = lTerminate && (Courier::Platform::ThreadStatus::Terminated == lControllerThread.GetStatus());
#endif
#if (0 != ENABLE_MODEL_THREAD)
            lTerminate = lTerminate && (Courier::Platform::ThreadStatus::Terminated == lModelThread.GetStatus());
#endif
#if (0 != ENABLE_EXTCOMM_THREAD)
            lTerminate = lTerminate && (Courier::Platform::ThreadStatus::Terminated == lExtCommThread.GetStatus());
#endif
#if defined(COURIER_IPC_ENABLED)
            lTerminate = lTerminate && (Courier::Platform::ThreadStatus::Terminated == lIPCThread.GetStatus());
#endif
            lTerminate = lTerminate && (Courier::Platform::ThreadStatus::Terminated == toggleThread.GetStatus());

        } while (!lTerminate);

```

#### **Message Factories**

Usually [Courier](http://dev.doc.cgistudio.at/APILINK/namespace_courier.html) objects are created/deleted using the macros COURIER\_NEW() and COURIER\_DELETE().

For customization reasons [Courier::Message](http://dev.doc.cgistudio.at/APILINK/class_courier_1_1_message.html) instances must be handled in a different way.   
Therefore a platform specific interface ([Courier::Platform::MessageFactory](http://dev.doc.cgistudio.at/APILINK/class_courier_1_1_platform_1_1_message_factory.html)) was introduced:

```
    Message* lpMessage;
    lpMessage = COURIER_MESSAGE_NEW(Helper::BroadcastMsg)();
    EXPECT_NE((void*)0, lpMessage);

    MessageFactory::Destroy(lpMessage);

```

For convenience reasons the macro [COURIER\_MESSAGE\_NEW()](http://dev.doc.cgistudio.at/APILINK/group___c_o_u_r_i_e_r___p_l_a_t_f_o_r_m.html#ga49830e96f37f0b76cc63f52696ceb119) was defined.

There are two different ways of Message allocation: **static** and **dynamic**. This is reflected by either using <span style="color: rgb(230, 126, 35);">[DynamicMessageFactory](https://doc316en.candera.eu/link/578#bkmrk-dynamicmessagefactor)</span> or <span style="color: rgb(230, 126, 35);">[StaticMessageFactory](https://doc316en.candera.eu/link/578#bkmrk-staticmessagefactory)</span>.

<div class="contents" id="bkmrk--18"><div class="contents"><div class="textblock">---

</div></div></div>##### <a class="anchor" id="bkmrk--38"></a>DynamicMessageFactory

Courier::Platform::Messaging::DynamicMessageFactory allows the creation of an unlimited number of Message instances using the [Courier](http://dev.doc.cgistudio.at/APILINK/namespace_courier.html) memory management.   
See Candera::MemoryManagement::PlatformHeap for details.

##### <a class="anchor" id="bkmrk--39"></a>StaticMessageFactory

Courier::Platform::Messaging::StaticMessageFactory preallocates memory for a certain number of Message instances using [Courier::StaticObjectBuffer](http://dev.doc.cgistudio.at/APILINK/class_courier_1_1_static_object_buffer.html). The **number of instances** must be requested by using Courier::StaticObjectBuffer\_Private::BufferData specialization. Please note that the specialization has to be done either in global namespace or in namespace [Courier](http://dev.doc.cgistudio.at/APILINK/namespace_courier.html) (prefered).

```
class TestClass_A { };
static FeatStd::SizeType sBuffer_A[((sizeof(TestClass_A) + SIZE_OF_VOID_PTR + SIZE_OF_VOID_PTR - 1) / SIZE_OF_VOID_PTR) * 8];
    static const Courier::Internal::StaticObjectBuffer_Private::BufferDataTyped<TestClass_A> sBuffer_AT(8, sBuffer_A);

namespace Courier {
    class TestClass_A { };
    static FeatStd::SizeType sBuffer_A[((sizeof(TestClass_A) + SIZE_OF_VOID_PTR + SIZE_OF_VOID_PTR - 1) / SIZE_OF_VOID_PTR) * 3];
    static const Courier::Internal::StaticObjectBuffer_Private::BufferDataTyped<TestClass_A> sBuffer_AT(3, sBuffer_A);

```

For convenience reasons the macro COURIER\_MESSAGE\_CONFIGURATION() was defined:

```
#include "MessageFactoryConfiguration.h"

namespace AppPlatform {
    void LoadMessageFactoryConfiguration()
    {
    }

} // namespace AppPlatform

namespace Courier {
    COURIER_MESSAGE_CONFIGURATION( ::Courier::Internal::ListEventMsg, 10);

// ------------------------------------------------------------------------
    COURIER_MESSAGE_CONFIGURATION( ::<a class="code" href="http://dev.doc.cgistudio.at/APILINK/class_courier_1_1_update_model_msg.html" title="Update model message is responsible to carry requests to modify or update data back from view / contr...">Courier::UpdateModelMsg</a>, 10);

// ------------------------------------------------------------------------
    COURIER_MESSAGE_CONFIGURATION( ::<a class="code" href="http://dev.doc.cgistudio.at/APILINK/class_courier_1_1_startup_msg.html">Courier::StartupMsg</a>, 1);
```

See CourierSampleApp/AppPlatform/MessageFactoryConfiguration.cpp for details.

For configuring the usage of StaticMessageFactory please see chapter <span style="color: rgb(230, 126, 35);">[Platform Implementation](https://doc316en.candera.eu/link/578#bkmrk-platform-definition%C2%A0)</span>.

<div class="contents" id="bkmrk-if-couriergenerator."><div class="textblock"><dl class="remark"><dd><p class="callout warning">If CourierGenerator.exe is used to generate MessageFactoryConfiguration.cpp the configuration has to be done in XML (MessageFactoryConfiguration.xcmdl).</p>

</dd></dl></div></div><div class="contents" id="bkmrk-workaround%3A-due-to-t"><div class="textblock align-right"><dl class="note"><dd><p class="callout info align-left">Workaround: Due to the fact that some linkers throw away unreferenced static declarations, MessageFactoryConfiguration.\[h|cpp\] has to implement a method which has to be called before the first Message creation. In SampleApp this is done in AppEnvironment::Setup().</p>

</dd></dl></div></div>####   
**OS Abstraction**  


[Courier](http://dev.doc.cgistudio.at/APILINK/namespace_courier.html) provides ready-to-use implementations of Courier::Platform interfaces based on different OS, environments, etc., which can be used as a construction kit for any platform setup. These sources are located in the folder

```
./cgi_studio_courier/src/Courier/Platform/Impl/Os
```

Various operating systems implementations are available, like Win32, Posix, Integrity, etc. and Generic, which basically implement the interface based on other interfaces (e.g. Mutex, CriticalSection, AtomicOp, etc.) or have stub implementations for atomic platform interfaces (means they **must** be implemented for the target OS), like Semaphore, Thread, Ticks, etc.

For more details of interfaces, which have to be provided for the OS abstraction, refer to API definition of Courier::Platform.