# Part 5: Configure State Machine
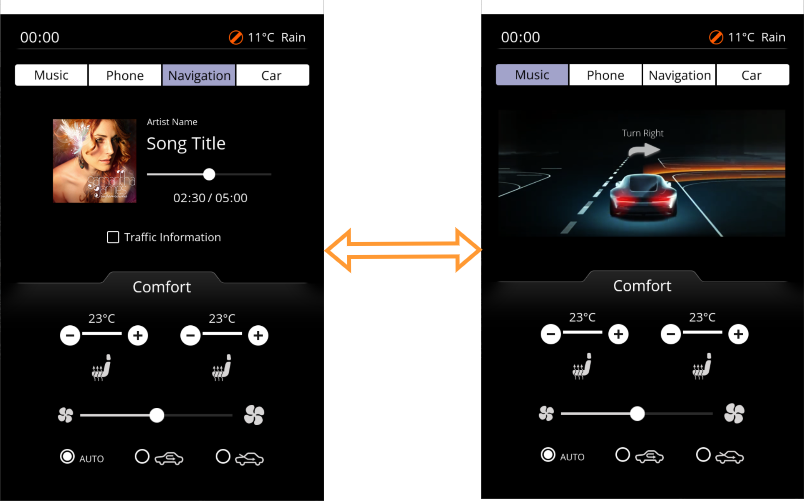
State Machine feature is used to configure a Music State and a Navigation State. Transitions are created from one state to the other. Behaviors are set up using the powerful Fusion Editor. These behaviors trigger the configured transitions and set GroupNodes visible and invisible.
### Configuring the State Machine
Using the State Machine Editor configure the already existing GlobalStateMachine to incorporate 2 states: Music and Navigation. Connect these states with transitions in both directions. Define these transitions to be triggered by TextButton\_Music and TextButton\_Navigation.
1. In Solution Explorer navigate to the **GlobalStateMachine** which can be found following the path below. **Double-click** the **GlobalStateMachine**.
- The **State Machine Editor** will be opened and GlobalStateMachine will be displayed.
- GlobalStateMachine consists of an Initial State (circle) and a State (rectangle) called "State" and a transition from the Initial State to the State.
| Solution Explorer Path
| Solution > State Machines > **GlobalStateMachine**
|
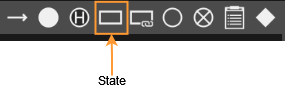
2. In **State Machine Editor** add another state by dragging a State from the upper right toolbar and dropping it into the State Machine diagram below the already existing state.
- A new state "State\_1" will be created in the State Machine Editor.
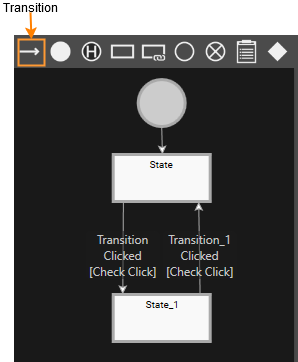
3. In State Machine Editor add a transition from "State" to "State\_1" and another transition from "State\_1" to "State". To do this drag a Transition from the toolbar onto the outgoing state (e.g. State) then click onto the second state (e.g. State\_1).
- 2 Transitions will be added from State to State\_1 and back
4. In **State Machine Editor** select the **State** and **State\_1** one by one. In the **Properties panel**'s **\[General\]** section change their Name properties according to the table below.
- In State Machine Editor you can see that the states have been renamed.
| | **Target State "State"** | **Target State "State\_1"** |
| General > Name
| Music
| Navigation
|
5. In State Machine Editor select the transitions one by one. In the Properties panel's \[Transition\] section configure the Sender property according to the table below.
- Both transitions are configured to be executed whenever the corresponding TextButton is pressed. To easily configure this property lock the **Properties panel** clicking the **padlock** icon in the panel's top right corner. **Drag** the desired node **from** the **Scene Tree onto** the input field of the **property** to be configured. Release the mouse button when the mouse cursor is changed. The input field will be filled. Finally click the padlock icon again to **unlock** the Properties panel.
| **Transition** | Sender \[Event Filter\]
|
| Music -> Navigation
| IVI\_Sample > IVI\_Sample > Menu\_button > TextButton\_Navigation |
| Navigation -> Music
| IVI\_Sample > IVI\_Sample > Menu\_button > TextButton\_Menu |
### Configuring Behaviors using Fusion
Here we are using Fusion to define the actions to be performed when entering and exiting the Music and Navigation State. In the Fusion diagram of TextButton\_Music and TextButton\_Navigation we connect a HandleControlState behavior.
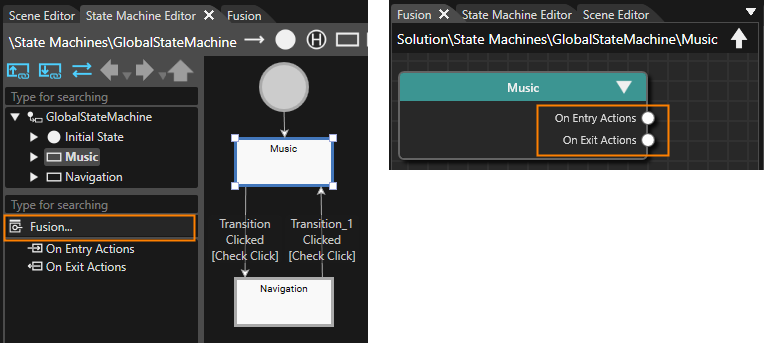
1. While the state "Music" is selected in the State Machine Editor click on the **\[Fusion...\]** button on the bottom left.
- Fusion will be opened, displaying the **Fusion node "Music".**
- The displayed Fusion node offers 2 behavior connectors: one for \[On Entry Actions\] and one for \[On Exit Actions\].
2. In the **\[Music\]** Fusion Node drag the \[On Entry Actions\] connector circle to the right and release the mouse.
- A **Select Behavior** dialog will be opened.
- This dialog has an input field on top and a list of behaviors organized as a tree on the bottom.
- This list of behaviors is similar to the one in the Toolbox panel's **\[Behaviors\]** section.
3. In the Select Behavior dialogue find the "Enable Rendering" behavior and double-click it.
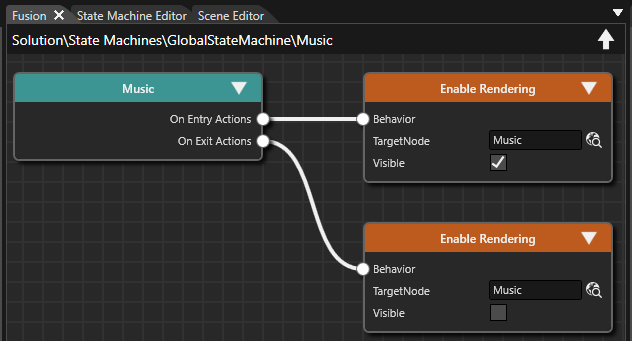
- In Fusion a new **\[Enable Rendering\]** node is created, which is connected to the Music's \[On Entry Actions\] connector. Use the dialogue's input field and start typing "Enable Rendering". While you are typing, the list of behaviors decreases as the content of the input field serves as a filter.
4. In Fusion configure the **\[Enable Rendering\]** node according to the table below.
- The \[Enable Rendering\] node is fully configured.
- Whenever GlobalStateMachine **enters** the **state "Music"**, the GroupNode "Music" will get **visible**.
| **Music Node**
| On Entry Actions > EnableRendering
|
| TargetNode
| IVI\_Sample > IVI\_Sample > Music
|
| Visible
| TRUE
|
5. Repeat similar steps to create an **\[EnableRendering\]** Fusion Node for the \[Music\] node's **\[On Exit Action\]** connector. Configure this new \[EnableRendering\] node according to the table below.
- The \[Enable Rendering\] node is fully configured.
- Whenever GlobalStateMachine **exits** the **state "Music"**, the GroupNode "Music" will get **invisible**.
| **Music Node**
| On Exit Actions > EnableRendering
|
| TargetNode
| IVI\_Sample > IVI\_Sample > Music
|
| Visible
| FALSE
|
6. In State Machine Editor select the **\[Navigation\]** state, switch to Fusion and configure a similar **\[On Entry Action\]** and **\[On Exit Action\]**. Necessary configuration details are given in the table below.
- The \[Navigation\] State has been configured similar to the \[Music\] State.
- Whenever GlobalStateMachine enters the state "Navigation", the GroupNode "Navigation" will get visible.
- Whenever GlobalStateMachine exits the state "Navigation", the GroupNode "Navigation" will get invisible.
| **Navigation Node**
| On Entry Actions > EnableRendering
|
| TargetNode
| IVI\_Sample > IVI\_Sample > Navigation
|
| Visible
| TRUE
|
| **NavigationNode**
| On Exit Actions > EnableRendering
|
| TargetNode
| IVI\_Sample > IVI\_Sample > Navigation
|
| Visible
| FALSE
|
7. In the Scene Tree panel navigate to TextButton\_Music which can be found following the path below and select it. Click on the Fusion button on the top right of the Scene Tree panel.
- Fusion will be opened, displaying the TextButton\_Music's Fusion node with a Behaviors connector.
| Scene Tree Path
| IVI\_Sample > IVI\_Sample > Menu\_button > **TextButton\_Music**
|
8. Drag the **Behaviors connector** to the right and release the mouse button.
- The Select Behaviors dialog will be opened
9. Find the "**Handle Control State**" behavior and double-click it.
- A new Fusion node **\[Handle Control State\]** will be created.
10. Repeat these steps for TextButton\_Navigation which can be found following the path below.
- A new Fusion node **\[Handle Control State\]** will be created.
| Scene Tree Path
| IVI\_Sample > IVI\_Sample > Menu\_button > **TextButton\_Navigation**
|
### Check the Transitions in Player
Use the Player to check the configured transitions between Music and Navigation.
1. Save your solution and click the \[Play selected scenario...\] icon on the toolbar to start the Player.
- Three windows will open, and you can see that the simulation display shows the IVI\_Sample scene.
- The Music GroupNode will be displayed.
2. In the simulation display click the Navigation menu button.
- The Navigation GroupNode will be displayed.
3. In the simulation display click the Music menu button.
- The Music GroupNode will be displayed again.