# Part 4: Animation settings

This section describes how to create an animation that animates the position and size of an object. Here, the thumbnail image of the music is animated.

### Configuring the Animation

1. In the Scene Tree panel navigate to the RenderNode2D **Cover** and right-click it. Select \[Add Animated Property...\] from the context menu. The **Cover** node can be found in the path below. 
    - The **Property Animation Configuration** dialog will be opened.  
        <table border="1" class="align-left" style="border-collapse: collapse; border-width: 1px; width: 570px;"><tbody><tr><td style="background-color: rgb(35, 111, 161); width: 150px;"><span style="color: rgb(236, 240, 241);">Scene Tree Path  
        </span></td><td>IVI\_Sample &gt; IVI\_Sample &gt; Music &gt; **Cover**</td></tr></tbody></table>
2. In the **Property Animation Configuration** apply the settings as in the table below and press **\[OK\]**. 
    - A new animation **MyAnimation** has been created.
    - The new animation is visible in the Solution Explorer.
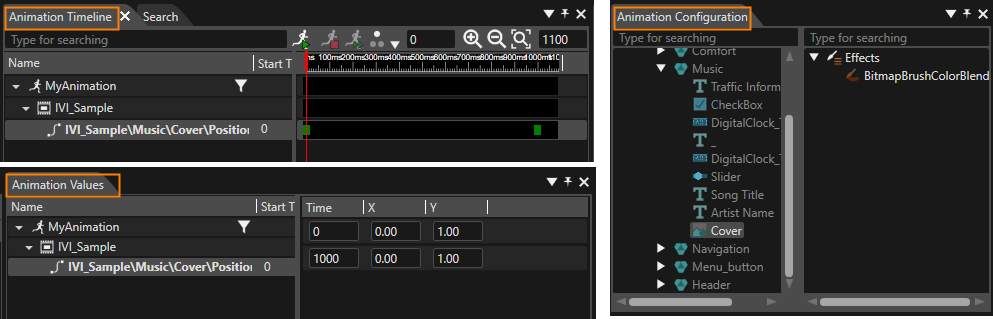
    - Scene Composer switches to **Animation Design**. Three new panels are visible: 
        - **Animation Configuration** panel
        - **Animation Timeline** panel
        - **Animation Values** panel
        
        <p class="callout info">To switch back to Scene Design press the **\[Scene Design\]** button in Scene Composer's main toolbar.</p>
        
        <table border="1" class="align-left" style="border-collapse: collapse; border-width: 1px; width: 570px;"><tbody><tr><td style="background-color: rgb(35, 111, 161); width: 213px;"><span style="color: rgb(236, 240, 241);">Create new Animation  
        </span></td><td style="width: 356.333px;">MyAnimation</td></tr><tr><td style="background-color: rgb(35, 111, 161); width: 213px;"><span style="color: rgb(236, 240, 241);">Location  
        </span></td><td style="width: 356.333px;">/Animations  
        </td></tr><tr><td style="background-color: rgb(35, 111, 161); width: 213px;"><span style="color: rgb(236, 240, 241);">Property  
        </span></td><td style="width: 356.333px;">Position  
        </td></tr><tr><td style="background-color: rgb(35, 111, 161); width: 213px;"><span style="color: rgb(236, 240, 241);">Interpolation  
        </span></td><td style="width: 356.333px;">Spline</td></tr><tr><td style="background-color: rgb(35, 111, 161); width: 213px;"><span style="color: rgb(236, 240, 241);">Create new keyframe sequence  
        </span></td><td style="width: 356.333px;">X and Y  
        </td></tr></tbody></table>
        
        <div drawio-diagram="8411"><img src="https://doc316en.candera.eu/uploads/images/drawio/2025-05/drawing-5-1748007940.png" alt=""/></div>
        
        <div class="contents" id="bkmrk--2"></div>
3. In the **Animation Configuration** panel's scene tree select the same **Cover** node as before. In the Properties panel click on the **\[+\]** button. 
    - The Property Animation Configuration will be opened.
4. In the **Property Animation Configuration** apply the settings as in the table below and press **\[OK\]**. 
    - A new keyframe sequence for the property "scale" has been added to the existing animation **MyAnimation.**
    - This can be seen in the **Animation Timeline**, in the **Animation Values** panel and in the **Properties** panel.  
        <table border="1" class="align-left" style="border-collapse: collapse; border-width: 1px; width: 570px;"><tbody><tr><td style="background-color: rgb(35, 111, 161); width: 213px;"><span style="color: rgb(236, 240, 241);">Selected Animation  
        </span></td><td style="width: 356.333px;">MyAnimation</td></tr><tr><td style="background-color: rgb(35, 111, 161); width: 213px;"><span style="color: rgb(236, 240, 241);">Property  
        </span></td><td style="width: 356.333px;">Scale  
        </td></tr><tr><td style="background-color: rgb(35, 111, 161); width: 213px;"><span style="color: rgb(236, 240, 241);">Interpolation  
        </span></td><td style="width: 356.333px;">Spline</td></tr><tr><td style="background-color: rgb(35, 111, 161); width: 213px;"><span style="color: rgb(236, 240, 241);">Create new keyframe sequence  
        </span></td><td style="width: 356.333px;">X and Y  
        </td></tr></tbody></table>
5. In the **Animation Values** panel select the animated properties and enter the configurations from the table below. 
    - The keyframes for the animated properties are fully configured.  
        <table border="1" class="align-left" style="border-collapse: collapse; border-width: 1px; width: 250px;"><tbody><tr><td colspan="3" style="background-color: rgb(35, 111, 161);"><span style="color: rgb(255, 255, 255);">IVI\_Sample\\Music\\Cover\\**Position**\\XY</span></td></tr><tr><td style="background-color: rgb(53, 152, 219);"><span style="color: rgb(255, 255, 255);">**Time**</span></td><td style="background-color: rgb(53, 152, 219);"><span style="color: rgb(255, 255, 255);">**X**</span></td><td style="background-color: rgb(53, 152, 219);"><span style="color: rgb(255, 255, 255);">**Y**</span></td></tr><tr><td>0</td><td>138.00</td><td>140.00</td></tr><tr><td>1000</td><td>104.00  
        </td><td>207.00</td></tr></tbody></table>
        
        <table border="1" class="align-left" style="border-collapse: collapse; border-width: 1px; width: 250px;"><tbody><tr><td colspan="3" style="background-color: rgb(35, 111, 161);"><span style="color: rgb(255, 255, 255);">IVI\_Sample\\Music\\Cover\\**Scale**\\XY</span></td></tr><tr><td style="background-color: rgb(53, 152, 219);"><span style="color: rgb(255, 255, 255);">**Time**</span></td><td style="background-color: rgb(53, 152, 219);"><span style="color: rgb(255, 255, 255);">**X**</span></td><td style="background-color: rgb(53, 152, 219);"><span style="color: rgb(255, 255, 255);">**Y**</span></td></tr><tr><td>0</td><td>0.50</td><td>0.50</td></tr><tr><td>1000</td><td>1.00</td><td>1.00</td></tr></tbody></table>

### Check Animation in Player

Use the Player to check the configured animation.

1. Save your solution and click the \[Play selected scenario...\] icon on the toolbar to start the Player.  
    
    - Three windows will open, and you can see that the simulation display shows the IVI\_Sample scene.
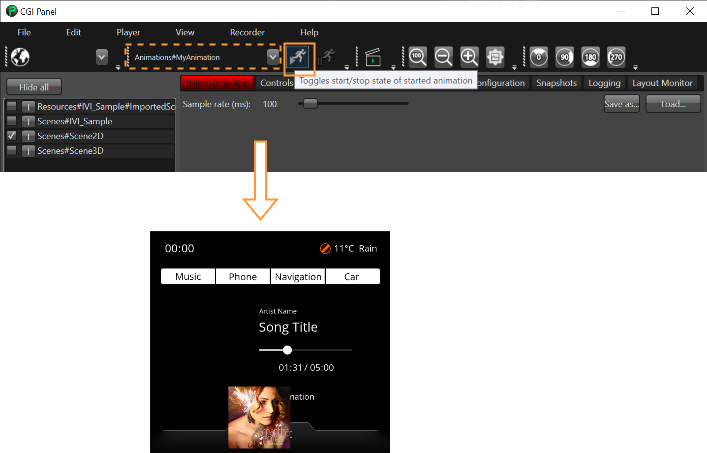
2. In CGI Panel below the menu select your animation from the drop-down list and press the "run animation" button right next to the drop-down list.  
    
    - The configured animation of the Cover image will be started and played once in the simulation display.
    
    <div drawio-diagram="4428"><img src="https://doc316en.candera.eu/uploads/images/drawio/2023-09/drawing-5-1696002805.png" alt=""/></div>