# Part 3: Configure Behaviors

This page explains how to configure interaction between various components of the scene with Behaviors using Fusion.

<div class="contents" id="bkmrk-changing-the-playbac"><div class="contents"><div class="textblock">

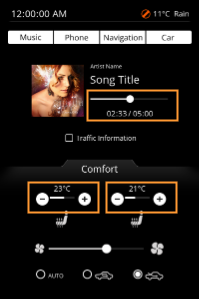
- Changing the playback time value by moving the slider knob for playback music
- Changing the state of the temperature progress bar by pressing the seat heater buttons

</div></div></div>### Configuring the Music's Playback Time Slider  


1. In the Scene Tree panel navigate to and select the **Slider** control, which can be found following the path below. 
    - The Slider Control is selected.  
        <table border="1" class="align-left" style="border-collapse: collapse; border-width: 1px; width: 570px;"><tbody><tr><td style="background-color: rgb(35, 111, 161); width: 150px;"><span style="color: rgb(236, 240, 241);">Scene Tree Path  
        </span></td><td style="width: 419px;">IVI\_Sample &gt; IVI\_Sample &gt; Music &gt; **Slider**  
        </td></tr></tbody></table>
2. In the Menu select **\[View &gt; Fusion &gt; Fusion\]**.  
    
    - The Fusion editor will be opened, hiding the Scene Editor.
    - The **Slider Fusion Node** is displayed as Top node with a set of properties.
3. In the **\[Slider\]** Fusion Node drag the Behaviors connector circle to the right and release the mouse. 
    - A **Select Behavior** dialog will be opened.
    - This dialog has an input field on top and a list of behaviors organized as a tree on the bottom.
    - This list of behaviors is similar to the one in the Toolbox panel's **\[Behaviors\]** section.
4. In the Select Behavior dialogue's input field start typing "**Forward Value**".  
    
    - While you are typing the list of behaviors gets smaller as the content of the input field serves as a filter.
5. In the Select Behaviors dialog **double-click** the **Forward Value** behavior. 
    - In Fusion a new **\[Forward Value\]** node is created, which is connected to the Slider's Behaviors connector.
6. In the **\[Forward Value\]** node click the search icon next to the property "Target Node". 
    - The **Choose Item** dialog will be opened.
7. Select the IVI\_Sample scene's **DigitalClock\_Time** control, which can be found following the path below and click **\[OK\]**. 
    - **DigitalClock\_Time** is set as Forward Value's TargetNode.
    - When the Slider's value is changed, the value will be forwarded to DigitalClock\_Time.  
        <table border="1" class="align-left" style="border-collapse: collapse; border-width: 1px; width: 570px;"><tbody><tr><td style="background-color: rgb(35, 111, 161); width: 100px;"><span style="color: rgb(236, 240, 241);">Path</span></td><td>IVI\_Sample &gt; IVI\_Sample &gt; Music &gt; **DigitalClock\_Time**</td></tr></tbody></table>

<div class="contents" id="bkmrk--1"><div class="contents">  
</div></div>### Configuring Seat Heater Setting

#### Creating Fusion Nodes

1. In the Scene Tree panel select the Seat\_Right's "**Icon\_Button\_-**", which can be found following the path below. 
    - Fusion displays the Fusion Node for "**Icon\_Button\_-**".  
        <table border="1" class="align-left" style="border-collapse: collapse; border-width: 1px; width: 570px;"><tbody><tr><td style="background-color: rgb(35, 111, 161); width: 100px;"><span style="color: rgb(236, 240, 241);">Path</span></td><td>IVI\_Sample &gt; IVI\_Sample &gt; Comfort&gt; Seat\_Right &gt; **Icon\_Button\_-**</td></tr></tbody></table>
2. In Fusion drag the Fusion Node's Behaviors connector to the right and release the mouse button.  
    
    - The Select Behavior dialog will open.
3. Find the "**Event Handler**" behavior and double-click it. 
    - A Fusion node for the **Event Handler** behavior is created.
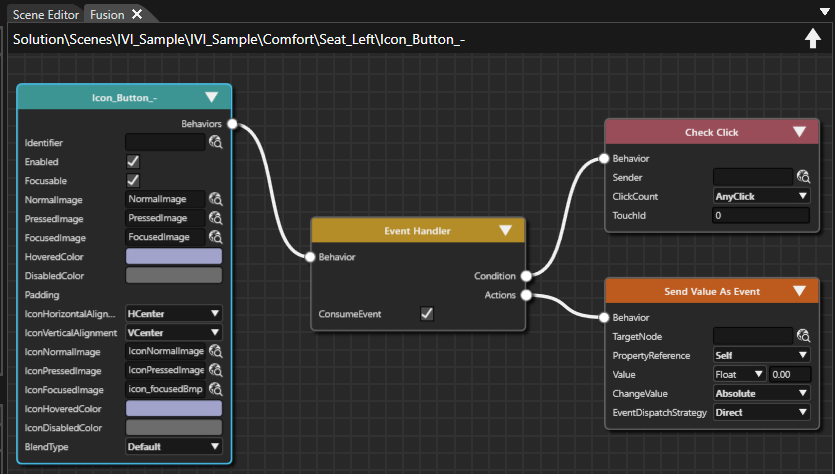
4. Using the Event Handler's Condition connector connect a **Check Click** condition. 
    - A Fusion node for the Check Click condition is created.
5. Using the Event Handler's Actions connector, connect a **Send Value As Event** behavior.  
    
    - A Fusion node for the **Send Value As Event** behavior is created.
    - The Fusion diagram will look like in the image below. <div drawio-diagram="8468"><img src="https://doc316en.candera.eu/uploads/images/drawio/2025-06/drawing-5-1751007068.png" alt=""/></div>
6. Select the 3 Fusion Nodes you have just created **(Event Handler, Check Click, Send Value As Event)** and copy them either using the context menu "Copy" or via the keyboard shortcut &lt;Ctrl + C&gt;. 
    - Fusion Nodes are copied and ready to be pasted into another Fusion diagram.
7. Select the IconButtons in the table below one by one and paste these Fusion Nodes into their Fusion diagrams either using the context menu "Paste" or via the keyboard shortcut &lt;Ctrl + P&gt;. 
    - EventHandler, Check Click condition and Send Value As Event behavior have been created for all 4 seat heating Icon\_Buttons.  
        <table border="1" class="align-left" style="border-collapse: collapse; border-width: 1px; width: 570px;"><tbody><tr><td style="background-color: rgb(35, 111, 161); width: 100px;"><span style="color: rgb(236, 240, 241);">Path</span></td><td>IVI\_Sample &gt; IVI\_Sample &gt; Comfort&gt; Seat\_Right &gt; **Icon\_Button\_+**</td></tr><tr><td style="background-color: rgb(35, 111, 161); width: 100px;"><span style="color: rgb(236, 240, 241);">Path  
        </span></td><td>IVI\_Sample &gt; IVI\_Sample &gt; Comfort&gt; Seat\_Left &gt; **Icon\_Button\_-**</td></tr><tr><td style="background-color: rgb(35, 111, 161); width: 100px;"><span style="color: rgb(236, 240, 241);">Path  
        </span></td><td>IVI\_Sample &gt; IVI\_Sample &gt; Comfort&gt; Seat\_Left &gt; **Icon\_Button\_+**</td></tr></tbody></table>

#### Configuring Value Behaviors  


When pressing Icon\_Button\_-, the value should be decreased (-1,00) and when pressing Icon\_Button\_+, the value should be increased (+1,00). These value changes need to be reflected in the corresponding ProgressBar, which will be set as TargetNode.

1. In Scene Tree panel select the Icon\_Buttons of Seat\_Right and Seat\_Left one by one. In Fusion configure their **Send Value As Event** Nodes that you created in "Creating fusion nodes" as in the table below. 
    - The Send Value As Event Nodes are fully configured and functional.  
        <table border="1" class="align-left" style="border-collapse: collapse; border-width: 1px; width: 570px;"><tbody><tr><td style="background-color: rgb(35, 111, 161); width: 110px;"><span style="color: rgb(255, 255, 255);">**Seat\_Right**  
        </span></td><td style="background-color: rgb(35, 111, 161); width: 200px;"><span style="color: rgb(255, 255, 255);">Icon\_Button\_-</span>  
        </td><td style="background-color: rgb(35, 111, 161); width: 200px;"><span style="color: rgb(255, 255, 255);">Icon\_Button\_+</span></td></tr><tr><td style="background-color: rgb(35, 111, 161); width: 110px;"><span style="color: rgb(236, 240, 241);">TargetNode  
        </span></td><td>Seat\_Right &gt; ProgressBar  
        </td><td>Seat\_Right &gt; ProgressBar  
        </td></tr><tr><td style="background-color: rgb(35, 111, 161); width: 110px;"><span style="color: rgb(236, 240, 241);">Value  
        </span></td><td>-1,00  
        </td><td>1,00  
        </td></tr><tr><td style="background-color: rgb(35, 111, 161); width: 110px;"><span style="color: rgb(236, 240, 241);">Change Value  
        </span></td><td>Relative  
        </td><td>Relative  
        </td></tr></tbody></table>


        <table border="1" class="align-left" style="border-collapse: collapse; border-width: 1px; width: 570px;"><tbody><tr><td style="background-color: rgb(35, 111, 161); width: 110px;"><span style="color: rgb(255, 255, 255);">**Seat\_Left**  
        </span></td><td style="background-color: rgb(35, 111, 161); width: 200px;"><span style="color: rgb(255, 255, 255);">Icon\_Button\_-</span>  
        </td><td style="background-color: rgb(35, 111, 161); width: 200px;"><span style="color: rgb(255, 255, 255);">Icon\_Button\_+</span></td></tr><tr><td style="background-color: rgb(35, 111, 161); width: 110px;"><span style="color: rgb(236, 240, 241);">TargetNode  
        </span></td><td>Seat\_Left &gt; ProgressBar  
        </td><td>Seat\_Left &gt; ProgressBar  
        </td></tr><tr><td style="background-color: rgb(35, 111, 161); width: 110px;"><span style="color: rgb(236, 240, 241);">Value  
        </span></td><td>-1,00  
        </td><td>1,00  
        </td></tr><tr><td style="background-color: rgb(35, 111, 161); width: 110px;"><span style="color: rgb(236, 240, 241);">Change Value  
        </span></td><td>Relative  
        </td><td>Relative  
        </td></tr></tbody></table>
2. In the Scene Tree panel select the **Seat\_Right &gt; ProgressBar**. In Fusion drag the ProgressBar's Behaviors connector to the right and release the mouse button.   
    
    - The Select Behavior dialog box will open.
3. Find the "**ForwardValue**" behavior and double-click it. 
    - A Fusion node for **ForwardValue** behavior is created.
4. Configure the ForwardValue behavior's **TargetNode** to the Seat\_Right's TextValue\_Temperature node. 
    - The ProgressBar is configured to forward its value to the respective TextValue\_Temperature node.  
        <table border="1" class="align-left" style="border-collapse: collapse; border-width: 1px; width: 570px;"><tbody><tr><td style="background-color: rgb(35, 111, 161); width: 90px;"><span style="color: rgb(236, 240, 241);">  
        </span></td><td style="background-color: rgb(35, 111, 161); width: 480.333px;"><span style="color: rgb(255, 255, 255);">**Seat\_Right &gt; ProgressBar --&gt; Fusion ForwardValue Node**</span>  
        </td></tr><tr><td style="background-color: rgb(35, 111, 161); width: 90px;"><span style="color: rgb(236, 240, 241);">TargetNode</span></td><td style="width: 480.333px;">IVI\_Sample &gt; IVI\_Sample &gt; Comfort&gt; Seat\_Right &gt; TextValue\_Temperature  
        </td></tr></tbody></table>
5. Repeat steps 2 - 4 with **Seat\_Left &gt; ProgressBar** configure the TargetNode as in the table below.  
    
    - The ProgressBar is configured to forward its value to the respective TextValue\_Temperate node.  
        <table border="1" class="align-left" style="border-collapse: collapse; border-width: 1px; width: 570px;"><tbody><tr><td style="background-color: rgb(35, 111, 161); width: 90px;"><span style="color: rgb(236, 240, 241);">  
        </span></td><td style="background-color: rgb(35, 111, 161); width: 480.333px;"><span style="color: rgb(255, 255, 255);">**Seat\_Left &gt; ProgressBar --&gt; Fusion ForwardValue Node**</span></td></tr><tr><td style="background-color: rgb(35, 111, 161); width: 90px;"><span style="color: rgb(236, 240, 241);">TargetNode</span></td><td style="width: 480.333px;">IVI\_Sample &gt; IVI\_Sample &gt; Comfort&gt; Seat\_Left &gt; TextValue\_Temperature  
        </td></tr></tbody></table>

<div class="contents" id="bkmrk--6"></div>### Checking the Configuration in Player  


Use the Player to check the functionality of the behaviors configured in Fusion.

#### Checking the Behavior's Functionality

In the Player you can test the interactivity between the music Slider and the numeric display of the playback time.

1. Save your solution and click the \[Play selected scenario...\] icon on the toolbar to start the Player.  
    
    - Three windows will open, and you can see that the simulation display shows the IVI\_Sample scene,
2. In the simulation display drag the slider's knob below the "Song Title".  
    
    - While dragging you can watch the digital playback time, which is displayed below the slider, increase and decrease accordingly.
3. In the scene's lower "Comfort" part click on the \[+\] and \[-\] buttons for seat heating.
    
    
    - The progress bar will change its value
    - The numeric temperature displayed above the progress bar will be updated according to your operation.  
        <div drawio-diagram="8408"><img src="https://doc316en.candera.eu/uploads/images/drawio/2025-05/drawing-5-1748000000.png" alt=""/></div>

<div class="contents" id="bkmrk-drag-a-progress-bar-"><div class="contents"><div class="textblock">  
</div></div></div>