# Creating Content with various DCC Tools
As CGI-Studio is building on standard data formats like FBX, PNG, TIFF or TGA it is possible to use almost all modern digital content creation tools (DCC tools) to create 2D/3D content. Examples for 3D content tools are Autodesk 3DS Max, Autodesk Maya or MAXON Cinema 4D. Examples for 2D DCC Tools are Adobe Photoshop or Corel Draw. Usually, it is no problem to use many of them for one project but sometimes it can lead to problems because of the different creation methods these tools prefer. In this chapter we want to explain best practices in the CGI-Studio tool chain and how to overcome different obstacles you may face.
### General Recommendations
#### Use a single 3D DCC Tool
It is recommended to use only one 3D DCC tool for one project and not to mix content created from e.g. Cinema 4D and 3ds Max. This guarantees the best outcome without import problems. If there is a need to use more than one tool you have to be aware to fix import/export problems afterwards.
#### Mixing Content from 3ds Max and Cinema 4D
If you are forced to mix the content from 3ds Max and Cinema 4D you have to be aware that the handling of the coordinate systems is totally different. If you use an exported camera from Cinema 4D this camera usually has Y as up vector. So, if you load a 3D object from 3ds Max in the Scene Composer into a scene which was created by Cinema 4D you will see that your object is maybe rotated 90 degrees around the X axis. A simple fix is to rotate the object back -90 degrees around the X axis. However, by exporting the FBX file with option “Up Vector: Y” this can also be handled easy.
#### Use same FBX Plugin Version in whole Workflow
Using different FBX plugins within the workflow will may result in strange behavior and appearance of objects after importing them into CGI-Studio or when editing them in your 3D DCC tool after re-import with another plugin version.
The FBX versions are recommended as in the following table:
| **Scene Composer Version** | **FBX Version** |
| 3.3.0 | 7.4 or newer |
| 3.3.1 or newer | 7.4 or newer |
#### FBX Export Settings
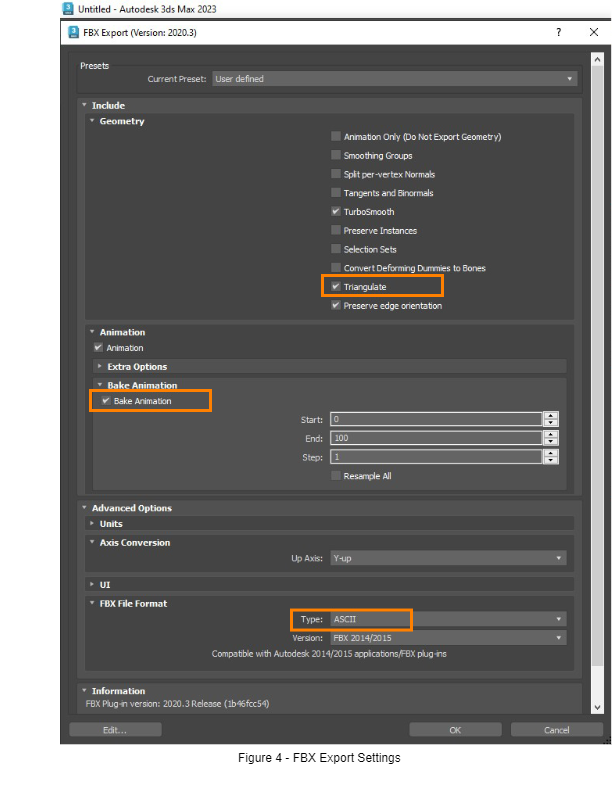
In general, we recommend starting with the default preset “Autodesk Media & Entertainment” and then manually setting the following options (Figure 4):
- Include -> Geometry -> Triangulate \[ON\]
(To ensure conversion of all polygons to triangles. Not available in some older FBX plugin versions.)
- Include -> Animation -> Bake Animation \[ON\]
(To preserve non-standard animations such as camera movement along a spline.)
- Advanced Options -> FBX File Format -> Type: ASCII
(Is human readable and easier to version in SCM tools.)
Only if you use a virtual Y-up axis” in 3ds Max (as shown in [Switching to a virtual Y-up Axis in 3ds Max](#bkmrk-switching-to-a-virtu)) then you should also set:
- Advanced Options -> Axis Conversion -> Up Axis: Z-up Tip: It’s advisable to save the modified export settings as new preset.
### Best Practice for 3ds Max
If you use 3ds Max alone for the whole project, then it is best to stay with its Z-up coordinate system. This means that you do not have to rotate every single object till it fits the OpenGL coordinate system used by CGI-Studio. The only thing you must consider when exporting a scene with the Autodesk 3ds Max FBX plug-in you have to choose Y as up vector to match the OpenGL coordinate system.
However, in some cases you may need to work with a Y-up coordinate system in 3ds Max. Examples are animations in 3ds Max which are to be combined with Cinema 4D content in Scene Composer. The following chapter shows how to setup a virtual Y-up axis.
#### Switching to a virtual Y-up Axis in 3ds Max
As 3ds Max uses “Z” as default up axis it is not possible with an in-built option to switch to another up axis. But with some tweaks you can change the up axis to “Y” and work within 3ds Max the same as you are working in a usual OpenGL coordinate system:
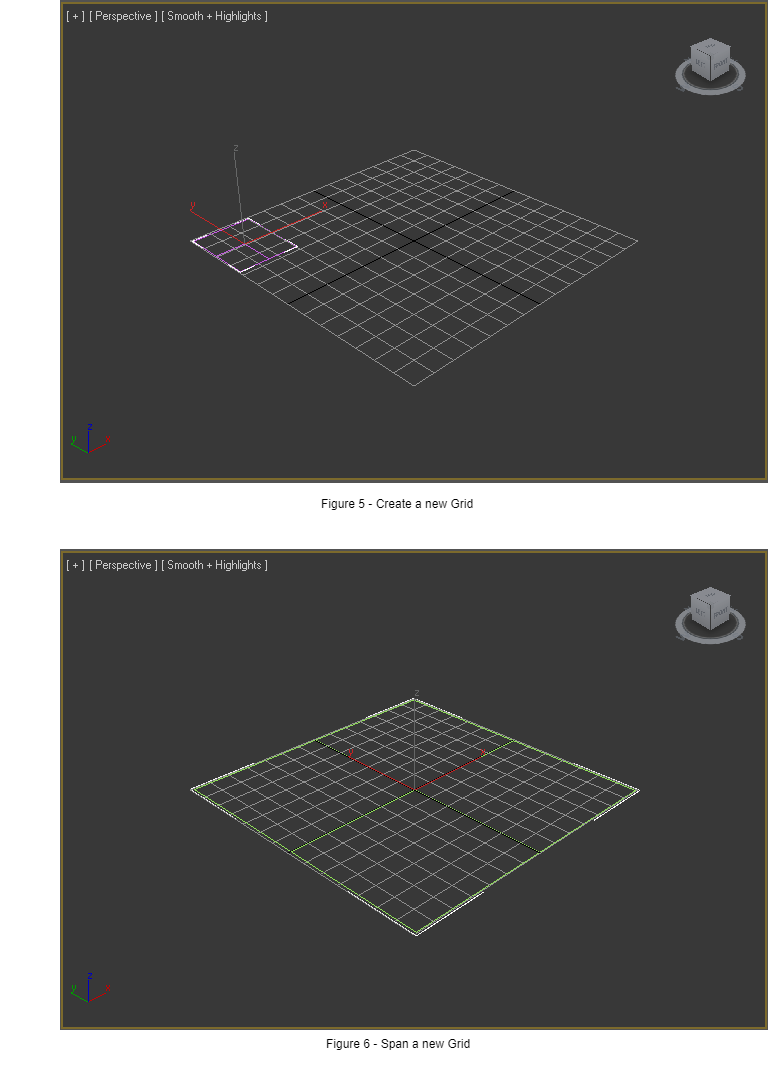
1\. Create a new Grid in the 3ds Max menu “Create” -> “Helpers” -> “Grid” and span the new Grid over the already existing one (refer to following two figures)
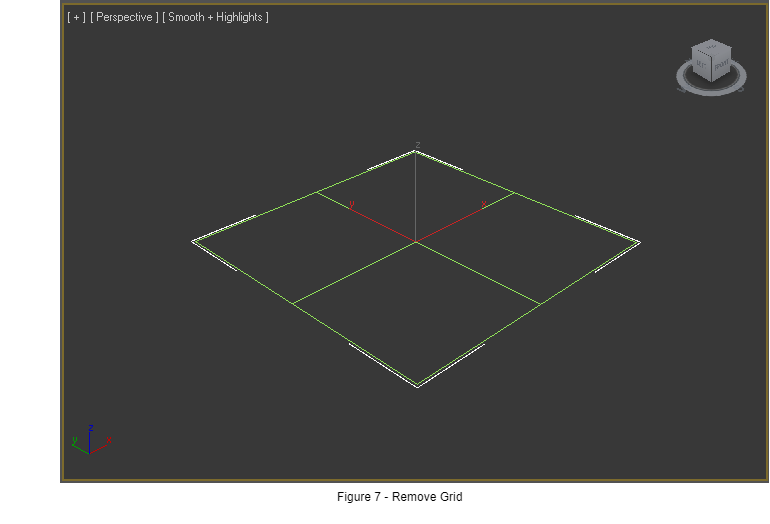
2\. Remove the existing Grid with the shortcut “G” in 3ds Max. (see the result in Figure 3)
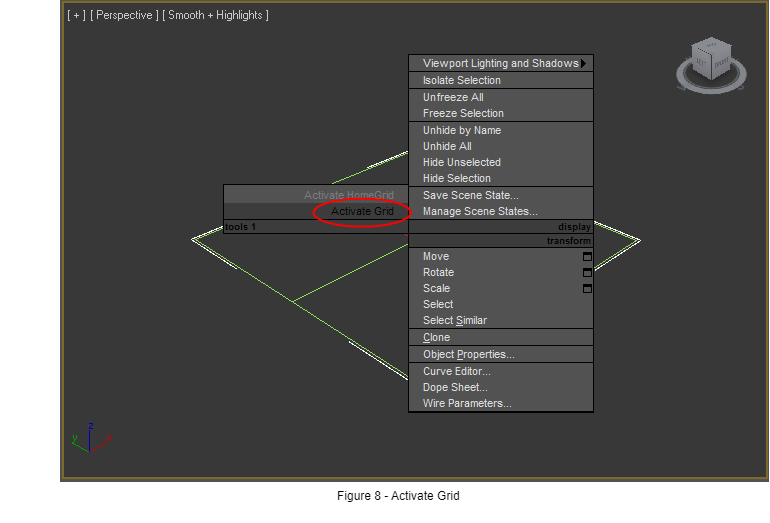
3\. Right click on the new grid an select “Activate Grid” from the context menu:
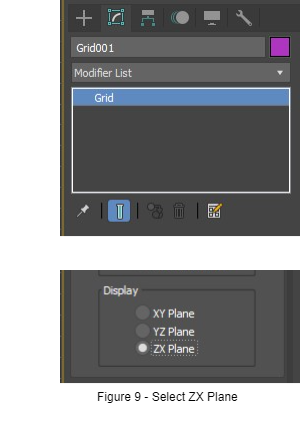
4\. Go to the “Modifier” Tab and change the Grid orientation to “ZX Plane”:
5\. Right click on the Grid, in the context menus select “Freeze Selection”.
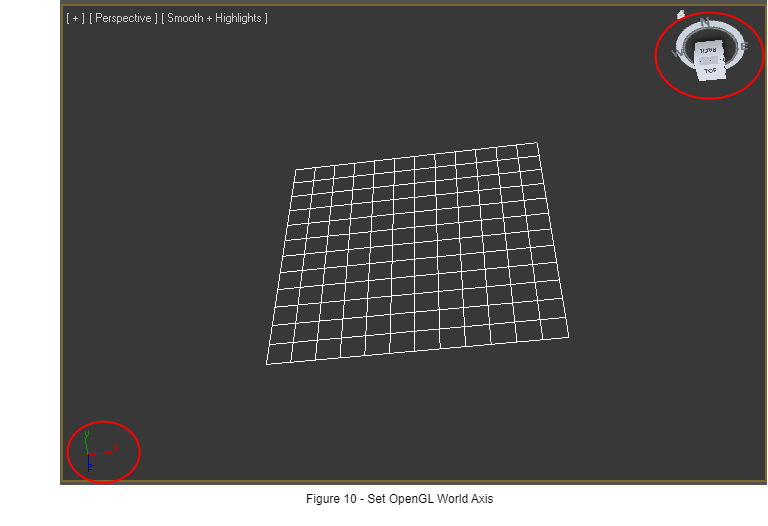
6\. Orbit the whole view to see the world axis like in OpenGL, which is Y-up, X-right, Z-front:
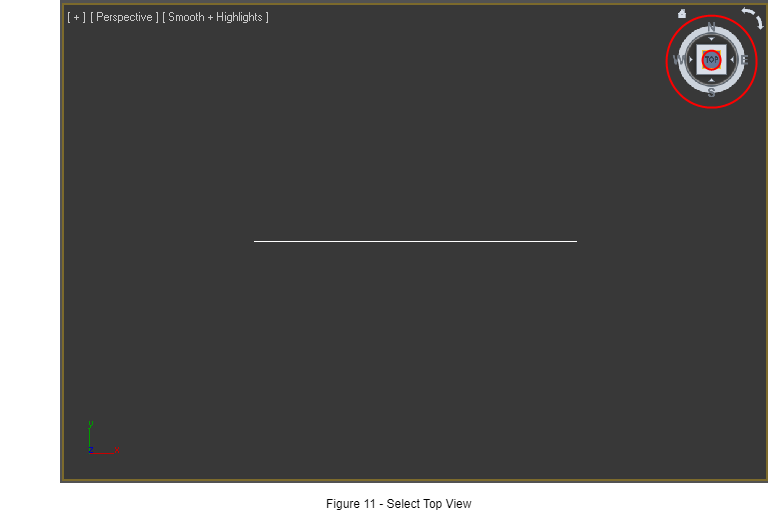
7\. Click “Top” on the View Cube to fix the view to a 100% “top view”. Please take care that the North-South-East-West is the same as in Figure 8.
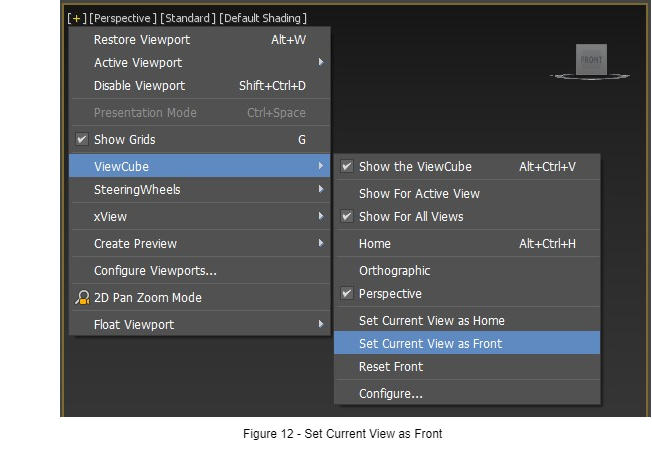
8\. As last step, click on the small plus (“+”) sign in the top left corner and select “View Cube” -> “Select current view as front”
You have created now a new “virtual” OpenGL view coordinate system and can work in 3ds Max with “Y” as up axis. (Hint: the easiest way to orbit around the scene is now with the help of the View Cube).
But please remember to export with the Option “Z” as up axis in the FBX Exporter when working in this way.
#### Render Settings Width and Height
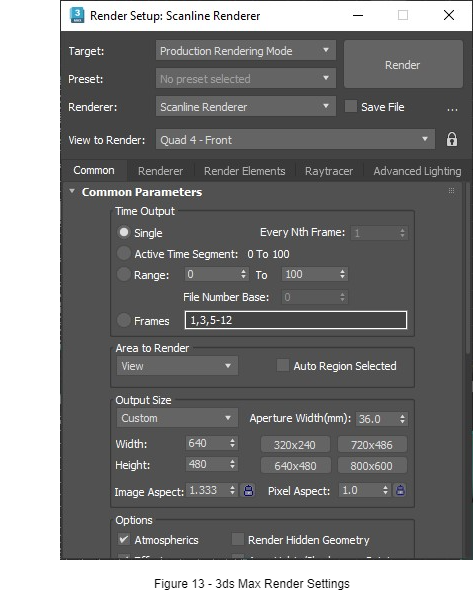
The 3ds Max FBX import plug in does not read out the film width and height stored in the FBX file. So, if you open a FBX file in 3ds Max and save it back again you have to take care to type in always the correct width and height of your project. Otherwise, the aspect ratio of the camera will not be calculated correctly, and you will have a distorted view in your project.
#### Camera “Near Range” and “Far Range”
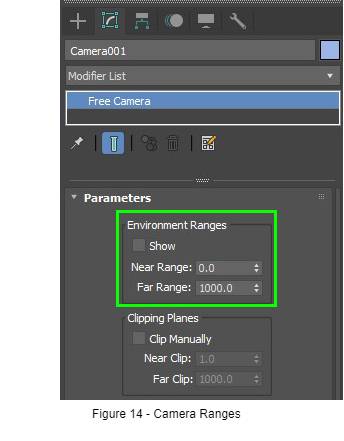
3ds Max has camera properties “Near Range” and “Far Range”. These values are imported correctly by CGI-Studio Scene Composer but 3ds Max does not take these values into account.
This means: If you create a camera in 3ds Max and look through the Camera on your scene then you can see always infinitely far into your scene. The Far Range has no limiting effect in 3ds Max. Please consider this when exporting the camera – it could be that you see your scene in 3ds Max but nothing in the Scene Composer because the Scene Composer (i.e., the Candera engine) always takes the near and far range into account.
####
Camera FOV
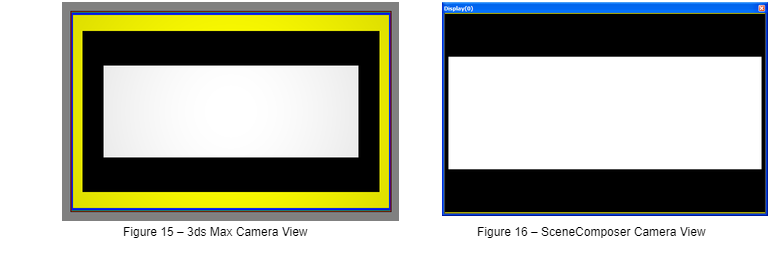
Sometimes, especially at wide angles, the camera field of view may appear different in SceneComposer from how it has been set up in 3ds Max:
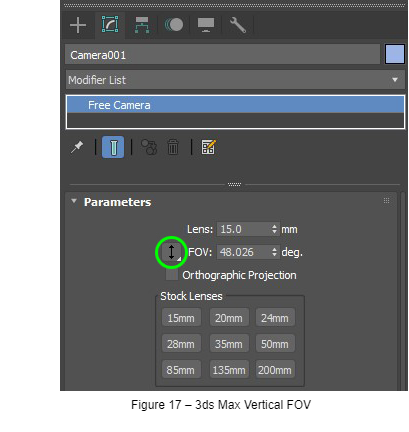
That’s because in OpenGL the FOV angle is defined vertically while in 3ds Max the default is horizontal. Therefore, when working with CGI content always set the camera FOV to vertical within the 3ds Max camera parameters:
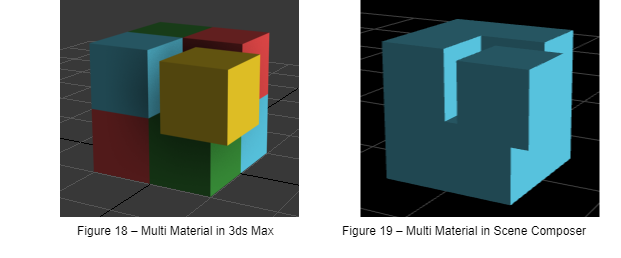
#### Multi/Sub-Object Materials
If multi materials have been assigned to (sub objects of) a mesh, only the first material is taken over into Scene Composer.
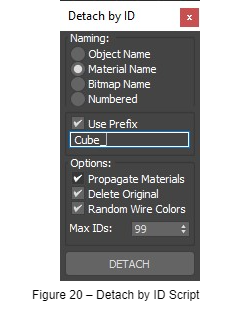
The easiest way to overcome this is to run the [Detach by Material ID](http://www.scriptspot.com/3ds-max/scripts/detach-by-material-id) script by Jefferson Lim. It splits the mesh into sub objects based on the different sub-object materials assigned to it.
#### Material Brightness Discrepancies
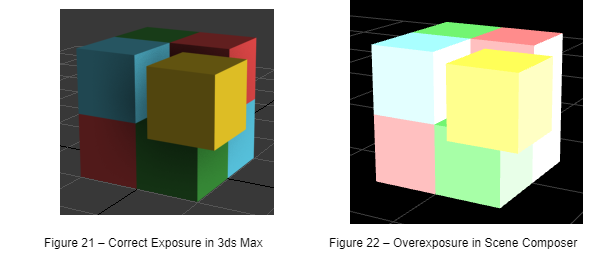
Often a scene which is lit just right in 3ds Max appears overexposed in Scene Composer:
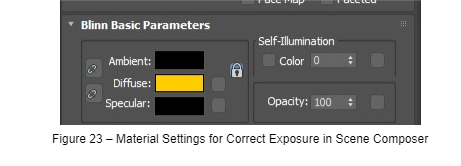
That’s due to differences how 3ds Max and Scene Composer handle Ambient and Specular material settings. To fix that kind of overexposure just make sure that Ambient and Specular are set to a dark color. Black might be a good start if no explicit highlights and ambient tones are used in the scene.
#### Affect Pivot only / Affect Object only / Affect Hierarchy only
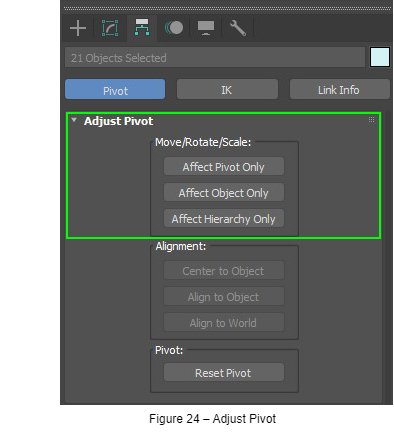
3ds Max has tools to move the pivot point of an object independent from the object itself. (Affect Pivot only / Affect Object only / Affect Hierarchy only) They are can be found in the Adjust Pivot section under the Hierarchy tab.
Our recommendation is to not use these tools but to create additional Groups in 3ds Max if Pivot functionality is needed. The reason for this is that 3D-Engines usually (like Candera) do not support independent Pivot Points from Objects. The recommended way to realize this feature is to generate empty Groups or Dummy Objects (“Null”-Nodes) and make the 3D object a child of the Group. After the 3D Object is a child of the (Pivot) Group or Dummy object the position of the Group serves as Pivot point for the object.
#### Fix 3ds Max files with translated Pivot Points
If you come across a 3ds Max or FBX file which already has translated (moved) Pivot Points, it can happen that this FBX file is not correctly imported by the Scene Composer. The experienced effect is seen as objects that are floating around in the scene at arbitrary positions. There are two ways to fix this:
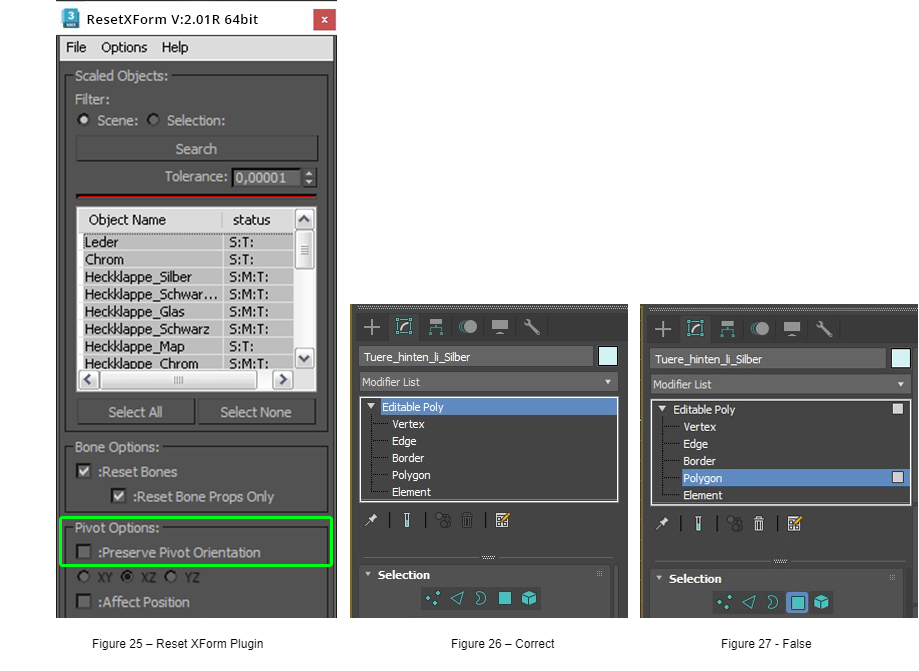
- Use the free [ResetXForm plugin](https://www.scriptspot.com/3ds-max/scripts/reset-xform) by PEN-Productions. For installation drag and drop the \*.mzp file into a Max viewport. Then go to “Customize – Customize User Interface… – Tab Toolbars – Category ‘PEN Tools’. Select ‘Reset XForm UI’ and drop it as new button on the Max toolbar. For correct script usage and configuration please see the following screenshots:
The most important option in the plug-in for fixing the wrong import of Pivot Points is the “Preserve Pivot Orientation” option in the ResetXForm plug-in (Figure 25). This option has to be **de-selected** to create a correct 3D Object for importing in the Scene Composer. (Tipp: You may permanently set the default state of this checkbox by changing the text entry “preserveOrientation=true” to “false” in the script file “PEN\_resetXformV2.ms”.)
Then you may select the objects you wish to reset – or just hit ‘Select All’ – and press ‘Reset X Form’.
You must ensure that none of the selected elements in the plugin’s object listing has an active sublevel selection (vertex, edge, border, polygon or element, as shown in Figure 26) otherwise single scene elements might be placed, scaled or rotated in an unwanted way.
- For scenes with flat object hierarchy, you may also use the ResetXForm functionality from 3ds Max (see 3ds Max documentation). Please keep in mind that objects in groups cannot be reset correctly by 3ds Max. You will have to move the object outside of any group to fix the Transform. You can move back the object into the group after the transform has been fixed.
#####
#### Animations are cut-off in Scene Composer
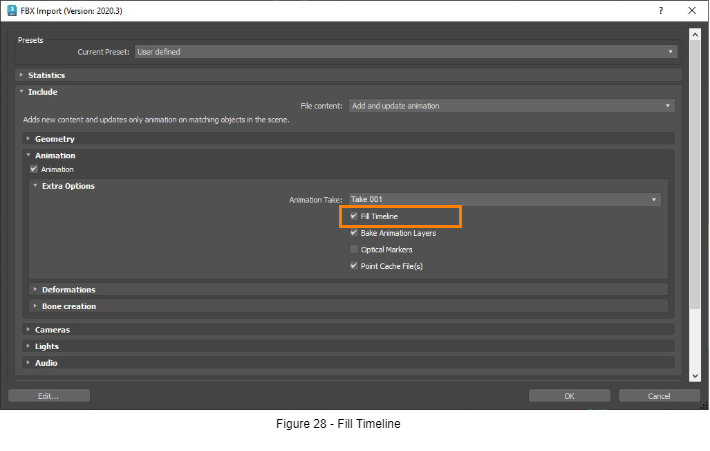
100 frames is the default animation length in 3ds Max. If you import an FBX file in 3ds Max which contains an animation with e.g. 200 frames, the animation will be cut off upon re-saving at frame #100 if you didn’t manually change the timeline length. (In fact the keys after #100 are not deleted but still remain in the FBX. They are just ‘hidden’ by a lower “TimeLineStopTime” value.)
**Solution:**
- Activate „Fill Timeline” (Figure 28) when importing an FBX into 3ds Max. Then the animation timeline is automatically updated in 3ds Max to the correct length.
- Unfortunately this is not the default setting within the importer but remembered if changed once.
##### Animations along a Path don’t work after FBX Export
In 3ds Max you can animate objects along a path or spline. After FBX export this kind of animation may not work anymore.
**Solution:** Activate “Bake Animation” as described in [FBX Export Settings](#bkmrk-fbx-export-settings).
#### Best Practice for Cinema 4D
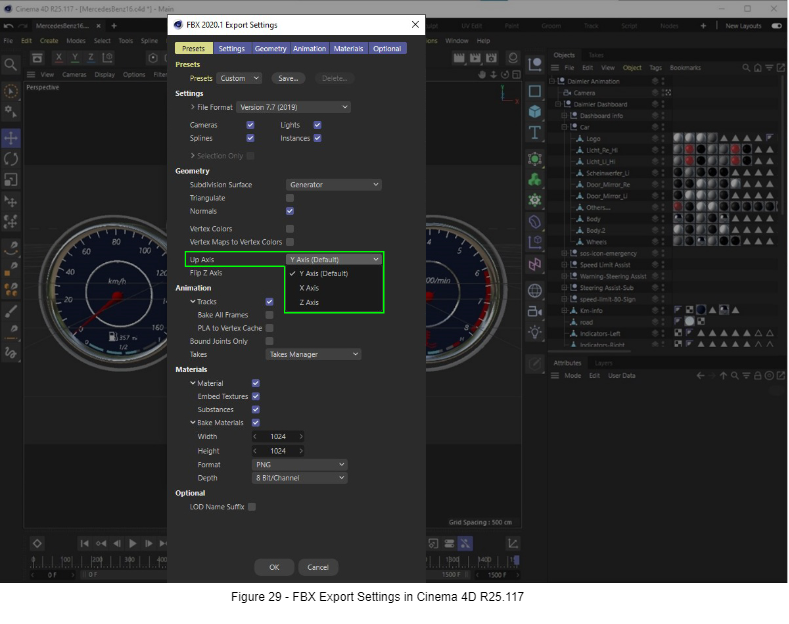
Cinema 4D uses Y-Axis by default as an up-vector and it can be changed to X-Axis or Z-Axis when exporting to FBX in the Geometry section as demonstrated in Figure 29.
#### Best Practice for Maya
##### Pivot Point
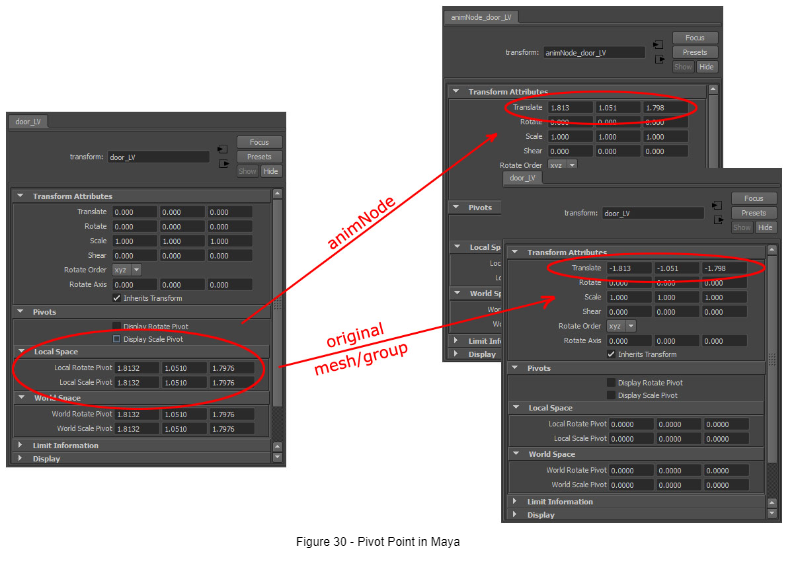
The Local Rotate Pivot and Local Scale Pivot of an object can’t be exported to CGI Studio; all transformations need to be done in the world coordinate system. To simulate a local rotate or scale point, the object can be put under an additional group which translates the objects to the desired position of the local pivot, while the translation of the object itself reverses this translation. See the screenshot for an example. Animating the group will then have the same effect as using a local pivot point.
### General Pitfalls
#### Empty FBX Import in Scene Composer
Sometimes instead of showing the new content the Scene Composer import dialogue stays empty after importing an FBX file. This happens mainly on Windows XP systems and seems to be a problem with external system components which may be resolved by future updates. Until then following workarounds may help:
1. Close the import dialogue and retry a few times to import the FBX. Sometimes each 2nd to 5th try may work.
2. If your scene contains special geometry like NURBS convert it all to meshes before exporting to FBX.
3. Only export part of the scene and try to import into Scene Composer part by part.