# Edit Animations
# Animation Values - Keyframes
#### Animation Values Panel
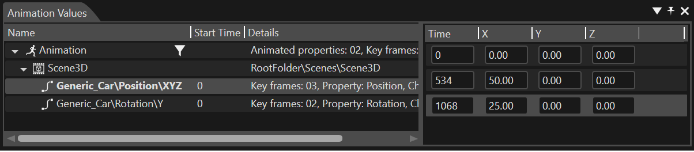
The "Animation Values" panel is used to textually view and edit the properties values and the key frame's sequence times of an animated property. Editing can only be done on the user defined animated properties. The template animated properties, which are displayed italic, can only be viewed.
The left part of the "Animation Values" panel contains the selected animation and its animated properties.
- Selecting an animated property will show its key frames (sequence time and values for the channels) in a table at the right of the panel.
- The sequence time and each key frame's values can be edited manually. One can navigate easily through the table's cells using the Tab or arrows keys.
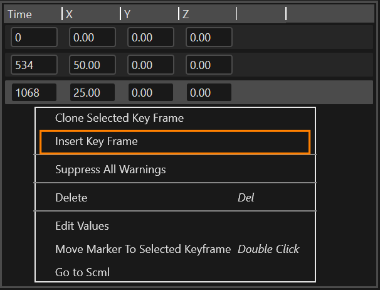
The right table's context menu allows inserting a key frame, deleting a key frame, copy and paste.
---
#### Add a new Keyframe
A new key frame is always added after the highlighted key frame. The new key frame's time and channels' values will be the mean values of the key frames' values it was added between.
If a key frame is added to the last key frame in the table, the channels values are the same as the highlighted key frames values but the new time value will have the same difference to the last like the second to last.
The timeslider can be moved by using "Move marker to selected keyframe" option from the context menu of any keyframe available in "Animation Timeline" or "Animation Values" panels.
##### Delete a Keyframe
To delete a key frame, select and hit the "Delete Keyframe" context menu item.
---
#### Copy and Paste Keyframes from and to Excel
Selecting one or multiple key frames in the table and hitting "Ctrl+C" copies the sequence times and values of the key frames to the clipboard, for later pasting in Excel. Copying the key frames can also be done via the "Copy" context menu item.
Also a table with the same number of columns can be copied from Excel and pasted by hitting "Ctrl+V" to form the key frames of the animated property. Pasting the key frames can also be done via the "Paste" context menu item.
---
# Timeline Editor
#### Animation Timeline Editor
The "Animation Timeline" panel is used to graphically view and edit the properties' values and the key frames' sequence times of an animated property. The editing can only be done on the user defined animated properties. The template animated properties can only be viewed.
The left column of the "Animation Timeline" panel of the main view of the application contains the selected animation and its animated properties.
---
#### Timeline
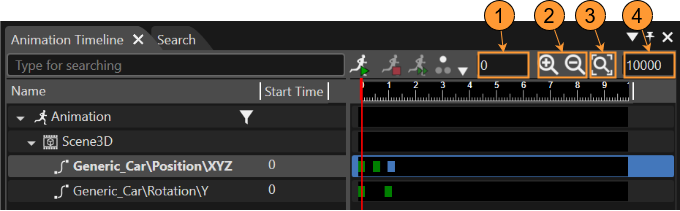
In the Timeline section of Animation Timeline panel,
- user defined animated properties are depicted on a black background, and
- template defined animated properties are depicted on a gray background.
A key frame is represented by
- a green rectangle which is positioned depending on its sequence time.
- A selected frame is represented by a red rectangle.
Time is displayed in the header of the table in the form of a ruler.
- The red bar represents graphically the current time of the animation
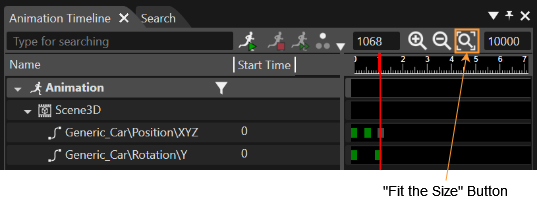
- First text box on the upper right of the panel represents the current time textually. Changing the value of this text box will move the red bar at the specified time, while animated properties will be updated according to the configured animation values for that point in time.
| 1
| Current Time of Animation |
| 2
| Buttons to Increase or Decrease the Time Scale |
| 3
| "Fit to Size" Button |
| 4
| Maximum Time |
- To **increase the scale** of the time ruler, press the "+" button on the upper right of the panel.
- To **decrease the scale** of the time ruler, press the "-" button on the upper right of the panel.
- To make the time ruler **fit to the size** of the panel, press the "magnifying glass" button on the upper right of the panel.
- The **maximum time** of the time ruler can be edited in the last text box on the upper right of the panel.
---
#### Edit Key Frame Values
There are following options to edit a key frame value:
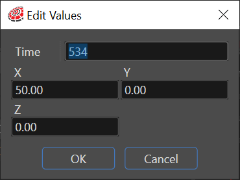
Double click on the red or green rectangle representing the key frame to open the "Edit Values" dialog:
On a selected key frame, use the gizmos available in the Scene Editor to modify the animated property graphically.
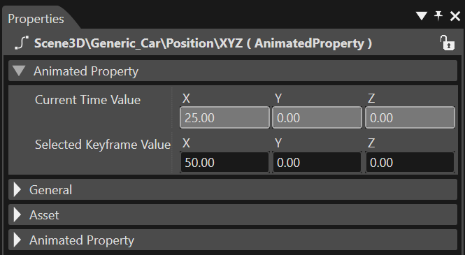
For a selected key frame, all animated properties are displayed in the "Properties" panel and animation values can be modified there:
Alternatively, switch to the Curve Editor by double-clicking on the animated property in the Animation Timeline panel to manipulate key frames by editing the animation value curve. Curve Editor can also be activated by using the context menu item "Show Curve Editor" on a selected animated property.
##### Add, Clone, Move, or Delete Key Frames
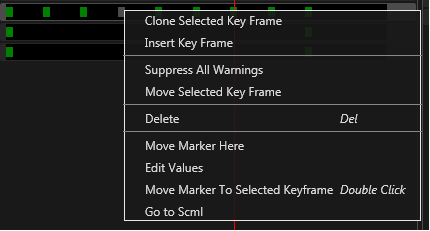
To insert, clone, or delete a key frame at the current time position, use the context menu of the selected key frame in the Timeline Editor:
Key frames can be moved by dragging them along the timeline. Alternatively, the context menu can be used. At the right click, the context menu "Move Selected Keyframe" will give the possibility to choose the desired time value. When double clicking a key frame in both "Animation Timeline" and "Animation Value", the marker will be instantly moved to this key. At the same time, the timeslider can be moved by using "Move marker to selected keyframe" option from the context menu of any keyframe available in "Animation Timeline" or "Animation Values" panels.
Refer to section [Animation Editing Modes](https://doc316en.candera.eu/books/animation-design/page/animation-editing-modes) for a descriptions of helpers available for modifying key frame sequences.
---
#### Change an Animated Transformable
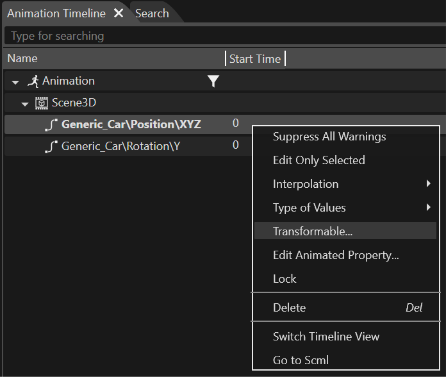
If it is required to apply the configured animated property to another transformable, use the context menu "Transformable..." on the selected animated property. A "Choose Item" dialog will appear which allows to select another transformable from the scene tree.
##### Delete an Animated Property
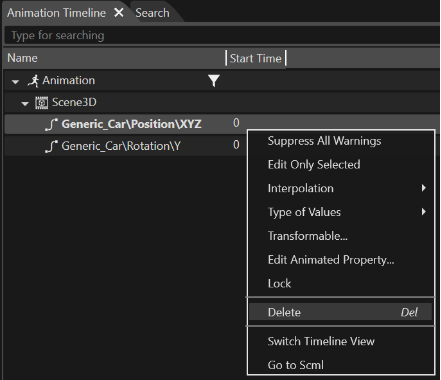
To delete an animated property of the currently selected animation, select it in the left tree and hit the "Delete" menu item of its context menu.
##### Rename or Delete an Animation
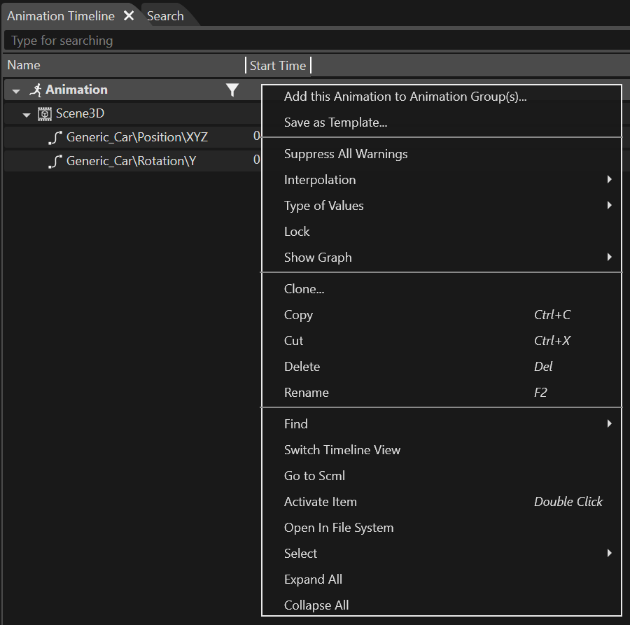
Rename or delete an animation in Timeline Editor by using the context menu of the selected animation:
##### Filter the Visibility of Animated Properties
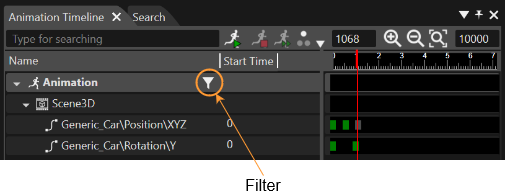
The user has the possibility to select certain animated properties and enter a special editing mode in which only those animated properties are visible in the Animation Timeline, Animation Values and Curve Editor panels.
By pressing the button near the animation name in the Animation Timeline panel, only the animated properties that were previously selected are visible.
---
# Curve Editor
#### Curve Editor
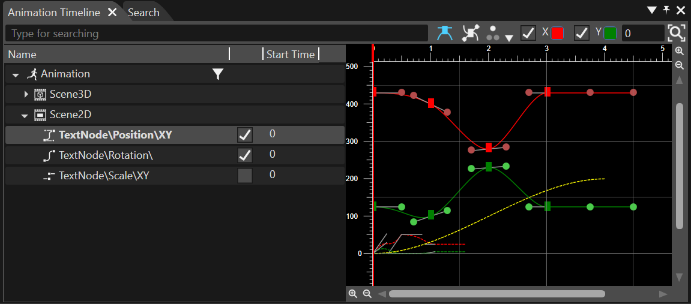
The Curve Editor is a special editing mode in the "Animation Timeline" panel, which allows graphical editing of the animation values on the interpolation curve.
- Double click on an animated property in Animation Timeline panel to open the Curve Editor of the animated property. It is possible to Use ctrl-scroll to zoom-in/out in the Curve Editor.
- Double clicking again switches back to the default editing view in the Timeline Editor.
These two editing modes can also be selected from the context menu of the animated property in Animation Timeline panel.
---
#### Modify Key Frame Values
In "Curve Editor" the vertical ax represents the range of values for the property and the horizontal one the Timeline. The key frame values can be modified by moving them with the mouse.
Depending on the animated property each channel is represented (highlighted with different colors) and can be modified.
On the top right side of the panel following options are available:
- Select the channel which shall be visible in the curve by enabling or disabling the checkbox for the channel.
- Select the color which shall be used to highlight a given channel in the Curve Editor.
- Set the current time by editing the text box in the upper right corner of the panel.
Almost on the top right side of the panel the "Fit the size" button allows the user to set the time ruler to fit the size of the panel.
Refer to Animation editing modes for a description of helpers available for modifying key frame sequences.
---
#### Bézier Animations in Curve Editor
Note that for Bézier Animations, more control points are available to manipulate key frame values.
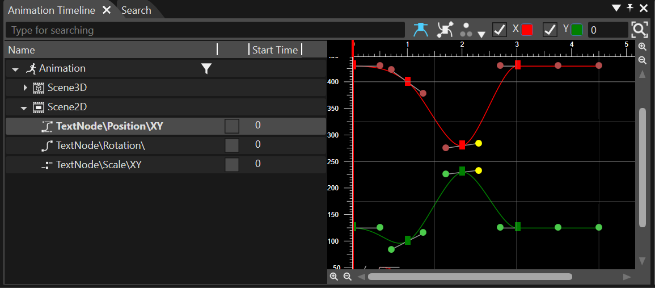
When in curve mode you can see a checkbox next to each animated property in the Animation Timeline panel. This checkbox can be used to configure the visibility of the animation curves. The curve of the currently selected animated property is displayed as continuous line, the remaining curves are displayed as dotted lines.
- In the image above, the first animated Property (Position\\XY) is selected - therefore, the red and green lines are displayed continuously.
- The second animated Property (Rotation) is configured to be visible but is not selected - therefore it is displayed as dotted line (in yellow).
- The last animated Property (Scale) is neither configured to be visible nor is it selected - therefore it is not displayed at all.
##### Enable/Disable control point pairing
Two control points (left and right, on the timeline) can be "paired" when:
- only a keyframe exists between them
- the predecessor of the left control point is also a control point
- the control point following the right control point is also a control point
When Pairing will be disabled, SceneComposer will behave like it does usual - Controls points will be adjusted freely, independently one of another. When Pairing is enabled the user drags the selected control point, the paired control point will automatically be adjusted so that the control points and the keyframe are colinear (are on the same line) and the keyframe lines in the middle of the segment determined by the two control points.
##### Show/Hide tangents
The Bézier tangents can be shown or hidden. This feature is applied to Bézier interpolation and is available through a toggle button "Show tangents".
The button will become available when at least one animated property within the selected ones has Bézier interpolation. The tangents will be drawn by connecting each keyframe to the nearest control point(s) (one control point - on one side - or two control points - on both sides). A control point surrounded by two keyframes is excluded from this rule. Also, all control points before the first keyframe and the control points after the last keyframe are excluded from this rule.
---
# Animation Editing Modes
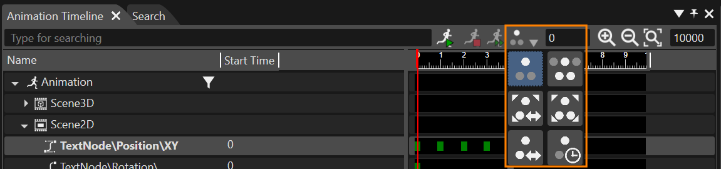
Both in Animation Timeline Editor and in Curve Editor, following animation editing modes are available:
- Move key frame without restriction
- Move only between neighbors
- Scale earlier, move later key frames
- Scale key frames
- Shift all key frames
- Move later key frames of all animated properties
If multiple animated properties are selected (by using the CTRL + left click), the related operation will affect all selected animated properties.
For "Move key frame without restrictions" and "Move only between neighbors", the operation can only be applied to a single selected key frame.
---
#### Move key frame without restriction
The key frame is moved without affecting in any way its neighbors.
***Example:*** Consider following key frame sequence with an animation duration of 200 msec.
- KF1: 70,
- KF2: 120,
- KF3: 130
Moving KF2 to 90 ms means -25 % for KF2 without affecting any of its neighbors.
---
#### Move only between neighbors
The selected key frame can only and exclusively be moved between neighbors.
***Example:*** Consider following key frame sequence with an animation duration of 2000 msec.
- KF1: 500,
- KF2: 1000,
- KF3: 1500
Moving KF2 means that it can be moved just between 500 and 1500.
---
#### Scale earlier, move later key frames
The earlier key frames are scaled, while the later are shifted.
***Example:*** Consider following key frame sequence with an animation duration of 300 msec.
- KF1: 50,
- KF2: 100,
- KF3: 150,
- KF4: 200
Moving KF2 to 90 ms means -10 % for earlier key frame and -5 % for later key frames.
- Applying -10 % to KF1: 45,
- Applying -5 % to KF3: 142,5, to KF4: 190.
---
#### Scale key frames
All key frames are moved in such a way as to keep the relative distance between key frames the same.
***Example:*** Consider following key frame sequence with an animation duration of 300 msec.
- KF1: 200,
- KF2: 700,
- KF3: 1700
Moving the key frames means to keep the relative distance between key frames the same.
- Applying 612 ms to KF1: 812,
- Applying 867 ms to KF2: 1567,
- Applying 1400 ms to KF3: 3100.
---
#### Shift all key frames
All the key frames are moved by the same absolute amount as the key frame that is being edited.
***Example:*** Consider following key frame sequence with an animation duration of 300 msec.
- KF1: 50,
- KF2: 100,
- KF3: 150,
- KF4: 200
Moving KF4 to 700 ms means to move +500 ms all the key frames.
- Applying +500 ms to KF1: 550,
- Applying +500 ms to KF2: 600,
- Applying +500 ms to KF3: 650
---
#### Move later key frames of all animated properties
Those key frames placed after a selected one are moved by the same absolute amount.
***Example:*** Consider following key frame sequence with an animation duration of 300 msec.
- KF1: 50,
- KF2: 100,
- KF3: 150,
- KF4: 200
Moving KF2 to 150 ms means to move +50 ms for later key frames.
- Applying +50 ms to KF3: 200,
- Applying +50 ms to KF4: 250
---